CHOCOLATE-COVERED OREOS

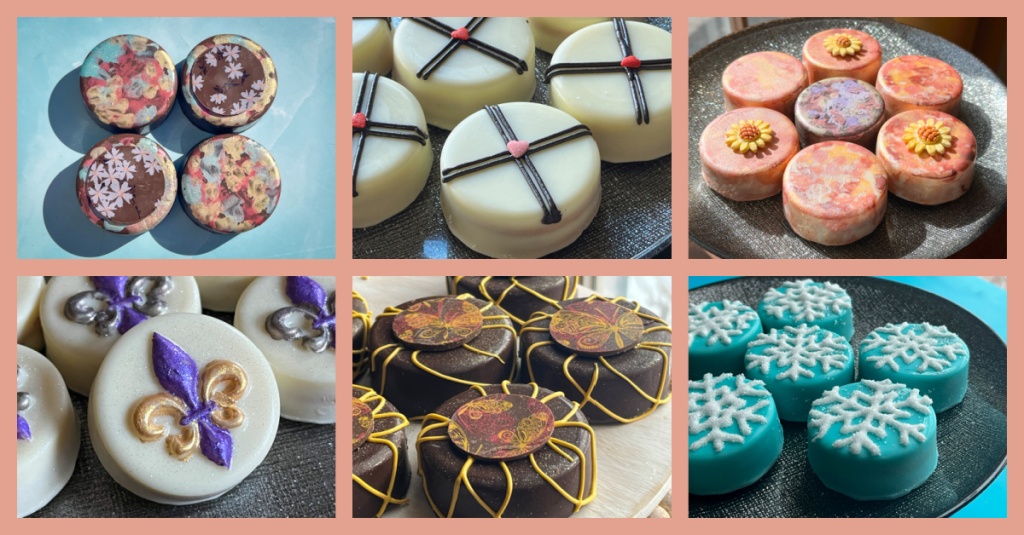
I make them weekly because they are very popular with the homeless dinner, and as you might imagine, I don’t like to repeat designs. I love variety. These can be decorated in countless ways, some easier than others. In fact, I have tried a few things that quickly went into the “Never Again Folder”… For previous collections, click here and here. Without further ado, here are some of the designs I made in the past couple of months, starting with perhaps my very favorite!

.
THE JAPANESE-MODERN

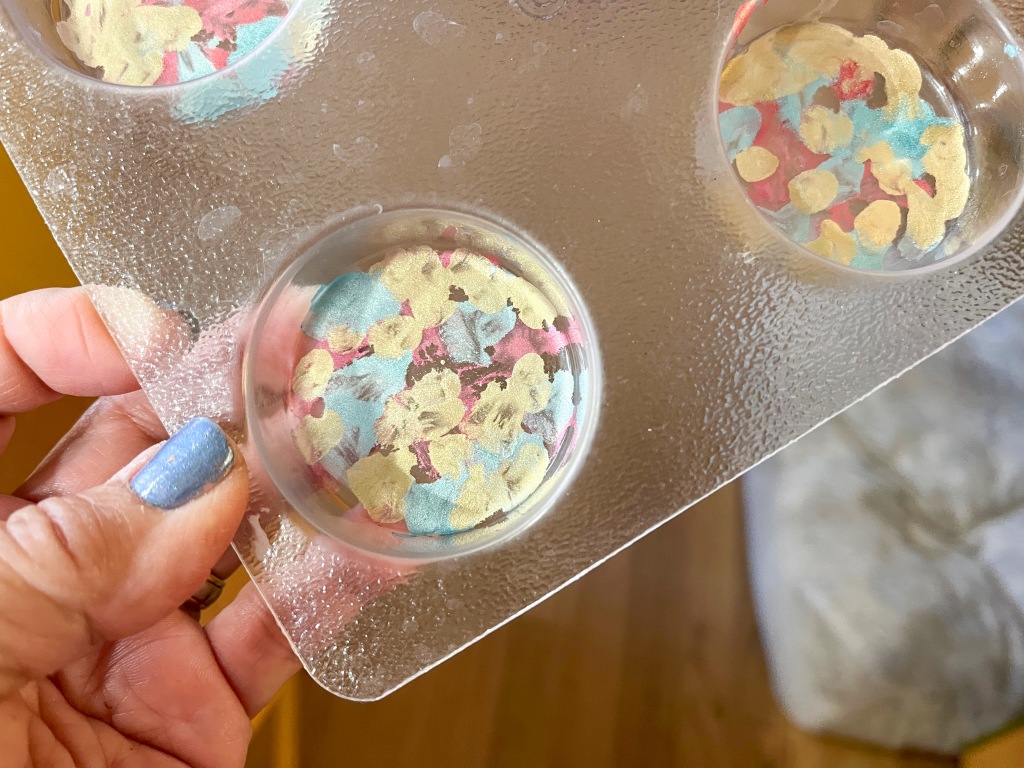
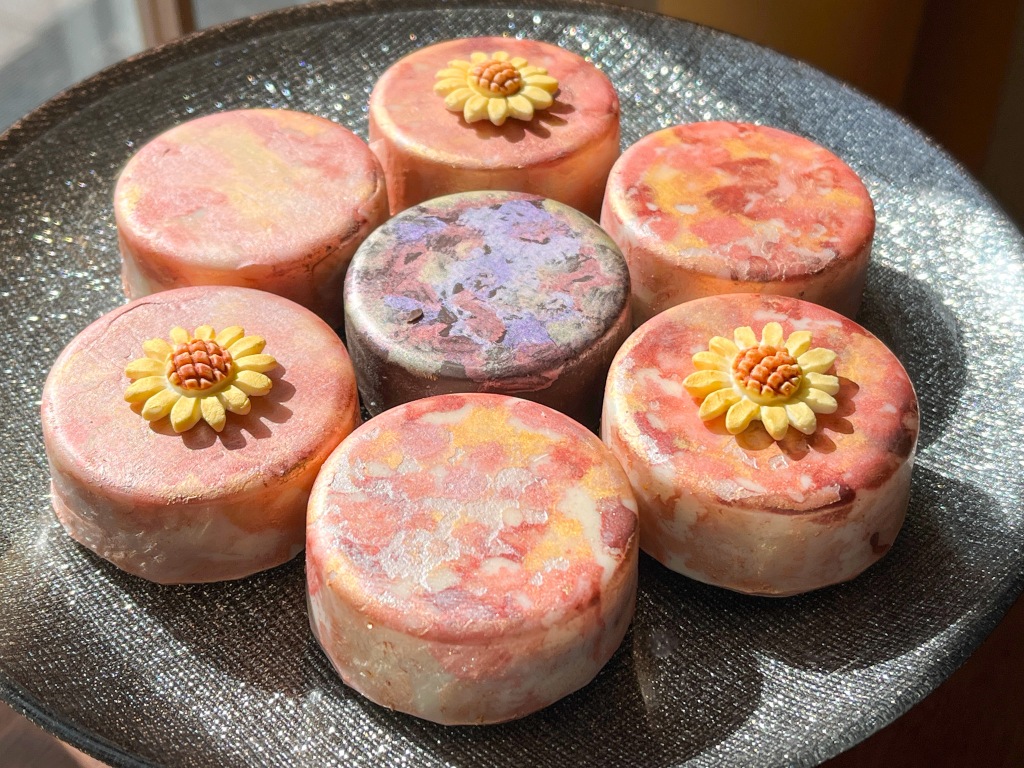
To make this design, all you need is some different colors of luster powder and a bit of vodka. Make a suspension and add small blotches on the surface of the mold. Let it dry for a few minutes and pour the melted compound chocolate. They will look good just with the colors, or you gild the lily with a small disc of chocolate decorated with a transfer sheet, in this case I used a cherry blossom pattern.

.


The same exact method works with white chocolate… In this case I added some fondant sunflowers I had from last year’s cookie projects. I have quite a few ideas for color combinations in the near future, so stay tuned!

Luster powder can also be used to paint the surface of the chocolate after it sets, as I did for the set below… It does not go into the “Never Again Folder”, but it is a bit time-consuming.

Another great way to decorate is Royal icing… For the ones below I made straight lines in black and before they set I glued a little sprinkle heart in the crossed section. I love their minimalist look.

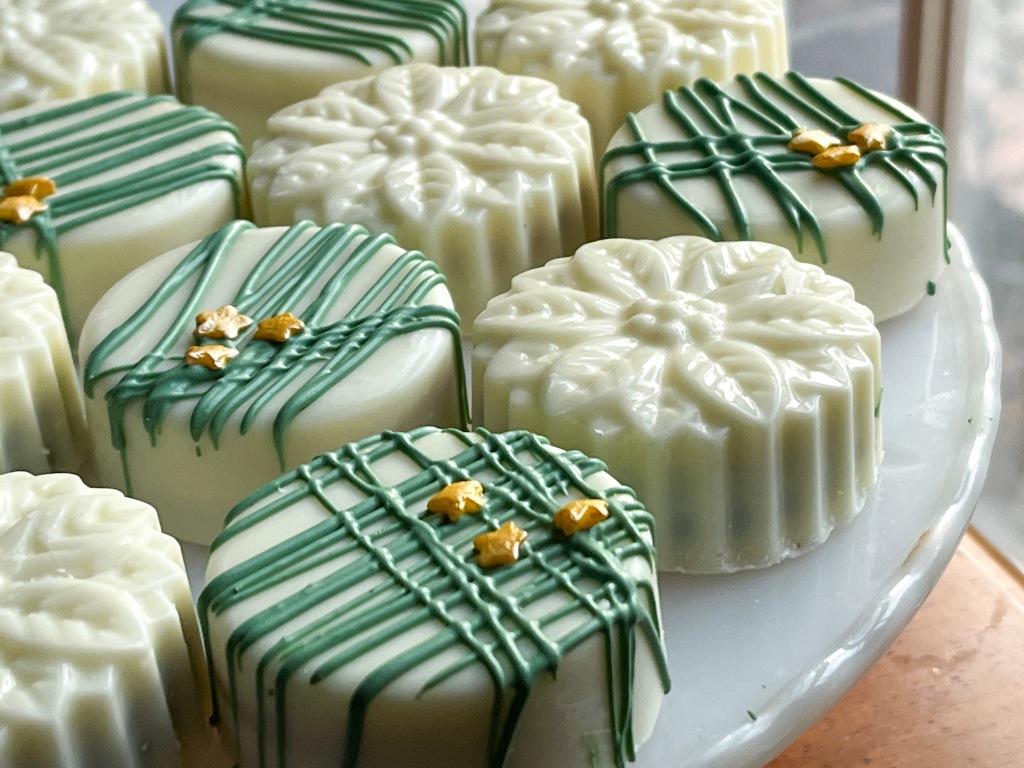
You can also pipe thicker lines of Royal icing coupled with a little sanding sugar… For added contrast, I dyed the white chocolate poured into the mold with fat-soluble sky blue dye. These were a good match for some macarons I made in that same week (see post here).

Even easier is just making a random drizzle with icing, fast and straightforward..

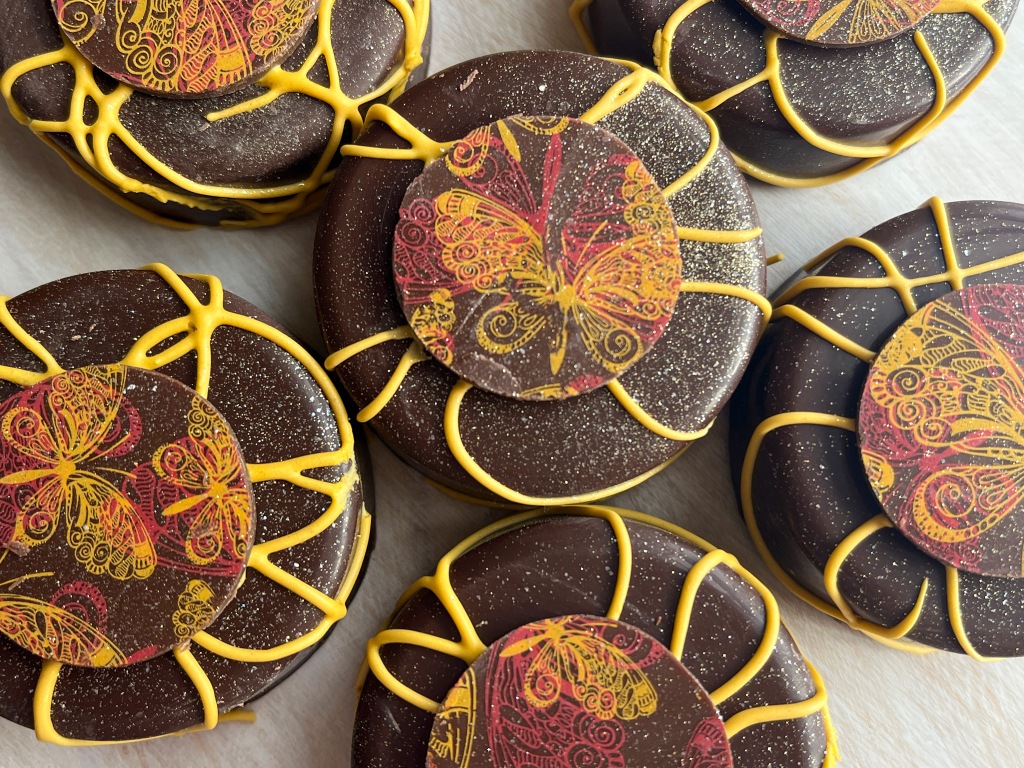
Sharing perhaps my second favorite of this set: Royal icing in circular piping plus a disc of chocolate decorated with transfer sheet, also saved from a project last year. The Royal icing was dyed with Americolor Gold. And once all was set, I sprayed some gold dust all over because.. why not?

Finally, the method that I don’t recommend and it truly drove me crazy: spread the Royal icing with a stencil. It was very very tricky to hold the stencil over the small surface, I had to scrape it all and start all over many times, as it would smear and end up quite messy. I managed to get three reasonably good ones, but as I said before…. never again!

.

.

.

ONE YEAR AGO: Zucchini-Chickpea Baked Bites

TWO YEARS AGO: Slow-Cooker Hoisin Pulled Pork

THREE YEARS AGO: I Will Cracker you Up

FOUR YEARS AGO: Pickling Ribbons

FIVE  YEARS AGO: Green Beans and Carrots with Spicy Almonds

SIX YEARS AGO: Quiche 101

SEVEN YEARS AGO: Persian Butternut Squash Soup

EIGHT YEARS AGO: Walnut Cranberry Sourdough Bread

NINE YEARS AGO: Ottolenghi in Brazil?

TEN YEARS AGO: Roasted Winter Vegetables with Miso-Lime Dressing

ELEVEN YEARS AGO: 2012 Fitness Report: P90X2

TWELVE YEARS AGO: Caramelized Bananas

THIRTEEN YEARS AGO: Roasted Lemon Vinaigrette

FOURTEEN YEARS AGO: Whole Wheat Bread

REVVING THE ENGINES FOR HALLOWEEN!


It is almost time!!!! I share with you three baking ideas to keep you appropriately spooked…

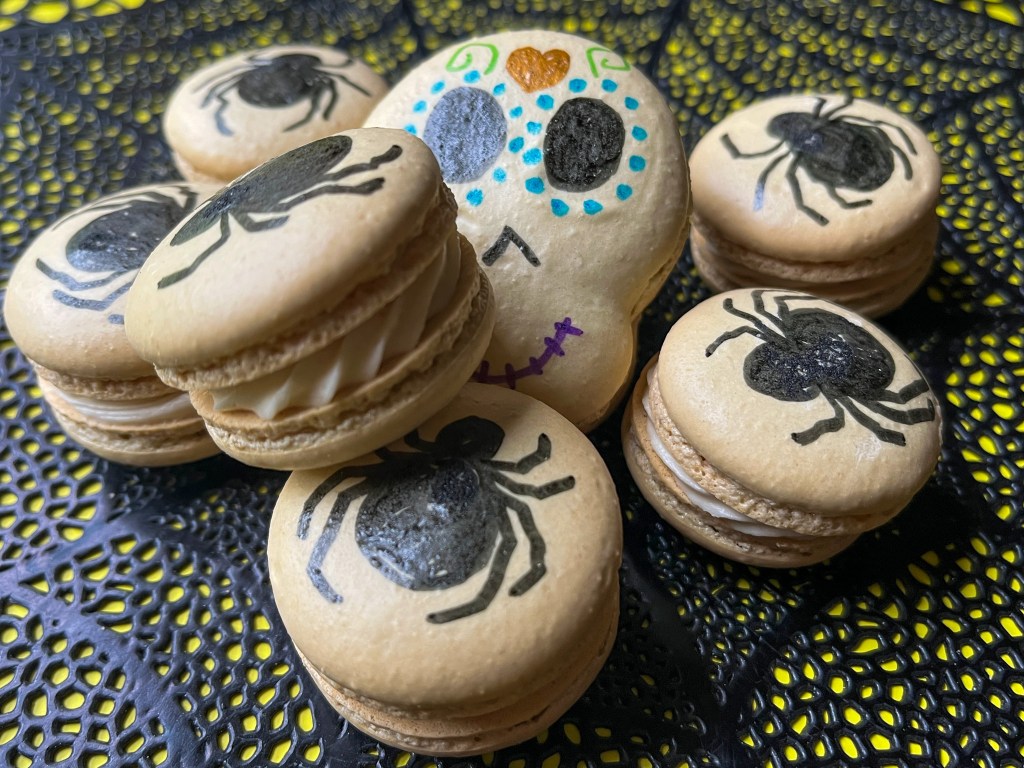
SKULL AND SPIDER MACARONS

The idea for these came from my friend Dorothy, who tagged me on Instagram after seeing this post. I opted for a filling of Caramel Buttercream and Apple Jelly for these scary creatures.

CARAMEL AND APPLE MACARONS
(from the Bewitching Kitchen)

for the shells, use my default recipe.
I dyed the shells with a very small amount of AMERICOLOR CORK

For the filling:
60g butter
120g powdered sugar
pinch of salt
5 soft caramels (Werther’s)
2 tablespoon milk
apple jelly (store-bought is ok)

Pipe the shells in skull shape or round (if you prefer to simplify). Bake them, let them cool, and pair them.

Draw the design of your choice (skull or spider) on the shells.

Make the buttercream: beat the room temperature butter for a couple of minutes. Add the salt and powdered sugar, beat until almost incorporated (mixture will be dry). Microwave the caramels with the milk until very hot, and whisk the caramels to dissolve. Let them cool slightly and add to the buttermilk. Finish creaming everything together, you should not need to add any more liquid, but if necessary, add a few drops of milk to achieve piping consistency.

Add a circle of buttercream to the bottom shell, a little blob of apple jelly in the center, and close the macaron with the top shell. Keep in the fridge for 24 hours before eating.

ENJOY!

to print the recipe, click here


Comments: The idea for the filling came from this post. That is a great site for macaron ideas, by the way. I did not make a template for the skulls, just improvised them starting from a regular circle, so they are not all the same shape, which I think is even better for a spooky bake.


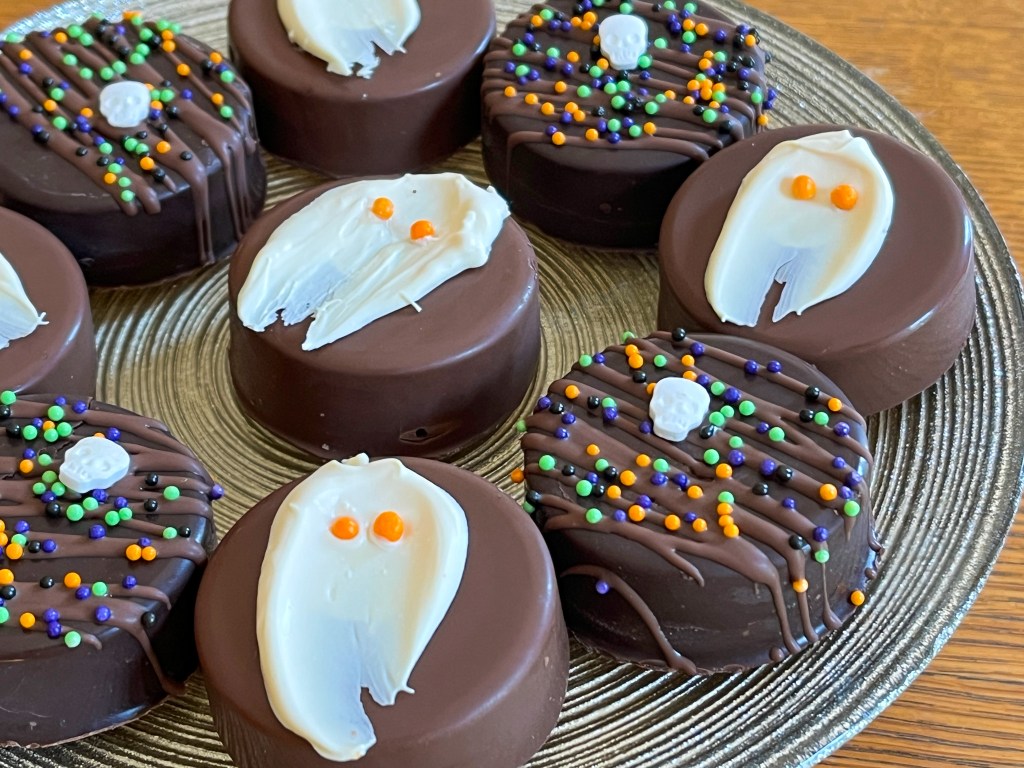
SPOOKY CHOCOLATE-COVERED OREOS

Use your regular mold for covering Oreos and use a contrasting color of chocolate to drizzle and glue sprinkles. The ghost is made with a smear of white compound chocolate on parchment paper, and orange sprinkles for the eyes. Once that is set (within a few minutes), place on the covered Oreo with a tiny amount of melted chocolate.


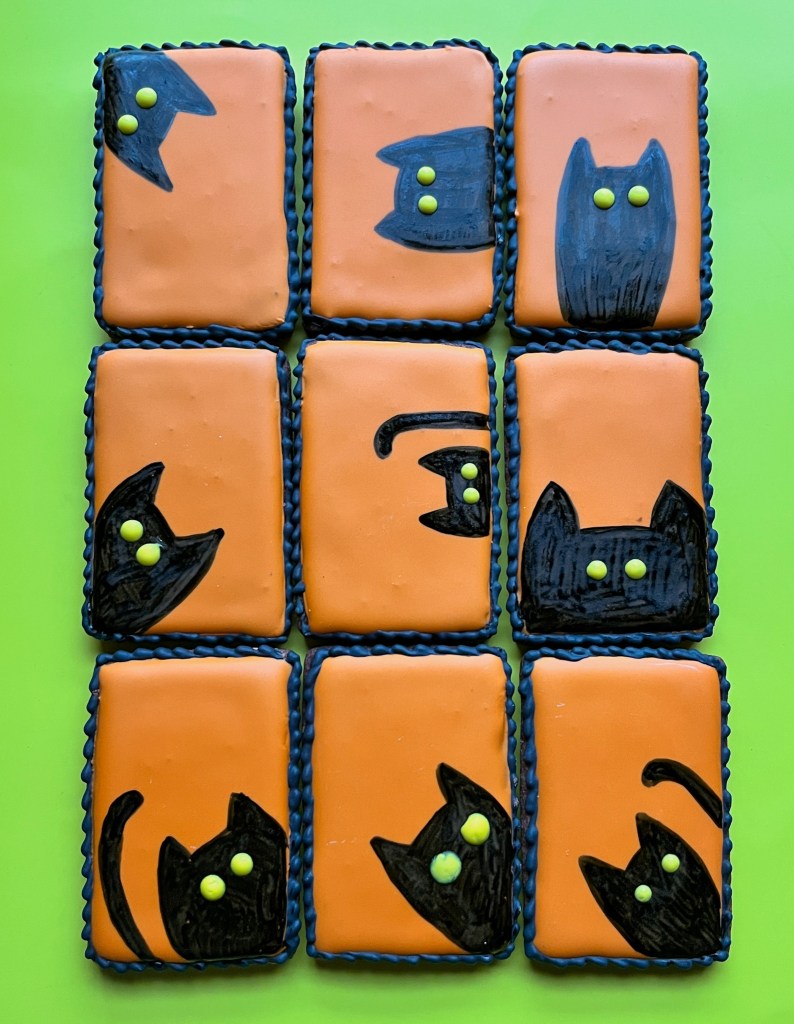
NINE BLACK CATS

These are my default Chocolate-Chipotle cutout cookies, iced with orange Royal icing and painted with Sugarprism. I just did a free-hand drawing, following the design of Kathy Barbro (IG page here).

ONE YEAR AGO: Happy Halloween from my Cookie Blog to You!

TWO YEARS AGO: Incredibly Simple Carrots

THREE YEARS AGO: Sarah Bernhardt’s Cookies

FOUR YEARS AGO: A Really Big Announcement

FIVE YEARS AGO: Stir-Fried Chicken in Sesame-Orange Sauce

SIX YEARS AGO: Monday Blues

SEVEN YEARS AGO: A New Way to Roast Veggies

EIGHT YEARS AGO: Two Takes on Raspberries

NINE YEARS AGO: Spice Cake with Blackberry Puree

TEN YEARS AGO: Own Your Kitchen with Cappuccino Panna Cotta

ELEVEN YEARS AGO: Chicken Parmigiana, the Thriller

TWELVE YEARS AGO: Wild Mushroom Risotto

THIRTEEN YEARS AGO: Tartine Bread:  Basic Country Loaf 

FOURTEEN YEARS AGO:  Pugliese Bread

FIESTA BAKES FOR CINCO DE MAYO

A small collection of goodies, all inspired by a Mexican fiesta… Cupcakes, Chocolate-Chipotle Cookies, Macarons (filled with Mexican chocolate ganache), and Chocolate-covered Oreos.

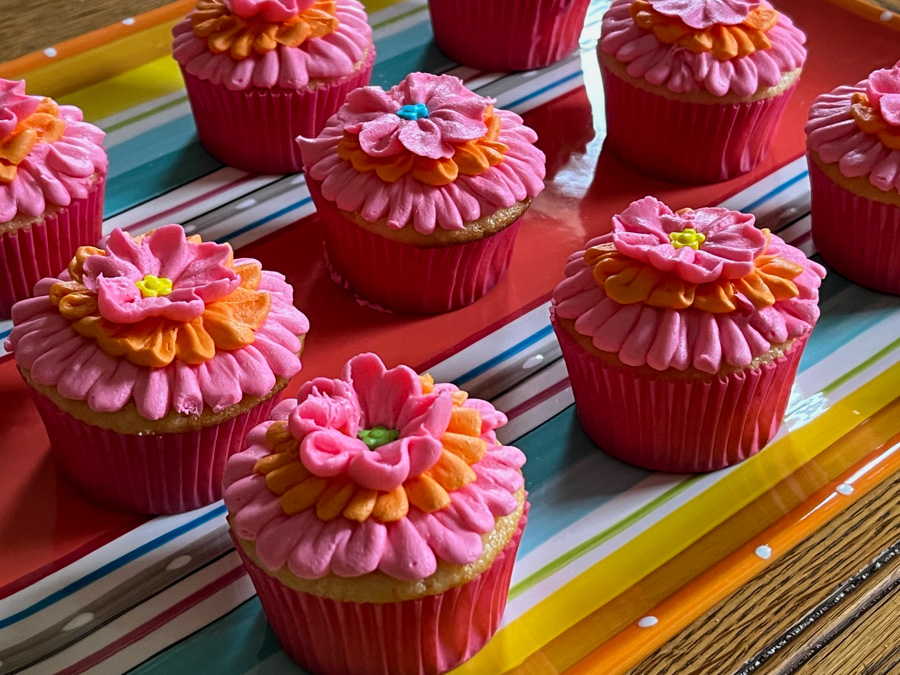
FIESTA CUPCAKES

Any vanilla cupcake recipe (or chocolate) will work. Refer to this post for the buttercream, which was divided in two unequal portions: a larger portion dyed pink, and a smaller portion dyed orange. Then, a petal tip like 102 was used to add the icing in layers, as shown below. Any combination of colors will work, this one seemed appropriate for the Cinco de Mayo theme.


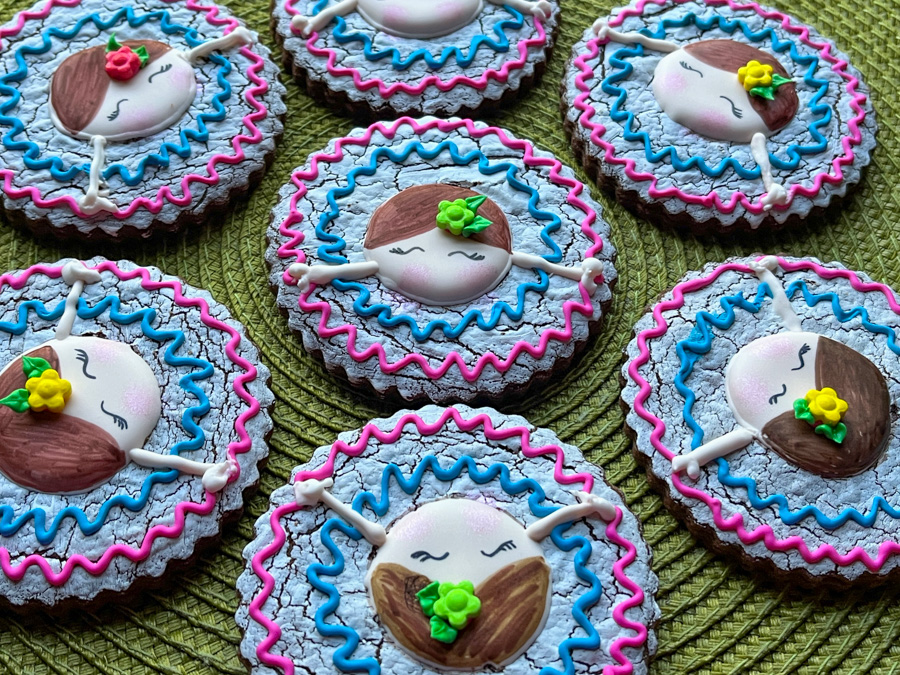
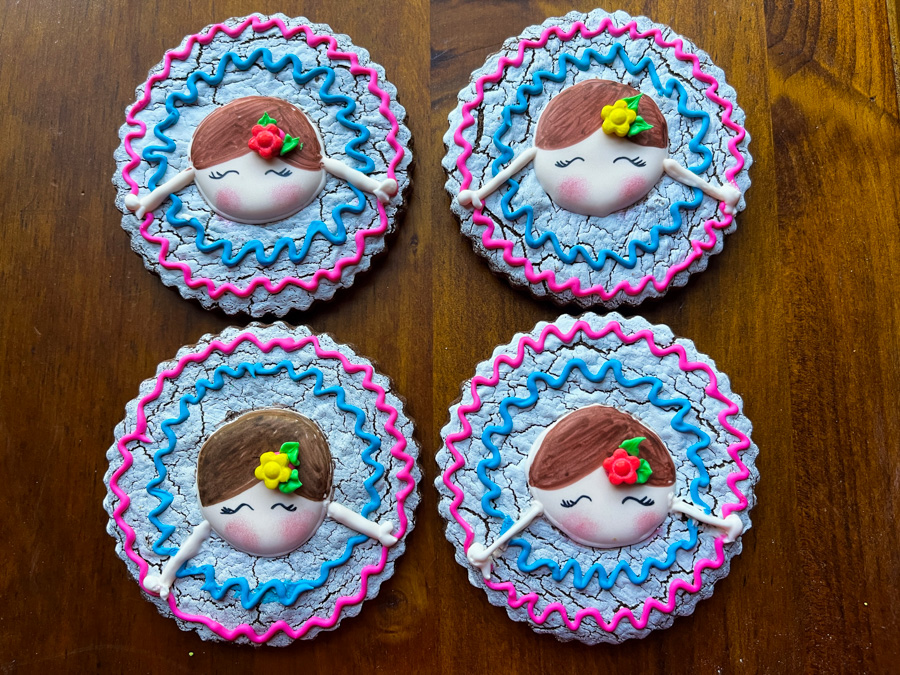
CHOCOLATE-CHIPOTLE COOKIES

I am so smitten by these! Not at all complicated to put together, start with your favorite chocolate cookie recipe (mine is definitely this one), paint with Americolor white before baking to get the crackled effect. Then use Royal icing dyed with flesh tone or ivory to pipe a round for the face. Use any colors you want to make the wavy decorations. Once that sets, you can paint the face and hair, add the arms, and you are done. You can see the steps below.

They make for a real fun set, and will please those who prefer a modest amount of icing on their cookies.

Many colors will work, and I also made a batch with sugar cookies instead of chocolate, with a pink and orange skirt.


MEXICAN CHOCOLATE MACARONS

For these macs, I used my default French meringue method (recipe here), divided the batter into three portions, a large pink, a medium size yellow, and a smaller orange. Piped a circle of pink, went with yellow in the center, then orange to form three concentric circles. Baked the shells and decorated with Royal icing. The ganache was made with


4 oz semisweet chocolate
1/4 cup heavy cream
1/2 tsp cinnamon
a pinch of cayenne pepper


Once the ganache cooled, I whipped it with a handheld mixer for a minute or so. You cannot go too long or the whole thing will turn grainy. You just want to incorporate some air into the ganache.


FIESTA CHOCOLATE COVERED OREOS

These are so much fun to make! I used chocolate transfer sheets cut to fit the inside of the mold, as described in this post. I love this colorful pattern, that would look good also on a white chocolate background.

HAPPY CINCO DE MAYO!

ONE YEAR AGO: Thai-Meatballs Over Wilted Bok-Choy

TWO YEARS AGO: Asparagus with Gunpowder Masala

THREE YEARS AGO: The Home Bakers Collective, April Project

FOUR YEARS AGO: Asian-Style Eggplant Meatballs

FIVE YEAR AGO: Uzbek Flatbread

SIX YEARS AGO: First Monday Favorite – Black Sesame FOUR

SEVEN YEARS AGO: Chocolate Orange Mini-Cakes

EIGHT YEARS AGO: In My Kitchen, May 2015

NINE YEARS AGO: P90X3, a Review of Tony Horton’s Latest Fitness Program 

TEN YEARS AGO: Pasta and Mussels in Saffron Broth

ELEVEN YEARS AGO: Triple Chocolate Brownies

TWELVE YEARS AGO: Shanghai Soup Dumplings

THIRTEEN YEARS AGO: Bite-sized Chocolate Pleasure

CHOCOLATE-COVERED OREOS

I am slightly obsessed with these. So. Many. Possibilities. I will have to disappoint the purists, though. I do not use high-quality chocolate to make them, I go with compound chocolate. Go ahead, twist your nose, but I have to be mindful of my baking budget. Feel free to splurge and temper chocolate if you prefer.


To make them you will need the appropriate molds. Go to online sources such as amazon or etsy and search for molds for chocolate covered Oreos. I will share links to the specific ones I used, but there are countless possibilities out there. Then, you need your choice of dark or white compound chocolate (about 250g for a mold of 6 cookies). A touch of coconut oil, maybe 1 teaspoon. And the items to decorate: oil-soluble food dye, luster powder, or chocolate transfer sheets.

.

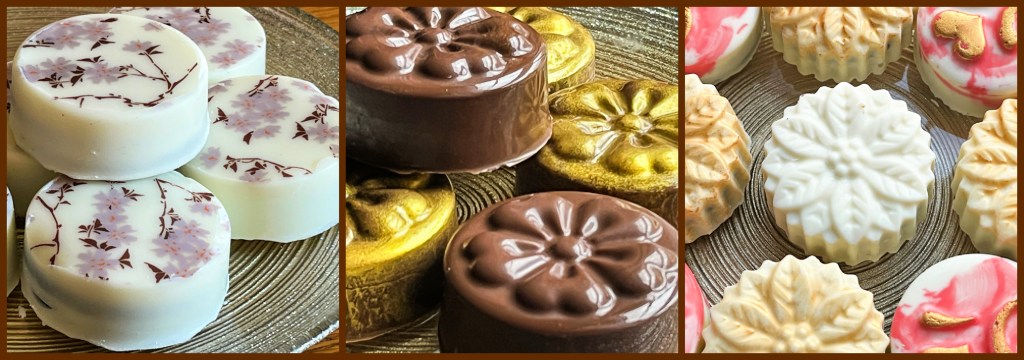
VERSION #1

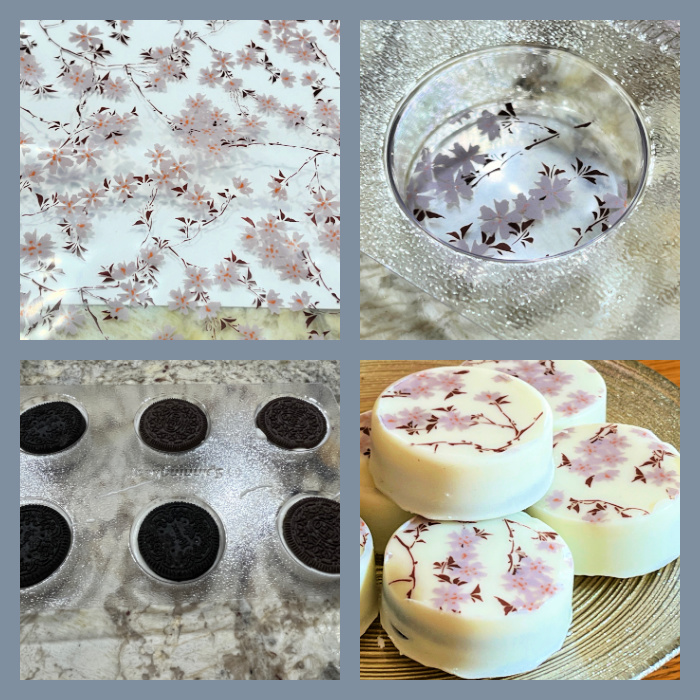
CHERRY BLOSSOMS ON WHITE CHOCOLATE

Mold used can be found here. To decorate this set, I used chocolate transfer sheets that I bought a couple of years ago (!!!!). Simply cut them to fit the bottom of the mold, making sure the transfer motif is up, so it will be in contact with the warm chocolate. Pour the melted white chocolate and pour about halfway up. Place an Oreo cookie inside, and add chocolate to cover. Tap a little bit to force air bubbles up, smooth the top (which will be the bottom of the enrobed cookie), and refrigerate for 30 minutes. You can also freeze for about 10 minutes. They should come out very easily.

.

.

VERSION #2

DARK CHOCOLATE ON FLOWER MOLD

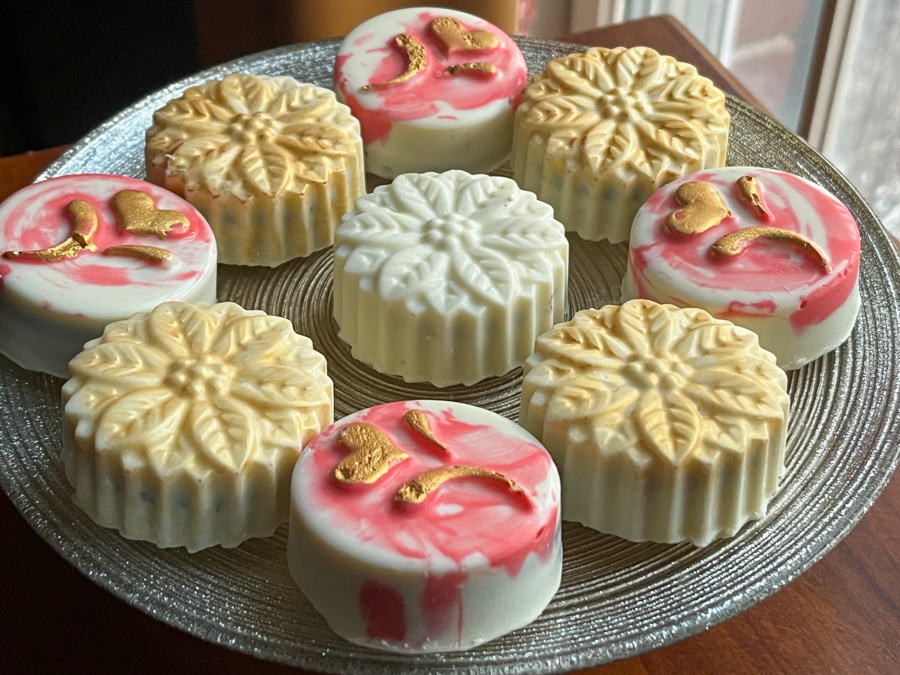
Mold used for this set can be found here. Same method as the previous one, except that the gold decoration was achieved by painting the bottom of the mold with luster powder (as a powder, no vodka needed). A little bit goes a long way, next time I will use less. They also look nice left plain.

.

VERSION #3

WHITE CHOCOLATE WITH PINK AND GOLD

For the molds, follow this and this link. A small portion of melted chocolate-coconut oil was dyed with fat-soluble red dye (a very small amount, to get a pink tone), and used to paint the bottom of the mold. Then the rest of the melted chocolate was poured normally on top, cookie added, and topped to close with more chocolate. Details with gold were painted after unfolding. The White poinsettias were dusted with dry gold powder, the heart was painted with gold + vodka.

Since there is not need to temper chocolate, these are incredibly easy and quick to make. You can make a batch of 6 or 12 in 45 minutes, including cooling time. They would be a ton of fun to make with kids too, so consider that option for a fun weekend…

.

ONE YEAR AGO: Pan-Steamed Broccoli with Miso Vinaigrette

TWO YEARS AGO: Cookies and Rubber Stamps

THREE YEARS AGO: Macarons for all Seasons and Reasons

FOUR YEARS AGO: Lentils and Radicchio? Yes, please!

FIVE YEAR AGO: Tres Leches Cake

SIX YEARS AGO: The Joys of Grating Squash

SEVEN YEARS AGO: Auberge-Pecan Walnut Bread

EIGHT YEARS AGO: Gluten-free and Vegan Raspberry Bars

NINE YEARS AGO: Lasserre, a French Classic

TEN YEARS AGO: Sourdough Bread with Walnuts and Dates

ELEVEN YEARS AGO: Braised Brisket with Bourbon-Apricot Glaze

TWELVE YEARS AGO: The Real Vodka Sauce

THIRTEEN YEARS AGO: Pork Tenderloin and Blue Cheese