HAPPY EASTER TIMES THREE!

Sourdough, Chocolate-Covered Oreos and Macarons for you today…

.

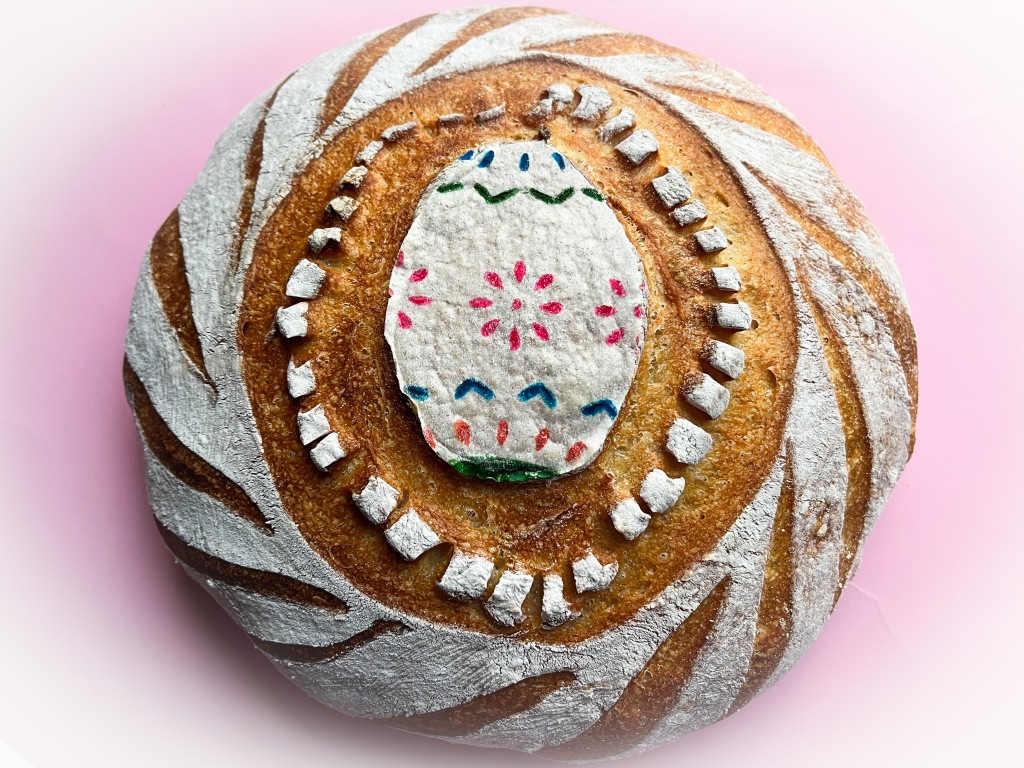
For this sourdough boule, I made a decoration using wafer paper and food safe pens, with a little stencil to help me out. Then a bit of scoring with my Sonic blade, and into the oven it went…


I love how the colors stayed during baking, it was my first time using food pens, until now I have relied on colors designed for air-brushing.

.

HAPPY EASTER CHOCOLATE-COVERED OREOS

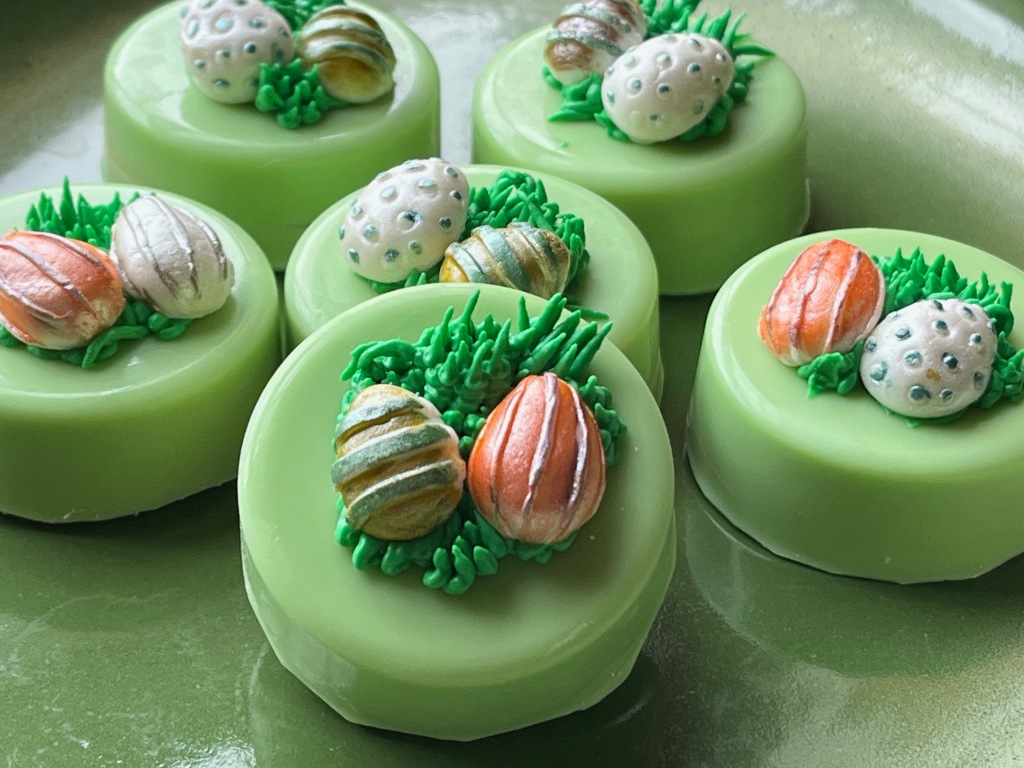
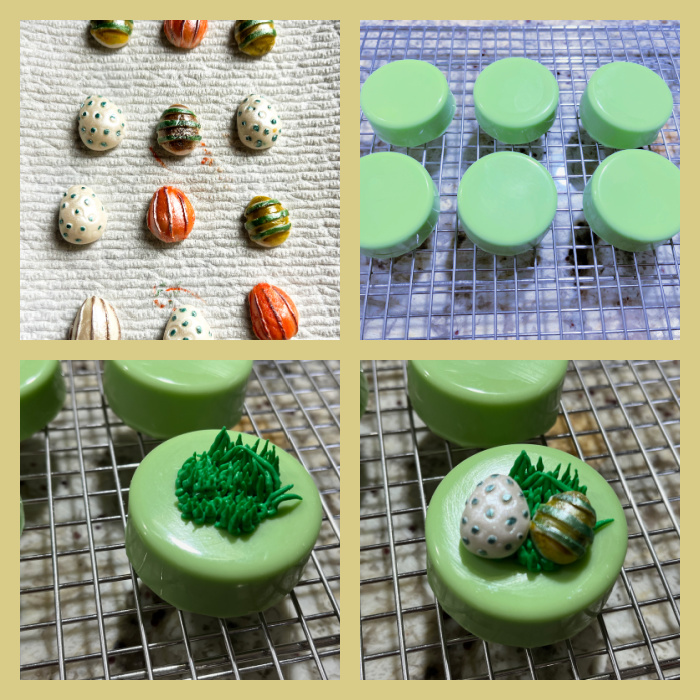
I had so much fun with these! First, I made fondant decorations as little Easter eggs, and used a new set of food pens to paint them (they will be featured in my upcoming In My Kitchen post). Then I dyed white compound chocolate with oil-based green food color, and covered the Oreos. Once that set, I used thick Royal icing and a grass tip as the base to glue the eggs on the surface.


This is the full batch, donated on Good Friday…

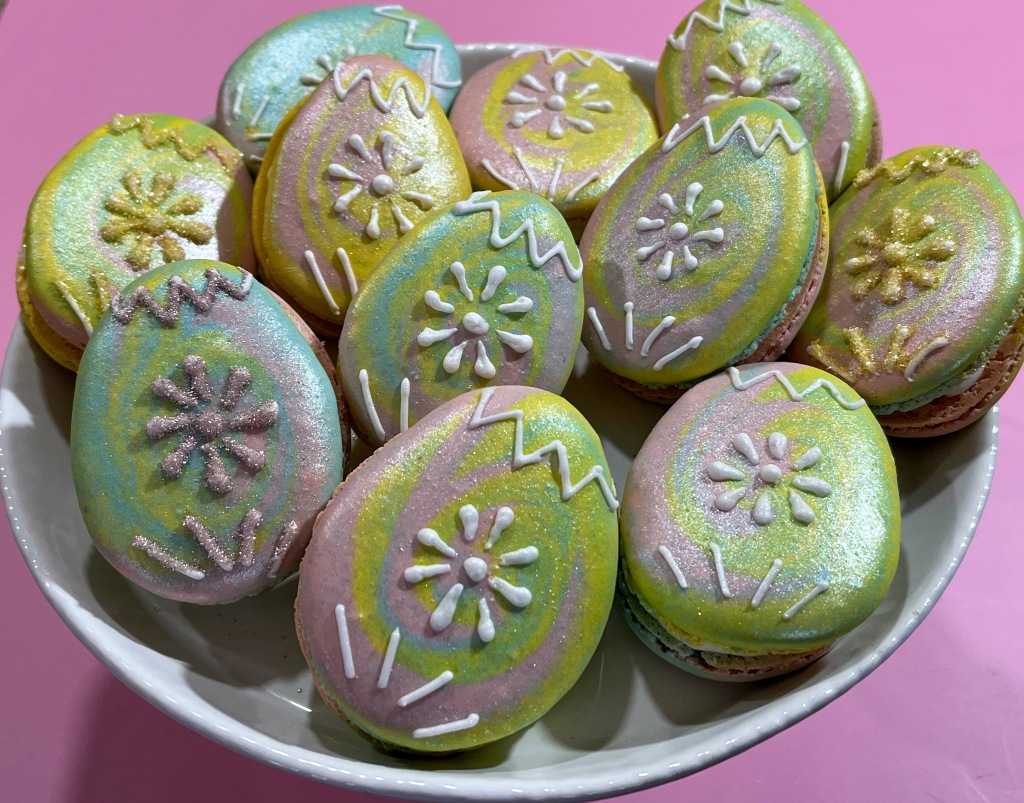
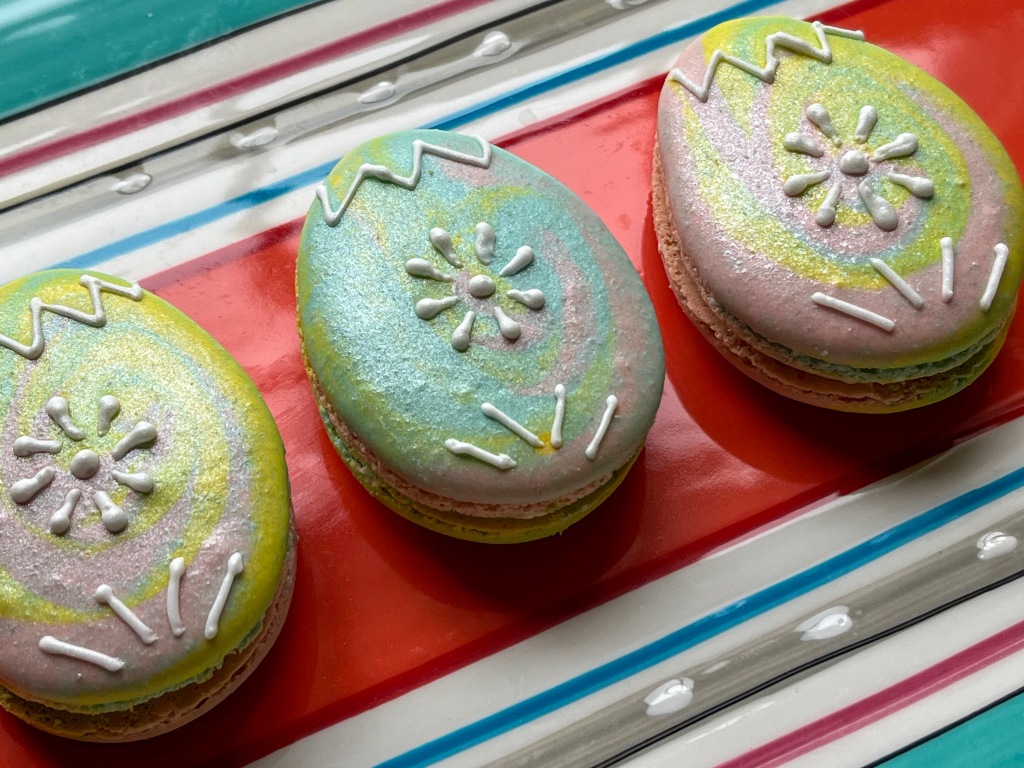
EASTER EGG LEMON MACARONS
(recipe as published here, filling as published here)


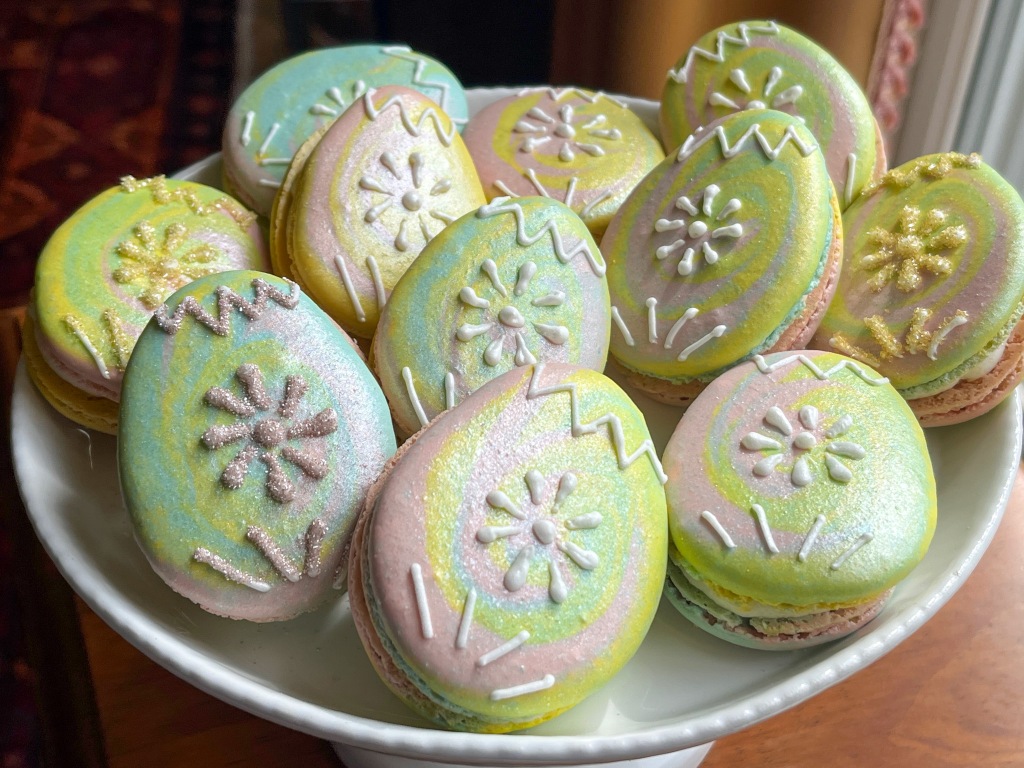
Sometimes a bake goes exactly the way I plan. It is rare, but it happens. These macarons turned out this way. I used a mixture of three colors (yellow, pink and blue), added them to the same piping back to get a tie-dye effect. After baking the details were piped with Royal icing, and in some I added sparkling sugar right away. Most were left plain, and got just a little spray with PME luster for some shine. That step is optional. They look nice without it.

I hate to pick favorites, but I must say of the three bakes I shared today, these macs might very well be the winners for me!

I hope you enjoyed this trilogy of bakes… The macaron design can be used on regular round macarons, piping flower shapes for a springtime version, so keep that in mind. I might just have to re-visit the method soon!

ONE YEAR AGO: In My Kitchen, Spring 2023

TWO YEARS AGO: In My Kitchen, April 2022

THREE YEARS AGO: In My Kitchen, April 2021

FOUR YEARS AGO: In My Kitchen, April 2020

FIVE YEARS AGO:  In My Kitchen, April 2019

SIX YEARS AGO: In My Kitchen, April 2018

SEVEN YEARS AGO: First Monday Favorite

EIGHT YEARS AGO: In My Kitchen, April 2016

NINE YEARS AGO: Spring has Sprung with Suzanne Goin

TEN YEARS AGO: Chai Brownies

ELEVEN YEARS AGO: Pomegranate-Molasses Glazed Carrots

TWELVE YEARS AGO: Braised Brisket with Bourbon-Peach Glaze

THIRTEEN YEARS AGO: The Real Vodka Sauce

FOURTEEN YEARS AGO: Spring Rolls on a Spring Day

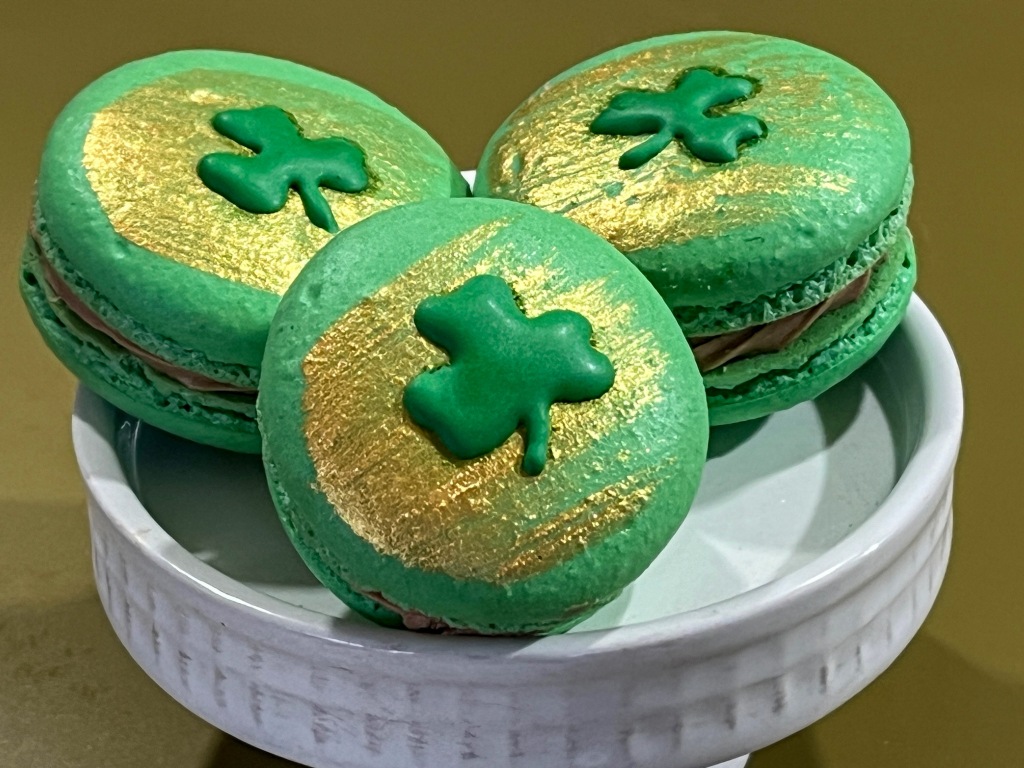
NUTELLA SHAMROCK MACARONS


Green. Green for Spring, green for St. Patrick, green is definitely the color of March. These macs are simple to decorate, especially if you can free-hand the piping, which unfortunately I cannot. A little stencil to airbrush the shape helped me out.

NUTELLA SHAMROCK MACARONS
(from The Bewitching Kitchen)

For the shells:
200g Icing/powdered sugar (1 â…” cups)
115 g Almond Meal (1 + scant ¼ cup)
115 g egg whites at room temperature (approx. 4 eggs)
1/8 tsp of cream of tartar (optional)
100 g granulated sugar (½ cup)
1/8 tsp vanilla extract
leaf green food gel

Line 3 heavy baking sheets with parchment/baking paper or Silpat mats. Layer the powdered/icing sugar and ground almonds/almond meal in a food processor. Pulse until the mixture looks like fine meal, about 12 pulses. Pass through a sieve and transfer to a small bowl or to a sheet of parchment/baking paper. Set aside.

Place the egg whites and cream of tartar in the bowl of a stand mixer fitted with the whisk attachment. Make sure that the bowl and the whisk are impeccably clean. Starting on medium speed, whip the whites with the cream of tartar until they look like light foam. The whites should not appear liquid. The foam will be light and should not have any structure.

Slowly rain in the granulated sugar in five additions, trying to aim the stream between the whisk and the side of the bowl. Turn the speed up to high. Continue to whip the meringue until it is soft and shiny. It should look like marshmallow creme (marshmallow fluff). Add the vanilla and food gel color. Whip the egg whites until the mixture begins to dull and the lines of the whisk are visible on the surface of the meringue. Check the peak. It should be firm. Transfer the whites to a medium bowl.

Fold in the ground almond/almond meal mixture in two increments. Paint the mixture halfway up the side of the bowl, using the flat side of a spatula. Scrape the mixture down to the center of the bowl. Repeat two or three times, then check to see if the mixture slides slowly down the side of the bowl. Add drops of gel color and mix them briefly with a toothpick. Put the mixture in a piping bag fitted with your choice of piping tip (round, ¼ or ½ inch in diameter or 6 – 12 mm). If you don’t have a macaron mat, draw circles on baking/parchment paper about 2inches/5cm in diameter & turn the paper over before placing on the baking sheets. Pipe shells, I like to count numbers in my head and use the same count for each shell so they end up similar in size.

Slam each sheet hard four to six times on the counter/worktop. Let the unbaked macarons dry until they look dull but not overly dry. Drying time depends on humidity. In a dry climate, the macarons can dry in 15 to 20 minutes; in a humid climate, it can take 35 to 40 minutes.

While the macarons are drying, heat the oven to 300 F (150 C/130C Fan oven/Gas Mark 2). Bake one sheet at a time on the middle rack. Check in 11 minutes. If the tops slide or move (independently of the ‘feet’ when you gently twist the top), then bake for 2 to 3 more minutes. Check one or two. If they move when gently touched, put them back in the oven for 1 to 2 more minutes until they don’t move when touched. Let the macaroons cool for 10 minutes before removing from the pan. The macarons should release without sticking.

Assemble the macarons: find two macarons similar in size and add a good amount of filling to the bottom of one of them. Place the other on top and squeeze gently to take the filling all the way to the edge. Store in the fridge for 24 hours for perfect texture.

For the filling:

NUTELLA BUTTERCREAM
60g unsalted butter softened
125g powdered sugar
40g Nutella
1 to 2 tbsp heavy cream to adjust consistency

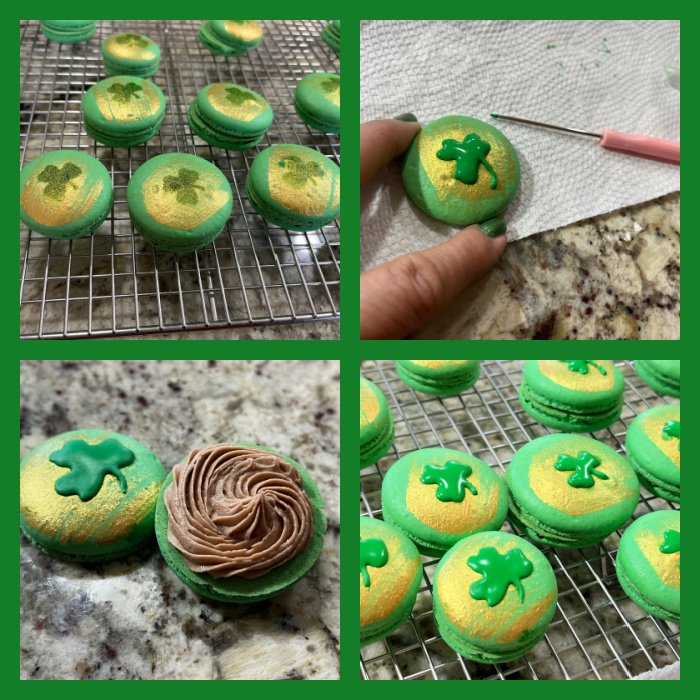
Whisk butter, powdered sugar and Nutella until light and fluffy. Adjust consistency with heavy cream, if needed. Transfer to a piping bag fitted with a open star tip. Match similar sized macaron shells with each other, fill and sandwich the cookies. Decorate the top with Royal icing in the shape of a shamrock, and if you like add a brush of gold before piping the decoration for added bling.

ENJOY!

to print the recipe, click here


Comments: At first I wanted to make them filled with mint, but I have done two batches in a row with that flavor, so these went the Nutella route, which I also love… As to the decoration, I cut a small stencil to airbrush the leaf, but if you are brave and talented, skip the stencil and just go for it. Some of the steps are shown below.

.

I really like the way they turned out, and hope they brought a little smile to those who got them…

.

HAPPY SAINT PATRICK’S DAY!

ONE YEAR AGO: Air-Fryer Corn Ribs

TWO YEARS AGO: Lemony Chicken Thighs with Artichokes and Olives

THREE YEARS AGO: Farari Bateta

FOUR YEARS AGO: Covid-19, Keeping yourself safe

FIVE YEARS AGO: Carrot Cake Macarons

SIX YEARS AGO: Soup Saturday: Say Goodbye to Winter

SEVEN YEARS AGO: Manchego and Poblano Soup

EIGHT YEARS AGO: A Smashing Pair

NINE YEARS AGO: Spinach and Mushroom Stuffed Pork Tenderloin

TEN YEARS AGO: Crispy Chickpea and Caper Spaghetti

ELEVEN YEARS AGO: Spring has Sprung!

TWELVE YEARS AGO: Chickpea and Fire Roasted Tomato Soup

THIRTEEN YEARS AGO: Double Asparagus Delight

FOURTEEN YEARS AGO:  Sun-dried Tomato and Feta Cheese Torte

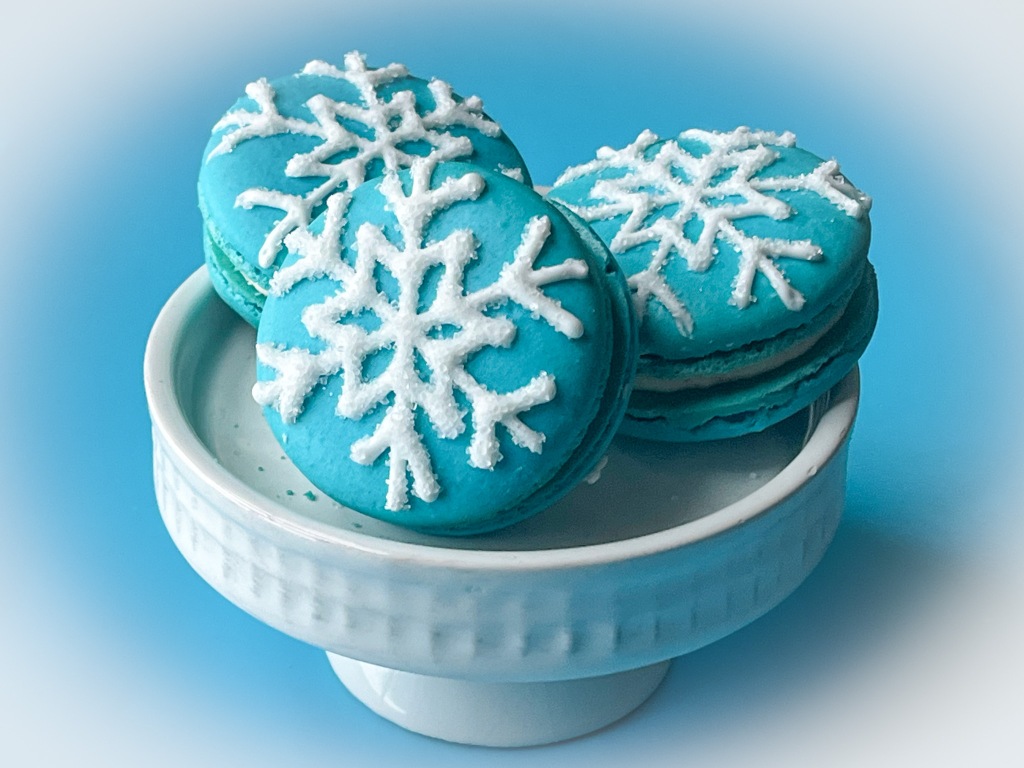
PEPPERMINT DUST MACARONS

Embracing winter, one macaron at a time…


PEPPERMINT DUST MACARONS
(from The Bewitching Kitchen)

For the shells:
200g Icing/powdered sugar (1 â…” cups)
115 g Almond Meal (1 + scant ¼ cup)
115 g egg whites at room temperature (approx. 4 eggs)
1/8 tsp of cream of tartar (optional)
100 g granulated sugar (½ cup)
1/8 tsp vanilla extract
light blue food gel (I used Colour Mill Baby Blue)

Line 3 heavy baking sheets with parchment/baking paper or Silpat mats. Layer the powdered/icing sugar and ground almonds/almond meal in a food processor. Pulse until the mixture looks like fine meal, about 12 pulses. Pass through a sieve and transfer to a small bowl or to a sheet of parchment/baking paper. Set aside.

Place the egg whites and cream of tartar in the bowl of a stand mixer fitted with the whisk attachment. Make sure that the bowl and the whisk are impeccably clean. Starting on medium speed, whip the whites with the cream of tartar until they look like light foam. The whites should not appear liquid. The foam will be light and should not have any structure.

Slowly rain in the granulated sugar in five additions, trying to aim the stream between the whisk and the side of the bowl. Turn the speed up to high. Continue to whip the meringue until it is soft and shiny. It should look like marshmallow creme (marshmallow fluff). Add the vanilla and food gel color. Whip the egg whites until the mixture begins to dull and the lines of the whisk are visible on the surface of the meringue. Check the peak. It should be firm. Transfer the whites to a medium bowl.

Fold in the ground almond/almond meal mixture in two increments. Paint the mixture halfway up the side of the bowl, using the flat side of a spatula. Scrape the mixture down to the center of the bowl. Repeat two or three times, then check to see if the mixture slides slowly down the side of the bowl. Add drops of gel color and mix them briefly with a toothpick. Put the mixture in a piping bag fitted with your choice of piping tip (round, ¼ or ½ inch in diameter or 6 – 12 mm). If you don’t have a macaron mat, draw circles on baking/parchment paper about 2inches/5cm in diameter & turn the paper over before placing on the baking sheets. Pipe shells, I like to count numbers in my head and use the same count for each shell so they end up similar in size.

Slam each sheet hard four to six times on the counter/worktop. Let the unbaked macarons dry until they look dull but not overly dry. Drying time depends on humidity. In a dry climate, the macarons can dry in 15 to 20 minutes; in a humid climate, it can take 35 to 40 minutes.

While the macarons are drying, heat the oven to 300 F (150 C/130C Fan oven/Gas Mark 2). Bake one sheet at a time on the middle rack. Check in 11 minutes. If the tops slide or move (independently of the ‘feet’ when you gently twist the top), then bake for 2 to 3 more minutes. Check one or two. If they move when gently touched, put them back in the oven for 1 to 2 more minutes until they don’t move when touched. Let the macaroons cool for 10 minutes before removing from the pan. The macarons should release without sticking.

Assemble the macarons: find two macarons similar in size and add a good amount of filling to the bottom of one of them. Place the other on top and squeeze gently to take the filling all the way to the edge. Store in the fridge for 24 hours for perfect texture.

For the filling:

PEPPERMINT BUTTERCREAM
1 + 1/3 cups powdered sugar
4 tbsp unsalted butter softened
1/2 tsp vanilla extract
a couple tablespoons peppermint dust (I got mine on Marshall’s, similar to this)
1/2 -1 tbsp milk to adjust consistency, if needed

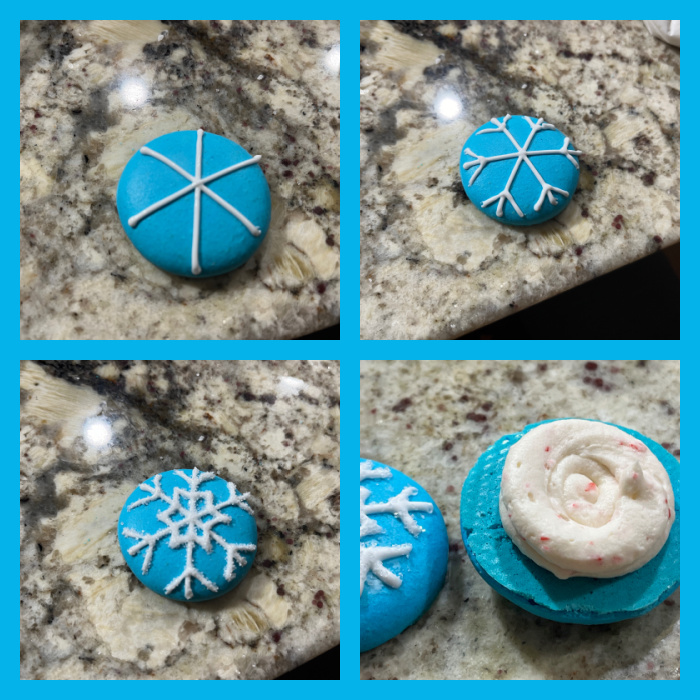
Whisk butter, powdered sugar and vanilla extract until light and fluffy. Mix gently the peppermint dust, adjust consistency with milk, if needed. Transfer to a piping bag fitted with a round tip. Match similar sized macaron shells with each other, fill and sandwich the cookies. Decorate the top with Royal icing in the shape of a snowflake and sanding sugar, if so desired, or leave them plain. Keep in the fridge for 24 hours for perfect texture.

ENJOY!

to print the recipe click here

Comments: After the incredibly amazing macaron masterpiece I shared with you, maybe this post should be named “Down to Earth Macarons”…. I am still in complete awe of Veronika’s talent. But moving on to my little babies: normally I would add peppermint extract or peppermint oil to the buttercream, but this time I omitted and just incorporated some of the peppermint dust. I find that it is very easy to add too much of the extract, and get into “Toothpaste Territory”. I liked the more subtle flavor of the pulverized candy. As to the decoration, piping consistency Royal icing and sanding sugar did the job.

From what I learned browsing around, peppermint “dust” is sold in many versions, some quite fine, some pretty coarse. I don’ think it makes much of a difference in taste, so use what you are able to find, and if all else fails, you can always crush some candy yourself and incorporate it in your buttercream. It is a flavor that helps fight the cold outside. Macarons, a little hot chocolate, and a fireplace going! 

ONE YEAR AGO: Valentine’s Sourdough, Three Ways

TWO YEARS AGO: Embossed Chocolate-Cherry Sourdough Loaf

THREE YEARS AGO: Springerle Painting 101

FOUR YEARS AGO: Mincemeat Pies, when the third time is a charm

FIVE YEARS AGO: Shibari Bread]

SIX YEARS AGO: Incredibly Simple Times Four – January 2018 

SEVEN YEARS AGO: Two Salads and a Blog Award!

EIGHT YEARS AGO: When Three is Better than Two

NINE YEARS AGO: Somebody Stop Me!

TEN YEARS AGO: Zucchini Pasta with Cilantro-Cashew Pesto

ELEVEN YEARS AGO: Bran Muffins, Take Two

TWELVE YEARS AGO: Brown Butter Chocolate Chip Cookies

THIRTEEN YEARS AGO: Mogo Mojo

FOURTEEN YEARS AGO: Slow-Roasted Chicken Thighs: an Ice-Breaker

VERONIKA GOWAN, THE MACARON QUEEN!

I am absolutely excited to invite you to visit my cookie blog, aka For the Love of Cookies, as I have a very special guest blogger featured today. I have admired Veronika’s work for such a long time, she takes the concept of decorated macarons to the highest possible level. They are pure art. And she is not just about what they look like. Her fillings are very carefully crafted to be the perfect match for each design. She is a source of inspiration like no other! It is a huge honor to have her contribute to my cookie blog sharing how she designed and brought to life a box full of chocolates, all in macaron format. Please stop by to see it, clicking here. Below I share some of her creations. And to follow her, visit Instagram with a click here.

UBE MACARONS


Are you familiar with this Philippine ingredient? I was not, until my dear daughter-in-law Courtnie professed it to be her favorite flavor for all baked things… I was intrigued. Read a lot about it, gathered ingredients and went to work. For the macarons you will need ube extract and ube jam, which you can make yourself or buy it ready at the store. We do have a couple of great Asian markets in town and they carry exotic ingredients from all over the planet. For this adventure, I used store-bought jam, but stay tuned for my next post about it, in which I will show you how to make the jam from scratch.

UBE MACARONS
(from The Bewitching Kitchen, adapted from several sources)

For the shells:
200g Icing/powdered sugar (1 â…” cups)
115 g Almond Meal (1 + scant ¼ cup)
115 g egg whites at room temperature (approx. 4 eggs)
1/8 tsp of cream of tartar (optional)
100 g granulated sugar (½ cup)
¼ tsp ube extract
1/8 tsp vanilla extract

Line 3 heavy baking sheets with parchment/baking paper or Silpat mats. Layer the powdered/icing sugar and ground almonds/almond meal in a food processor. Pulse until the mixture looks like fine meal, about 12 pulses. Pass through a sieve and transfer to a small bowl or to a sheet of parchment/baking paper. Set aside.

Place the egg whites and cream of tartar in the bowl of a stand mixer fitted with the whisk attachment. Make sure that the bowl and the whisk are impeccably clean. Starting on medium speed, whip the whites with the cream of tartar until they look like light foam. The whites should not appear liquid. The foam will be light and should not have any structure.

Slowly rain in the granulated sugar in five additions, trying to aim the stream between the whisk and the side of the bowl. Turn the speed up to high. Continue to whip the meringue until it is soft and shiny. It should look like marshmallow creme (marshmallow fluff). Add the vanilla and ube extract. Whip the egg whites until the mixture begins to dull and the lines of the whisk are visible on the surface of the meringue. Check the peak. It should be firm. Transfer the whites to a medium bowl.

Fold in the ground almond/almond meal mixture in two increments. Paint the mixture halfway up the side of the bowl, using the flat side of a spatula. Scrape the mixture down to the center of the bowl. Repeat two or three times, then check to see if the mixture slides slowly down the side of the bowl. Add drops of gel color and mix them briefly with a toothpick. Put the mixture in a piping bag fitted with your choice of piping tip (round, ¼ or ½ inch in diameter or 6 – 12 mm). If you don’t have a macaron mat, draw circles on baking/parchment paper about 2inches/5cm in diameter & turn the paper over before placing on the baking sheets. Pipe shells, I like to count numbers in my head and use the same count for each shell so they end up similar in size.

Slam each sheet hard four to six times on the counter/worktop. Let the unbaked macarons dry until they look dull but not overly dry. Drying time depends on humidity. In a dry climate, the macarons can dry in 15 to 20 minutes; in a humid climate, it can take 35 to 40 minutes.

While the macarons are drying, heat the oven to 300 F (150 C/130C Fan oven/Gas Mark 2). Bake one sheet at a time on the middle rack. Check in 11 minutes. If the tops slide or move (independently of the ‘feet’ when you gently twist the top), then bake for 2 to 3 more minutes. Check one or two. If they move when gently touched, put them back in the oven for 1 to 2 more minutes until they don’t move when touched. Let the macaroons cool for 10 minutes before removing from the pan. The macarons should release without sticking.

Assemble the macarons: find two macarons similar in size and add a good amount of filling to the bottom of one of them. Place the other on top and squeeze gently to take the filling all the way to the edge. Store in the fridge for 24 hours for perfect texture.

Make the filling:

UBE BUTTERCREAM
100g Unsalted butter, room temperature
65g Cream cheese, room temperature
50g Ube halaya (If you can’t find any use ½ tsp ube extract and 20g icing sugar)
¼ tsp Ube extract

Whisk butter, cream cheese and ube halaya together until light and fluffy. Add ube extract and mix until well combined. Transfer to a piping bag fitted with a star tip. Match similar sized macaron shells with each other, fill and sandwich the cookies. Decorate the top with Royal icing swirls and sanding sugar, if so desired, or leave them plain. Keep in the fridge for 24 hours for perfect texture.

ENJOY!

to print the recipe, click here

Comments: I am pretty happy with these! The ube gives the macarons a very interesting flavor, cutting the sweetness a bit. If you have never tried ube, please do so, you might fall in love with it, as I did… Big thank you to Courtnie for bringing this ingredient to my attention!

ONE YEAR AGO: Christmas Sourdough

TWO YEARS AGO: Star-Shaped Sun-dried Tomato Bread

THREE YEARS AGO: Cranberry White Chocolate Tart

FOUR YEARS AGO: I dream of Madeleines and a Tower of Cheesecakes

FIVE YEARS AGO: Dominique Ansel’s Chocolate Mousse Cake

SIX YEARS AGO: Slow-Roasted Eye of the Round Beef

SEVEN YEARS AGO: Steam-Roasted Indian-Spiced Cauliflower

EIGHT YEARS AGO: Creamy Zucchini-Mushroom Soup

NINE YEARS AGO: Ken Forkish’s Pain au Bacon

TEN YEARS AGO: Carrot and Cumin Hamburger Buns

ELEVEN YEARS AGO: Potato Galettes a l’Alsacienne & Book Review

TWELVE YEARS AGO: Caramelized Carrot Soup

THIRTEEN YEARS AGO: Miso-Grilled Shrimp

FOURTEEN YEARS AGO: Pain Poilane