HOME BAKERS COLLECTIVE: AUGUST PROJECT

One year ago, filming of Season 5 of The Great American Baking Show was coming to an end. In fact it was probably right this very day a year ago that Dana, Marissa and Brother Andrew faced their last baking challenges in that dreamy tent. Amazing that with this assignment we went full circle, and all the bakers who participate in “the collective”, proposed challenges on a monthly basis. It makes my heart sing. Dana chose a very cool project for the month of August.  Recreate your favorite childhood treat.  I had to give it some thought, but then my friend Denise (who grew up in Rio) reminded me of something called Nhá Benta. No need to panic, I will explain to you exactly how to say it (after the comments).  Nhá Benta is a kind of sweet that is found in many countries under names like Marshmallow Puff, Tunnock’s Tea Cakes, Mallomars. The Brazilian version had a very thin base and a ton (I mean a real huge amount) of marshmallow on top. It was very messy to eat, which was a bit of a turn-off for me. Both my late Dad and I, we shared a little quirk: intense dislike of sugary mess. Even as a child, you would never see me with ice cream melting down my arm or lips. The very idea would leave me paralyzed. But it was so tasty, I could never resist it for very long. My re-make of this Brazilian classic is “user-friendly” and “Dad-approved.”  A bigger, sturdier cookie base, and just the right amount of marshmallow to allow you to bite into it and not lose your dignity. To make it even more Brazilian, a green-and-yellow decoration, because sprinkles make my world go around.

NHÁ BENTA
(from the Bewitching Kitchen)

for the cookie base:
100g flour
25g whole wheat flour
25g hazelnut flour (or hazelnuts, finely ground)
50g brown sugar
½ tsp salt
113g unsalted butter (½ cup) cold, cubed
2 tbsp milk
1 tsp vanilla

for the marshmallow (makes more than you’ll need): 
200 g sugar
¼ cup water
5 sheets gelatin
2 egg whites
¼ fine salt

For the chocolate coating:
250g chocolate couverture, tempered
1 tsp coconut oil, melted
drizzle: white chocolate, melted and dyed with oil-soluble food dye
sprinkles

Heat oven to 350F.

In a food processor, pulse together the flours, sugar and salt. Add the butter and pulse until mixture resembles coarse crumbs. Add the milk and vanilla and pulse until dough holds together when squeezed. Turn the dough out onto the counter and knead gently to bring together. Dust the counter with flour and roll the dough to ¼-inch thickness. Cut into rounds and place on a parchment-lined baking sheet. Freeze for 10 minutes. Bake until firm and beginning to brown on the edges, 12 to 15 minutes. Cool for 2 minutes on baking sheet, then transfer to a wire cooling rack to cool completely.

Make the marshmallows only when the cookies are ready and cool, because it sets reasonably quickly.  Soak the gelatin sheets in cold water. Add the sugar and water in a small saucepan and bring to a boil over medium-high heat. Start whipping the egg whites so that they are at soft peaks within 5 minutes or so. Reduce the heat in the saucepan to medium and boil until mixture reaches 235-240F. Remove from heat and allow bubbling to subside.

With the mixer running on medium-high, gradually stream in the sugar syrup and drained gelatin sheets along the side of the mixing bowl into the egg whites. Continue to beat until glossy, thick and cooled to room temperature, about 6 to 8 minutes. Add the salt and mix for 1 minute.

Spoon the mixture into a piping bag fitted with a medium round piping tip and pipe over the cookies to form a dome. If dome needs smoothing, moisten fingers with water and gently smooth dome. Set aside to cool.

Temper the chocolate and add the coconut oil, mixing gently to incorporate. Immediately dip the cookies, marshmallow side down, into the chocolate. Flip to coat the bottom and place them gently over Silpat or parchment paper (do not place over a grid like a drying rack because that will mess up the coating at the bottom). Melt white chocolate and dye yellow. Place in a small piping bag, cut a very thin opening, and drizzle the surface of the covered cookies. Add sprinkles right away.  Cool and serve, they can be stored in the fridge.

ENJOY!

to print the recipe, click here

Comments: First of all, if you want to make a version closer to the authentic one sold in Brazil by Kopenhagen, roll the cookie very thin, and pile that marshmallow as if you are trying to reach the ceiling. Good luck coating it all with tempered chocolate… but I bet it can be done. This was messy enough for me, I tell you.  The drizzles are optional and are never found in the commercially available Nhá Bentas.


So what about its name? It would be best translated as Ms Benta. Nhá is a contraction of the word sinhá, a term commonly used in rural areas of the country decades ago. Basically, they are both  variations of the formal “Senhora” still used today as a respectful way to refer to an older woman. For instance, my friends addressed my Mom as “Senhora Salete”, and my Dad as “Senhor Danillo.”  The pronunciation of the word can be tricky for foreigners, so here we go, repeat after me…

This was my first time making Nha’ Bentas and I had no idea 2 egg whites would produce such a big volume of marsmallow. If your mixer handles 1 egg white, consider halving the recipe that part of the recipe.  I also had quite a bit leftover tempered chocolate, and saved it for future adventures…

Follow your heart…

Dana, this was such a clever challenge, I am looking forward to the flash-back into childhood of our tent-baking friends. I invite my readers to stop by the Home Bakers Collective to read all about it.

ONE YEAR AGO: The Best, The Very Best Hummus

TWO YEARS AGO: Chicken Katsu

THREE YEARS AGO: Whole-Lemon Marinade: Long Overdue

FOUR YEARS AGO: Tomato and Cucumber Salad with Almond Vinaigrette

FIVE YEARS AGO: Eggplant Tomato Stacks

SIX YEARS AGO: The Couscous that Wasn’t

SEVEN YEARS AGO: Apple-Cinnamon Bread

EIGHT YEARS AGO: Blueberry Galette

NINE YEARS AGO: In My Kitchen, August 2011

TEN YEARS AGO: Journey to a New Home

ELEVEN YEARS AGO: Friday Night Dinner

GALETTE DES ROIS

When I first applied to be on the Great American Baking Show, I started working to improve my baking skills.  I made a list of general techniques and a list of “classic bakes” to go along with them. Two years passed by. I went to the tent and came back. But this “self-improvement process” goes on. In fact, being in the show gave me extra energy and passion to get better. Tackle the techniques I still feel insecure about. Bake the classics. Such as Galette des Rois. I have always associated it with France, but it originated in Medieval times, enjoyed during Roman festivities known as Saturnalia. Usually a hidden figurine (or a bean, a whole almond) is baked in the tart, and the person who finds it gets to be King (or Queen) for a day.  I skipped that part in my dessert, afraid some departmental colleague would break a tooth. Galette des Rois: puff pastry enclosing almond cream. I can think of few things equally mouth-watering.

GALETTE DES ROIS
(adapted from Bake-Street)

For quick puff pastry:
125g all purpose flour
125g pastry flour
250 g unsalted butter, cold
6 g sugar
5 g salt
100-110g very cold water, from the fridge

for almond filling:
125 g almond flour
100 g powdered sugar
100 g unsalted butter at room temperature
2 eggs
1 tsp vanilla extract
3/4 tsp cinnamon
1/2 tsp ground ginger
1/8 tsp ground cloves

to brush before baking:
2 egg yolks

to brush after baking (optional, but nice):
30 g water
30 g sugar

Make the puff pastry dough. Add the flours, sugar, salt and butter to the bowl of a KitchenAid type mixer fitted with the paddle attachment. Mix for about 1 minute in low speed until the butter gets into small pieces.  Add 100g of the water and mix another minute, checking to see if you need to add a little more.  The mixture should not feel too sticky, but it should come together nicely if you press it with your fingers.  Do not mix for too long, to avoid developing gluten. Tranfer the dough to a plastic wrap, form into a rectangle and place in the freezer for 30 minutes.

Roll the dough out as a large rectangle on a lightly floured surface. No need to worry too much about dimensions, I try to make it twice as long as it is wide. Make one envelope-type fold bringing the top down and the bottom part over it.  Turn the dough  so that one folded part is to your right. Roll out the same way, fold again.  Freeze for 30 minutes.

Remove from the freezer and roll again two more times. If the dough seems too warm, and the butter is threatening to melt into it, freeze it again for 30 minutes between the third and fourth folds. Once you finish the fourth fold, keep the dough in the fridge until ready to make the dessert. You can keep it overnight or longer.

Prepare the galette: Lightly sprinkle a work surface with flour. Roll the dough to a large rectangle,  around 22 x 14 inches. Cut two circles of approximately the same size, with the diameter you want your galette to be. Mine was 8 + ¾ inch in diameter.  Cover both circles with plastic and refrigerate while you make the filling.

Make the almond filling. To the bowl of your KitchenAid type mixer add the powdered sugar and butter, mix at low-speed until it starts to form a thick paste, add one egg and continue mixing.  Add the almond flour, always at low-speed, ,then the second egg. Add the vanilla and the spices, mix to incorporate.   Place in a piping bag, no need for icing tip.

Place the first round of pastry over parchment paper on a baking sheet. Pipe the almond cream makig a spiral over the circle, leaving  a space at the edge without cream.  Moisten the edges lightly with cold water. If you want to include a figurine or a whole almond, now is the time to do it.

Place the second disc on top, the water brushed on the edge should help it stick. Gently press the top dough over the filling to avoid bubbles being trapped underneath.  Use the side of a knife opposite of the blade to mark the dough all around the edges, so that upon baking, it will form a nice wavy design.  Brush the top with a well beaten egg yolk. Refrigerate for 1 hour, uncovered.

Brush with egg yolk again. Make a pattern over the surface, adding a small hole in the center to vent the galette during baking. Refrigerate, uncovered for another hour.

Meanwhile, make the syrup to brush the surface by adding all  the ingredients in a saucepan. Place on medium heat and boil until the sugar dissolves.  Cool completely before using.

Heat the oven to 375 F. Place the galette in the oven and bake for 10 minutes, then reduce the temperature to 340-350F and bake for 40 to 45 minutes longer.  If you want to brush with the syrup, do it as soon as the galette is baked, still hot from the oven.  Let it cool completely before slicing.

ENJOY!

to print the recipe, click here

Comments: The traditional scoring on the surface is a spiral design. I decided to go with a different style, inspired by sourdough slashing. After I baked this galette, I saw a very nice version on Instagram decorating the surface with many concentric hearts. Who knows? I might fully ignore that Valentine is over, and go for it in the near future. After all, I already disrespected the correct day to serve this pastry, which happens to be January 6th. So a Galette de Coeur in March or April? Does not bother me at all.

The galette dough can be made with full-laminated pastry or a quick puff. I opted for the latter because it is a type of dough I am not that comfortable with. I made some for what would have been the semi-final of the show (click here), but had to speed up the process quite a bit to fit it all in the available timing.  For this galette, you can see that once you take your time and allow the dough to stay very cold all the time, it really puffs up beautifully.

I loved the addition of spices to the almond cream, which was a twist shared in the recipe at Bake-Street. By the way, that is one of my favorite blogs, I never miss her posts, the videos are a pleasure to watch. She is the neat and precise baker I aspire to be. Next life. There’s always next life…

Grab a pin, and let’s Saturnalia together!

ONE YEAR AGO: Sous-Vide Overnight Oatmeal

TWO YEARS AGO: A Valentine’s Day Opera

THREE YEARS AGO: Incredibly Simple Times Four

FOUR YEARS AGO: Walnut-Cranberry Sourdough Bread

FIVE YEARS AGO: Ottolenghi in Brazil?

SIX YEARS AGO: Roasted Winter Vegetables with Miso-Lime Dressing

SEVEN YEARS AGO: 2012 Fitness Report: P90X2

EIGHT YEARS AGO: Caramelized Bananas

NINE YEARS AGO: Roasted Lemon Vinaigrette

TEN YEARS AGO: Whole Wheat Bread


LEMON BUTTERCREAM MACARONS

I baked this batch back in February, evidently I took my sweet time (pun intended) to blog about them. The recipe is the same basic one I’ve been using from the Craftsy tutorial. I want to feel totally comfortable with it before moving to the Italian version. To get this color, I used a mixture of green and yellow gel coloring, but it’s hard to be precise about the amounts. I added a little bit of the green, mixed, added a little more, then some yellow, and gave a thorough mix. Crossed my fingers and hoped that the color would stay true during baking. You just never know. Not a single shell cracked, and all formed cute feet. What more can a baker ask to the Macaron Gods? Not much. Maybe uniformity in size? Yeah, that would be nice…


LEMON BUTTERCREAM MACARONS
(from the Bewitching Kitchen, adapted from Crafsy)

for the shells:
198 g powdered sugar
115 g almond meal
113 g egg whites (aged for three days)
a pinch of cream of tartar
100 g granulated sugar
Green and Yellow Gel colors from AmeriColor
2 drops vanilla extract

for the filling:
3 eggs
1 cup (200 grams) sugar
grated zest from 2 large lemons
juice of 2 large lemons
1 cup plus 2 tablespoons (230 g) chilled butter, cut in pieces

Line 3 heavy baking sheets with parchment paper or Silpat mats. Layer the powdered sugar, almond meal and lavender in a food processor or mini processor. Pulse until the mixture looks like fine meal, about 15 seconds. Pass through a sieve and transfer to a small bowl. Set aside.

Place the egg whites and pinch of cream of tartar in the bowl of a stand mixer fitted with the whisk attachment. Make sure that the bowl and the whisk are impeccably clean. Starting on medium speed, whip the whites with the cream of tartar until they look like light foam. The whites should not appear liquid. The foam will be light and should not have any structure.

Slowly rain in the granulated sugar, trying to aim the stream between the whisk and the side of the bowl. Turn the speed up to medium-high. Continue to whip the meringue until it is soft and shiny. It should look like marshmallow creme. Add the gel colors and the vanilla. Staying at medium-high speed, whip the egg whites until the mixture begins to dull and the lines of the whisk are visible on the surface of the meringue. Check the peak. It should be firm. Transfer the whites to a medium bowl.

Fold in the almond meal mixture in three increments. Paint the mixture halfway up the side of the bowl, using the flat side of a spatula. Scrape the mixture down to the center of the bowl. Repeat two or three times, then check to see if the mixture slides slowly down the side of the bowl. Put the mixture in a piping bag fitted with a Wilton #8 tip or another kind of your preference. Pipe rounds of the batter.

Slam each sheet hard four to six times on the counter. Then fist bump each end of the sheet’s underside twice. Let the unbaked macarons dry until they look dull but not overly dry. Drying time depends on humidity. Ina dry climate, the macarons can dry in 15 to 20 minutes; in a humid climate, it can take 35 to 40 minutes.

While the macarons are drying, heat the oven to 330 F (170 C/gas mark 3). Bake one sheet at a time on the middle rack. Check in 11 minutes. If the tops slide, then bake for 2 to 3 more minutes. The macarons should release without sticking. Check one or two. If they stick, put them back in the oven for 1 to 2 more minutes. Let the macaroons cool for 10 minutes before removing from the pan.

Make the filling: Beat together the eggs and the sugar with a Kitchen Aid type mixer on high-speed. Try to get the butter to double in volume by beating. Transfer to a saucepan and add the lemon zest and juice. Stir until it thickens slightly and all liquid is incorporated.  Pour the mixture into a bowl, cover with plastic wrap and cool in the fridge.

Once the lemon mixture is cold, put back into the bowl of the mixer, and beat with the wire whisk for a couple of minutes. Start adding the pieces of chilled butter, whipping until incorporated.  The mixture is now ready to be used to fill the shells.

Assemble the macarons: find two macarons similar in size and add a good amount of filling to the bottom of one of them. Place the other on top and squeeze gently to take the filling all the way to the edge.  Ideally, store in the fridge for 24 hours before savoring them.

ENJOY!

to print the recipe, click here

Comments: I made this batch before my dear niece Raquel sent me the macaron Silpat that I showcased in the Black Sesame Macarons post. The mat does make it a lot easier to get baking, as there’s no need to draw circles in parchment. Place the silpat over the baking sheet and off you are to a good start.  The lemon buttercream turned out very good to balance the sweetness of the shells. If you’d like to make it even easier, get some lemon curd from the store, but I imagine the texture is not as pleasing as homemade buttercream.

I must say that now I am not sure what I enjoy more, baking bread or macarons. They can easily turn into a bit of an obsession. And when you are obsessed, you tend to order special cookbooks. Such as….

order from amazon with a click here
(side note: I am not affiliated to amazon.com)

This is a more advanced macaron book. Can you imagine little macaron horses? I am not ready to face fancy shapes yet, but it’s fun to dream… It all starts with a dream, you know…

😉

Add to FacebookAdd to DiggAdd to Del.icio.usAdd to StumbleuponAdd to RedditAdd to BlinklistAdd to TwitterAdd to TechnoratiAdd to Yahoo BuzzAdd to Newsvine

ONE YEAR AGO: Raspberry Buckle

TWO YEARS AGO: Seafood Gratin

THREE YEARS AGO: Black Bean and Pepper Jack Burger

FOUR YEARS AGO: Carrot and Sesame Sandwich Loaf

FIVE YEARS AGO: Border Grill Margaritas

SIX YEARS AGO: Goodbye L.A.

SEVEN YEARS AGO: Vermont Sourdough


SaveSave

SaveSave

SaveSave

SaveSave

SaveSave

SaveSave

SaveSave

SaveSave

SaveSave

SaveSave

SaveSave

SaveSave

SaveSave

SaveSave

SaveSave

SaveSave

BISCOTTI FOR A BABY SHOWER!

Biscotti Baby ShowerToday I have a special post for you!  We are throwing a virtual baby shower for a great food blogger I got to know through the Secret Recipe Club, Tara,  from Tara’s Multicultural Table. We are all baking biscotti for this party. Why biscotti, you may ask? Well, it is her second baby, and these are twice baked cookies: a natural choice!  Wanna see what I came up with? Here they are:

MapleWalnutBiscotti

I was quite excited to participate, because – believe it or not – I’d never made biscotti from scratch. But first, let me share a story. My first time enjoying biscotti was in 1991, during a visit to Italy. The best possible place to get acquainted with this delicacy, if you ask me.  I had given a seminar in a big vaccine biotech company, and they took me out for a fantastic dinner later that evening. After dinner, where vino was flowing freely, someone insisted that we should all head to a bar so that I could try biscotti dunked in grappa. I knew nothing about either entity, but quickly realized that they complement each other perfectly. The biscotti are hard, but the grappa softens it. And the sweetness of the biscotti masks quite well – maybe too well –  the alcohol in the grappa. Of course, after dunking, you’re supposed to drink the leftover grappa with the little tiny bits of biscotti that found their way to the bottom of the glass. Great food, vino, grappa, all framed by the beauty of Tuscany! Good thing I had already given my talk at that point, and was in full “dolce far niente” mode. At any rate, it was a magical evening. I remember a complete sense of awe as I walked back to my hotel under the most amazing full moon shining over the streets of Siena.  One of those perfect moments that stay with you forever. Since biscotti are so dear to my heart, I spent quite a bit of time debating which kind to bake for Tara’s baby shower. Of course, keeping it all baby-friendly, I’ll ask you to skip that dunking in grappa.  Unless there’s a full moon outside, then all bets are off… 😉
tray

MAPLE WALNUT BISCOTTI
(from Susan Russo, for NPR)

Makes about 36 biscotti

for the biscotti:
2 cups unsalted walnuts
1 cup granulated sugar
1 cup light brown sugar
1/2 teaspoon ground cinnamon
2 teaspoons baking powder
2 1/2 cups all-purpose flour
2 large eggs, plus 1 egg, lightly beaten, for brushing tops of loaves
3 tablespoons maple extract

for the icing:
1/2 cup confectioners’ sugar
3 tablespoons maple syrup

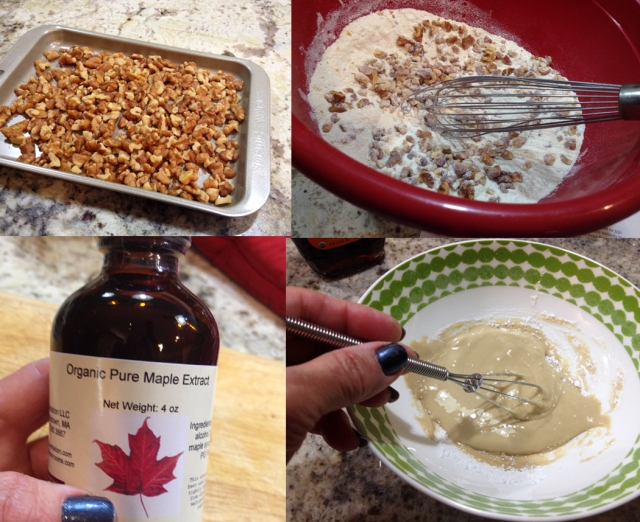
Position racks in the upper and lower thirds of the oven and preheat to 350 degrees. Line 2 large baking sheets with parchment paper. Place walnuts in a single layer on a baking sheet and toast in the 350-degree oven for 10 minutes. Transfer to a cutting board and coarsely chop. Set aside.

In a large bowl, hand mix toasted walnuts, sugars, cinnamon, baking powder and flour. In a small bowl, whisk eggs. Add maple extract and whisk until well blended. Add to the flour mixture. Stir a few times. Work the batter together with lightly floured hands. Keep squeezing the batter with your hands, until a dough starts to form. Shape as a ball and divide it into 4 equal pieces.

On a lightly floured surface, place one piece of dough, and using your hands, roll into a log shape that is approximately 8 inches long, 2 inches wide, and 3/4 of an inch high. If it’s sticky, simply dust your palms with more flour. Repeat with remaining three pieces of dough. Brush loaves all over with 1 lightly beaten egg.

Bake for 40 minutes, rotating pans halfway through, or until the tops of the loaves are shiny and deep golden. Cool on a rack for about 20 minutes before slicing, using a large serrated knife. Cut 3/4-inch-thick slices, using a sawing motion to prevent crumbling. Each loaf should yield 9 to 11 cookies.

Place slices on their sides back on to the baking sheets; place in the still warm oven with the temperature off and the door closed for 30 to 60 minutes. The longer they stay in the oven, the harder they will become. Remove from oven and cool completely before storing in an airtight container.

To make the maple icing, mix the confectioners’ sugar and maple syrup in a small bowl and whisk briskly until the icing is smooth and opaque and clings to the back of a spoon. Dip a teaspoon into the icing and drizzle the spoon back-and-forth over the biscotti. Allow to dry completely before storing. Store biscotti in an airtight container, preferably a tin, which helps keep them crisp.

ENJOY!

to print the recipe, click here

composite1

Comments: I was a bit nervous about this baking adventure, because I know that biscotti can be tricky to make, and that very few things are worse than bad biscotti, right?  I fell in love with the flavors of this recipe because anything with maple makes me all warm inside, and walnuts only make it better.  I suppose most people go crazy for chocolate, but I usually opt for other flavors in sweets.  The recipe called for maple extract, because it has a more concentrated flavor, so I was “forced” to place an order for some. It smells amazing!

composite2
One of the tricky things about biscotti is slicing them after the first bake. You are supposed to wait for 20 minutes, and use a good quality serrated knife for the job. Worked great, I had no problems. By the way, I made half the recipe, and ended up with 18 biscotti, some quite small, cut from the edges. They are also called “sacrificial biscotti”. Honest. Not making that up.

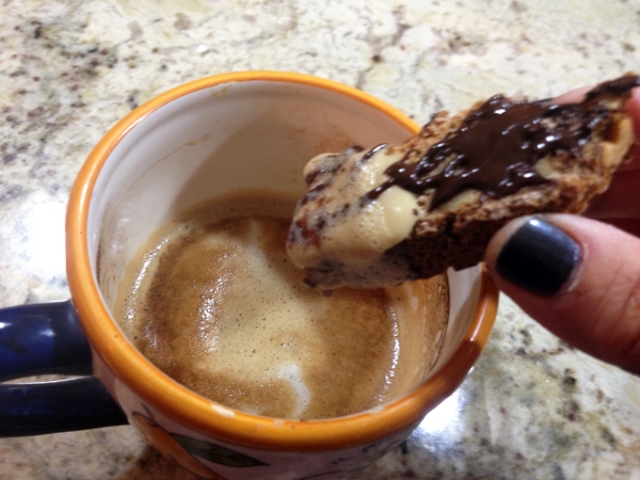
I went for a double type of icing, the maple called for in the recipe, and then a drizzle of chocolate for cosmetic purposes.  But, after tasting them, I do think the chocolate drizzle did more than beautify them. The taste complements the maple and walnuts quite well.

dunking

Now that I am older, not necessarily wiser, I dunk my biscotti into a steaming hot cup of cappuccino… Great way to start any day!

Tara, I hope this virtual Baby Shower brought a big smile to your face, we certainly had a great time planning and making sure it was kept secret until today…

And here I share  the collection of biscotti from all virtual secreters who joined this party:

Biscotti Bites from Nicole at I am a Honey Bee

Blueberry Pecan Biscotti from Renee at Magnolia Days

Cinnamon Biscotti from Lauren at Sew You Think You Can Cook

Cranberry Pistachio biscotti from Stacy at Food Lust People Love

Dark Chocolate Orange Biscotti from Amy at Amy’s Cooking Adventures

Green Tea Biscotti Cookies from Rebekah at Making Miracles

Jam-Filled Mandelbrot from Kelly at Passion Kneaded

Maple Walnut Biscotti from Sally at Bewitching Kitchen

Nut-Free Anise Biscotti with Chocolate Chips from Susan at The Wimpy Vegetarian

Orange and Dark Chocolate Biscotti from Lynsey at Lynsey Lou’s

Orange, Date, and Almond Biscotti from Karen at Karen’s Kitchen Stories

Parmesan-Peppercorn Biscotti from Camilla at Culinary Adventures with Camilla

Spa Water from of Dorothy at Shockingly Delicious

Biscotti Baby Shower

ONE YEAR AGO: Barley Risotto with Peas

TWO YEARS AGO: Oatmeal Fudge Bars

THREE YEARS AGO: Cauliflower Steaks

FOUR YEARS AGO: Soft Spot for Chevre

FIVE YEARS AGO: Quick sun-dried Tomato Crostini

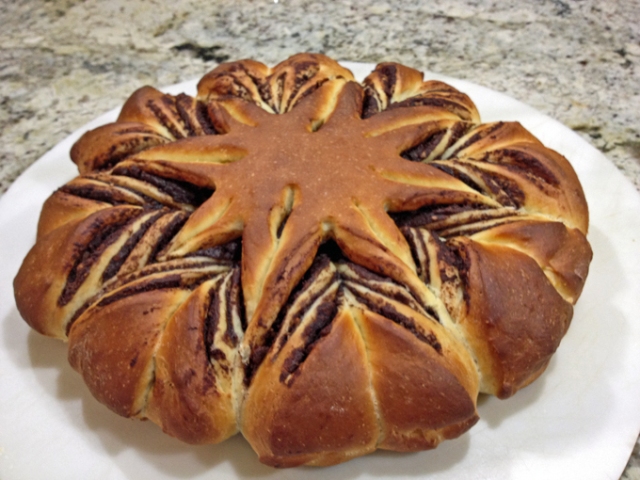
STAR-SHAPED CHOCOLATE BRIOCHE BREAD

Every once in a while I fall in love with a recipe, and cannot wait to make it. Last week I logged into Facebook, and by pure chance there on the top of the Artisan Bread Bakers page I saw a gorgeous bread, worthy of the cover of a Breads Illustrated Swimsuit Issue – if there was such a thing. Except that, contrary to what seems to be the case for many supermodels, no Photoshop tweaking was involved. The bread was naturally stunning. I wasn’t sure I would be able to make it, as it involved a shaping technique I had never seen before. But, it all worked well. It’s bread after all, not cake.  😉

Star-Shaped Brioche1

STAR-SHAPED CHOCOLATE BRIOCHE BREAD
(from  Lindarose at Instructables)

for the dough:
500g all-purpose flour
2 eggs
60g sugar
180ml room temperature milk (3/4 cup)
80g room temperature butter
7g active dry yeast
8g salt
peel from one orange

for the chocolate cream:
35g cocoa powder
75g sugar
250g ricotta ( about 1 cup)
30g hazelnuts

Put the flour in the mixer and add the yeast, milk, sugar and eggs. Start mixing on low, as the ingredients start to incorporate, add the butter in small pieces, the salt, and the orange peel.  Keep mixing until very smooth (about 5 minutes on a Kitchen Aid type mixer). Remove the dough to a lightly floured surface and finish kneading it by hand, to make sure all butter is uniformly distributed. The dough should be slightly tacky, resist the urge to add more flour. Form a ball, and let it rise in a bowl in a warm spot until double in size, about 2 hours, depending on the temperature of your kitchen.

While you wait for your dough to rise, prepare the chocolate cream.

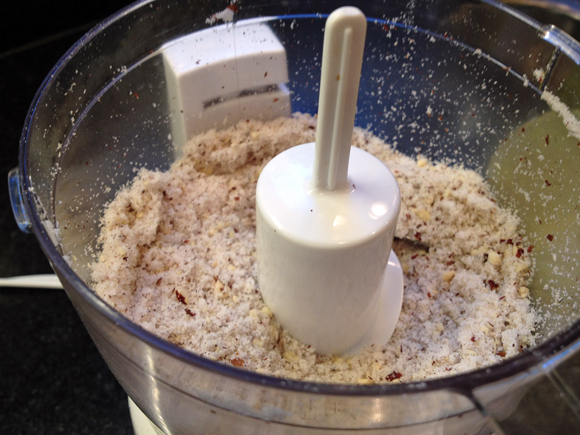
In a food processor, mix the sugar and hazelnuts together until you obtain a powder. It’s ok if there are still some big pieces in it. Transfer to a bowl, and sift the cocoa powder on top of it.   Add the ricotta and mix everything together with a hand mixer until your mixture becomes a cream.

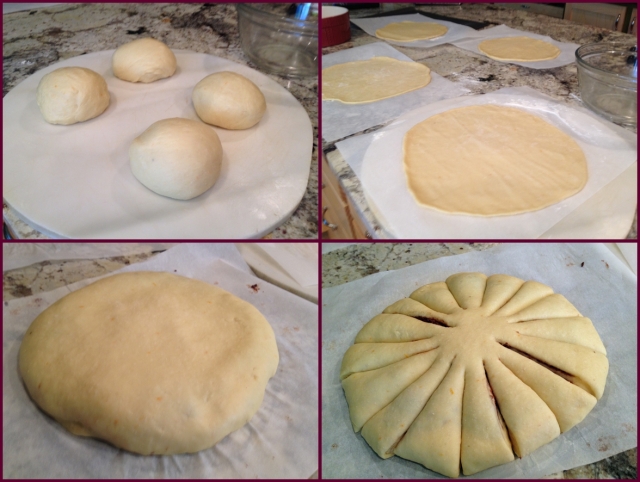
Once your dough has risen, divide it in 4 equal pieces and make 4 separate balls. Make a disc with each of the 4 balls using a rolling-pin. The most important thing is that the discs are all the same size.

Place the first disc on a piece of parchment paper and spread some chocolate cream on it, making sure to leave about half an inch of free border all around. Lay the second disc on the first one and press the border with your fingers to join them together. Now spread some other chocolate cream on the second disc (always leaving a free border), add the third disc and close it with your fingers. Do the same on the third disc and close it with the last disc, but don’t spread the chocolate on it this time. The 4th disc is the top of the bread.

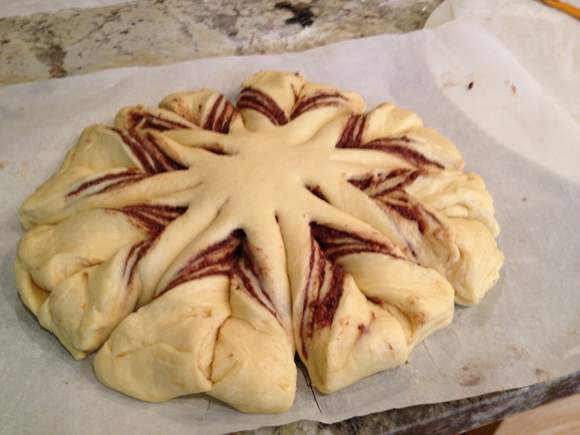
Using a knife, divide the dough in 4 with 4 cuts. It’s  crucial for the shaping that you don’t cut the center of the disc (see pictures). Now make other 4 cuts between the others, for a total of 8, always leaving the center free. Finally, make 8 cuts between the ones you already made, just like the others. You will have a total of 16 sections now.

Consider 2 sections that are next to each other: lift one with one hand and the other with the other hand and twist each of them towards the outside. This means that the piece you are holding with your right hand will be twisted to the right and the one you are holding with your left hand will be twisted to the left. Do this for all the sections. Your bread will look like a snowflake. Put it in the baking sheet with the help of the parchment paper (don’t remove it) and let it rest and rise for another hour. As the bread rises, turn your oven to 350 F.

Bake at 350°F (180°C) for 25 to 30 minutes. Let it cool on a rack.

ENJOY!

to print the recipe, click here

balls-checker

I woke up very early on Labor Day to bake this bread. Long before sunrise. Mixed the dough and went for a run with Phil, while the streets were still completely dark. Come to think of it, “with Phil” is not a correct statement. Let’s say we start together and within five minutes I am begging for mercy,  slow down my pace and see him move farther and farther ahead.  The sun started to rise midway through our run, in such a magical experience, the subtle change in light, slow and beautiful. By far my favorite kind of run. A day that started so perfectly had  to be a good baking day. And indeed it was.

hazelnutpowder

This dough is wonderful to work with.  As you can see in the instructions, the most important thing to keep in mind is dividing the dough in equal parts – use a scale, don’t just eye-ball it.  Once the dough is divided, it rolls out very nicely, use just a little bit of flour on top of the parchment paper so that you can release it easily. I rolled all four balls of dough, but if you prefer, roll one at a time, spread the chocolate cream, move to the next one. Before you cover the bread with the last disk of dough, wash your hands of any chocolate to keep the surface of the bread clean.

shaped

Slicing the dough in 16 sections and twisting the sections for the final shaping is not as hard as it may seem.  I have a lot of trouble with spacing things regularly, and was a bit nervous handling the knife, but even if my cutting was not perfectly uniform,  the bread turned out ok.  Maybe not worthy of the cover of Breads Illustrated, but not bad for a first time.

This star-shaped bread reminded me of the classic Chocolate Babka, which I’ve never made, but saw Peter Reinhart demonstrate in a lecture in Dallas many years ago. In fact, my friend Marilyn said this bread looked like “Babka’s wealthy cousin”.  I suppose that defines it quite well.

The filling can be anything you like. Some bakers from the Facebook group used pesto and cheese, others used cinnamon cream, or a mixture of different nuts with chocolate. Pretty much anything goes with the exact same dough and shaping.  Be creative and impress your friends and family, it is a show-stopper of a bread.

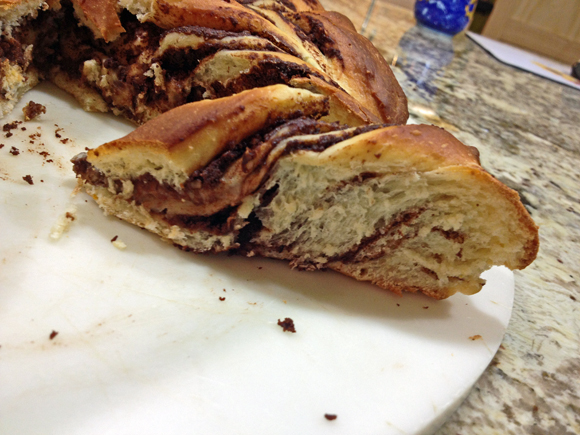
Sliced

I am submitting this post to Susan’s Yeastspotting event…

ONE YEAR AGO: Blueberry-Banana Bread 

TWO YEARS AGO: Into the Light Again

THREE YEARS AGO: Five Grain Sourdough Bread

FOUR YEARS AGO: The Nano-Kitchen

FIVE YEARS AGO: Kaiser Rolls