I invite you to visit the Cookie Blog to see my two favorite production of this year, in the scary department…
Without further ado…
Halloween Gingerbread House….
(details here)

.
3D Coffin
(details here)


Four ways to use Oreos in your baking, starting with my favorite of this set…
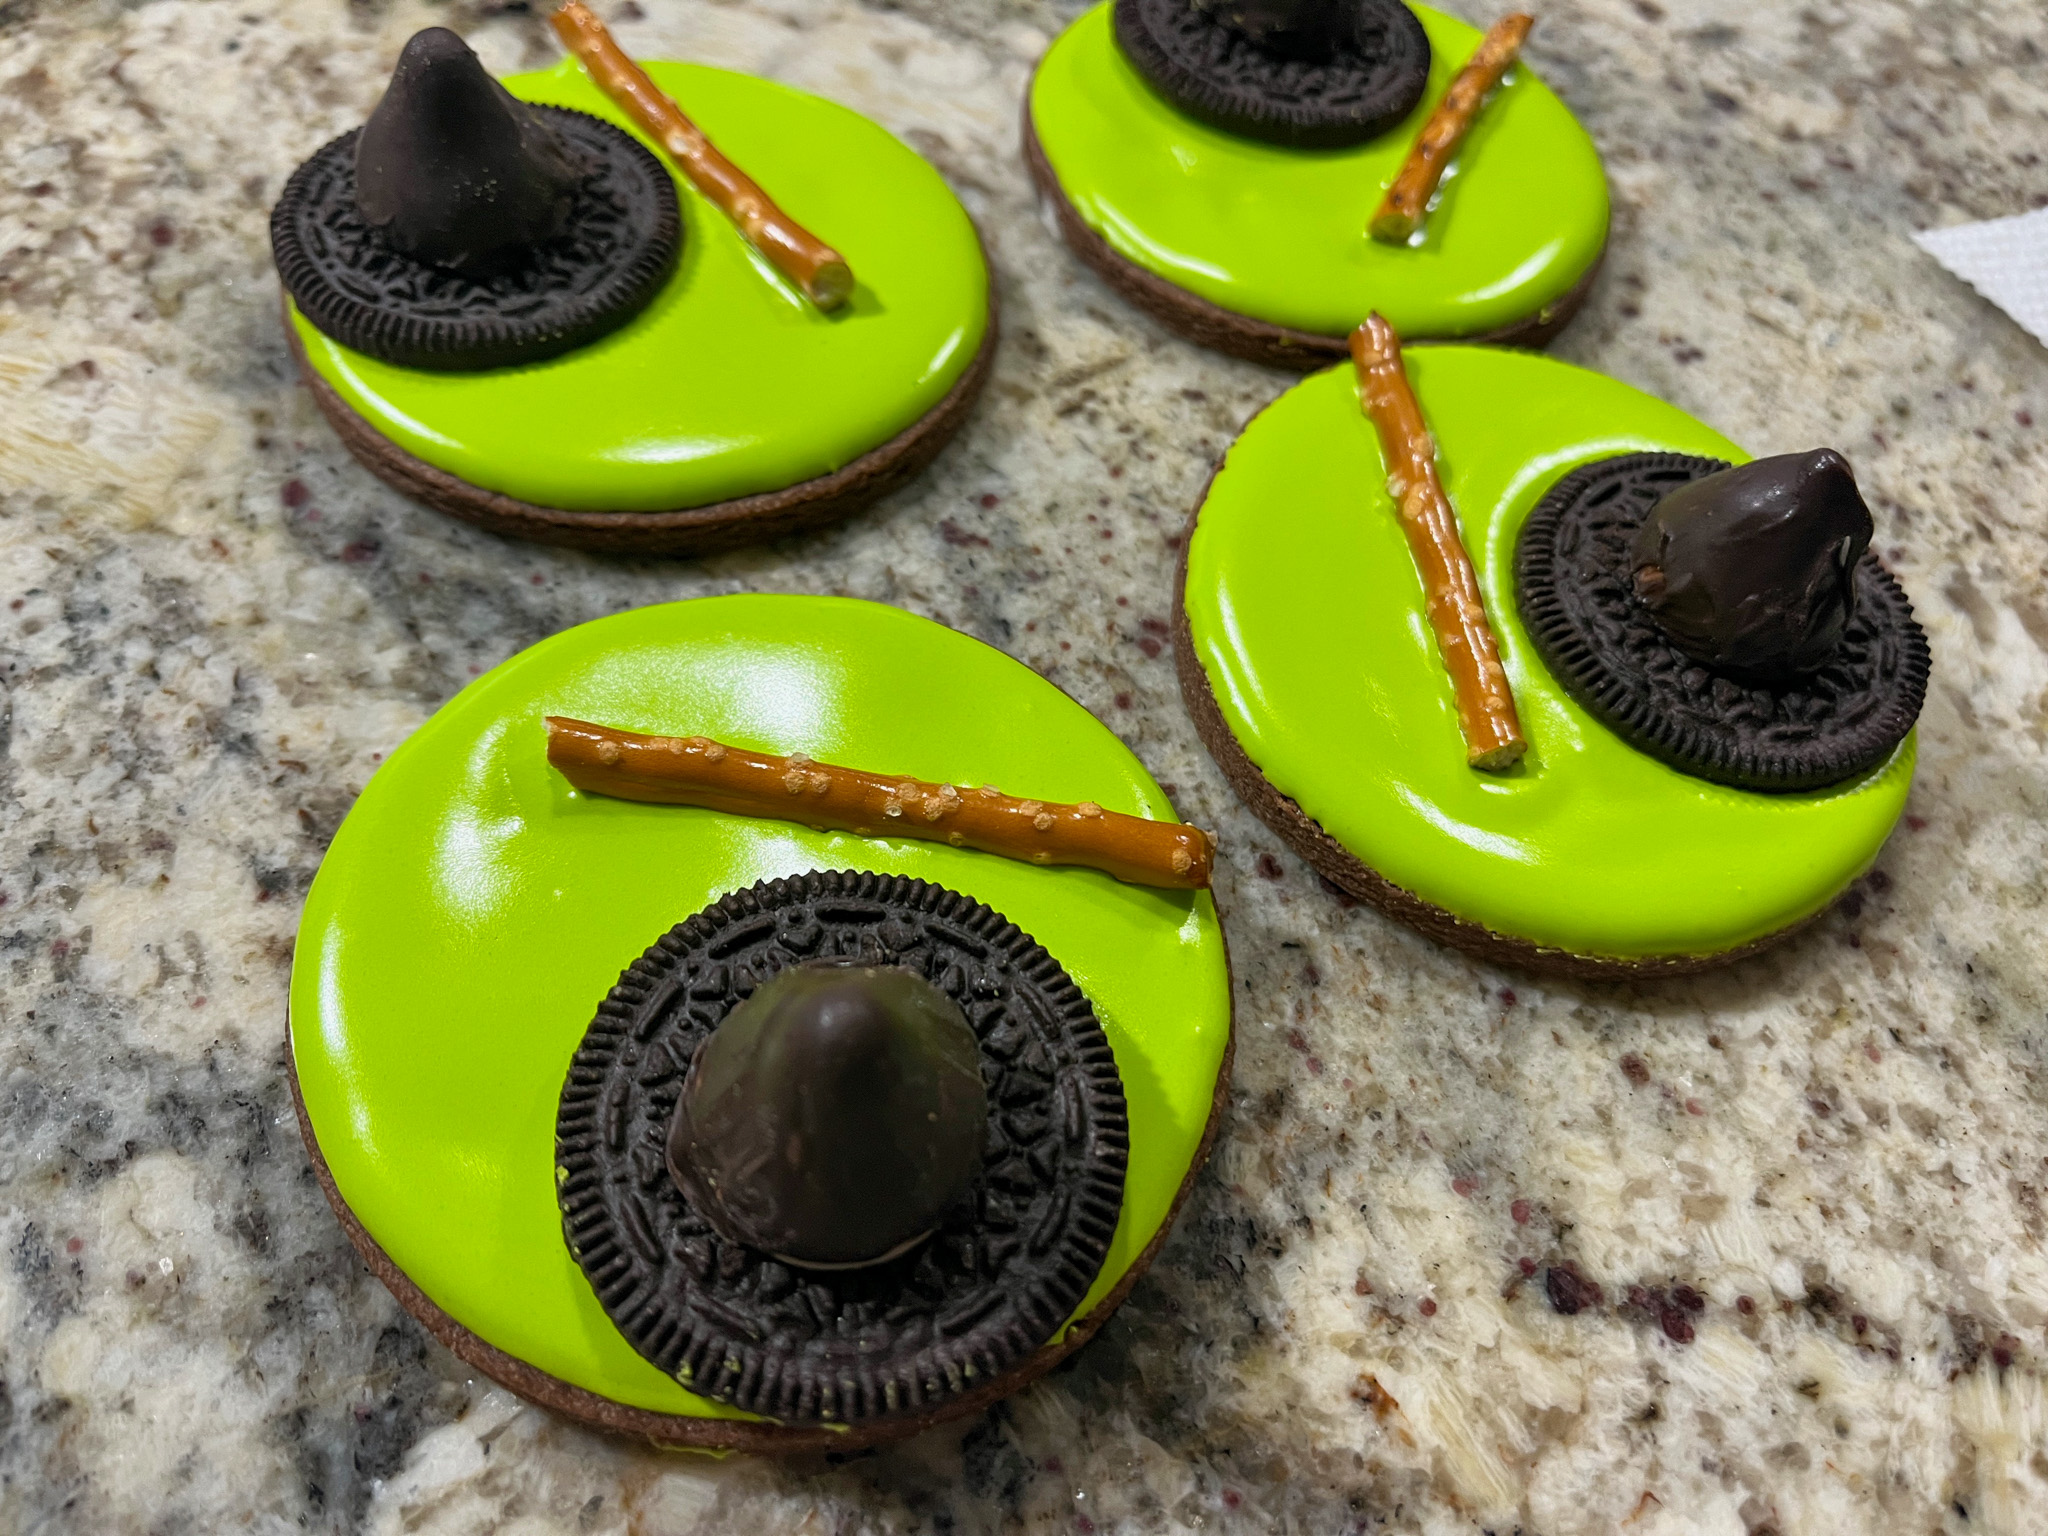
The Melting Witch Chocolate Cookie

I cannot take credit for this cute idea, but I modified it slightly from what was published in this site.
For the cookie, I used my default recipe with a touch of chipotle pepper and cinnamon (click here). For the hat, I used Hershey’s kisses, but gave it an additional coat with Candy Melts dark chocolate, to make it match the color of the Oreo underneath. Then all you need to do is flood the cookie with Electric Green icing, immediately add the half Oreo cookie and the pretzel stick. Once that sets, pipe the broom detail, and glue the Hershey kiss on the Oreo. You are done!
.
STRAWBERRY OREO LITTLE BALLS

OREO STRAWBERRY BALLS
(from The Bewitching Kitchen)
24 Oreo cookies
90g strawberry cream cheese, at room temperature
200g white chocolate
30g grape seed oil
fat-soluble dye, pink and red
Place the Oreos and cream cheese in the bowl of a food processor and process until it starts to form a dough.
Form little balls using about 20g of Oreo dough. Place them in the freezer for 1 hour.
Melt the chocolate gently in a microwave at 50% power, together with the oil. Whisk gently from time to time. Separate a small amount to dye red. Dye most of the batch pink.
Remove the Oreo balls from the freezer, and gently but quickly dip each one in the melted chocolate (ideally at about 100F), using a toothpick or medium-size wooden stick. Place upright to set. Drizzle the red chocolate all over for decoration. Remove the stick and place on paper cups to serve.
If desired, spray a little Diamond dust or pink luster powder over them.
ENJOY!
to print the recipe, click here
.
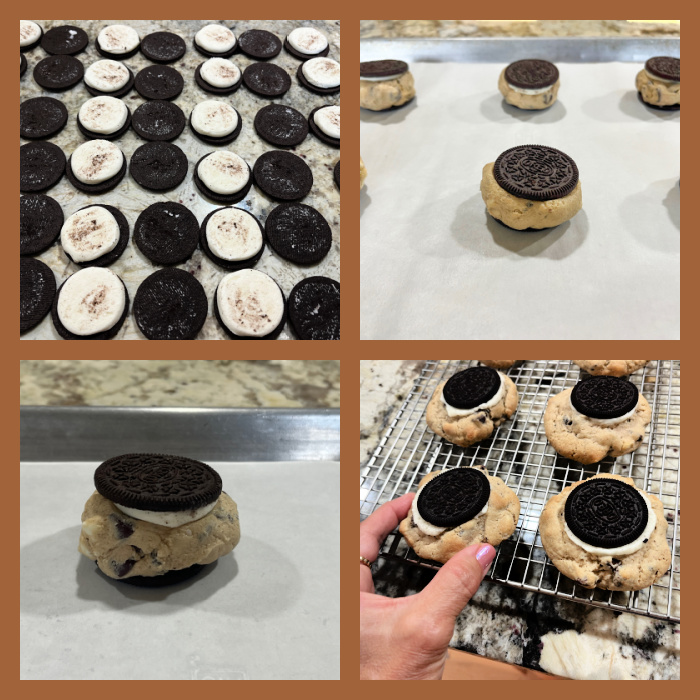
OUTRAGEOUS COOKIES AND CREAM COOKIES
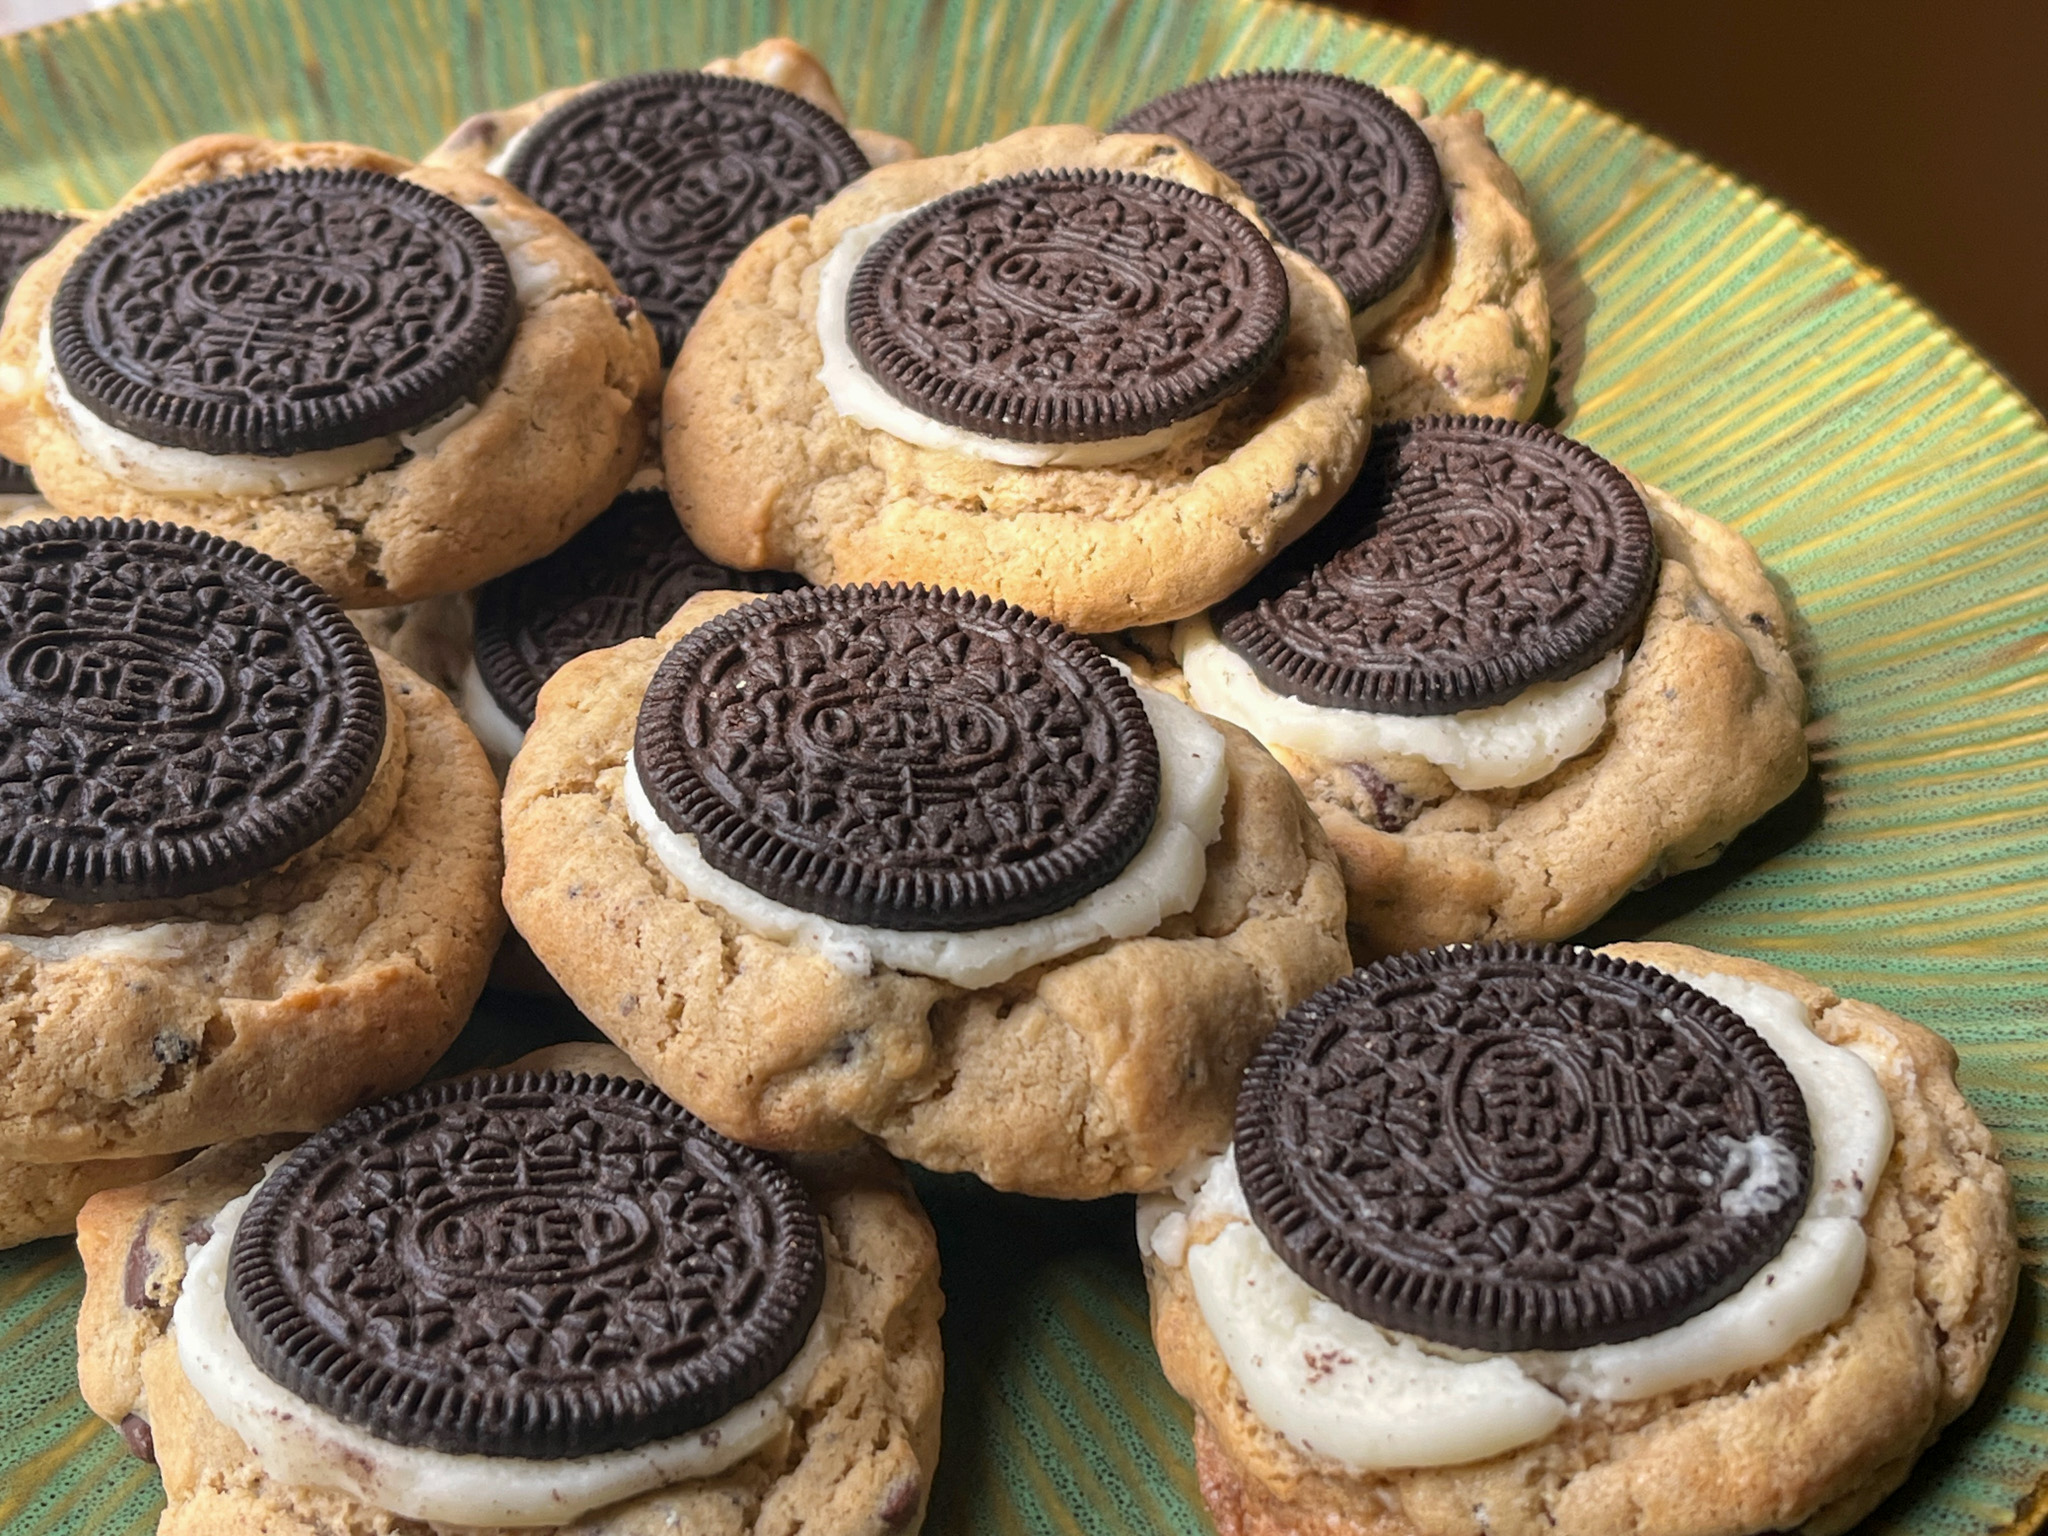
These are nothing short of amazing… For the full recipe, please visit the site where I originally found them (click here). One cookie will feed a family of four, so to speak… But absolutely worth the calories!
.
CHOCOLATE-COVERED OREOS
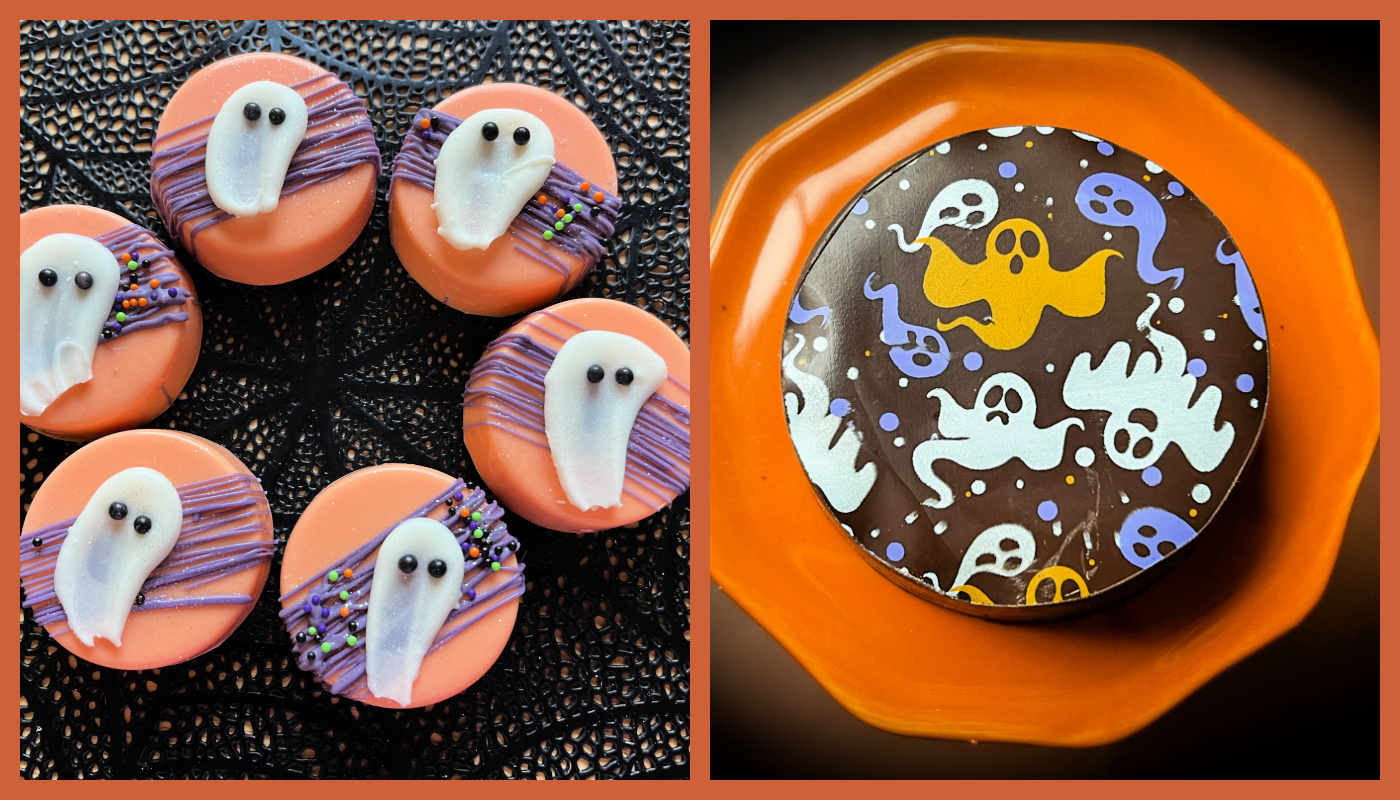
I do these often, as I like to include a small batch in my donation box of Friday. Two ways to decorate them for the Halloween season. On the left, ghosts made with candy melts, just a drop on parchment paper, then pull the shape with a gloved finger. Add eyes. Done! On the right, chocolate transfer sheets. Sweet and simple!

I hope I convinced you to go out and buy a big package of Oreos, so you can have some fun in your own kitchen…
ONE YEAR AGO: Halloween Brownies, Two Ways
TWO YEARS AGO: Revving the Engines for Halloween
THREE YEARS AGO: Happy Halloween from my Cookie Blog to You!
FOUR YEARS AGO: Incredibly Simple Carrots
FIVE YEARS AGO: Sarah Bernhardt’s Cookies
SIX YEARS AGO: A Really Big Announcement
SEVEN YEARS AGO: Stir-Fried Chicken in Sesame-Orange Sauce
EIGHT YEARS AGO: Monday Blues
NINE YEARS AGO: A New Way to Roast Veggies
TEN YEARS AGO: Two Takes on Raspberries
ELEVEN YEARS AGO: Spice Cake with Blackberry Puree
TWELVE YEARS AGO: Own Your Kitchen with Cappuccino Panna Cotta
THIRTEEN YEARS AGO: Chicken Parmigiana, the Thriller
FOURTEEN YEARS AGO: Wild Mushroom Risotto
FIFTEEN YEARS AGO: Tartine Bread: Basic Country Loaf
SIXTEEN YEARS AGO: Pugliese Bread
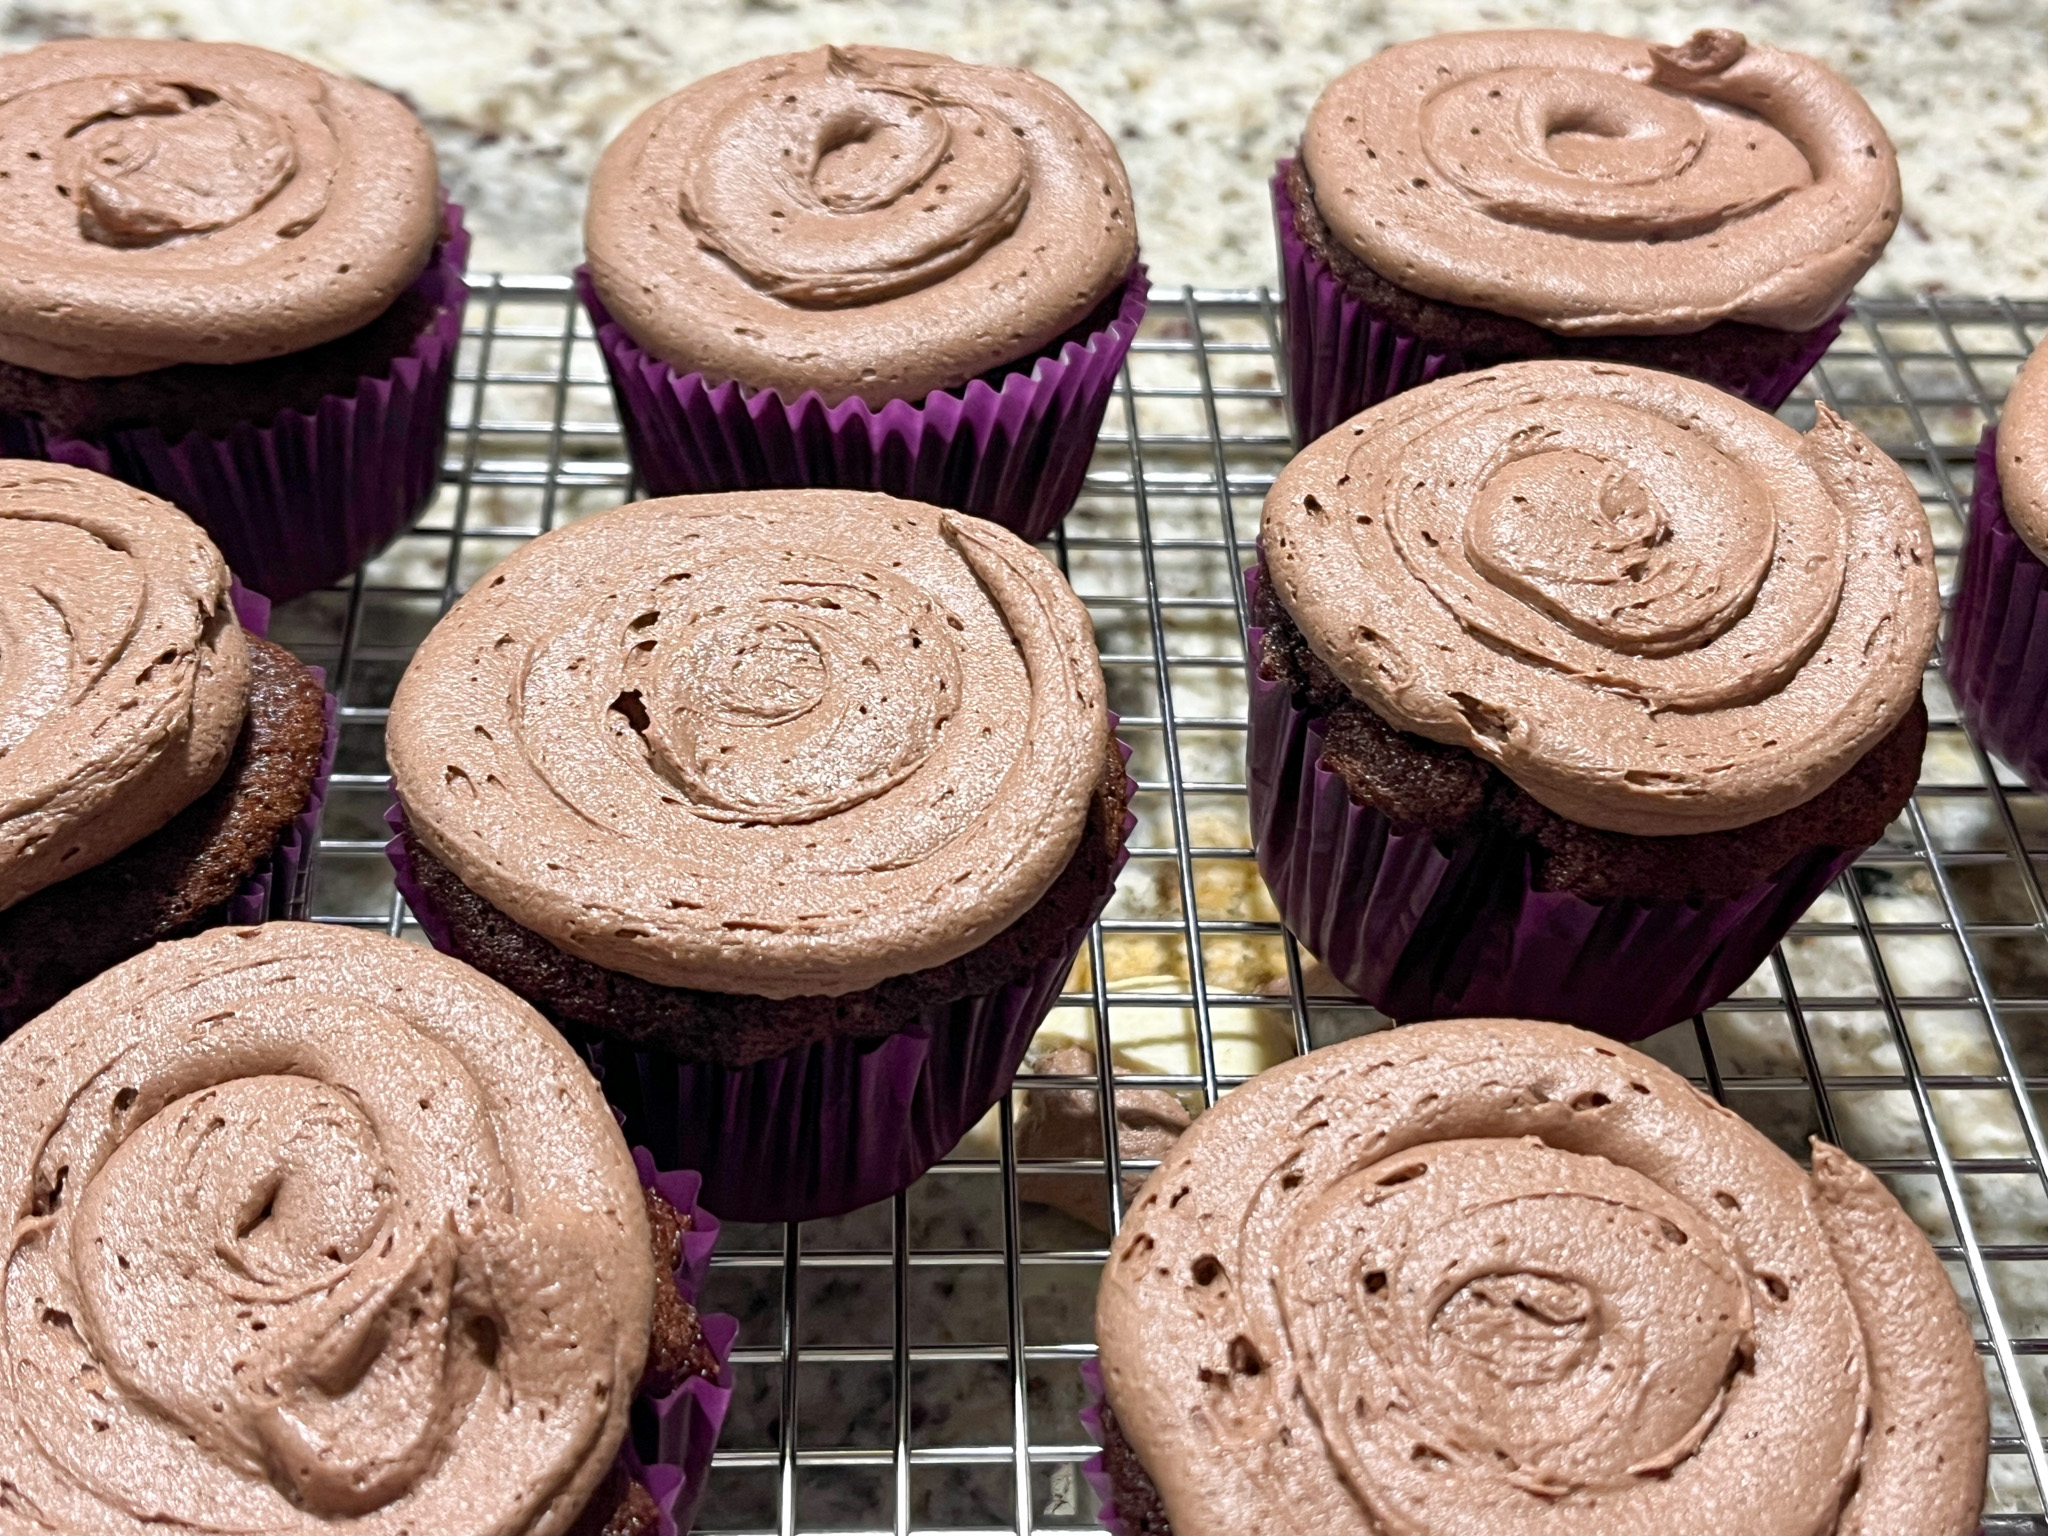
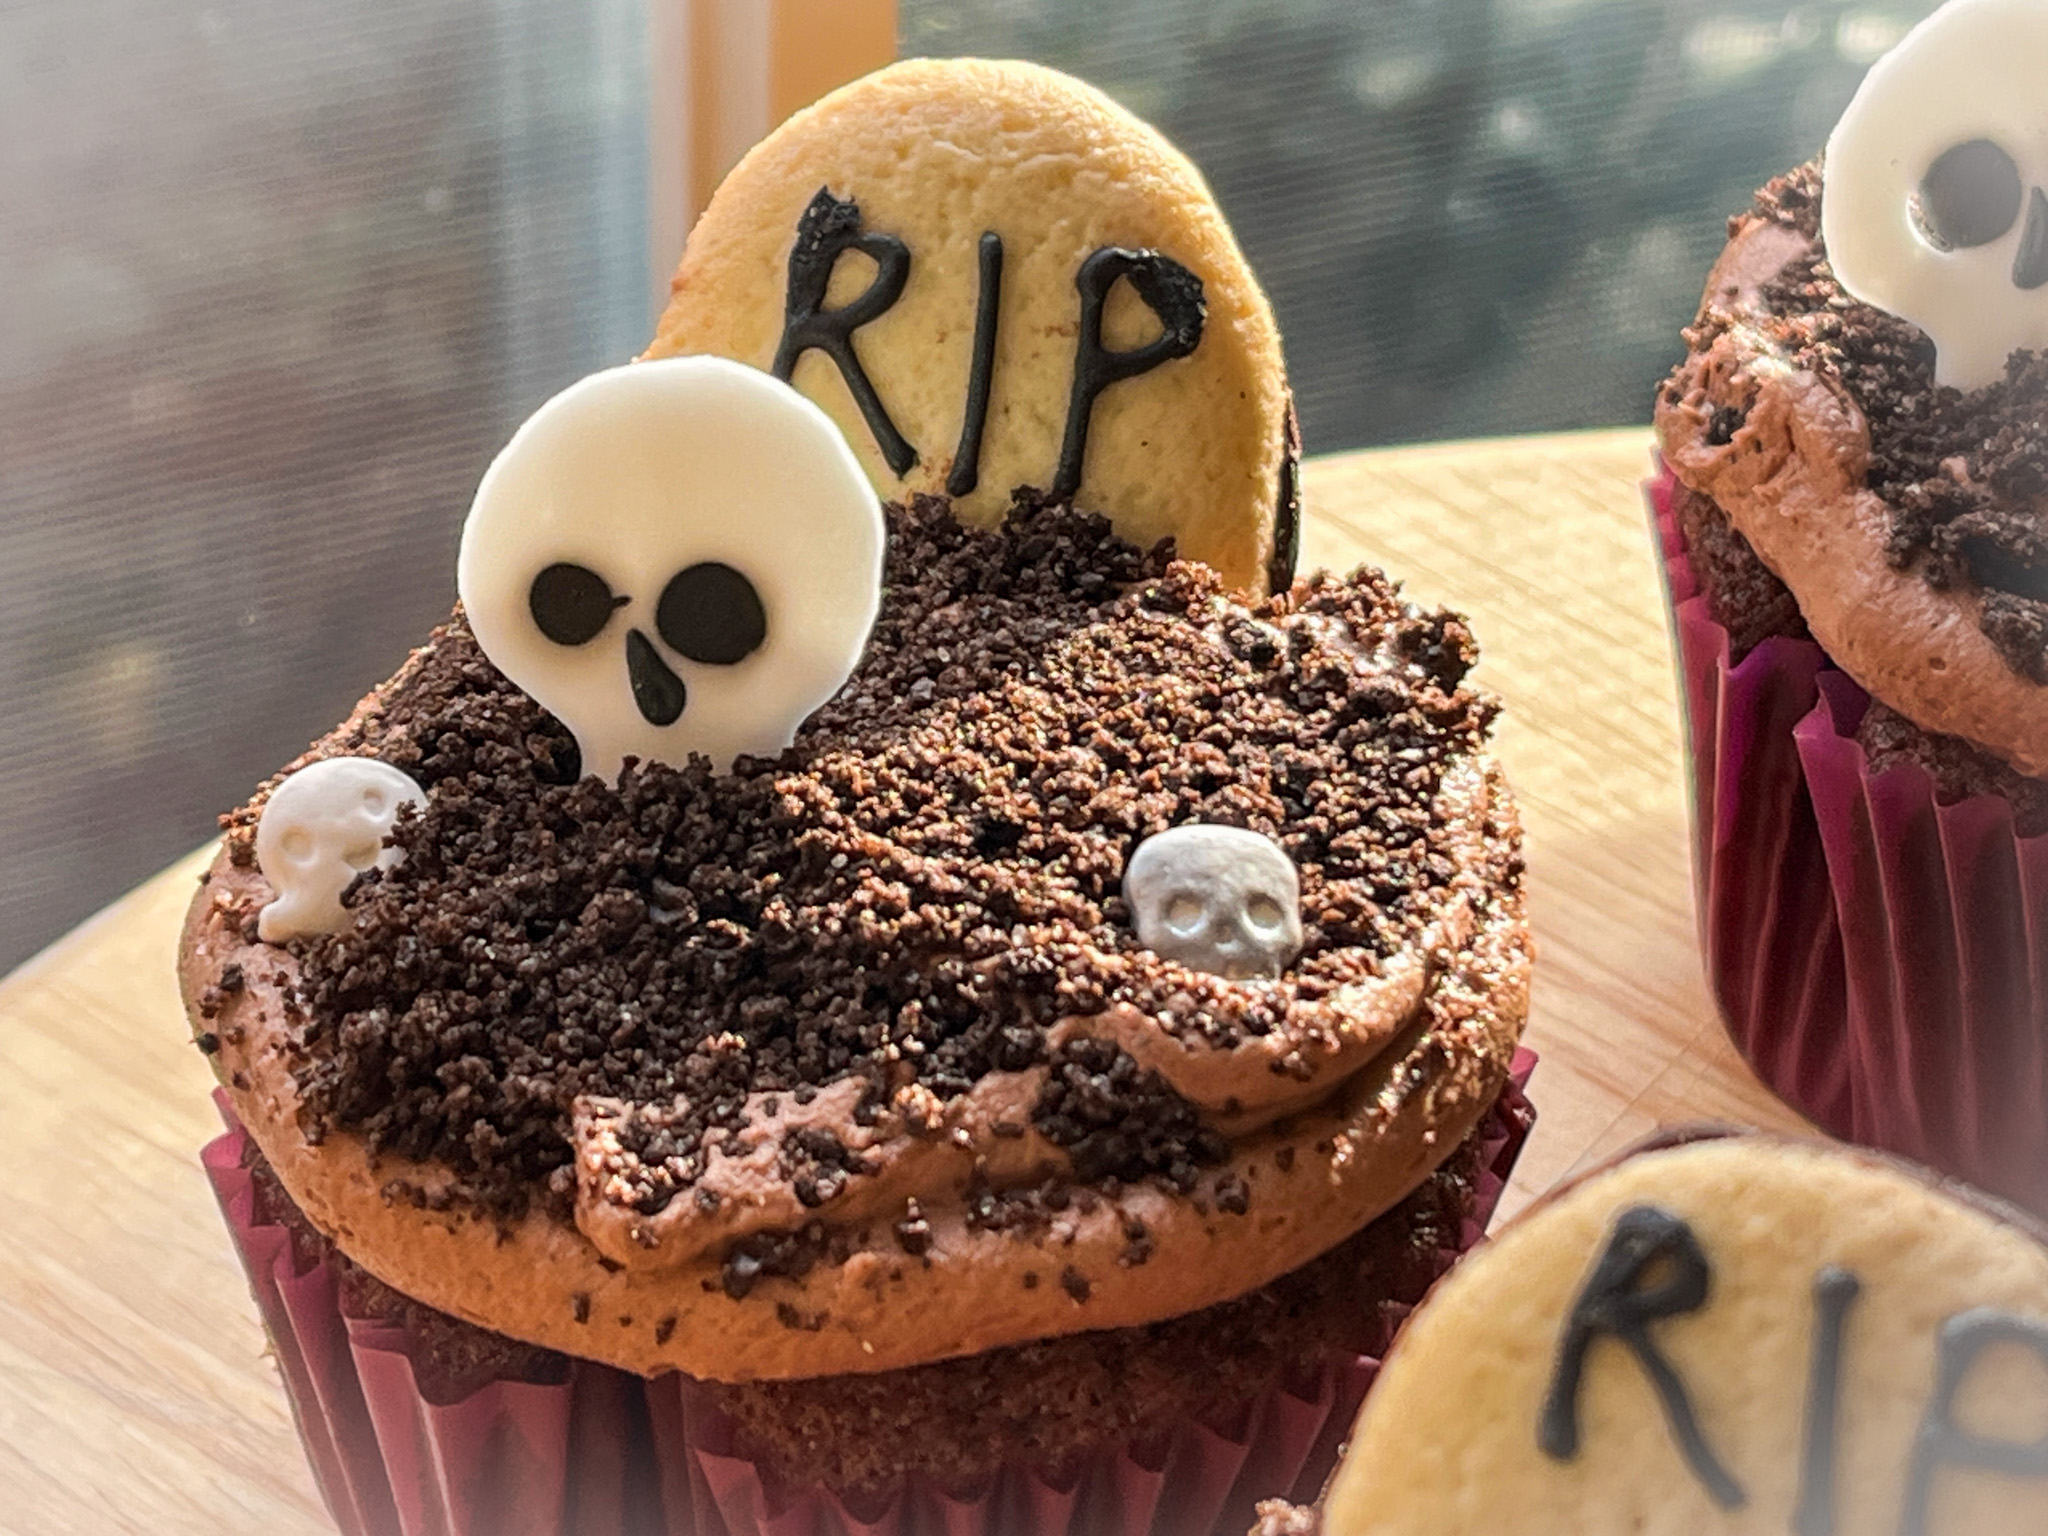
Sometimes I see something that grabs my heart really hard… Check out this recent post by Karen, and you will understand I simply had to take matters into my own baking hands…. I opted for cupcakes, so I share with you today the recipes for cake and frosting. The use of Milano cookies for the tombstone is just brilliant!

CHOCOLATE GRAVEYARD CUPCAKES
(from The Bewitching Kitchen, inspired by Karen’s Kitchen Stories)
for the cupcakes (makes 10):
100g all-purpose flour
20g cocoa powder
140g granulated sugar
40g butter, softened
1/8 tsp salt
1 large egg
120mL milk, full-fat
1 + 1/2 tsp baking powder
Heat oven to 350F and line a tray with cupcake liners.
Mix the milk with egg in a small bowl, whisk, reserve.
Put the flour, cocoa powder, butter, sugar and salt in the bowl of a standing mixer fitted with the paddle attachment. Mix until the butter forms a sand consistency. Pour half the milk mixture into the bowl and mix on low-speed for a minute. Increase the speed to medium-high for a couple of minutes. Add the remaining milk mixture, and mix on low-speed until fully incorporated.
Increase the speed for a few seconds, then add the batter to the lined cupcakes. Bake for about 15 minutes, until a toothpick comes clean when inserted in the center.
Cool the cupcakes completely before frosting.
CHOCOLATE BUTTERCREAM FROSTING
1/2 cup (113g) unsalted butter, softened to room temperature
210g confectioners’ sugar
20g Dutch-process cocoa powder
1 Tablespoon heavy cream
pinch of salt
With a handheld or stand mixer fitted with a paddle attachment, beat the butter on medium speed until creamy, about 2 minutes. Add confectioners’ sugar, cocoa powder, heavy cream and salt. Beat on low speed for 30 seconds, then increase to high speed and beat for a full minute Add 1/4 cup more confectioners’ sugar or cocoa powder if frosting is too thin or adjust with heavy cream if too stiff.
For decoration:
Milano cookies
Piping consistency black Royal icing
crushed Oreo cookies for “dirt”
Frost the cupcakes using a piping bag fitted with a round tip. Immediately cover the surface with Oreo cookie crumbs. Insert a Milano cookie with the RIP message written on it. Add any decorations you desire.
ENJOY!
to print the recipe, click here
Comments: Totally smitten by these little cupcakes! Big thank you for Karen, a very cute concept made very easy with the Milano cookies. Of course, you can always bake some sugar cookies and do the whole thing from scratch, but why not make life a little easier without compromising flavor? Milano cookies are delicious!
ONE YEAR AGO: Muertos Rancheros
TWO YEARS AGO: Scary Skull Bakes
THREE YEARS AGO: Spicy Citrus Peanut Salad
FOUR YEARS AGO: Shrimp Stir-Fry, Kung Pao-Inspired
FIVE YEARS AGO: Cauliflower Steaks with Olive and Caper Salsa
SIX YEARS AGO: Twice-Cooked Eggplant
SEVEN YEARS AGO: Turkey Burger, Japanese-Style
EIGHT YEARS AGO: Pumpkin Macarons
NINE YEARS AGO: Slow-Cooked Whole Chicken
TEN YEARS AGO: Chocolate Zucchini Cake with Chocolate Frosting
ELEVEN YEARS AGO: Pecan-Crusted Chicken with Honey-Mustard Dressing
TWELVE YEARS AGO: Bewitching Kitchen on Fire!
THIRTEEN YEARS AGO: Cashew Chicken Lettuce Wraps
FOURTEEN YEARS AGO: Chiarello’s Chicken Cacciatore
FIFTEEN YEARS AGO: Donna Hay’s Thai-Inspired Dinner
SIXTEEN YEARS AGO: Panettone
And three small changes in my overall sourdough approach… I will save those for the comments, check it out in case you are interested. But first things first, the method to make a scary good sourdough bread in the comfort of your kitchen…

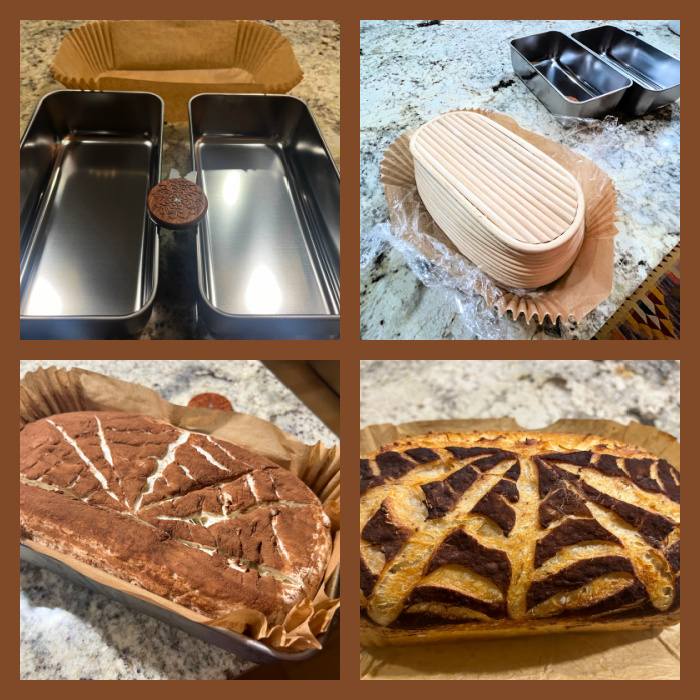
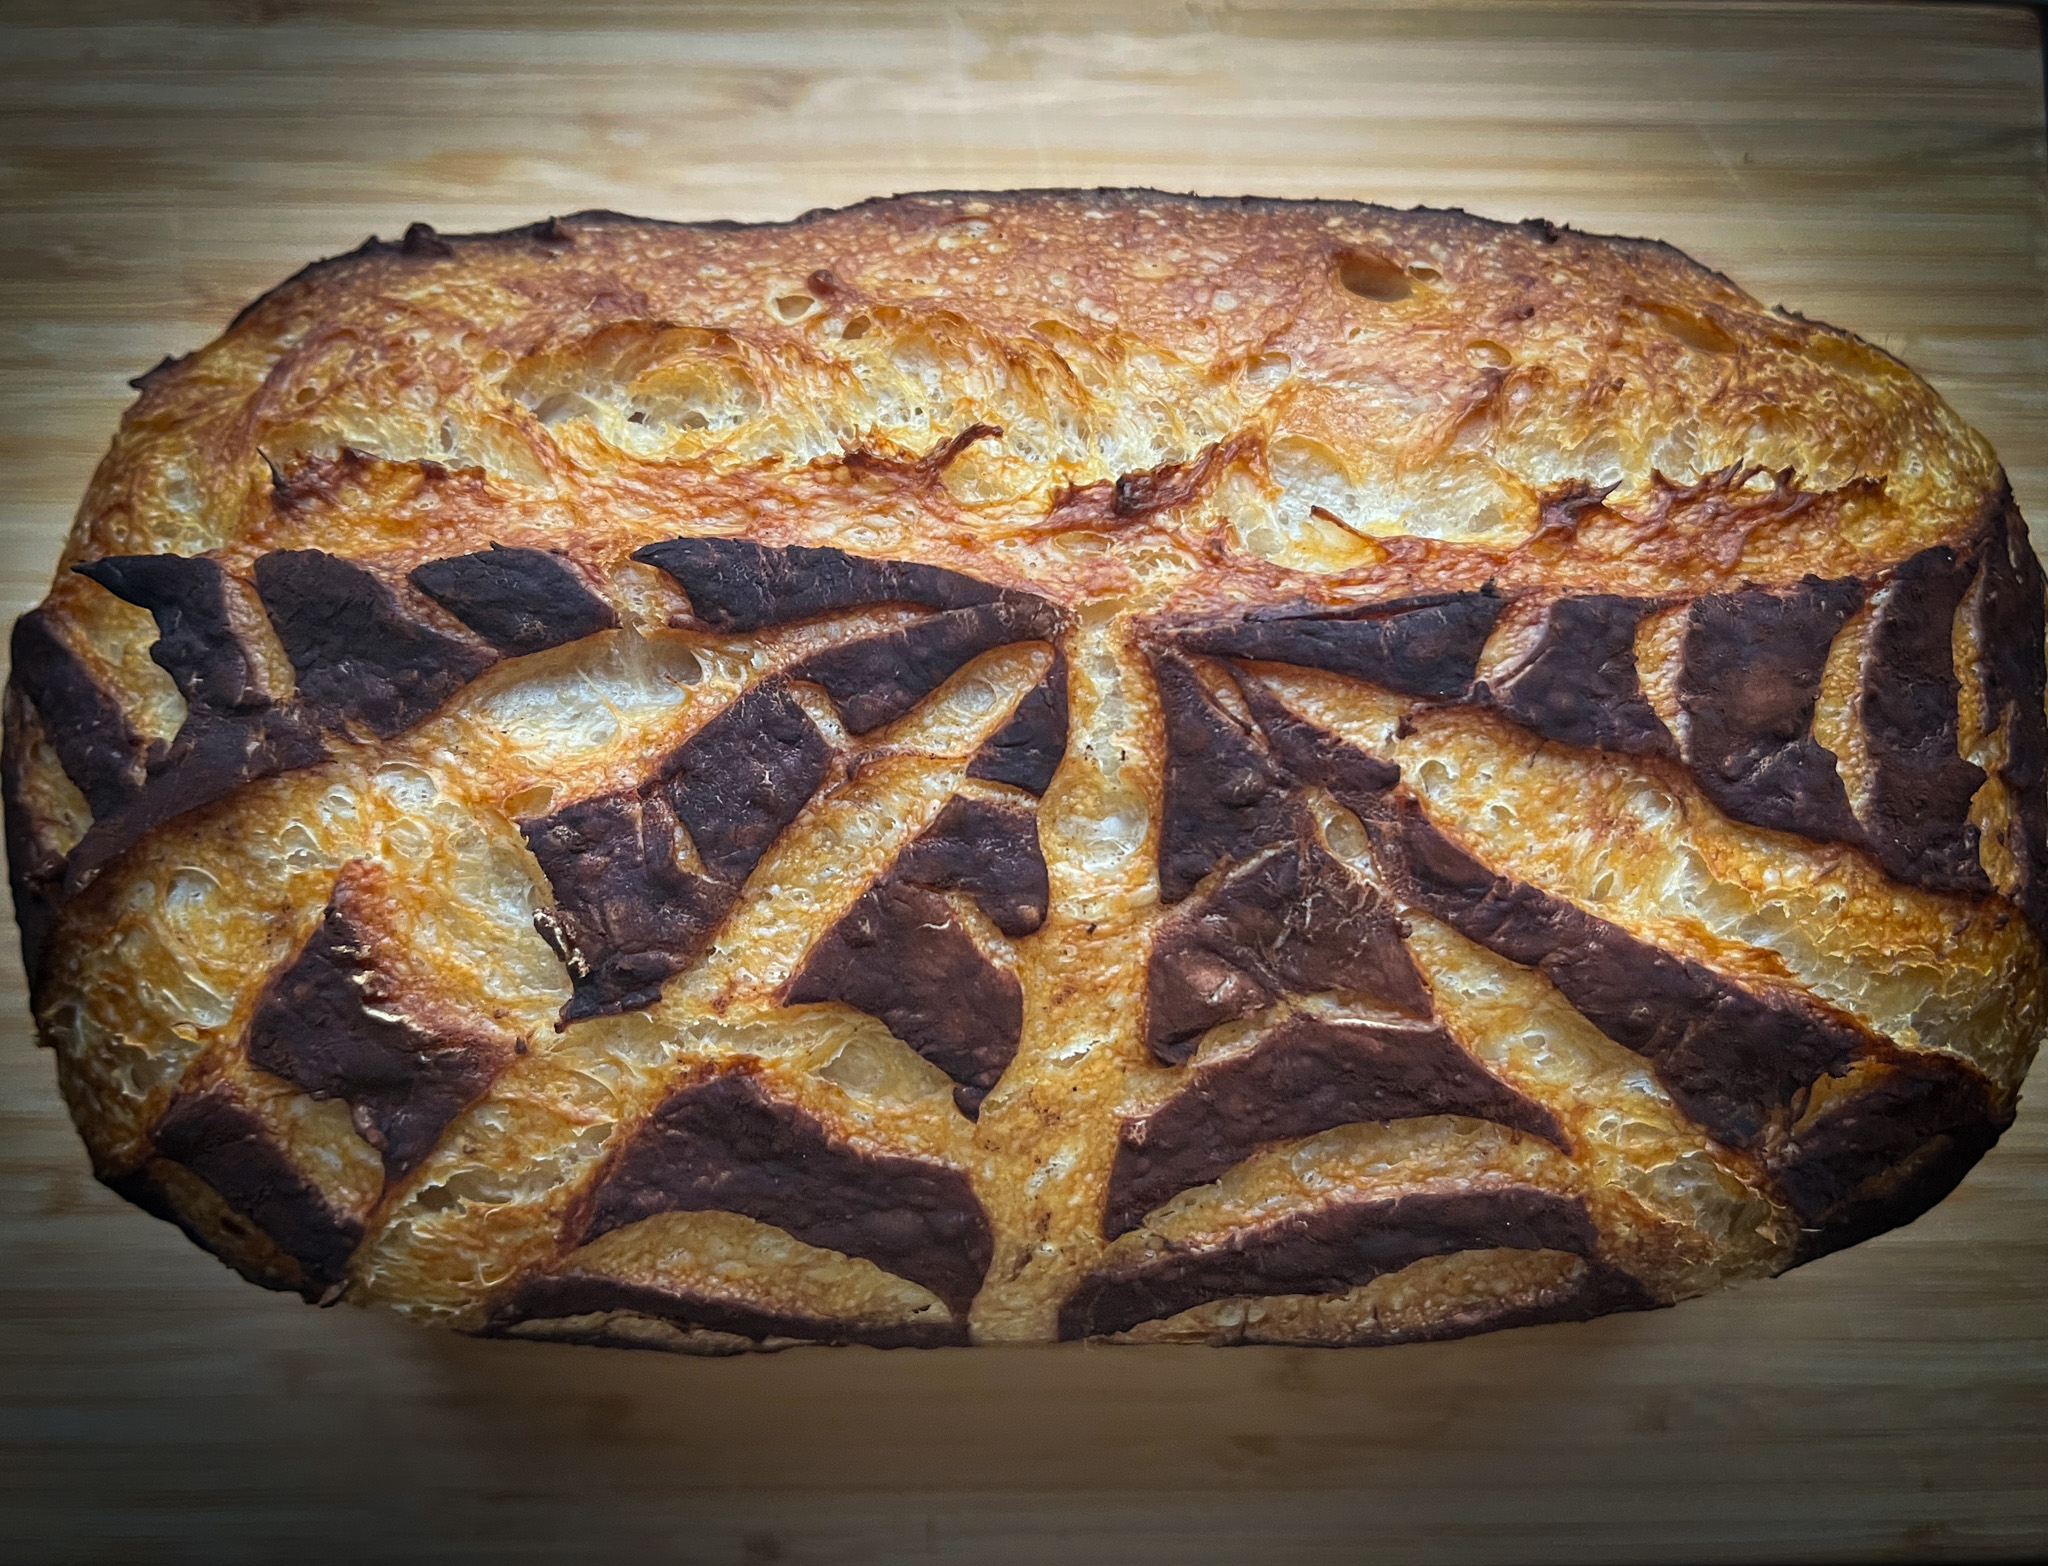
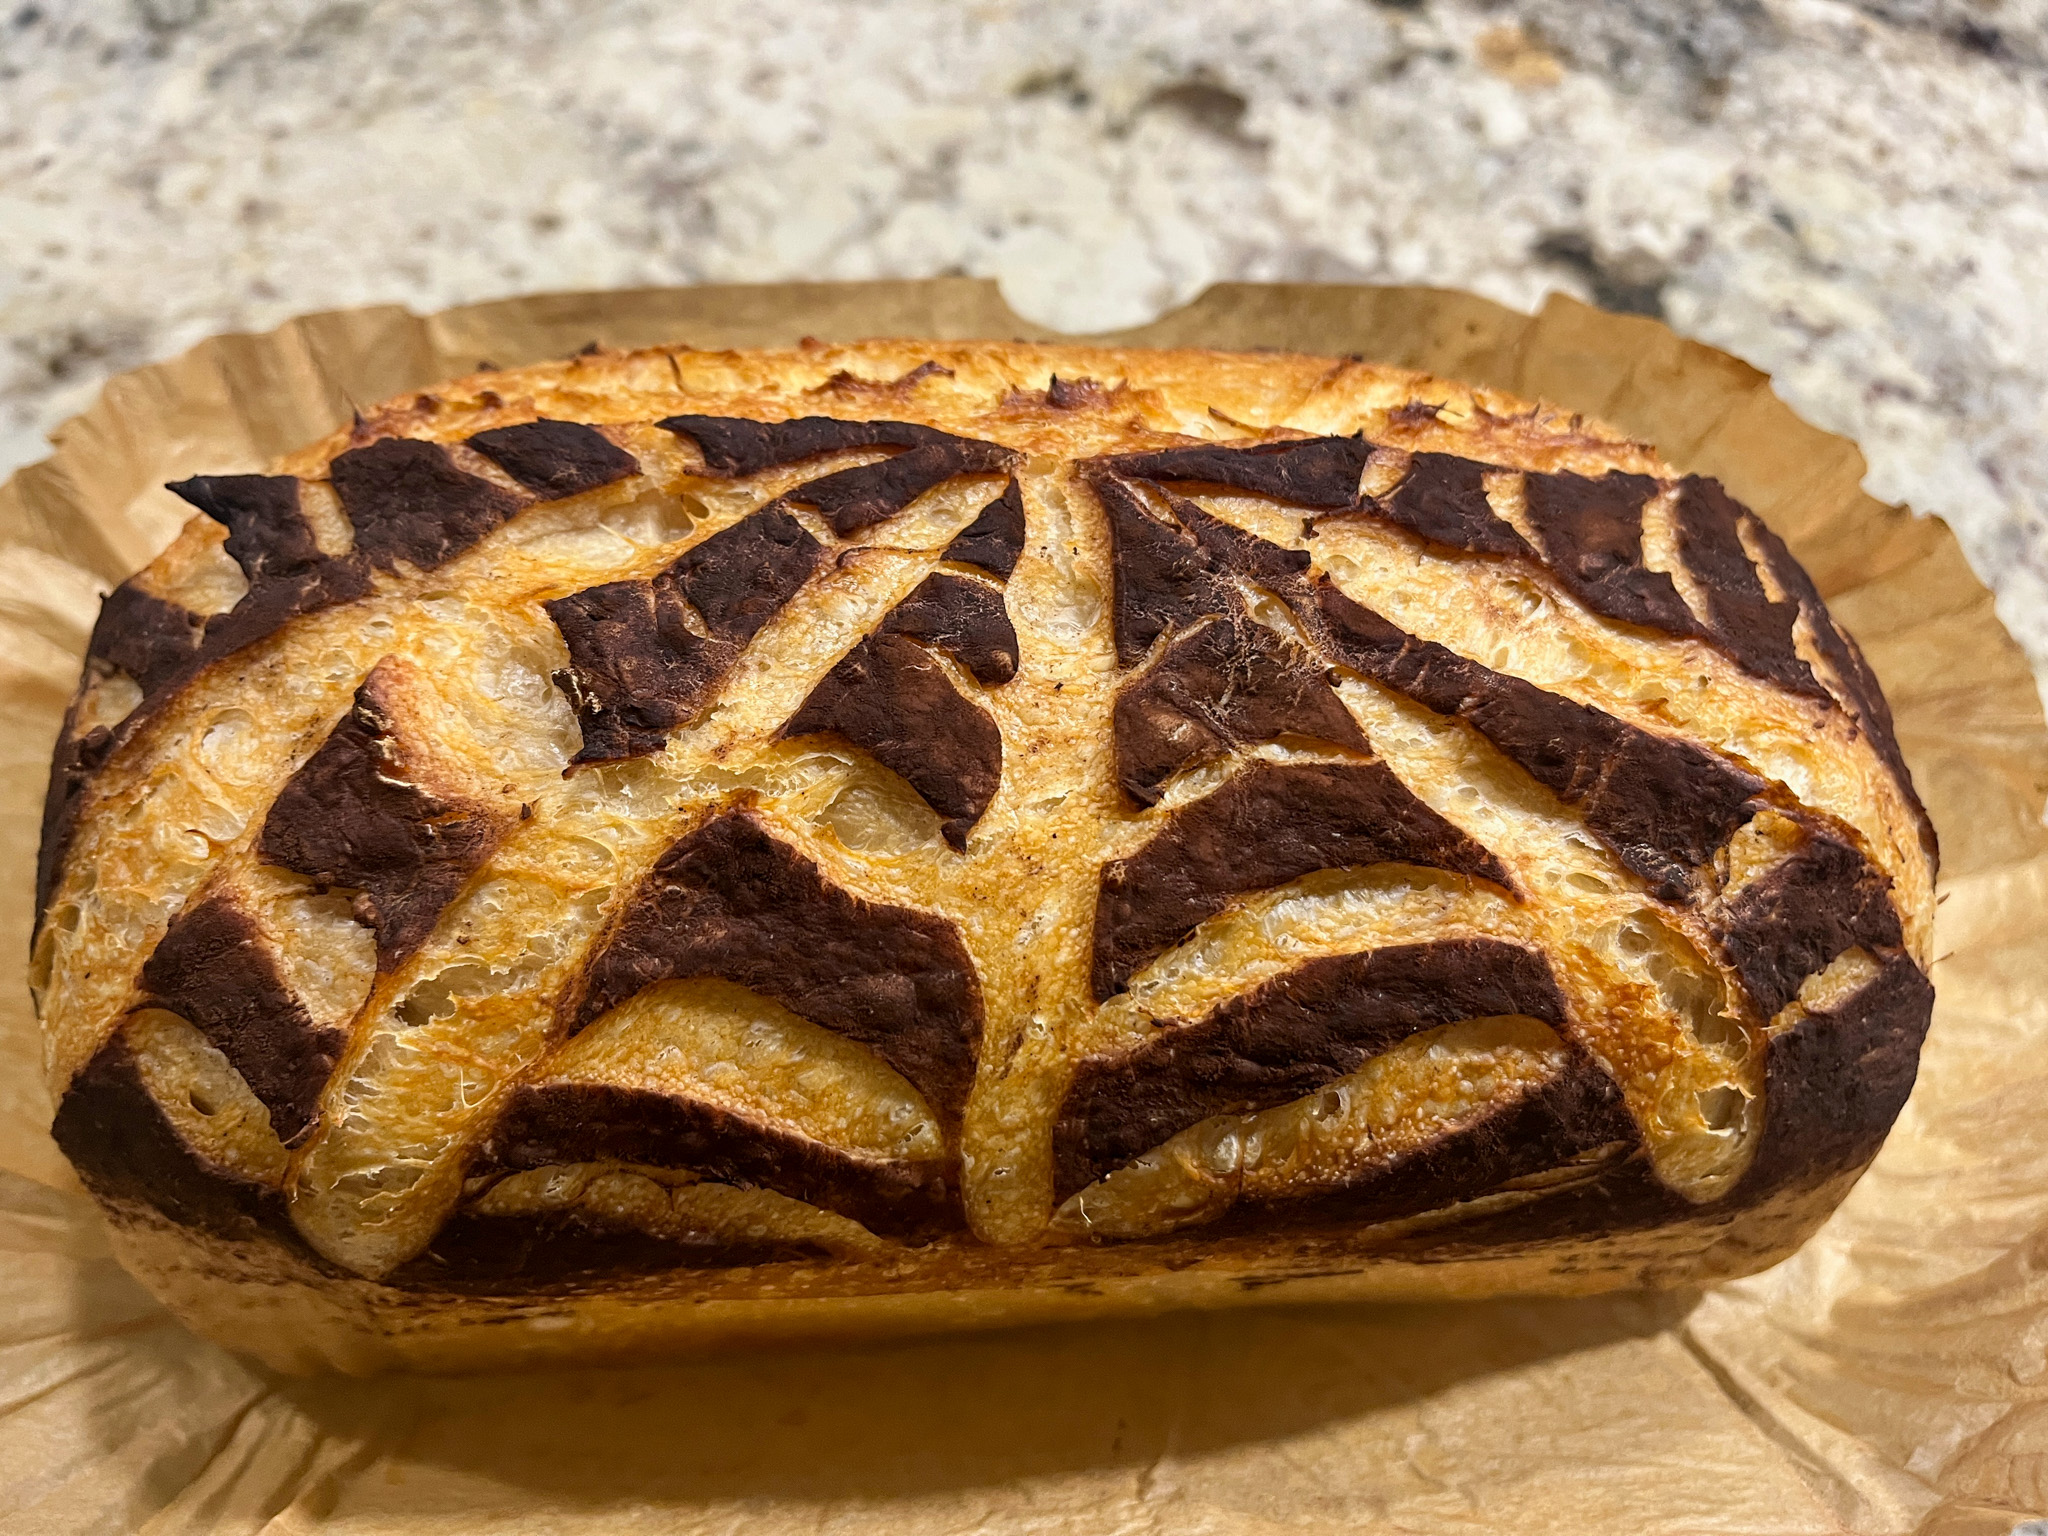
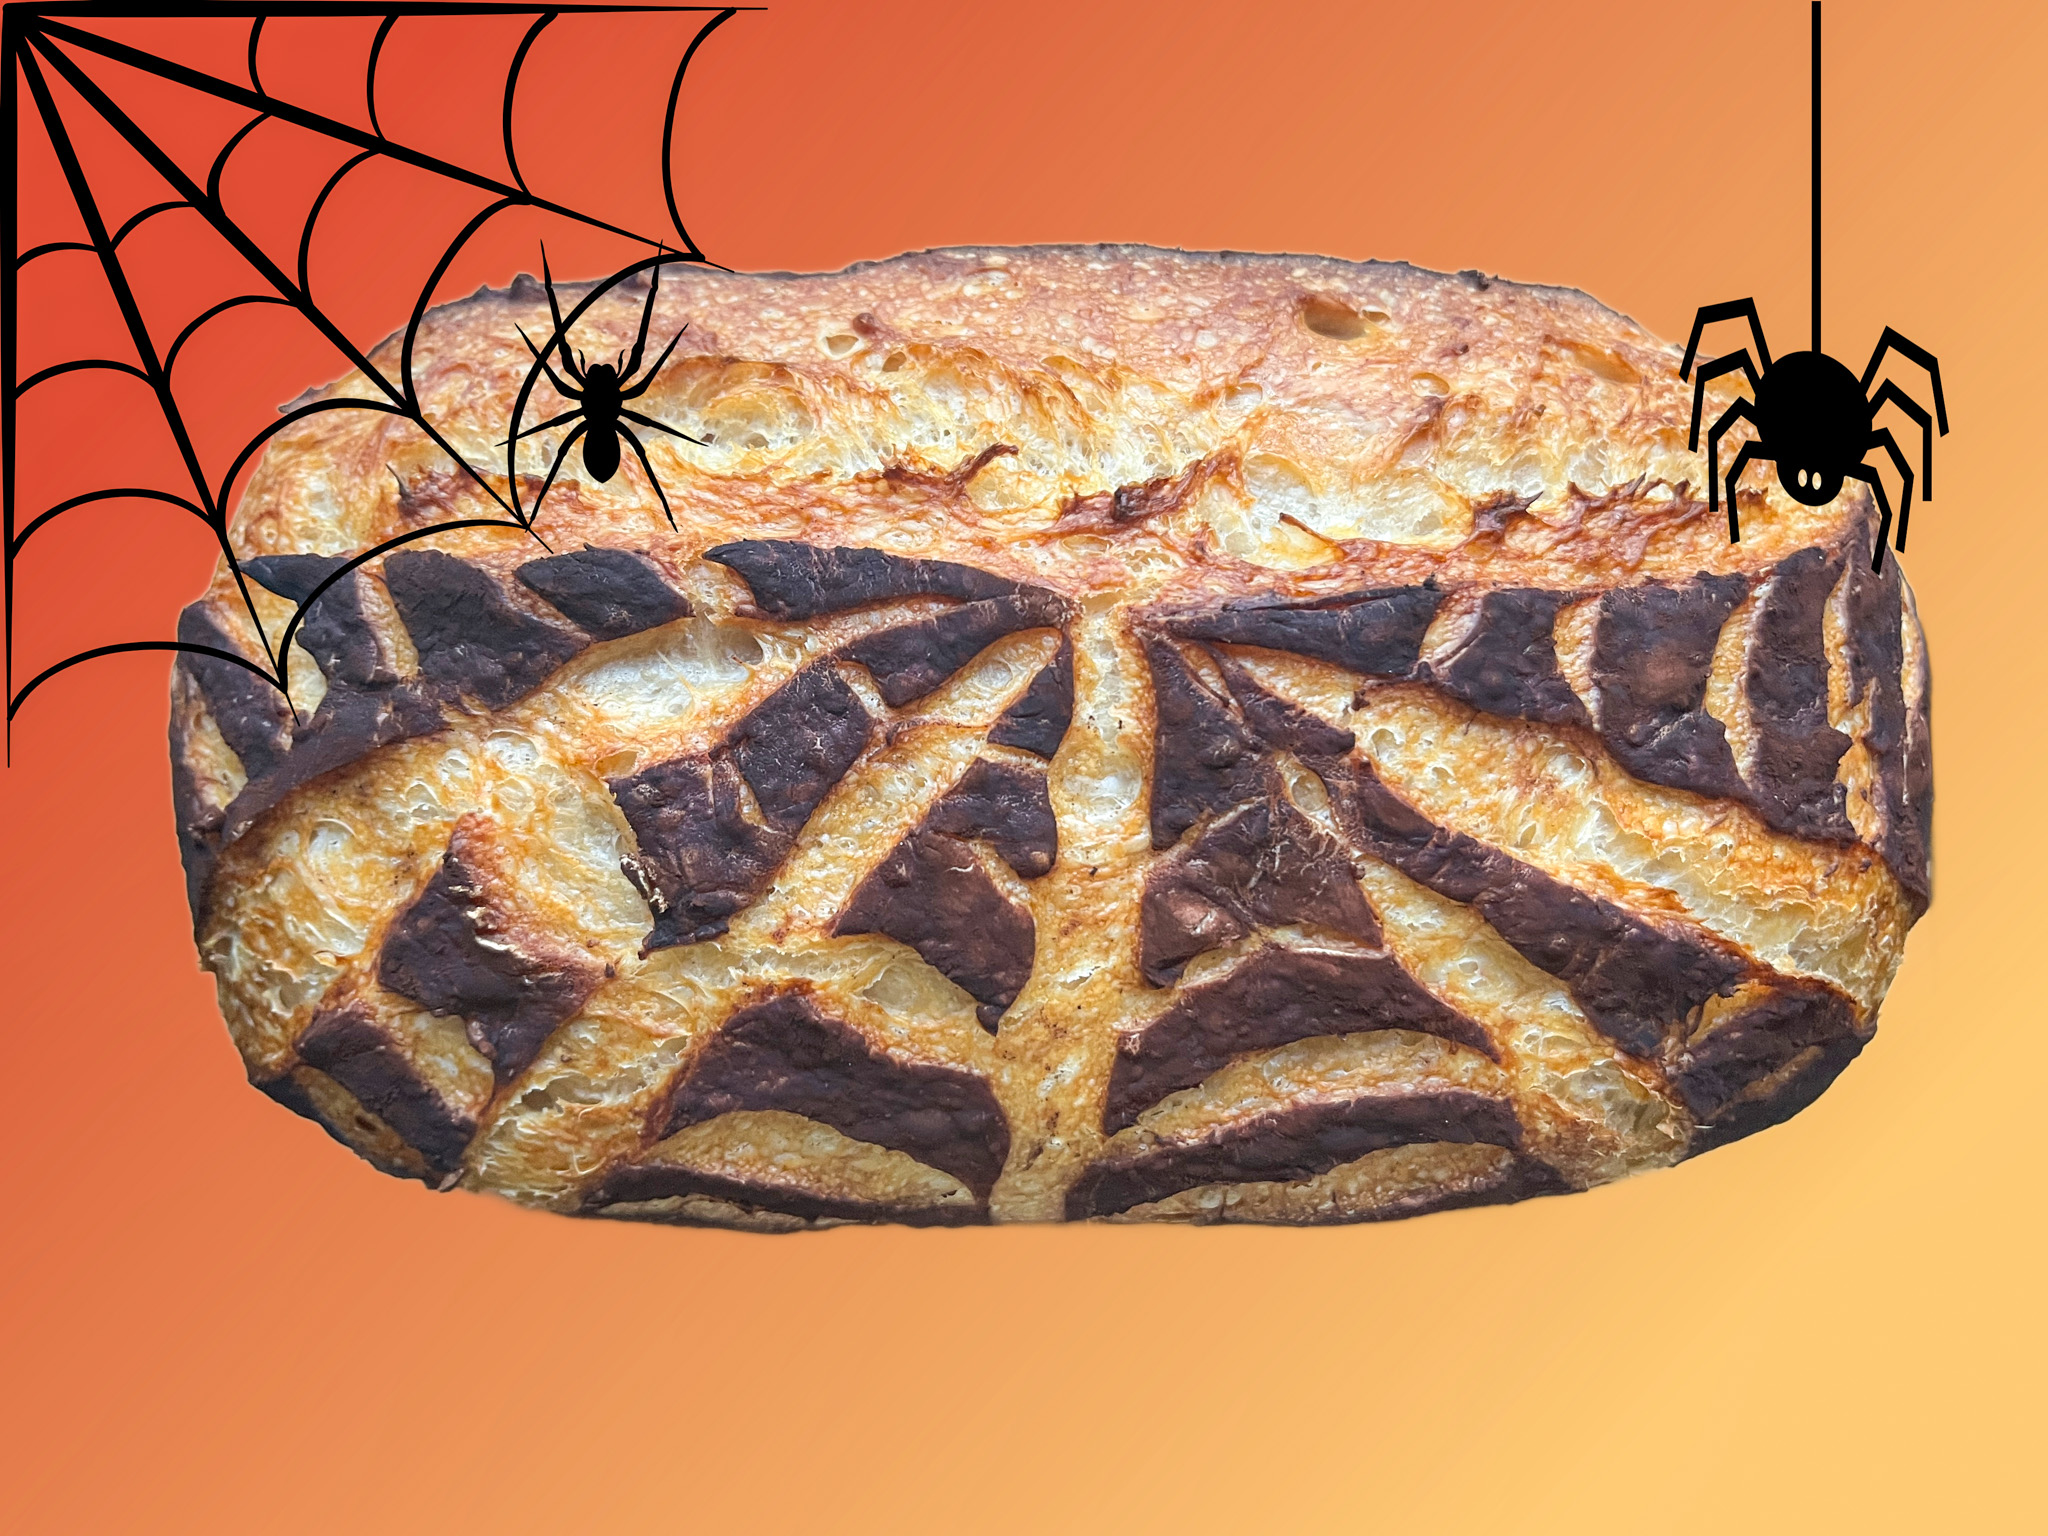
SPIDER WEB SOURDOUGH LOAF
(from The Bewitching Kitchen)
410g bread flour
275g water
8g salt
75g starter (I used stiff, at about 75% hydration)
Mix all ingredients in the bowl of a KitchenAid type mixer fitted with the dough hook. Knead gently for about 4 minutes (first or second speed maximum).
Transfer dough to a lightly oil bowl and do a bulk fermentation with 4 folds made 45 minutes apart. Before you start the fermentation , remove a very small amount of dough to a small glass container (like those that hold spices), and mark where the level of the dough is with a permanent marker. Keep that at room temperature to monitor fermentation.
After the last folding cycle, keep an eye on the fermentation using the small vial. Ideally you want to let the dough ferment until it is double in size. Depending on the day, temperature of your kitchen, it might take 8 hours or more. Be patient, it will pay off.
Once bulk fermentation is over, shape the dough and place in a floured banetton. Place in the fridge overnight.
Next day, freeze the dough for 30 minutes in the banetton, to make it easier to score later. Invert the dough on the paper liner, place in the loaf pan. Add cocoa powder on the surface and score the pattern of a spider web.
Place small cubes of ice on the four corners of the pan, sliding the ice cubes between the metal pan and the paper liner. Place an inverted pan on top to act as a lid, and bake at 450F for 30 minutes. Remove the top pan, and allow the bread to bake further for another 15 minutes or so.
If when you remove the bread from the pan the bottom seems a little soggy, place it back in the oven over a rack and bake for 5 minutes outside of the pan.
Let it cool completely before slicing.
ENJOY!
to print the recipe, click here
.
Pan liners available here
Loaf pans similar to these ones. I have a set of four, could not find the exact match. But they are 9 x 5 (inches).
.
Comments: I’ve been playing quite a bit with my default recipe for sourdough and the main change is that I now prefer to use a stiff sourdough starter to make my dough (sourdough starter from my fridge + 80g flour + 60g water, for a 75% hydration level). I like the way it handles, I like that it stays at maximal height for longer time than the 100% hydration version. In some bakes I have reduced the hydration to 60% – in this case the starter almost behaves like a dough that you can knead to mix – but after talking with my friend Philip, who recently also got into stiff starters, I settled for 75%. The good news is that I don’t need to adjust anything in the recipe, I can use my formula with the exact same amount of stiff versus loose starter. The difference in the amount of total flour is negligible and does not affect the outcome.
My second change is following the fermentation
with a small amount of dough removed once I mix it.
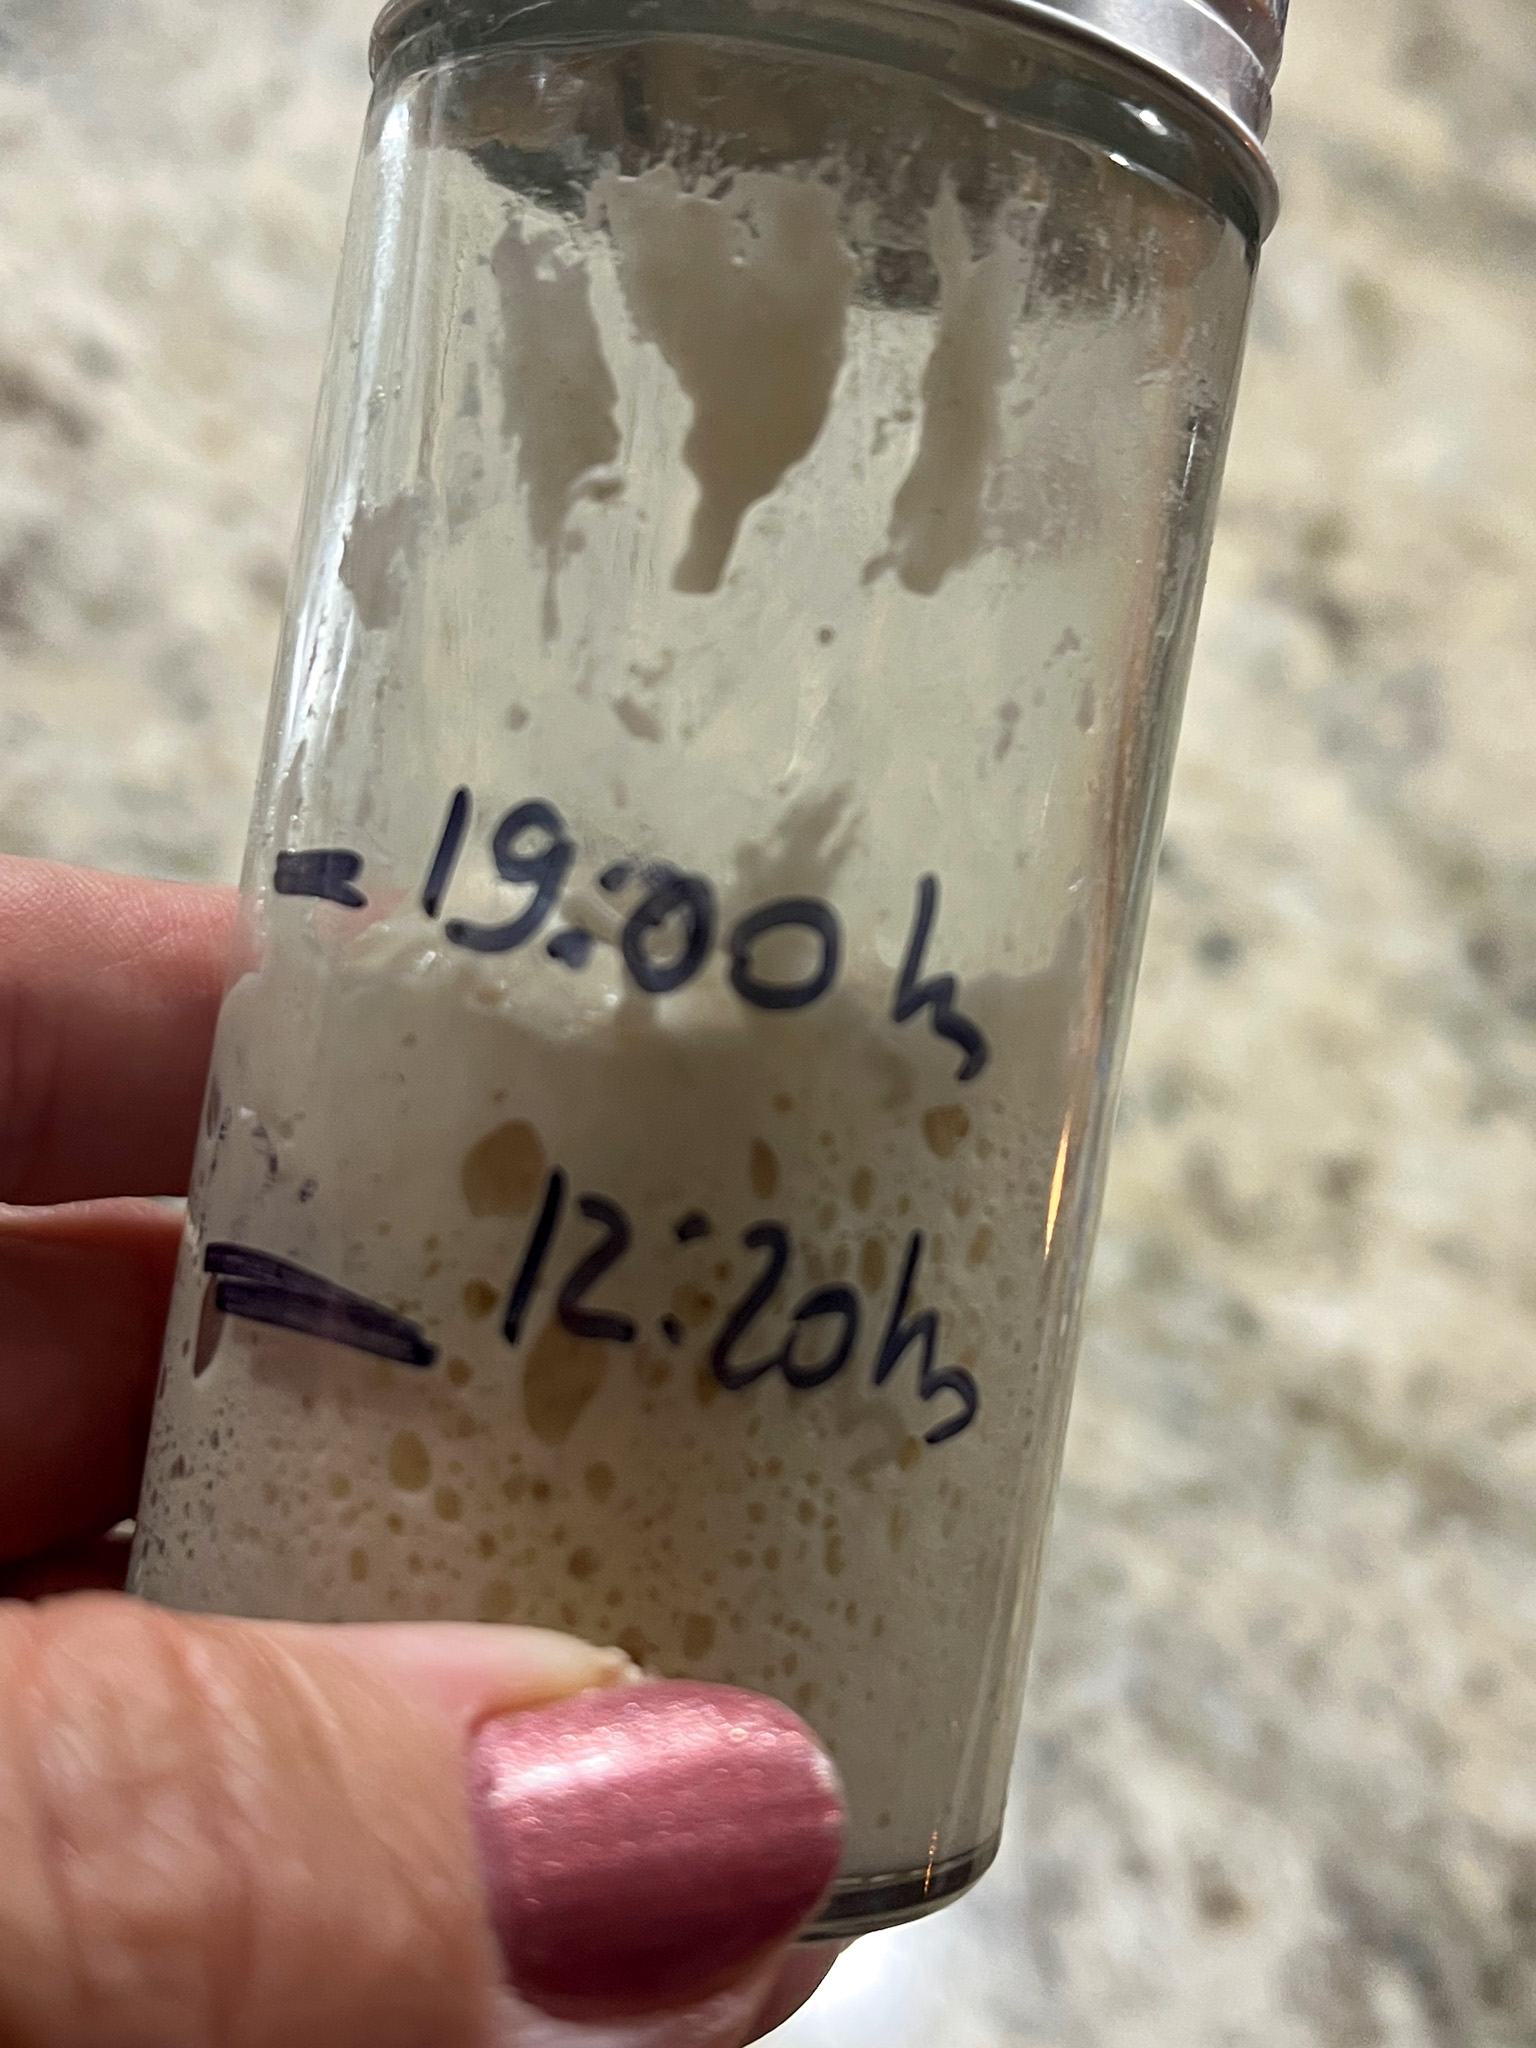
It turns out that I never bothered doing that, and yes, my bread was usually pretty good, no problems, but I had some inconsistencies from loaf to loaf that were hard to explain. It turns out that I always left the dough for 5.5 hours in bulk fermentation and after monitoring my dough with this method, I realize that in most cases I was cutting it a bit short. What I love about this simple detail is that I now wait until it doubles or almost doubles, shape the dough and retard in the fridge. It is really fun to see how it is quite sluggish in the first few hours and then in the last 90 minutes or so it gets going at a faster pace. No need to buy special gadgets that monitor the fermentation under controlled temperature. A simple little glass vial is all you need…
And finally, the third change is that I now freeze the dough for 30 minutes before inverting it out of the banetton and doing the scoring. Especially when doing more intricate designs, freezing the surface helps a lot. If you are just slashing the dough with two crossed lines, no need to freeze, but anything that requires a bit of more time you will notice a huge improvement.
And let the countdown to Halloween begin!
ONE YEAR AGO: Halloween Almond Cookies
TWO YEARS AGO: Miso-Honey Chicken Thighs
THREE YEARS AGO: Raw Zucchini and Chickpea Salad with Tahini Yogurt
FOUR YEARS AGO: Black Tahini Shortbread Cookies
FIVE YEARS AGO: A Fruitful Trio (of Macarons)
SIX YEARS AGO: Halloween Entremet Cake
SEVEN YEARS AGO: Pork with Prunes, Olives and Capers
EIGHT YEARS AGO: Kansas Corn Chowder
NINE YEARS AGO: Impossibly Cute Bacon and Egg Cups
TEN YEARS AGO: Pulling Under Pressure
ELEVEN YEARS AGO: Cooking Sous-vide: Two takes on Chicken Thighs
TWELVE YEARS AGO: Miso Soup: A Japanese Classic
THIRTEEN YEARS AGO: On my desk
FOURTEEN YEARS AGO: A must-make veggie puree
FIFTEEN YEARS AGO: Vegetarian Lasagna
SIXTEEN YEARS AGO: Brazilian Pão de Queijo
The idea for these cupcakes came from this recent post in a blog I love… She added the disclaimer of “NO FONDANT” in her title and I decided to do the same because the first thing that comes to mind when you see these babies is… wow, that is A LOT of fondant! No, friends. The ghost “clothing” is made of modeling chocolate! How cool is that?

The road to make these babies was full of trepidation. I opted for cupcakes after exchanges with Haniela, the Cookie Goddess who is also an amazing baker in all fronts. She had made cupcakes covered in fondant (check them out here) so my adventure was a cross between two ideas.
First things first. I made chocolate cupcakes using this adorable pan from Wilton, the same that Haniela used in her bake. The result was a complete disaster. I forgot to spray the cavities (can you believe it?) and the cakes did not release. I was left with a mess of cake crumbs. I was ready to bag the project for that day, but Hani gave me the brilliant idea of making cake pops in the pan. I gathered the crumbs, mixed with a simple American chocolate buttercream, and pressed into the cavities. Froze for 1 hour.
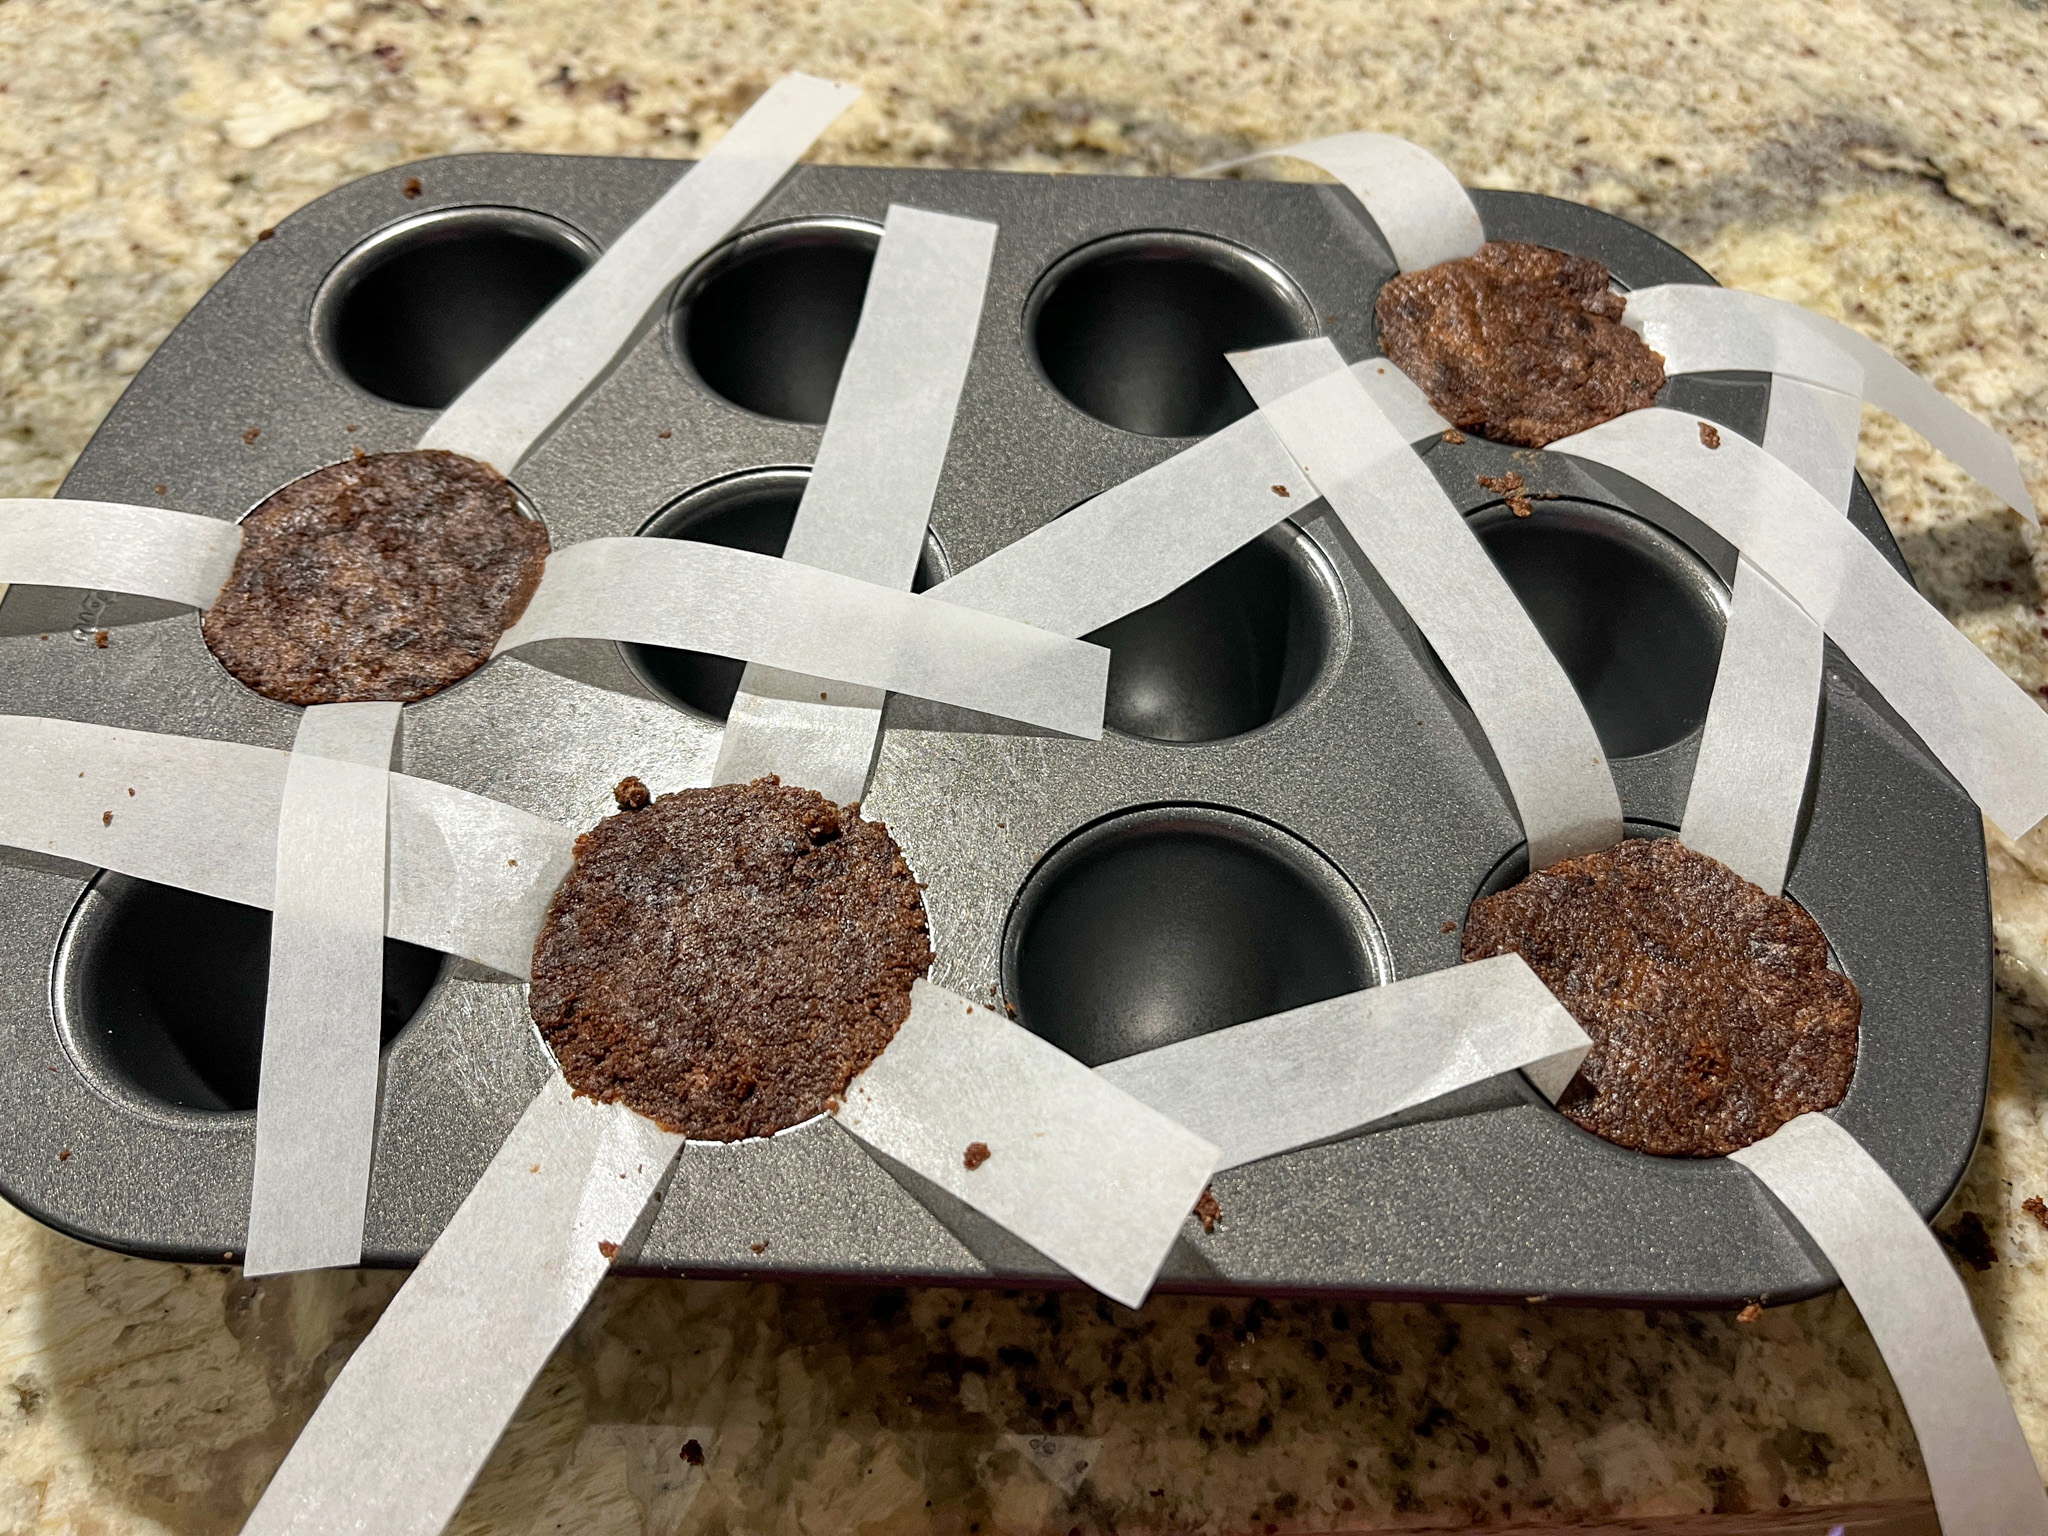
That worked like a charm. Brought the pan to room temperature, dipped the bottom in hot water for 5 minutes, and they all came out perfectly domed. After that, I gave them a light coating with chocolate buttercream and placed back in the freezer while I worked on the modeling chocolate.
.
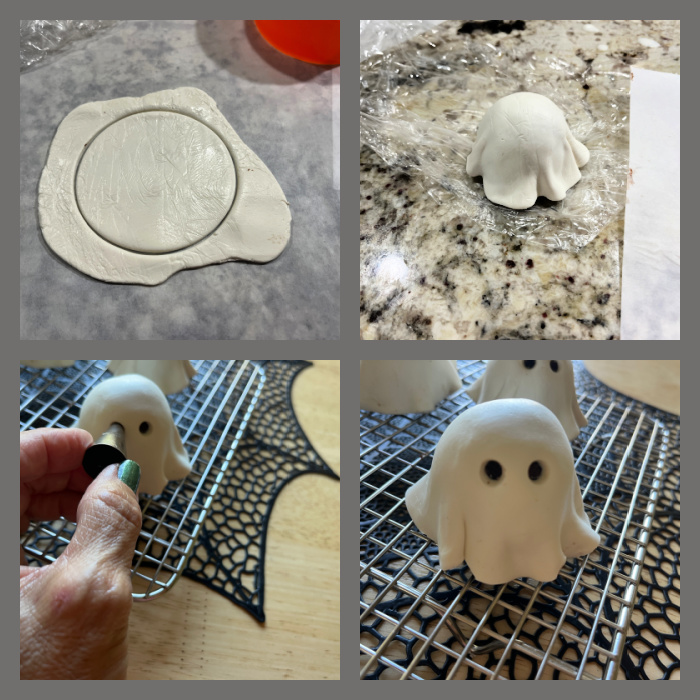
MODELING CHOCOLATE USING WILTON CANDY MELTS
Melt 15 oz WHITE WILTON candy melts gently in the microwave
Heat 1/3 cup light corn syrup in the microwave for just 10 seconds until barely warm
Mix corn syrup with melted candy, stir. When it forms a dough, stop immediately.
Allow it to sit at room temperature, covered in plastic for 2 hours or overnight.
Roll out between two sheets of parchment paper, cut circles large enough to drape over the cakes.
.
Cut circles for eyes using a small piping tip. Glue sprinkles, and if desired, spray with diamond dust or another type of glitter of your choice.
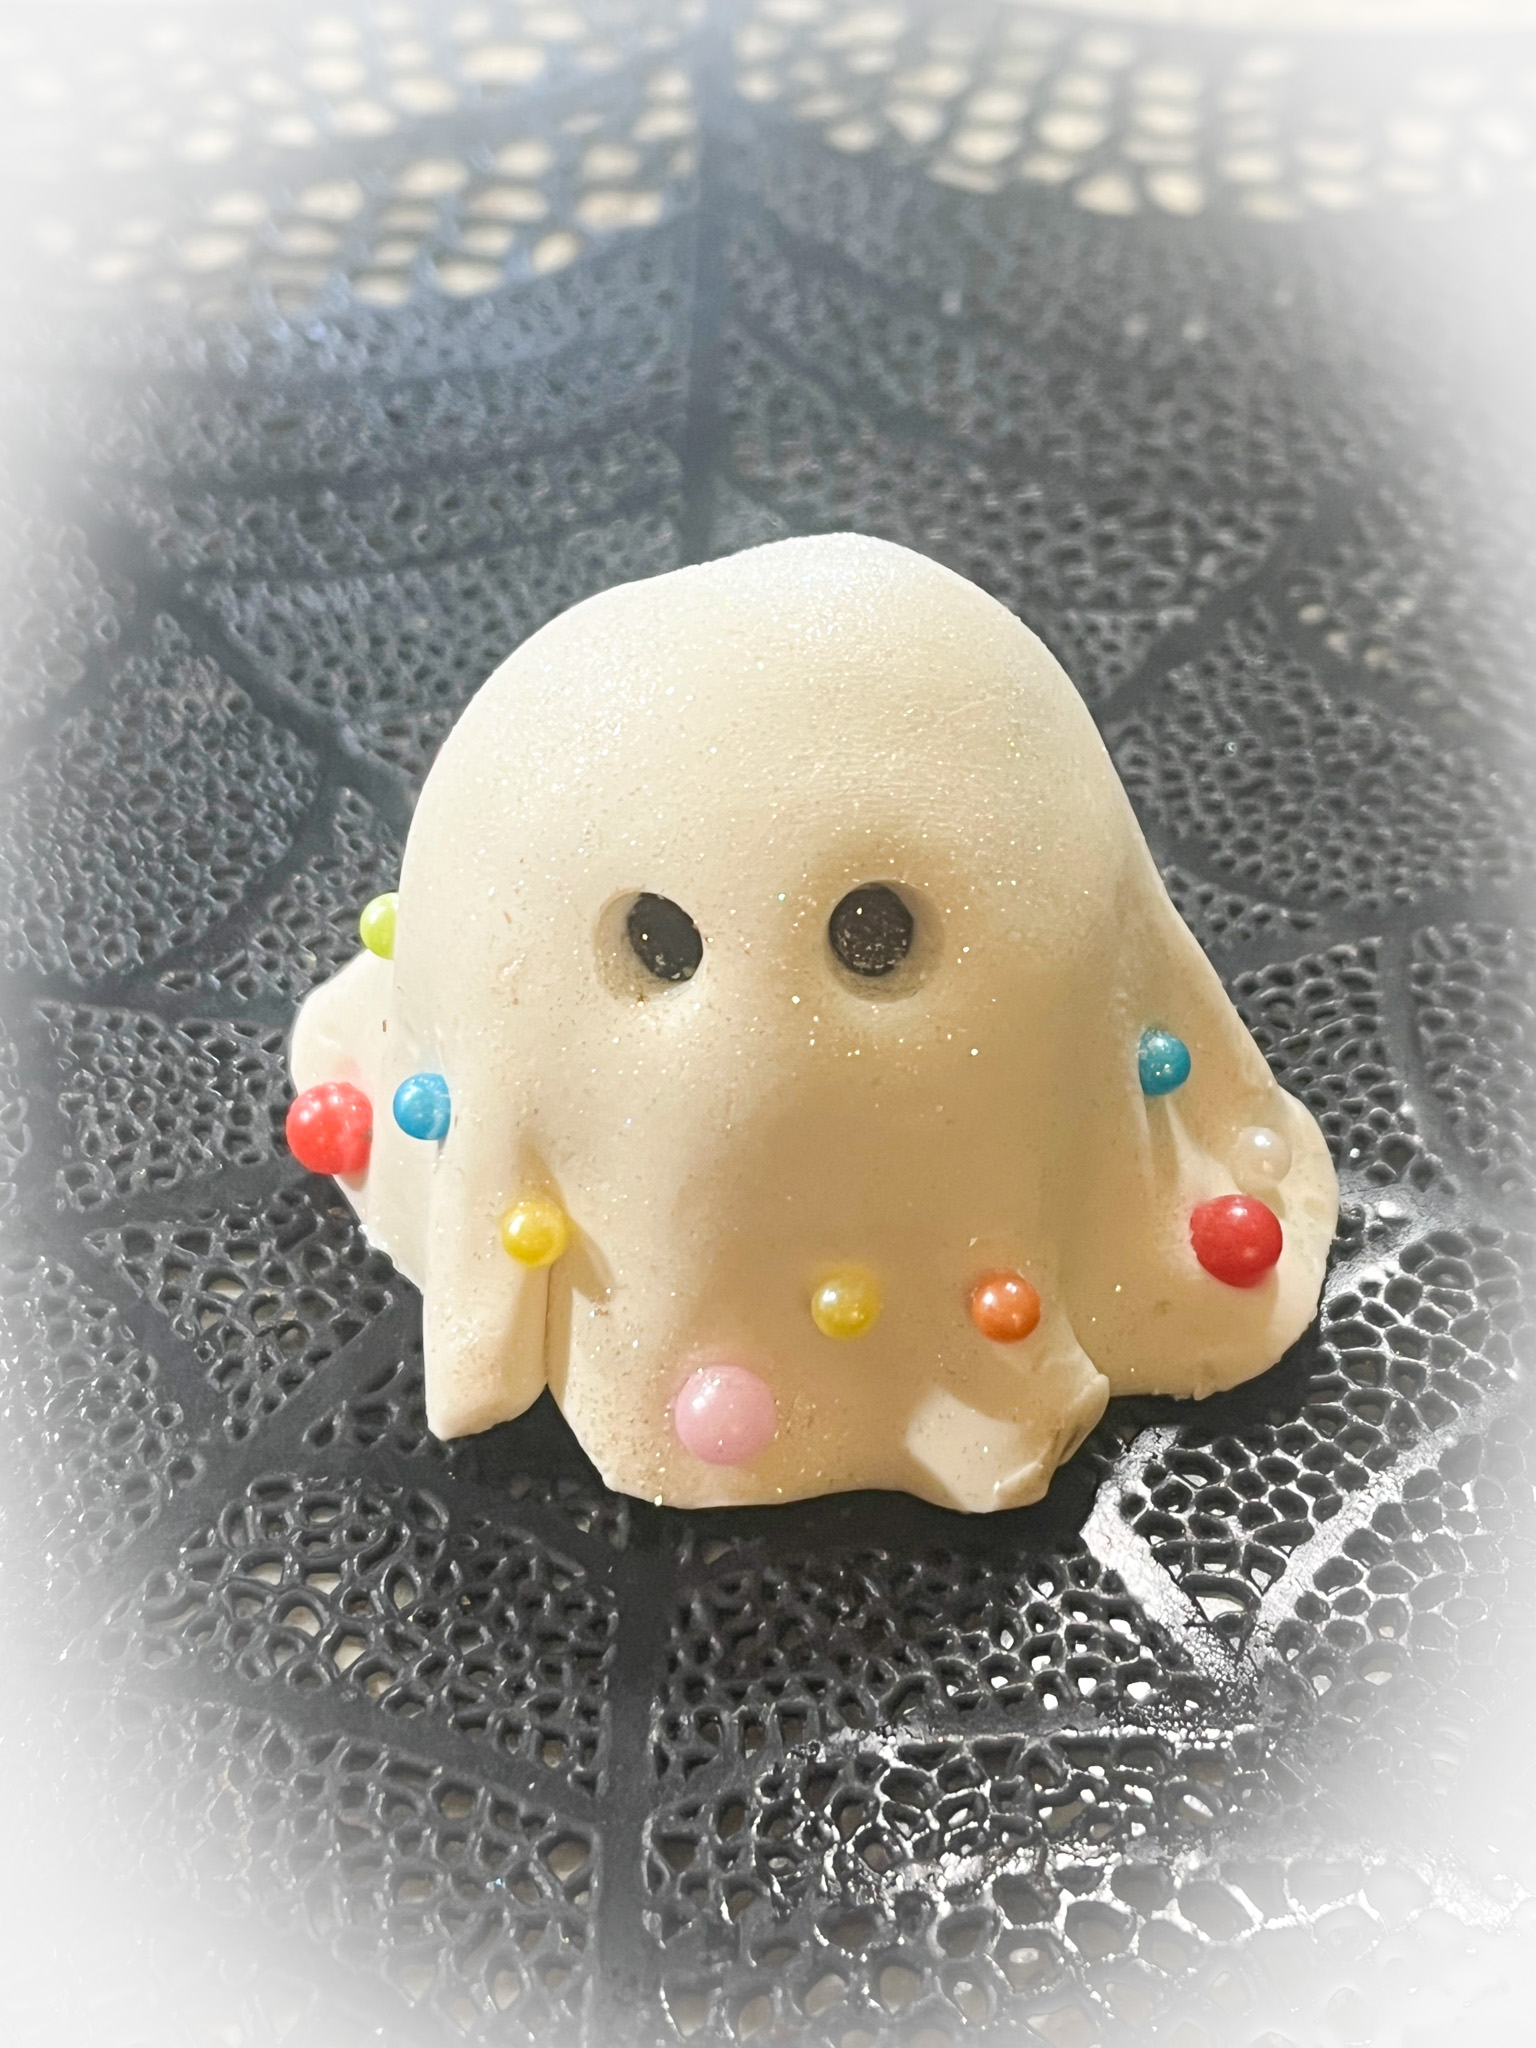
.
I am so in love with this project! Maybe one day I will be brave enough to do the large cake from Sprinklebakes blog, but for the time being I am happy with these. Huge thank you to Haniela for saving my day after the baking fiasco.

ONE YEAR AGO: Semolina Sourdough
TWO YEARS AGO: Incredibly Simple, times three
THREE YEARS AGO: Chile Rellenos
FOUR YEARS AGO: Vietnamese “Pizza”
FIVE YEARS AGO: Chocolate Bonbons with Mango-Ganache Filling
SIX YEARS AGO: Giant Cookie Meets Mousse
SEVEN YEARS AGO: The Brazilian Battenberg
EIGHT YEARS AGO: Salzburg Sourdough
NINE YEARS AGO: If I had One Hour
TEN YEARS AGO: Apple Cinnamon Oatmeal Cake
ELEVEN YEARS AGO: Sourdough Rye Bread with Flaxseeds and Oats
TWELVE YEARS AGO: Apricot-Raspberry Sorbet: A farewell to Summer
THIRTEEN YEARS AGO: Marcela’s Salpicon
FOURTEEN YEARS AGO: Pork Kebabs
FIFTEEN YEARS AGO: Fondant au Chocolat
SIXTEEN YEARS AGO: Got Spinach? Have a salad!
