OREO BALLS, FUN AND EASY

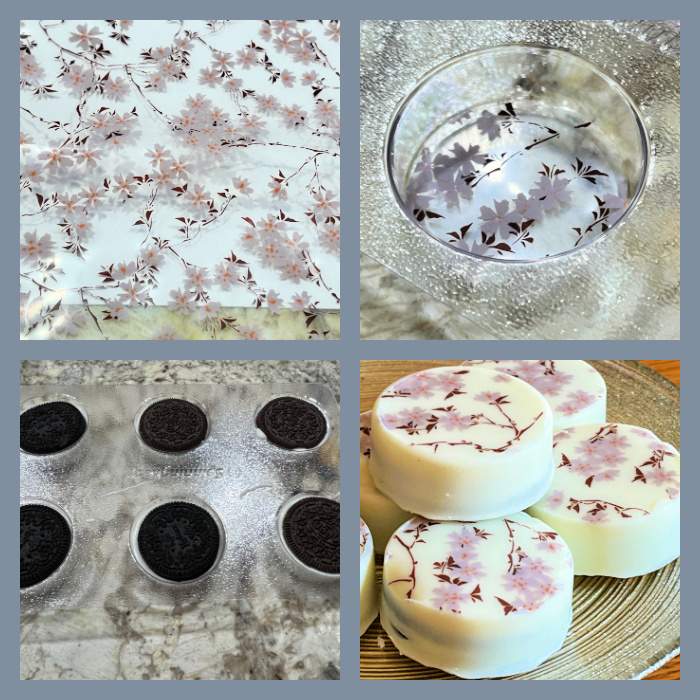
For those who are not into complicated baking recipes but want to impress friends, here is a great idea: Oreo balls. All you need is a food processor, Oreo cookies and cream cheese. The real step that takes them to a higher level is covering them with chocolate, and yes you can use compound chocolate without feeling guilty and inadequate. Nothing wrong with making life a little easier. Decorating them with a fondant bit is optional, you can add sprinkles, or paint with a brush of gold luster mixed with vodka. Or leave them plain. Keep them in the fridge and enjoy them either still pretty cold or after allowing to sit at room temperature for 10 minutes or so.

OREO BALLS
(from The Bewitching Kitchen)

24 Oreo cookies, any flavor
90g cream cheese, at room temperature or slightly cold
200g compound chocolate or regular chocolate with 30g vegetable oil
fondant to decorate (optional)

Coarsely chop the Oreos and place them in a food processor. Add the cream cheese and process it all until a kind of sticky dough forms. Make little balls, each with 20g of the mixture. It they got too warm in the food processor, place in the fridge for a few minutes before forming the balls. Transfer the balls to the freezer for a full hour, that will make the coating set faster.

Melt the compound chocolate and dip each ball using a stick to help it get fully coated. Stick on a base of styrofoam until full set. Make fondant decorations if so desired, paint with gold and stick to the top once the chocolate is set. Keep in the fridge, they stay good for a week or so.

ENJOY!

to print the recipe, click here

Comments: You need some type of a stick to help coat the balls with melted chocolate and to stand them up to set. I used a little styrofoam board to keep them upright. You can of course re-use the sticks, just clean them up after removing from the little balls.

To glue the fondant I used some royal icing I had hanging around, but you can also use melted chocolate. Consider using white chocolate plain or dyed with different colors, and different kinds of Oreo cookies to make the balls. Really a super fun project that you can definitely do with kids.

ONE YEAR AGO: Pork with Prunes

TWO YEARS AGO: Honeyed-Jalapenos on Spelt Pizza

THREE YEARS AGO: Bulgur and Chickpea Salad with Pomegranate Seeds

FOUR YEARS AGO: Purple Star Macarons

FIVE YEARS AGO: Smoked Salmon, Fait Maison

SIX YEARS AGO: Kouign-Amann, Fighting Fire with Fire

SEVEN YEARS AGO: In My Kitchen, Yin and Yang

EIGHT YEARS AGO: Chocolate Toffee Banana Bread

NINE YEARS AGO: In My Kitchen, June 2014

TEN YEARS AGO:  Strawberry Frozen Yogurt

ELEVEN YEARS AGO: Baked Coconut and “The Brazilian Kitchen”

TWELVE YEARS AGO: Honey-Glazed Chicken Legs

THIRTEEN YEARS AGO: French-Style Rolls

FIESTA BAKES FOR CINCO DE MAYO

A small collection of goodies, all inspired by a Mexican fiesta… Cupcakes, Chocolate-Chipotle Cookies, Macarons (filled with Mexican chocolate ganache), and Chocolate-covered Oreos.

FIESTA CUPCAKES

Any vanilla cupcake recipe (or chocolate) will work. Refer to this post for the buttercream, which was divided in two unequal portions: a larger portion dyed pink, and a smaller portion dyed orange. Then, a petal tip like 102 was used to add the icing in layers, as shown below. Any combination of colors will work, this one seemed appropriate for the Cinco de Mayo theme.


CHOCOLATE-CHIPOTLE COOKIES

I am so smitten by these! Not at all complicated to put together, start with your favorite chocolate cookie recipe (mine is definitely this one), paint with Americolor white before baking to get the crackled effect. Then use Royal icing dyed with flesh tone or ivory to pipe a round for the face. Use any colors you want to make the wavy decorations. Once that sets, you can paint the face and hair, add the arms, and you are done. You can see the steps below.

They make for a real fun set, and will please those who prefer a modest amount of icing on their cookies.

Many colors will work, and I also made a batch with sugar cookies instead of chocolate, with a pink and orange skirt.


MEXICAN CHOCOLATE MACARONS

For these macs, I used my default French meringue method (recipe here), divided the batter into three portions, a large pink, a medium size yellow, and a smaller orange. Piped a circle of pink, went with yellow in the center, then orange to form three concentric circles. Baked the shells and decorated with Royal icing. The ganache was made with


4 oz semisweet chocolate
1/4 cup heavy cream
1/2 tsp cinnamon
a pinch of cayenne pepper


Once the ganache cooled, I whipped it with a handheld mixer for a minute or so. You cannot go too long or the whole thing will turn grainy. You just want to incorporate some air into the ganache.


FIESTA CHOCOLATE COVERED OREOS

These are so much fun to make! I used chocolate transfer sheets cut to fit the inside of the mold, as described in this post. I love this colorful pattern, that would look good also on a white chocolate background.

HAPPY CINCO DE MAYO!

ONE YEAR AGO: Thai-Meatballs Over Wilted Bok-Choy

TWO YEARS AGO: Asparagus with Gunpowder Masala

THREE YEARS AGO: The Home Bakers Collective, April Project

FOUR YEARS AGO: Asian-Style Eggplant Meatballs

FIVE YEAR AGO: Uzbek Flatbread

SIX YEARS AGO: First Monday Favorite – Black Sesame FOUR

SEVEN YEARS AGO: Chocolate Orange Mini-Cakes

EIGHT YEARS AGO: In My Kitchen, May 2015

NINE YEARS AGO: P90X3, a Review of Tony Horton’s Latest Fitness Program 

TEN YEARS AGO: Pasta and Mussels in Saffron Broth

ELEVEN YEARS AGO: Triple Chocolate Brownies

TWELVE YEARS AGO: Shanghai Soup Dumplings

THIRTEEN YEARS AGO: Bite-sized Chocolate Pleasure

CHOCOLATE-COVERED OREOS

I am slightly obsessed with these. So. Many. Possibilities. I will have to disappoint the purists, though. I do not use high-quality chocolate to make them, I go with compound chocolate. Go ahead, twist your nose, but I have to be mindful of my baking budget. Feel free to splurge and temper chocolate if you prefer.


To make them you will need the appropriate molds. Go to online sources such as amazon or etsy and search for molds for chocolate covered Oreos. I will share links to the specific ones I used, but there are countless possibilities out there. Then, you need your choice of dark or white compound chocolate (about 250g for a mold of 6 cookies). A touch of coconut oil, maybe 1 teaspoon. And the items to decorate: oil-soluble food dye, luster powder, or chocolate transfer sheets.

.

VERSION #1

CHERRY BLOSSOMS ON WHITE CHOCOLATE

Mold used can be found here. To decorate this set, I used chocolate transfer sheets that I bought a couple of years ago (!!!!). Simply cut them to fit the bottom of the mold, making sure the transfer motif is up, so it will be in contact with the warm chocolate. Pour the melted white chocolate and pour about halfway up. Place an Oreo cookie inside, and add chocolate to cover. Tap a little bit to force air bubbles up, smooth the top (which will be the bottom of the enrobed cookie), and refrigerate for 30 minutes. You can also freeze for about 10 minutes. They should come out very easily.

.

.

VERSION #2

DARK CHOCOLATE ON FLOWER MOLD

Mold used for this set can be found here. Same method as the previous one, except that the gold decoration was achieved by painting the bottom of the mold with luster powder (as a powder, no vodka needed). A little bit goes a long way, next time I will use less. They also look nice left plain.

.

VERSION #3

WHITE CHOCOLATE WITH PINK AND GOLD

For the molds, follow this and this link. A small portion of melted chocolate-coconut oil was dyed with fat-soluble red dye (a very small amount, to get a pink tone), and used to paint the bottom of the mold. Then the rest of the melted chocolate was poured normally on top, cookie added, and topped to close with more chocolate. Details with gold were painted after unfolding. The White poinsettias were dusted with dry gold powder, the heart was painted with gold + vodka.

Since there is not need to temper chocolate, these are incredibly easy and quick to make. You can make a batch of 6 or 12 in 45 minutes, including cooling time. They would be a ton of fun to make with kids too, so consider that option for a fun weekend…

.

ONE YEAR AGO: Pan-Steamed Broccoli with Miso Vinaigrette

TWO YEARS AGO: Cookies and Rubber Stamps

THREE YEARS AGO: Macarons for all Seasons and Reasons

FOUR YEARS AGO: Lentils and Radicchio? Yes, please!

FIVE YEAR AGO: Tres Leches Cake

SIX YEARS AGO: The Joys of Grating Squash

SEVEN YEARS AGO: Auberge-Pecan Walnut Bread

EIGHT YEARS AGO: Gluten-free and Vegan Raspberry Bars

NINE YEARS AGO: Lasserre, a French Classic

TEN YEARS AGO: Sourdough Bread with Walnuts and Dates

ELEVEN YEARS AGO: Braised Brisket with Bourbon-Apricot Glaze

TWELVE YEARS AGO: The Real Vodka Sauce

THIRTEEN YEARS AGO: Pork Tenderloin and Blue Cheese

GROWN-UP SPICY CHOCOLATE COOKIE

I bake cookies often. So often that I ended up starting a new blog just to document my adventures in the subject. But whenever I want to share a new recipe, it will be here, in the good old Bewitching Kitchen. This cookie is super versatile. It is so flavorful and complex that it can stand on its own without icing, without filling. But I’ve used it in many different formats, as you will see in my post published simultaneously in my baby blog. It resembles an Oreo in texture and basic taste. But then the chipotle and cinnamon kick in… and all of a sudden you are in love.

GROWN-UP SPICY CHOCOLATE COOKIES
(from the Bewitching Kitchen)

226g butter
200g sugar
1/2 tsp vanilla extract
1 large egg
380g flour
12 g cocoa powder
12g BLACK cocoa powder
1/2 tsp salt
1/4 to 1/2 tsp chipotle pepper
1/2 tsp cinnamon

Mix flour, both types of cocoa powder, chipotle pepper, cinnamon and salt in a large bowl. Reserve.

Cream butter with sugar with a Kitchen Aid type mixer. Add vanilla and egg. Mix until incorporated, then add the dry ingredients in three portions, mixing on low speed. When the dough starts to glue together, stop, check if it holds well when you press a small amount of it with your fingers. Adjust with more flour if needed. Pat the dough into a disc and place in the fridge. It can also be rolled out immediately if you did not have the butter too soft in the beginning.

Roll to desired thickness, cut in shapes, freeze for 10 minutes before baking at 350F. Baking time will depend on size of the cookies, usually 12 minutes.

ENJOY!

to print the recipe, click here

Comments: I did something totally different to get the pattern on these cookies. I used a fondant impression mat, laid it on top of the rolled cookie and then cut the rounds and baked. Inspiration came from the great Dawn Williams, a virtual friend from Facebook, aka Queen of Molded Cookies.

This is the mat… Available on amazon.com

And this is the dough after imprinted with it (dough is rolled over parchment, mat goes on top, then a rolling pin presses it gently over the dough. Peel the mat off, and you are left with this:

Cut rounds, freeze for 10 minutes and bake straight from frozen…

The cookies will be ok without any further adornment. But you know I cannot resist some bling, so I used gold luster dust mixed with vodka and brushed lightly on the design. The suspension needs to be a bit on the thick side, so that it won’t puddle inside the whole pattern.

For the dough, you can also skip the cinnamon and use orange extract + orange zest. Works great too. If you don’t have black cocoa, simply use the full amount of Dutch cocoa. I find that mixing some black with it makes it perfect for my taste. I’ve done in countless times, tweaking the recipe a bit and pretty much anything works.

Now, I invite you to visit my baby blog
to see how versatile this simple dough can be…

See you there!

ONE YEAR AGO: The Home Bakers Collective, May Project

TWO YEARS AGO: Purple Star Macarons

THREE YEAR AGO: Smoked Salmon, Fait Maison

FOUR YEARS AGO: Kouign-Amann, Fighting Fire with Fire

FIVE YEARS AGO: In My Kitchen, Yin and Yang

SIX YEARS AGO: Chocolate Toffee Banana Bread

SEVEN YEARS AGO: In My Kitchen, June 2014

EIGHT YEARS AGO:  Strawberry Frozen Yogurt

NINE YEARS AGO: Baked Coconut and “The Brazilian Kitchen”

TEN YEARS AGO: Honey-Glazed Chicken Legs

ELEVEN YEARS AGO: French-Style Rolls

SECRET RECIPE CLUB: MINI-CHOCOLATE CHEESECAKE BITES

August is already knocking at the door, this year is flying by.  But before a new month starts, there’s always the excitement of the last Monday of the month, with Reveal Day of The Secret Recipe Club. For those who are new to this concept, bloggers are paired in secret, have a few weeks to stalk their assigned site, and everyone in the club blogs about their recipe on the exact same day and time. Nothing cooler than that, you must admit…  This month I was paired with Colie’s Kitchen.  Nicole, who hosts the site, is a full-time college student, with a full-time life of organized chaos.”  Ha!  I can totally relate…  She is married and a “bonus mom”, what a great expression, much better than step mom,  I guess I can relate to that too.  I had quite a few options selected as possibilities for my assignment, like her Lasagna Rolls, her Parmesan Meatloaf Muffins (great idea!),  her Oh My God Macaroon Pie, and her Cauliflower Cheddar Fritters.  But, as is often the case with The Secret Recipe, I took the sweet path, and ended up with these super cute single bite (ok, a couple of bites) desserts…

MiniCheesecakeBits


MINI CHOCOLATE CHEESECAKE BITES
(from Colie’s Kitchen)

3 Packages of Neufchatel, softened
1 + 1/4 cups sugar
1 (8 ounce) container of dairy sour cream
2 teaspoons vanilla extract
1/2 cup cocoa powder
2 Tablespoons all-purpose flour
3 eggs
28 Oreo cookies halves, removing the cream center
28 cupcake tins/liners

Heat oven to 300 degrees F.

Beat cream cheese and sugar until blended. Add sour cream and vanilla and beat until fully mixed.

Beat in cocoa and flour. Add eggs, one at a time, beating just until well blended.

Remove Oreo filling with a butter knife and add one half of a Oreo to each cupcake tin. Fill each tin with one large spoon full of cheesecake filling until you have filled all 28 then go back and top off each tin with any extra filling.

Bake for 20-25 minutes. Remove from oven and cool on a rack.

Refrigerate 4 to 6 hours. Store covered in refrigerator or in the freezer.

 ENJOY!

to print the recipe, click here

composite1

Comments:  I cannot tell you how much fun I had making this recipe! The toughest part was discarding the filling of the Oreo cookies. Part of me wanted to throw caution to the wind and behave like my former self of decades ago: shamelessly open the Oreos, scrape them clean, and try to sneak the cookie halves to the trash can without my Mom realizing. That never had a happy ending.  At most, I could get by with a couple of cookies, then pay a price for my behavior. Waste not. Ever. Do you know how many kids in the world went to bed hungry last night?  Apparently, I did not. (sigh)

The idea of using Oreos as a base for these cheesecake bites is a strike of genius!  Perfect size for cupcake liners. Because the recipe made so many and I only have one muffin baking pan, I got the disposable aluminum pans at the grocery store, and was quite pleased by how well they worked.  No difference in quality of baking, although in the name of full disclosure, I confess that I dropped one of the disposable pans while taking them out of the oven.  Huge big mess, coupled with language even more colorful than the cupcake liners. I am glad there are no hidden cameras in our home…

rack

If you follow my blog, you know that I never add the caloric content of any of my recipes for the simple reason that I don’t pay attention to it. But, since Nicole provided that info, I will share it with you: one of these babies has only 134 calories, which, as far as dessert is concerned, sounds pretty moderate to me.  Keep in mind this interesting linear fit, though. It can be cruel to your waistline.

cheesecake


Nicole, thanks for such a cute recipe that was very appreciated by our colleagues at the department…  I hope you had as much fun as I did with my assignment this month.

As usual, if any of my readers would like to see all assignments for my group, click on the blue amphibian at the end of this post, and enjoy the ride through the blogosphere…

ONE YEAR AGO: Whole-Wheat Spaghetti with Grated Tomato Sauce

TWO YEARS AGO: A Taste of Yellow to Honor Barbara

THREE YEARS AGO: Gratin of Beefsteak Tomatoes

FOUR YEARS AGO: Tour de France Final Stage: PARIS

FIVE YEARS AGO: Snickerdoodles with a Twist