PANCH PURAN SOURDOUGH (from the Bewitching Kitchen)
500g bread flour 350g water 75g starter at 100% 9g salt 1 tsp pinch puran spice mix
Make the levain mixture about 6 hours before you plan to mix the dough. It should be very bubbly and active.
When you are ready to make the final dough, place the water in the bowl of a KitchenAid type mixer and dissolve the starter in it, mixing with a spatula briefly, then add the flour, salt and spice mixture. Turn the mixer on with the hook attachment and knead the dough for 4 minutes at low-speed all the time. You will notice the dough will gain quite a bit of structure even with just 4 minutes in the mixer. Remove from the machine, and transfer to a container lightly coated with oil, cover lightly with plastic wrap and allow it to ferment for 4 hours, folding every 45 minutes or so. Because the dough is already a bit developed from the initial time in the mixer, you should get very good structure after 3 and a half hours, or even sooner than that.
After four hours bulk fermentation, shape the dough as a ball, and place, seam side up, in a lightly floured banetton. Leave at room temperature one hour, and then place in the fridge overnight, from 8 to 12 hours.
Next morning, heat the oven to 450F.Place a parchment paper on top of the dough, a flat baking sheet, and invert the dough, flipping it out of the banneton. Flour the surface of the dough, score with a razor blade, and bake at 450F for 45 minutes, preferably covered for the first 30 minutes to retain steam. Cool completely over a rack before slicing.
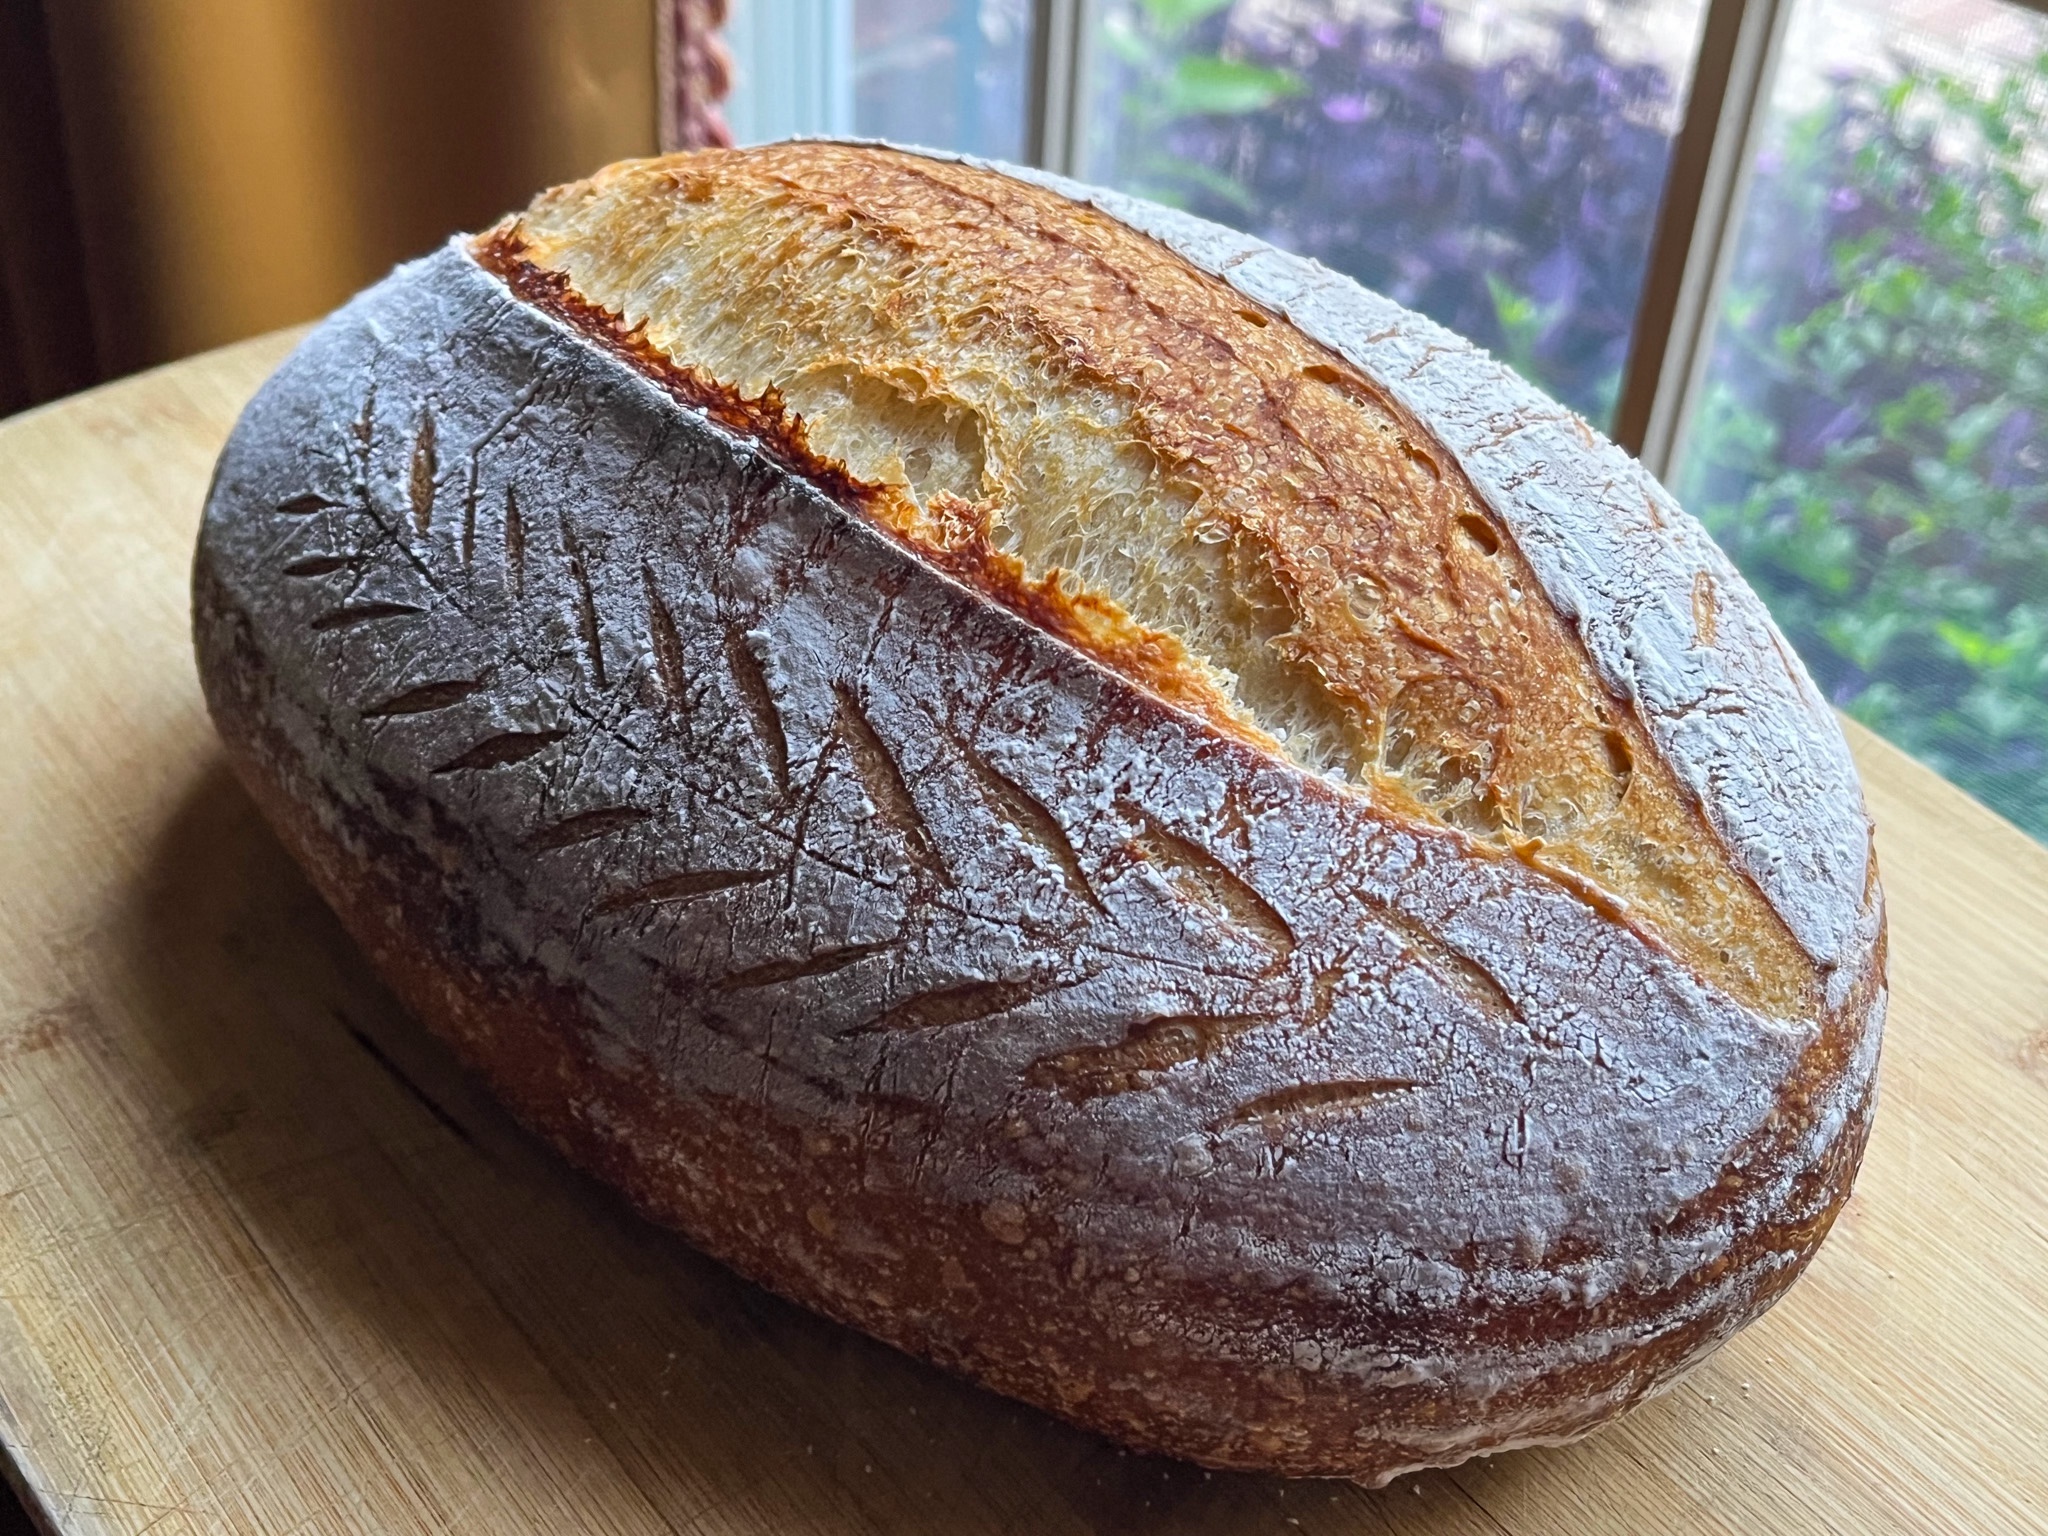
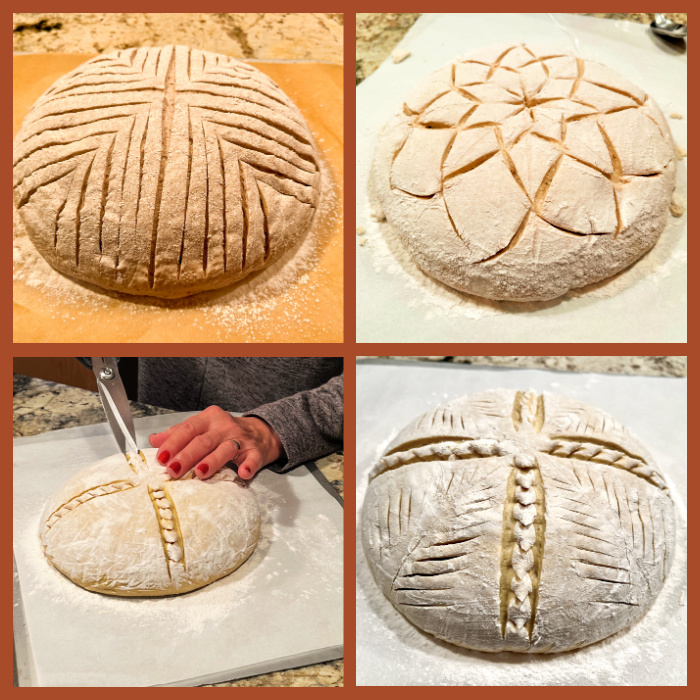
Comments: I love the yin-yang feel of this design which is quite popular for batard-shaped loaves, you can see examples everywhere in social media. Coupling razor blade with small scissors is all you need to get this simple look going.
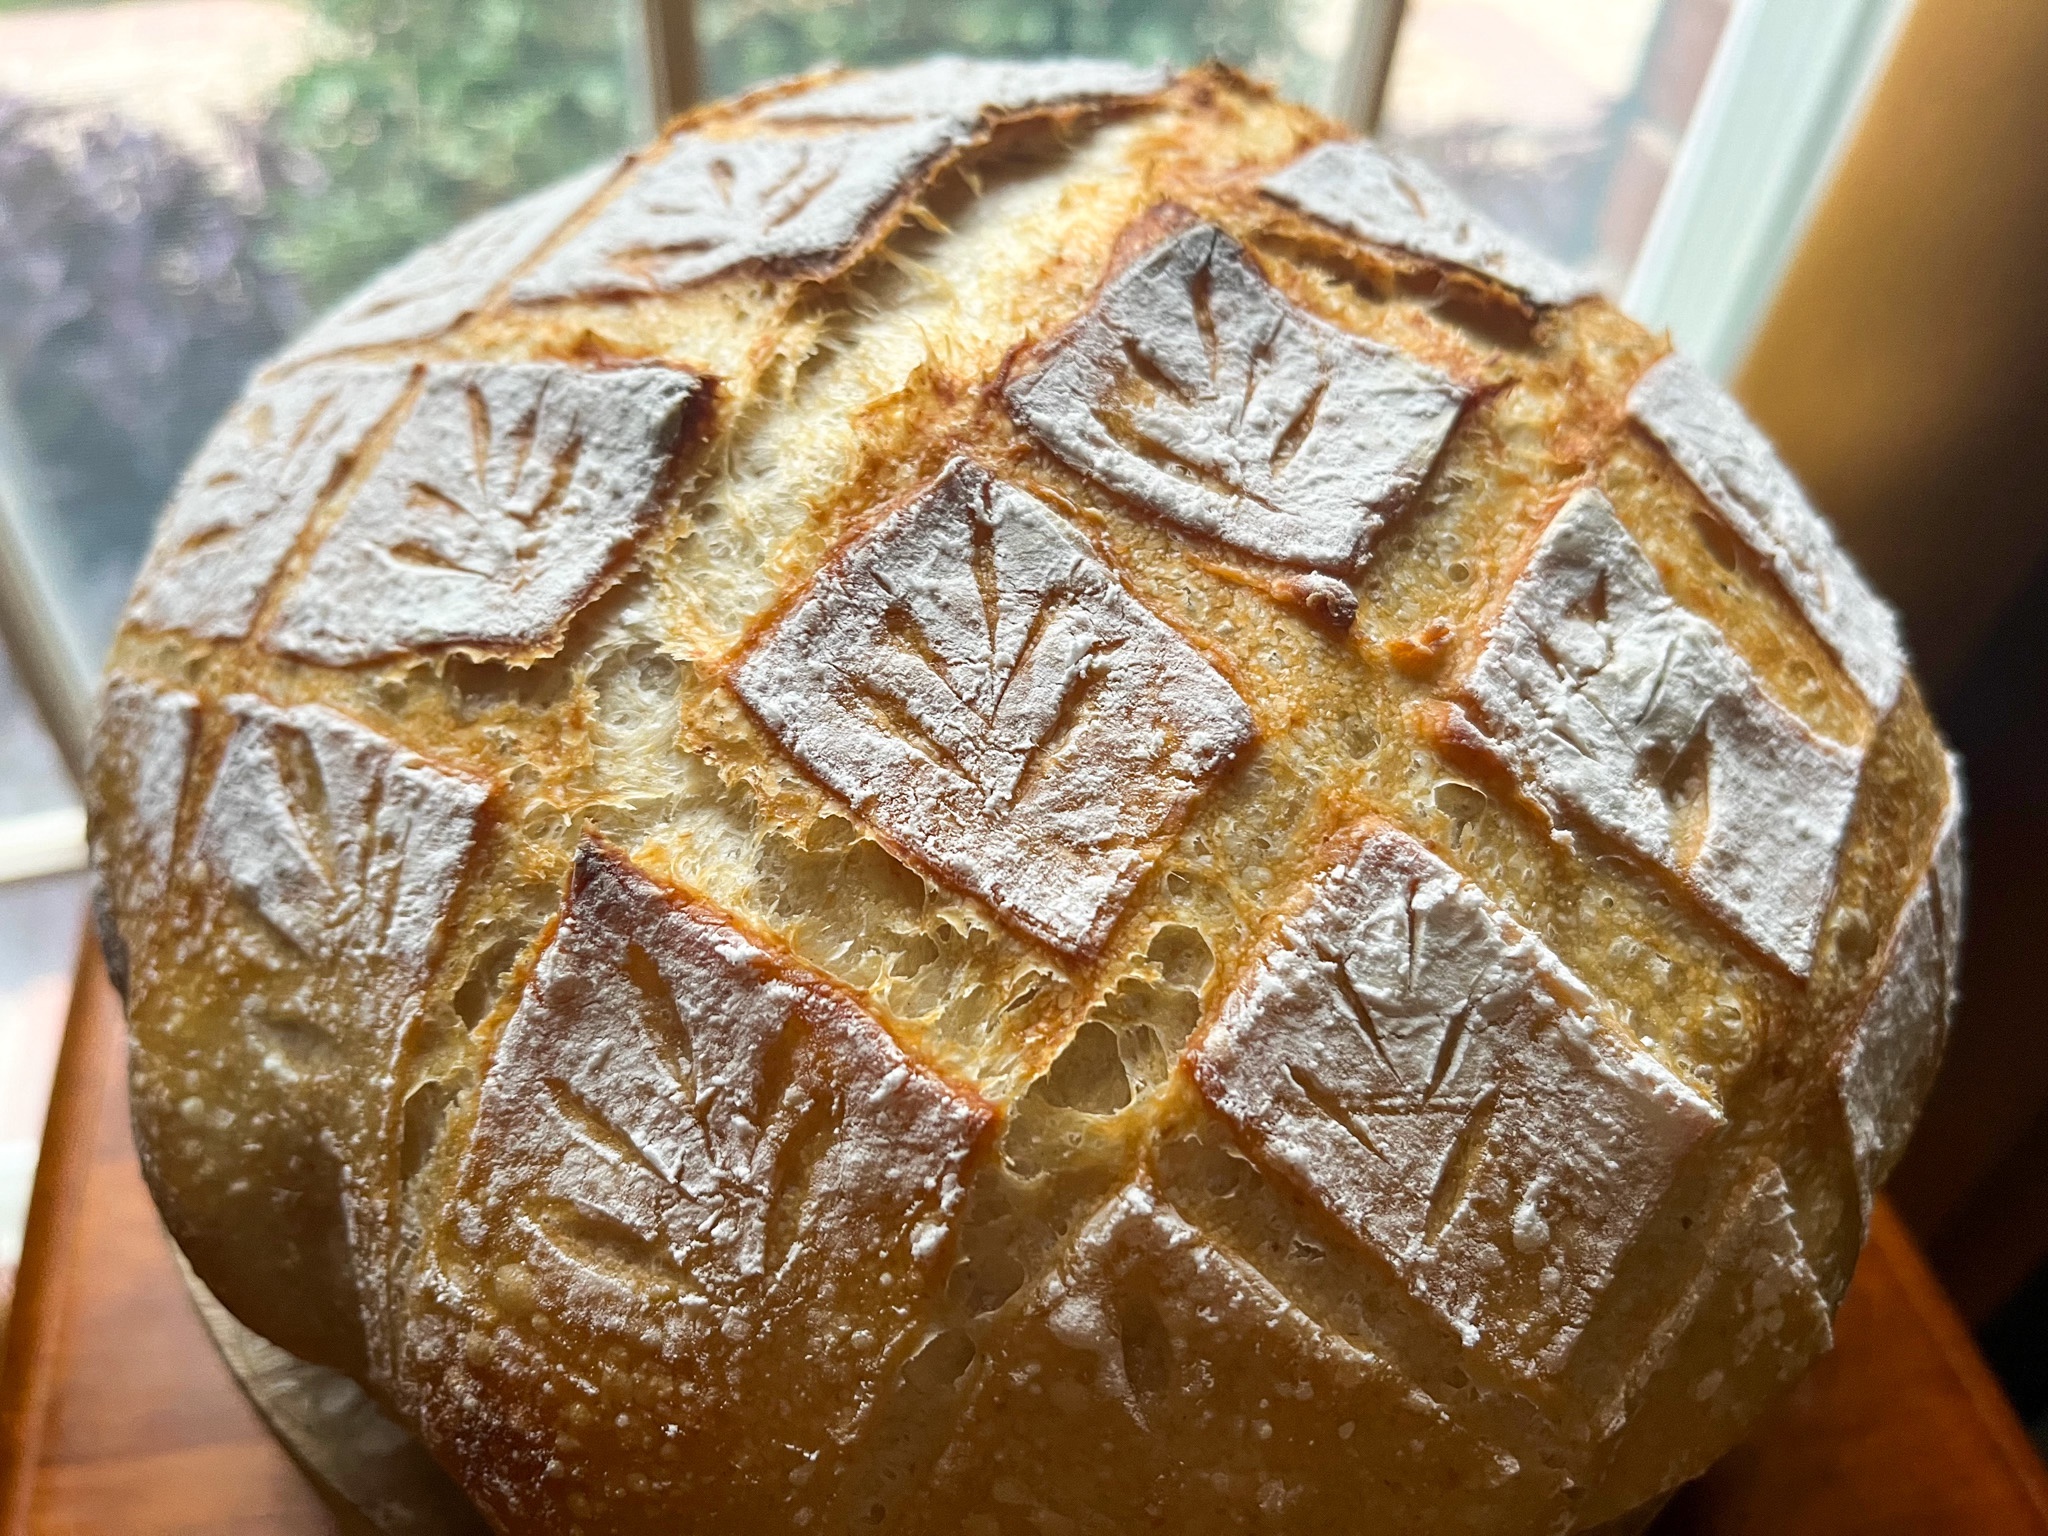
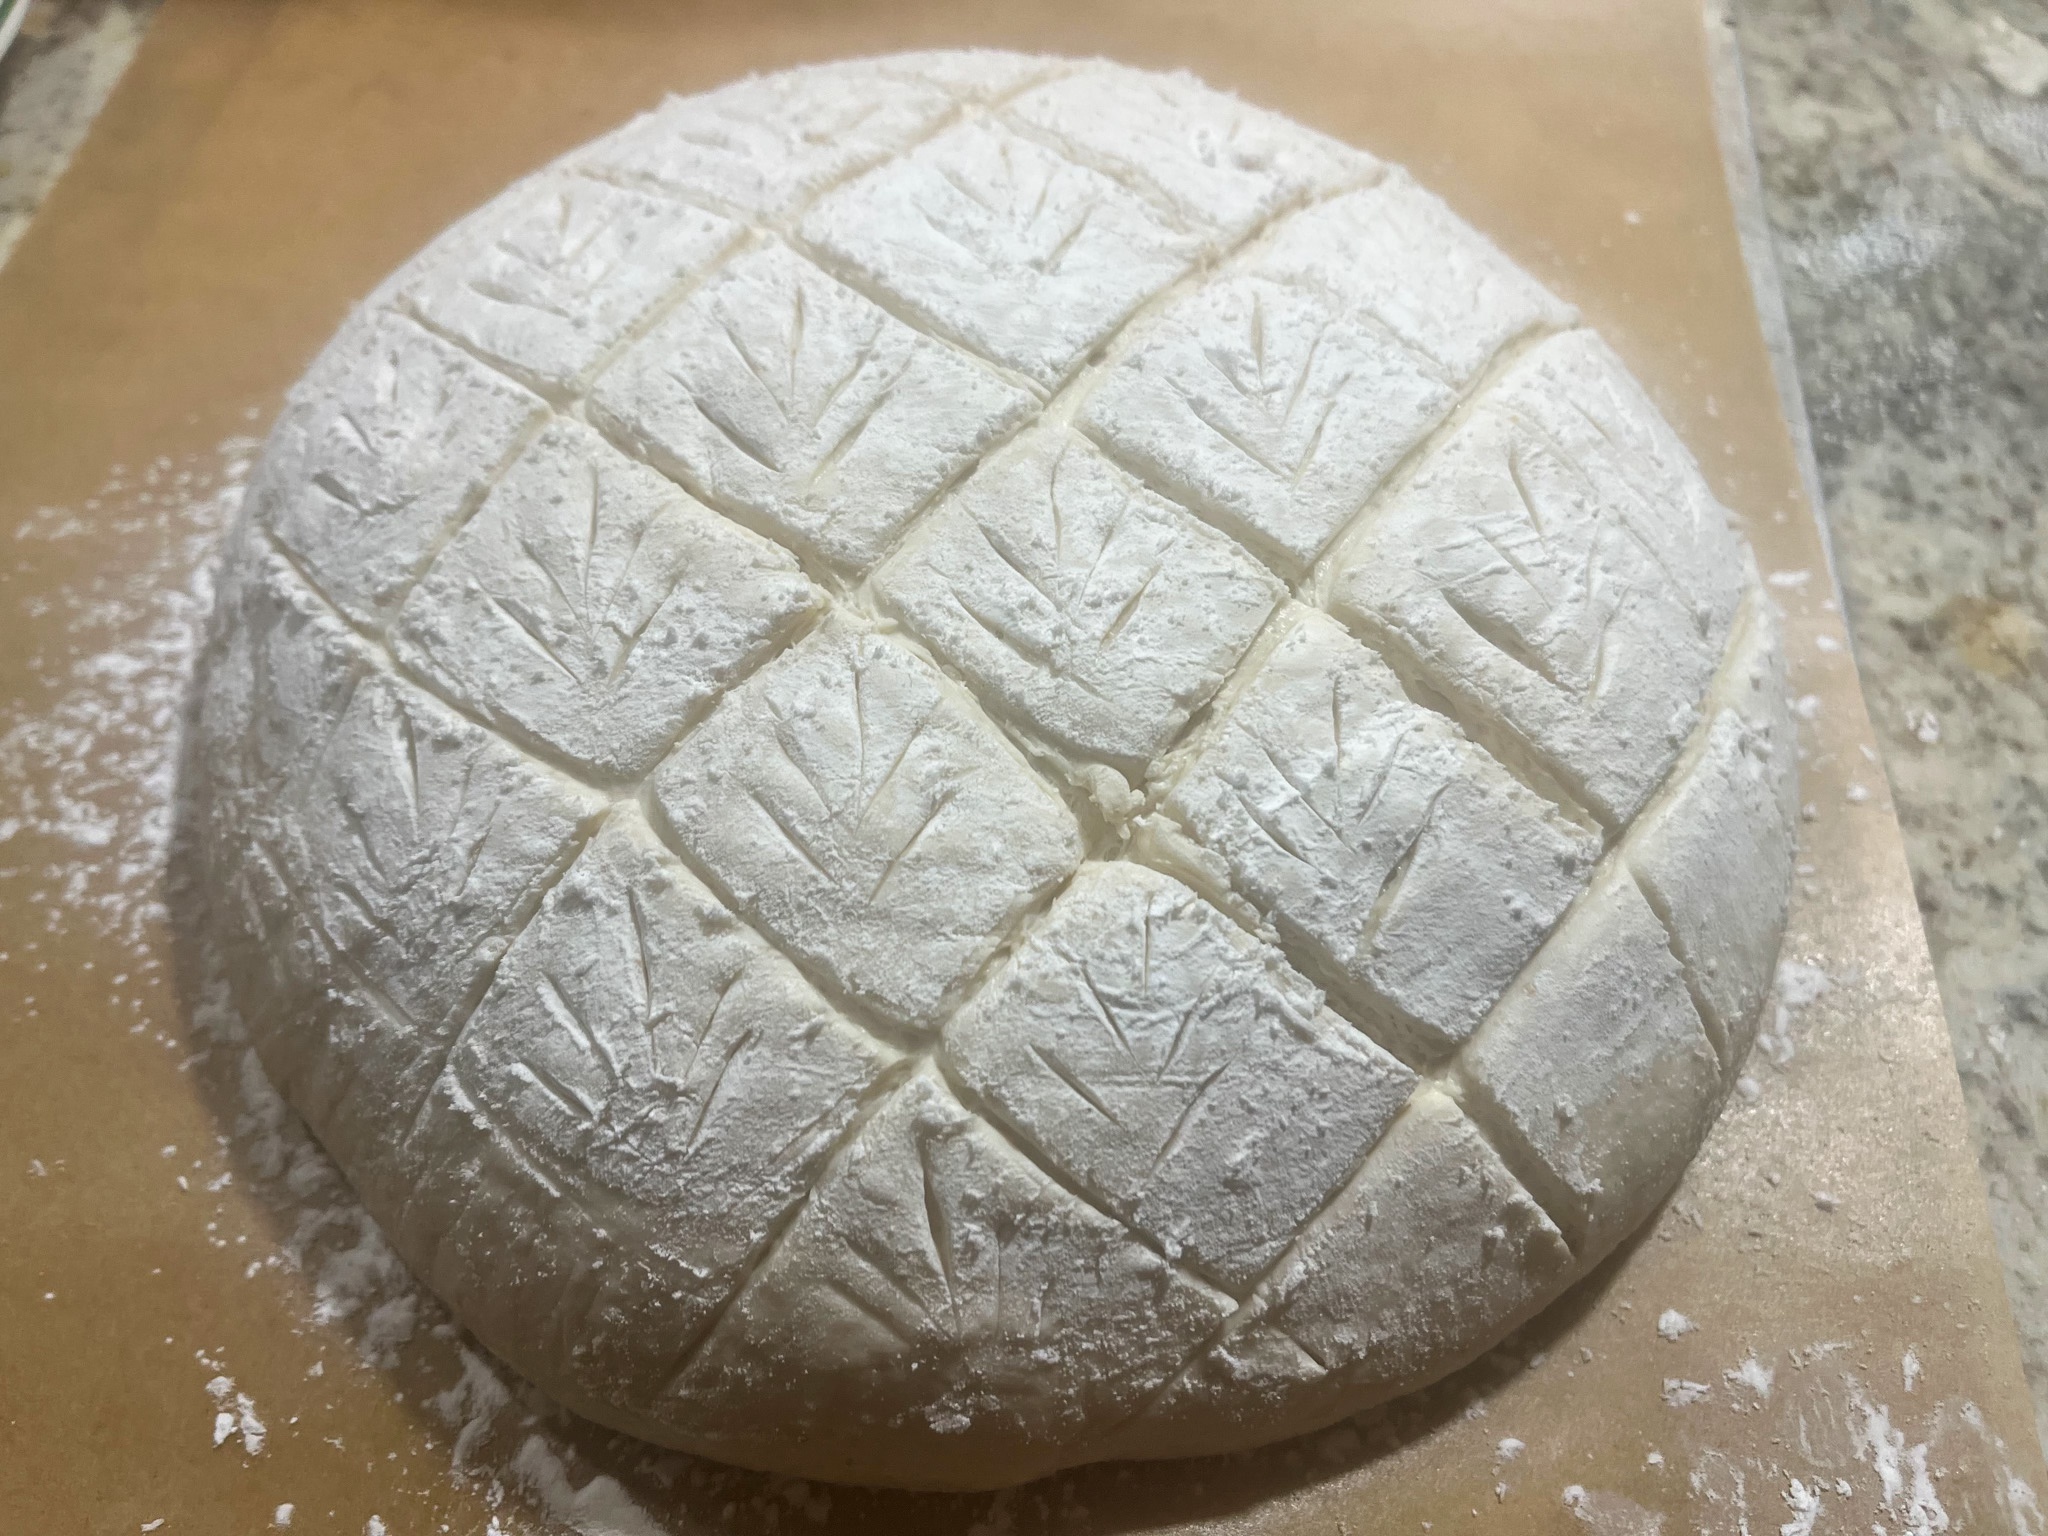
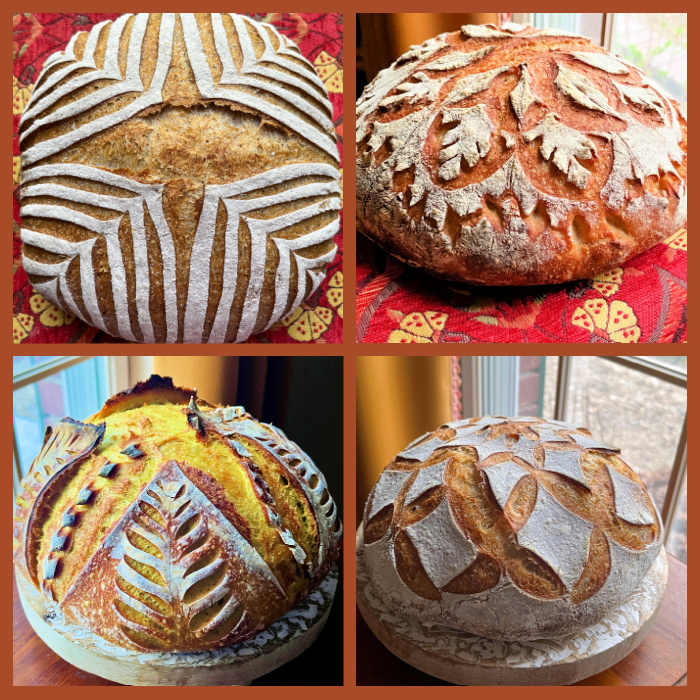
Before I leave, let me share a few more designs of the recent past…
For the above look, a very simple grid is the initial scoring, then just a few extra touches in the center of each square.
.
Another batard shape that is super simple and effective, relying on a central deep cut and a few decorating light touches with the blade…
A little stencil adventure…
And a festive scoring coupled with a slightly heavier coating with tapioca flour…
That’s all for now, folks, stay tuned for more soon!
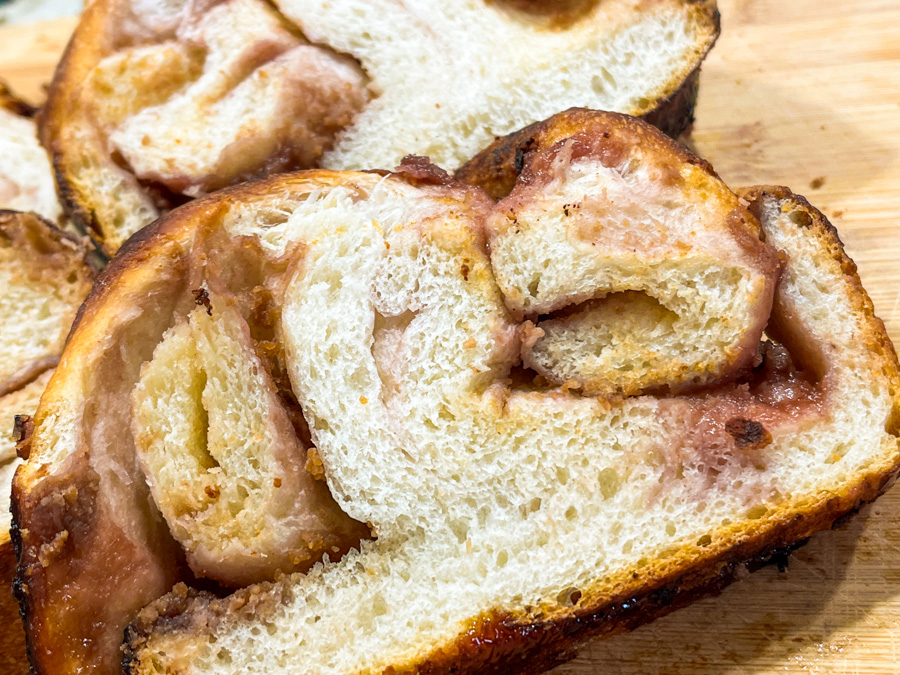
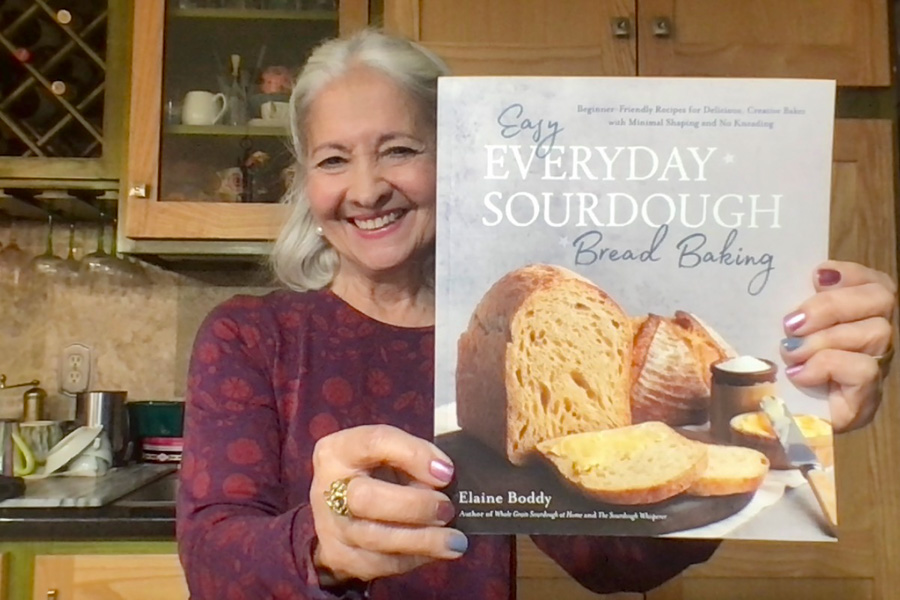
I am absolutely thrilled to share my review of a GREAT sourdough bread cookbook, published just this week by my friend Elaine! This is her third cookbook, I have reviewed her two first babies here and here. Let me tell you, this is her best one. I wanted to make every single one of her recipes, they all had some kind of intriguing twist, unexpected addition, or unusual shaping. But first, let me share the first recipe I made, the moment the book arrived at my doorstep. The husband is crazy for peanut butter and jelly, so of course that was an easy choice for me.
for the dough: 50 g active sourdough starter at 100% 350 g reduced-fat milk (I used full-fat) 500 g white bread flour 7g salt or to taste (up to 10 g)
for the filling: 50 g peanut butter, smooth or crunchy 100 g jelly of your choice (I used seedless raspberry)
In the early evening, mix all the dough ingredients in a large bowl until you have a rough dough. Cover with plastic wrap or a shower cap and leave in the counter for 2 hours. Perform a set of pulls and folds. The dough will be stiff at first, but will become smooth and come into a ball. At that point, stop, cover again and leave it on your center for one hour.
Perform one more set of pulls and folds, then leave over the counter at room temperature overnight (8 to 10 hours at around 68F). Our kitchen is warmer, but I had no issues with overnight fermentation.
Next morning place the bowl of the dough in the fridge, without touching it, for one hour. Prepare a 9 x 5 in loaf pan by spraying it with oil or lining it with parchment paper.
After one hour, sprinkle flour on the countertop and open the dough with your hands and/or a rolling pin to a dimension of 8 by 16 inches, making sure it has even thickness. Spread the peanut butter gently all over the dough, then the jelly. Roll up the dough from the shorter end. Once rolled, use a sharp knife to cut the sausage lengthwise down the middle in two equal pieces. Twist the two pieces together, then lift the dough and place it inside the prepared pan.
Allow the dough to proof again until it reaches the edge of the pan, 2 to 4 hours, depending on the temperature of the room. You can also proof in the fridge for up to 24 hours and bake straight from the fridge.
Bake at 400F for about 40 minutes, making sure to protect the surface with aluminum foil after about 30 minutes to prevent excessive darkening.
Remove the loaf from the oven and the pan, remove the paper, tap the base of the loaf and if it sounds hollow, it is baked, if not return it to the oven, out of the pan, directly into the oven rack to bake for a further 5 to 10 minutes. Allow it to cool before slicing.
Comments: The dough is a pleasure to work with. My only change was to use the KitchenAid for the initial mixing, just because I got so used to doing it that way for all my sourdough baking, that it became second nature. Of course, you can just mix by hand and it will be even simpler, less stuff to wash. Don’t worry about leaving the bread overnight at room temperature, it will be perfect. The amount of peanut butter and jelly is just right, don’t add more. Even though the peanut butter seemed to disappear once it baked, the taste was there, in the exact intensity needed. In the book Elaine gives alternatives to bake from cold oven, which is something she does often. In fact, every single one of her recipes offers the option of starting from cold oven.
The bread feels surprisingly rich, when you consider it has no butter or eggs in it. I love the texture, and because it has no sugar, you can definitely use the exact same formula and take it into savory territory with pesto, cheese, tapenade, or as Elaine herself did in her book with a surprising combo of flavors (check my summary of Chapter 2). I will definitely be doing that in the near future.
Of course, the husband loaded the bread with peanuts, because that’s what he does!
Now let’s dig into the review of Elaine’s beautiful cookbook shall we?
The book is divided into chapters, according to the general way, in which you will bake your breads and that in itself is unusual and fun. I will now go into each chapter and give you a few examples of the recipes you will find
Chapter 1: THE BREAD PAN COLLECTION In this set of recipes, you will be using a regular Dutch pan or enameled pan with the cover that if you are used to baking sourdough bread is pretty much the container of choice. She opens the chapter with her Easy Shape Crusty White Loaf, which is what she described as the archetypal sourdough loaf.
Many recipes called my attention, but my favorites would be Same-Day Chia Seed Boule, the Yogurt and Nut Boule, the Turkish-Style Seed-Topped Pide and her Cheesy Herby Pull Apart Rolls.
.
Chapter 2: THE LOAF TIN COLLECTION In the second chapter, you will be using loaf pans like the regular 9 x 5 in that is often used in bread baking. She will also bring into play the fun Pullman type pan, and will share formulas to get absolutley beautiful square loaves, that are so handy to make sandwiches. I wanted to bake pretty much everything! The chapter is divided in two sections, “Simplest” and “Flavored”. In the simplest section, the breads are made with seeds, ancient grains, or the super cool Whey and Honey Sandwich Loaf, that is calling my name really loud. In that recipe, the whey component can be the liquid that accumulates over yogurt. We consume A LOT of yogurt at home, so that is going to happen, trust me. The flavored section is unreal! The Peanut Butter and Jelly Babka I highlighted is from that part, but Elaine went wild on this brings all sorts of twists: Cheese and Ketchup Babka (I know this is a real winner because we talked about it when she first made it), Roasted Cumin, Coriander and Caraway Loaf, Dark Chocolate Chip, Hazelnut and Rye Loaf (be still, my heart!), Satay-Swirled Black Sesame Seed Loaf. Need I say more? The teaser recipe at the end of my post is also from this section.
.
Chapter 3: THE CAKE TIN COLLECTION She opens the chapter with a question: How many cake tins do you have? I have quite a few and I never bake cakes!
Well, I bake cakes and have more cake pans than I care to admit in public, so this chapter is dear to my baker’s heart. And we are not talking just big cake pans! Elaine makes these small cute loaves in circular 8 inch cake pans, so adorable! I a a bit lazy to adjust amounts to different sizes of pans, so it was nice to have it all laid down nicely for me. Also, she puts Bundt pans into the universe of sourdough baking. Yes you got that right Bundt pans are not just for cakes anymore! Many recipes tempting me, I give you just a few: Pumpkin Spiced and Shaped Loaf, Fast Coconut and Cherry Tea Loaf,Feta and Spinach Bundt Tin Loaf with Red Onion Topping,Holiday Chocolate Enriched Bundt Tin Loaf (!!!!), and wait for the last one… Gingerbread Cookie Enriched Bundt Tin Loaf (wow, just wow!).
.
Chapter 4: THE MUFFIN TIN COLLECTION Ok, now I really have to tell you, I was in Nirvana with this chapter. The whole idea is to use your muffin pan to bake sourdough in all kinds of cute shapes and flavors. Apple and Apricot Enriched Sourdough “Roses”, Sweet Potato Apple and Cheese Roll Ups, Stuffed Pizza Rolls (OMG), Sweet Potato, Za’atar and Tahini Rolls. And the last one almost took my breath away (the picture is amazing): Falafel-Spiced Chickpea Bites.
.
Chapter 5: THE OVEN TRAY COLLECTION This chapter lists a series of recipes you can bake in a simple, humble baking sheet. Same-Day Cheats Baguettes, Seeded Pide with Cheese, Red Pepper and Baked Eggs (the picture made me drool), Butternut Squash, Pecan and Fall Spiced Focaccia, Spiced Cheese Sandwich Crackers. After this chapter, what she calls a bonus recipe: Air-Fryer Pitas. Needless to say, that goes into my list to bake very very soon. .
The photography of the book is simply outstanding! Every single recipe has a picture, they are stylish, beautiful, and since I know Elaine personally, I realize that they convey her style perfectly. The method behind her recipes is the same of he previous books: simple, straightforward, instead of feeling intimidated by a bunch of parameters and temperatures and factors you need to control, she makes you feel confident and ready to go to the kitchen and play. A perfect book if you are a beginner and a total delight if you are an experienced sourdough baker.
and now, for the teaser recipe….
FAST SPELT, DRIED FRUIT, NUTS AND SEEDS LOAF (page 86)
I am going to tell you something pretty major: this was one of the tastiest breads I’ve made. It is ready in less than 2 hours, essentially you mix all the ingredients, sourdough starter, baking powder and baking soda, and bake. It is rich, loaded with nuts, seeds and dried fruits (figs, apricots, cranberries, raisins), and OMG SO SO GOOD! If you can wait until it is totally cool and slice it thinly, place it in the toaster and you will have a ticket to Nirvana. Absolutely wonderful!
Elaine, thank you so much for allowing me to publish one of the recipes in my blog! You outdid yourself with this cookbook, and I know I will have a blast making more recipes from it!
Playing with different scoring styles for sourdough… The only new recipe is Pecan Flour Sourdough (top left). I had a bag of pecan flour hanging around, and did a little sourdough experiment with it. Pecan flour brings flavor and some fat to the party, but no gluten, so it’s not a good idea to add too much to your basic bread formula. We loved the texture of the crumb, the delicate flavor, and the slight purple tone it contributed. The bread lasts longer at room temperature without drying. And of course, it freezes beautifully, like any sourdough does.
PECAN FLOUR SOURDOUGH (from the Bewitching Kitchen)
480g bread flour 20g spelt flour 20g pecan flour 10g salt 370g water 80g sourdough starter at 100% hydration
Make the levain mixture about 6 hours before you plan to mix the dough. It should be very bubbly and active.
When you are ready to make the final dough, place the water in the bowl of a KitchenAid type mixer and dissolve the starter in it, mixing with a spatula briefly, then add the three types of flour, and the salt. Turn the mixer on with the hook attachment and knead the dough for 4 minutes at low-speed all the time. If the dough is too sticky, add 1/4 cup flour, you want the dough to start clearing the sides of the bowl, but still be sticky at the bottom.
Remove from the machine, and transfer to a container lightly coated with oil, cover lightly with plastic wrap and allow it to ferment for 4 hours, folding every 45 minutes or so. After four hours bulk fermentation, shape the dough as a ball, and place, seam side up, in a lightly floured banetton. Leave at room temperature one hour, and then place in the fridge overnight, from 8 to 12 hours.
Next morning, heat the oven to 450F. Invert the dough over parchment paper, sprinkle tapioca flour over it for a very light coverage. Next, use a brand new razor blade to score the design.
Bake at 450F for 45 minutes, preferably covered for the first 30 minutes to retain steam. Cool completely over a rack before slicing.
Comments: The picture did not really show the color too well. In real life, there was a very very light hint of purple. The bread is delicious, with a complex flavor, not clearly associated with pecans. I wanted to keep just the flour in this version, but adding pieces of toasted pecan to the formula will be happening in the future.
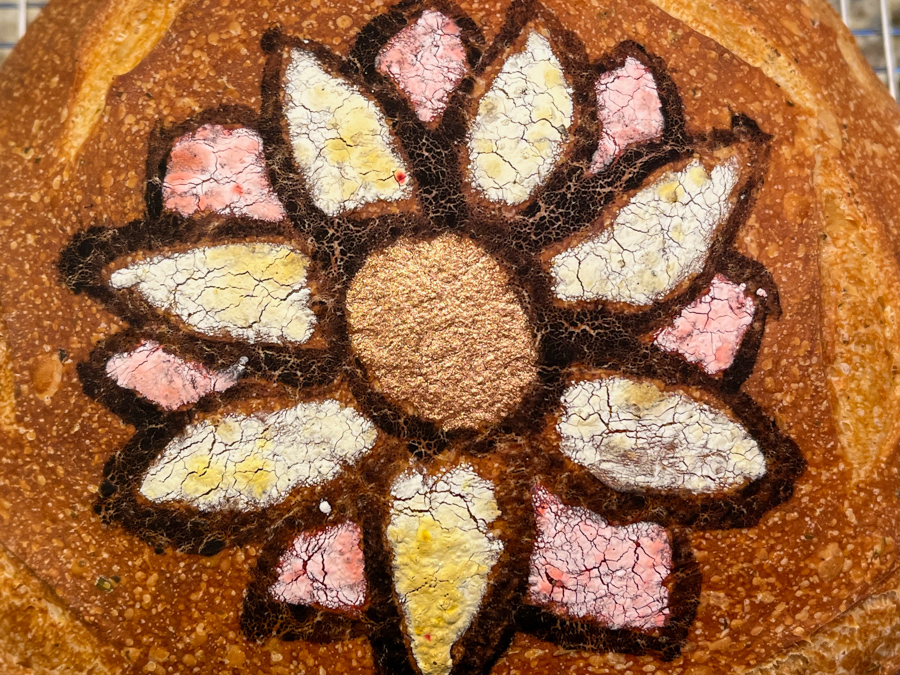
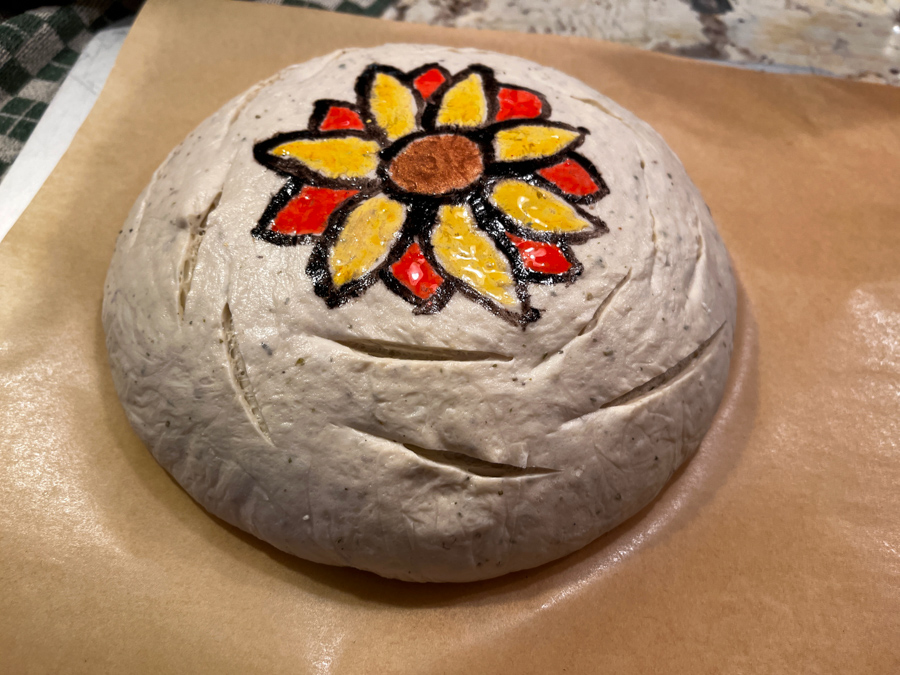
I consider this bread a work in progress, as the color is fading a bit during baking. Sugarprism stays very well on cookies (as I showed in the first cookie from this post), but I suppose 450F is a different story. However, this was only my second time doing it, and I already saw some improvement from the first attempt. Any sourdough recipe you are fond of will work. I opted for Elaine’s Herb and Olive Oil Sourdough, which I used as a teaser recipe in my recent review of her wonderful book (click here to read it, in case you’ve missed it). I like the way the olive oil in the dough seemed to tame a bit the crust explosion, and that worked well to keep the design untouched.
Basic things to consider when painting… minimize the amount of flour on the surface. When we do stenciling or even artistic slashing, a coating with flour is super important. In painting the dough, it makes things difficult and interferes negatively with the color. In today’s bread, for the outline I used black cocoa diluted with water. For the petals, Sugarprism in yellow and red. For the center of the sunflower, bronze luster powder diluted with vodka. As you can see, from the before pictures the bronze luster powder was the champion as far as keeping the color during baking. Black cocoa will always stay well, but if your goal is color, that cannot really help you much…
Just in case you are curious, below you see my first attempt painting sourdough. Two small issues happened: the dough had so much oven-spring that it lifted the design in ways that were not ideal. And I coated the surface with flour, which made the Sugarprism color interact with it and fade even more. The flour also gave a rough texture that made it impossible to spread the color nicely with a brush. In this case, I re-painted the bread the moment it came out of the oven to bring the color back. But my goal is to not have to do that, and get some method that retains the color during baking. Stay tuned then for my next adventure, in which I will use exclusively luster powder + vodka, hoping for a happy, very colorful ending…
Another example of a recipe that blew the doors of the competition once I spotted it at The Fresh Loaf forum. They highlighted this bread on their front page, since it is so unique and gorgeous. My starter was eagerly waiting for a chance to shine, I had wheat germ in the freezer, the only departure from the original recipe was the use of sage instead of rosemary. Not for gastronomic preference, but because a “certain dog” – who used to wander the streets of Hollywood – destroyed our rosemary plant. The dog has a good lawyer, and is presently free on bail.
TOASTED WHEAT-GERM AND SAGE SOURDOUGH (adapted from Ross’ recipe at The Fresh Loaf Forum)
150 g starter (white, 80% hydration)
335 g water
490 g bread flour
20 g toasted wheatgerm
2 Tbs fresh sage leaves, finely chopped
9 g salt
Mix all ingredients, except the salt, until they form a shaggy mass, no need to worry with kneading yet. Let it rest undisturbed for 40 minutes at room temperature.
Place the dough on a lightly oiled surface, open flatten it out slightly, sprinkle the salt all over, and knead a few times to distribute the salt. Place the dough in an oiled bowl, cover, let it sit for 1 hour. Knead by stretching and folding a few times – it will feel very smooth and easy to fold – put back in the bowl and let it rise 1 hour. Repeat the stretch and fold one more time, cover the dough and let it rise for 2 hours and 20 minutes.
Form the dough into a ball, place it in a floured banetton type container, cover it and place in the fridge overnight.
Remove from the fridge 1 hour and 30 minutes before baking. Bake in a 450F oven, using your favorite method to generate steam. After 20 minutes, reduce the temperature to 425F, and bake for a total of 40-45 minutes. If you baked the bread covering with a roasting pan, remove the cover after 30 minutes.
What a delicious loaf of bread this one turned out to be! I used very little sage because it is such a strong-tasting herb, so its flavor was barely noticeable. This bread would be great at a Thanksgiving dinner. The wheat germ lends a bit of moisture to the crumb, allowing it to last longer than your regular sourdough.
The crust, hearty and crunchy, was covered with those tiny blisters that make the baker very happy. Inside, the crumb was open, airy, and light. Cannot ask for much more than that… 😉
I am submitting this post to Susan’s Yeastspotting, please make sure to stop by and marvel at her weekly display of breads. I know my Friday is not complete without it!