CHESTNUT FLOUR SOURDOUGH BREAD

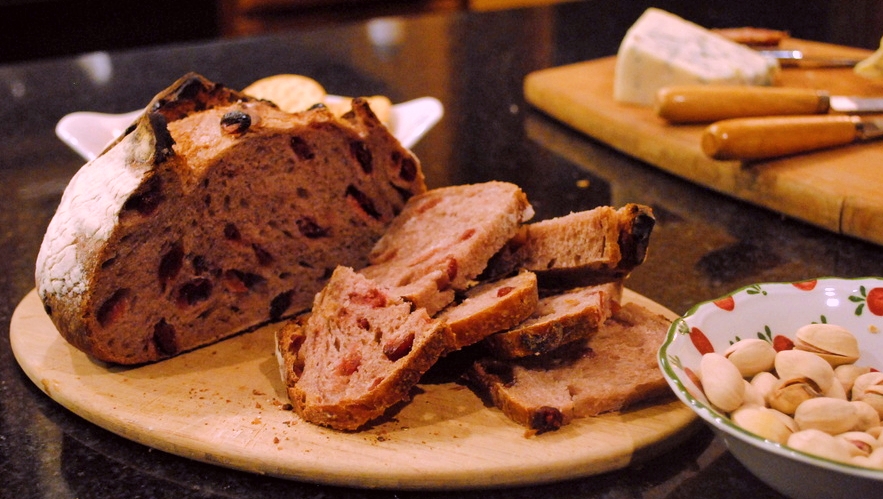
On the last In My Kitchen post, I promised to come back to talk about a bread made with chestnut flour brought all the way from France. The Bread Baking Queen Farine was the one who got me into this bread adventure, and advised me to search for this exotic flour in Paris. When I sent her a photo of the bag I bought she was super excited because it turns out chestnut flour from Corsica is considered the best in the world!  Amazing that it was exactly the type available near our hotel. Pure luck. With the stars so beautifully aligned, I was sure this would turn out as a wonderful baking project!  Was I right?  Well, let’s say that troubles were brewing faster than the wild yeast in my sourdough starter.

chestnutbread12

CHESTNUT SOURDOUGH BREAD
(from Farine’s blog)

(makes 4 small loaves)

For the pre-fermented dough
175 g mature white starter
494 g unbleached all-purpose flour
258 g water
26 g raw wheat germ (I used toasted)
12 g salt

For the final dough
750 g unbleached all-purpose flour
400 g chestnut flour
700 g water
450 g fermented white dough
5 g instant dry yeast
25 g salt
200 g whole, peeled cooked chestnuts, crumbled into chunks

For the fermented dough
Mix flour, water and white starter until the flour is well hydrated, cover with a cloth and let rest 20 minutes. Add salt and mix until you get a gluten window (when you stretch some of the dough really thin, you see strands of gluten and almost-see through spots). Put in an oiled bowl and cover tightly.

Let rise at room temperature for about two hours, then put in the fridge for up to 48 hours

Remove from the fridge at least two hours before using

For the final dough
Combine the flours in the bowl of the mixer, add the water and mix well. Cover with a cloth and let rest for 30 minutes

Add the fermented dough and yeast and mix until the dough is smooth and elastic. Sprinkle the salt over it and mix some more.

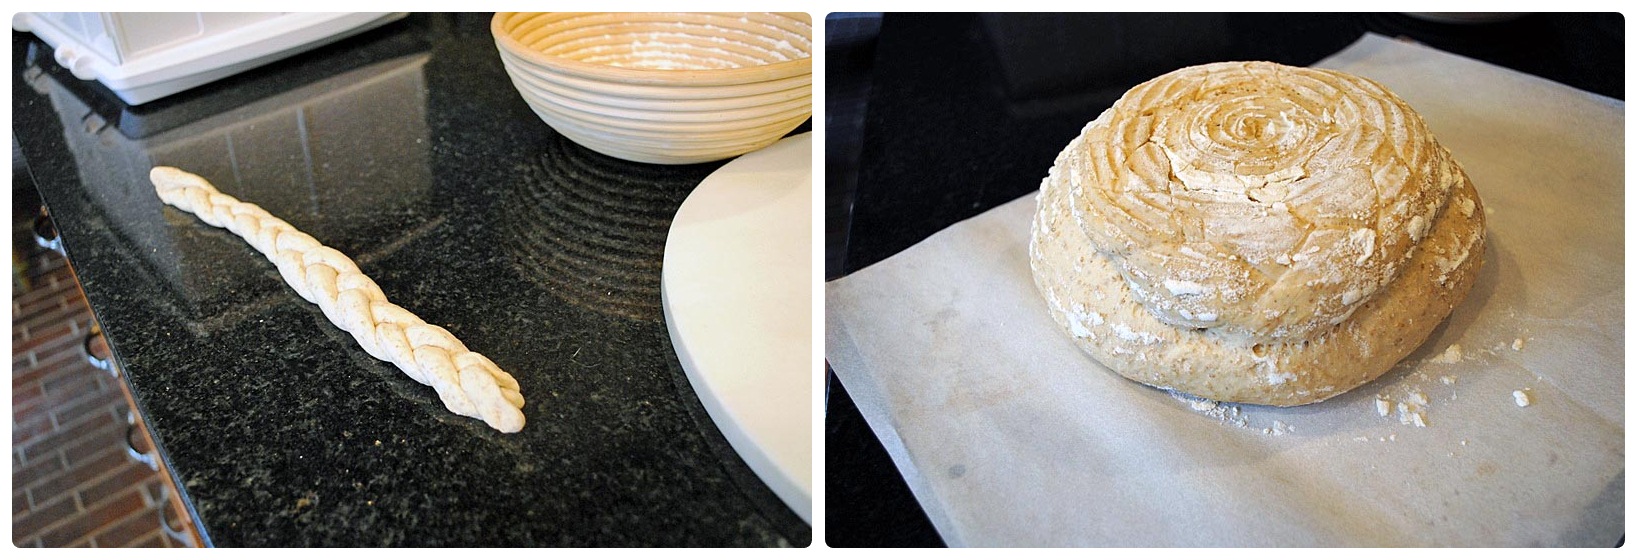
Very lightly flour your work surface. Place your dough on it, rough-side up, and flatten it out with your fingers. Spread the chestnut pieces over the top and press them well into the dough. Fold a few times so that all the chestnuts are incorporated into the dough. Form the dough into a ball, put it into an oiled bowl, cover with a cloth and let it rest for 40 minutes.

Lightly flour your work surface again, and turn the dough out on it. Fold the dough (on all four sides), then put back into your bowl, cover with baking cloth and let it rest for another 20 minutes. Lightly flour your work surface again, turn out the dough and divide it into 4 equal pieces.  Shape as desired.

Place on a semolina dusted parchment paper over a sheet pan. Let rise, covered with baking cloths, for 1 ½ hour or until just doubled in volume.

Meanwhile turn on the oven to 500ºF/250ºC with a baking stone in it and an empty cast iron (or metal) pan on the bottom shelf. When ready to bake, score the breads the way you like, pour 1 cup of water in the cast iron (or metal) pan and slide the breads (still on their parchment paper) onto the baking stone, spray some water into the oven and close the door quickly.

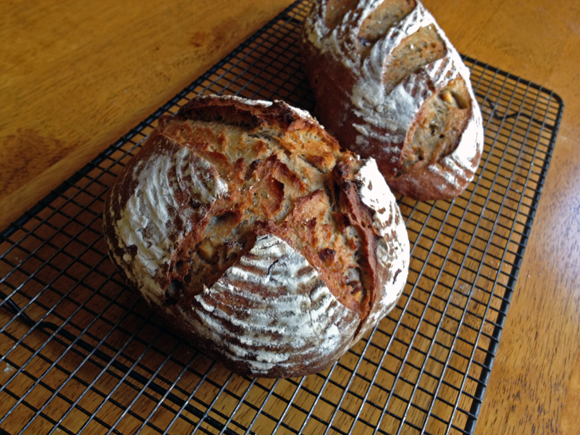
After 5 minutes, turn the oven down to 440ºF/220ºC and bake for another 20 minutes. Check to see if the loaves need to be turned around or if they need to switch places, then bake for another 10 minutes as needed

Let cool on a rack.

ENJOY!

to print the recipe, click here

ChestnutsDough1

Comments: When you buy 500g of chestnut flour several thousand miles away from home, you become very protective of it  A recipe that calls for 400g (in other words, 80% of my treasure) prompted me to launch a quick email to Farine, asking her thoughts on halving the recipe.  She is far more experienced in sourdough baking than me, so when she speaks, I listen. Once she gave me the ok to go for it, I felt empowered, on top of the world. Yes, I will be able to bake this bread and have a lot of chestnut flour leftover to play with. How cool is that?  So, being the super smart person I like to think I am, I made a nice table in which all amounts were cut in half, and went to work.

The catastrophic event was completely neglecting to look back at the table when mixing starter with the other components of the dough. I would have noticed that only HALF of the fermented dough should be added. So, that beautiful photo you see above, with a stretched out dough and the chestnuts waiting to be incorporated, was taken right before the piercing cry, the calling myself names, and the scared dogs running after Phil as he dashed out of the kitchen.  It is shocking and appalling to realize how little sympathy I get from those who live with me.

It is not easy to think rationally under duress, but I figured that the only way out of my self-inflicted misery was to discard half of that dough (ouch, it hurt!)  and add more of all other components to the other half, except (obviously) the starter.  Two problems with this strategy: I would not have time to let the flours go through autolyse before mixing, and I would have to use more of my precious chestnut flour.  With a heavy heart, that’s what I did.

compositechestnut

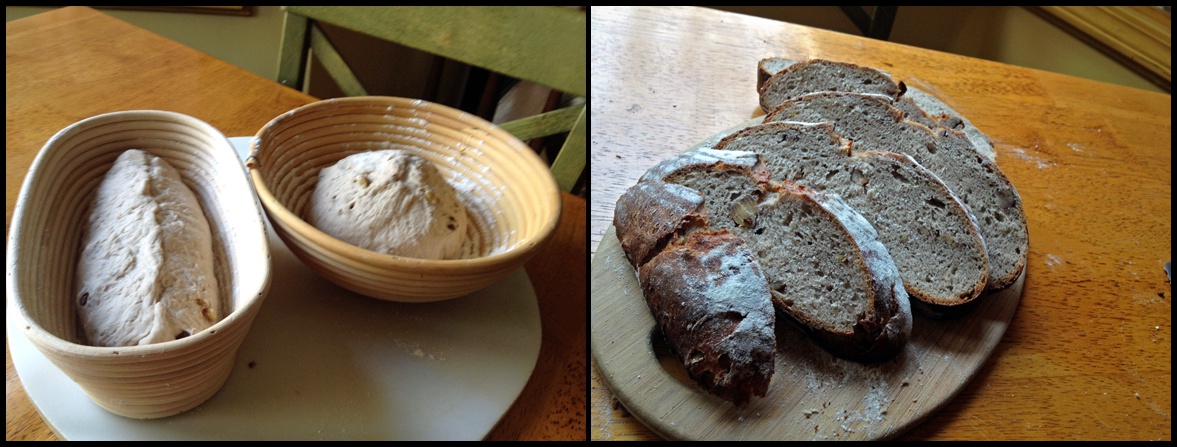
I was absolutely sure the abused bread would turn out to be a complete failure, but the Gods of Bread are a lot kinder than the Gods of Golf, so all had a miraculous happy ending.  Maybe the crumb turned out a little too tight, but I can tell you this bread tastes amazing!  If you can find chestnut flour where you live, or if you can order it online, try this bread. And, I echo Farine with one piece of advice she gave me: it is ok to scale down the recipe, but do not substitute walnuts or other nuts. Chestnuts are essential…

MC, thanks for the constant inspiration, and sorry I messed up the recipe. There’s always next time, as long as I find a good source for chestnut flour here in the US. Amazon.com to the rescue?  😉

Breads11

I am submitting this post to Susan’s Yeastspotting

ONE YEAR AGO: Kinpira Gobo and Japanese Home Cooking

TWO YEARS AGO: Walnut Sourdough

THREE YEARS AGO: Thai Chicken Curry

FOUR YEARS AGO: Zen and the art of risotto


RED WINE SOURDOUGH BREAD WITH CRANBERRIES

The Fresh Loaf Forum is a virtual paradise for bread bakers, as not only very experienced folks share their best recipes, but you can also get feedback in case problems arise with a recipe.  Last week I stopped by the site and the thread right at the top had the following title: Sourdough Wine Bread. That got my full attention.  I clicked on it, and was blown away by the gorgeous photos, and the unusual color of the bread’s crumb, given by the wine and the dried cranberries.  I revived my starter that same day, and started this bread on a Friday night.  Sometimes you  should not wait to chase a dream.loaf1RED WINE SOURDOUGH BREAD WITH DRIED CRANBERRIES
(adapted from The Fresh Loaf Forum, bread by Yuko)

102 g sourdough starter (at 100% hydration)
288 g  all-purpose flour
80 g water
123 g red wine
6.7 g Salt
80 g dried cranberries

In a bowl, mix flour, wine, and water roughly, cover it with plastic and keep for 12 hours in the fridge (autolyse).

Add sourdough starter and mix by folding dough in the bowl. Add  cranberries and mix by folding dough in the bowl. Add salt and slap & fold for 3 – 4 minutes or until the dough becomes a ball.  Bulk fermentation at room temperature, folding the dough every half and hour until it develops enough strength (I did 4 sets of folds).

Let it rise until the dough starts showing the yeast activity. It takes about 6 hours total depending on the temperature of your kitchen (I used my bread proofing box set at 78 F).  Shape the bread as a boule (or 2 baguettes), place in a banetton or other appropriate container, and let it proof in the fridge for 16 to 18 hours.

Pull it out of the fridge and leave it out for one to three hours (see comments).  Slash the bread and bake in a 450F oven with initial steam for a total of 40 minutes (for a boule), or 20 to 25 minutes for baguettes.

Cool on a rack before slicing.

ENJOY!

to print the recipe, click here

crumb

Comments:  Preparing this bread had me worried up until the point I finally sliced it. Something seemed terribly wrong, as I detected very little fermentation, even though I kept the dough for almost 7 hours at 78 F. The original recipe called for retarding the dough in the fridge and shaping it next day, but my dough seemed so…. slow!  I decided to shape it on the same day, and retard the dough in its final form, ready for the oven.  Ideally, you should remove the bread from the fridge and allow it to almost double in size.  That was not happening, so after a couple of hours I simply had to bake it.

Now, a little tangent.  I usually wake up several times during the night, and tend to think about our experiments while trying to go back to sleep.  Sometimes (unfortunately not that often),  when I wake up again an hour or so later, I have a new idea to solve a problem or at least approach it.  Almost as if during my sleep something goes to work “behind my back”…   😉  That Saturday night, I went to bed thinking about the red wine sourdough and why it seemed so weak.  Exactly at 2am I woke up with one word blinking in my mind: SULFITES!  All wine these days is preserved with sulfites! Maybe some batches have a higher concentration, maybe some of the bacteria or yeast in my starter was particularly sensitive to it.  At any rate, one thing is certain: when you add red wine to make the dough the pH will be lower (higher acidity) so that will affect the efficiency of fermentation.  Add to that the sulfites, and things can get trickier.   Discussing these points in The Fresh Loaf forum, one of the bakers mentioned that when he adds wine to the dough the crumb of his bread gets tighter (indicating lower production of gas). For that reason,  he normally tweaks his recipes to lower the alcohol and increase the water.  Since in this case we are hoping for a nice red tint in the crumb, compromise is in order.  I’d say keep the recipe as it is, and see how your starter behaves with it.  Just for fun, I’ll try to find an organic red wine for my next “experiment”. Organic wines cannot have extra sulfites added,  so the levels of the chemical will be low, ranging from 10 to 20 ppm (parts per million).  Non-organic red wines often reach 125 ppm of sulfites or higher.

Even if the fermentation was not at its peak, this bread was delicious!  I love the slightly sweetness given by the cranberries.  My favorite match for the bread was a Maytag blue cheese, sharp and salty.   Next day, slightly toasted, it seemed even better!

plattercheese

I am submitting this post to Susan’s Yeastspotting

ONE YEAR AGO: Award-Winning Sourdough Baguettes

TWO YEARS AGO: Country Rye (Tartine)

THREE YEARS AGO: Penne a la Vechia Bettola

LET’S BRAID IT ON!

Joanna from Zeb Bakes is a constant source of inspiration. She always comes up with the most amazing breads, just because she got up one day in the mood to play with an idea, or try to mimic something from a fancy bakery.  Not too long ago she shared with her readers a gorgeous bread with a crown, looking like a Roman Emperor, perhaps Julius Caesar on his golden days.  According to Joanna, the Emperor had indulged a tad too much on vino the evening before, so his crown was tilted to one side.  Granted, we’ve all had our days of overindulging, so let’s not be too critical.  Here is my attempt at crowning a sourdough:
boule1
HAIL CAESAR SOURDOUGH
(adapted from Joanna, at Zeb Bakes)

Mix together:
25 g of active sourdough starter
100 g  bread flour
125 g water

Leave for 12-16 hours in a cold kitchen;  6-10 hours in a warm one.

The following day, make the dough:
225 g of the above mixture
200 g water
175 g bread flour
150 g regular bread flour
75 g dark rye flour
1/2 tablespoon of dark malt dissolved in water
3 g dry yeast
10 g sea salt

Mix all ingredients together, except the salt.  Leave the mass of dough to rest for 20 minutes, sprinkle salt on top and knead it in for a couple of minutes until smooth. You can use a KitchenAid in low-speed if you like.

Ferment the dough for 3 hours, with two folds (at 60 and 120 minutes). Leave the dough rise undisturbed for the last hour.   Weigh the dough and separate a small amount roughly 10% of its weight for the braid.  Divide that portion in three, make long strands with it, and form a braid.   Place the braid at the bottom of a well floured banetton, form the remaining of the dough as a ball, and place it, seam side down over the braid.

Ferment the shaped dough for 2 hours, invert it on a piece of parchment paper, and bake in a 450 F oven with initial steam for 20 minutes, reduce the oven to 420 F and bake for 20 to 25 minutes more.  Cool completely on a rack.

ENJOY!

to print the recipe, click  here

composite

I loved making this bread!  When Joanna posted her article, she got a comment from the baker who originally designed this recipe, and he advised her to use less dough (5 to 8% from the total weight) to make the braids.  I used 10% because it already seemed like a very small amount, but I ran into some difficulties. I should have rolled my strands a little longer, and glued them better to the rest of the dough.  Still, it is a nice touch to embellish a sourdough boule. I will not lie to you, though.  My  Emperor was also vino-happy the previous night, as these (more revealing) shots will demonstrate. 😉

oops2oops

This was a nice loaf of bread, with the delicious flavor of rye, and a golden brown crust, boosted by the inclusion of malt. I baked it inside a large roasting pan with a lid, after a nice comment left by Donna on my sourdough mini-rolls post. It worked extremely well, thanks for the great tip, Donna!  I did not add any extra water inside the pan. I just poured some inside the lid, emptied it leaving a little water clinging to the surface, and inverted it quickly to close the roaster.  At the end of 20 minutes I opened the roasting pan and continued baking uncovered.

closeup

Joanna, thanks for another great recipe!  This one goes straight to Susan’s Yeastspotting

ONE YEAR AGO: In My Kitchen, December 2011

TWO YEARS AGO: Festivus Dinner Rolls

THREE YEARS AGO: 100% Sourdough Rye

THERE WILL BE BREAD


Drum roll, please…  

This post officially inaugurates the new kitchen in The Little Apple!  What better than a loaf of bread to start things on a nice track?  So, let me share with you a golden bread perfumed with the special saffron I received as a gift from our friend Steve. The bread looked like a blast of sunshine sitting on the black granite, and it made nice cracking noises as it cooled, the promise of a nice crumb underneath a hearty crust.

GOLDEN SAFFRON & FENNEL LOAF
(from the Bewitching Kitchen, inspired by Flo Makanai)

125 g  sourdough starter (at 100% hydration)
250 g water (divided)
large pinch of saffron
375 g bread flour
7 g salt
1 tsp fennel seeds

Heat 50 ml (no need to be precise) of water in a microwave until almost boiling, add the saffron and let it sit until it cools to almost room temperature, stirring every now and then.  Strain the saffron water through a fine mesh colander, and add to the rest of the water for a final volume of 250ml. Reserve.

Add the active starter to a large bowl, mix it with the water until it dissolves more or less smoothly. Add the flour and the fennel seeds, and briefly do a few kneading moves to form a shaggy mess.  Cover loosely with plastic wrap for 20 minutes.

Sprinkle the salt over the dough and incorporate by kneading lightly and folding the dough on itself.  You can keep the dough in the bowl, or transfer to a surface.  After 20-30 seconds of kneading/folding, cover the dough again and let it sit for 40 minutes (total rising time up to this point: 1 hour).

Repeat cycles of quick kneading/folding two more times, spacing them 40 to 50 minutes.   After the third and final kneading cycle, let the dough sit for 20 to 30 minutes, shape it as a round or oval loaf, and leave it at room temperature  30 minutes longer.  Total rising time from beginning to end: about 3 and a half hours.  Place it in the fridge overnight.

Remove the dough from the fridge 2 hours before baking (see my comments). Heat the oven to 450F. If using a clay pot, place it in the cold oven as you turn it on. Bake the bread covered for 30 minutes, remove cover, and allow it to fully bake (reducing the temperature to 425F if the bread seems to be browning too fast) for 12 to 15 minutes longer.  Remove to a rack to cool completely before slicing.

ENJOY!

to print the recipe, click here

Comments:  It’s been a while since I baked a loaf of bread that made me as happy as this one! I’d been refreshing my starter for weeks in a row, but placing it back in the fridge, unable to squeeze bread baking in our crazy schedule.  My cookbooks are not unpacked yet, so I decided to go with the simple but very efficient method devised by Flo Makanai years ago: her famous 1, 2, 3 recipe.   One part starter, 2 parts water, 3 parts flour.  You can adapt and use any liquid or flour, but that’s the basic formula.   I wanted to incorporate saffron in the dough, and fennel seemed like a good match too.  Considering that it was not a tried and true recipe, and that it would be my first time using the oven in our new home, I admit I was  pushing the envelope. Interesting expression, by the way, I learned its origin not too long ago, and was a bit surprised. No Post Office material was used in its making.  Live, and learn.

Live, learn, and bake!  😉

To add a bit more emotion to the adventure, I could not find my banettons to proof the dough after shaping.  I actually have two, one round, and one oval, but they are both MIA, probably hidden inside one of the unpacked boxes.  I ended up using a copper colander, lined with a white cloth.

Necessity is the mother of invention.

I pushed the envelope once more by removing the dough from the fridge only 30 minutes before placing it in the 450F oven, trying to minimize the time our kitchen would be exposed to such insanely high temperature. Still, the bread had an impressive oven spring, and the beautiful, golden open crumb I hoped for.  It would be amazing with paella or a bowl of bouillabaisse, but until the weather cools enough for those dishes, we’ll enjoy it with fresh, juicy tomatoes and a sprinkle of Maldon salt.   Simple pleasures. Golden pleasures.

A final remark: I wish I could take credit for the title of this post, but my beloved husband was the genius behind it…  Sorry, ladies, he’s mine, all mine!

I am submitting this post to Susan’s Yeastspotting.

ONE YEAR AGO: In My Kitchen, July 2011

TWO YEARS AGO: Heavenly Homemade Fromage Blanc

THREE YEARS AGO: A Perfect Sunday Dinner

BLACK OLIVE SOURDOUGH BREAD

Inspired by a bread from Hamelman (Olive Levain), which I’ve made a few times in the past, I improvised on the basic sourdough method from Emmanuel Hadjiandreou and his “How to Make Bread“, that I recently blogged about.  You want this bread to deliver real big olive flavor, so keep the olives in large pieces, you can even leave some whole (but pitted, of course! 😉

BLACK OLIVE SOURDOUGH
(adapted from Emmanuel Hadjiandreou)

400 g (3 + 1/2 cups) bread flour
10 g (2 tsp) salt
200 g (3/4 cup) warm water
300 g (1 + 1/2 cups) sourdough starter (100% hydration)
4-5 ounces black olives (preferably Kalamata, pitted and chopped in large pieces – roughly 1 cup, loosely packed)

Add into one bowl the flour and the salt.   This is your dry mixture.

In another, larger bowl, mix the  water and the sourdough starter. This is  your wet mixture.

Add the dry mixture to the wet mixture and mix until it all comes together. Cover with a plastic wrap and let it stand for 10 minutes.  After 10 minutes, add the pieces of olives and knead the dough in the bowl, by pulling one portion of the dough from the side and pressing it down in the middle.  Repeat it turning the bowl slightly at each kneading, doing this kneading motion about 8 times and covering the full circumference of the ball of dough. The whole process should take about 20 seconds.   Cover the dough again and leave it resting for 10 minutes.

Repeat this kneading cycle three more times, 10 minutes apart.  Cover the bowl and let it rest for one hour.

Turn the dough onto a floured surface, and shape it  as a round ball,  coat the surface lightly with cornmeal or rice flour, and place it in a suitable container for the final rise.  Let the dough rise until doubled in size, which should take from 3 to 6 hours, depending on how active your starter was.

Heat the oven to 475 F, and have your method to generate steam ready.   Slide the bread on a parchment paper or a wooden peel, slash it, and place it in the oven.  I like to bake it over tiles, and place an inverted roasting pan moist with hot water over it for about 30 minutes, then remove it.   Once the bread is in the oven, reduce the temperature to 425 F.  Bake for a total of 40 minutes, or until the internal temperature is over 200F.

Let the bread cool completely before slicing.

ENJOY!

to print the recipe, click here

Comments:  I confessed before that I am a kalamata-cheerleader,  so this bread is obviously a favorite of mine.  I already have a spicy kalamata sourdough in the blog,  but in this version I took a minimalist approach and used only olives, nothing else.

Don’t worry if when you start kneading the dough, the pieces of olive insist on poking out, just let them be.   In the end, they will find their perfect spot in the crumb.   Try not to squish the pieces too much as you fold or knead the dough.

I used cornmeal to coat the surface of the bread during proofing, because I ran out of rice flour, but in the end it turned out pretty good, the cornmeal gave the bread an interesting golden hue, and did a good job releasing the proofed bread from the banetton.

I am sending this post to Susan’s Yeastspotting, make sure you stop by to get inspired by all the baking going on this past week…   😉

ONE YEAR AGO: Buttermilk Cluster

TWO YEARS AGO: Farfalle, Farfalle

Add to FacebookAdd to DiggAdd to Del.icio.usAdd to StumbleuponAdd to RedditAdd to BlinklistAdd to TwitterAdd to TechnoratiAdd to Yahoo BuzzAdd to Newsvine