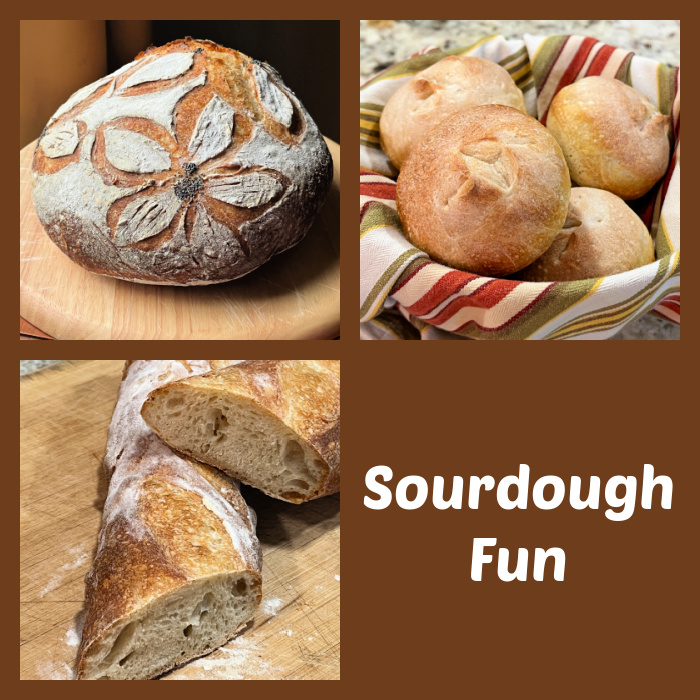
For some odd reason, we’ve been going through sourdough eating at a fast pace. I used my default recipe two days in a row, first being a regular boule with an attempt of flowery design that had so much enthusiasm in the oven that it exploded through the petals, but I am not one to complain about excessive oven spring…
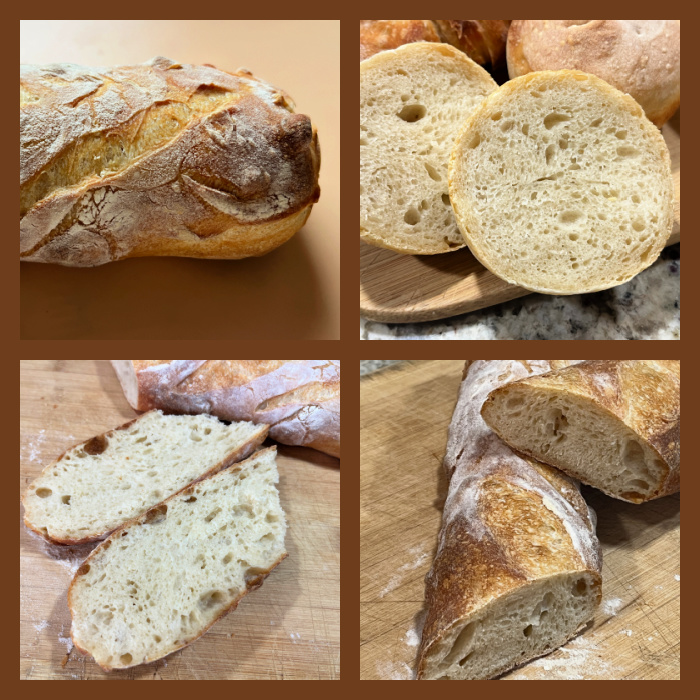
Next day, I went a bit crazy and did something totally different. I shaped the dough as a batard, and placed it in the fridge overnight. Next day, I divided it lengthwise in half, and used the first portion to bake a baguette-ish creature (not quite as thin), and divided the remaining half in 7 pieces to bake as small boules in a muffin tin. You can watch a short video of my first attempt to do this technique, which had a few issues, but nothing too serious. Halfway through the video, the important stuff got a bit off-center, but I caught in time to re-adjust for the final scoring. Apologies, I am a true newbie at this. Also, if the closed captions are showing and annoying you, I do not know now how to get rid of them. Will have to investigate that for future videos.
Apart from the problems handling the dough, I loved the method, and intend to do it again and again, The little boules are adorable and two of them were almost immediately consumed by the husband with a bit of jam.
As to the recipe, essentially any formula will work. I used 475g white bread flour and 25g whole-wheat, with my usual method that you can find here. I have incorporated following the fermentation by removing a small portion of the dough to a little jar, which gives me extra confidence in the bulk fermentation step. I leave it fermenting at room temperature until almost doubled in volume, then shape and place in the fridge overnight.
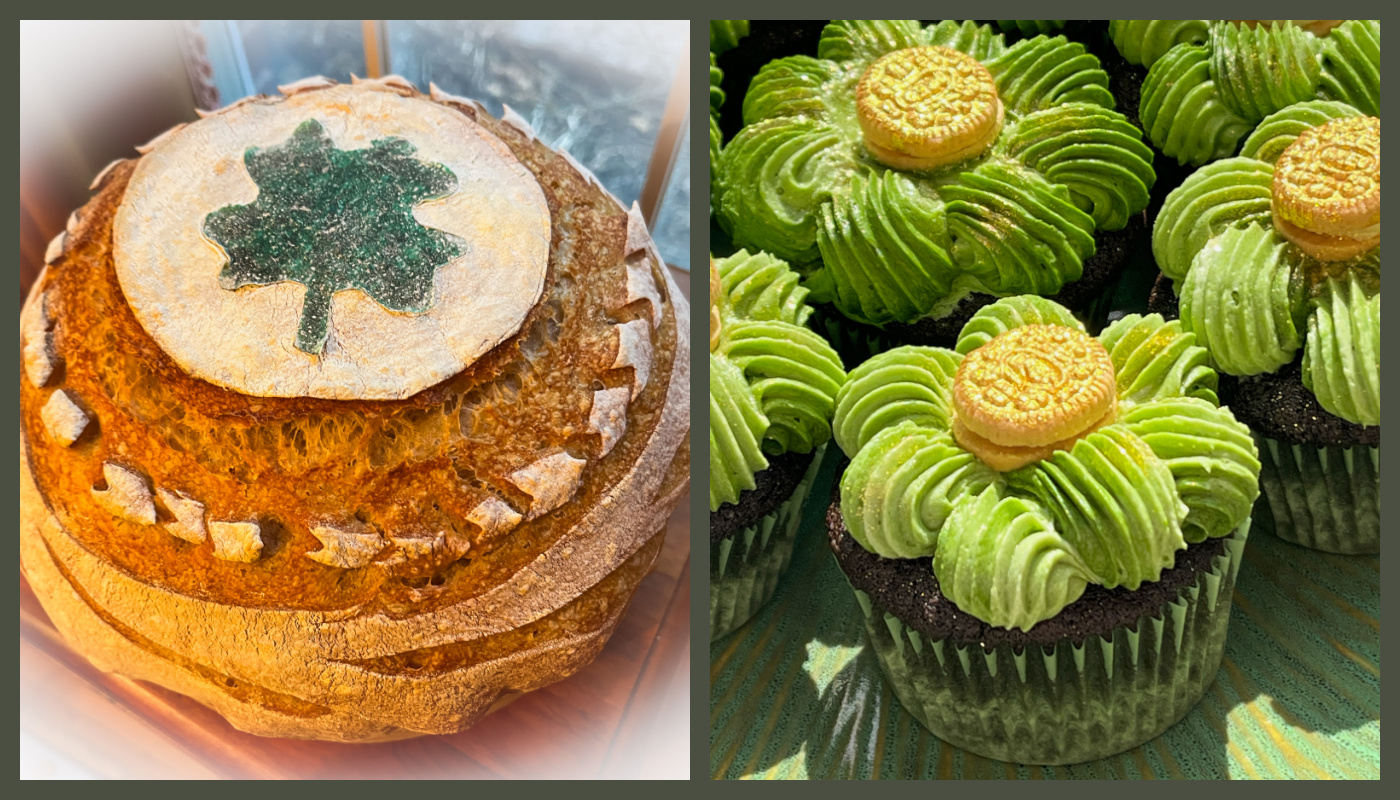
If you follow my baby blog, perhaps you’ve noticed I ran out of time to blog about St. Patrick’s cookies? It turns out I also got in trouble right here in the Bewitching Kitchen. Today I share a bread and a batch of cupcakes made in honor of that special holiday. Included in this post, a little cupcake decorating video, that you can find right after the recipe.
x
Better late than never, let’s start with the bread…
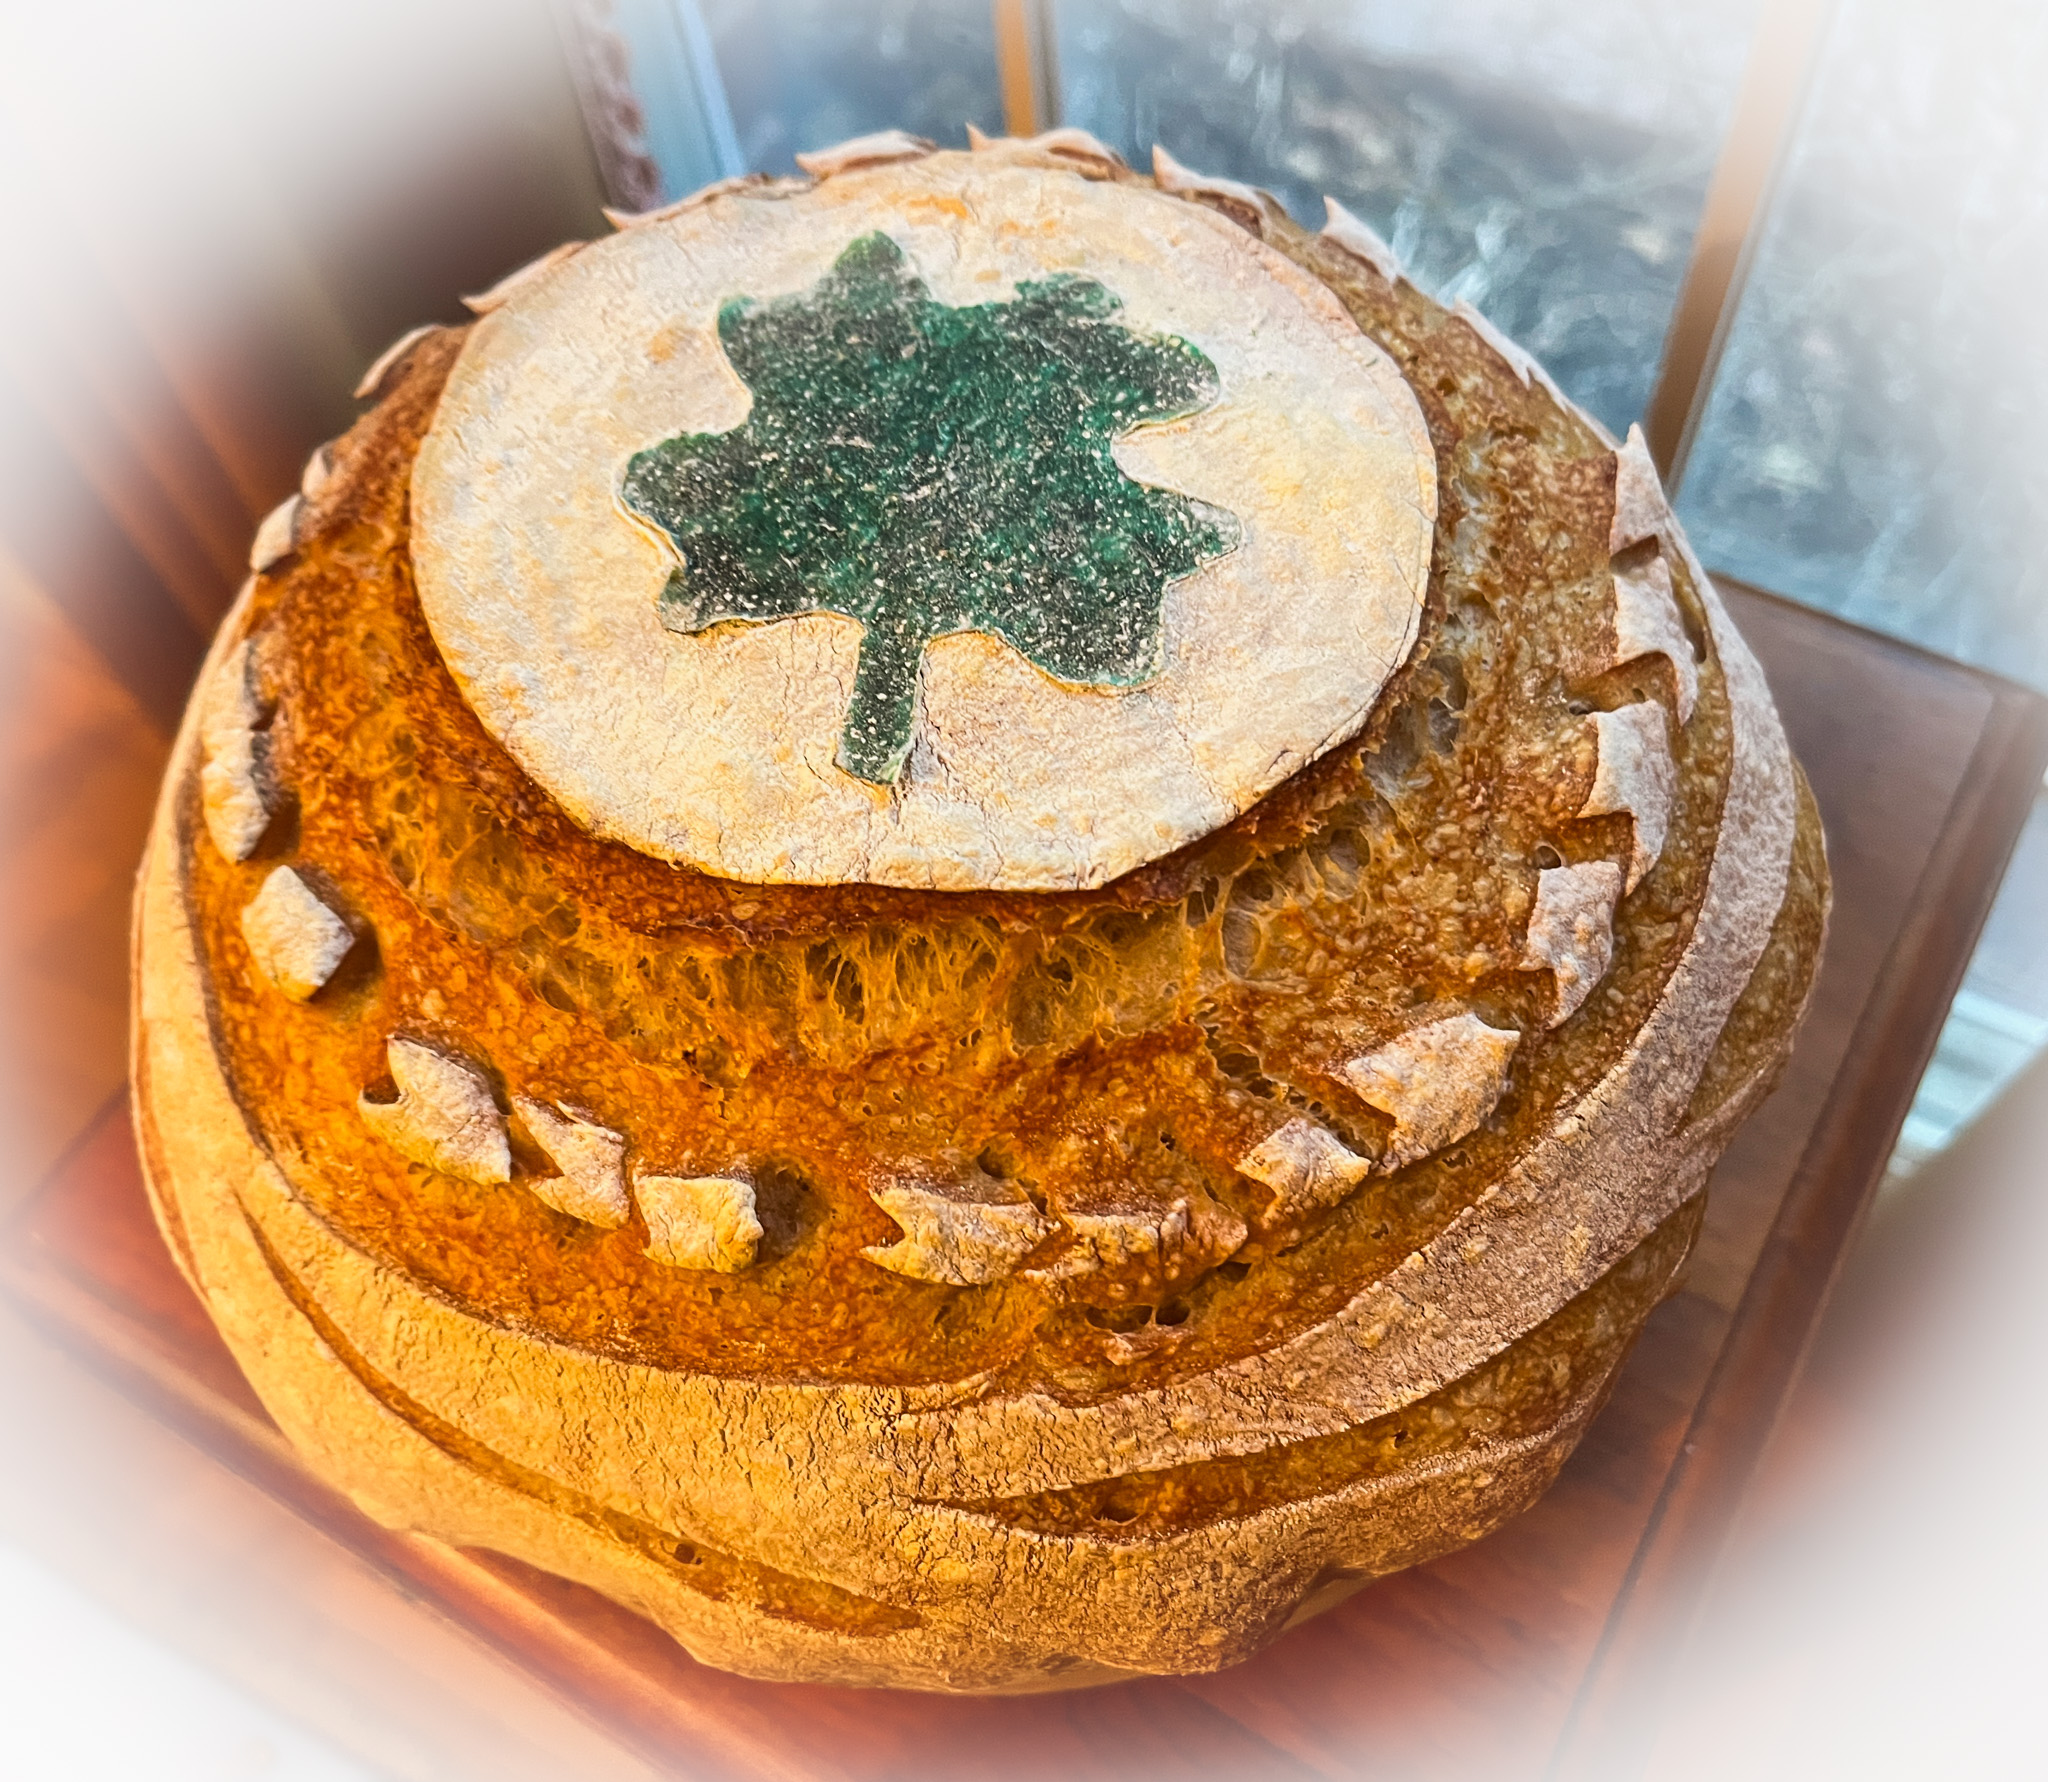
SHAMROCK SOURDOUGH (from The Bewitching Kitchen)
450g bread flour 25g spelt flour 25g dark rye flour 75g sourdough starter (stiff or 100% hydration) 10g salt 360g water Thai rice flour (or tapioca flour) shamrock shape cut from edible paper
Mix all ingredients in the bowl of a KitchenAid type mixer fitted with the dough hook. Knead gently for about 4 minutes (first or second speed maximum).
Transfer dough to a lightly oil bowl and do a bulk fermentation with 4 folds made 45 minutes apart. Before you start the fermentation , remove a very small amount of dough to a small glass container (like those that hold spices), and mark where the level of the dough is with a permanent marker. Keep that at room temperature to monitor fermentation.
After the last folding cycle, keep an eye on the fermentation using the small vial. Ideally you want to let the dough ferment until it is double in size. Depending on the day, temperature of your kitchen, it might take 8 hours or more.
Once bulk fermentation is over, shape the dough as a round ball. Place in the fridge overnight.
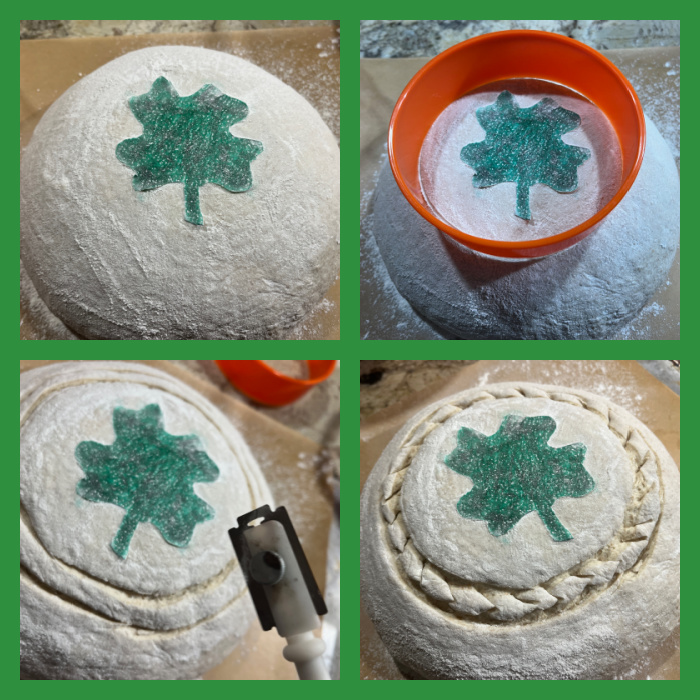
Next day, freeze the dough for 30 minutes in the banetton, to make it easier to score later. Invert the dough on a paper liner, add the shamrock shape in the center, and flour the region around it (I used Thai rice flour). To make the paper stick, you can spray the surface VERY LIGHTLY with water. Score the perimeter of the shamrock and the outer area of the dough, and place in a Dutch oven.
Close the pan and bake at 450F for 30 minutes, open and allow the bread to brown for a further 15 minutes.
Comments: I used my Supersonic blade to score the dough, but a sharp razor blade will do, of course. This composition of sourdough, with mostly white flour, but a touch of spelt and rye might very well be my favorite these days.
x
Moving on, time for cupcakes!
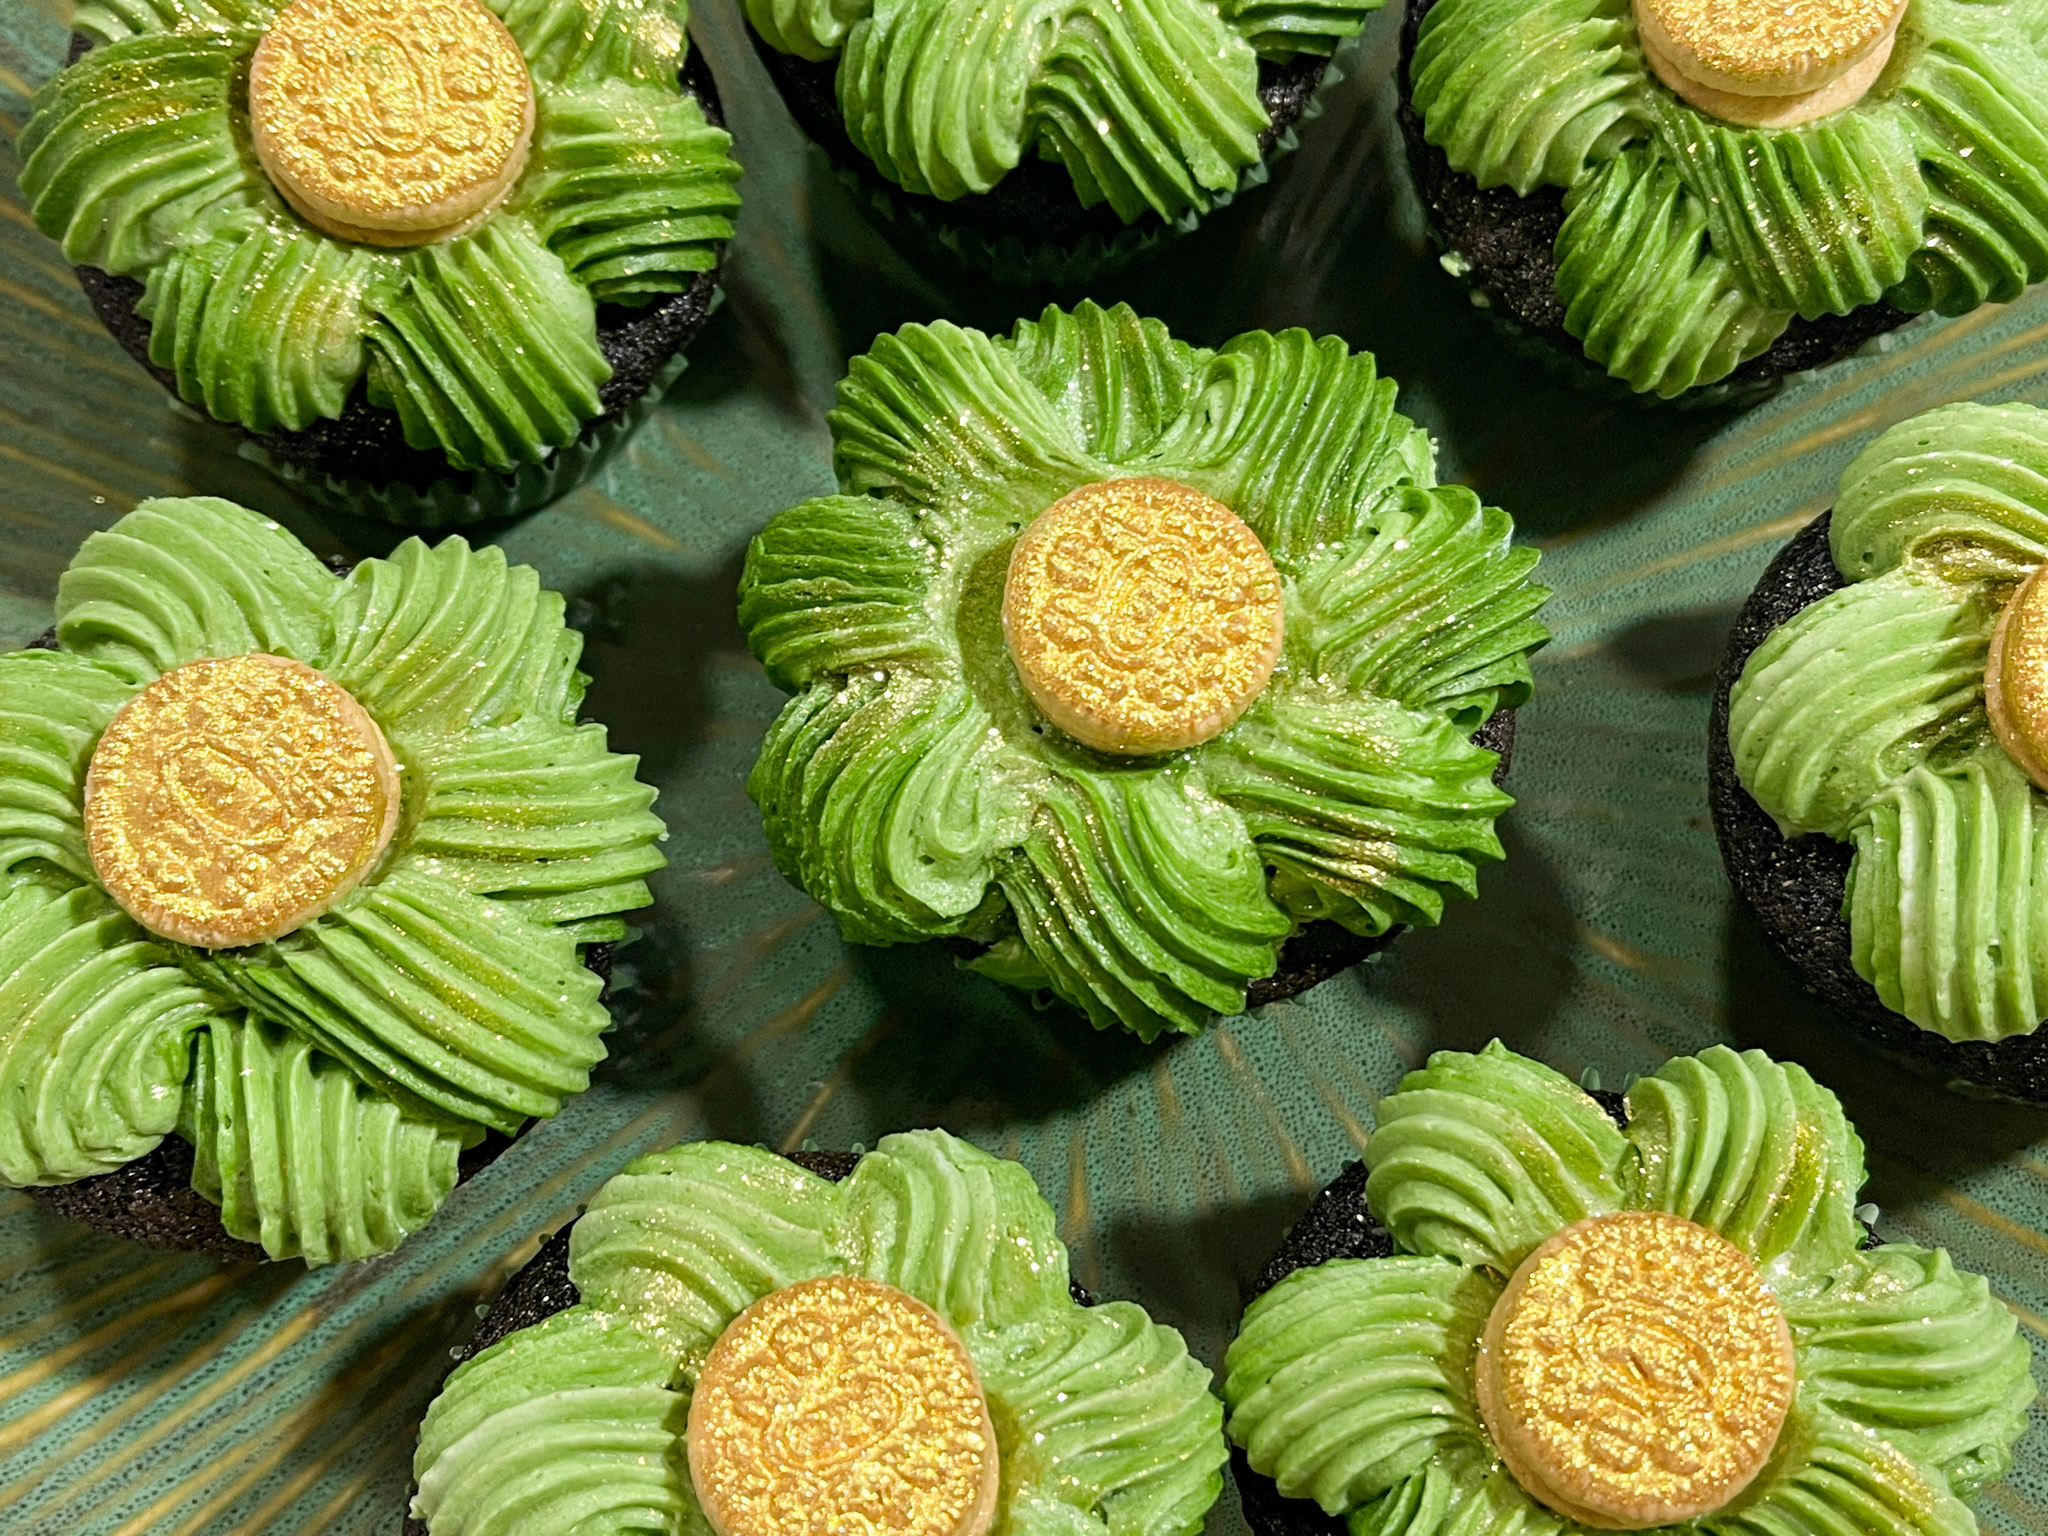
ST PATRICK CHOCOLATE CUPCAKES (from The Bewitching Kitchen)
makes 10 cupcakes
100g all-purpose flour 20g cocoa powder 140g granulated sugar 1/8 tsp salt 40g unsalted butter 1 large egg 120ml milk 1 + ½ tsp baking powder buttercream for topping Mini-golden Oreos painted with gold luster powder + vodka
Heat your oven to 350F and line a muffin tray with cupcake liners.
In a small, bowl, whisk the milk and egg with a fork. Reserve.
Put the flour, baking powder, cocoa powder, butter, sugar and salt into the stand mixer bowl with the paddle attachment. Mix on a medium speed until the butter turns into the consistency of sand.
Pour in half of the milk and egg mixture into the stand mixer bowl with your other ingredients and mix on a slow speed until it all fully combines and becomes a thick paste. Pour the remaining milk mixture and mix on low-speed until the batter is smooth.
Fill the lined pan with batter, a little more than halfway full. Bake for 16 minutes, testing with a toothpick. Leave to cool in the pan for 5 minutes, then remove the cupcakes to a rack to cool completely.
BASIC BUTTERCREAM FOR CUPCAKES
226g butter, unsalted, softened 452g powdered sugar pinch of salt Vanilla extract, about 1 tsp or more to taste a couple or more tablespoons of milk (to adjust consistency)
Place the softened butter in the bowl of a KitchenAid type mixer with the paddle attachment, add the pinch of salt, and whip at high speed for about 7 minutes. It needs to be really soft and lighter. Stop the mixer. Eyeball the amount of powdered sugar, add 1/3 and mix at low speed at first, once the sugar is starting to get incorporated, increase the speed to medium-high.
Add the second portion of the sugar, and incorporate the same way. Add the final portion, start at low speed, clean the sides of the bowl well with a spatula, add the vanilla and increase the speed slowly all the way to high. Whip it until very smooth. Add milk to desired consistency. Divide the buttercream in two portions, dye one with light green, one with darker green. Place both portions over a plastic wrap, enclose them as a sausage, drop inside a large piping bag fitted with an open star tip. Decorate the tops of the cupcakes as shown in the video. Add the gold Oreos.
Comments: I was pretty happy with the way these cupcakes turned out. It was fun to decorate, and to show the process in more detail, here is a little video for you.
This wonderful bread was inspired by The Perfect Loaf, but I modified it quite a bit. Check his site for the original, which makes two loaves and includes a few extra instructions I omit.
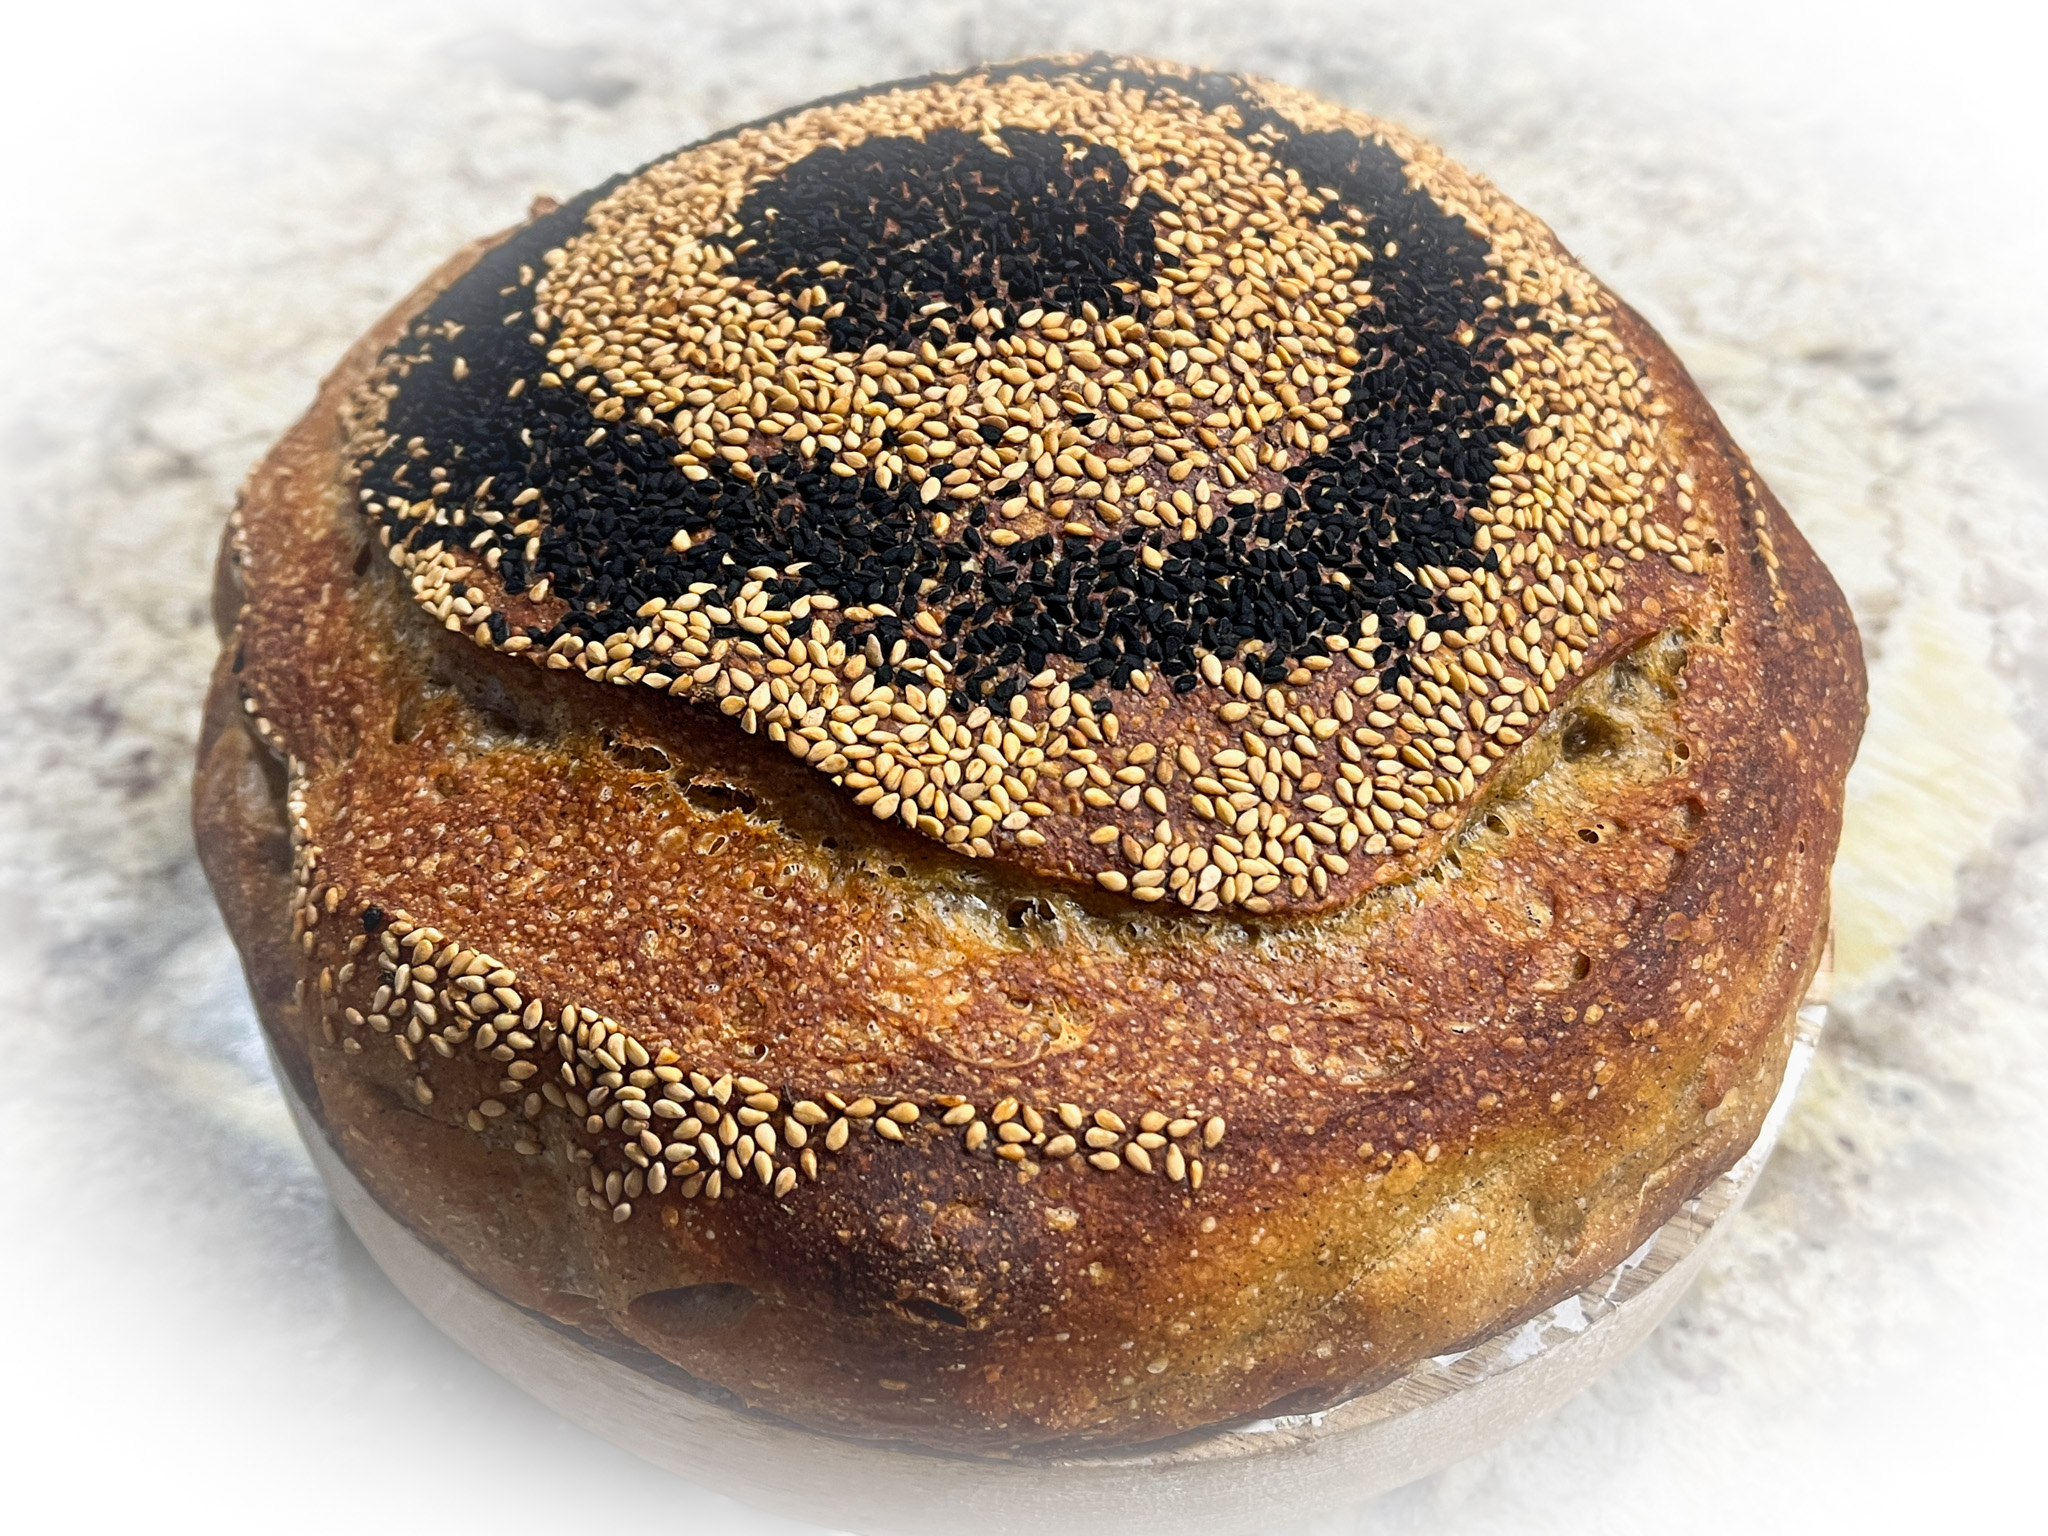
SCALDED BUCKWHEAT FLOUR AND HONEY SOURDOUGH (adapted from The Fresh Loaf)
for the levain: 27 g whole wheat flour 27g water 27g sourdough starter
flour scald: 23g buckwheat flour 37g boiling water
autolyse step: 320g bread flour 95g whole wheat flour 270g water All of the flour scald
main dough: 45g water 9g salt all the level 40g honey
sesame seeds for decoration (optional)
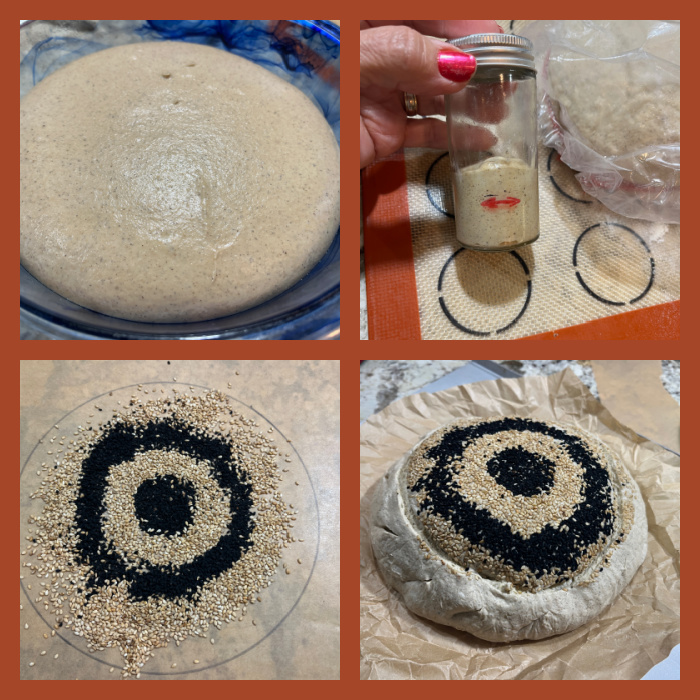
Prepare the levain: mix and allow it to ferment for 3 hours. At the same time make the buckwheat scald by mixing the flour with boiling water. Mix well into a paste. Cover and reserve.
Do the autolyse step: Combine flours, water, and scalded buckwheat in the bowl of your KitchenAid mixer. Use your hands or the dough hook to mix the ingredients until the flour is all incorporated. Cover and let it at room temperature for 1 hour.
Add the levain, additional water (hold some back and see if the dough can take the full amount), salt, and honey. Turn the mixer with the dough hook and knead for 3 minutes in low-speed. Turn the mixer off, wait for 5 minutes and turn it on again at low-speed for 3 to 5 more minutes. Remove a small portion of the dough to monitor fermentation.
Ferment for 3 hours (I used my proofing box set at 78F), with folds at every 30 minutes. Allow the dough to sit undisturbed until it increases by 50% in volume. I left mine for a total of 6 hours.
Pre-shape the dough, allow it to rest for 15 minutes and shape as a ball. Place it in the fridge overnight.
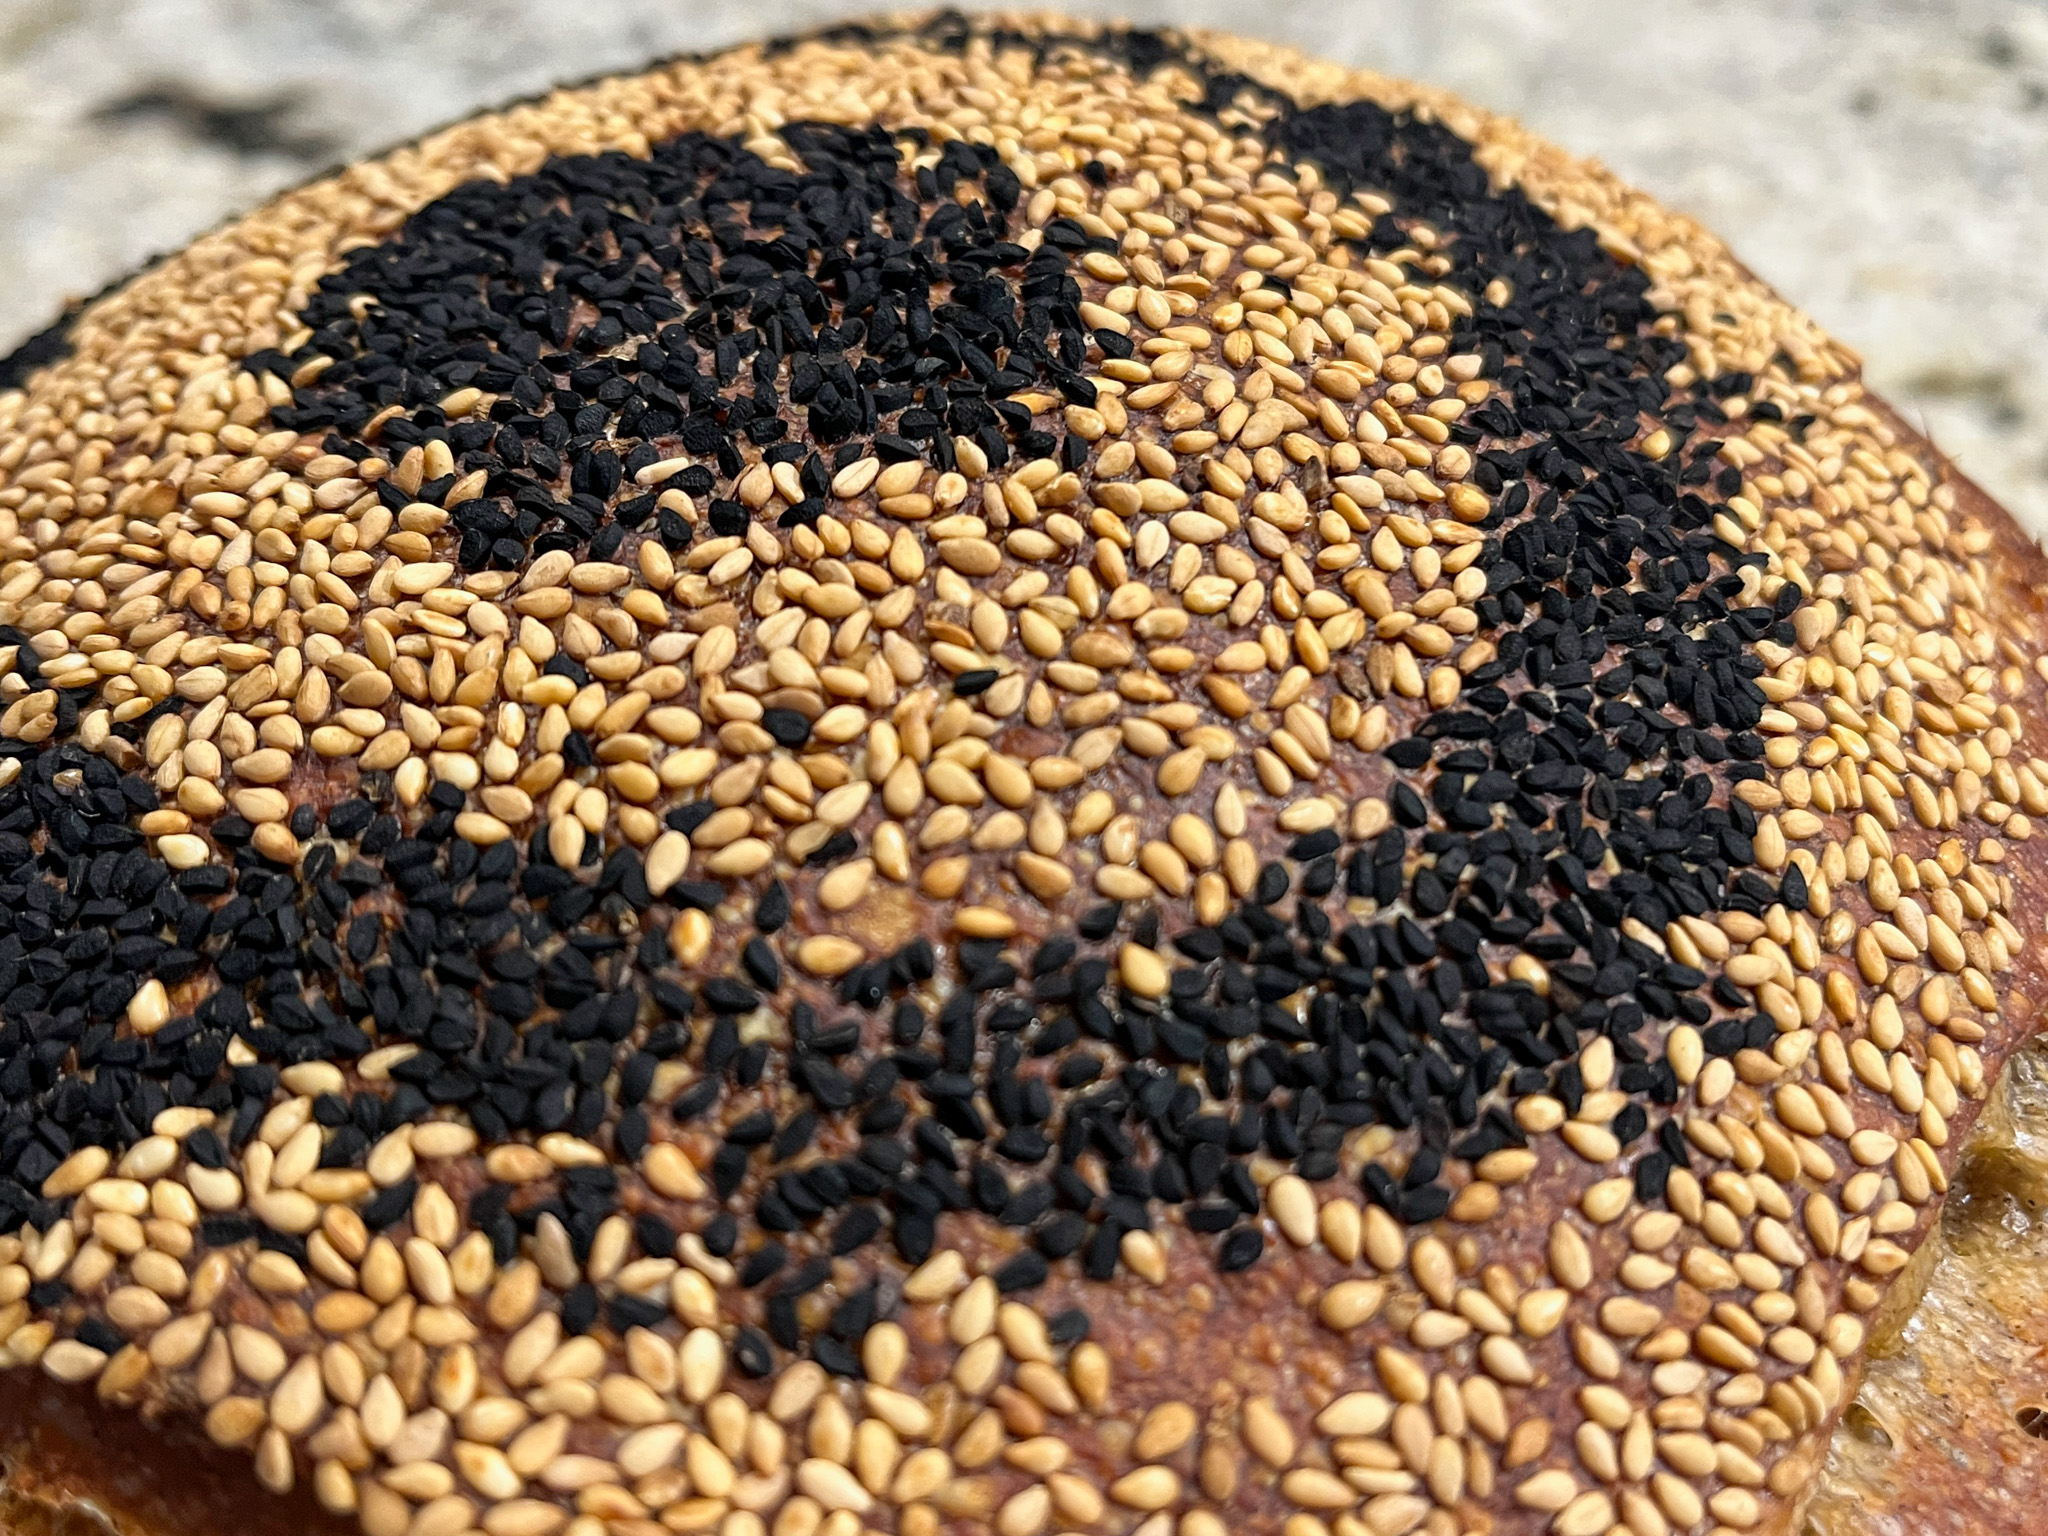
Next morning, freeze the dough for 20 minutes to make it easier to handle. Spread black and white sesame seeds over parchment paper. Invert the dough on the seeds, roll to coat it well. Slash if so desired.
Bake in a Dutch oven at 450F for 30 minutes with the lid on, remove the lid and bake for another 15 minutes.
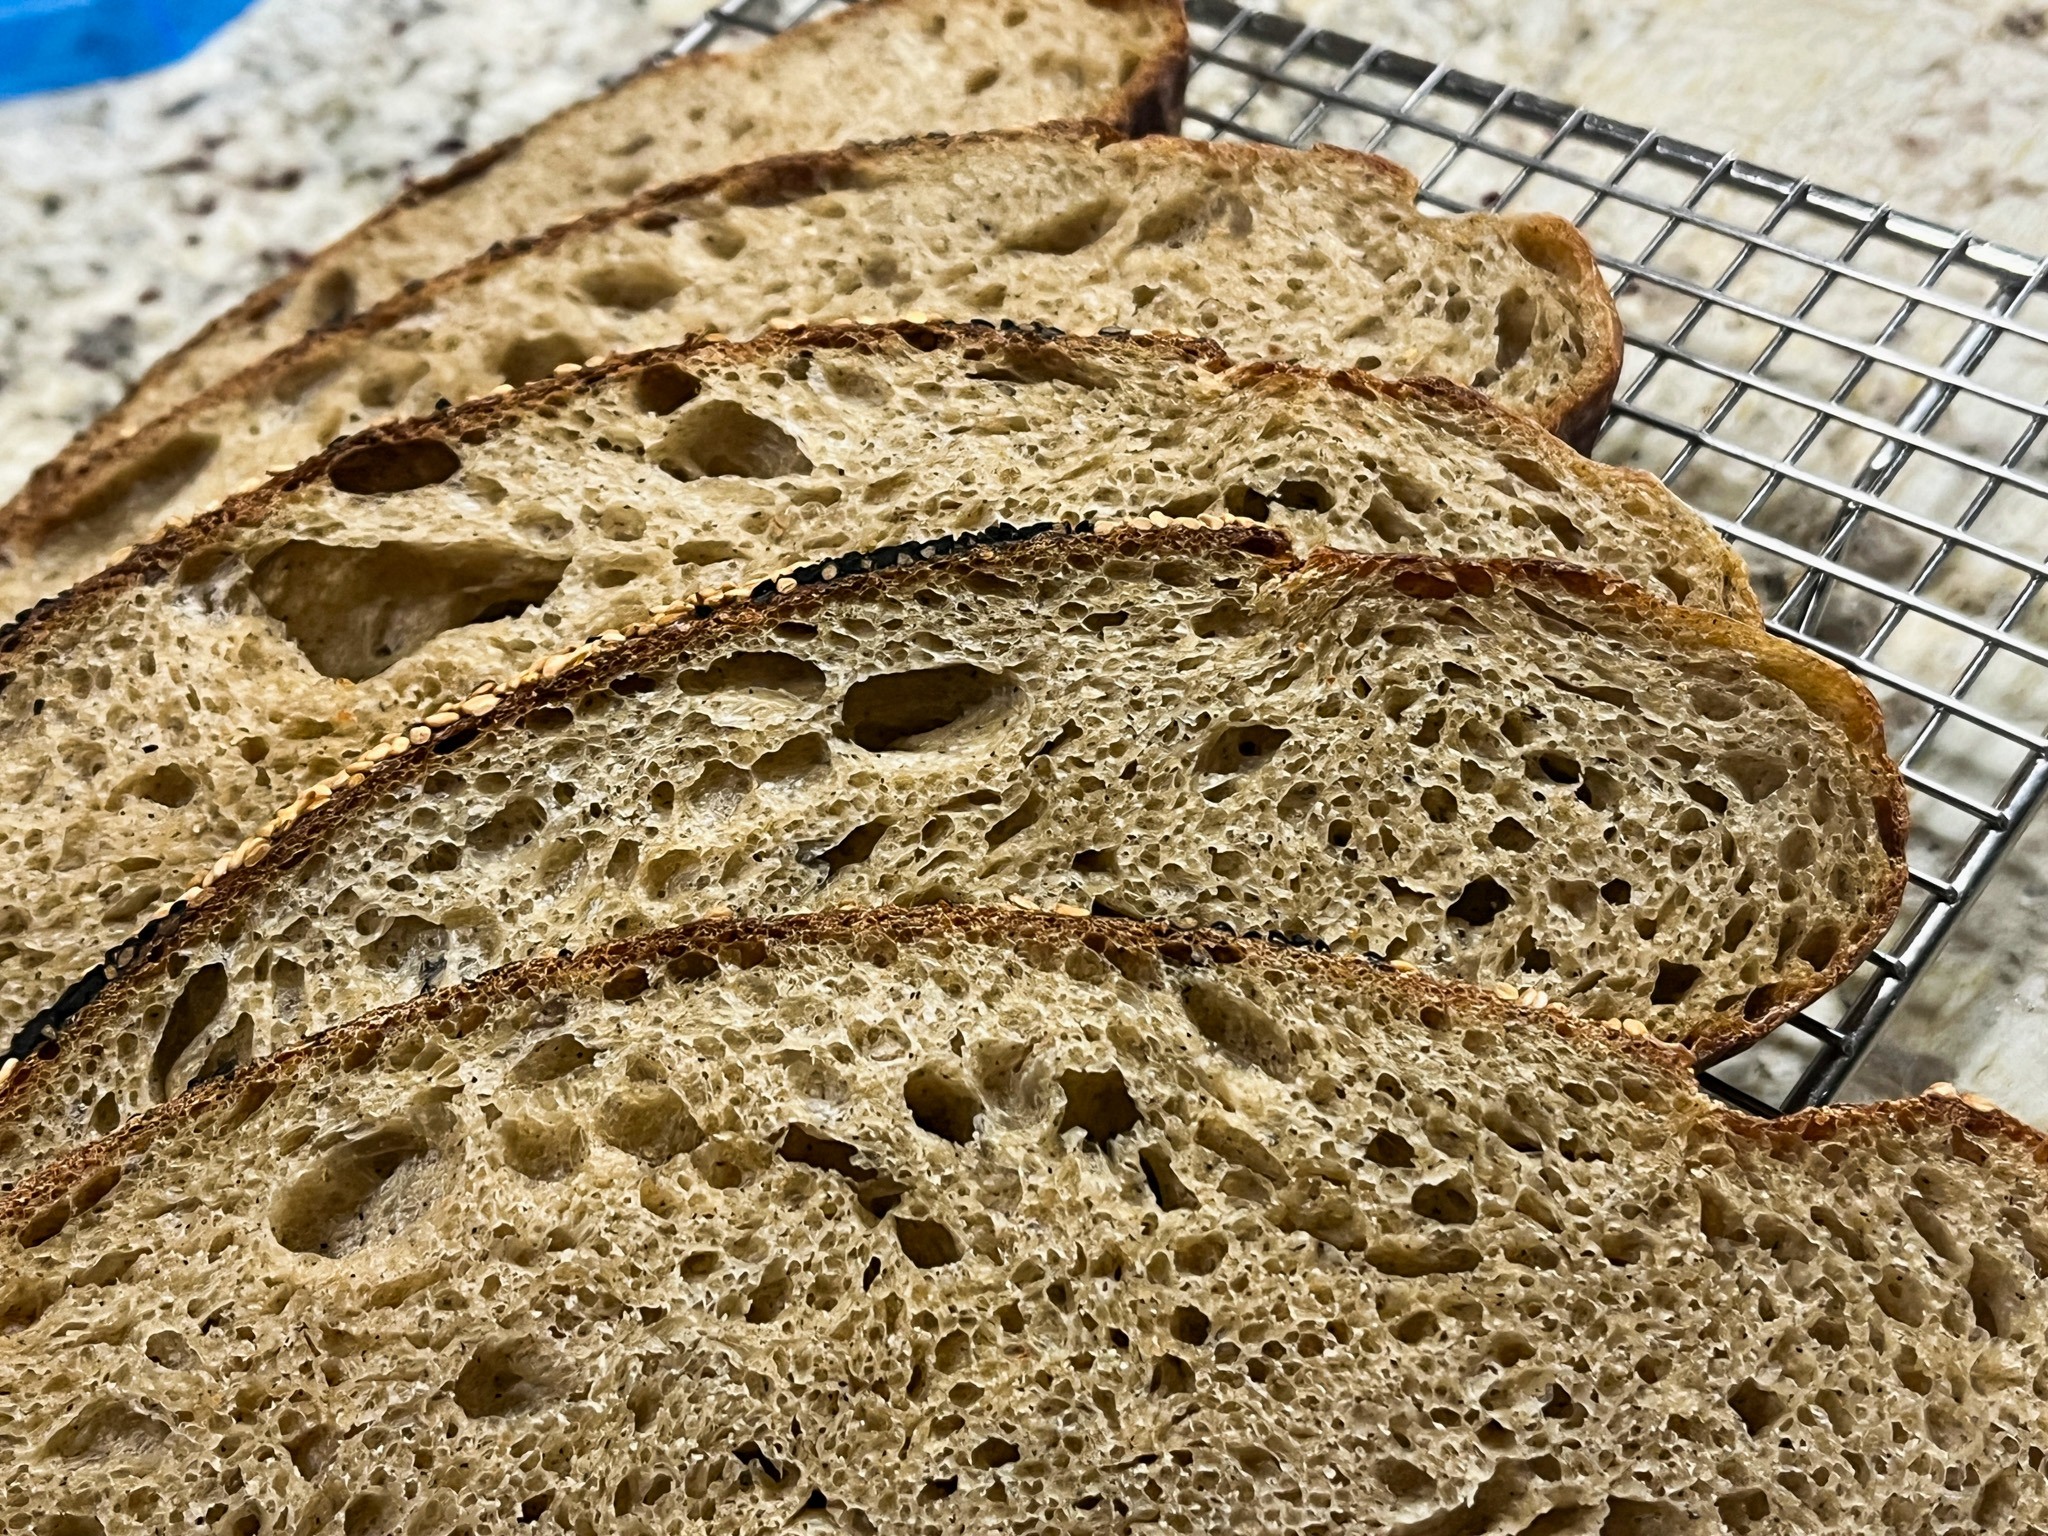
Allow it to cool completely before slicing the bread.
Comments: We loved this bread! It has a smoky quality, probably due to the scalded buckwheat flour, perfect for ham or smoked salmon. It is hearty, very flavorful, with a nice crumb and perfect crust. I highly recommend you try this recipe, or go for the original from The Perfect Loaf, that has a much higher proportion of whole-wheat, and uses malt syrup and aniseeds.
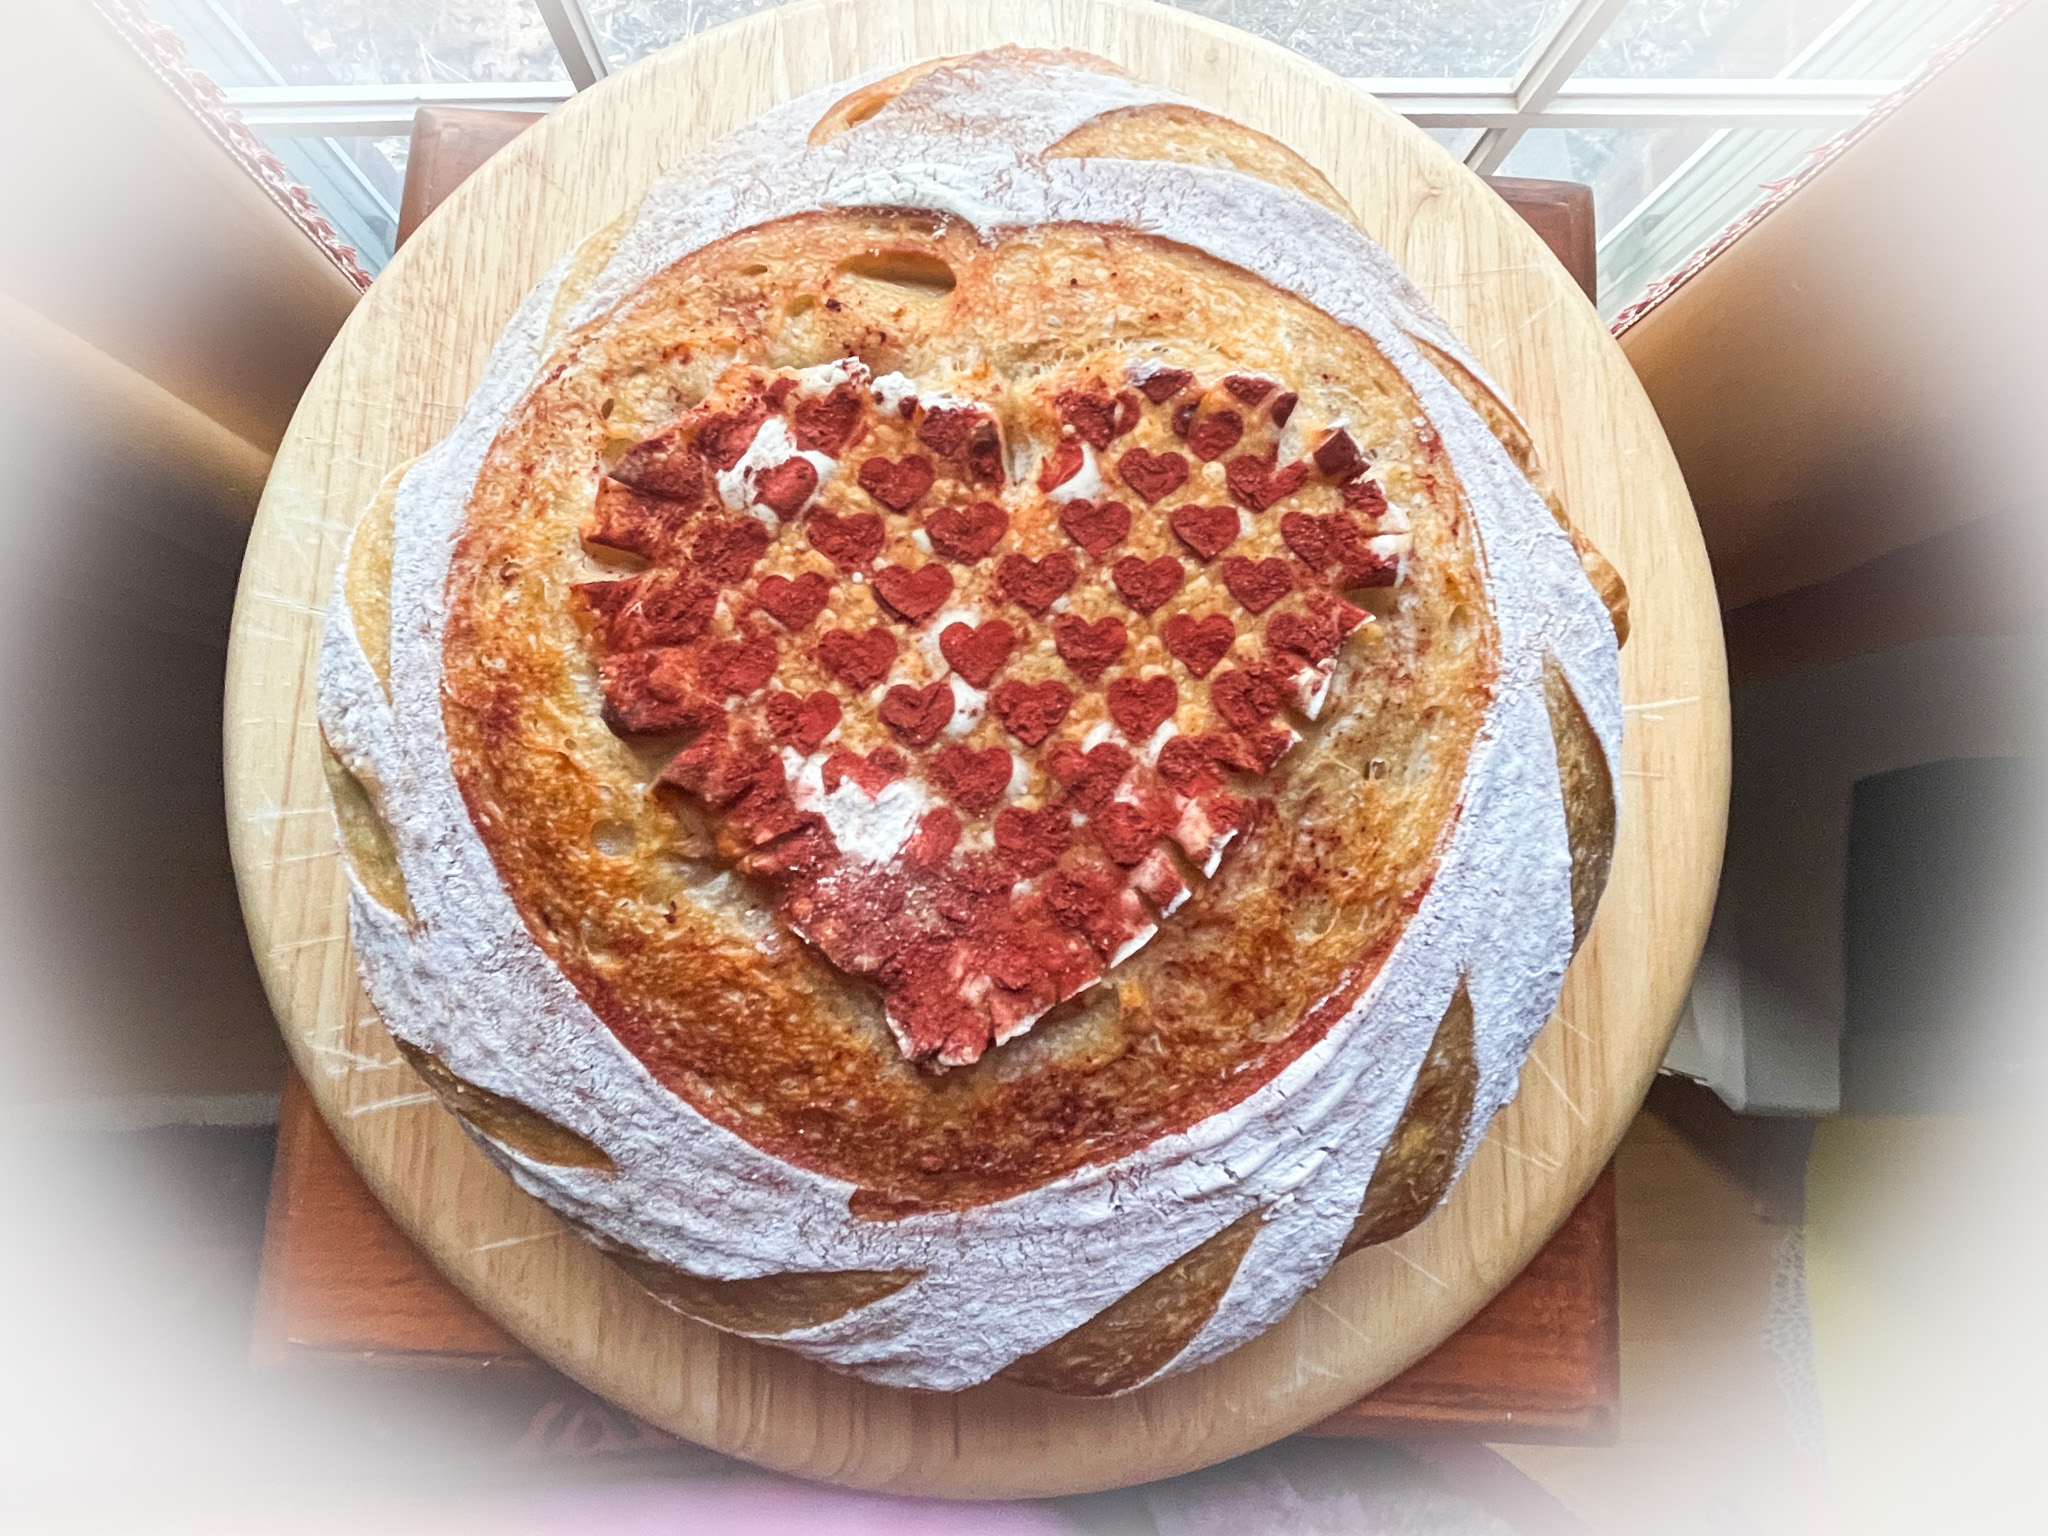
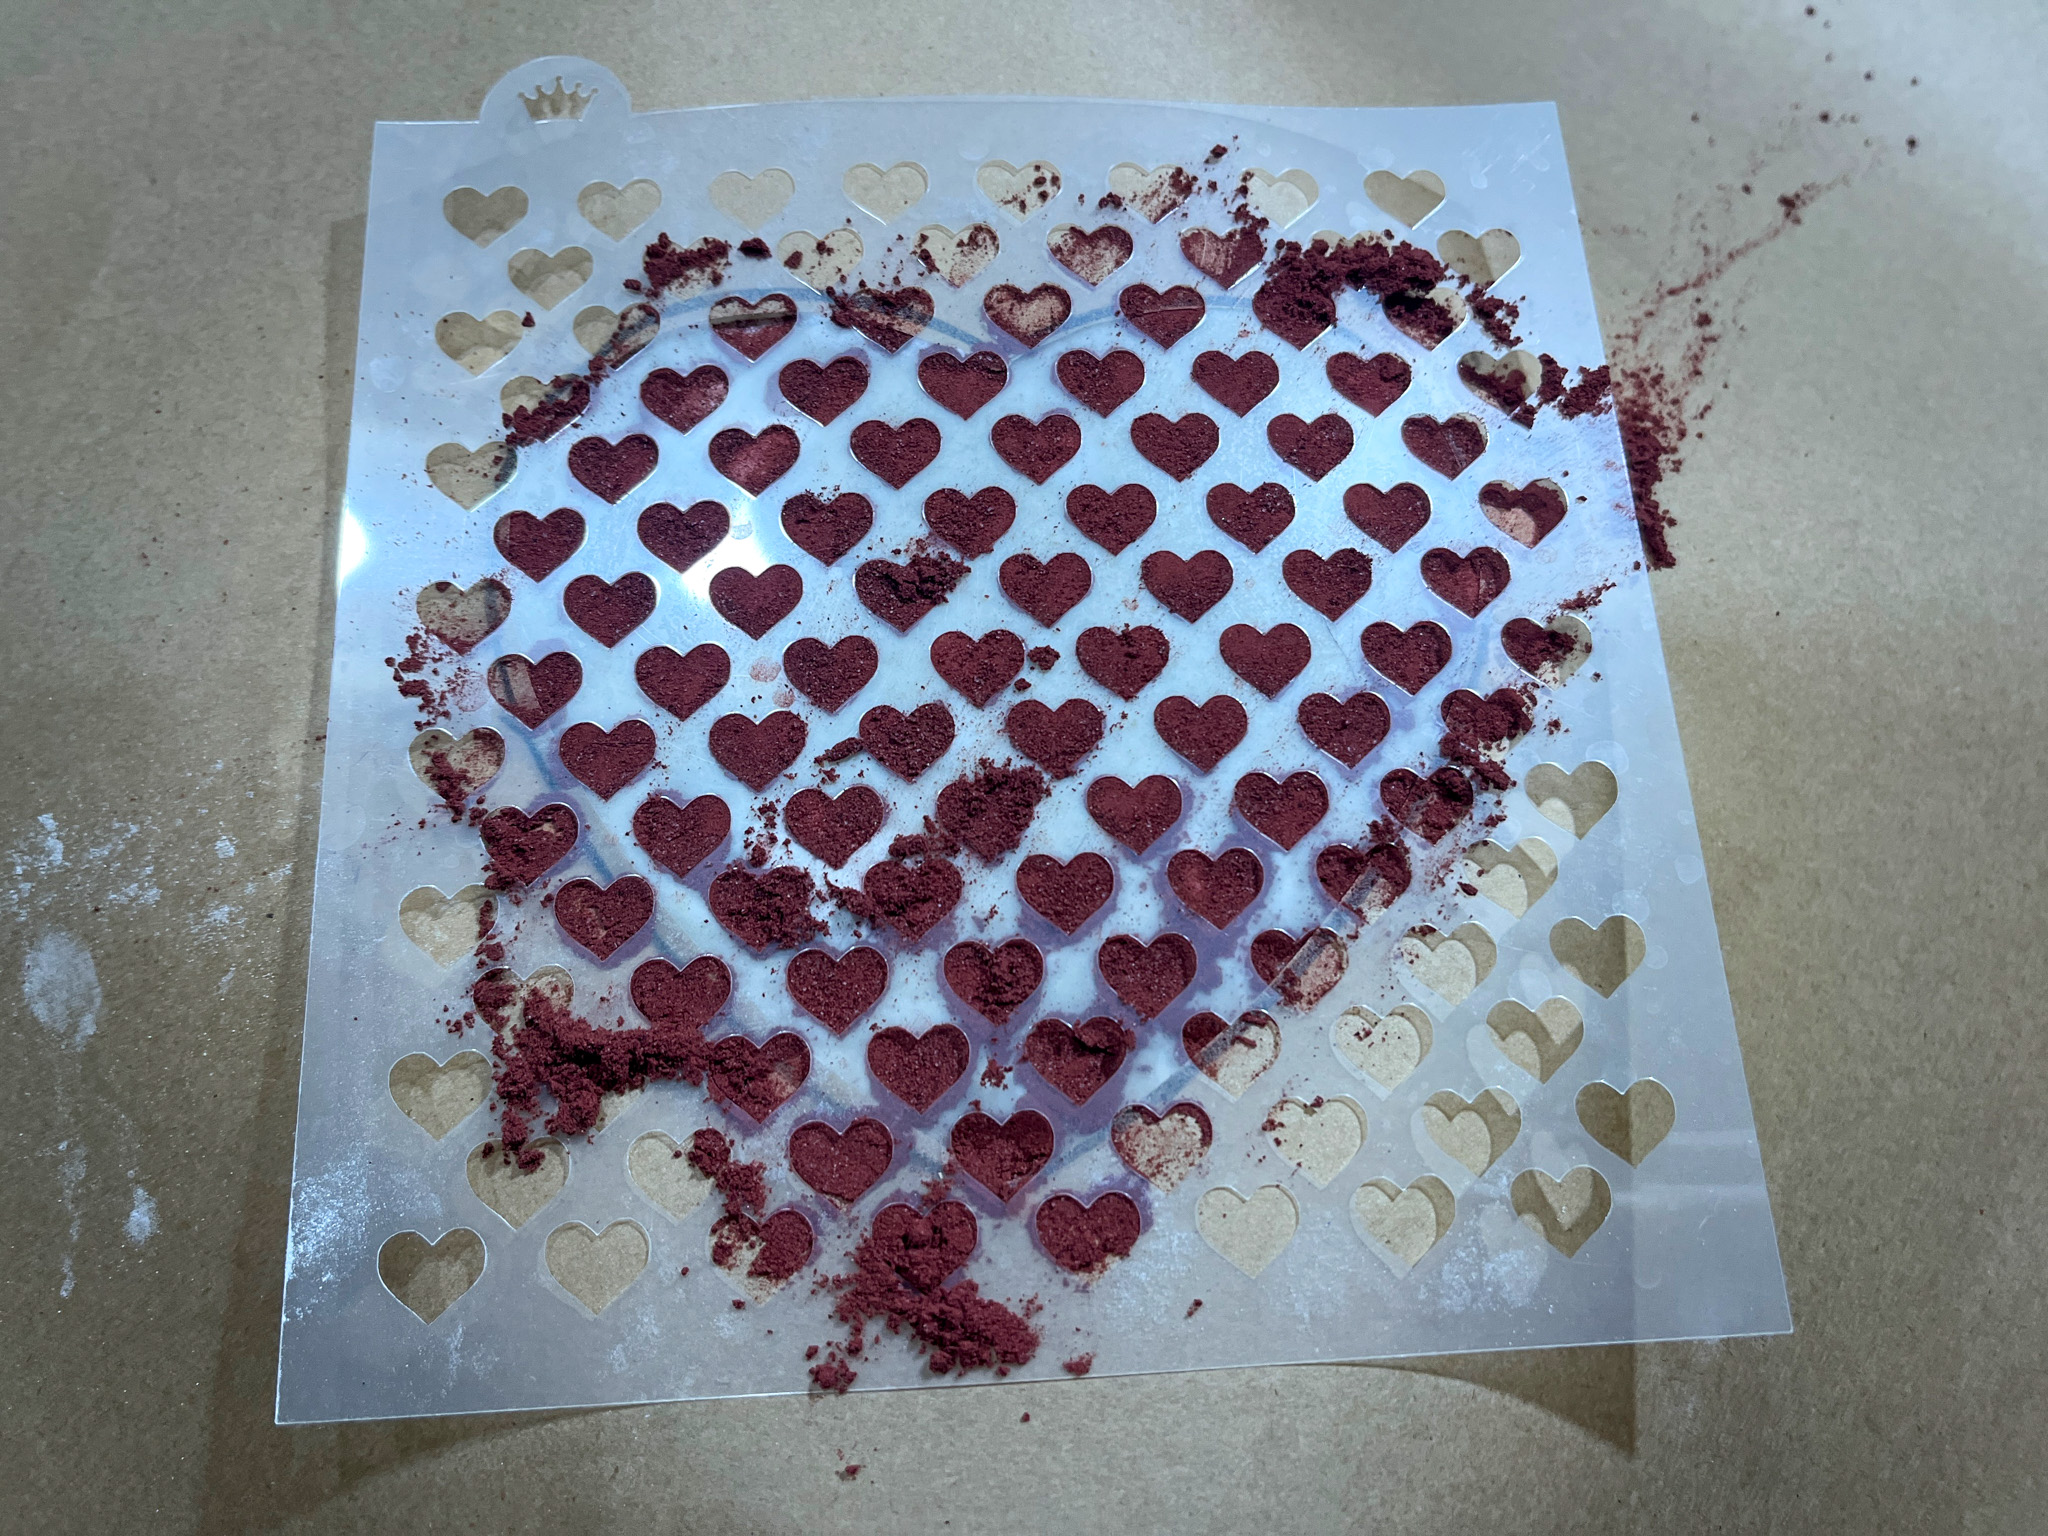
You can use any recipe you are fond of, the scoring is not intricate so you can even increase a bit the hydration level if you prefer. You will need parchment paper cut with a heart shape (save the heart and the outside area), and a stencil with little hearts. I used Red Yeast Powder to add color, but air-brushing would also work. I love how the little white heart popped into the design, totally by accident! Serendipity at work…
VALENTINE’S SOURDOUGH (from The Bewitching Kitchen)
450g bread flour 50g whole wheat flour 75g sourdough starter (stiff or 100% hydration) 10g salt 360g water Thai rice flour (or tapioca flour) Red Yeast Powder for color (I used this one)
Mix all ingredients in the bowl of a KitchenAid type mixer fitted with the dough hook. Knead gently for about 4 minutes (first or second speed maximum).
Transfer dough to a lightly oil bowl and do a bulk fermentation with 4 folds made 45 minutes apart. Before you start the fermentation , remove a very small amount of dough to a small glass container (like those that hold spices), and mark where the level of the dough is with a permanent marker. Keep that at room temperature to monitor fermentation.
After the last folding cycle, keep an eye on the fermentation using the small vial. Ideally you want to let the dough ferment until it is double in size. Depending on the day, temperature of your kitchen, it might take 8 hours or more.
Once bulk fermentation is over, shape the dough as a round ball. Place in the fridge overnight.
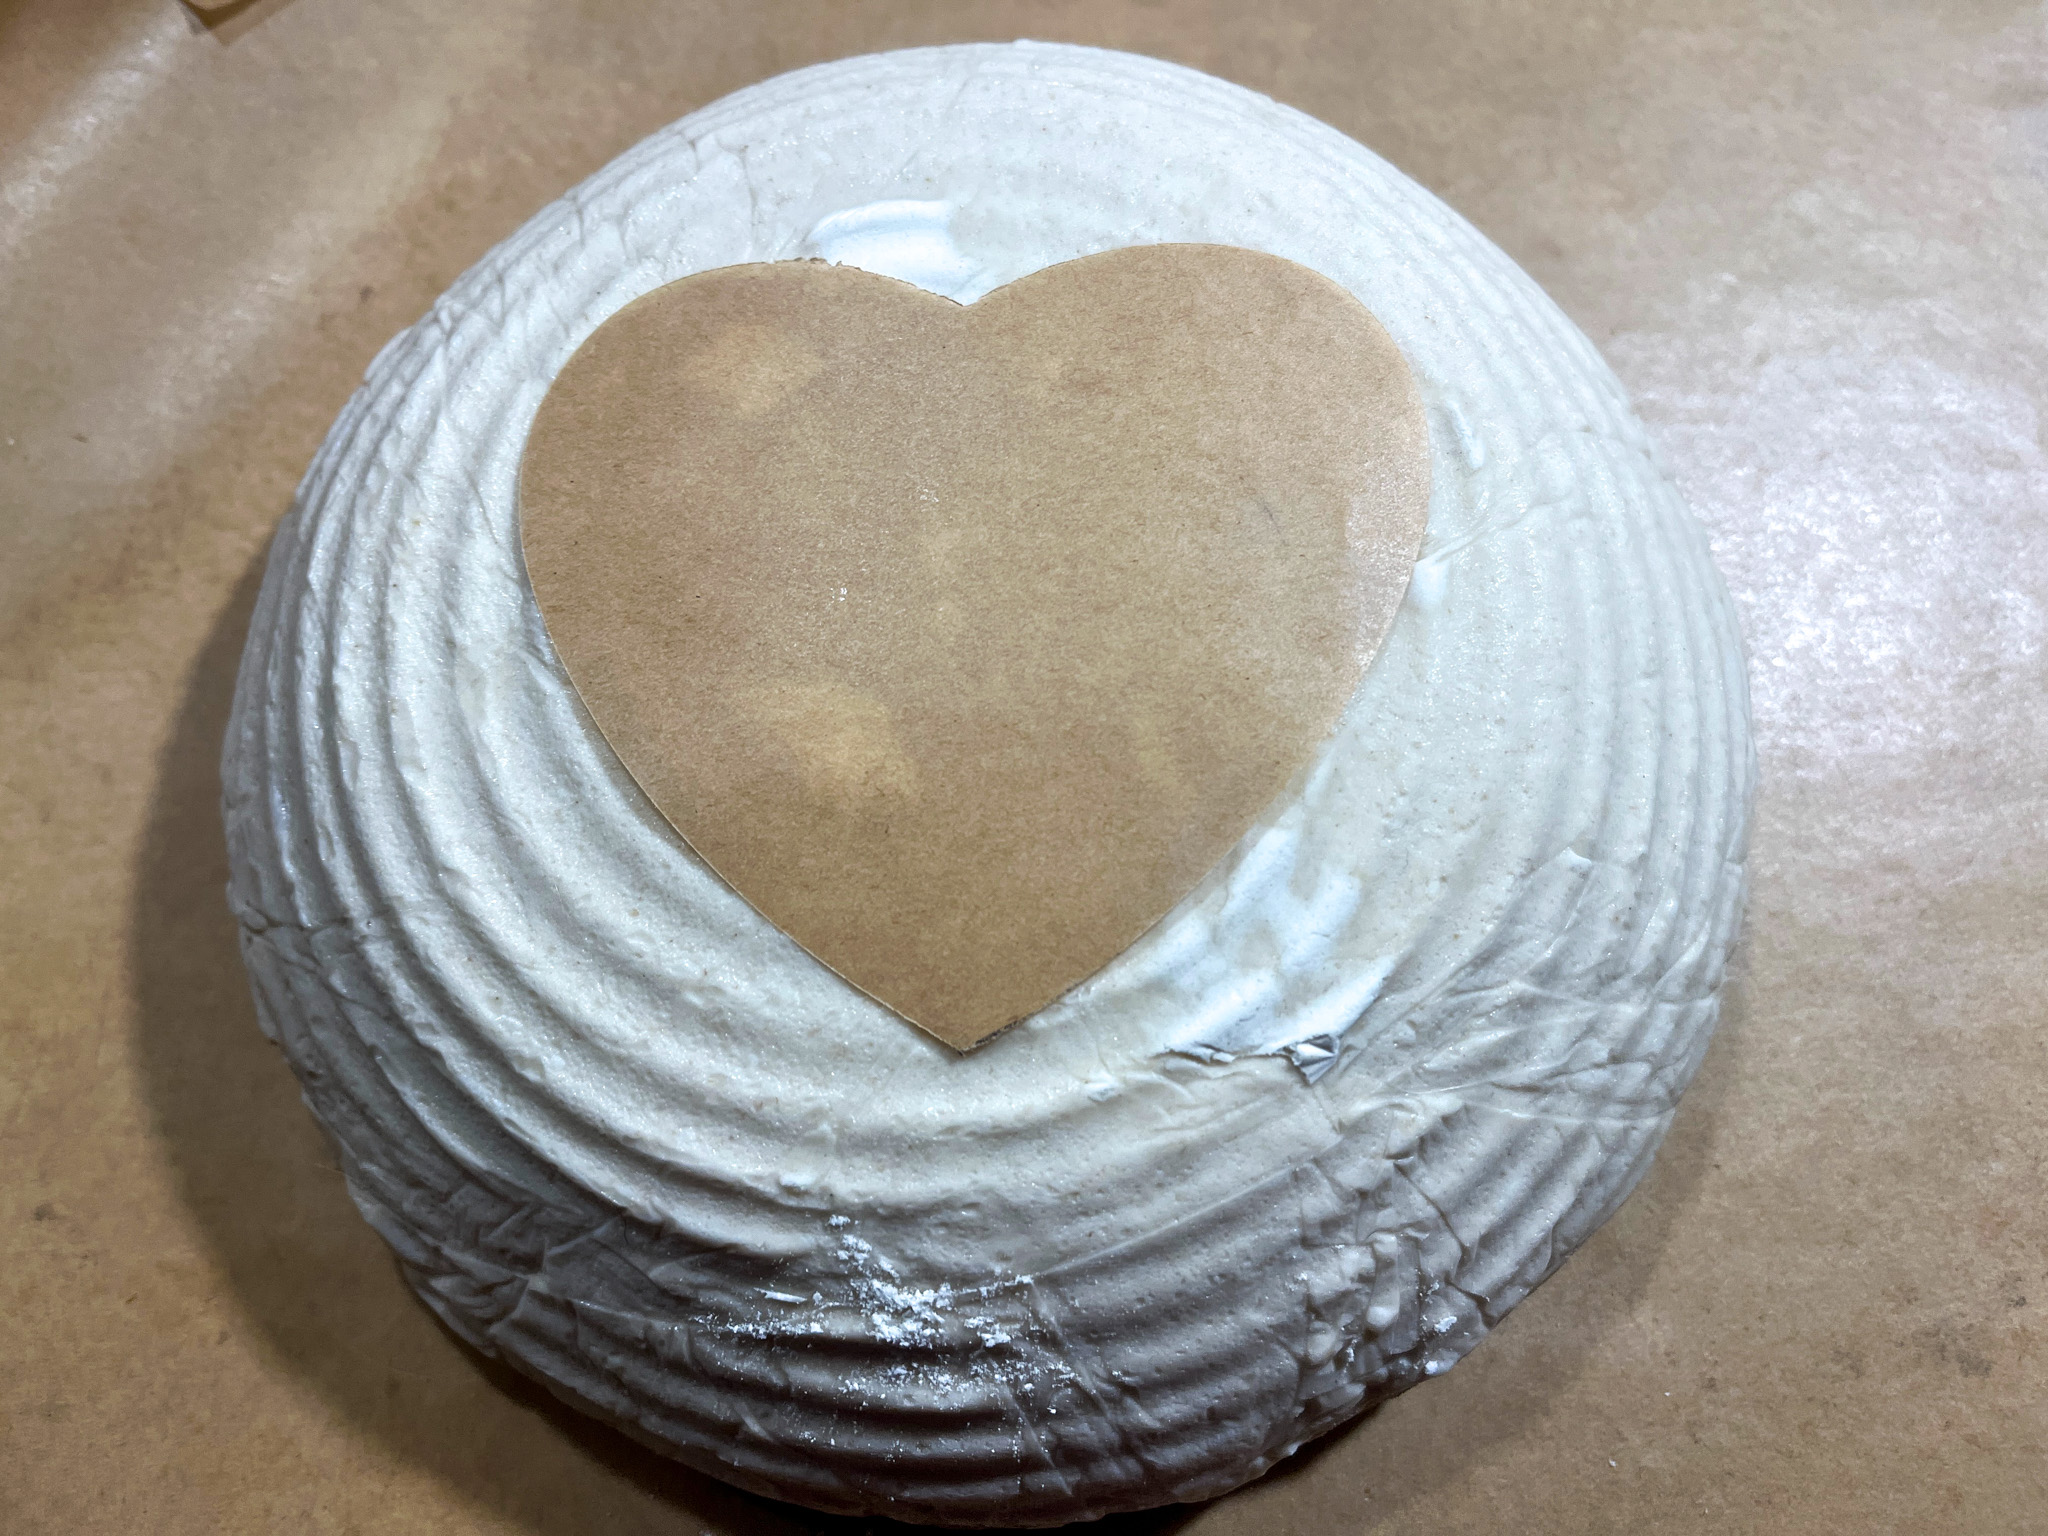
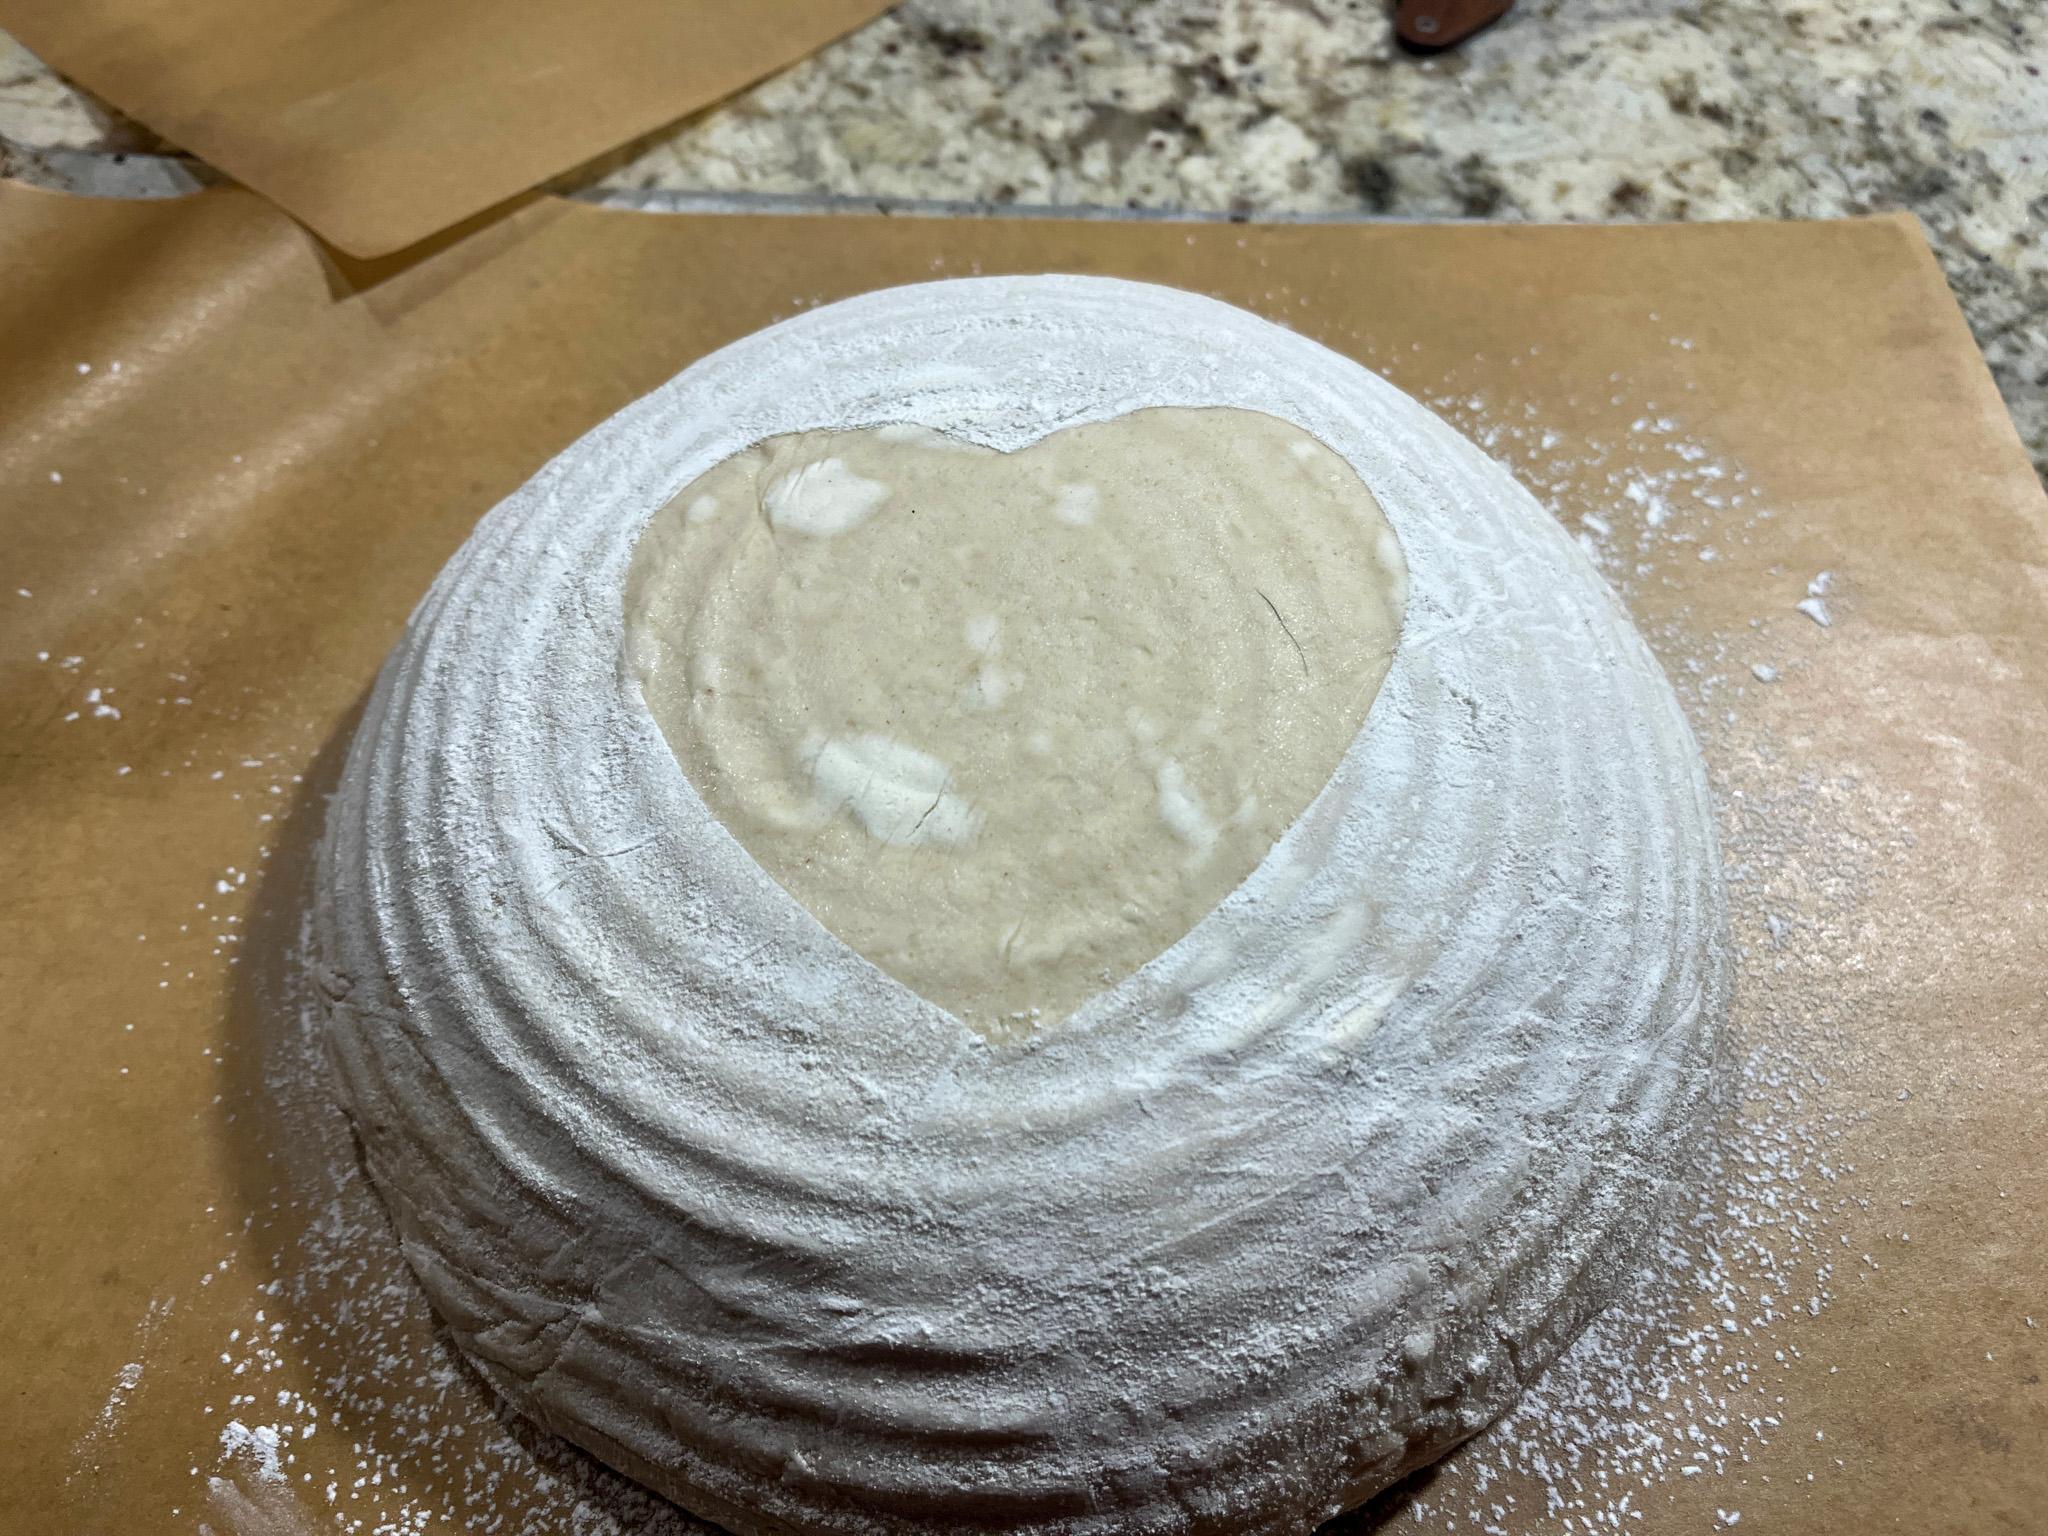
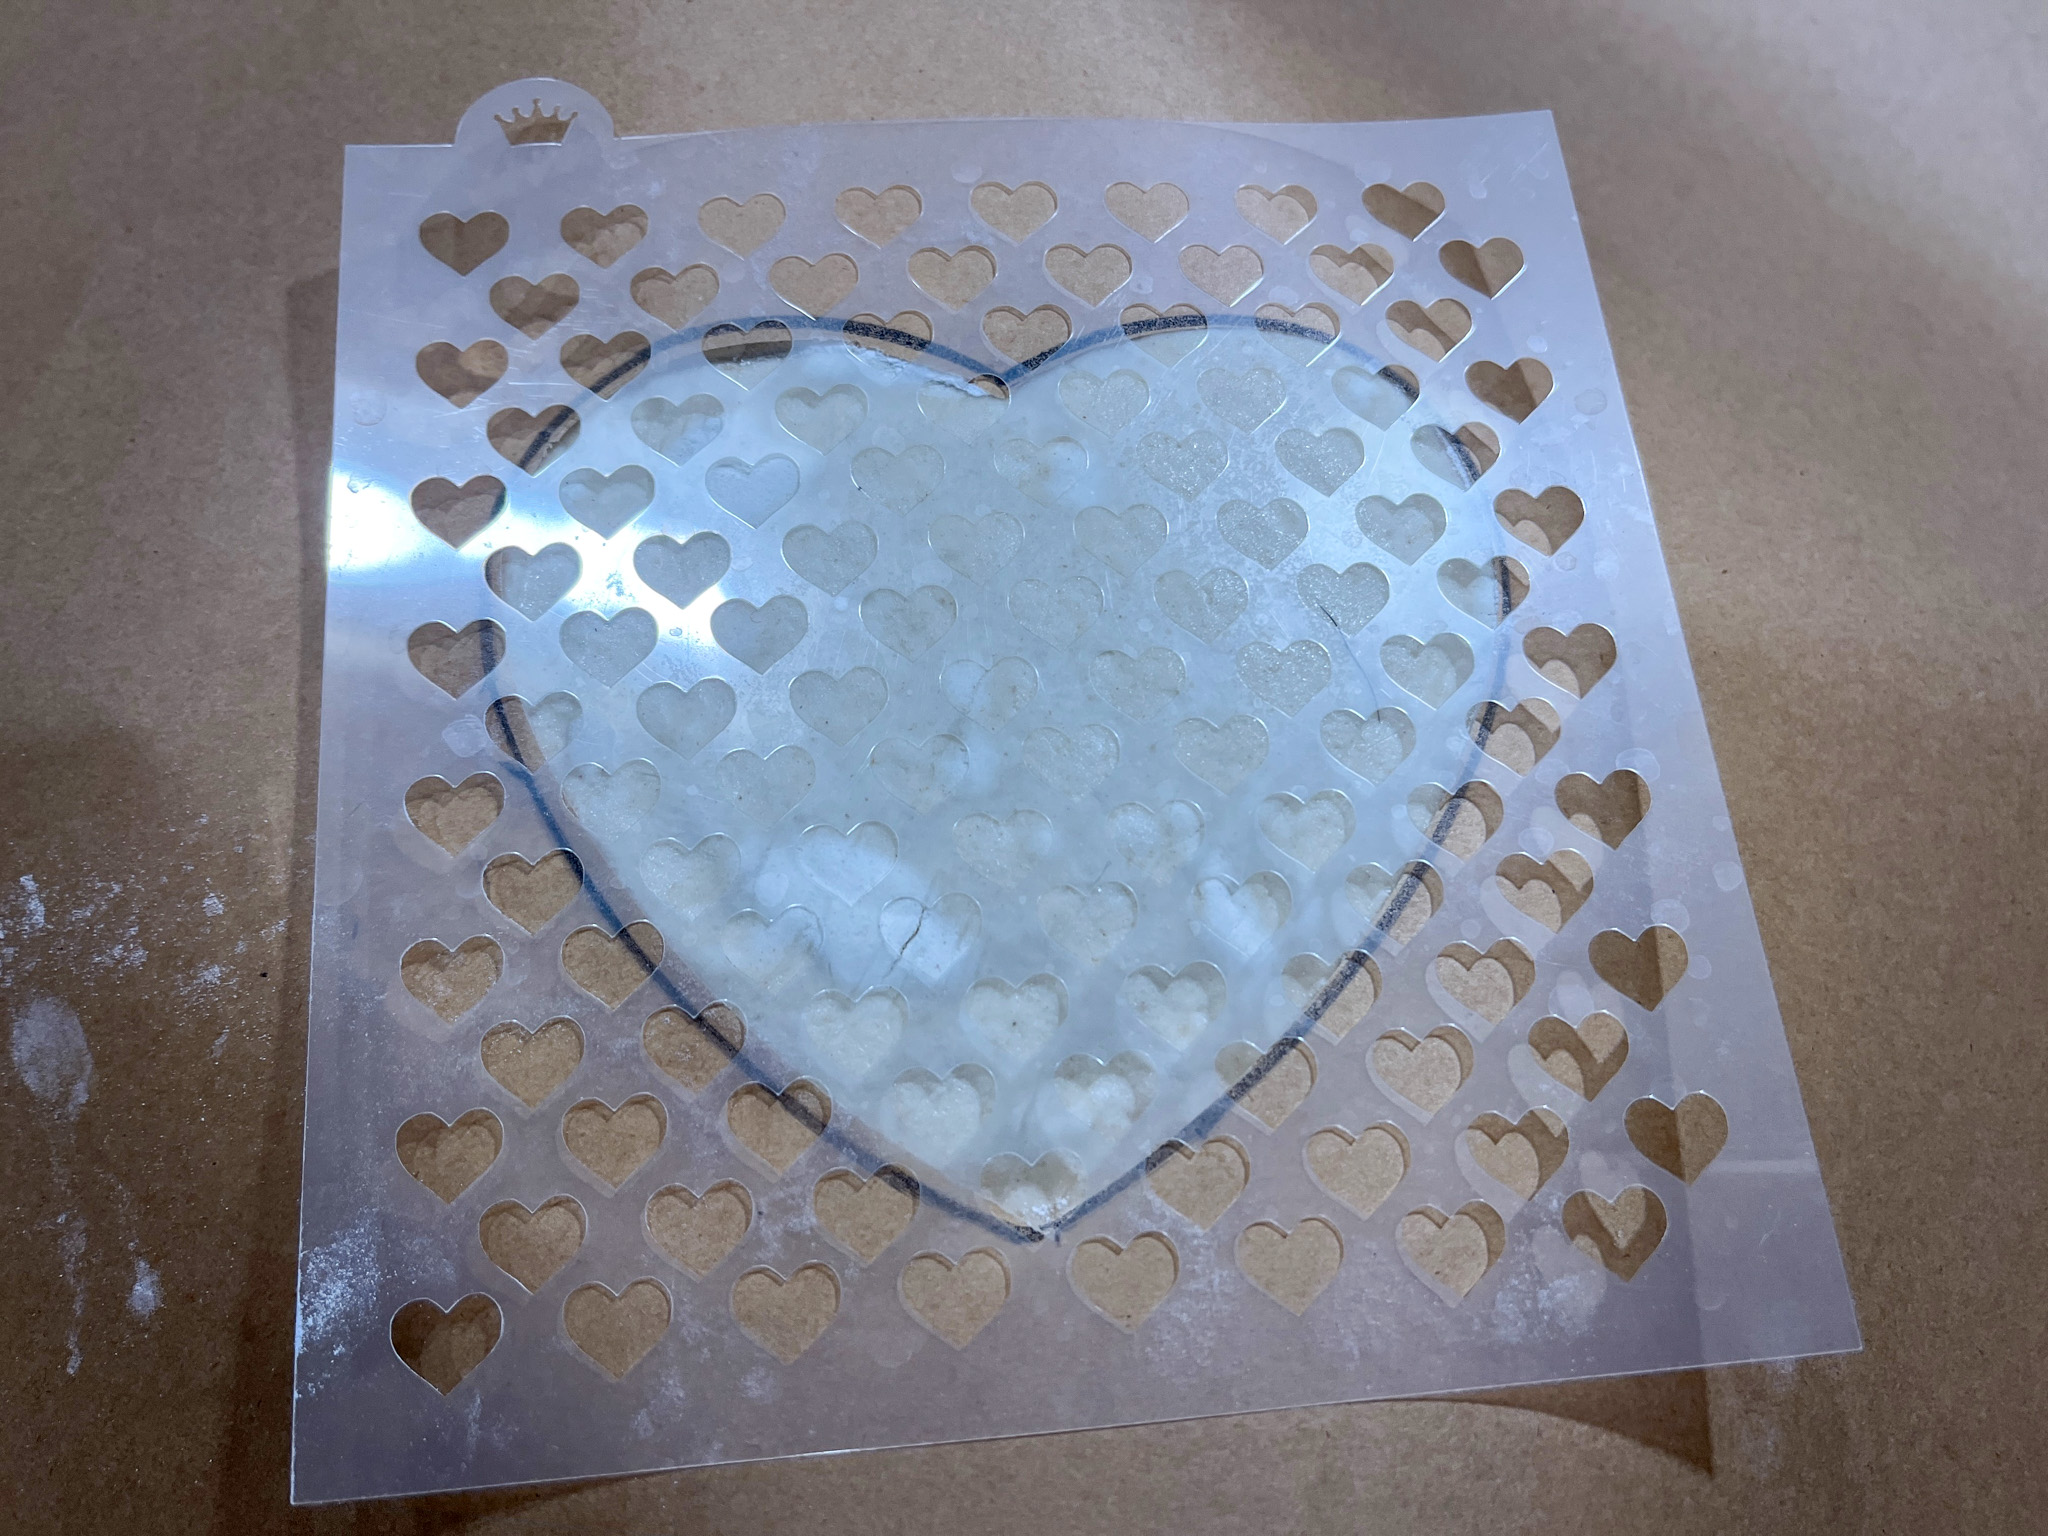
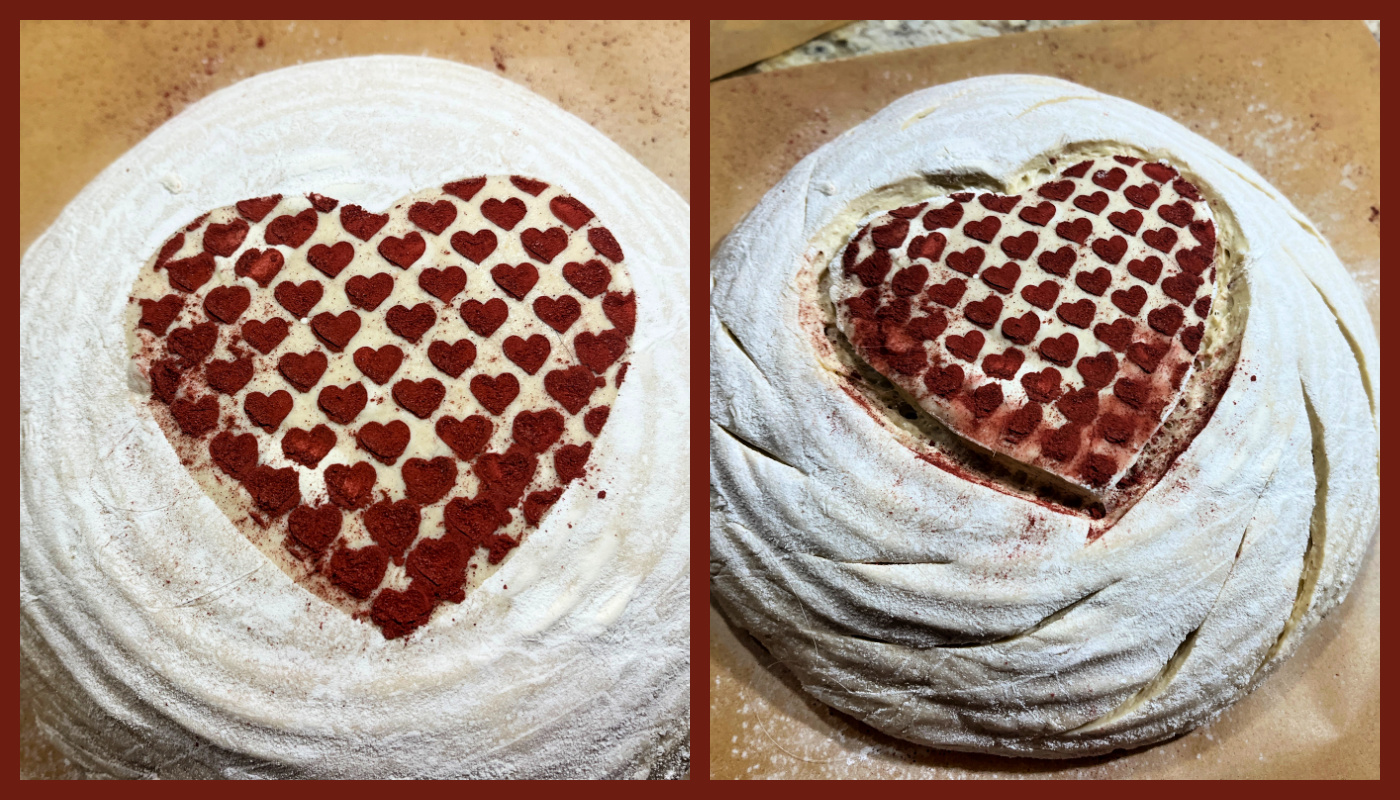
Next day, freeze the dough for 30 minutes in the banetton, to make it easier to score later. Invert the dough on a paper liner, add the heart shape in the center, and flour the region around it (I used Thai rice flour). Lift the heart shape, place the larger parchment as a mask to cover the rest of the dough. Add your stencil, making sure it is tight on the surface. Rub Red Yeast powder over the design, lift the stencil carefully. Score the perimeter of the heart and the outer area of the dough, and place in a Dutch oven.
Close the pan and bake at 450F for 7 minutes. Remove the lid, go back and re-inforce the cut around the heart, although this step is optional. Close the pan and bake for 30 minutes, open and allow the bread to brown for a further 15 minutes.
Comments: This was a lot of fun to make, although I could have done a better job keeping the stencil tighter to the surface for a sharper edge around the little hearts. Here is the full process…
First, get the parchment paper cut and the stencil ready.
Now start by placing the heart on the top of the loaf, fresh from its little rest in the freezer… Rub flour all around.
Lift the stencil, revealing the heart underneath with no white flour on it…
Place the parchment paper as a mask hiding the areas outside the heart, the stencil on top of it…
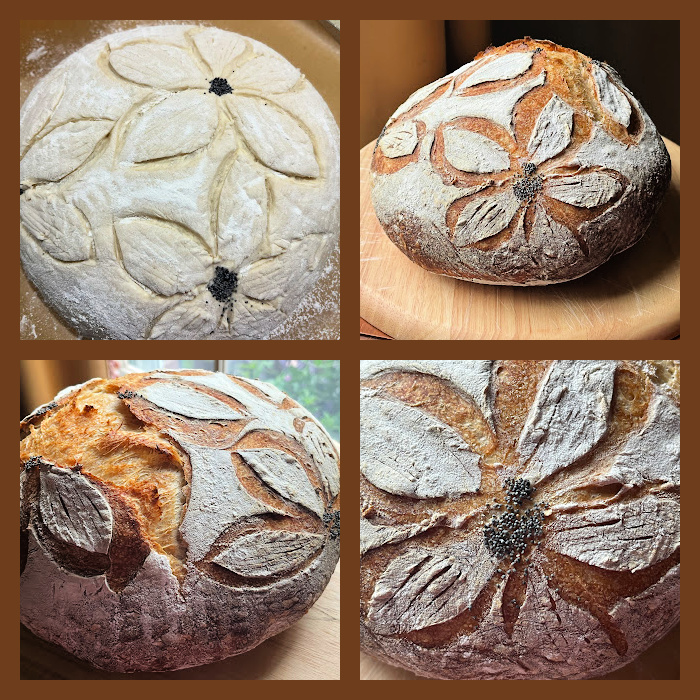
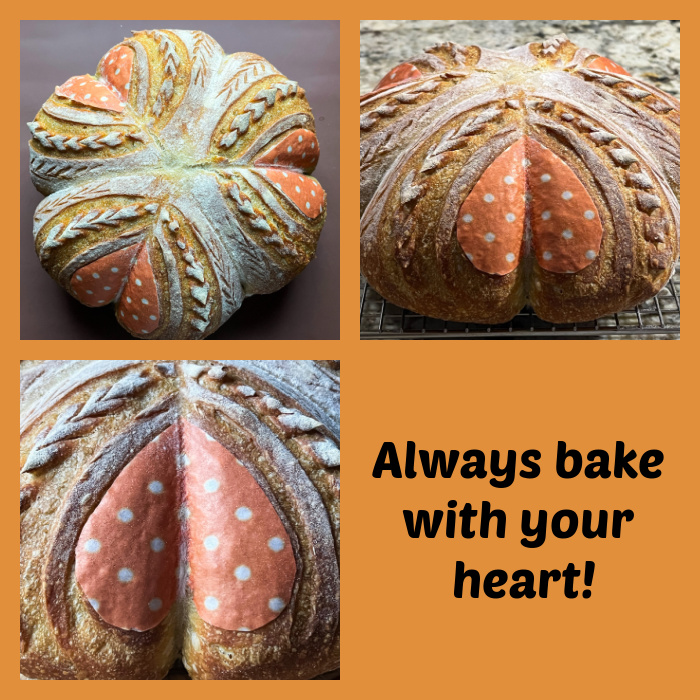
I have tried quite a few times this method in which portions of a sourdough design are lifted during baking, usually by inserting small pieces of crumbled parchment paper underneath the area, something that is done once the bread is in the oven for about 7 minutes. I had failure after failure, but this time it worked better. There is a lot of room for improvement, but at least I see the light at the end of the tunnel.
RAISED FLOWER SOURDOUGH BREAD (from The Bewitching Kitchen)
480g bread flour 20g whole wheat flour 75g sourdough starter (stiff or 100% hydration) 10g salt 360g water 2 tsp oregano
Mix all ingredients in the bowl of a KitchenAid type mixer fitted with the dough hook. Knead gently for about 4 minutes (first or second speed maximum).
Transfer dough to a lightly oil bowl and do a bulk fermentation with 4 folds made 45 minutes apart. Before you start the fermentation , remove a very small amount of dough to a small glass container (like those that hold spices), and mark where the level of the dough is with a permanent marker. Keep that at room temperature to monitor fermentation.
After the last folding cycle, keep an eye on the fermentation using the small vial. Ideally you want to let the dough ferment until it is double in size. Depending on the day, temperature of your kitchen, it might take 8 hours or more.
Once bulk fermentation is over, shape the dough as a round ball. Place in the fridge overnight.
Next day, freeze the dough for 30 minutes in the banetton, to make it easier to score later. Invert the dough on a paper liner, with three strings equally spaced. Rub the surface with cocoa powder, and proceed to score as a flower, using the strings to guide you (check the video after this recipe).
Close the pan and bake at 450F for 7 minutes. Remove the lid, go back and its a razor blade re-inforce the petals to force them to separate better, gently slice the tip of each petal with the blade parallel to the surface, and place a small piece of parchment paper underneath each petal to force it to rise up. Close the pan and bake for 30 minutes, open and allow the bread to brown for a further 15 minutes.
Remove the strings, and let the bread cool completely over a rack before slicing.
This is a video of the scoring before baking. It is four times faster than real-time.
Comments: I consider this bread a work in progress. My goal is to repeat this technique but with more finesse. The lifted area needs to be thinner, more delicate, which is not a very easy thing to do. But I am stubborn. Just don’t tell the husband I admitted to that. Once you open the pan after 7 minutes, it is quite hot and steamy, it is hard to get the correct angle to work with the blade without burning yourself. More practice and a lot more Zen is needed. But I am thrilled with this outcome, as I had so many frustrated attempts in the past.