FRESH DILL AND FETA SOURDOUGH

A match made in heaven and materialized in the Bewitching Kitchen! We were lucky to get a huge bag of fresh dill from a departmental colleague and I had some feta cheese hanging in the fridge. One thing led to another and here we are!

FRESH DILL AND FETA SOURDOUGH
(from the Bewitching Kitchen)

475g white bread flour
25g whole-wheat flour
9g salt
350g water
65g sourdough starter at 100% hydration
2 tablespoons fresh dill, minced (or amount to taste)
50-100g feta cheese, crumbled

Make the levain mixture about 6 hours before you plan to mix the dough. It should be very bubbly and active.

When you are ready to make the final dough, place the water in the bowl of a KitchenAid type mixer and dissolve the starter in it, mixing with a spatula briefly, then add the two types of flour, and the salt. Turn the mixer on with the hook attachment and knead the dough for 3 minutes at low-speed all the time. Add the dill, knead for another minute to incorporate. If the dough is too sticky, add 1/4 cup flour, you want the dough to start clearing the sides of the bowl, but still be sticky at the bottom.

Remove from the machine, and transfer to a container lightly coated with oil, add the feta and gently mix it in. Don’t worry about incorporating it, it will all go into the dough as you fold it. Cover lightly with plastic wrap and allow it to ferment for 4 hours, folding every 45 minutes or so. After four hours bulk fermentation, shape the dough as a ball, and place, seam side up, in a lightly floured banetton. Leave at room temperature one hour, and then place in the fridge overnight, from 8 to 12 hours.

Next morning, heat the oven to 450F. Invert the dough over parchment paper, rub gently tapioca flour on the surface. Score with the pattern of your choice and bake at 450F for 45 minutes, preferably covered for the first 30 minutes to retain steam. Cool completely over a rack before slicing.

ENJOY!

to print the recipe, click here

Comments: For the scoring of the surface I used a combination of razor blade and scissors. The bread had impressive oven spring, but I liked the way the design ended up. As to the flavor, I noticed that the dill came through stronger on the second day of the loaf sitting at room temperature. Usually in the evening of day #2 we slice what is left and freeze for later, so that’s what we did.

Really nice to bite into a little piece of feta cheese…..


ONE YEAR AGO: Marinated Chickpeas with Slow-Roasted Red Peppers

TWO YEARS AGO: Passionfruit Millionaire’s Shortbread

THREE YEARS AGO: Chai-Mango Rosette Macarons

FOUR YEARS AGO: Common Table, Something New in My Life

FIVE YEARS AGO: The Daisy, a Bread with Brioche Alter-Ego

SIX YEARS AGO: Pork Tenderloin, Braciole Style

SEVEN YEARS AGO: Raspberry Buckle

EIGHT YEARS AGO: Seafood Gratin for a Special Dinner

NINE YEARS AGO: Cooking Sous-Vide: Sweet and Spicy Asian Pork Loin

TEN YEARS AGO:  Farewell to a Bewitching Kitchen

ELEVEN YEARS AGO: In My Kitchen. June 2012

TWELVE YEARS AGO: Goodbye L.A.

THIRTEEN YEARS AGO: 7-6-5 Pork Tenderloin

CURRY SOURDOUGH WITH SESAME SEEDS

Vadouvan Curry once again joined our sourdough bread. This time I went a little crazy and tried two new things in the same loaf. Inspired by amazing stuff I see on Instagram, I decided to use a stencil, some luster powder, a razor blade, and a little edge decoration with sesame seeds.

PAINTED CURRY SOURDOUGH WITH SESAME SEEDS
(from the Bewitching Kitchen)

385g white bread flour
16g spelt flour
1/2 tsp Vadouvan curry (or any curry you like)
8g salt
280g water
65g sourdough starter at 100% hydration

optional for decoration:
egg white + a little water (egg wash)
sesame seeds (I used a mixture of white and black)
luster powder + vodka

Make the levain mixture about 6 hours before you plan to mix the dough. It should be very bubbly and active.

When you are ready to make the final dough, place the water in the bowl of a KitchenAid type mixer and dissolve the starter in it, mixing with a spatula briefly, then add the two types of flour, the curry and the salt. Turn the mixer on with the hook attachment and knead the dough for 4 minutes at low-speed all the time. If the dough is too sticky, add 1/4 cup flour, you want the dough to start clearing the sides of the bowl, but still be sticky at the bottom.

Remove from the machine, and transfer to a container lightly coated with oil, cover lightly with plastic wrap and allow it to ferment for 4 hours, folding every 45 minutes or so. After four hours bulk fermentation, shape the dough as a ball, and place, seam side up, in a lightly floured banetton. Leave at room temperature one hour, and then place in the fridge overnight, from 8 to 12 hours.

Next morning, heat the oven to 450F. Invert the dough over parchment paper, place your chosen stencil over it, and rub gently white flour on the design. Paint the details with a bright color using luster powder diluted with vodka. You need it to be a bit on the thick side, and don’t worry about precision, it will more or less mix with any flour bits around it. Do not worry. Paint a band around the perimeter of the bread with egg wash and gently press sesame seeds all over it. Slash quickly with a razor blade according to the design of your stencil, so that when it expands in the oven it won’t affect too much the design.

Bake at 450F for 45 minutes, preferably covered for the first 30 minutes to retain steam. Cool completely over a rack before slicing.

ENJOY!

to print the recipe, click here

Comments: The trick about painting the surface of the bread is keeping in mind the color will considerably change during baking. If you start with a brown, soft red, or golden, chances are they will almost disappear once the bread bakes. So if you like some contrast, pick something that will be super bright to start with. I used a luster powder called Mexican Rose, and it is wild. But it did bake to a shade I liked and very visible in the bread. Water alone won’ t be enough to stick the sesame seeds in a defined pattern, so use egg white instead.

Next I want to try a simple design made with a razor blade and couple it with the luster powder. It was a little tricky to join the stencil (with the required extra amount of flour on the surface) with the paint. But I am still pretty happy with the way it turned out for a first time.

ONE YEAR AGO: Chocolate-Crusted Passion Fruit Tart

TWO YEARS AGO: Lemony Shredded Brussels Sprouts with Almonds

THREE YEAR AGO: Savory Oatmeal with Bacon and Cheddar

FOUR YEARS AGO: Air-Fried Carrots, Two Ways (most popular post on my blog!)

FIVE YEARS AGO: Five Minutes in L.I.T (a tour of our laboratory!)

SIX YEARS AGO: Chicken Thighs with Artichokes and Capers

SEVEN YEARS AGO: Pea Pancakes with Herbed Yogurt

EIGHT YEARS AGO: Mushroom Stroganoff

NINE YEARS AGO: Tomato Sourdough

TEN YEARS AGO: Gamberetti con rucola e pomodori

ELEVEN YEARS AGO: Flirting with Orzo

FOR THE LOVE OF SOURDOUGH

It is amazing how a bread formula can be tweaked slightly and result in totally different outcomes. I share today nine versions of sourdough. They all start with the same composition (90% white bread flour; 10% whole-wheat, salt and sourdough starter). From this starting point, some get added flavor components, and the final outcome depends on how they were handled for scoring.

BASIC SOURDOUGH FORMULA
(from the Bewitching Kitchen)

470g white bread flour
30g whole-wheat flour (regular whole-wheat, spelt or rye)
10g salt
75g sourdough starter at 100% hydration
375g water

Make the levain mixture about 6 hours before you plan to mix the dough. It should be very bubbly and active.

When you are ready to make the final dough, place the water in the bowl of a KitchenAid type mixer and dissolve the starter in it, mixing with a spatula briefly, then add all flours and salt.  Turn the mixer on with the hook attachment and knead the dough for 4 minutes at low-speed all the time. You will notice the dough will gain quite a bit of structure even with just 4 minutes in the mixer. Remove from the machine, and transfer to a container lightly coated with oil, cover lightly with plastic wrap and allow it to ferment for 4 hours, folding every 45 minutes or so. Because the dough is already a bit developed from the initial time in the mixer, you should get very good structure after 3 and a half hours, or even sooner than that.

After four hours bulk fermentation, shape the dough as a ball, and place, seam side up, in a lightly floured banetton. Place in the fridge overnight, from 8 to 12 hours.

Next morning, heat the oven to 450F.

Invert the dough on a piece of parchment paper and score with a new razor blade, if so desired, or simply make a cut on the surface in the shape of a cross with a very sharp knife.

Bake at 450F for 45 minutes, preferably covered for the first 30 minutes to retain steam. You can generate additional steam by spraying the inside of the lid with water before closing the pan.  Cool completely over a rack before slicing.

ENJOY!

to print the recipe, click here

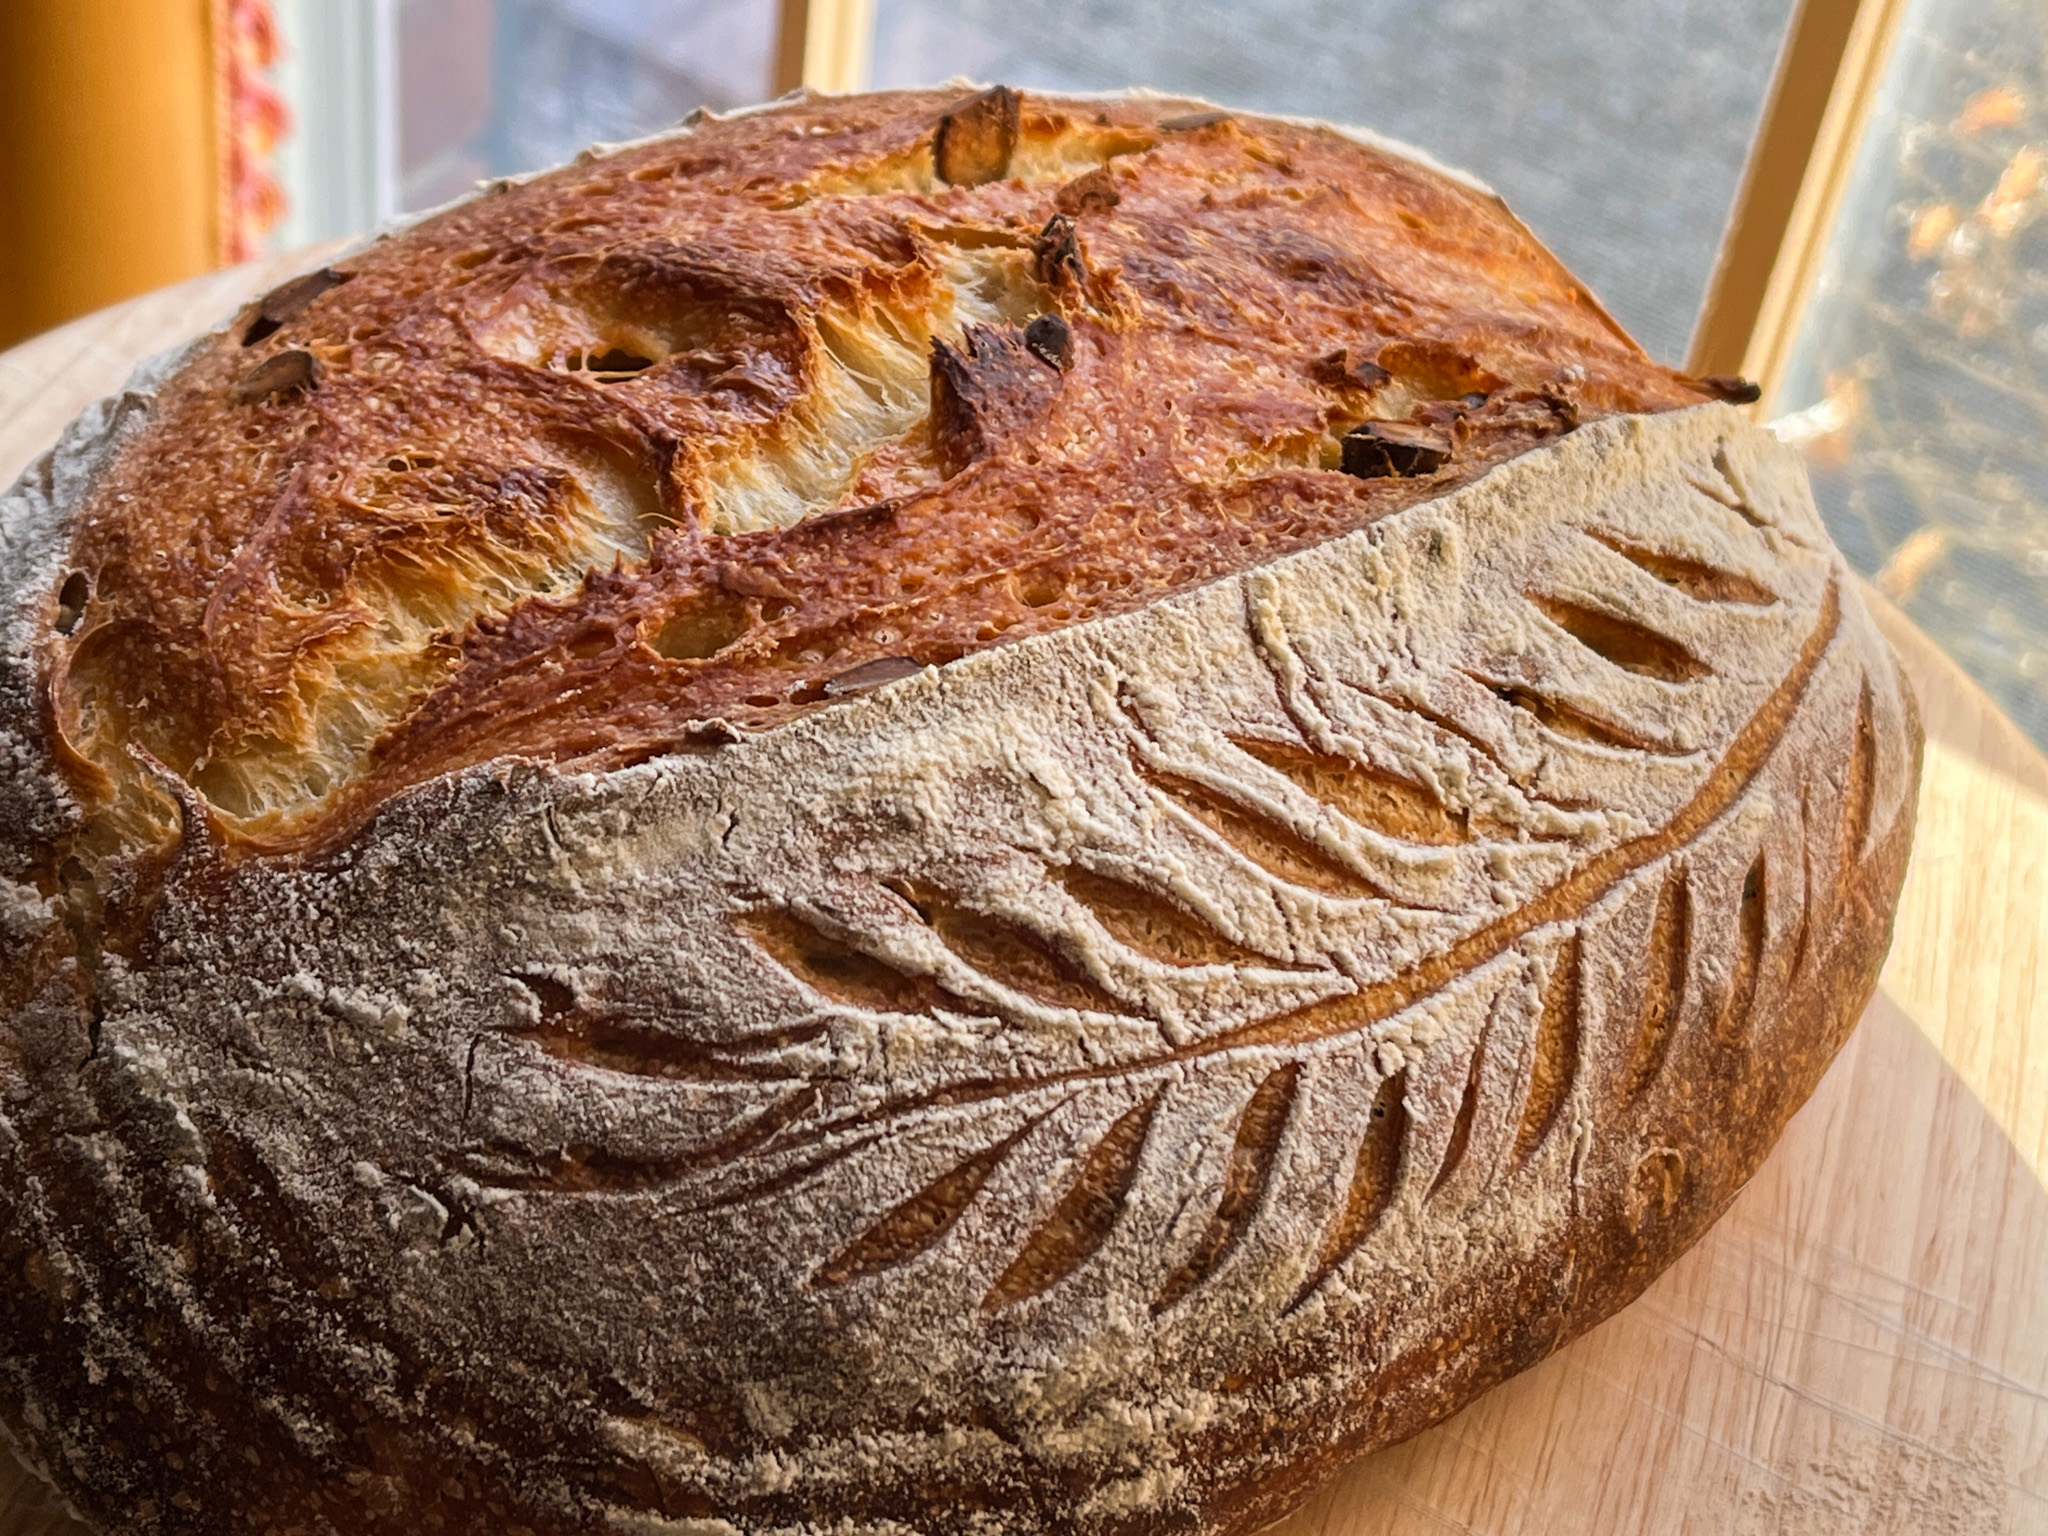
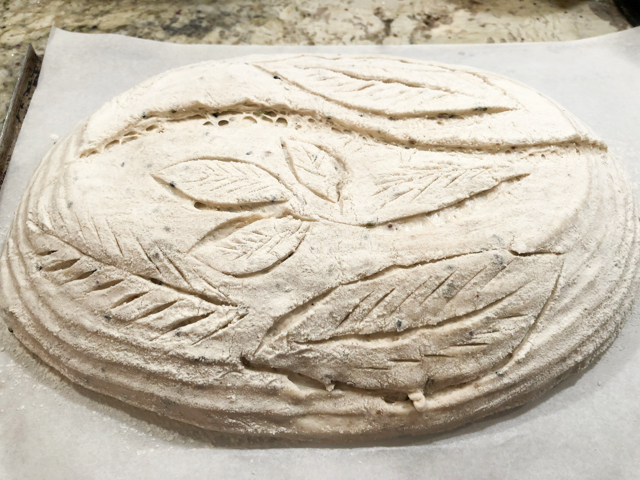
PANCH PHORON SOURDOUGH

To the basic recipe above, add 1 to 2 tsp Panch Phoron, a five spice mixture from Eastern India, often used in Bengali cuisine. It is a mixture of equal parts of seeds of fenugreek, nigella, cumin, black mustard and fennel. I shaped this bread as an oblong loaf, and scored a pattern of leaves.

We loved this bread, in fact it was the first loaf that got us into a path of sourdough flavored with Middle Eastern spices.

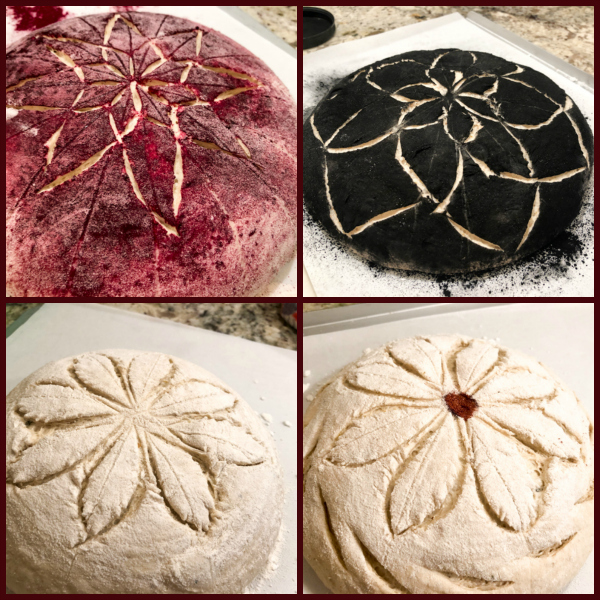
VADOUVAN CURRY SOURDOUGH

In these three loaves, 1 + 1/2 tsp of Vadouvan curry mix was added together with the flour and incorporated in the dough. The bread in the center had spelt as the minor flour component, the other two regular whole-wheat.

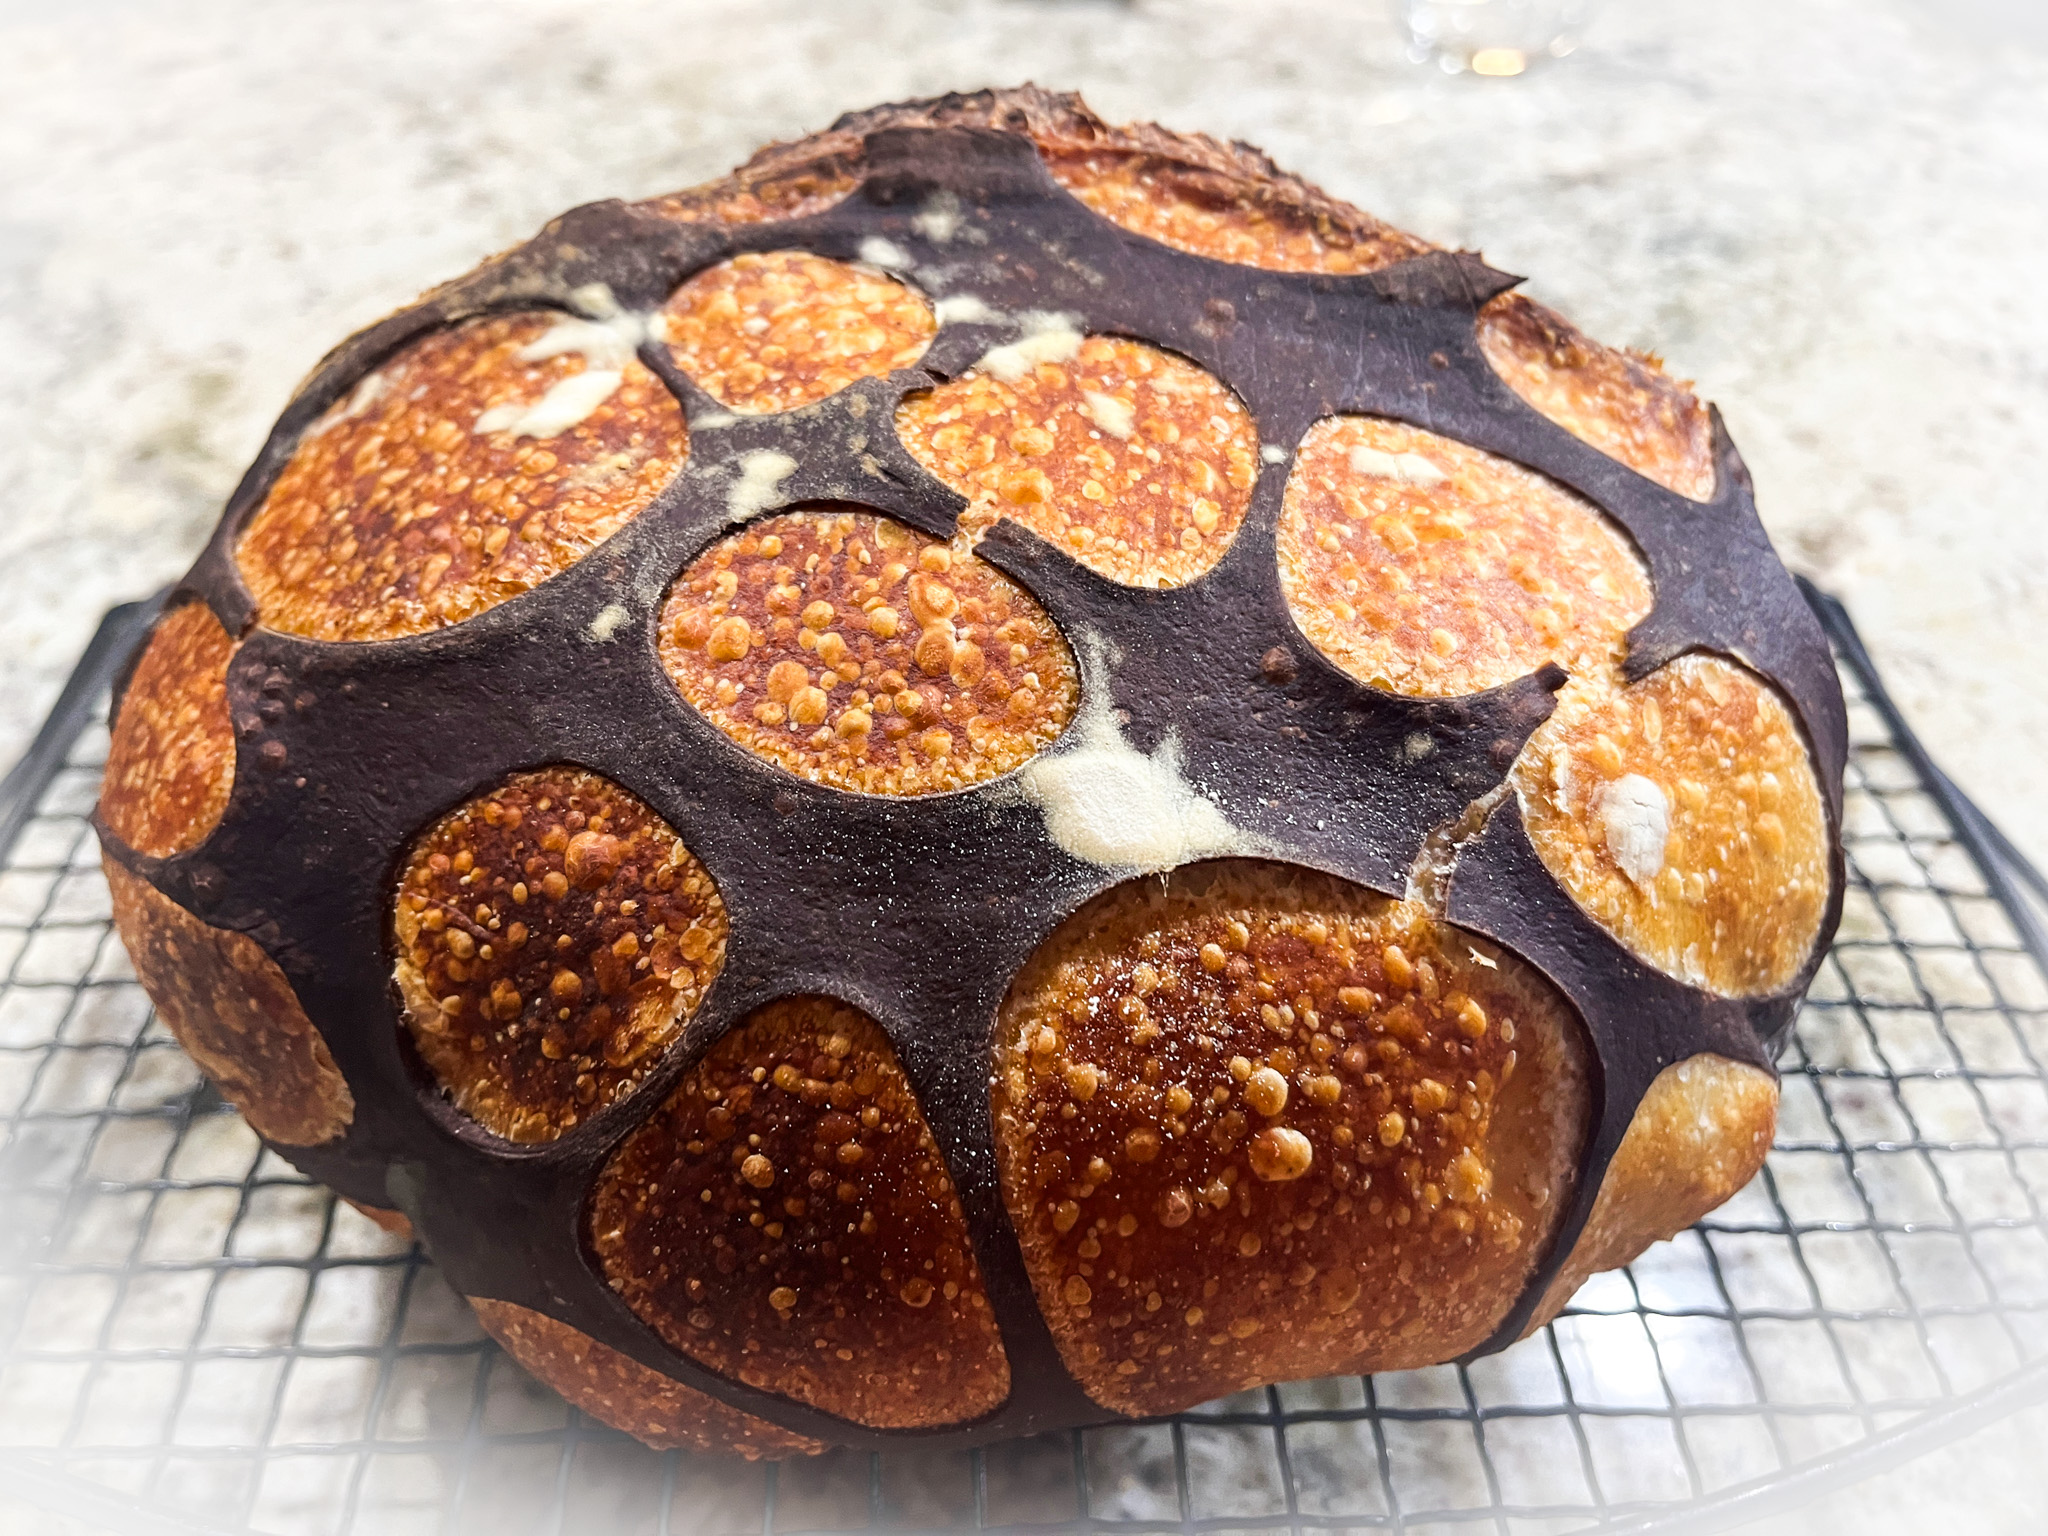
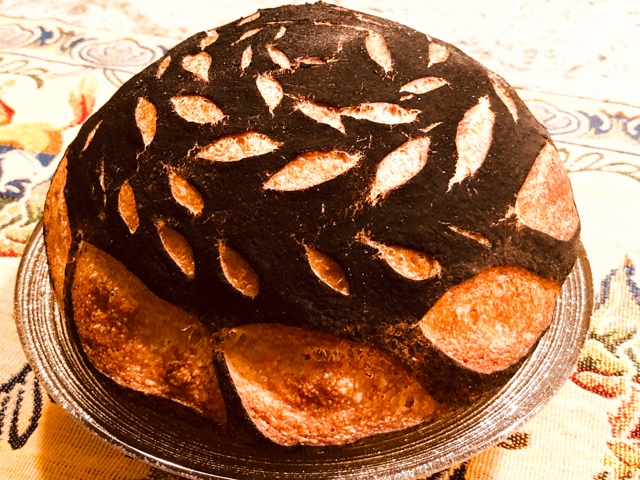
For the final decoration, I covered the first loaf with red beet powder, marked with a string a symmetry of 8 guide lines and then scored as shown. The beet color faded a bit during baking but still gave it a little hint of purple. The second loaf got a dusting with charcoal powder, the string marked 6 guide lines to create a slightly different type of design. Finally, the third loaf was dusted with flour, marked with 8 lines and scored as a flower. A little center of pearl dust was added but the color faded during baking (is that a recurring pattern for this baker?).

I love the charcoal and the beet powder effects, but be warned: they stain your fingers as you handle the bread, so when you cut a slice, make sure you don’t touch your face right after. No further questions on this subject. Please and thank you.

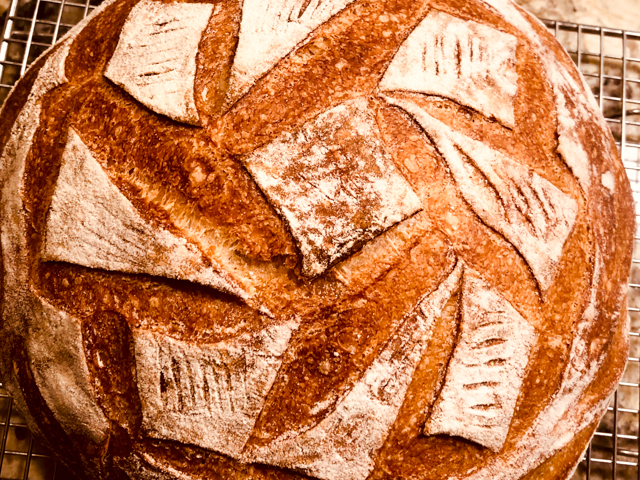
RAS-EL-HANOUT SOURDOUGH

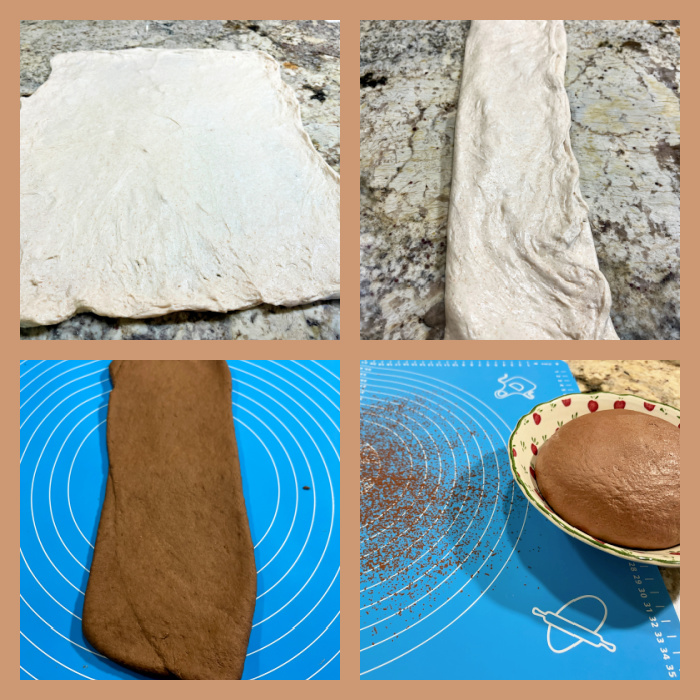
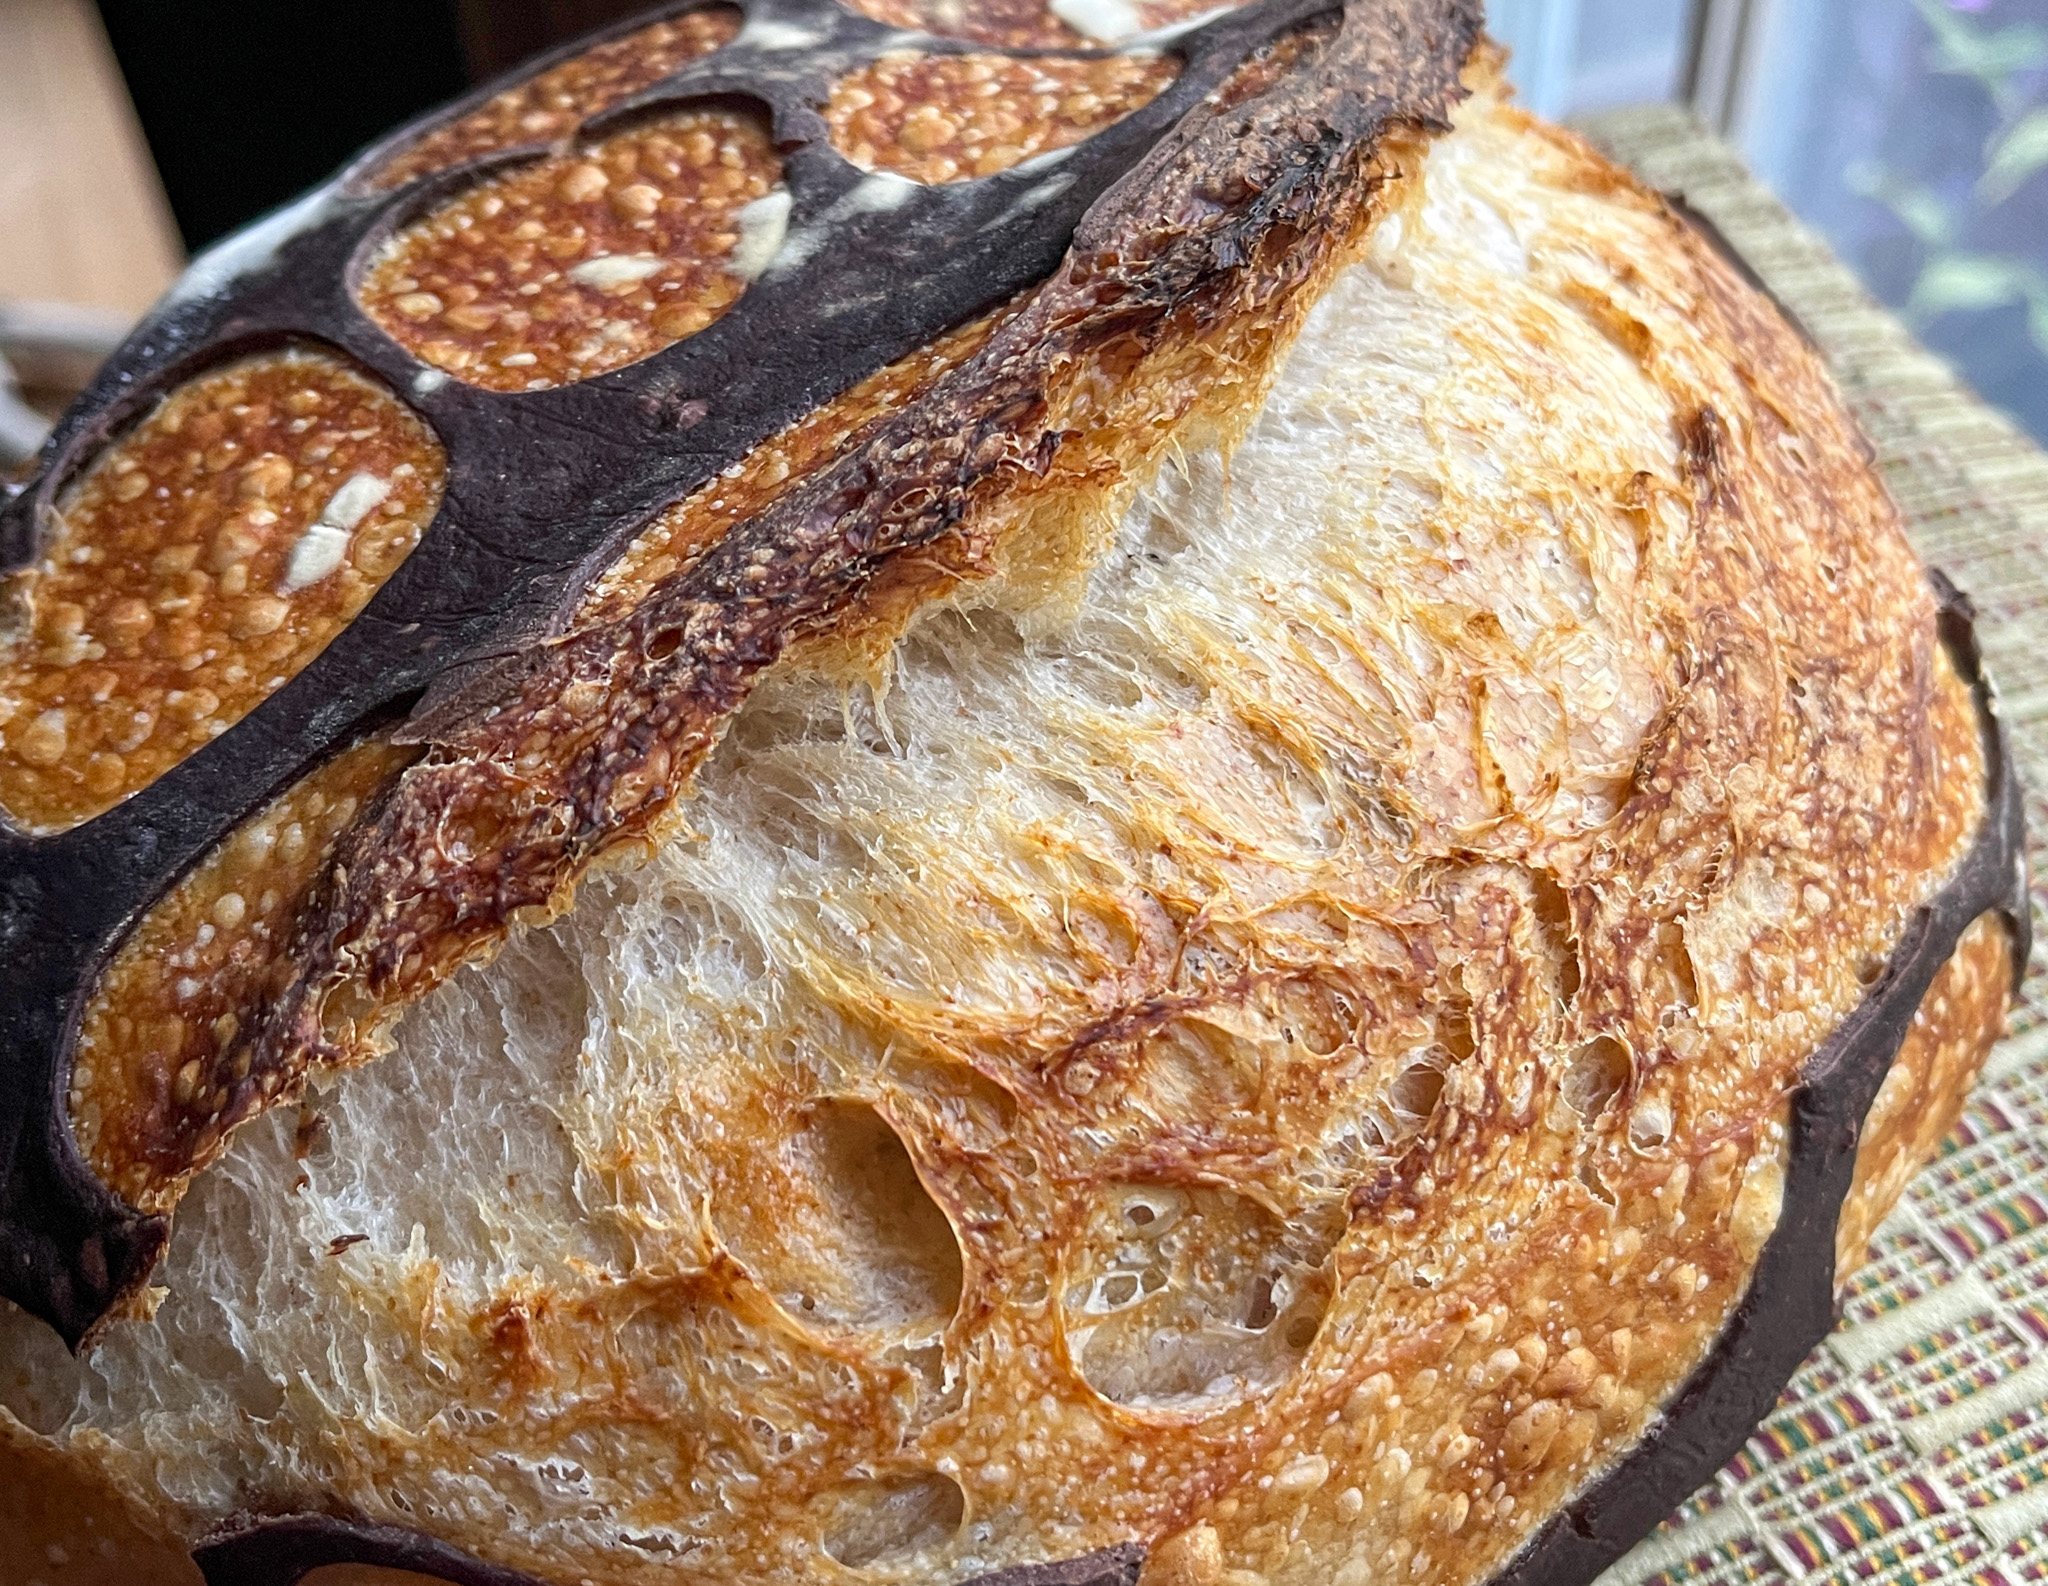
Exact same recipe using rye as the minor flour component, and 1+1/2 tsp Ras-El-Hanout in the formula. One of our favorite breads in this series. I should give credit to a baker from Israel who is a true magician with scoring. I follow him on Instagram (check him out here) and often try to make one of his cool designs. This is one example, that starts with a little square as shown below.

I am very fond of geometric-type scoring. I find it easier to do if I make a drawing on a piece of paper with the different steps because once that razor blade hits the surface of the bread… is game over! There is no “erasing” possible. Of course, during baking the design will be affected in unpredictable ways. I am still trying to figure out ways to minimize explosions.
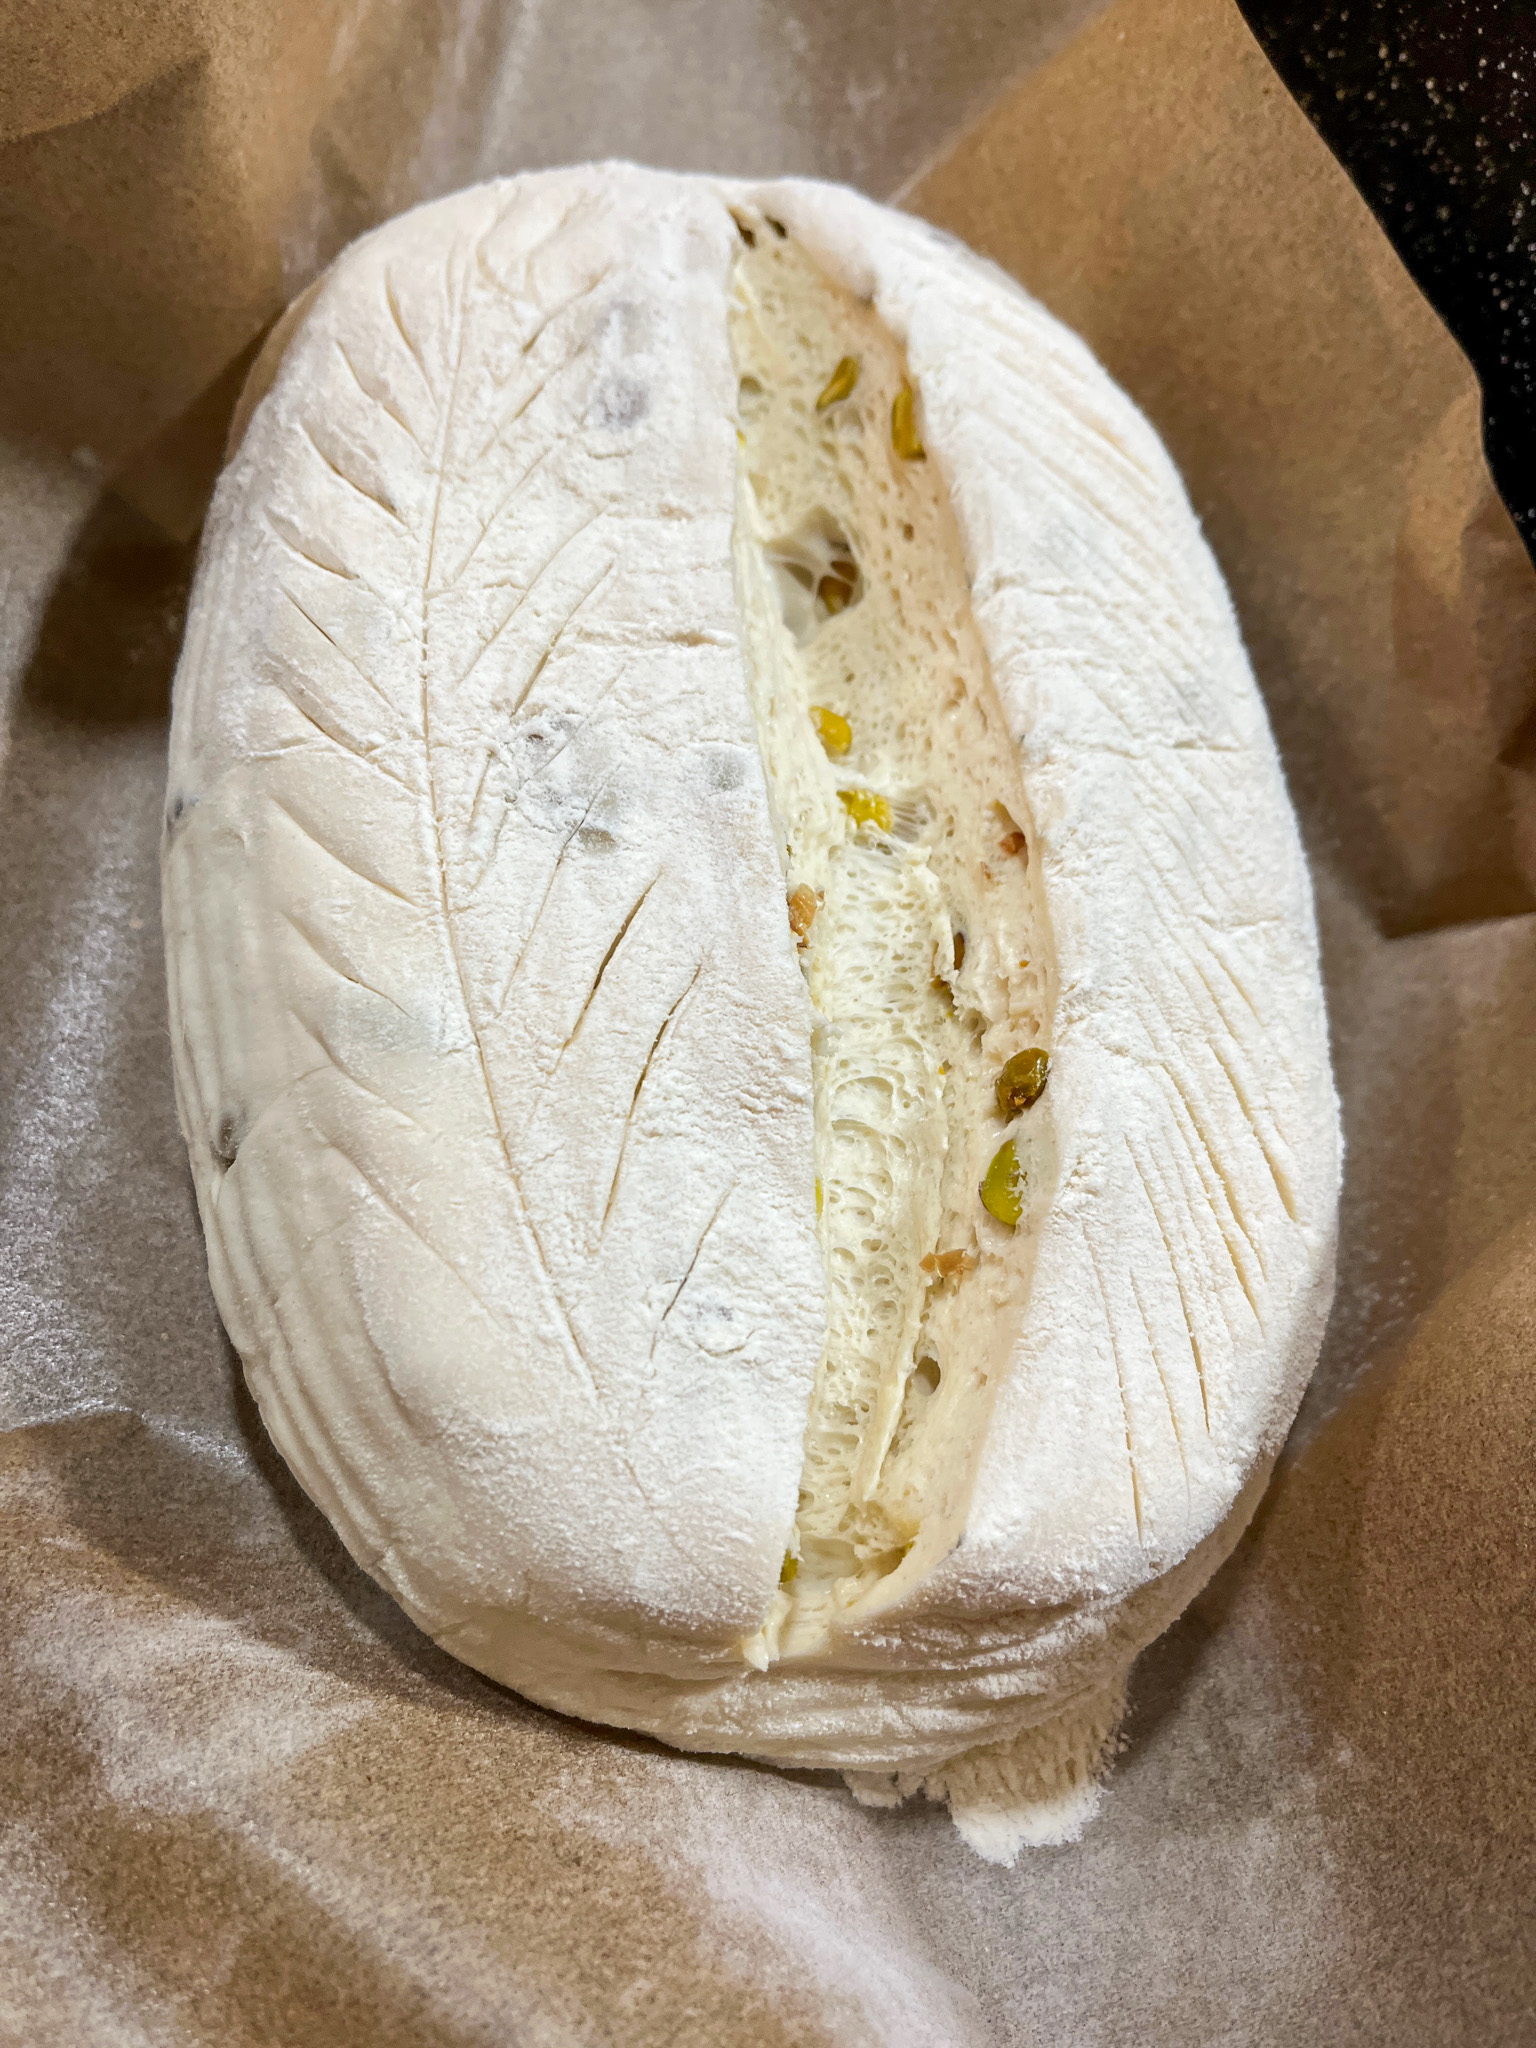
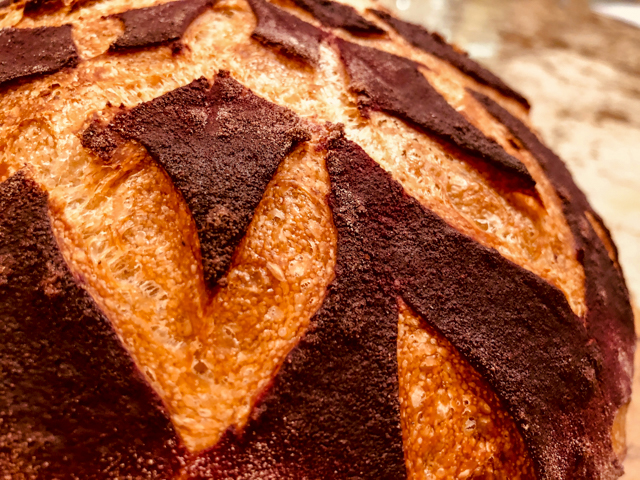
ZA’ATAR SOURDOUGH

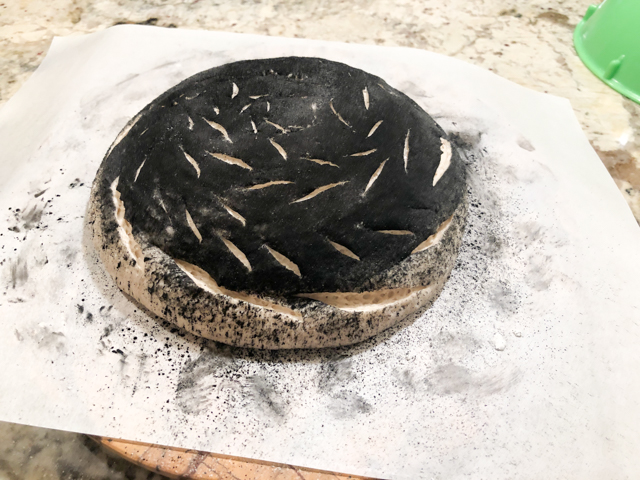
Basic recipe using spelt flour as the minor component and 1 + 1/2 tsp za’atar. The bread was coated with charcoal and I followed one of Mogi’s Dough Engineering scoring designs which he calls “reverse spiral”. Mine did not turn out as beautiful as his, but I still like it a lot. Here is what it looks like before baking.

He uploaded a video showing how to do it. It goes very fast, but after watching it (in awe) a few times, I felt ready to do it.
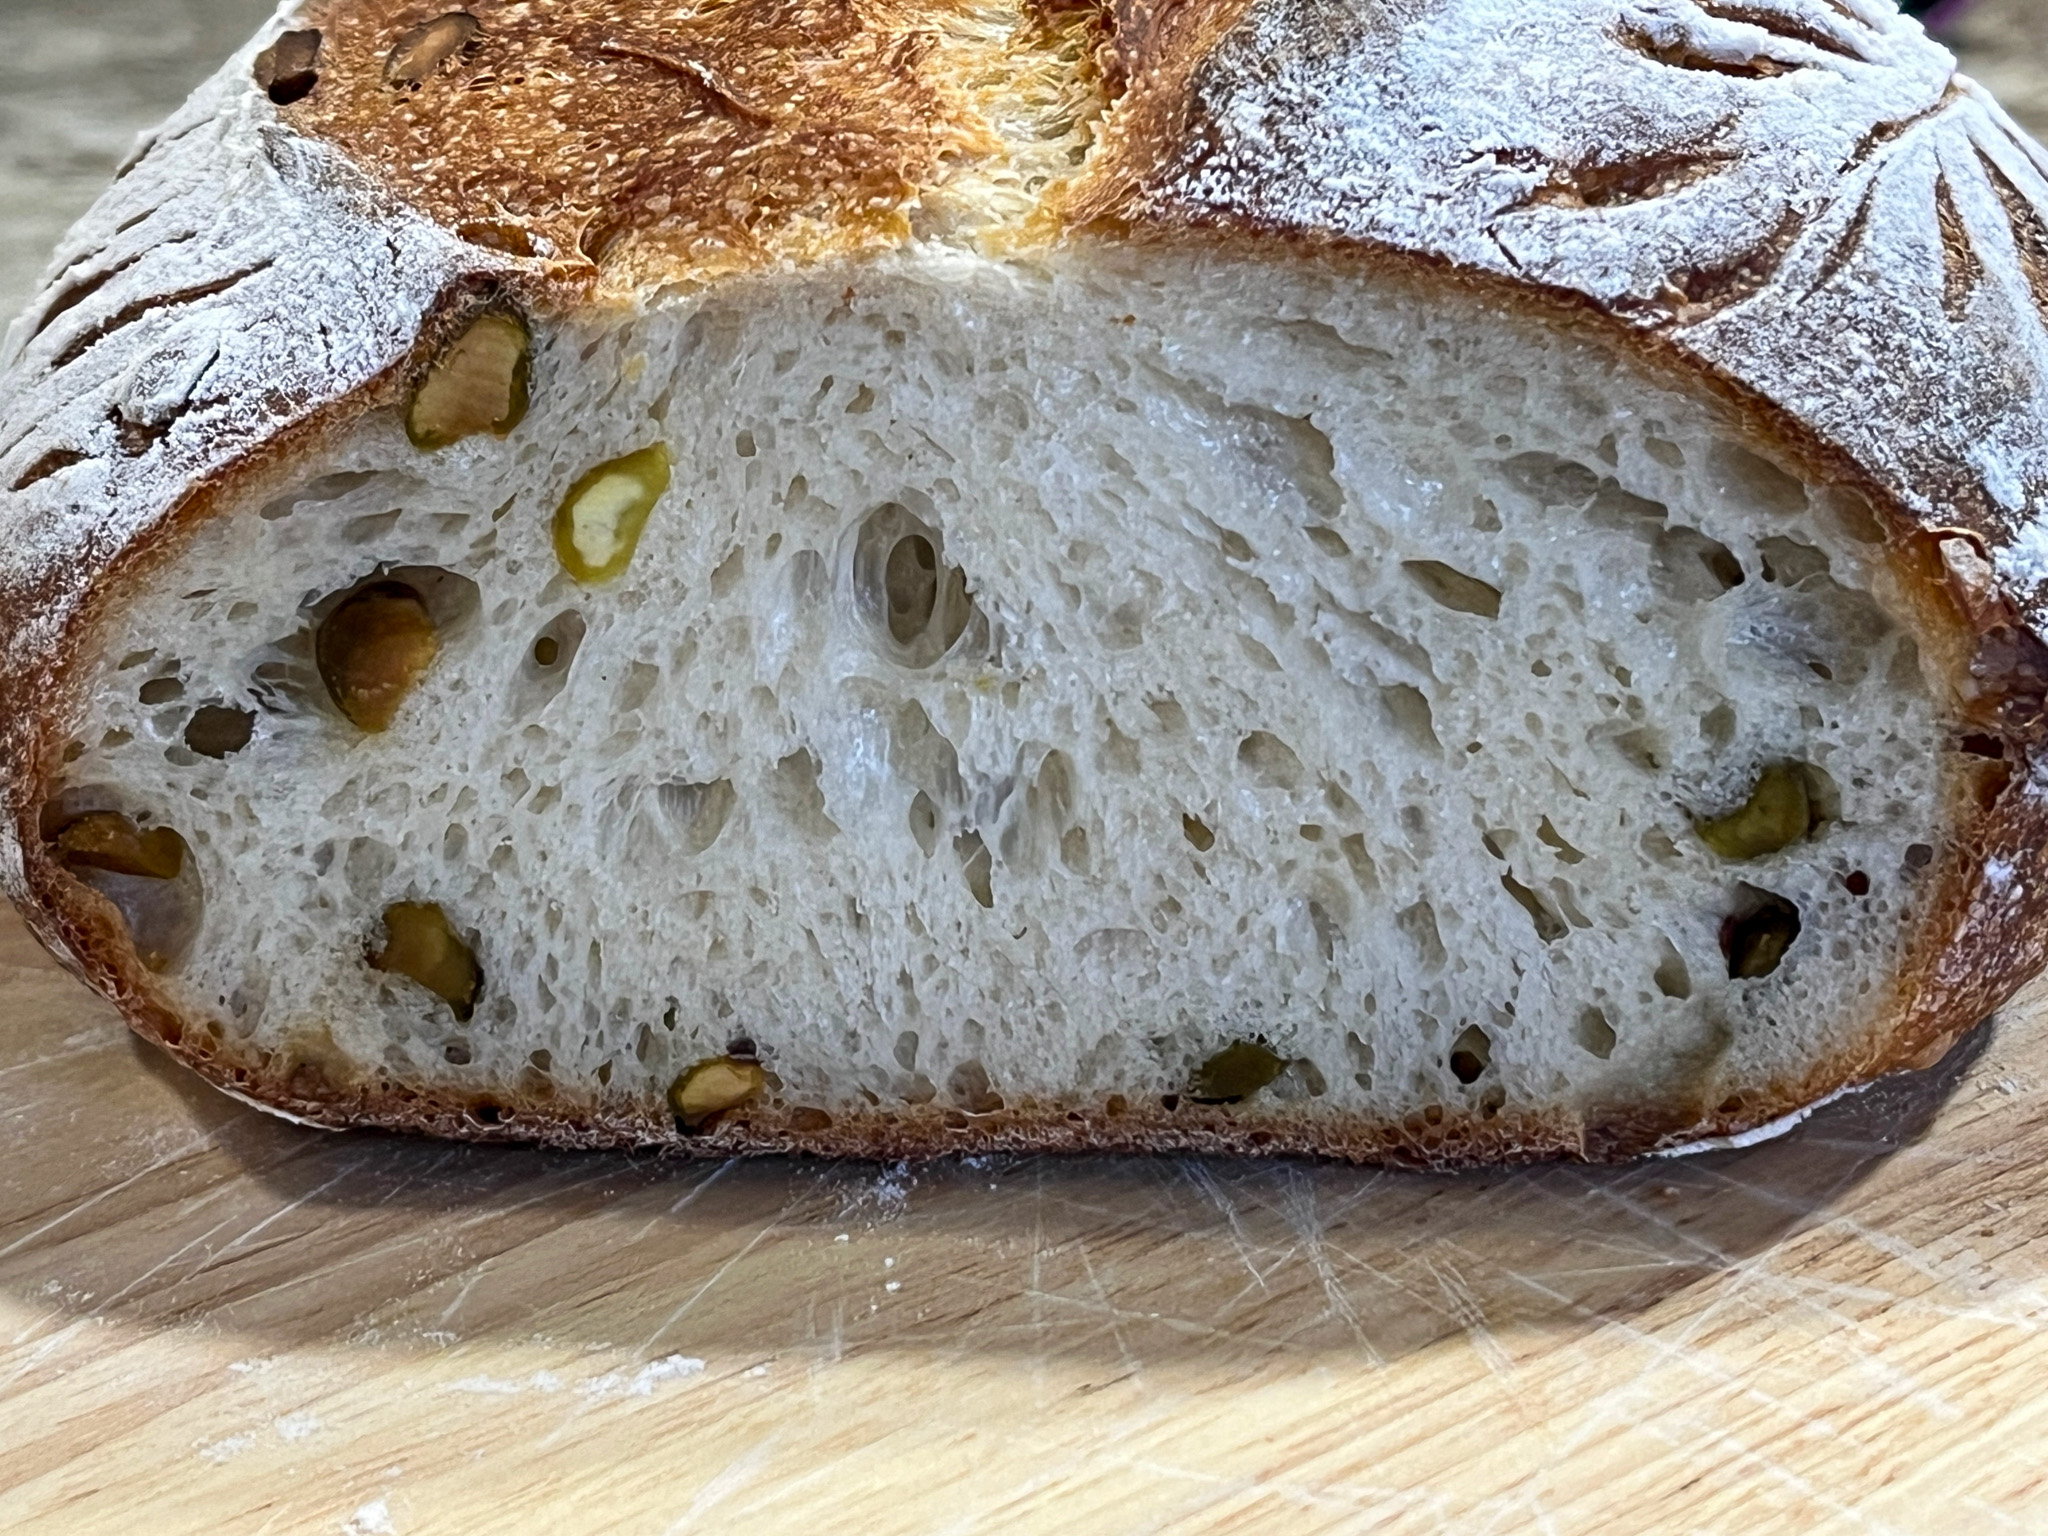
TAHINI SOURDOUGH

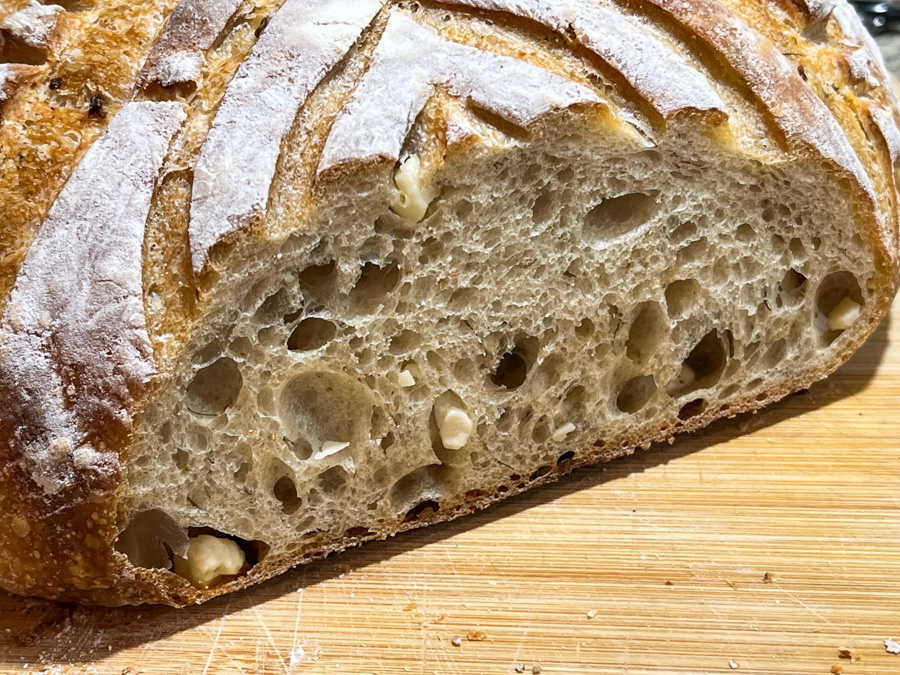
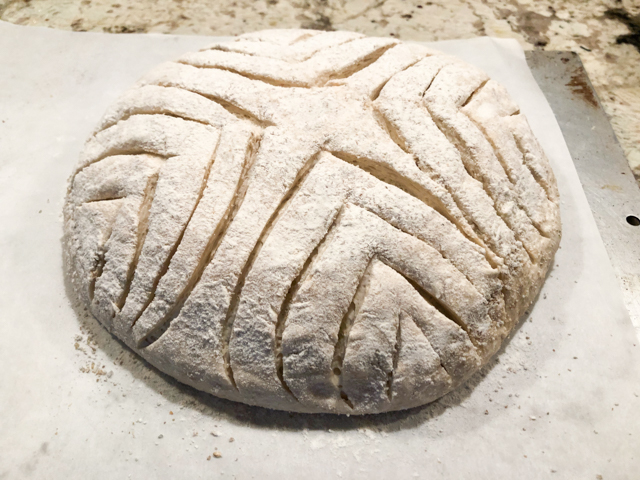
To the basic formula (with whole-wheat flour as minor component), I added 25g tahini, and adjusted the consistency with a little more flour after the initial mixing with the Kitchen Aid, as the tahini I used was reasonably fluid. The tahini gives a wonderful flavor. The scoring made the round loaf end up with a square shape after baking, pretty interesting.

You can see it starts pretty round, but the way the slashing opens up during baking substantially affects the final shape. I love using nut butters in sourdough, they bring a bit of fat to the composition and the crumb feels moist and tender. Along those lines I share another favorite version….

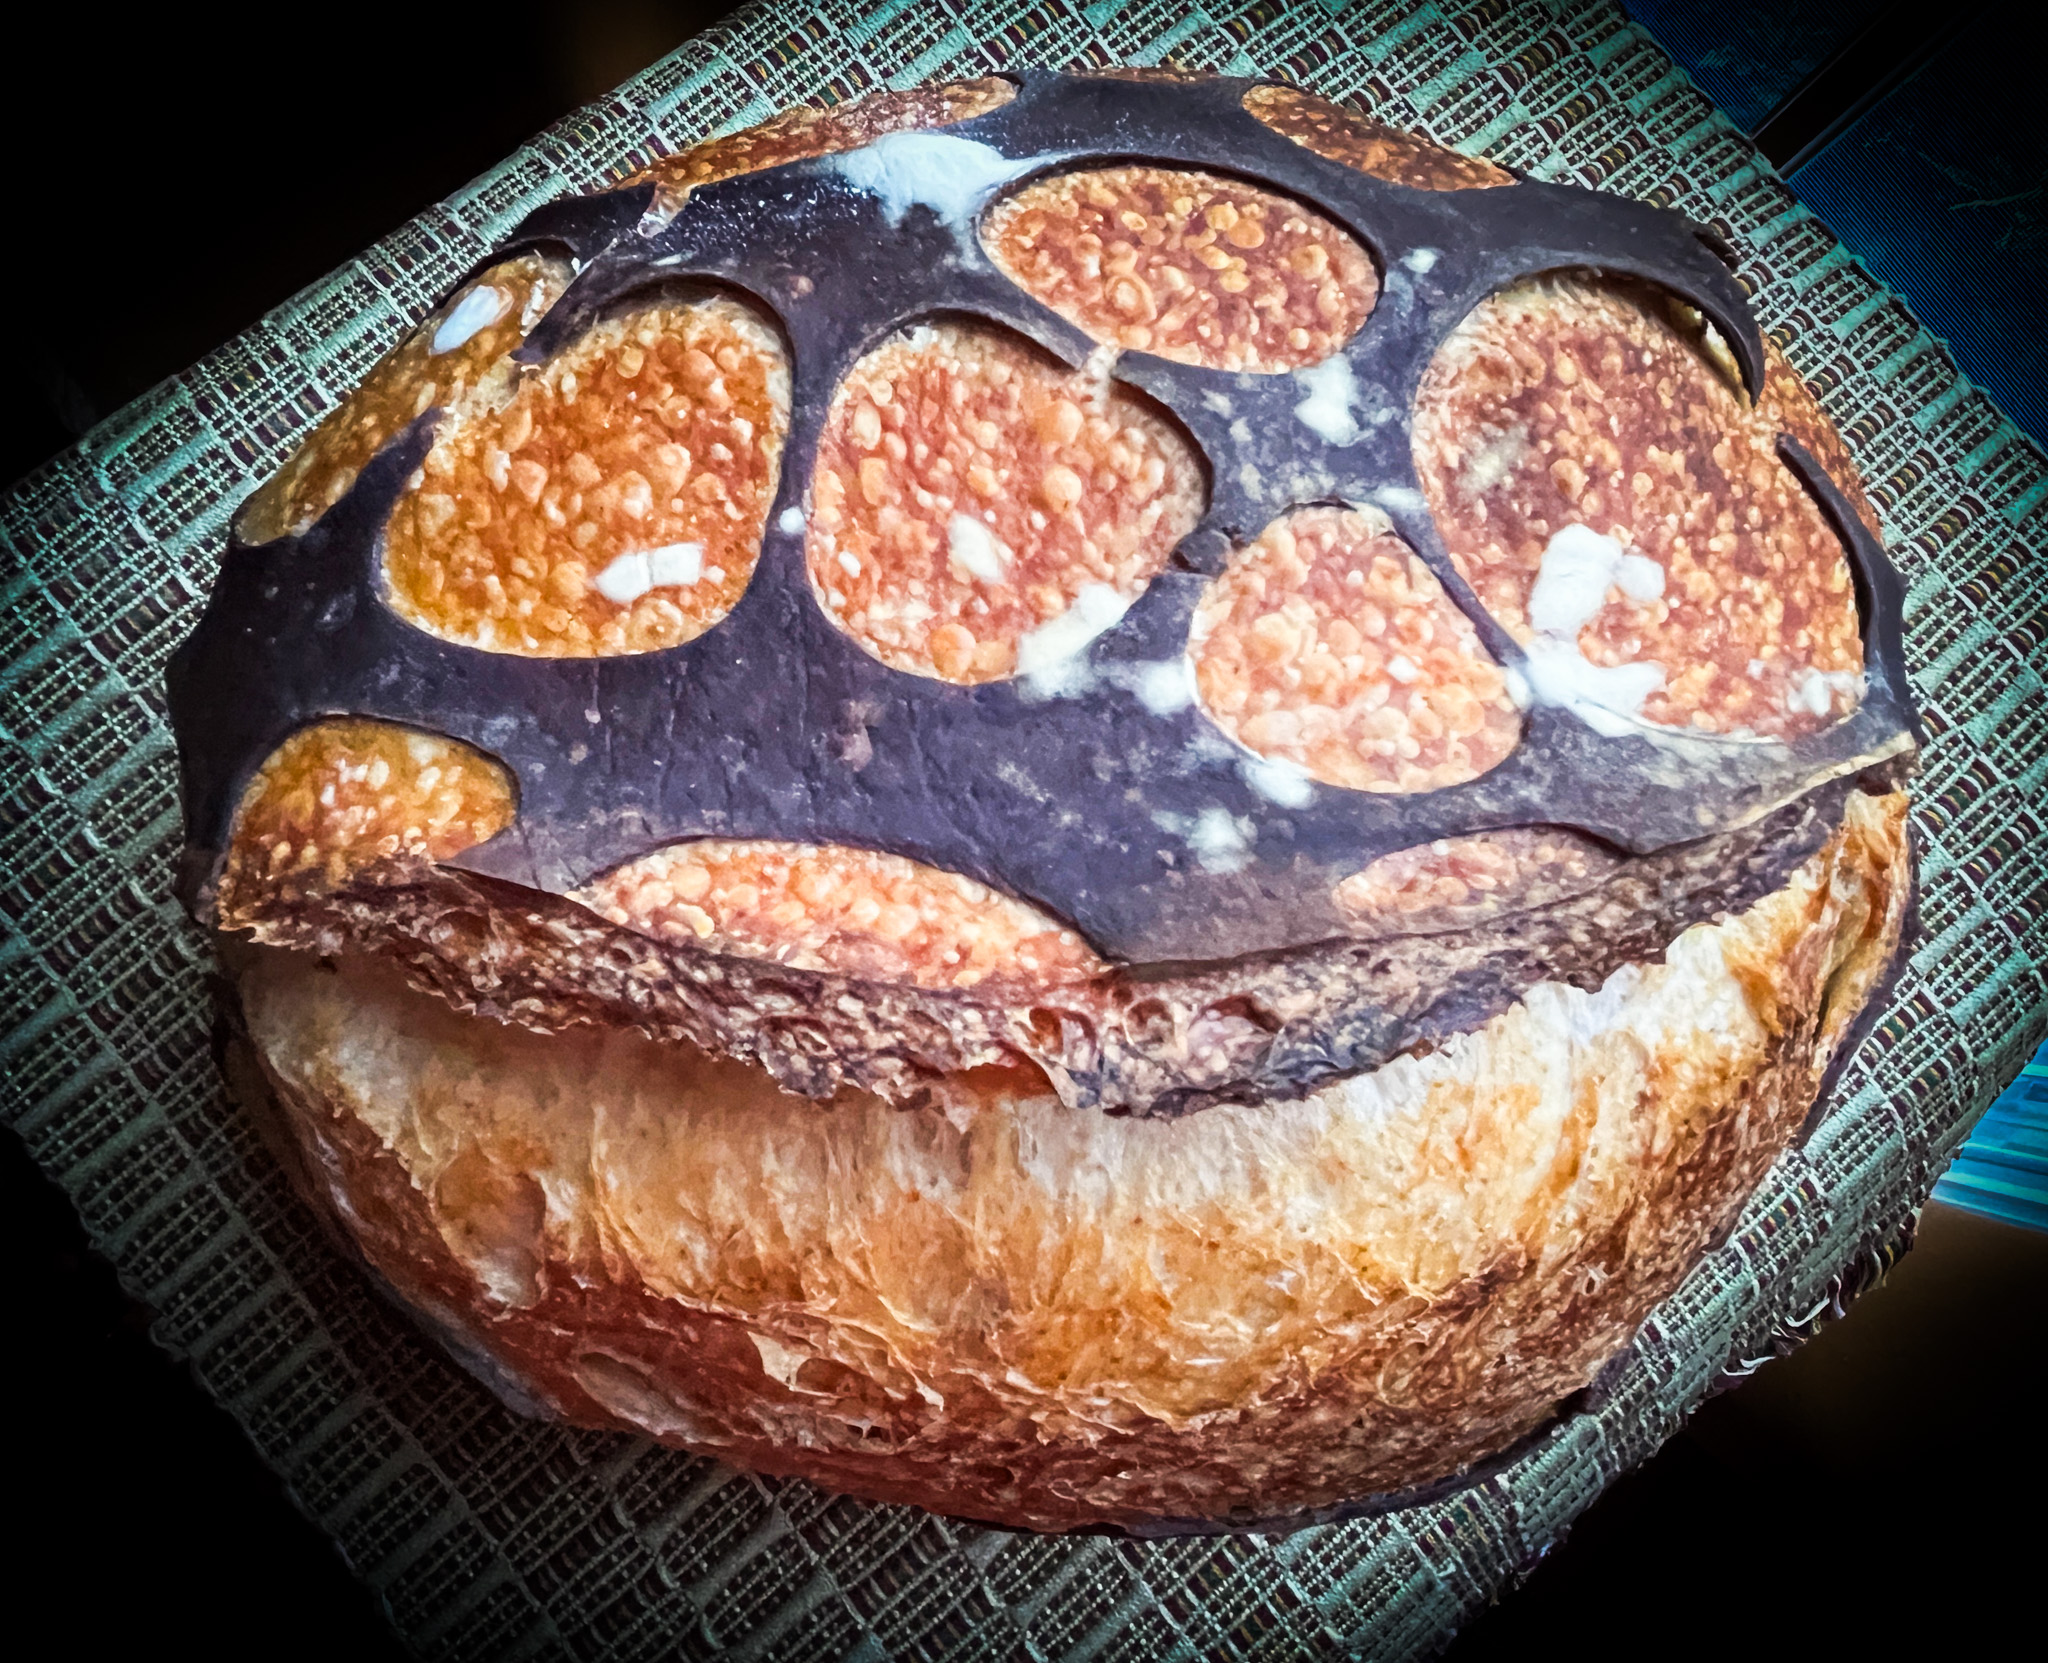
PEANUT BUTTER SOURDOUGH

Basic formula with spelt flour and 25g creamy peanut butter. This was one delicious bread, the smell during baking is something! The scoring was once again inspired by Mogi’s Instagram feed, and this time I used a powder red food dye that is fat-soluble (appropriate for chocolate work). That seemed to stand better during baking.

Very simple scoring, I used 8 guide lines made with a string, but you could definitely just improvise.

CELEBRATION OF LOVE SOURDOUGH

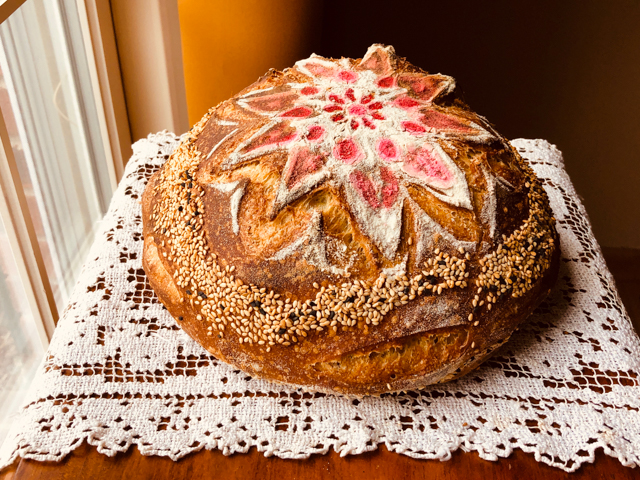
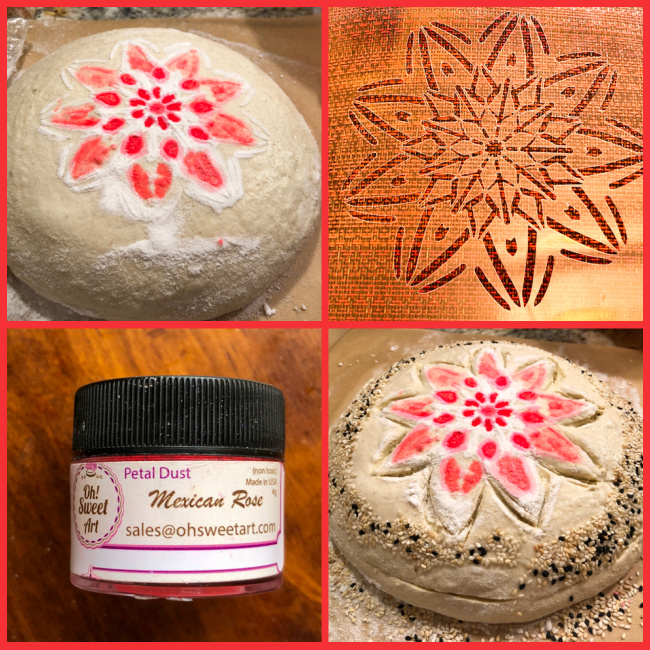
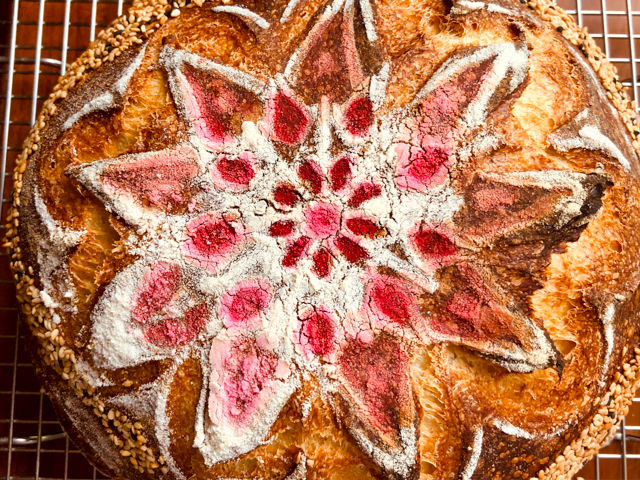
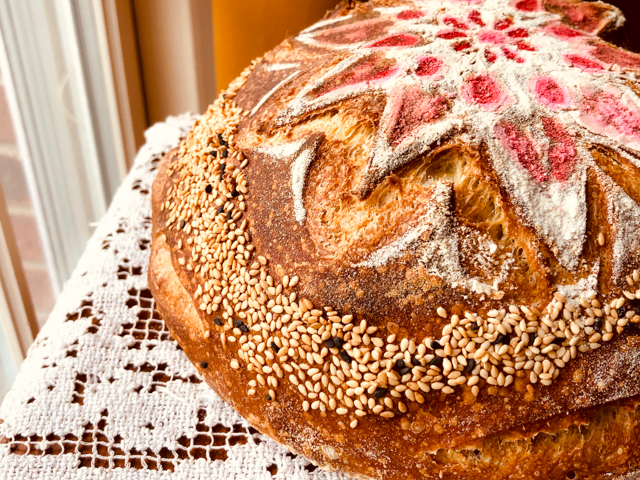
My final adventure following the footsteps of Mogi. This is a bread called Tu B’av (ט״ו באב), the Jewish holiday of love, similar to our Valentine’s Day. I made a simple sourdough with full white flour, and 1 tsp turmeric in the dough. The surface was dusted with white flour, a shower of turmeric, and the center was dyed with pitaya powder, which next time will be replaced by red dye powder. A round cookie cutter comes in very handy to contain the red dot. I am still struggling with how heavy a hand to use when adding colors, particularly the subtle ones as turmeric that might end up too similar to the crust. Once again my results are not as gorgeous as Mogi’s, but there is always next time!

So that’s all for now, my friends… This post, entitled For the Love of Sourdough, had to end with a bread to celebrate love, that feeling that keeps us together, staring at the future without fear.

ONE YEAR AGO: Brazilian Pao de Mel

TWO YEARS AGO: Stir-Fried Chicken in Sesame Orange Sauce

THREE YEARS AGO: Monday Blues

FOUR YEARS AGO: A New Way to Roast Veggies

FIVE YEARS AGO: Two Takes on Raspberries

SIX YEARS AGO: Spice Cake with Blackberry Puree

SEVEN YEARS AGO: Own Your Kitchen with Cappuccino Panna Cotta

EIGHT YEARS AGO: Chicken Parmigiana, the Thriller

NINE YEARS AGO: Wild Mushroom Risotto

TEN YEARS AGO: Tartine Bread:  Basic Country Loaf 

ELEVEN YEARS AGO:  Pugliese Bread


PANETTONE, WILD YEAST VERSION

It is almost that time of the year, my friends! I firmly believe that Brazil might be the number 2 country in the world with the highest consumption of panettone in the month of December, losing to Italy, but barely so. They are obsessed over there. Odd bird that I was, I did not care for it until I was about 30 years old.  Now, not only I love it, but I am partial to the authentic version. No chocolate chips for me. Of course, I won’t be mad if you modify this version to include them. I  am open-minded, your chocolate chips will be fine with me!

Timing for the process:
Mix and ferment first dough: 12.5 hours
Mix final dough: 30 minutes or longer
First fermentation of final dough: 1 to 1.5 hours, with folds every 20 – 30 minutes
Divide, rest, and shape: 25 minutes
Proof: 4 – 6 hours at 80F, or about 12 hours at room temperature
Bake: about 40 minutes
Hang/cool: several hours

Time consuming? Yes. Very involved process? Yes.
Worth it? TOTALLY!

PANETTONE
(very slightly modified from Wild Yeast)

yield: two large loaves, best if baked in paper molds
(available at amazon.com)

for starter:
20 g mature stiff (50%-hydration) sourdough starter
20 g flour
10 g water

Mix all ingredients and ferment at 85F for 4 hours. Repeat feedings at 4-hour intervals, each time discarding all but 20 grams of starter, and feeding it with 20 grams of flour and 10 grams of water.

To feed the starter for a whole night, use only 10 g starter with the flour and water, then leave until next morning. Make sure that the final feeding right before you make the dough happens 4 hours before, so that the starter is at its peak. When you are ready to make the final dough, prepare enough starter using these proportions to have enough to use (make a little over 100 g to allow for  eventual evaporation)

First Dough Ingredients:
346 grams flour
190 grams water
1 gram (1/3 teaspoon) osmotolerant yeast, or 1.3 grams (1/2 teaspoon) instant yeast
85 grams sugar
55 grams egg yolk
7 grams (1.5 teaspoons) diastatic malt powder
85 grams unsalted butter, at room temperature
90 grams sweet starter

Final Dough Ingredients:
all of the first dough
82 grams flour
5 grams (7/8 teaspoon) salt
25 grams egg yolk
1/2 tsp vanilla paste
zest of a medium orange
115 grams water, divided
82 grams sugar
126 grams unsalted butter, at room temperature (pliable)
20 grams honey
126 grams raisins
150 grams candied orange peel

Glaze Ingredients (optional)
42 grams granulated sugar
3 grams (2 teaspoons) ground almonds (or almond flour)
3 grams (3/4 tsp) vegetable oil
3 grams (1/2 tablespoon) cornstartch
3 grams cocoa powder
15 g egg whites
1/8 tsp vanilla paste

Topping (optional)
powdered sugar
Swedish pearl sugar
whole blanched almonds

Make the starter over a period of one to several days. Its final feeding should be given 4 hours before mixing the first dough.

Prepare the first dough the evening before baking: In the bowl of a stand mixer, mix all of the first dough ingredients just until combined. Cover the bowl and ferment for 12 hours at warm room temperature (about 72F), or longer for a cooler room. The dough should more than triple in volume.

Make the final dough: To the first dough in the mixer bowl, add the flour, salt, egg yolks, orange zest, vanilla seeds, and 40 grams of the water. Mix in low speed until the ingredients are just combined, about 3 minutes.

Turn the mixer to medium speed, mix for a minute or two, then continue to mix while slowly adding the sugar, in about 5 or 6 increments. Mix for one to two minutes between additions.

Continue to mix until the dough pulls away from the sides of the bowl and the gluten is almost fully developed. Turn the mixer back to low speed and add the butter. Mix for a minute in low speed, then in medium speed until the butter is completely incorporated into the dough and the gluten has reached full development (forms a nice windowpane when gently stretched).

In low speed, add the honey, and about half of the remaining water. Mix until the water is fully incorporated. Add the remaining water and mix until it is fully incorporated. At first it will seem very soupy, do not worry about it, keep mixing and it will end up very smooth and nice.

In low speed, add the raisins and candied peels, mixing just until they are evenly distributed. Place the dough in a lightly oiled container (preferably a low, wide one, to facilitate folding). Ferment at warm room temperature for about one hour, folding the dough after the first 30 minutes. If the dough seems very loose, fold it at 20-minute intervals instead.

Turn the dough onto a buttered surface. Divide the dough into two pieces, and form each piece into a light ball.

Allow the balls to rest (may be left uncovered) for 20 minutes. Meanwhile, if baking in paper molds (recommended) skewer them in the lower third portion with  two wooden skewers inserted in parallel. They will hold the panettone after baking upside down to keep the shape. Shape the dough into tight balls and place into the skewered molds.

Proof at 80F for 4 – 6 hours (or about 12 hours at room temperature), until the tops of the dough domes are even with the top of the molds and the sides are an inch or so below the tops. When the dough is nearly fully proofed, preheat the oven to 350F, with the rack in the lower third of the oven.

To mix the glaze, whisk all ingredients together. Pour, brush, or pipe the glaze evenly onto the top of the loaves. Sift powdered sugar generously over the tops, then sprinkle with pearl sugar and garnish with whole blanched almonds.

Place the loaves directly on the oven rack and bake for about 35 – 40 minutes, until the tops are dark brown and the internal temperature is 185F. If the tops are already quite dark after 25 – 30 minutes, turn the heat down to 325F.

While the panettone is baking, set up your hanging apparatus (See above). When the bread is done, hang them as quickly as possible. Allow the panettone to hang for at least four hours, up to overnight.

ENJOY!

to print the recipe, click here

Comments: I urge you to visit Susan’s site (Wild Yeast) for her original post on the subject, as she goes through many small details I omitted, just to make this post slightly shorter.  I actually made the panettone three times last year and had some issues when I baked using a regular metal tin (as shown in the composite picture above).  The issue was un-molding and having the baked product keep its shape. It simply did not happen. The crumb is very delicate as it comes out of the oven and in both situations I had the loaf forming a very unattractive fold, in which the crumb got compressed and deformed. Did it affect the taste? Not at all, but once that happened (twice), I decided that baking in paper molds is definitely better. It makes cooling – inverted in the mold – a lot easier.

Just make sure you have a large enough pan to hold it. I should also say that for this third bake I halved the full recipe and made one single large loaf. Panettone will always be bittersweet for me, as last year I baked one and shared with people from the lab, sent some to Aritri and she loved it so much I gave her a whole loaf later. At the time she was already quite sick and her parents were in the US to help take care of her. They all loved the panettone, I believe it was their first time trying it. If you’ve never baked one, don’t let the apparent complexity of the recipe scare you. Keep in mind it’s an enriched dough with a lot of goodies added to it, so the process must be taken slowly, if you try to speed it up, the final product won’t be as good. Patience is key.

Susan, I know you are not blogging anymore, and I really miss your bread-wisdom in the blogosphere, but maybe this post will give you a smile knowing that your recipe was baked several times in the Bewitching Kitchen! Thank you!

ONE YEAR AGO: Turkey Chili Under Pressure

TWO YEARS AGO: Tiramisu Macarons

THREE YEARS AGO: Cider Mini-Cheesecakes with Caramel Sauce

FOUR YEARS AGO: Rustic Ciabatta and Mini-Meatloaves

FIVE YEARS AGO: Green Rice

SIX YEARS AGO: Potato-Crusted Italian Mini-Quiches

SEVEN YEARS AGO: Beetroot Sourdough for the Holidays

EIGHT YEARS AGO: Cod Filet with Mustard Tarragon Crust

NINE YEARS AGO: Soba Noodles: Light and Healthy

TEN YEARS AGO: Potato-Rosemary Bread

A SOURDOUGH QUARTET

Today I share four different ways to play with sourdough… Different amounts of whole-wheat flour, different ways to slash and decorate it, and a version studded with a mixture of Kalamata and green olives that was probably the winner with the resident bread taster.

First, a loaf that pushes the level of whole-wheat a bit higher than I normally go for. I am calling it 50:50 sourdough, for obvious reasons

50:50 SOURDOUGH
(from the Bewitching Kitchen)

100 g active sourdough starter at 100% hydration
390g water
250g whole-wheat flour
250g bread flour
10g salt

Dissolve the starter in the water in a large bowl, mixing well until it is well-dispersed. Add the flours and salt, mix with your hands or with a wooden spoon until it forms a shaggy mass.

After 20 minutes, do a minimal kneading, about 10 times or so until the dough becomes smooth. You will now allow the dough to ferment for 4 hours at room temperature, folding the dough every 40 minutes, and keeping it covered with plastic. You don’t have to be precise, but allow the full four hours fermentation to take place.  You can do foldings at 40 min, 1h 20 min, 2 hs, 2 hs 40 min, 3 hours 20 min. After that final kneading, leave the dough undisturbed for 40 minutes more, then proceed to shape as a round (or a batard, if you prefer).

Place inside a banetton well dusted with flour and keep it in the fridge overnight, from 8 to 12 hours.

Next morning, heat the oven to 450F.

Invert the dough on a piece of parchment paper and lightly, very lightly coat it with flour, then rub all over the surface with the palm of your hand. Score the pattern of your choice.

Bake at 450F for 45 minutes, preferably covered for the first 30 minutes to retain steam.  Cool completely over a rack before slicing.

ENJOY!

to print the recipe, click here

Comments: The amount of whole-wheat flour in this bread makes it hearty and quite filling. I kept the hydration level of the final dough at 78%, because it makes it easier to slash the surface. If the hydration is too high, it’s a lot harder to get a pattern going.  I started from the center and drew a little spiral, not too deep but deep enough to coach the bread into opening a bit. Then I use a brand new razor blade to form the design inside the spiral.  I really liked the way it turned out, and the crumb was more open than I expected.

Next, a very similar formula, but lowering the level of whole-wheat a little bit.

70:30 SOURDOUGH
(from the Bewitching Kitchen)

100 g active sourdough starter at 100% hydration
400g water
350g bread flour
150g whole-wheat flour
10g salt

Dissolve the starter in the water in a large bowl, mixing well until it is well-dispersed. Add the flours and salt, mix with your hands or with a wooden spoon until it forms a shaggy mass.

After 20 minutes, do a minimal kneading, about 10 times or so until the dough becomes smooth. You will now allow the dough to ferment for 4 hours at room temperature, folding the dough every 40 minutes, and keeping it covered with plastic. You don’t have to be precise, but allow the full four hours fermentation to take place.  You can do foldings at 40 min, 1h 20 min, 2 hs, 2 hs 40 min, 3 hours 20 min. After that final kneading, leave the dough undisturbed for 40 minutes more, then proceed to shape as a batard (or a round, if you prefer).

Place inside a banetton well dusted with flour and keep it in the fridge overnight, from 8 to 12 hours.

Next morning, heat the oven to 450F.

Invert the dough on a piece of parchment paper and brush off all the flour stuck from the banetton to keep it as clean as possible. Place the stencil of your choice on top of the bread, shake some all-purpose flour, lift the stencil carefully. Slash the bread in a way that will be compatible with the design. You need to cut one or more reasonably deep slashes to coach the bread to open in those spots.

Bake at 450F for 45 minutes, preferably covered for the first 30 minutes to retain steam.  Cool completely over a rack before slicing.

ENJOY!

to print the recipe, click here

Comments: The overall technique remained the same, but the reduction in the proportion of whole-wheat makes the bread considerably lighter not only in color but also in taste. Since the slashing was going to be a lot simpler and the main decoration would come from the stencil, I increased the hydration a little bit to 80%.

Next, comes a loaf with even less whole-wheat in the formula, but made more special thanks to the inclusion of a good amount of olives, both Kalamata and green. I had never mixed two kinds of olives in the same loaf, and I can tell you this will be happening again soon. Phil decided this might very well be his favorite bread of 2019. It turned out divine, even if I say so myself.

MIXED OLIVES SOURDOUGH
(from the Bewitching Kitchen)

50 g active starter
380 g  water
470 g  bread flour
30 g whole-wheat flour
9 g fine sea salt
150 g pitted green and kalamata olives, chopped
1 tsp Herbes de Provence

Dissolve the starter in the water in a large bowl, mixing well until it is well-dispersed. Add the flours and salt, mix with your hands or with a wooden spoon until it forms a shaggy mass.

After 20 minutes, do a minimal kneading, about 10 times or so until the dough becomes smooth. You will now allow the dough to ferment for 4 hours at room temperature, folding the dough every 40 minutes, and keeping it covered with plastic. On your first folding cycle, add the mixture of olives. You can do foldings at 40 min, 1h 20 min, 2 hs, 2 hs 40 min, 3 hours 20 min. After that final kneading, leave the dough undisturbed for 40 minutes more, then proceed to shape as a round (or a batard, if you prefer).

Place inside a banetton well dusted with flour and keep it in the fridge overnight, from 8 to 12 hours.

Next morning, heat the oven to 450F.

Invert the dough on a piece of parchment paper and brush off all the flour stuck from the banetton to keep it as clean as possible. Place the stencil of your choice on top of the bread, shake some all-purpose flour, lift the stencil carefully. Slash the bread in a way that will be compatible with the design.

Bake at 450F for 45 minutes, preferably covered for the first 30 minutes to retain steam.  Cool completely over a rack before slicing.

ENJOY!

to print the recipe, click here

Comments: A light crumb due to the smallest proportion of whole-wheat (only 6%), and a hydration of 76% bumped a little bit due to the water content of the olives. The presence of the olives also made me reduce slightly the amount of salt.

Hard not to use superlatives to describe this bread. Green olives are definitely under-appreciated and I admit to this sin. Of course the Kalamatas bring a lot of flavor and moisture, but there is definitely a lot more happening through the slightly sharper nature of the humble green creatures. I did not pay close attention to the ratio of the olives in the mix, but I think it was pretty close to 50:50.  The crumb turned out pretty open and very moist, difficult to eat only one slice, and it went well with pretty much anything we paired it with, including a nice lentil soup made by the husband.

To get the best effect of a stencil design made with white flour, start with the bread inverted from the banetton and delicately but thoroughly brush off any residual flour that might have stayed glued to the surface. Then sprinkle the white flour over the stencil of your choice. If the bread has any flour on the surface, the design won’t be as evident after baking. The other thing to keep in mind is that you need to try and avoid the bread from opening right in the middle of your design. The best way to avoid that is to make a deep slash coaching the dough to open where you want it to. You can never be 100% sure it will work, but that’s your best bet. You can see how I dealt with it on the composite picture above.

Finally, I share a bread that used the exact same formula of the previous one, but no olives. In this case, my main goal was to do a white-on-black stencil design. Some bakers use charcoal powder, I decided to go with black cocoa powder, the kind that is used to bake Oreo type cookies.

BLACK COCOA SOURDOUGH
(from the Bewitching Kitchen)

50 g active starter
380 g  water
470 g  bread flour
30 g whole-wheat flour
10 g fine sea salt

water and black cocoa powder to form a thin paste

Dissolve the starter in the water in a large bowl, mixing well until it is well-dispersed. Add the flours and salt, mix with your hands or with a wooden spoon until it forms a shaggy mass.

After 20 minutes, do a minimal kneading, about 10 times or so until the dough becomes smooth. You will now allow the dough to ferment for 4 hours at room temperature, folding the dough every 40 minutes, and keeping it covered with plastic. You can do foldings at 40 min, 1h 20 min, 2 hs, 2 hs 40 min, 3 hours 20 min. After that final kneading, leave the dough undisturbed for 40 minutes more, then proceed to shape as a round (or a batard, if you prefer).

Place inside a banetton well dusted with flour and keep it in the fridge overnight, from 8 to 12 hours.

Next morning, heat the oven to 450F.

Invert the dough on a piece of parchment paper and brush off all the flour stuck from the banetton to keep it as clean as possible. Make a paste with cocoa powder (preferably dark) and water. Brush the surface of the bread with it, then immediately place the stencil of your choice on top of the bread, shake some all-purpose flour, lift the stencil carefully. Slash the bread in a way that will be compatible with the design.

Bake at 450F for 45 minutes, preferably covered for the first 30 minutes to retain steam.  Cool completely over a rack before slicing.

ENJOY!

to print the recipe, click here

Comments: The goal for this bake was to play with a new stenciling technique. After the shaped dough is inverted out of the banetton, simply make a little paste of cocoa powder and water, liquid enough to brush with a silicone brush, but not too soupy.  Then, add the stencil on top and dust with all-purpose flour.  I imagine other colors could be used. Beet powder, sweet potato powder, butterfly pea powder…  I am not sure the red color of beet powder would be preserved during baking, I tried using it in the dough once, and the result was a brownish color with very little to do with my expectations. Worth giving it a try, I am sure. Even if it turns brown, could be still a nice contrast with the white pattern of the stencil. I should mention that there is absolutely no taste of cocoa in the baked bread.

The bread had absolutely amazing oven spring, which in a way messed up the design a little, but a baker should never complain of too much oven spring, since that can upset the Gods of the Sourdough and result in failure after failure for months to come. Yeah, I am a scientist. Very pragmatic. But I try to keep a sense of humor.

Final remarks: these loaves use a very simplified method.  I did not do autolyse, and did not bother adding the salt later, it all went into the dough at the same time. As you can see from the photos, I got enough oven spring and a nice crumb using these shortcuts. Also, I never bother waiting for the shaped bread to sit at room temperature before baking, or keeping the oven at 450F for an hour before baking. Some bakers insist those steps are important for a good bake. They are not. Once the oven reaches temperature, my cold, shaped bread goes in. It amazes me that people would waste so much energy heating up an oven to very high temperature for a long time before baking their loaves. Trust me, it is not at all necessary.

ONE YEAR AGO: When bad things happen to good people

TWO YEARS AGO: Sweet Potato “Hummus”

THREE YEARS AGO: Cauliflower Crust Pizza

FOUR YEARS AGO: Silky Rutabaga Puree

FIVE YEARS AGO: Bon Bon Chicken: Light and Spectacular

SIX YEARS AGO: Red Wine Sourdough Bread with Cranberries

SEVEN YEARS AGO: Award-Winning Sourdough Baguettes

EIGHT YEARS AGO: Country Rye (Tartine)

NINE YEARS AGO: Penne a la Vechia Bettola