

Nutella and Biscoff spreads are items that live permanently in my heart, and almost permanently in my pantry. I am just a bit afraid of losing control and getting at those jars with a spoon. And wild abandon. If you find yourself with a bottle of Nutella hanging around, put it to good use. This recipe is slightly modified from Bakeat350, a site that was first recommended by my friend Tracy, Cookie Decorator Extraordinaire. From the cookies, I ventured into different directions using Royal Icing and also a simplified method for those times when your patience genes are in fully-repressed mode.

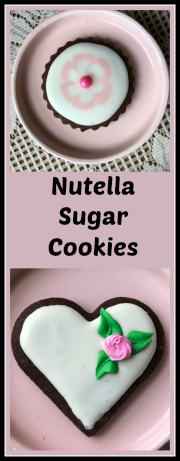
NUTELLA SUGAR COOKIES
(slightly modified from Bakeat350)
320g all-purpose flour
50g Dutch-process cocoa
1/2 teaspoon kosher salt
2 teaspoons baking powder
1 cup (226g) cold butter, cut into chunks
1/4 tsp salt
200g sugar
1/3 cup Nutella
1 egg
1 teaspoon vanilla paste
Line cookie sheets with parchment. Heat oven to 350.
Whisk the flour, cocoa, salt, and baking powder together. Set aside. Cream the butter and sugar together until fluffy. Add the Nutella and mix well, then the egg and vanilla paste. When all in fully combined, add the flour in 2 to 3 additions, mixing in low-speed until combined. Do not over-mix. Remove the dough and smooth it by kneading gently with your hands, then wrap in plastic and refrigerate for about 30 minutes.
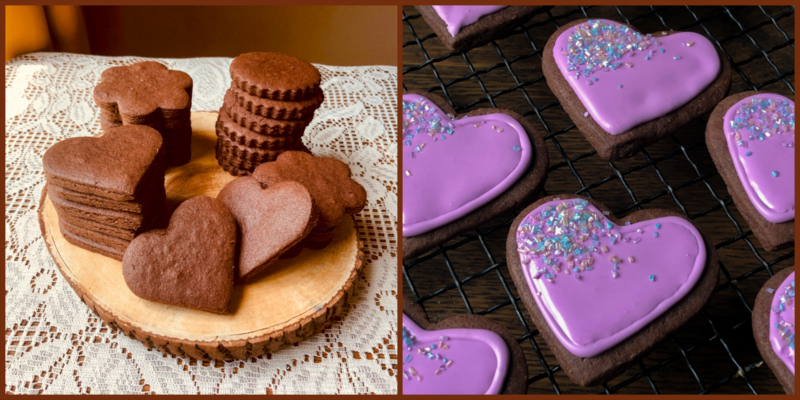
Roll the dough to your favorite thickness, cut shapes and freeze the cutout shapes on a baking sheet covered with parchment paper. Keep in the freezer for 5 to 10 minutes, bake straight from frozen for 10 to 12 minutes. Cool lightly on the baking sheet, then transfer to a cooling rack for icing when fully cold.
ENJOY!
to print the recipe, click here
Comments: The dough for these cookies is very forgiving. I’ve made it three times and settled on a smaller proportion of Nutella, without compromising flavor, but improving texture, in my opinion. The original amount specified in the recipe made it slightly harder to work with, and forced me to add too much flour/cocoa during rolling and cutting.
And now, let’s talk decoration… The first method uses the painted icing technique, as described in this post from Helen’s Pastries like a Pro. It is perfect for those times in which you are short on time and patience or both (yeah, that happens). The effects are random, each cookie very unique. Love it!

PAINTED COOKIES
(from Pastries Like a Pro)
2 cups unsifted powdered sugar (260 grams)
1/4 cup lemon juice or a mixture of lemon juice and water
sprinkles of your choice
Add sugar and lemon/water into a bowl, stir until fully smooth. The glaze should run off a spoon but remain fairly thick. If necessary, transfer to a bowl that will make it easier to dip the surface of the cookies. Dot the surface with gel food colors.
With a bamboo skewer or toothpick, swirl the colors around. Do not over-swirl. Pick the cookies up by the edge and dip top side down, just to the top of the cookie, into the glaze allowing the glaze to drip back into the bowl. When most of it has dripped back, turn it right side up and place it on parchment paperIf there is a lot of glaze still on the top, wipe the excess off by dragging it very lightly on the edge of the bowl. Place top side up on parchment to dry. Add sprinkles before the glaze hardens, if you so desire.
Dry for 24 hours before packing.
ENJOY!
to print the recipe, click here
I used yellow, pink and red to do the swirls on the surface of the icing. Because the cookies are brown, you won’t have a full coverage of the underlying surface. If you’d like, do a double coating, one fully white and then a second one with the swirls, then add the sprinkles. Because the icing is so thin, these cookies will have a more intense flavor of chocolate.

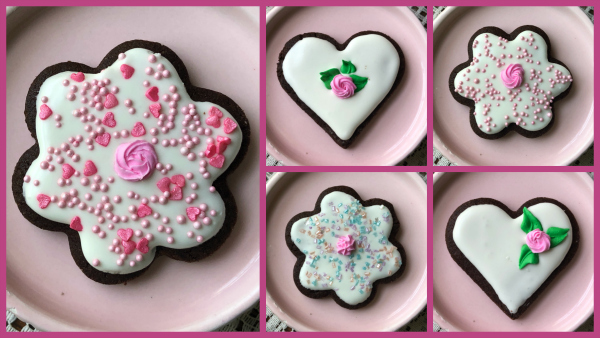
SMALL-BATCH ROYAL ICING DECORATION
(from the Bewitching Kitchen)
40 g egg whites
200 g powdered sugar
squeeze of lemon juice
sprinkles (optional)
Mix all ingredients in the bowl of a mixer and whisk for a couple of minutes with a hand-held mixer. Adjust consistency to give a nice flooding texture. Divide the icing in two portions, color one pink, keep the other white.
Decorate the cookies with the two-colors, and add sprinkles of your choice before the icing hardens. The flower pattern involves icing in color #1, then addint just one spot of contrasting color in the center of the cookie and a circle of the same color around it. A toothpick is then used to drag lines all around the perimeter of the circle. Sprinkles are added before the icing hardens.
ENJOY!
to print the recipe, click here

ROYAL ICING ROSETTES AND LEAVES
(adapted from Wilton)
1 recipe of small-batch Royal Icing (see above) to flood the cookies
for rosettes and leaves:
2 cups (about 1/2 pound) powdered sugar
2 tablespoons warm water
1 + 1/2 tablespoons meringue powder
Beat all ingredients with a KitchenAid type mixer and the paddle attachment for about 7 minutes. Let the icing rest for 10 minutes, adjust consistency if needed. For piping rosettes, it must be thick but soft enough to squeeze through a small piping tip.
Divide the icing in two portions, color one pink, one green. Use a small star tip (like a Wilton 16) for rosettes and a small leaf piping tip (I used a K13) for the leaves. Pipe your shapes over parchment paper and allow to dry. They last for a long time at room temperature.
Ice your cookies with White Royal Icing, and while it’s still wet, place the sugar decorations on top. Add sprinkles, if you like. Let the cookies sit at room temperature 24 hours in a single layer to fully dry.
ENJOY!
to print the recipe, click here

Those were so much fun to make! Very Zen, you should make more than you think you’ll need because some might break as you move them, some might not look that good, particularly if it’s the first time you make them, as it was the case for me. I now bought a smaller leaf-piping tip as the smallest I had was a big too big for the rosettes.
These decorations might go well over macarons, so I am saving the leftovers and waiting for my new piping tip so I can make additional ones with that goal in mind. It is nice to do this type of project with no hurry. I actually like to roll just half of the cookie dough and freeze the rest for a much easier second batch. And of course, you can make rosettes weeks in advance if you prefer, and just save them inside a plastic box at room temperature.
ONE YEAR AGO: Marshmallow Macarons
TWO YEARS AGO: Sprinkled Meringues
THREE YEARS AGO: Incredibly Simple Times Three
FOUR YEARS AGO: Dan Lepard Simple White Loaf
FIVE YEARS AGO: Maureen’s Fabulously Fudgy Brownies
SIX YEARS AGO: Wheat Berry Caraway Bread
SEVEN YEARS AGO: Mexican Focaccia
EIGHT YEARS AGO: Sunny Kamut Salad with Roasted Lemon Vinaigrette
NINE YEARS AGO: Pane de Casa & Crostini
TEN YEARS AGO: Down-home Dig-in Chili
ELEVEN YEARS AGO: Cinnamon Rolls

These are all so beautiful! And I’m sure tasty too!
LikeLike
Very Pretty!!
LikeLike