I WILL CRACKER YOU UP

THIS IS MY 1,400th BLOG POST!

Crackers are a lot of fun to make and bake. Ok, there is the rolling step to consider but if you are not too wild about a rolling pin and elbow grease, a pasta machine attachment can do wonders for the ones that need to be super thin. Today I share four recipes. Salted Egg Yolk Crackers and Moroccan Tortitas are quite unusual, different from any kind I’ve ever had. A copy-cat version of a Trader Joe’s favorite is a bit more involved to make but pretty amazing to eat. And finally, a lightning-fast Sourdough Cracker that can be made quite dramatic with a small amount of charcoal powder. Grab your flour, and let’s get crackin’!

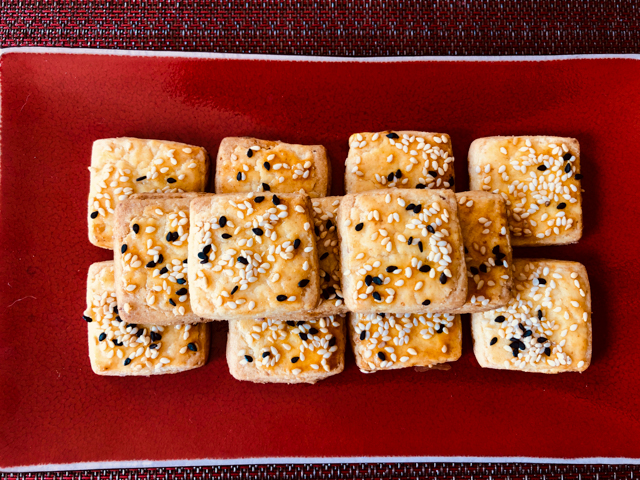
SALTED EGG YOLK COOKIES
(from Dana’s Wakeandbakemama)

240g plain flour
15g cornstarch
1/4 teaspoon baking powder
1/8 teaspoon baking soda
1 tablespoon milk powder
4 salted egg yolks (use this recipe to make them)
170g butter, at room temperature
1/2 teaspoon salt
85g sugar

Topping:
1 egg yolk + a little water for wash
1 tablespoon each of black and white sesame seeds

Make the egg yolks at least one day in advance, preferably a couple of days, so they are nice and dry. Once it is ready, smash with fork or pastry cutter until crumbled and set aside.

In separate bowl, sift flour, cornstarch, baking powder, baking soda and milk powder. In the mixer bowl, add butter, salt and sugar. Mix until well incorporated. Add smashed salted egg yolks and sifted flours until well combined. Chill dough for a few minutes. If it gets too cold it will crack easily. Roll out to 1/4 inch thick and use any cutter you desire. Place them on lined cookie sheets and refrigerate for 15 minutes.

Preheat oven to 350 degrees F. Place sesame seeds in a small bowl and mix. Remove cookies from refrigerator and brush with egg wash and sprinkle with sesame seeds. Bake for 15 minutes or until golden brown.

ENJOY!

to print the recipe, click here

Comments: Dana called them cookies, and it’s true, they are cookies. But their flavor is so unique, I see them quite well as “crackers”, going well with sweet or savory items. They are addictive, with a very intriguing texture. Definitely, the salted egg yolk talking. For people who bake macarons often (if the shoe fits, I better wear it), salted egg yolks are a great ingredient to play with.

MOROCCAN TORTITAS
(slightly adapted from The Jewish Journal)

3 eggs
1/4 cup sugar
1/2 cup grapeseed oil
1 tsp anise oil
1 tablespoon fennel seeds
1 tablespoon sesame seeds
1 tsp baking powder
2 and a half cups all-purpose flour

In large bowl on stand-up mixer, mix eggs, sugar and oil until well blended. Add the anise extract, seeds and baking powder and mix. While mixing, add flour half a cup at a time and continue to mix until the dough forms a ball. You may not need all the flour, or you may need a little bit more, it all depends on the size of your eggs and the moisture of the flour. Let the dough rest for 10 minutes.

Heat the oven to 350 F. Divide dough in tennis ball-size pieces. Roll out dough as thinly as possible, a pasta rolling machine works great. Pierce dough with fork or decorating tool. Cut into squares or use cookie cutters to cut in circles. Bake on parchment paper-lined cookie sheet for 15 minutes or until golden. Let cool for several hours, as they get crunchy as they fully dry.

ENJOY!

to print the recipe, click here

Comments: Don’t let the humble look of these crackers prevent you from making them. Much like the Salted Egg Yolk version, you will grab one and go back to munch on another. Fantastic with hummus. I made them twice, first time with a pasta roller machine (the ones in the photo), second time rolling by hand. They turned out slightly thicker when rolled by hand, but equally delicious. They keep very well at room temperature.

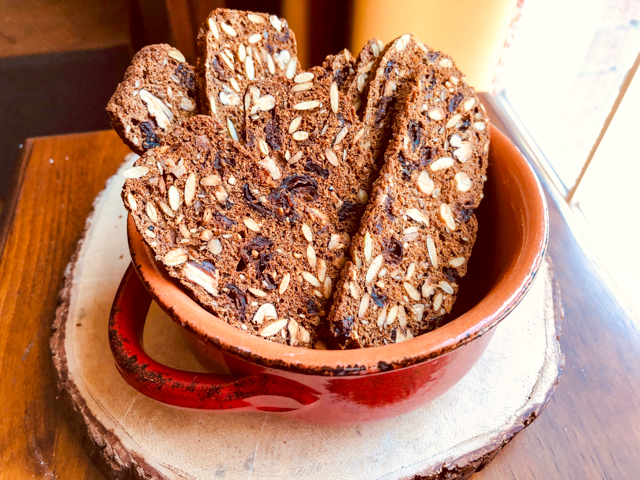
TRADER JOE’S CRACKERS WITH RAISINS AND ROSEMARY
(from Luci’s Morsels)

1/2 cup raisins or currants
1/2 cup unsalted sunflower seeds
1/4 cup almonds
1/2 cup each white and whole wheat flour
2 tablespoons fresh rosemary chopped
1 teaspoon baking soda
1 teaspoon salt
1 cup buttermilk
1 + 1/2 tablespoons maple syrup
extra salt for top

Heat oven to 350 degrees. Spray one large bread loaf pan with nonstick cooking spray.

Combine raisins, seeds, and almonds in a small bowl. Stir to combine, and reserve. In a large bowl, combine flours, rosemary, baking soda, salt, buttermilk, and syrup. Mix in fruit, nuts, and seeds. Pour batter into loaf pan. Sprinkle top with salt.

Bake 35 minutes until top is firm. Let bread come to room temperature. Wrap in plastic wrap or foil. Place in freezer for at least 2 hours or overnight. The cold bread helps with thinner slicing.

Heat oven to 400 degrees. Remove bread from freezer. Let sit 10 minutes to thaw slightly. With a serrated knife, cut 1/8-inch slices. Slices should be as uniform as possible. Place slices cut side down on an ungreased pan. Bake 8-10 minutes until crackers are a deep golden brown and corners start to crisp. Let cool completely for best texture.

ENJOY!

to print the recipe, click here

Comments: Whenever we have a chance to stop by Trader Joe’s, we get a couple of boxes of their delicious crackers. I am usually disappointed with copy-cat recipes, but I love these crackers so much, I decided to give the recipe a chance. I am very glad I did. Off all the versions I am sharing today, this is by far the most involved. Think about biscotti, but even a little worse because you need to cut the slices very very thin before the second baking. As you place the slices in the oven for the second bake, pay attention to how they are baking, because small variations in thickness will affect the outcome. Chances are you will have to remove some crackers before others are done baking. For my taste, these crackers are very close to perfection. Sweet, savory, crunchy, they are perfect with any type of cheese or jam.

My dear friend Heather from California designed a recipe for another copy-cat version of a wonderful cracker, the brand is called Raincoast, maybe you’ve seen them in grocery stores. They can be super expensive, actually. Her recipe, which she called Suncoast Crisps, is another big winner, but I don’t feel it’s fair to share it. It took her quite a bit of work to perfect it, so I will leave it as a teaser…. These have pumpkin seeds, dried cranberries and pecans.

20 MINUTE SOURDOUGH CRACKERS
(slightly modified from Phil’s Home Kitchen)

50g sourdough starter
50g bread flour
2g fine salt
charcoal powder to achieve desired color (1/2 tsp or more)
cold water to mix
olive oil
sesame seeds, black and white

Heat the oven to 400F. Mix the starter, flour, salt and charcoal powder in a bowl. Add enough water to give a soft but not sticky dough. Knead for a moment until smooth, but you do not need to knead the dough as fully as you would for full bread.

Take pieces of dough and either roll it by hand or pass it through the pasta machine: start with the widest setting 0, increasing a setting at a time until you get to two-settings before the last, thinnest one. That ensures a thin enough dough that won’t tear. You can bake it in large pieces and then break them in random shapes, or if you roll it by hand, make the dough thicker and cut in diamonds, squares, or circles. Brush the surface very lightly with olive oil and immediately sprinkle sesame seeds all over.

Bake over parchment paper for 10 minutes, turning the pieces over after 7 minutes or so. If baking large pieces uncut, cool completely before breaking them.

ENJOY!

to print the recipe, click here

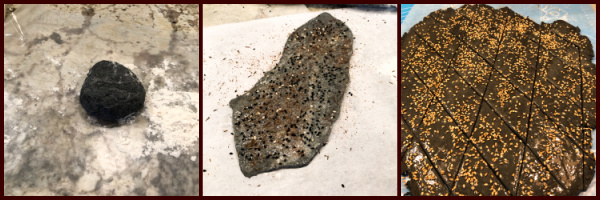
The composite above shows the two types of dough, rolled by pasta machine, very thin, or rolled by hand and cut in diamonds. The dough rolled in the machine will give a very crisp texture, whereas the other one will still retain some bread quality in it.

I cannot quite pick a favorite in this group, I really like them all. I make the sourdough version more often because it is so easy. The starter does not even have to be fully active. Stop by Phil’s blog for instructions on how to use regular yeast, if you prefer. One of my goals is to bake Ak-Mak from scratch, but that has proven quite tricky. I found a couple of recipes online but they were not even remotely close to the real thing. I am tempted to improvise from the ingredients list in the box, but have not yet gathered the energy for it. Stay tuned, if I get to Nirvana, I’ll share my recipe with you. Come to think of it, I might enlist the help of Heather to reach my goal…

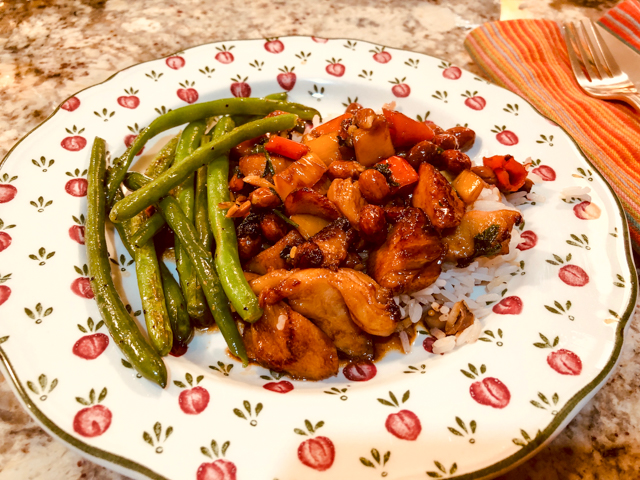
ONE YEAR AGO: Pickling Ribbons

TWO  YEARS AGO: Green Beans and Carrots with Spicy Almonds

THREE YEARS AGO: Quiche 101

FOUR YEARS AGO: Persian Butternut Squash Soup

FIVE YEARS AGO: Walnut Cranberry Sourdough Bread

SIX YEARS AGO: Ottolenghi in Brazil?

SEVEN YEARS AGO: Roasted Winter Vegetables with Miso-Lime Dressing

EIGHT YEARS AGO: 2012 Fitness Report: P90X2

NINE YEARS AGO: Caramelized Bananas

TEN YEARS AGO: Roasted Lemon Vinaigrette

ELEVEN YEARS AGO: Whole Wheat Bread

KUNG PAO CHICKEN

George likes his chicken spicy!

We like ours spicy too, but the beautiful thing about Kung Pao is that you can tame it to your favorite degree of heat by playing with the type of peppers you add, or reducing the amount of its most important ingredient: Szechuan peppercorns. Daredevils out there, pair Szechuan with Habaneros! Just make sure to have the firemen on speed dial…

KUNG PAO CHICKEN
(from the Bewitching Kitchen)

to marinate the chicken:
3 boneless/skinless chicken breast cut into 1 inch cubes
1 tablespoon dry sherry
1 tablespoon light soy sauce
2 teaspoons baking soda
1 teaspoon cornstarch

for the sauce:
1/2 cup chicken stock
1/3 cup soy sauce
2 tablespoons balsamic vinegar
2 tablespoon dry sherry
3 tsp hoisin sauce
1 tablespoons sugar
1 teaspoon cornstarch

for the stir-fry:
4 tablespoons peanut oil, divided
1 tablespoon minced ginger
1/2 red bell pepper seeded and diced
1/2 yellow or orange bell pepper seeded and diced
1 Serrano pepper, seeded and finely minced (or another hot pepper of your choice)
1 tablespoon (or to taste) Sichuan peppercorns, coarsely ground
1/2 cup roasted/unsalted peanuts
2 teaspoons sesame oil

Combine all ingredients for the chicken in a shallow bowl; cover and marinate for 30 minutes.
Whisk sauce ingredients together and set aside. Heat a large skillet or wok over high heat. Add 2 tablespoons peanut oil, allow to heat up, then add marinated chicken. Stir-fry chicken for a few minutes, until edges are browned, which will happen reasonably quickly because of the baking soda. Remove from the pan and set aside.

Add remaining cooking oil to the pan, stir in ginger, bell peppers, and Sichuan peppercorns and stir fry for a couple of minutes. Pour the reserved sauce into the pan and bring it to a boil. Add the chicken pieces, and heat everything together for a couple more minutes. Add the peanuts, sesame oil, and serve over rice.

ENJOY!

to print the recipe, click here

Comments: Szechuan peppers are quite special. They have a numbing effect, quite different from any other pepper and they are pretty much mandatory in a Kung Pao. I used a mortar and pestle to grind it, some recipes tell you to toast them lightly before grinding, but I used them fresh from the bag.

Marinating the chicken with the baking soda for 30 minutes is a quicker version of velveting, and worked pretty nicely, the meat developed that texture we all love in Chinese cooking. A little white rice, some green beans and all of a sudden we realized that Kung Pao is a nice antidote for the Polar Vortex.

ONE YEAR AGO: Galette de Rois

TWO YEARS AGO: Sous-Vide Overnight Oatmeal

THREE YEARS AGO: A Valentine’s Day Opera

FOUR YEARS AGO: Incredibly Simple Times Four

FIVE YEARS AGO: Walnut-Cranberry Sourdough Bread

SIX YEARS AGO: Ottolenghi in Brazil?

SEVEN YEARS AGO: Roasted Winter Vegetables with Miso-Lime Dressing

EIGHT YEARS AGO: 2012 Fitness Report: P90X2

NINE YEARS AGO: Caramelized Bananas

TEN YEARS AGO: Roasted Lemon Vinaigrette

ELEVEN YEARS AGO: Whole Wheat Bread

KUNG PAO CHICKEN
(adapted from

JOY COOKIE CLUB: VALENTINE’S DAY!

This post inaugurates a new series, the Joy Cookie Club, inspired by a favorite book/movie of mine, Joy Luck Club. If you have not read it, buy two boxes of Kleenex and do so. I bake sugar cookies every week to include in a box that gets donated in the Common Table project of our town. It gives me the opportunity of trying new styles and learn cute tricks with the generous professionals who share their expertise on youtube and instagram. For the basic recipes, I used either Neat Edges Sugar Cookies or Gingerbread. For Royal Icing, my favorite recipe is Tanya’s. You can it in her blog here. Now let me walk you through some of the cookies I made in the past 6 weeks.

STYLE #1: ZIG ZAG WITH BORDER

This is a pretty striking cookie that is so so easy to make! One thing that is hard when we start decorating sugar cookies is the edge. It always ends up a bit messy. By adding a border, you can say goodbye to that problem. Just pipe Royal icing and immediately touch the surface of the cookie on a layer of your favorite non-pareils (or sanding sugar). Let that dry for a few minutes, flood, quickly add lines of contrasting colors and work a needle or toothpick up and down, curving it gently to follow the overall shape of the heart. Detailed instructions here.

STYLE #2 – WAVY HEART

I consider this one a work in progress, as I could not quite match the beauty of the ones made by @thegracefulbaker. The design is actually quite simple. You pipe fine lines dividing the heart in wavy sections, then flood areas that are not touching. Wait for those to crust, maybe 30 minutes or so, and flood the others. If the consistency of your icing is thick enough, the sections will be more “puffed up” and it will look quite striking. I did not get there, but I still like the look.

STYLE #3 – DIVIDED HEART

I love this one so much! Flood one side with red, another side with white. Let them both crust for 30 minutes or more. You can even continue the following day. Add the lines, the dots, and once it’s all crusted, you can use a little diamond dust to make it truly special. For the lines and dots, you’ll need slightly thicker royal icing, either straight from mixing the batch, or very lightly thinned with water. Do not use flooding consistency. But, a similar style can also work with a simpler, wet-on-wet decoration

You can also mess up one side with a brush, and add a totally different texture to the icing. In that case, brushing some white luster powder mixed with vodka is a good move. The picture does not show it very well, but it added a nice shine to the white portion.

STYLE #4 : CRACKLED HEART

A variation of the wavy design, I let the final flooded regions crust for only 15 minutes, and used a little fondant ball tool to press the design. Once it was fully crusted, I brushed gold luster powder mixed with vodka only on the crackled part.

STYLE #5: ROSE BUDS

I was terrified of trying those, as they seemed way beyond my skill level. You can find countless youtube tutorials showing how it’s done, and in fact it is not that hard. You start by flooding in white (or any base color you like). Immediately add two or three concentric dots with the colors for the rose bud. Very slowly swirl them with a needle until you get the design you like. Add little dots of green and pull them with a needle to give them a leaf shape. Let it all dry completely and if you want, add additional bells and whistles. You can draw veins in the leaves, pipe their shape with thick royal icing, and add fine white lines on the rose buds for a completely different, almost modern look.

STYLE #6: CHEETAH HEARTS

I do sound like a broken record, but what can I do? I loved making those also… Super simple, which makes them even better. Flood with white, add large, irregular dots of your color of choice, immediately add edges, also irregular of a second, darker color. Since cheetahs are kept in zoos or far away from your home, no need to fear their revenge, you can go crazy with the color combination… Or even crazier, pairing them with a dinosaur!

STYLE #7: HEART WITHIN A HEART

Are you going to roll your eyes to the ceiling if I tell you I loved making these? Ok, I won’t then. Start with a plain cookie, use a small cookie cutter to draw a small heart in the center. If you are brave, do it free-hand. Flood with red. Let it crust for 15 minutes, surround it with white. Let it fully dry, pipe the edge of the inner heart with white icing, and cover it with non-pareils or sanding sugar. It is a simple, but very elegant look.

STYLE #8: HEARTS WITH DECORATIONS

The only thing that changes is that you need to flood the cookies and let them dry overnight. Then, you can glue to the surface Royal icing transfers in the shapes you like. Either made by yourself or using store-bought sprinkles.

I made the two rosettes with very thick Royal icing dyed pink, and brushed with golden lust powder. But as I mentioned, you can simplify your life and glue little decorations made by Wilton and available pretty much everywhere these days.

STYLE #9: WATERCOLOR SERIES

For these you absolutely need the coating to be fully crusted and dry, 24 hours is best. Flood the cookie with white. Mix food dye colors with a little vodka or everclear, and brush lightly on the surface of the cookie, making the design and colors you like. For a detailed tutorial on youtube, click here. I went with a tequila-sunrise motif. Add a border with royal icing and sprinkles if you so desire. You can also use food-safe pens and draw colorful lines all over the surface, or use a fan brush to add a band of gold, for a simple but effective design.

I hope you enjoyed this small collection of sugar cookies, and consider making them for someone you love.

Flour, sugar and eggs: $ 8.75
Assorted cookie cutters: $12.00
Food gel color: $10.00
Matching cookie to earrings and shirt
AND BEING FREE OF BRACES????
PRICELESS

ONE YEAR AGO: Uttapam, White Lentil and Rice Flatbread

TWO YEARS AGO: Valentine’s Day Sweetheart Cookies

THREE YEARS AGO: Fesenjan, Fast-Food Style

FOUR YEARS AGO: Lavender Macarons with White Chocolate Ganache

FIVE YEARS AGO: Raspberry Chocolate Truffles

SIX YEARS AGO: Red Velvet Cupcakes

SEVEN YEARS AGO: Happy Valentine’s Day!

EIGHT YEARS AGO:  A Few Blogging Issues

NINE YEARS AGO: Dan Dan Noodles

TEN YEARS AGO:  Sophie Grigson’s Parmesan Cake

ELEVEN YEARS AGO: Antibiotics and Food

BE MY VALENTINE SOURDOUGH BREAD

I had different plans for this post. It was going to be Kung Pao Chicken. Then it hit me. This is the last week before Valentine’s Day, so Kung Pao can wait. I shall dance to the romance. I have a special bread for you, decorated with a trio of hearts. Share it with someone who lives in your heart. If you are all alone in these crazy times, bake it for you. You deserve it.

BE MY VALENTINE SOURDOUGH
(from the Bewitching Kitchen)

450g bread flour
50g spelt flour
370g water
75g sourdough starter at 100% hydration
10g salt

Make the levain mixture about 6 hours before you plan to mix the dough. It should be very bubbly and active.

When you are ready to make the final dough, place the water in the bowl of a KitchenAid type mixer and dissolve the starter in it, mixing with a spatula briefly, then add the two types of flour, and salt. Turn the mixer on with the hook attachment and knead the dough for 4 minutes at low-speed all the time. You will notice the dough will gain quite a bit of structure even with just 4 minutes in the mixer. Remove from the machine, and transfer to a container lightly coated with oil, cover lightly with plastic wrap and allow it to ferment for 4 hours, folding every 45 minutes or so. Because the dough is already a bit developed from the initial time in the mixer, you should get very good structure after 3 and a half hours, or even sooner than that.

After four hours bulk fermentation, shape the dough as a ball, and place, seam side up, in a lightly floured banetton. Leave at room temperature one hour, and then place in the fridge overnight, from 8 to 12 hours.

Next morning, heat the oven to 450F.

Place three strings over the dough nicely spaced, and touch the strings to glue them lightly to the bottom of the bread. Place a parchment paper on top, a flat baking sheet, and invert the dough, flipping it out of the banneton. Flour the surface of the dough, and tie the strings on top as shown in the composite picture. Score as desired, forming a heart pattern.

Bake at 450F for 45 minutes, preferably covered for the first 30 minutes to retain steam. I cut the strings quickly after 30 minutes when I open the pan, and moved them gently out of the bread. Don’t worry if some parts of the string stay glued to the bread, you can remove later. Cool completely over a rack before slicing.

ENJOY!

to print the recipe, click here

Comments: The other day I was chatting with my friend Dorothy from Shockingly Delicious and she suggested that I make a Valentine-inspired sourdough. I jumped on the idea right away. However, I cannot take credit for the look of this bread, I had seen the scoring months ago on youtube and simply followed more or less her method with a few minor differences because I found myself with less space for additional details around the hearts. I wanted to use beets and make a vibrant red concoction, but there was no way I would go to the store under the dreadful weather conditions of this past weekend. If you don’t know what Polar Vortex is, count yourself lucky. Enough said.

I’ve been a bit puzzled by the way my designs sometimes tend to disappear during baking, and just the other day saw a tip about it. Apparently if you bake it in a Dutch oven (as I do), cracking the lid open allows some of the moisture to escape and the flour rubbed on the surface of the dough is not incorporated into it, so the design will be more evident and crisp. Obviously I forgot all about it when I baked this loaf. I will try it next time for sure.

ONE YEAR AGO: Orange Streusel Cake

TWO YEARS AGO: Pink Praline Brioche

THREE YEARS AGO: A Spinach Salad to Write Home About

FOUR YEARS AGO: Karen’s Four Hour French Country Bread

FIVE YEARS AGO: The Siren’s Song of the Royal Icing

SIX YEARS AGO: Blog-worthy Roasted Butternut Squash

SEVEN YEARS AGO: Chocolate Currant Sourdough Loaf & Roasted Beet Hummus

EIGHT YEARS AGO: Sesame and Flax Seed Sourdough

NINE YEARS AGO: Spanakopita Meatballs

TEN YEARS AGO: Saturday Morning Scones

ELEVEN YEARS AGO: Pain de Mie au Levain

NUT-FREE LADY GREY MACARONS

Nut allergies. They prevent a human being from enjoying one of the most beloved cookies in the known universe. Such cruel fate. But this recipe uses sunflower seeds instead of almonds and I can tell you the outcome is quite amazing. The batter is slightly more grainy, but the macs baked with very nice feet and good texture. Please use caster sugar (super fine). It does make a difference, particularly in this version.

NUT-FREE LADY GREY MACARONS
(from the Bewitching Kitchen)

For the shells:
200g powdered sugar
115 g sunflower seed meal (or finely ground sunflower seeds)
115 g egg whites at room temperature (approx. 4 eggs)
1/8 tsp of cream of tartar (optional)
100 g caster sugar (or regular sugar made finer in a food processor)
¼ tsp vanilla paste or extract
Americolor food gel Super Black
Americolor food gel Fog
Americolor food gel Tulip Red
Royal Icing, thick consistency

for filling:
1/4 cup butter
170g powdered sugar
1/2 cup milk
1 bag Lady Grey tea
chai extract (optional, I used Olive Nation)

Line 3 heavy baking sheets with parchment/baking paper or Silpat mats. Layer the powdered sugar and sunflower seed meal in a food processor. Pulse until the mixture looks like fine meal, about 12 pulses. Pass through a sieve and transfer to a small bowl or to a sheet of parchment/baking paper. Set aside.

Place the egg whites and cream of tartar in the bowl of a stand mixer fitted with the whisk attachment. Make sure that the bowl and the whisk are impeccably clean. Starting on medium speed, whip the whites with the cream of tartar until they look like light foam. The whites should not appear liquid. The foam will be light and should not have any structure.

Slowly rain in the granulated sugar in five additions, trying to aim the stream between the whisk and the side of the bowl. Turn the speed up to high. Continue to whip the meringue until it is soft and shiny. It should look like marshmallow creme. Add the vanilla. Whip the egg whites until the mixture begins to dull and the lines of the whisk are visible on the surface of the meringue. Check the peak. It should be firm. Transfer the whites to a medium bowl.

Fold in the sunflower seed mixture in two increments. When the mixture is more or less homogeneous (but before you smash it to deflate it), separate a very small amount of batter into a bowl and add black food gel to it. Proceed to fully mix it (macaronage step), and place it in a small piping bag, no need to use icing tip. Reserve. Go back to the main mixture and add a few drops of fog gel color to it. Paint the mixture halfway up the side of the bowl, using the flat side of a spatula. Scrape the mixture down to the center of the bowl. Repeat two or three times, then check to see if the mixture slides slowly down the side of the bowl. Put the mixture in a piping bag fitted with your choice of piping tip (round, ¼ or ½ inch in diameter or 6 – 12 mm). Pipe shells, I like to count numbers in my head and use the same count for each shell so they end up similar in size. After piping 5 or 6 shells, get the piping bag containing the black batter and make a cut. Pipe dots all over the shells.

Slam each sheet hard four to six times on the counter/worktop. Let the unbaked macarons dry until they look dull but not overly dry. Drying time depends on humidity. In a dry climate, the macarons can dry in 15 to 20 minutes; in a humid climate, it can take 35 to 40 minutes.

While the macarons are drying, heat the oven to 300 F. Bake one sheet at a time on the middle rack. Check in 11 minutes. If the tops slide or move (independently of the ‘feet’ when you gently twist the top), then bake for 2 to 3 more minutes. Check one or two. If they move when gently touched, put them back in the oven for 1 to 2 more minutes until they don’t move when touched. Let the macaroons cool for 10 minutes before removing from the pan. The macarons should release without sticking.

Make the filling: Infuse the milk with the bag of tea for 15 min. Remove the bag, squeezing it well to release all the tea flavor into the milk. Let it cool. Whisk the room temperature butter with a handheld mixer until creamy. Add the powdered sugar, 2 tablespoons of infused milk (you won’t need it all) and chai extract (if using). Whisk for a couple of minutes. Adjust consistency with more infused milk or powdered sugar, if needed.

Assemble the macarons: find two macarons similar in size and add a good amount of filling to the bottom of one of them. Place the other on top and squeeze gently to take the filling all the way to the edge. Store in the fridge for 24 hours for perfect texture.

To decorate: pipe hearts with Royal icing dyed red. Use a black food pen to smooth the edges of the black dots, if needed, and a red pen to draw the edge of the heart (optional).

ENJOY!

to print the recipe, click here

Comments: I’ve made macarons last Summer using a little bit of sunflower seed for flavor, but this time I replaced the full amount of almond flour with sunflower seed meal (I used this product instead of grinding the seeds myself). The batter was slightly harder to mix (the macaronage stage), and had a slightly denser structure, but I was surprised by how tall the feet were during baking (they always deflate a bit as they cool).

A few words on the decoration. Because the batter turned out a bit on the thick side, the dots I made with black batter were not perfectly round, and many ended up with ragged edges. So I smoothed things out with a black food pen after baking, which I also used to make the little dots all over. The heart was piped with Royal Icing, thick consistency (like you would use for transfers), because it gives the hearts a plump look that I find pretty attractive. I also used a red food pen to trace the edge, but that step can be omitted, I don’t think it added that much to the whole design.

I really enjoyed the flavor of the tea-chai-buttercream. If you brew the tea strong enough, it will have enough flavor but using chai extract is definitely a nice touch. I love Olive Nation products, and was searching for an opportunity to put my chai extract to use. This basic decoration design will come back in the future. Different colors, piping different shapes, I have a few ideas brewing. Or, should I say… macaroning?

ONE YEAR AGO: Mini-Heart Cakes for your Valentine

TWO YEARS AGO: Blue Moon Milk

THREE YEARS AGO: Slow-Cooked Chicken Meatballs

FOUR YEARS AGO: Zesty Flourless Chocolate Cake

FIVE YEARS AGO: Maple Pumpkin Pecan Snacking Cake

SIX YEARS AGOSilky Gingered Zucchini Soup

SEVEN YEARS AGO: Sweet Fifteen!

EIGHT YEARS AGO: Sesame and Flaxseed Sourdough

NINE YEARS AGO: Green Beans with Miso and Almonds

TEN YEARS AGO: Saturday Morning Scones

ELEVEN YEARS AGO: White Bread