A bit of an unusual flavor, but so much fun! Cupcakes or cookies? You decide!
.
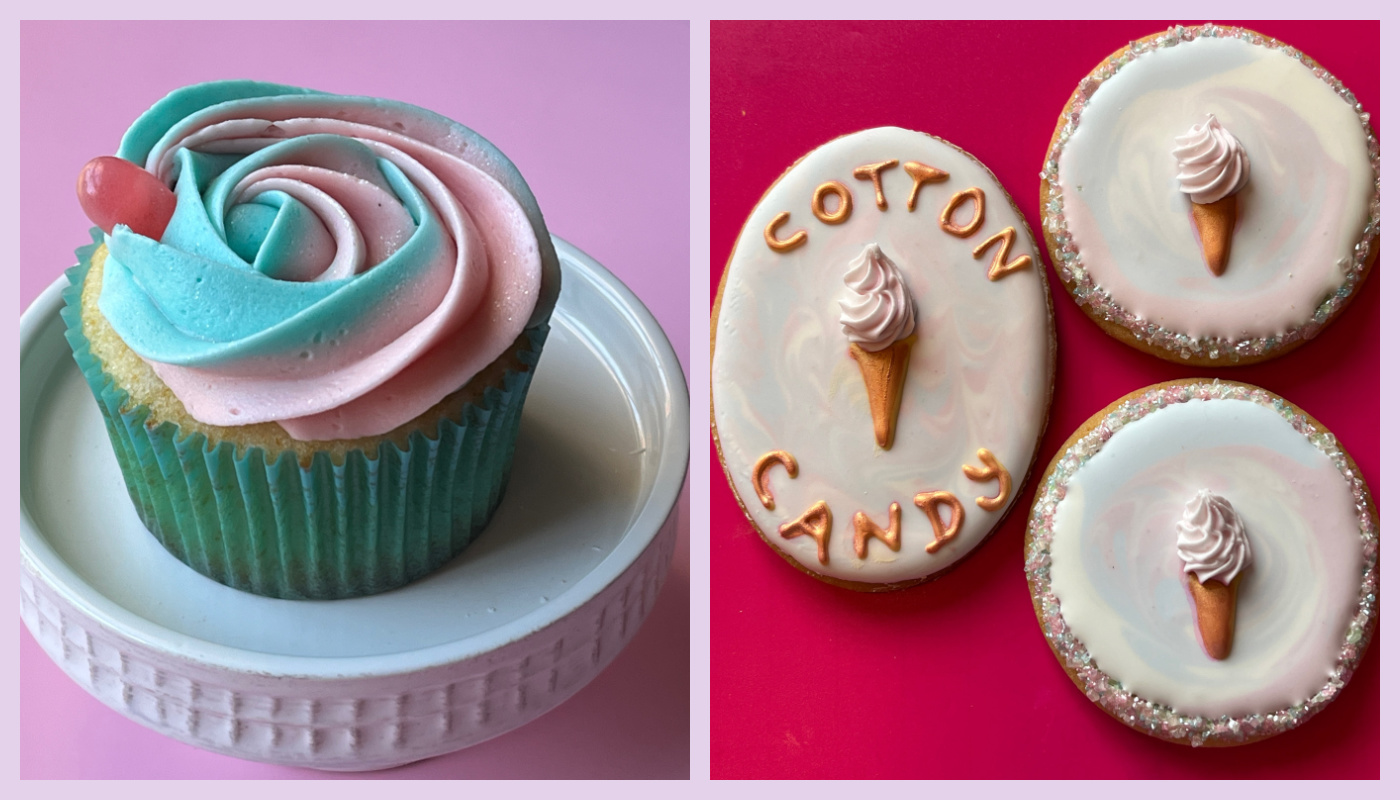
COTTON CANDY CUPCAKES
I cannot share the recipe for the cupcakes, but the cookbook is a definite must-have if you like to bake cakes. It is full of fun ideas, unexpected flavor combinations and cute decoration ideas. Girls Just Want to Bake Cupcakes, by Courtney Carey. It is inspired by the 80’s and each recipe has a song associated with it. Huge trip down memory lane! I adore this cookbook…
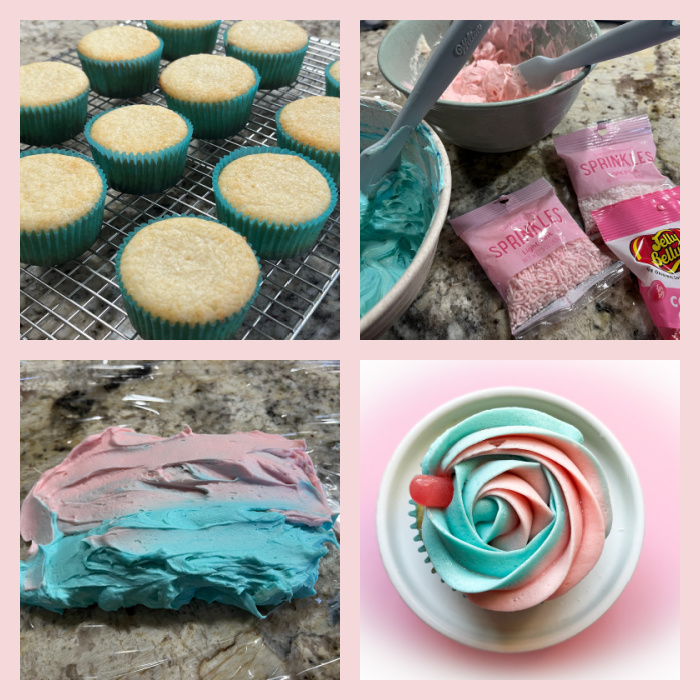
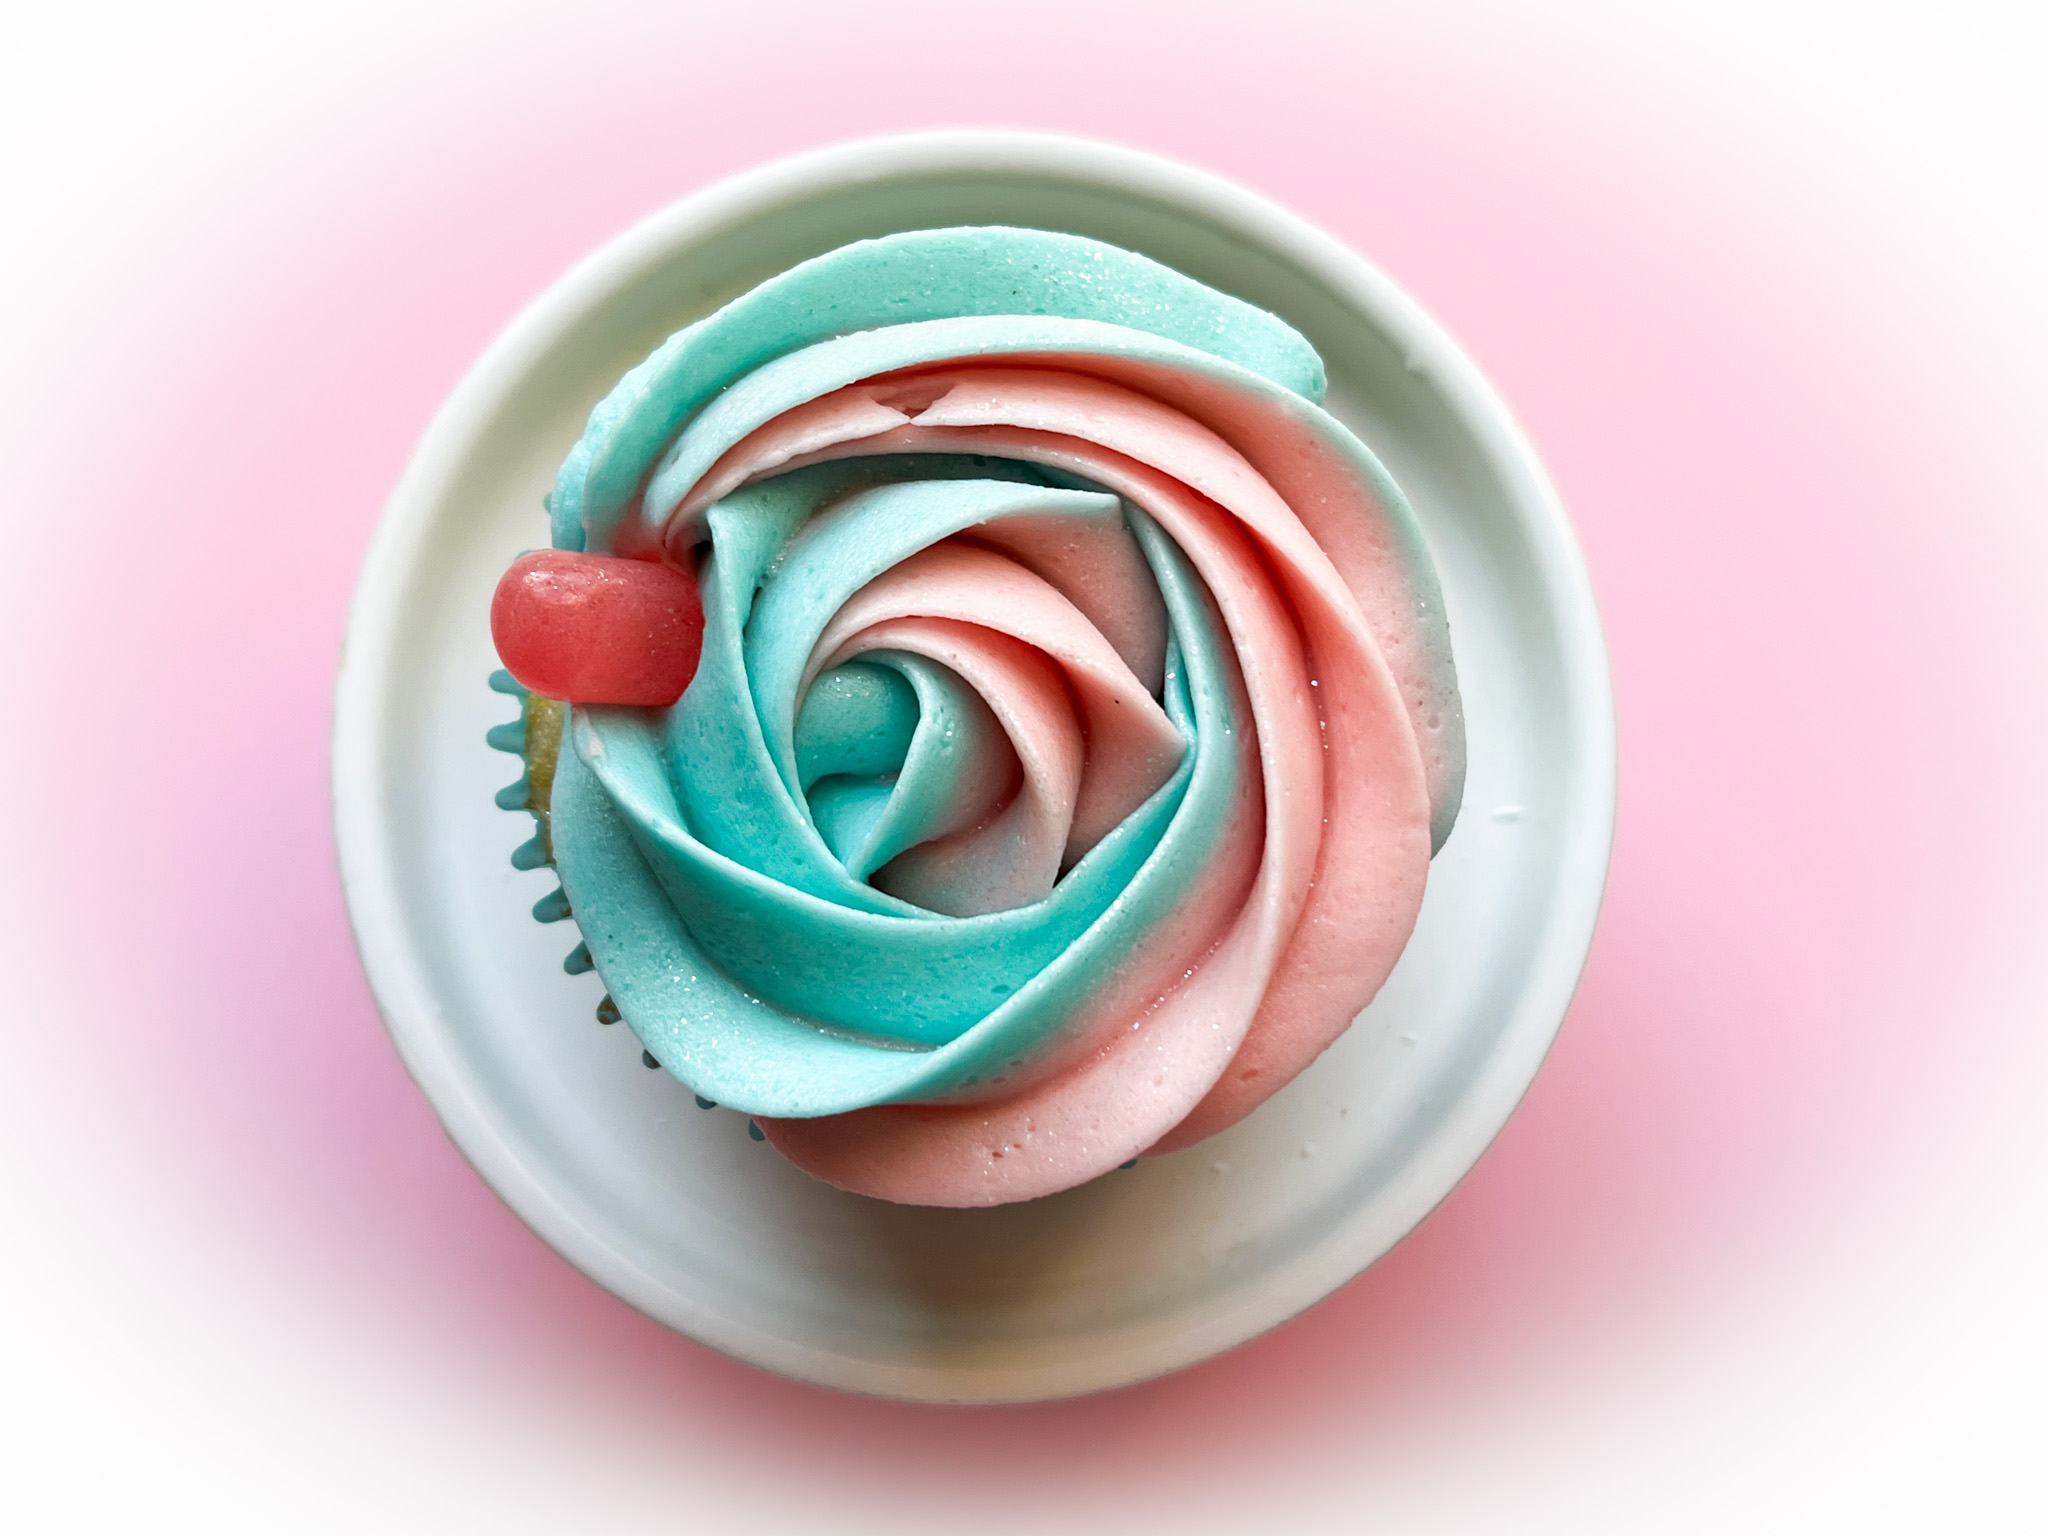
In the book they suggest dividing the batter in two portions and adding pink to half, blue to half. I totally forgot about it. So my cupcakes were pure white. The frosting is marbled and the cotton candy flavor comes from LorAnn (click here). I used Cotton Candy jelly bean to decorate each cake.
MOVING ON… COTTON CANDY CUTOUT COOKIES
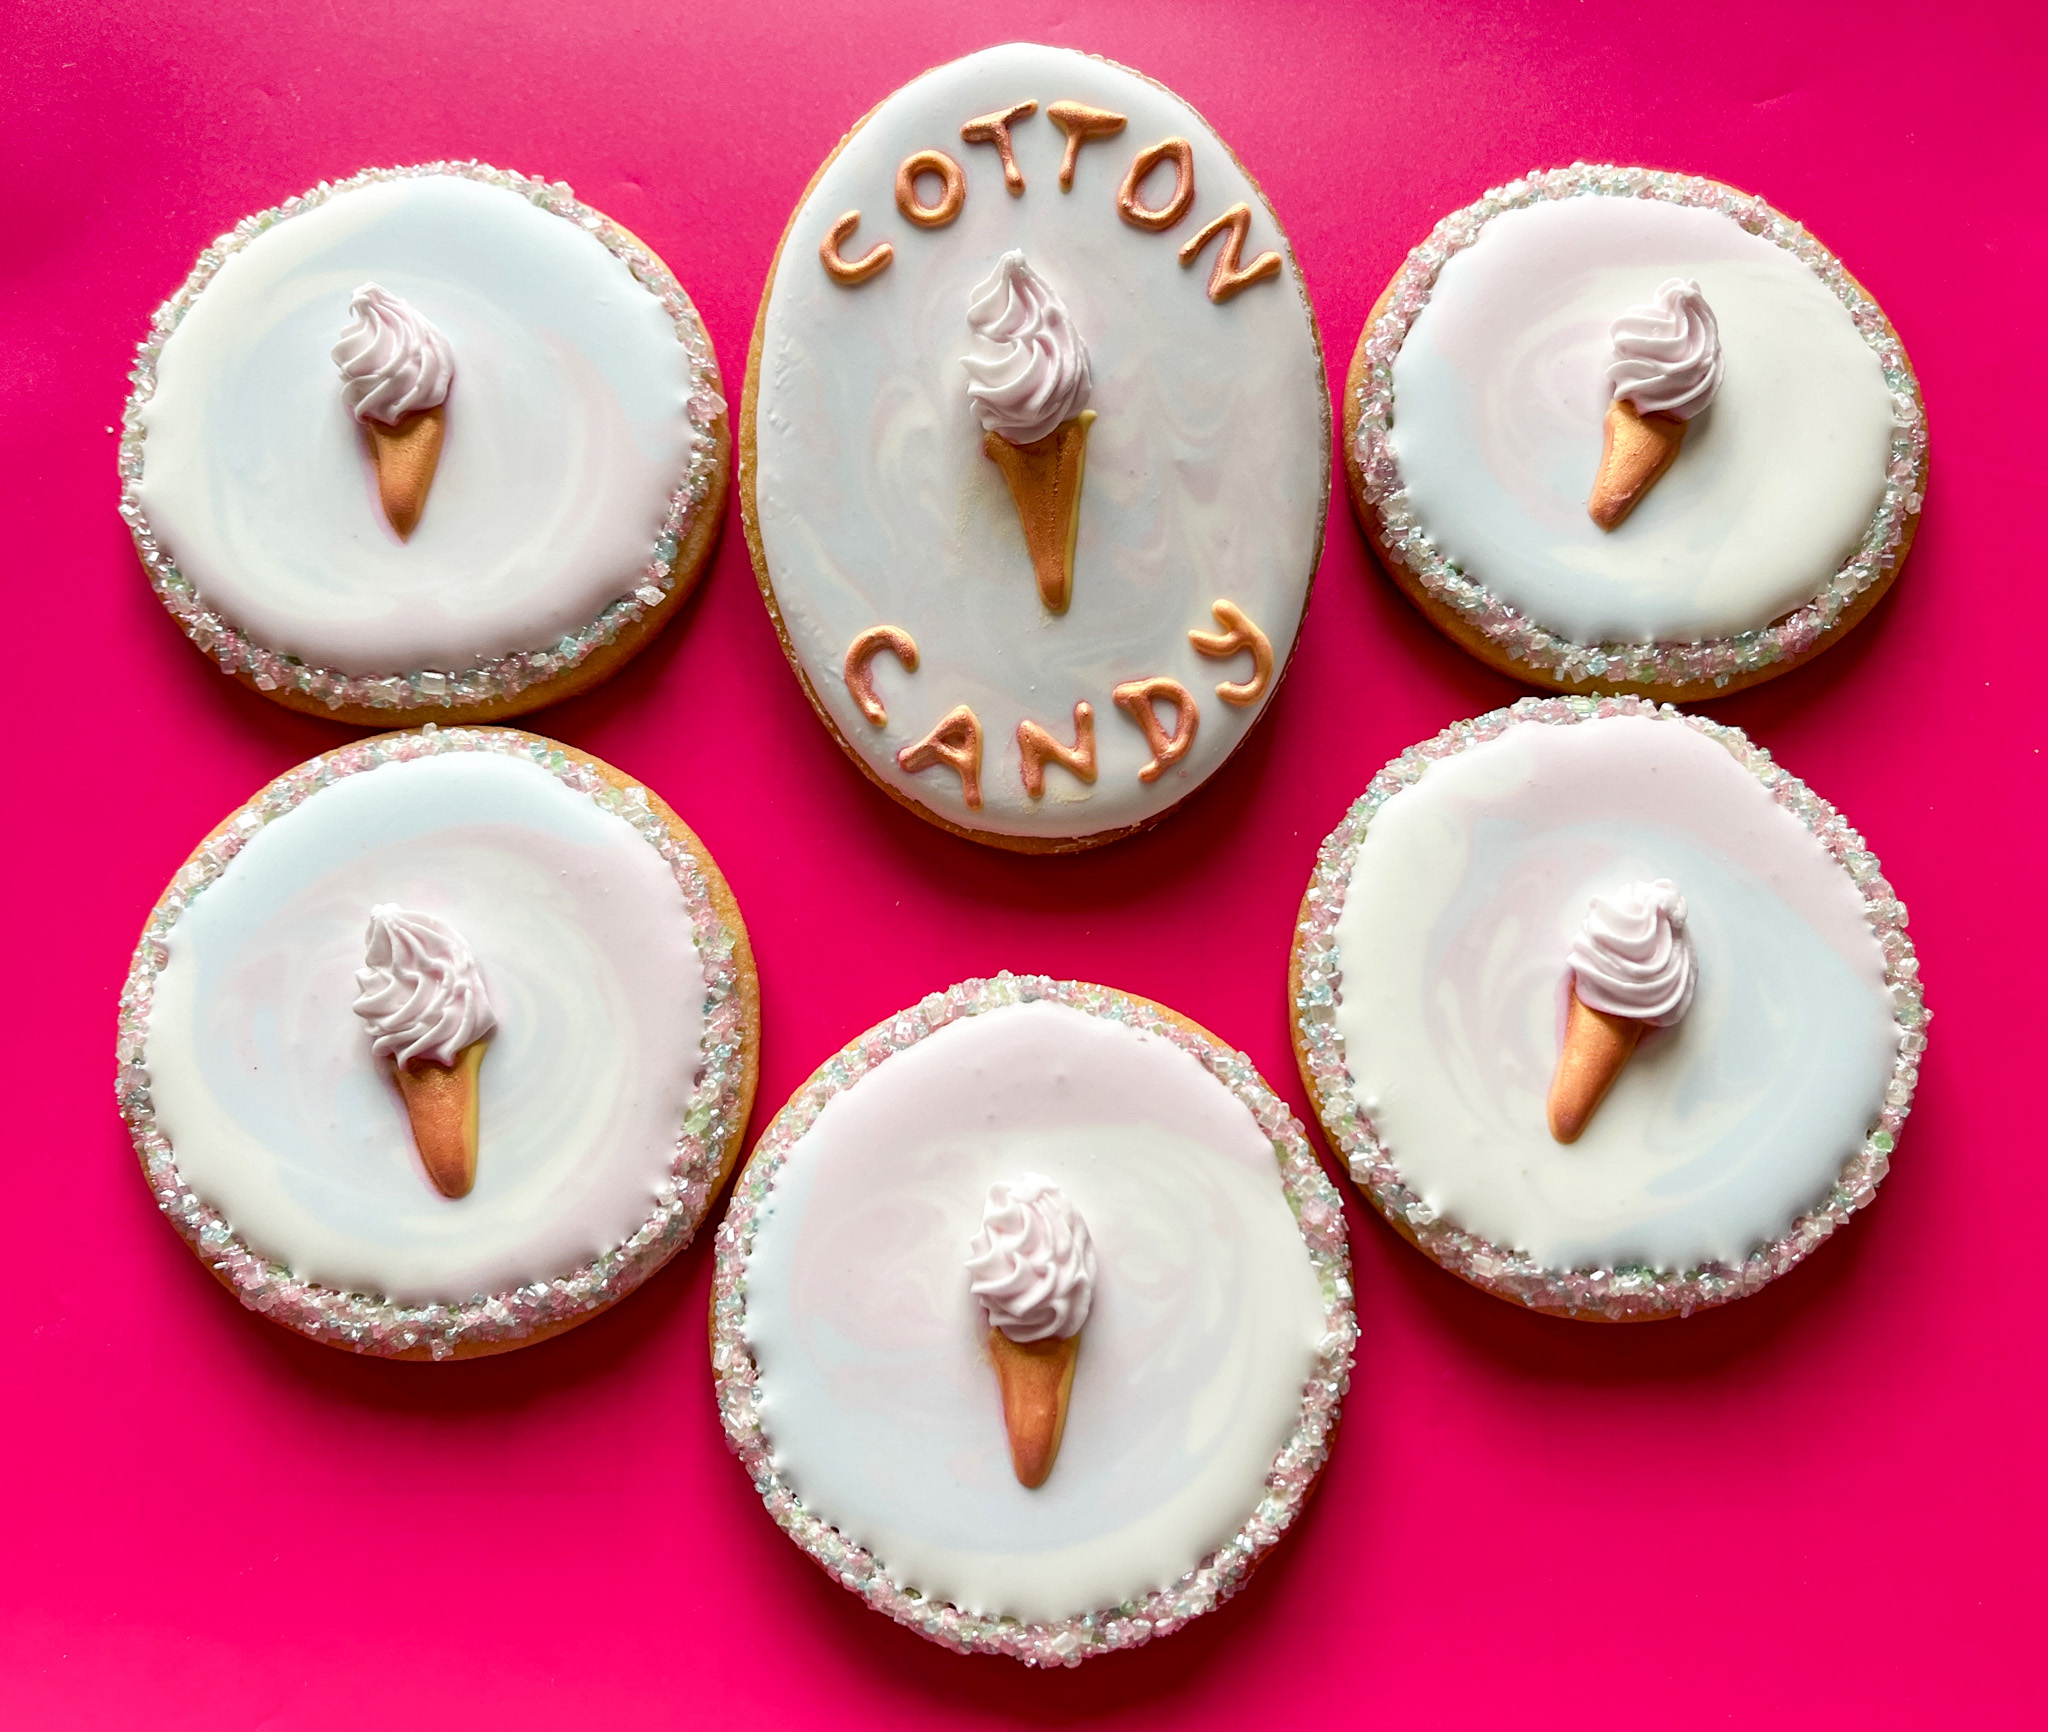
COTTON CANDY SUGAR COOKIES (from The Bewitching Kitchen)
1 cup (227g) room temperature unsalted butter 1 cup (200g) granulated sugar 1/8 cup agave nectar 3/4 tsp Cotton Candy Flavoring (LorAnn) 1/4 tsp vanilla extract or paste 1 large egg 1/2 tsp baking powder 1/2 tsp salt 3 cups (360g) all-purpose flour
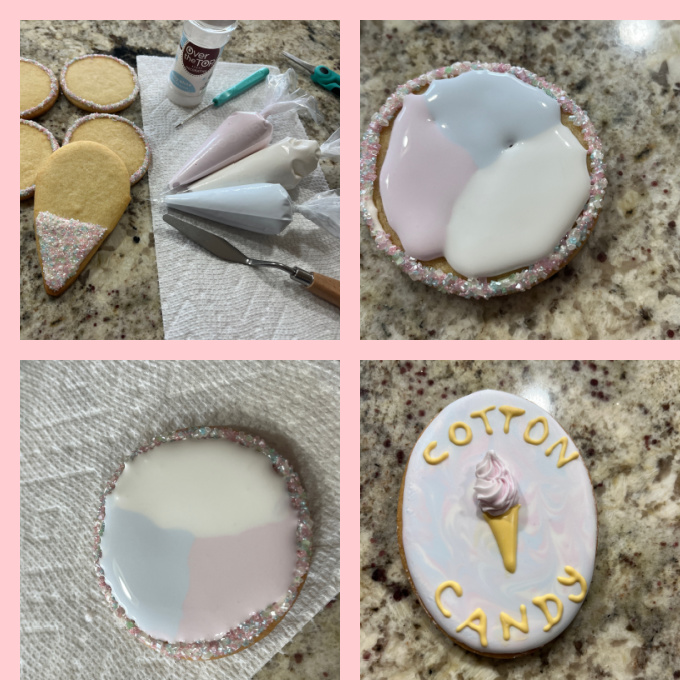
Royal icing in pastel pink, blue and white, flooding consistency. Royal icing in thick consistency for cotton candy (I used pink) Royal icing in piping consistency for writing and cone (I used gold) Sprinkles for edges.
Heat oven to 350 degrees F.
Combine baking powder, salt and flour in a bowl. Reserve.
Cream butter and sugar until smooth, at least 2 minutes. Add the agave nectar and mix until combined.
Beat in cotton candy flavoring, vanilla and egg. Add the dry ingredients and mix just until a dough forms.
You can roll it right away or place in the fridge for 30 minutes if you prefer.
Roll the dough, cut shapes and freeze for 10 minutes before baking until slightly golden at the edges. Depending on the size of the cookie, 10 to 14 minutes.
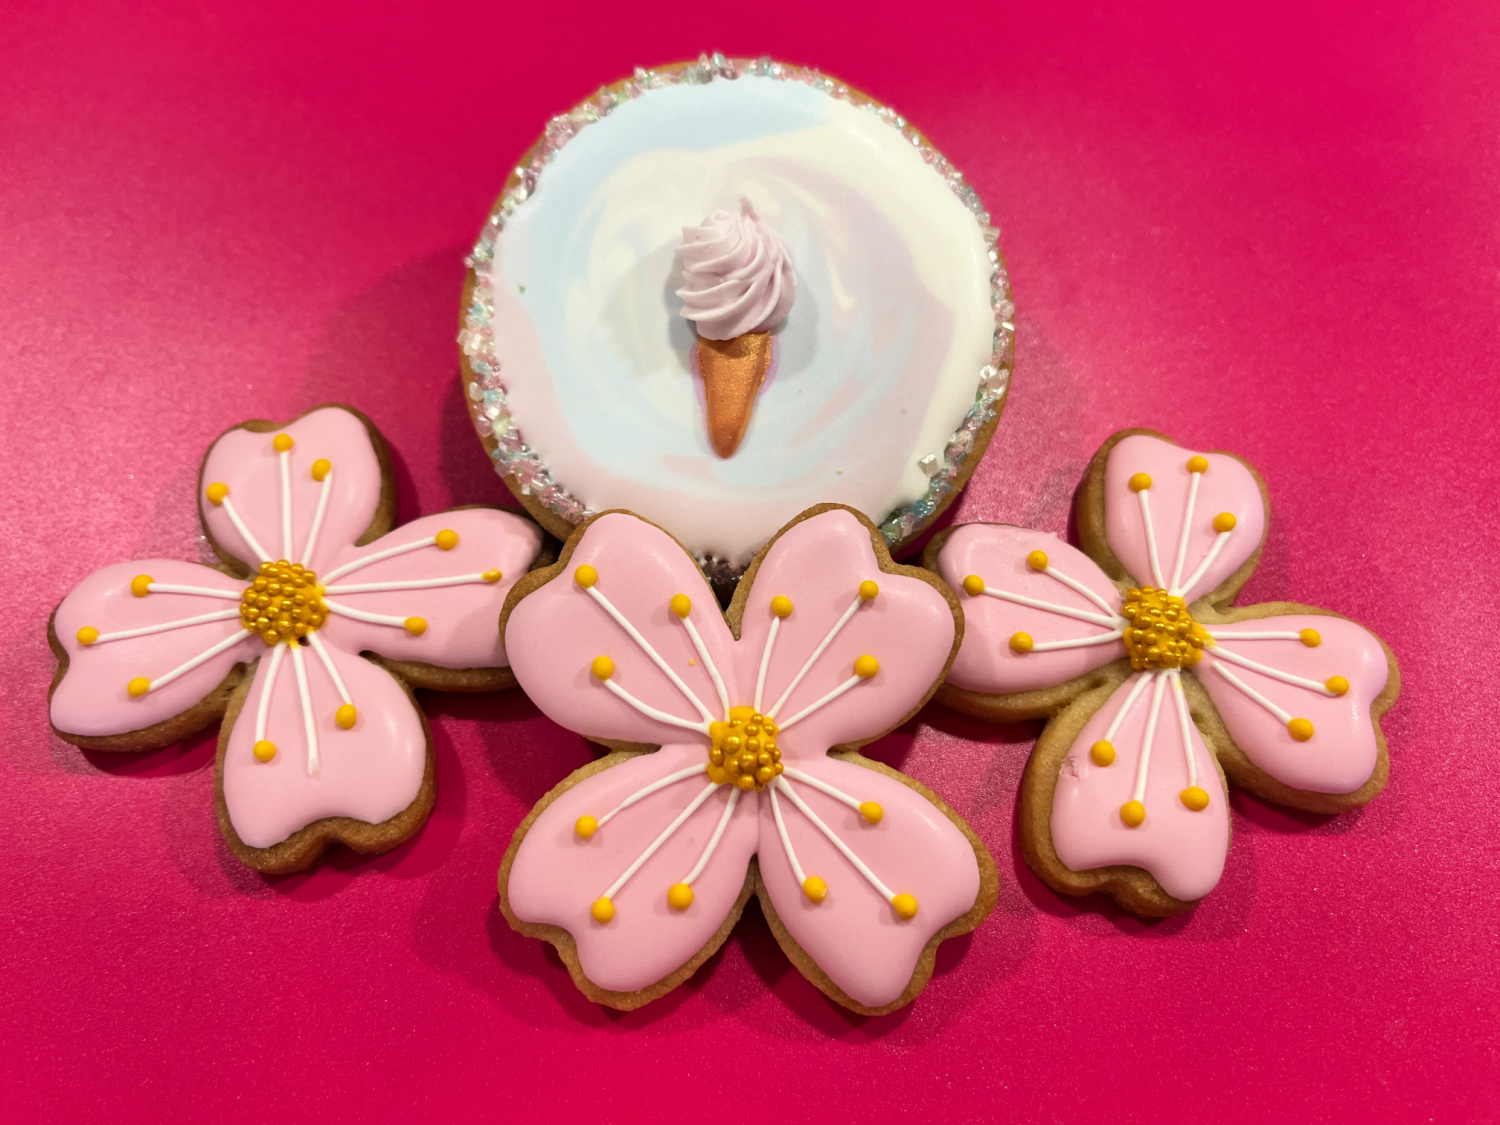
Comments: Decorating these cookies is quite straightforward, just pipe the border with white icing and coat with sprinkles. Then flood the whole cookie with three pastel colors and marble them with a spatula. Allow it to set and add the details. Once it all set, I painted the letters and the cones with Rose Gold luster powder from SugarArt. I am not sure one can really detect the flavor of Cotton Candy but they were delicious anyway…
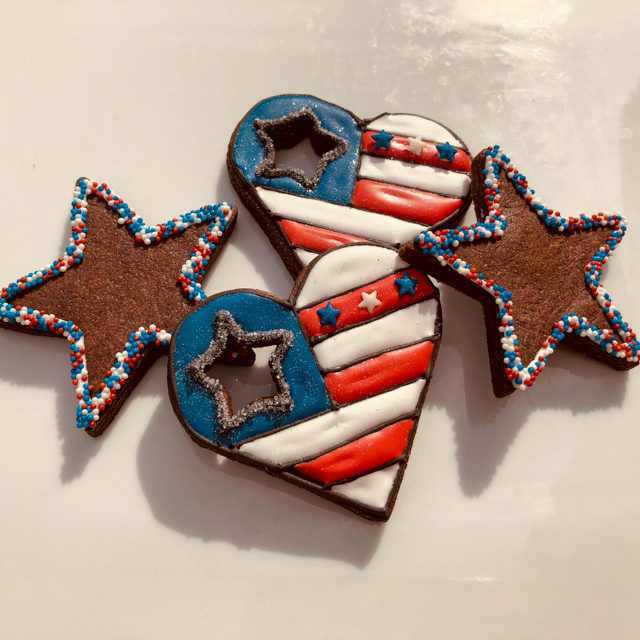
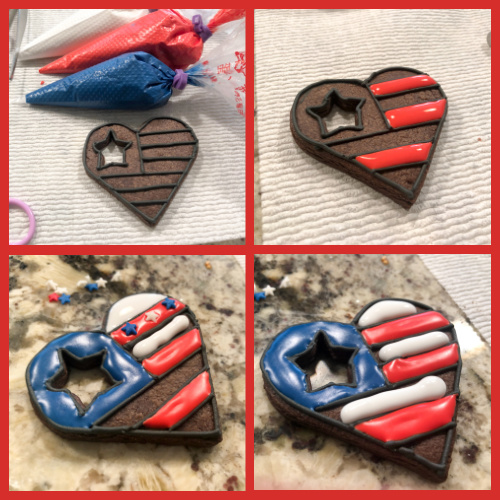
In this post I share chocolate cookies and brownie cupcakes, all dressed up for the occasion. Recipe for cookies can be found here, and brownie cupcakes with a click here.
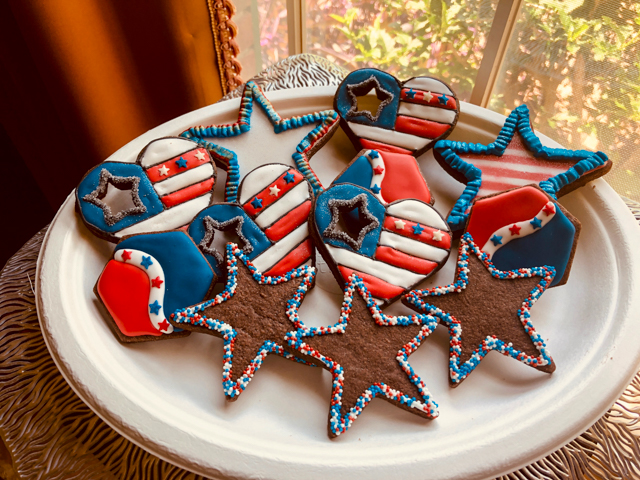
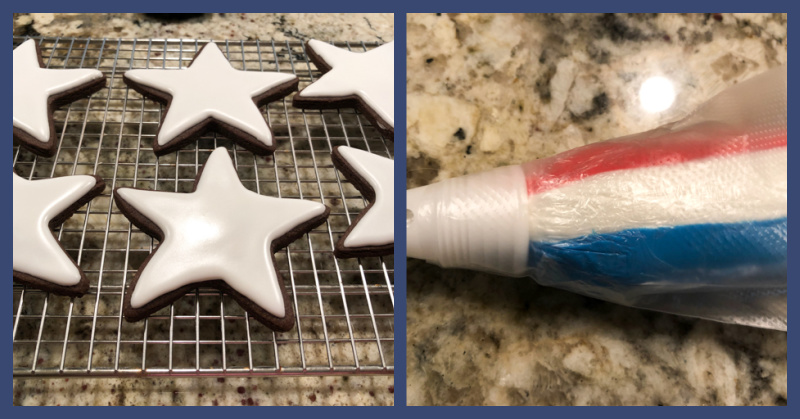
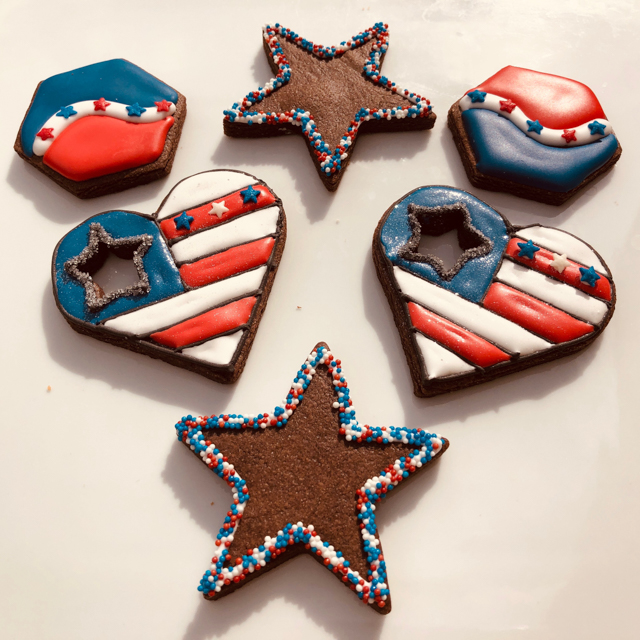
Four types of decorations, depending on how much icing and how much work you’d like to put into the cookies. The simplest is the chocolate star with the sprinkle border. All you have to do is pipe a little line of icing all around and then dip the cookie gently in sprinkles. The hexagons were featured recently on my baby blog.
These stars were inspired by Haniela. They started with a flooded white cookie, and then some were air-brushed with a combination of stencils (stripes and stars), and some were outlined with a three-color icing using a flat icing tip.
The 4th of July Hearts were inspired by something I saw on Instagram last year and saved for the future. And the future is now!
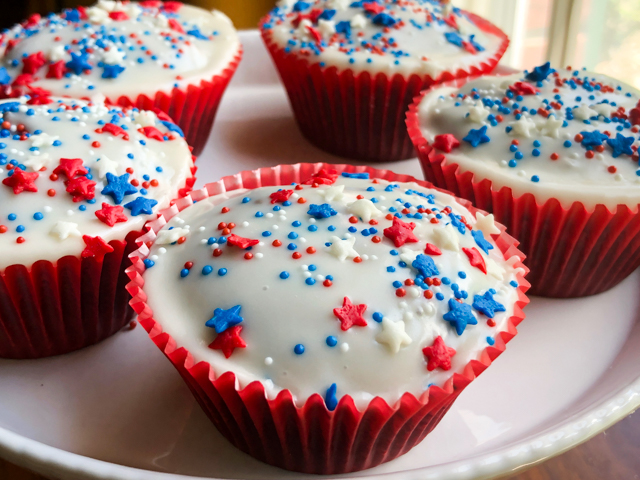
Cupcakes were made using 1/8 tsp of orange oil to flavor the cake batter. The icing was flavored with chai extract, as described in my post from a couple of months ago. Patriotic sprinkles complete the look…
I hope you are having a wonderful 4th, and please if you are into fireworks, think a little bit about all those pets getting terrified out there. If you can minimize your fun, or do it away from residential neighborhoods, please consider doing so.
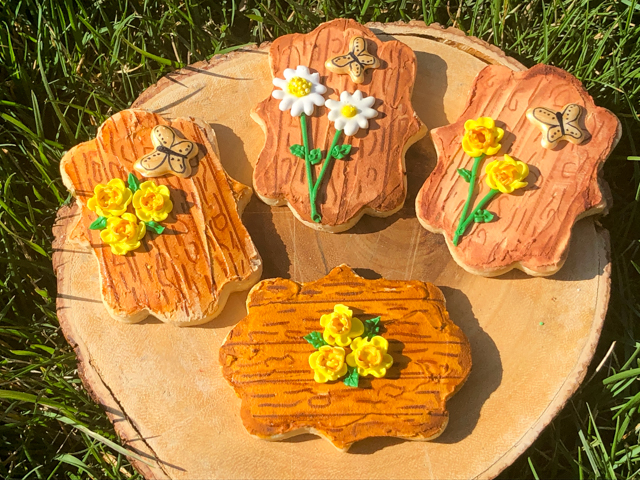
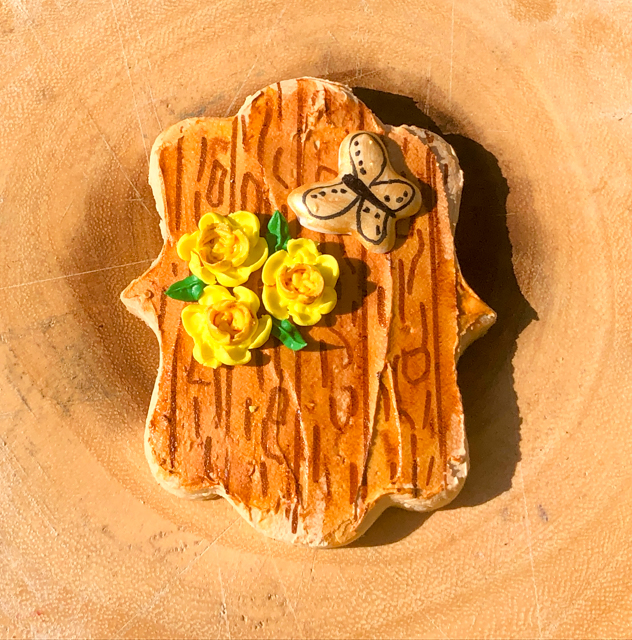
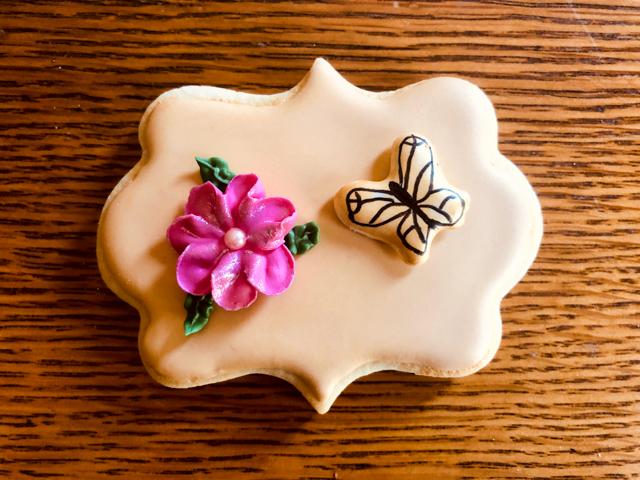
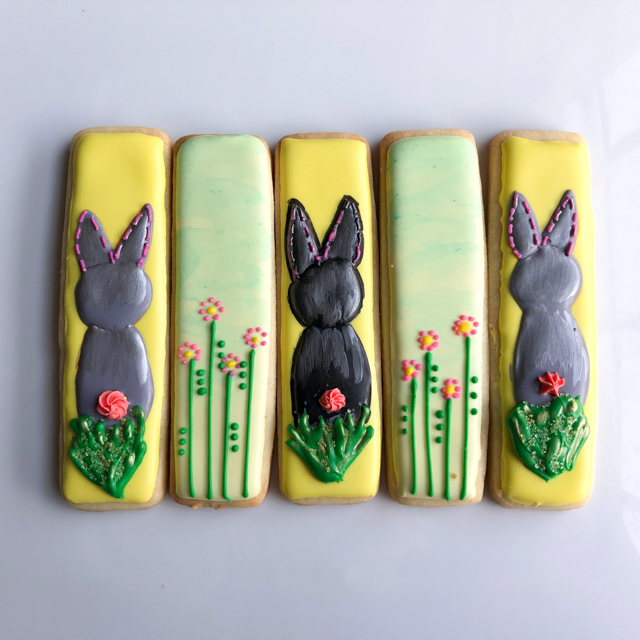
My cookie-baking adventures go on and on. So many different techniques to try, sometimes I am not sure which one to go for next. But the moment I saw my tent-baking friend Tanya sharing her method to make wood plank cookies, I dropped all other projects that were waiting, and jumped on it, like a Jack Russell on a snake. Or Oscar on an ankle (missed the story? click here). She shared a blog post and three tutorials to come up with a showstopper production, involving a bunny rabbit and gorgeous tulips. I confess that the skill to pipe the rabbit on the cookie is beyond my reach, so I opted to let the bunny go and bring butterflies, made as Royal icing transfers. A lot less stressful. I’m quite pleased with the way they turned out…
CHERRY-ALMOND SUGAR COOKIES (from The Bewitching Kitchen)
1 cup (227g) unsalted butter,cubed, cold 1 cup (200g) granulated sugar zest of half an orange 2 eggs 3 1/2 cups (420g) all-purpose flour 1/2 cup (60g) cornstarch 1/2 teaspoon kosher salt 1/4 tsp baking powder 1/2 teaspoon cherry extract (Olive Nation) 1/2 teaspoon almond extract (Olive Nation)
to decorate: your favorite recipe of Royal Icing (I use Tanya’s) royal icing transfers (butterflies and flowers) food-safe pen
Heat the oven to 350 F and line baking sheets with parchment. Sift the flour, cornstarch and salt, and set aside. Mix the sugar with the zest rubbing it well to release the oils. Cream the butter with the flavored sugar, just until smooth and combined.
Mix in the eggs and flavoring extracts until incorporated. Add the flour mixture on low-speed, in three portions. The mixture will seem very dry and sandy at first, but after a couple of minutes the mixer it will start to pull away from the sides of the bowl.
Remove the dough from the bowl, cut in two pieces and wrap one in plastic. Roll the second piece of dough out between 2 sheets of parchment paper, to a thickness of 1/4 inch. Cut into rounds, press a detail flower using another type of cutter, and freeze for 10 minutes. Bake for 10 to 15 minutes, depending on the size of the cookie. I like to have a slight golden tone at the edges.
Cool on a rack and decorate as desired. For the bee decoration you’ll need thick consistency Royal icing in cream color for the background, and leaf green for details. A brown food pen with reasonably fine tip, food gel dye in caramel or brown color, vodka, and royal icing transfers of the decorations you feel like adding to the plank.
Comments: To see Tanya’s gorgeous cookies visit her site with a click here. Those who have been following my blog for a while know that I’ve never been into cookie decorating, and Royal icing scared every cell of my body. My approach for a decade had been “thanks, but no thanks.” Being part of the Great American Baking Show forced me to deal with the issue. Although I never got as far as making decorated cookies in the tent, I admit that what I had planned for that particular episode was not that great. Once the show was over, I set as a goal for myself to improve, and ended up following the footsteps of Tanya in her online tutorials. She literally turned me into a cookie addict. Cookie making, that is. So, if you suffer from the same problem I used to, check her blog. Consider also supporting her through Patreon (or offering a subscription to someone you love).
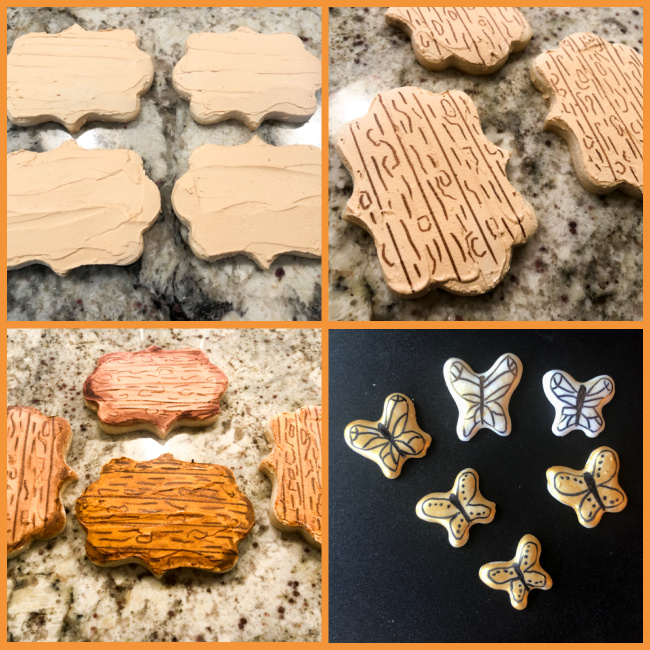
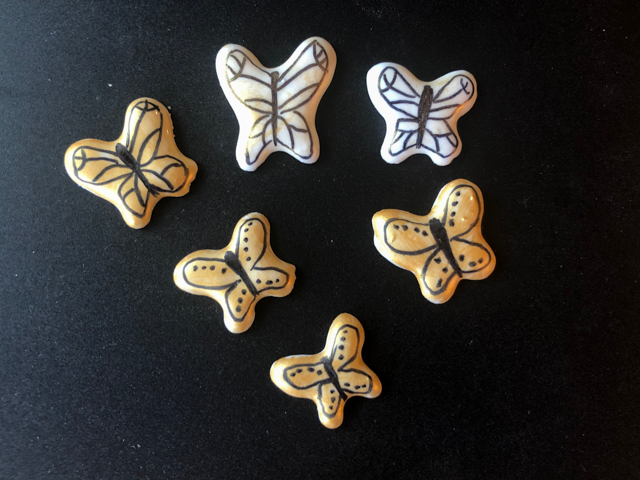
There are several ways to generate a wood appearance on cookies, but I like Tanya’s method because it minimizes the amount of icing you’ll need. She lays a background color with a spatula, gives it a little texture, draws the veins of the wood with a pen and goes over it all with diluted food dye. It is all very carefully detailed in her tutorial, step by step. For my decorations, I made small butterflies with Royal Icing. I drew templates by hand with a very loose butterfly format, and piped white icing. For transfers, you want icing that flows smoothly from the tip of your bag (I use tipless bags for that), or from the icing tip. But, it needs to be thick enough to hold it’s shape. I’d say about 20 seconds is what you want. For the base and the leaves and stems, you’ll need thicker than that. Once the butterflies dried completely (overnight is best), I painted them with luster gold and drew a pattern with a fine tip black food pen.
The daffodils were made according to a tutorial from Haniela which you can find here.
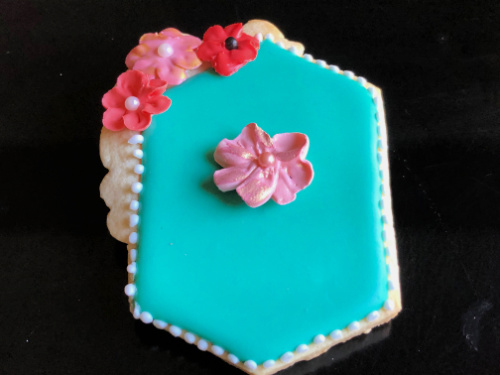
The plank is a very nice background to add to several shapes of cookies, and compatible with many different additions: birds, flowers, animals, butterflies, or even a simple monogram. And the plaque shape is also quite interesting to play with, even if you decide to go with a simple, solid color background.
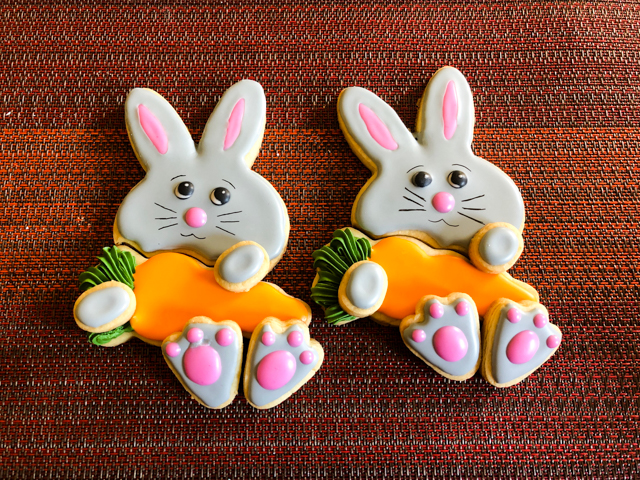
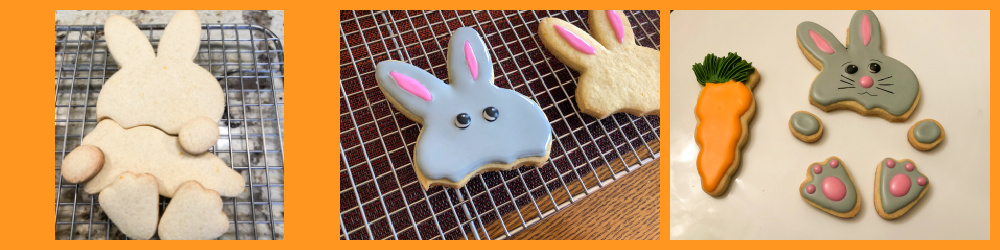
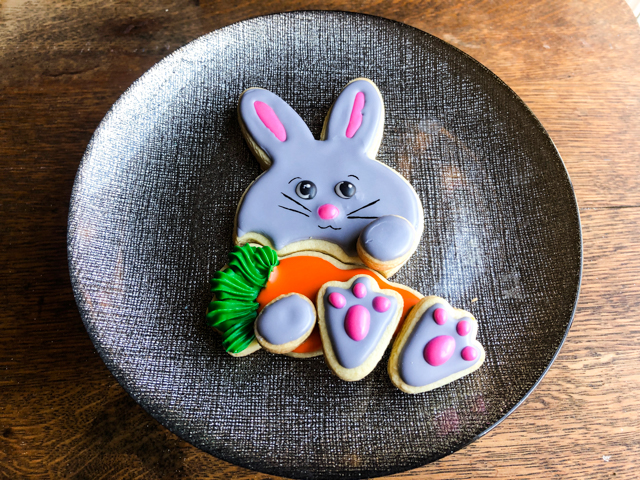
Do you know what a Franken-cookie is? No, it’s not just for Halloween, although of course you can make some perfectly tailored to that occasion. Franken cookies are made by joining different cutters in unexpected compositions. I share today my first attempt with Easter season in mind. Credit must go for the one and only Marlyn, cookier-extraordinaire from Canada (Montreal Confections). Her work is simply amazing. For a very detailed tutorial to make this little guy, click here. It starts at the 38 min mark. You will need rabbit cookie cutters + carrot shape cutter (mine was the one from this set).
FRANKEN BUNNY HONEY-LEMON COOKIE (design my Marlyn, cookie recipe from Bewitching Kitchen)
1 cup butter (226g), cut in pieces, cold 200g sugar zest of 1/2 lemon 2 eggs 1 tsp honey extract (Olive Nation) 1/2 tsp vanilla extract 420 g all-purpose flour 60 g cornstarch 1/2 tsp salt 1/4 tsp baking powder
Mix the flour, cornstarch, salt and baking powder and reserve.
Cream sugar, butter and lemon zest in the bowl of a Kitchen Aid for a couple of minutes until the sugar is incorporated well and does not feel gritty. Add the eggs, honey emulsion and vanilla extratc slowly and mix until incorporated, but don’t over-mix.
Add the flour mixture slowly, mixing in low-speed. If needed, add a little more flour, up to 1/4 cup. Once the dough comes together, stop, and form three discs. You should have three discs with about 330g each. Dough can be rolled out immediately or placed in the fridge to roll out later. It also freezes extremely well.
Cut in shapes, freeze the cut-outs for 10 minutes, then bake in a 350F oven for about 13 minutes. Ice and decorate as desired.
For my favorite Royal Icing recipe, visit Tanya’s blog with a click here.
Comments: This is my favorite cookie recipe for the time being. It is the same basic “neat edges” recipe I’ve been using for months, but the honey extract from Olive Nation truly takes this to a whole new level. I love it.
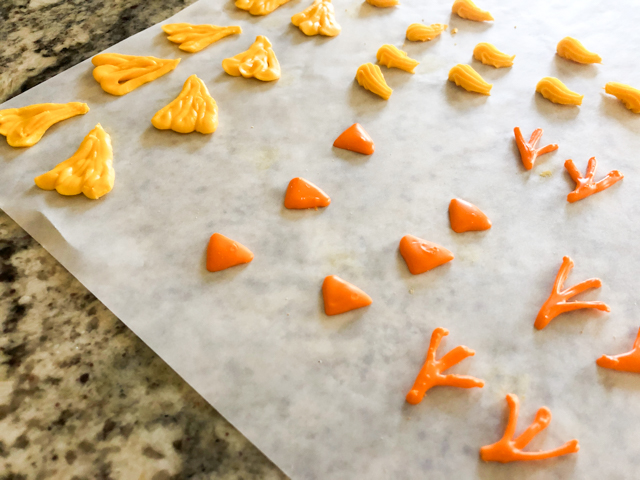
To decorate the Franken bunny, you’ll need Royal icing orange and grey in flooding consistency, pink in medium consistency (maybe around 20 -25 seconds if you like to measure it by how many seconds it takes to level off). Green in stiff consistency, as you will pipe the green part of the carrot with a star tip and you want it to hold the shape. Making the eyes as royal icing transfer was a bit tricky, but I managed to get 3 pairs that looked ok. You can always paint them with a food pen to make life easier. The transfer produces a more dramatic, realistic look.
For other fun examples of franken-cookies, take a look here, here, and here.
For this cookie, Marlyn suggests making all details as Royal Icing transfers, so make sure you plan ahead, as those need to dry overnight. Pipe more than you think you’ll need, because then you can choose the best ones, and also not go into panic mode if they break. You can always simplify and just flood the cookie then paint the details with a food pen.
The wings are made with a petal icing tip, the decoration on top of the head with a small star tip, and the beak and feet with a tipless bag, or if you prefer, a number 1 Wilton tip. Next day, flood the egg-shaped cookie with royal icing, and carefully place the transfers on top. For the eyes I used PEM black pearls, because they never bleed into the surrounding icing.
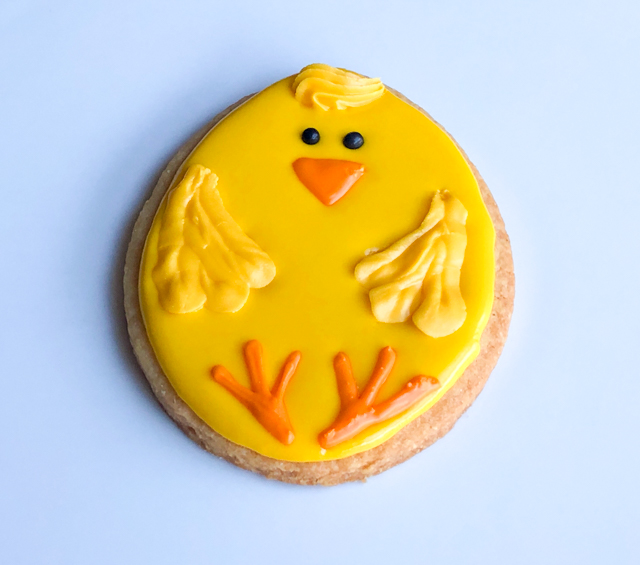
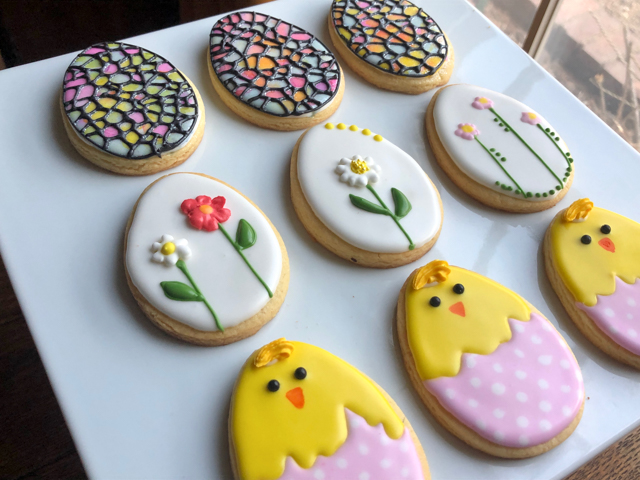
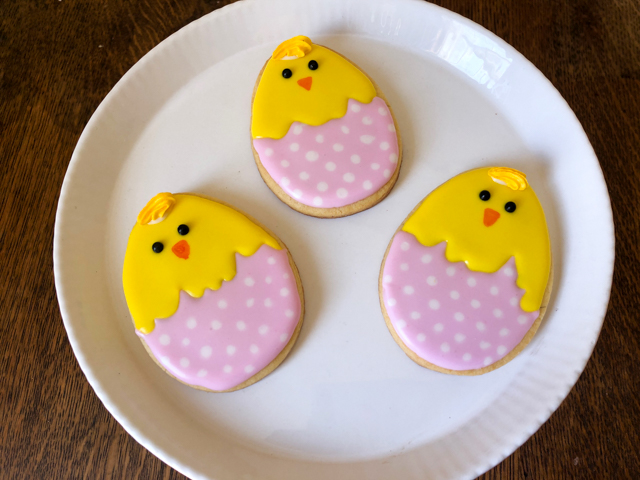
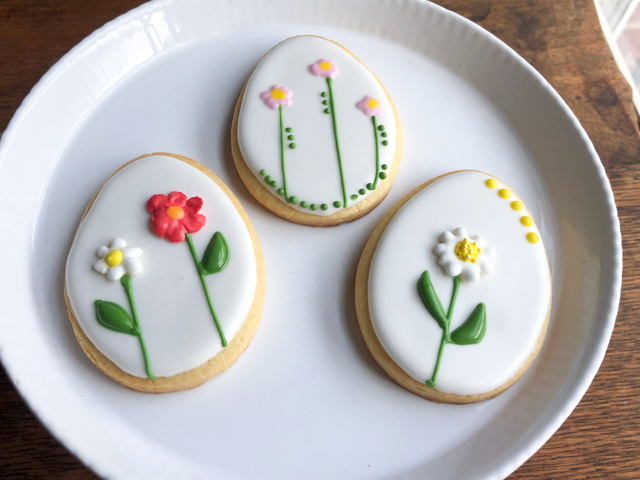
EGG-SHAPED TRILOGY
All cookies were made from the same recipe, Honey-Lemon Sugar Cookies. The simplest one to decorate is the bi-color chick, although I did use leftover decoration from the previous cookie for the top of the head. That can be omitted.
You will need pink, yellow and white Royal Icing, all in flooding consistency. Flood the pink, forming a random edge slightly above the middle of the cookie. Immediately add small white dots. Let it dry for 15 minutes, flood with yellow. Add the eyes if using black pearls, or allow to fully set before drawing the details with a food safe pen, orange and black.
For these cookies, you will need white Royal icing to flood the surface, and if adding flowers as transfers, place them immediately on top. The upper, central cookie was decorated with simple royal icing using a tipless bag, after the flooding set.
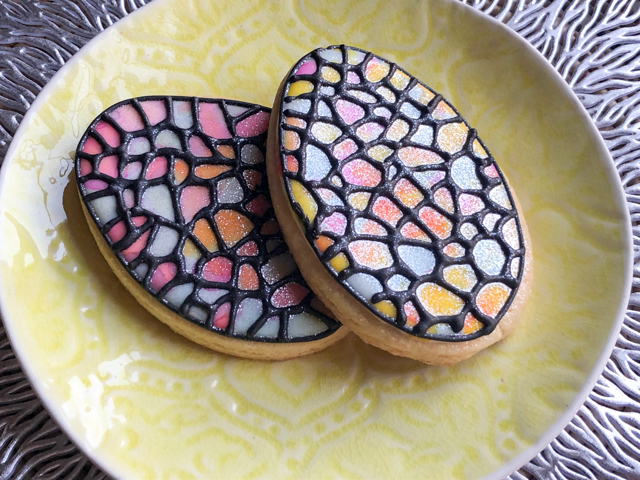
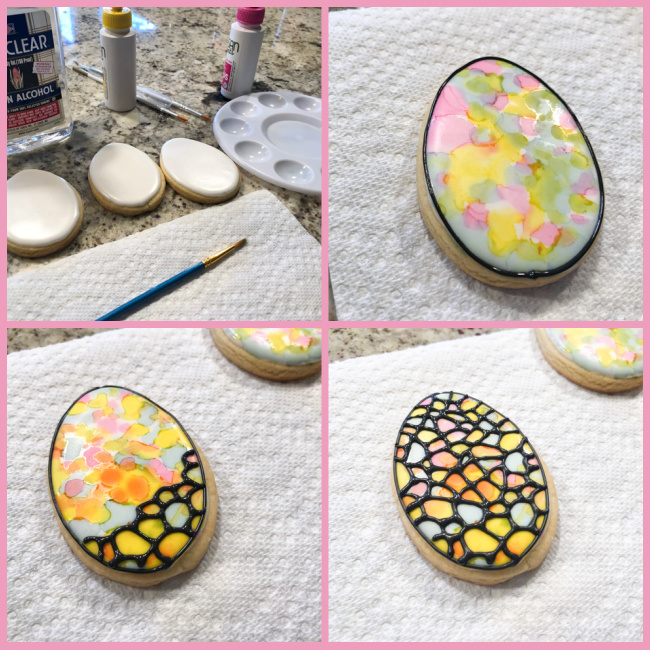
These were a lot of fun to make. I definitely need to improve on the dreadful fine lines, but how can you improve if you don’t try, right? The design is from another great cookier, Haniela, from sunny Spain. Her detailed tutorial for these eggs is found here.
You start with a white-flooded cookie, do a tie-dye decoration with gel dye and vodka, in any shades of colors you like. Let that air-dry for a few minutes, and add the details with black Royal icing using as fine a tip as you are able to. Follow Haniela’s tutorial for the best results. I need more practice.
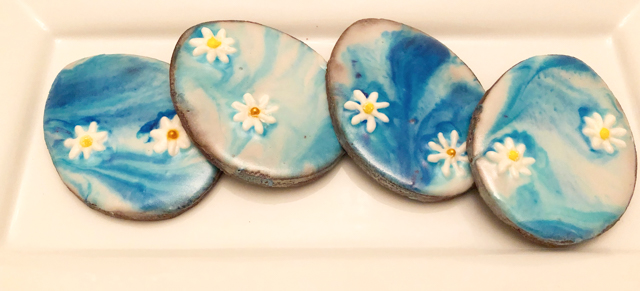
BLUE MARBLED EASTER EGGS
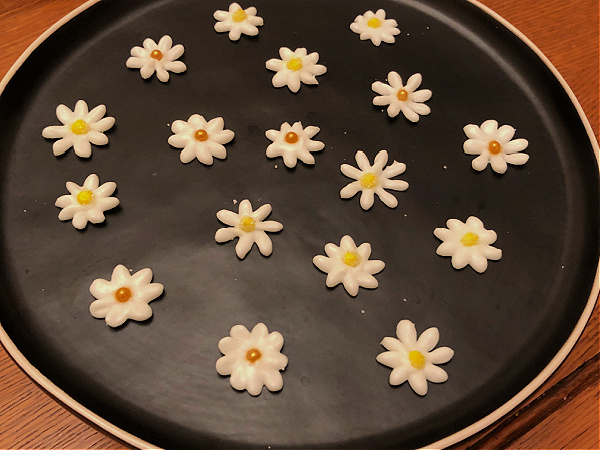
Another design by Haniela, using Royal icing in three different shades of blue, and then placing sugar daisies on the surface. Her tutorial explains it all very clearly. Once again, keep in mind that the daisies have to dry overnight before using as decoration.
BUNNY RABBIT STICK COOKIES
I could not share a series of Easter cookies without including cookie sticks, as I am quite smitten by this shape. They were inspired by CookieliciousNZ. I flooded them with light yellow Royal Icing allowed that to set, then piped the body of a bunny rabbit on top. Added a few more little details like the grass and tail. The flower cookie was made with Royal icing in detail consistency and a tipless bag.
I hope you liked this small collection of Easter-inspired sugar cookies. I have been practicing making Royal icing flowers, or simpler star-tip buds (like those used in the bunny’s tail). I simply save them in a little plastic box. It’s amazing how they can come in handy to add a little something something to cookies. Because you don’t need that much to make this type of decoration, whenever I have Royal icing leftover, I adjust the consistency to firm, and practice a few flowers. There are plenty of tutorials in youtube to help, Marlyn and Haniela have many available for free. Check their youtube channels here and here.
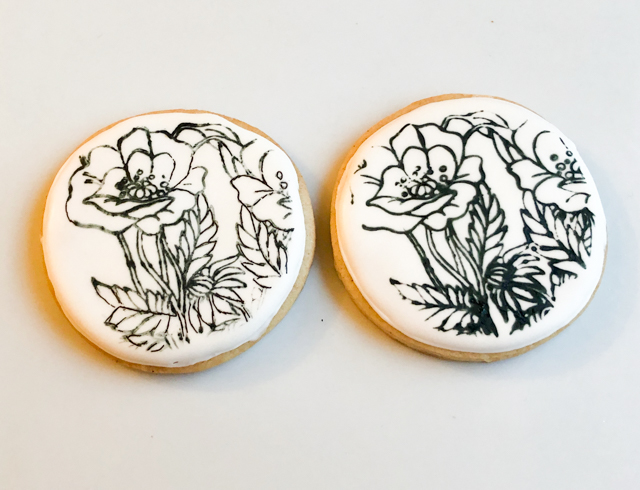
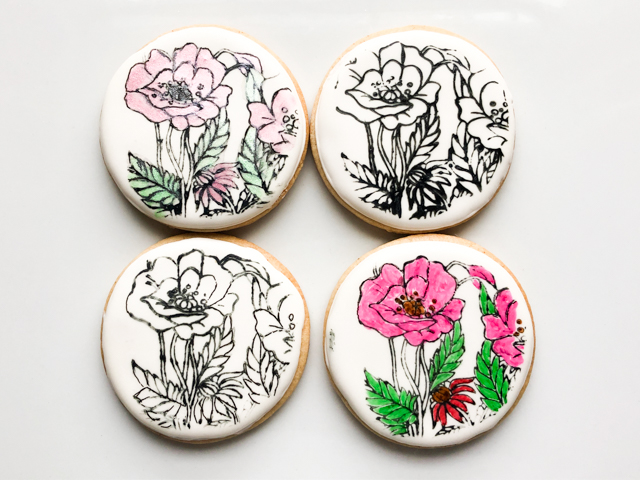
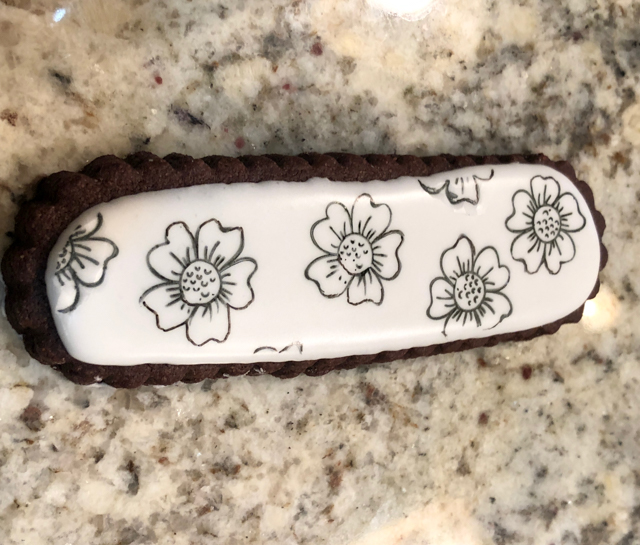
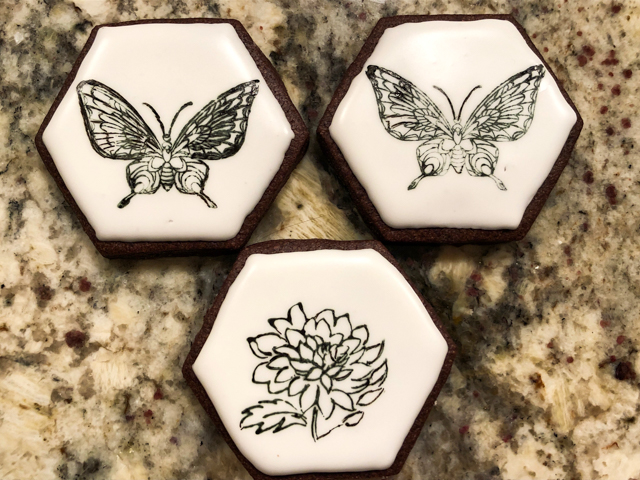
I try hard to avoid repeating myself, but sometimes I cannot help it: I am soooo excited about this! Rubber stamping is one cool method to decorate cookies for the artistically-challenged like myself. Truth is, if someone asks me to draw something or else face the guillotine I will simply tell them to make sure it is well-sharpened. Make it quick. Now, rubber stamping? Anyone can do it! All you need is to flood your cookies in any color you like, but I normally go for white. Let it sit overnight. Do not rush. I repeat: do not rush! The surface needs to be fully set and hard so that you can press the stamp on top and make sure the maneuver is not going to hurt the icing. If you go to a store such as Michael’s or Jo-Ann, visit the section on scrapbooking and pick your weapons. Some stamps work better than others, so it is a bit of a trial and error thing. But… so much fun!
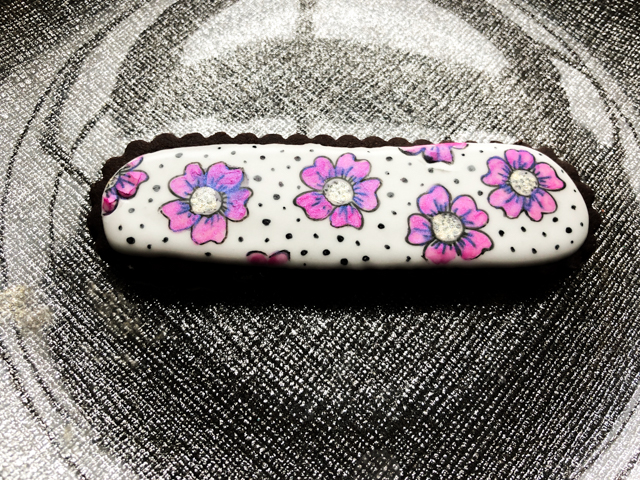
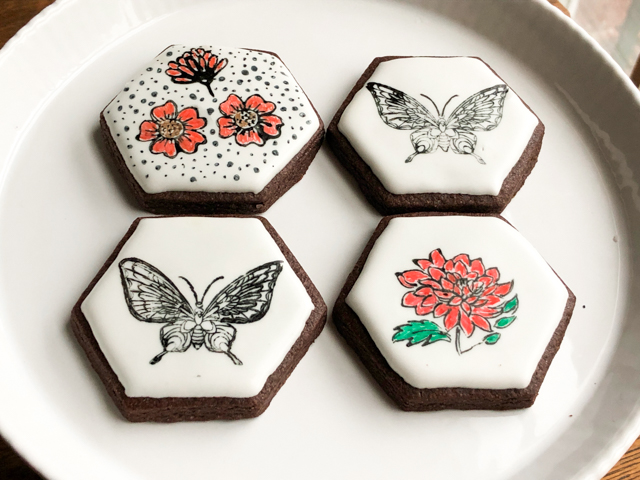
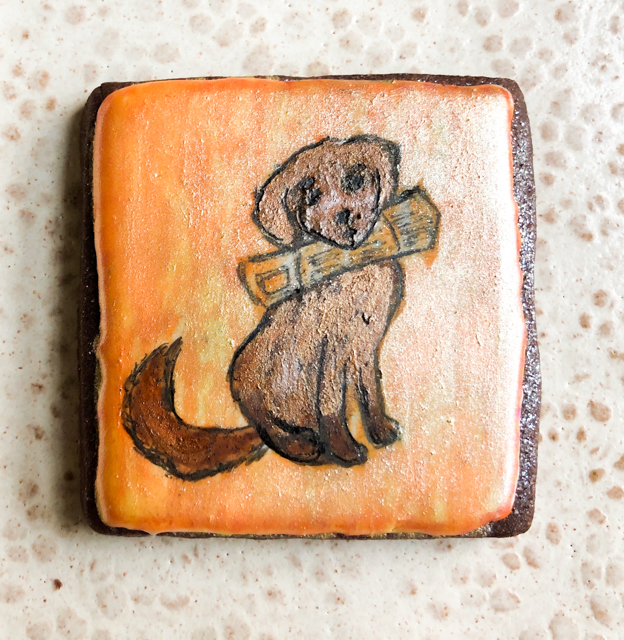
For this set, I used a type of stamp that I had never heard of, but apparently is very popular with the crowd that does serious scrapbooking. They are made of plastic and come glued to a type of acetate sheet. You can find them on amazon or etsy, I have not seen them for sale in stores where I live. For the one I used in these cookies, click here. Usually one sheet comes with several different designs. I find it easier to cut the acetate and isolate the image I want to work with. Then, I spread with a brush a small amount of food gel dye on kitchen paper, either black or another dark color like gun metal from Americolor, a bit more subtle. Press the stamp on it, and practice on a sheet of paper to check that the whole extension of the design was properly covered with dye. It does take a bit of playing with it. If you look at the set of four cookies above, you’ll notice that the design transferred better in some than others. If the design does not transfer completely, you can fill the missing lines with a very fine food pen like Tweets Cookie Connection 03. The cookies look nice in black and white, but I also made a couple painted either with luster powder (top left) or food pens (bottom right). Food pen is a lot easier and faster but I think I prefer the subtle look of luster powder.
Regular rubber stamps also work very nicely and tend to have simpler designs that are more user-friendly.
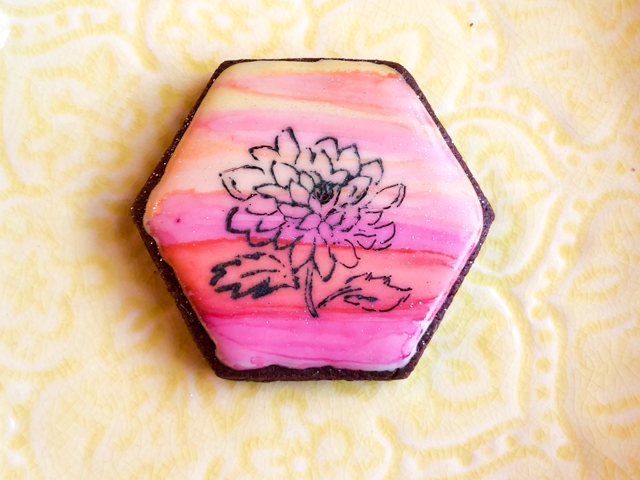
For this design I started with a flooded white icing and painted a background of striped in warm colors, using food gel dye and alcohol, just like described in a recent blog post.
The amount of dye to add to the paper is something you’ll need to adjust as you go. I don’t like the idea of buying a pad as used in scrapbooking because you need a lot of dye to soak it, and I am not sure how well it keeps for future uses, so I believe you waste too much dye.
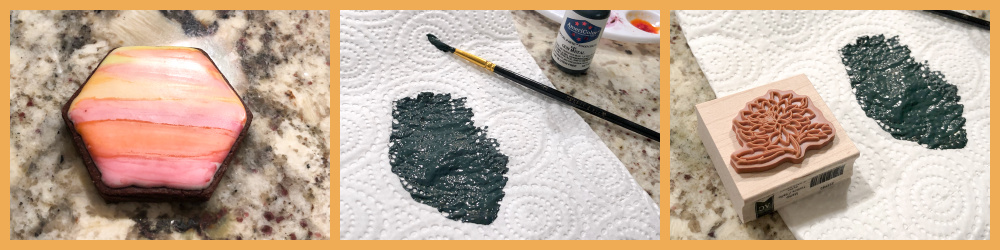
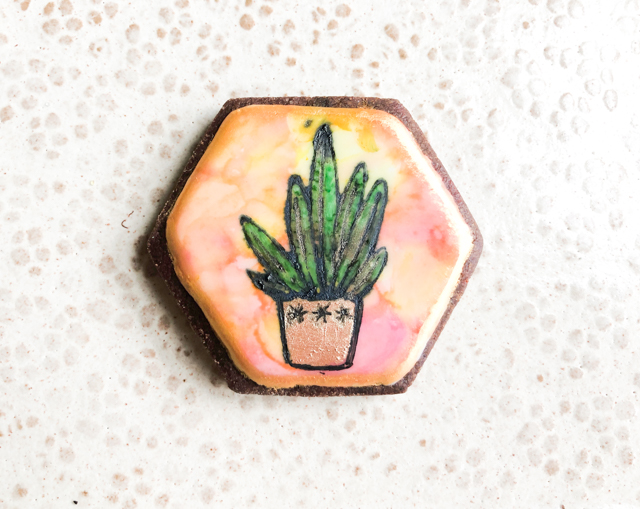
This is another stamp, also the traditional type, rubber with a wooden base. I colored the icing as before, but using a tie-dye instead of stripes. And in this design I went with colors: leaves painted with a food pen, and the little vase with gold luster powder. After painting, you might have to go back to the outline and touch it up with a fine tip black pen. Make sure the paint is fully dry, which happens quite quickly anyway.
Another way to deal with the stamp is using a food pen with a thicker point (I like this kind), paint the stamp, then quickly press it on the iced cookie. You need to work a bit faster because the amount of dye is going to be less than by soaking the paper, therefore it might dry quickly as you paint the stamp. The advantage of this method is reducing the probability of smearing, and saving quite a bit of dye. Below you see what it looks like.
Very sharp lines, no smearing at all. Again, you can leave it black and white or go wild with the design….
Some drawings like the butterfly are a bit too “busy” and not easy to transfer. I still think they are worth playing with, because the end result is quite striking. You need a very steady hand and be very assertive when laying the stamp on the cookie. Any hesitation and you’ll have a smudged design. If that happens, just eat the evidence when no one is looking.
In the set above, the butterfly was a plastic-acetate stamp, the other two were the traditional rubber kind. The top left, a composite using two very small stamps.
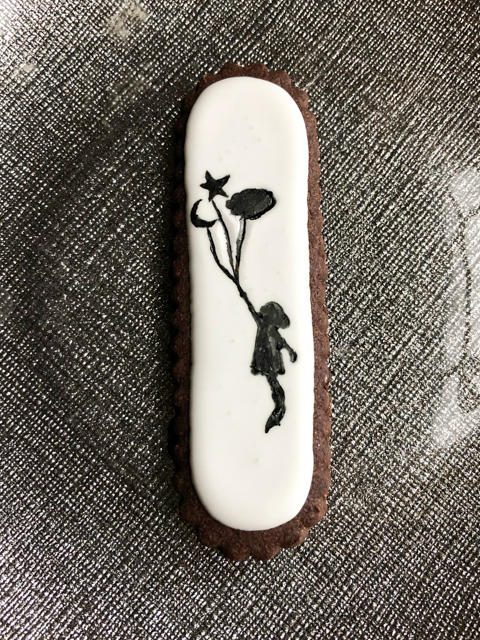
My most recent “experiment” with stamping was with a design that proved a bit tricky. It involved a silhouette type stamp, and it was almost impossible to get it uniform and without blurry edges. This was the best I could do. I think silhouettes might be better left for a projector.
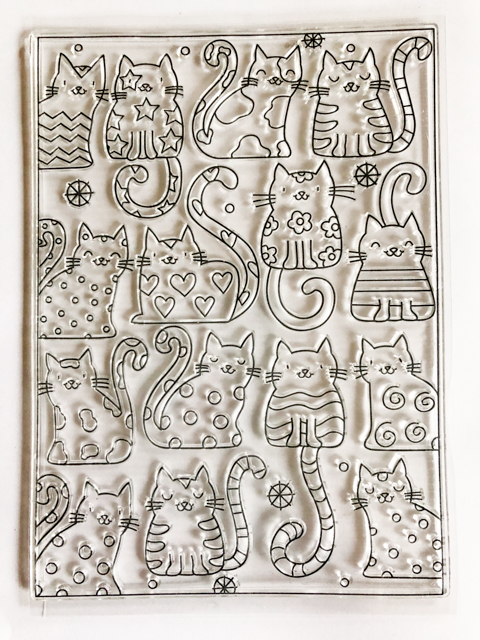
I close this post with something I got in the mail just as I finished writing this article.. Available here.
This is a plastic-acetate stamp sheet. It measures 4 1/2 x 6 in. Each kitten is a little different, so you can either stamp a series together or cut them individually and add to your cookie as a central image, which is what I intend to do. I suspect those images will work very well, as they are overall simple. My last attempt with a complicated image was a beautiful hummingbird (you can see it here), but I could not make it work on the surface of the cookie. Too bad, it is a stunning image. Maybe I’ll conquer it at some point.
I hope you’ll consider rubber stamping as a nice alternative for cookie decorating. It does take some experimenting and playing with it, but the possibilities are endless, and once you get the hang of it, you’ll be hooked.