No clay pot? No problem, I will tell you how to make the exact same recipe without it. What I love about the clay pot is how user-friendly it is. A little longer cooking never hurts, no risk of drying the meat or making it tough. Cornish Hens are perfect for a romantic meal, they bring a touch of elegance and cuteness at the same time. Often they are stuffed with wild rice, but I wanted to see if the humble white rice would work. I am here to tell you, it does! Aren’t you thrilled?
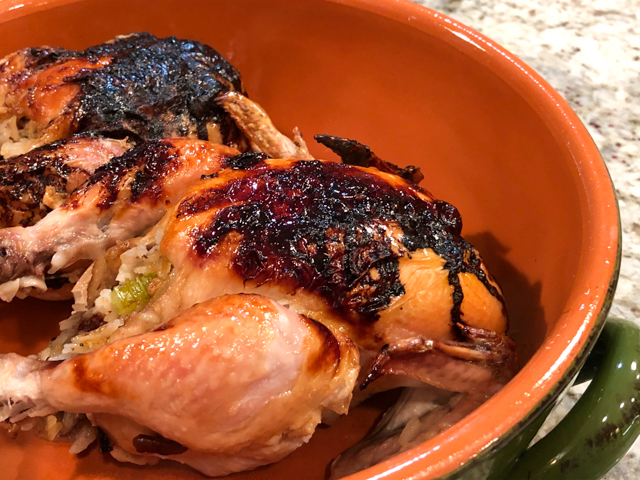
CLAY POT CORNISH HENS WITH RICE-PECAN STUFFING
(from the Bewitching Kitchen)
2 cornish hens
kosher salt and freshly-ground black pepper
2 tablespoons olive oil
1/4 cup chopped onion (I used fennel instead)
1/4 cup chopped celery
1/3 cup coarsely chopped pecans
1 tablespoon chopped fresh sage
1 cup cooked rice
1/2 cup dried cranberries
]flat-leaf parsley, chopped (amount to taste)
kosher salt and freshly-ground black pepper
for glaze:
2 tablespoons olive oil
2 tablespoons soy sauce
2 tablespoons honey
splash of lemon juice
Make the stuffing: Heat the olive oil in a skillet. Add onions (or fennel) and celery and cook until softened, about 5 minutes. Add pecans, sage, and 1/4 teaspoon each kosher salt and pepper. Cook until pecans are fragrant. Remove from heat and stir in cooked rice, cranberries, and parsley. Season to taste with additional salt and pepper. Set aside.
Make the glaze: mix all ingredients in a small bowl and set aside.
If using the clay pot, soak it for a couple of hours. If roasting in a regular pan, heat the oven to 425F. Remove hens from the refrigerator about 30 minutes prior to roasting. Rinse hens, and pat dry with a paper towel. Lightly season the cavities of the hens with salt and pepper. Spoon about 1/2 cup of stuffing into each cavity. Tie the legs closed with kitchen twine and tuck the wings under the birds. If using the clay pot, improvise a little “rack” using aluminum foil so that they don’t sit directly on the pot. Place the hens in the clay pot and place in a cold oven. Turn it to 450F. Roast for 1 hour, then open the clay pot and roast for 15 minutes longer, brushing with the glaze a couple of times.
If roasting in a regular pan, brush the skin with olive oil and roast for 20 minutes at 425F, then reduce the temperature to 375F and roast for about 50 minutes longer, brushing with the glaze a few times during roasting (if possible, check temperature at thigh, it should read 180F).
Let the hens rest for 15 minutes, then cut the kitchen twine and serve.
ENJOY!
to print the recipe, click here
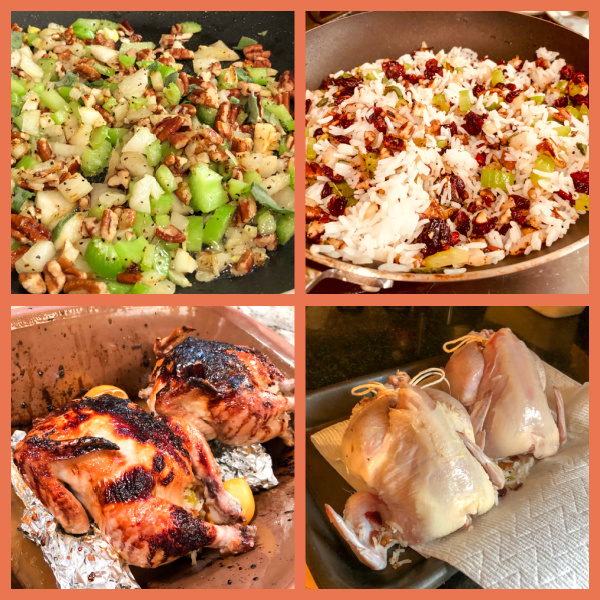
Comments: I pretty much gave up trying to make nice pictures of roast chicken and its relatives. So I hope you can surf beyond the photos and trust that it was truly very good. I used bland, nothing-to-it leftover white rice for the stuffing and it got totally transformed during roasting. The juices of the hen gave it a very deep flavor, and the pecans, cranberries and sage closed the deal beautifully. As the husband said, “this must go into our rotation.” Agreed. 100%.
ONE YEAR AGO: Ivory Lentils, my newfound love
TWO YEARS AGO: Bouillabaise for a Chilly Evening
THREE YEARS AGO: Bergamot-Cherry Macarons
FOUR YEARS AGO: Roasted Veggies with Queso Cotija Dressing
FIVE YEARS AGO: Creamy Broccoli and Mushroom Casserole
SIX YEARS AGO: Maple Walnut Biscotti
SEVEN YEARS AGO: Barley Risotto with Peas
EIGHT YEARS AGO: Oatmeal Fudge Bars
NINE YEARS AGO: Cauliflower Steaks
TEN YEARS AGO: Soft Spot for Chevre
ELEVEN YEARS AGO: Quick sun-dried Tomato Crostini