
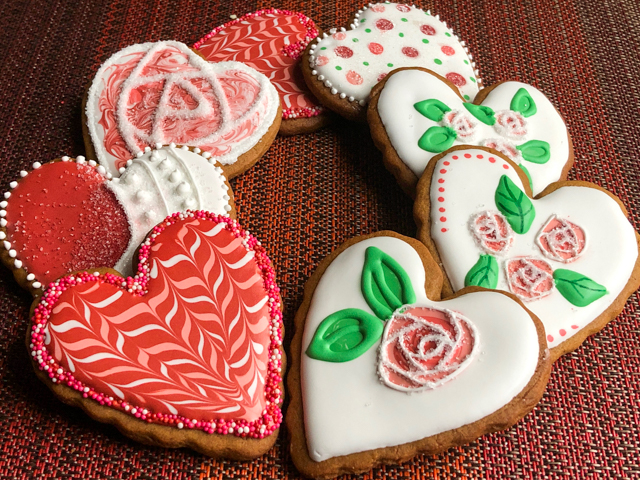
This post inaugurates a new series, the Joy Cookie Club, inspired by a favorite book/movie of mine, Joy Luck Club. If you have not read it, buy two boxes of Kleenex and do so. I bake sugar cookies every week to include in a box that gets donated in the Common Table project of our town. It gives me the opportunity of trying new styles and learn cute tricks with the generous professionals who share their expertise on youtube and instagram. For the basic recipes, I used either Neat Edges Sugar Cookies or Gingerbread. For Royal Icing, my favorite recipe is Tanya’s. You can it in her blog here. Now let me walk you through some of the cookies I made in the past 6 weeks.
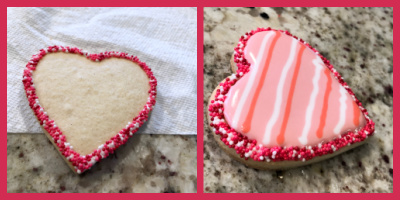
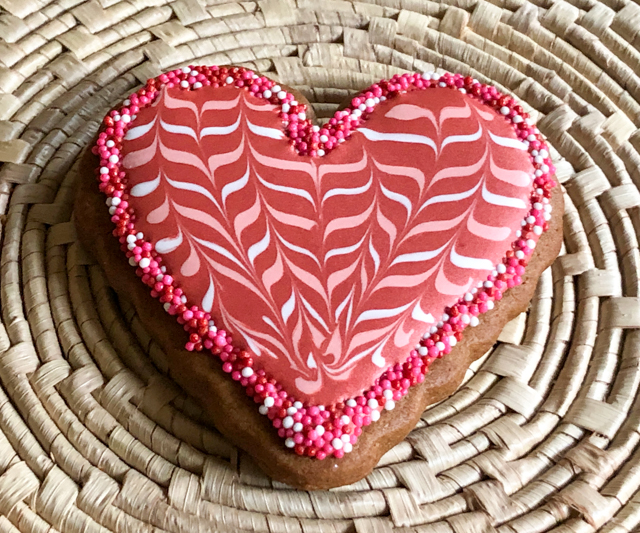
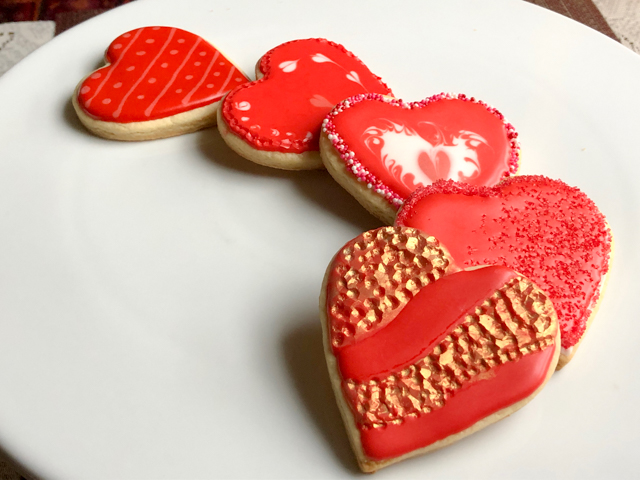
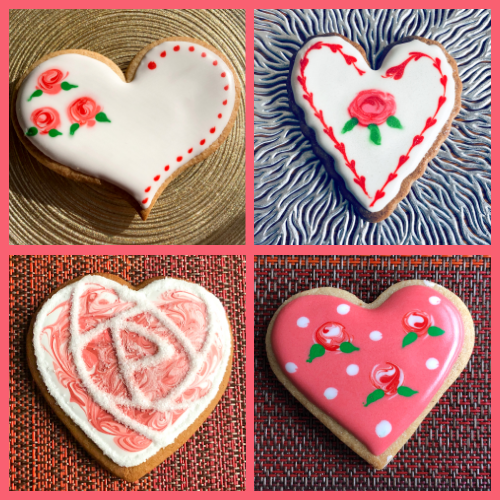
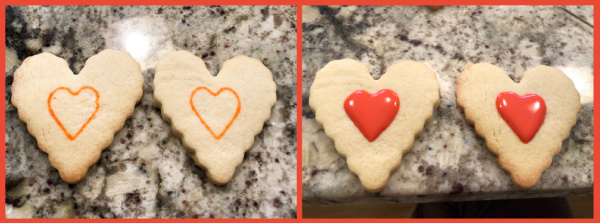
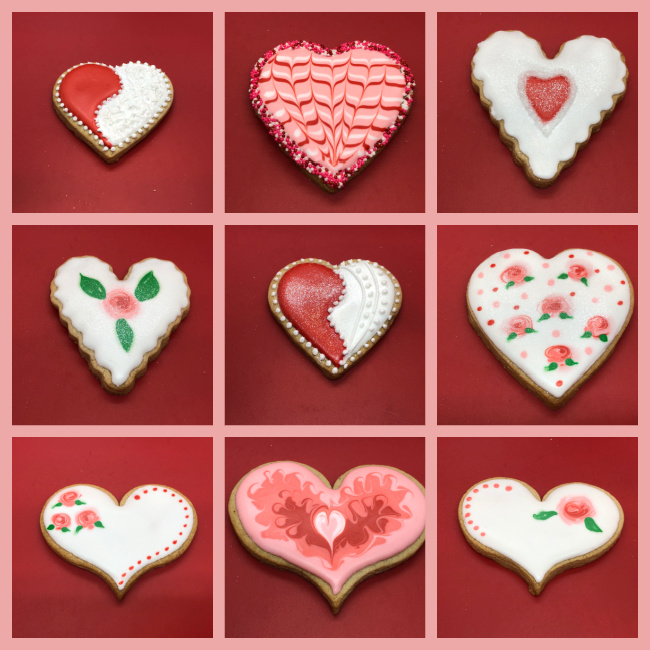
STYLE #1: ZIG ZAG WITH BORDER
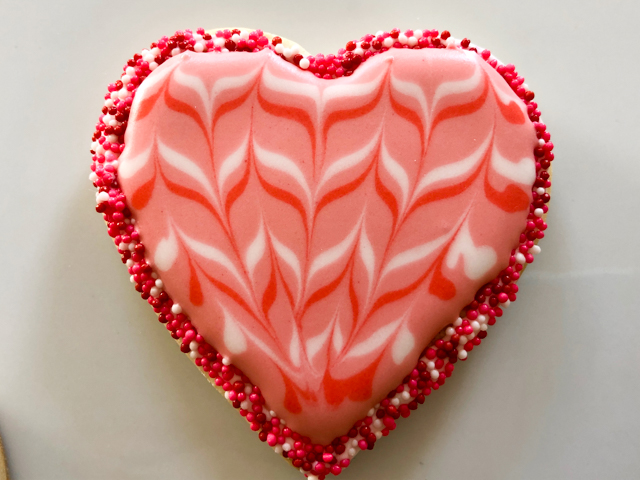
This is a pretty striking cookie that is so so easy to make! One thing that is hard when we start decorating sugar cookies is the edge. It always ends up a bit messy. By adding a border, you can say goodbye to that problem. Just pipe Royal icing and immediately touch the surface of the cookie on a layer of your favorite non-pareils (or sanding sugar). Let that dry for a few minutes, flood, quickly add lines of contrasting colors and work a needle or toothpick up and down, curving it gently to follow the overall shape of the heart. Detailed instructions here.
STYLE #2 – WAVY HEART
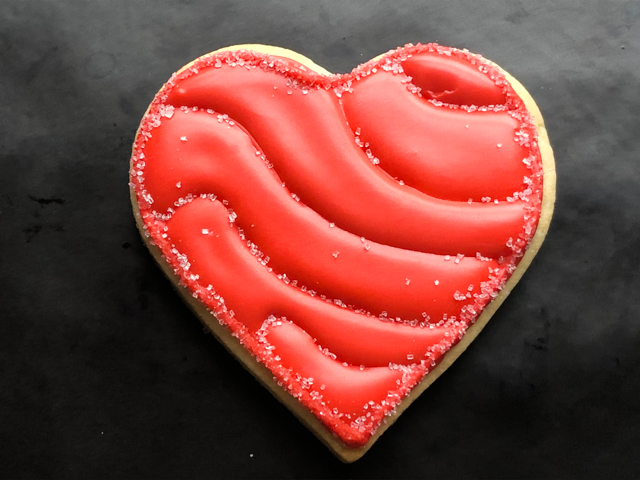
I consider this one a work in progress, as I could not quite match the beauty of the ones made by @thegracefulbaker. The design is actually quite simple. You pipe fine lines dividing the heart in wavy sections, then flood areas that are not touching. Wait for those to crust, maybe 30 minutes or so, and flood the others. If the consistency of your icing is thick enough, the sections will be more “puffed up” and it will look quite striking. I did not get there, but I still like the look.

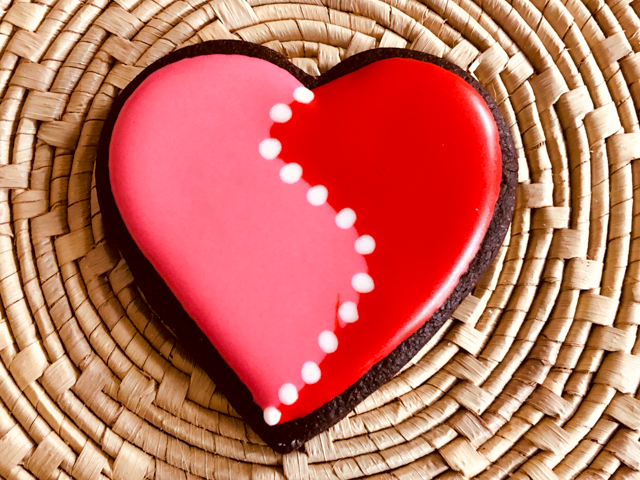
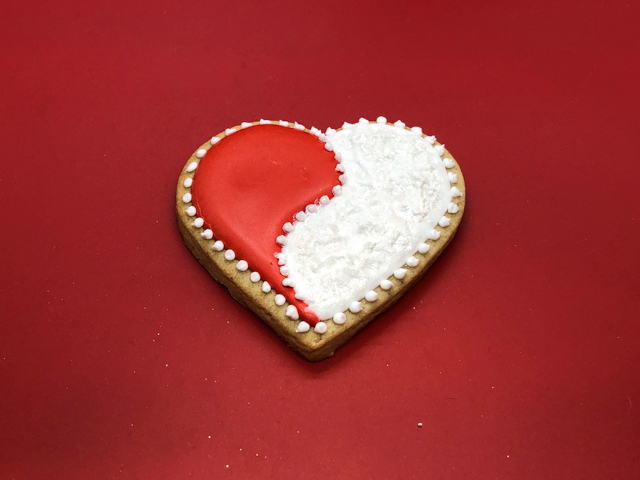
STYLE #3 – DIVIDED HEART
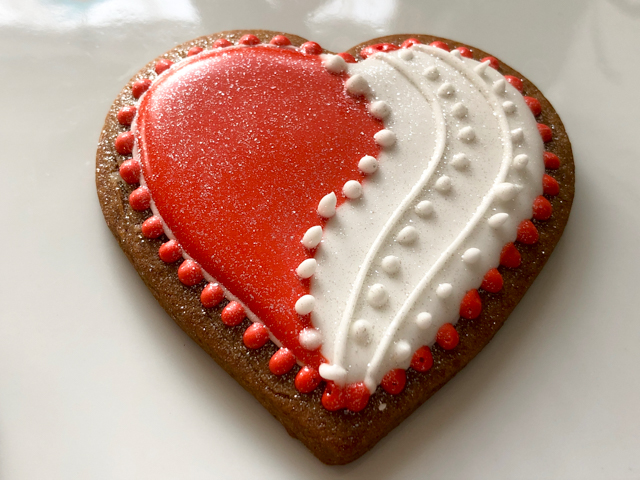
I love this one so much! Flood one side with red, another side with white. Let them both crust for 30 minutes or more. You can even continue the following day. Add the lines, the dots, and once it’s all crusted, you can use a little diamond dust to make it truly special. For the lines and dots, you’ll need slightly thicker royal icing, either straight from mixing the batch, or very lightly thinned with water. Do not use flooding consistency. But, a similar style can also work with a simpler, wet-on-wet decoration
You can also mess up one side with a brush, and add a totally different texture to the icing. In that case, brushing some white luster powder mixed with vodka is a good move. The picture does not show it very well, but it added a nice shine to the white portion.
STYLE #4 : CRACKLED HEART
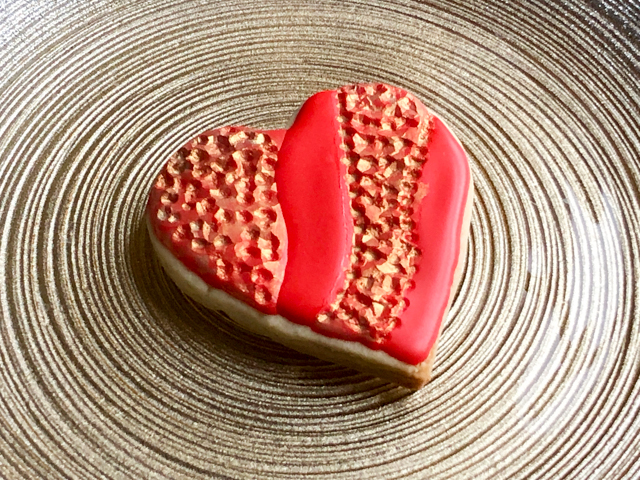
A variation of the wavy design, I let the final flooded regions crust for only 15 minutes, and used a little fondant ball tool to press the design. Once it was fully crusted, I brushed gold luster powder mixed with vodka only on the crackled part.
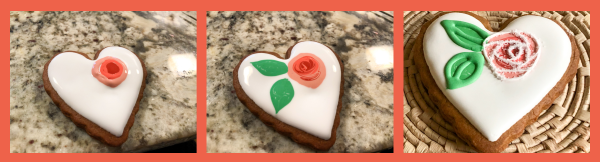
STYLE #5: ROSE BUDS
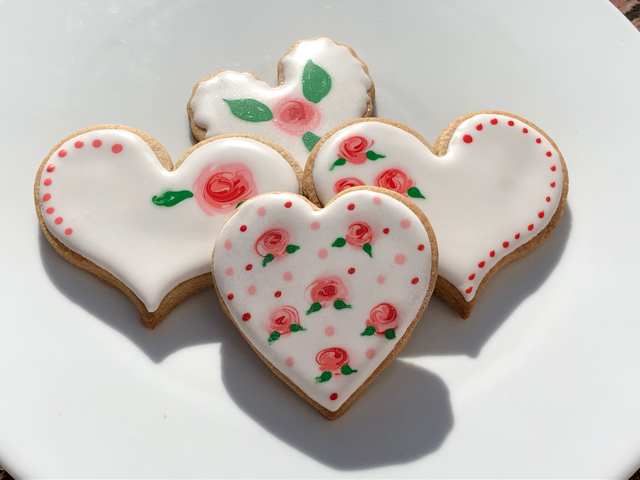
I was terrified of trying those, as they seemed way beyond my skill level. You can find countless youtube tutorials showing how it’s done, and in fact it is not that hard. You start by flooding in white (or any base color you like). Immediately add two or three concentric dots with the colors for the rose bud. Very slowly swirl them with a needle until you get the design you like. Add little dots of green and pull them with a needle to give them a leaf shape. Let it all dry completely and if you want, add additional bells and whistles. You can draw veins in the leaves, pipe their shape with thick royal icing, and add fine white lines on the rose buds for a completely different, almost modern look.
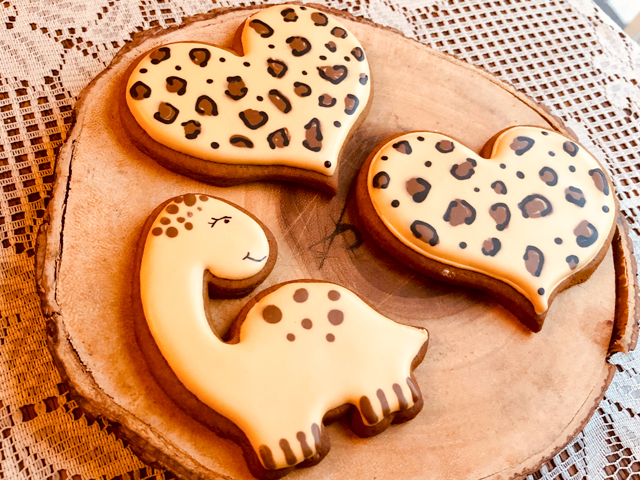
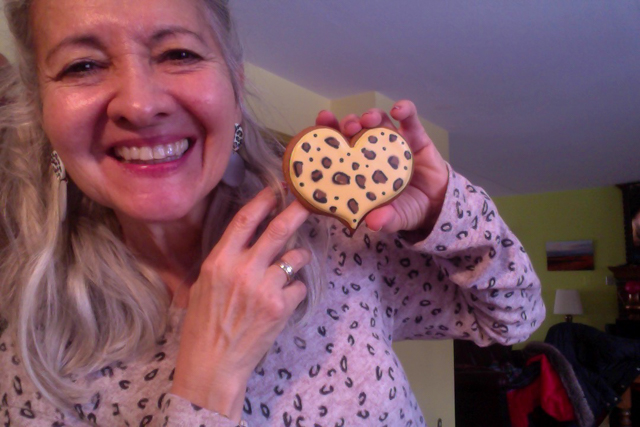
STYLE #6: CHEETAH HEARTS
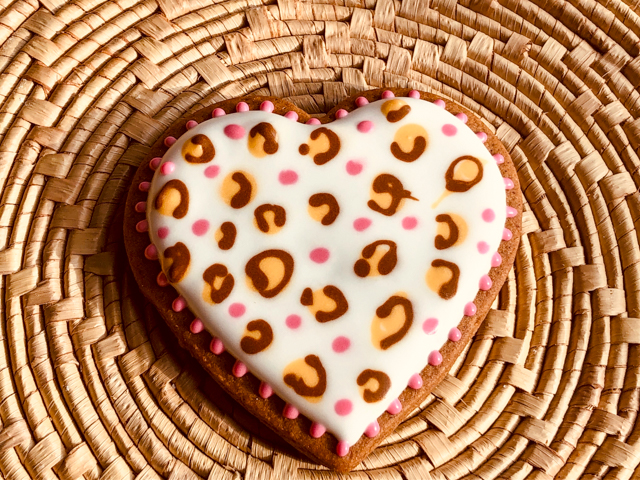
I do sound like a broken record, but what can I do? I loved making those also… Super simple, which makes them even better. Flood with white, add large, irregular dots of your color of choice, immediately add edges, also irregular of a second, darker color. Since cheetahs are kept in zoos or far away from your home, no need to fear their revenge, you can go crazy with the color combination… Or even crazier, pairing them with a dinosaur!
STYLE #7: HEART WITHIN A HEART
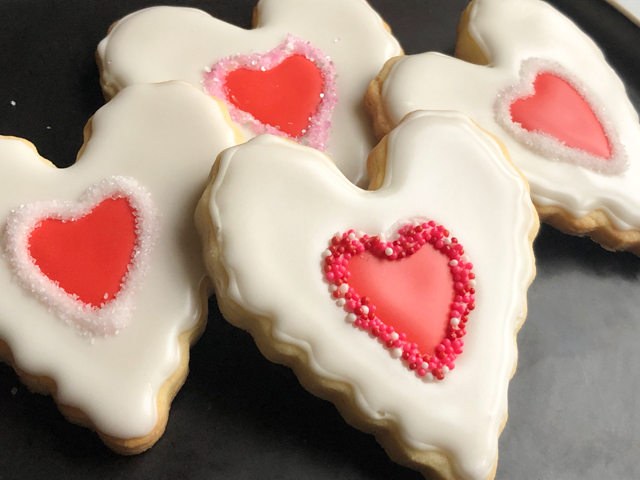
Are you going to roll your eyes to the ceiling if I tell you I loved making these? Ok, I won’t then. Start with a plain cookie, use a small cookie cutter to draw a small heart in the center. If you are brave, do it free-hand. Flood with red. Let it crust for 15 minutes, surround it with white. Let it fully dry, pipe the edge of the inner heart with white icing, and cover it with non-pareils or sanding sugar. It is a simple, but very elegant look.
STYLE #8: HEARTS WITH DECORATIONS
The only thing that changes is that you need to flood the cookies and let them dry overnight. Then, you can glue to the surface Royal icing transfers in the shapes you like. Either made by yourself or using store-bought sprinkles.
I made the two rosettes with very thick Royal icing dyed pink, and brushed with golden lust powder. But as I mentioned, you can simplify your life and glue little decorations made by Wilton and available pretty much everywhere these days.
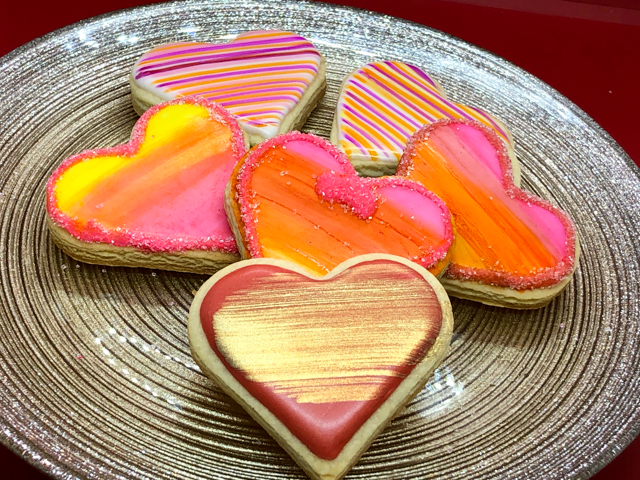
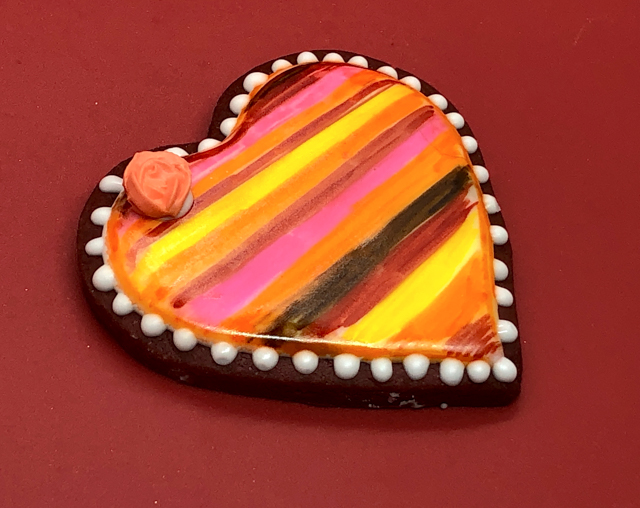
STYLE #9: WATERCOLOR SERIES
For these you absolutely need the coating to be fully crusted and dry, 24 hours is best. Flood the cookie with white. Mix food dye colors with a little vodka or everclear, and brush lightly on the surface of the cookie, making the design and colors you like. For a detailed tutorial on youtube, click here. I went with a tequila-sunrise motif. Add a border with royal icing and sprinkles if you so desire. You can also use food-safe pens and draw colorful lines all over the surface, or use a fan brush to add a band of gold, for a simple but effective design.
I hope you enjoyed this small collection of sugar cookies, and consider making them for someone you love.
Flour, sugar and eggs: $ 8.75
Assorted cookie cutters: $12.00
Food gel color: $10.00
Matching cookie to earrings and shirt
AND BEING FREE OF BRACES????
PRICELESS
ONE YEAR AGO: Uttapam, White Lentil and Rice Flatbread
TWO YEARS AGO: Valentine’s Day Sweetheart Cookies
THREE YEARS AGO: Fesenjan, Fast-Food Style
FOUR YEARS AGO: Lavender Macarons with White Chocolate Ganache
FIVE YEARS AGO: Raspberry Chocolate Truffles
SIX YEARS AGO: Red Velvet Cupcakes
SEVEN YEARS AGO: Happy Valentine’s Day!
EIGHT YEARS AGO: A Few Blogging Issues
NINE YEARS AGO: Dan Dan Noodles
TEN YEARS AGO: Sophie Grigson’s Parmesan Cake
ELEVEN YEARS AGO: Antibiotics and Food

Congrats on getting your braces off – love your beautiful smile as well as your engaging writing style and the detailed blog for making beautiful cookies. Happy Valentine’s Day!
LikeLiked by 2 people
Happy V-day to you too, thank you for your sweet words!
LikeLiked by 1 person
Wow. These are gorgeous. Hope you saved some for your sweetheart!
LikeLiked by 2 people
nope. All gone… I made some macarons today and we will have a special macaron tomorrow as dessert.. heart shaped and all 😉
LikeLiked by 1 person
Sally, your cookies are spectacular! You made everyone that received one very special.
LikeLiked by 1 person