Once again I share with you bakes that I’ve made over the past couple of months, following recipes from blogs I love… (links to recipes below each individual picture)
TROPICAL SHORTBREAD COOKIES from Pastries Like a Pro
These are shortbread type cookies with macadamia nuts and coconut, absolutely delicious! I made the chocolate glaze in two different ways, one simply dipping like Helen suggests, and the second way adding some texture. To do so, I laid a piece of textured paper on the chocolate while still wet as shown below. It is hard to get it smooth to the very edge of the chocolate, but I still liked the effect.
.
RAMASAN PIDESI from Caroline’s Easy Baking Lessons
This is a great soft bread, ready in 2 hours! Uses instant yeast, and depending on the size of your pizza pan, you can have enough for 2 full round breads or go with a large round and the leftover used for a different shape of your liking. I opted for a 4-stranded braided loaf.
The crumb is spectacular, Phil now wants this bread on a regular basis… His favorite is the flat shape.
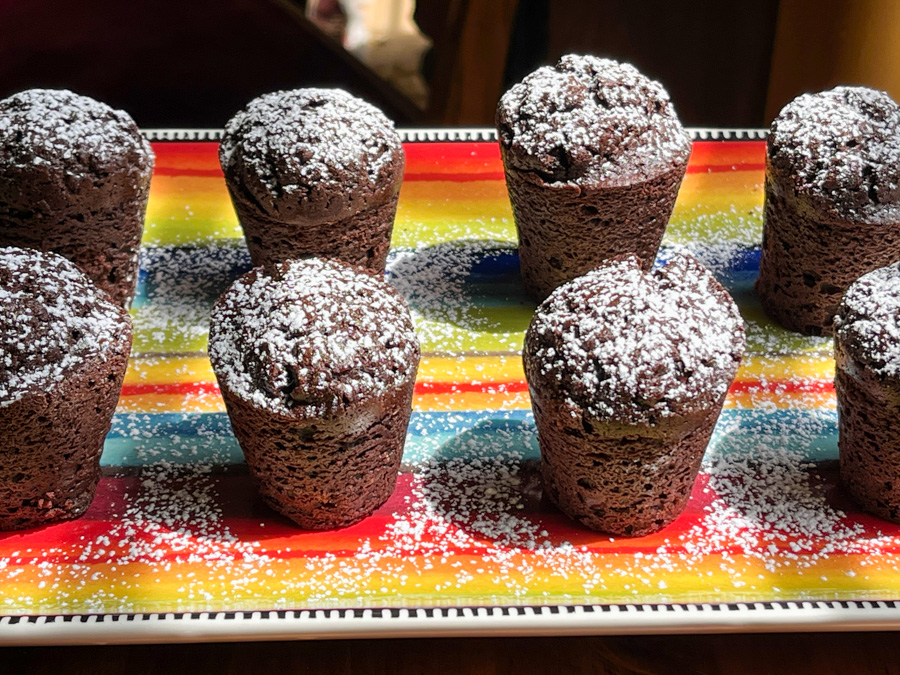
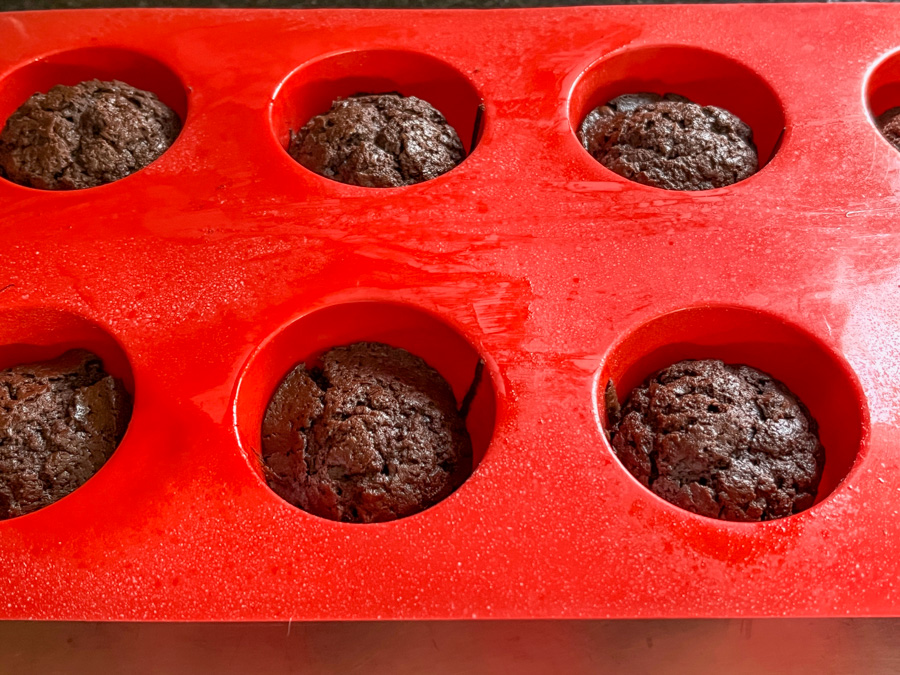
These were made famous by Thomas Keller, and they use a specific mold to make the right shape, like a cork. I’ve had the mold for years, unfortunately it does not seem to be available any longer, but you can use a muffin tin. I used the exact recipe blogged by Karen, which is a variation from the original. Absolutely delicious, but you must adore a strong chocolate taste, this is not a sweet, kid-friendly concoction. It will be showing up again in our kitchen, for sure!
Helen was a tent-baker with me during the Great American Baking Show and she is now a professional baker, with a super busy life! She keeps her blog with great recipes, and this one got the most enthusiastic reviews from our departmental colleagues. A must-make! It was a great opportunity to put to use my little cupcake corer thingie…
.
RED TART CHERRY PIE BARS from Bakes by Brown Sugar
Another tent-baker friend, Cheryl, from a season before mine, these are absolutely spectacular! She uses canned tart cherries, which I had never even bought before, not knowing if they would be good. Well, they work wonders in this preparation, and you will not be disappointed at all. Easy, sharp, sweet and tart at the same time. Make them!
>
CHOCOLATE CHIP COOKIES WITH PEANUT BRITTLE (from David Leibovitz)
Have you ever made peanut brittle? If not, you absolutely need to correct this handicap. The only problem is stop sampling the brittle so you have enough for the cookies. You’ve been warned. The cookies are amazing, with the regular flavor of a chocolate chip, but the added intensity of the caramelized peanuts.
I hope this series got you inspired to bake some sweetness!
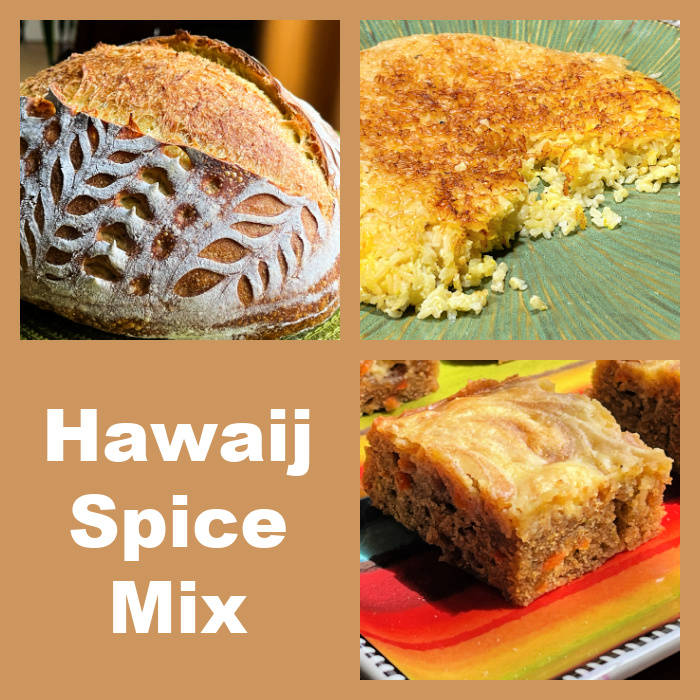
Hawaij (or Hawaj) is a spice mixture from Yemen that came to my attention very recently. I ordered a bottle, as you can see in my previous In My Kitchen post, and put it to use. Here you have three ideas, a sourdough, a tahdig type rice, and a delicious carrot cake with cream cheese topping, super easy to make. I have a soft spot for spice mixtures. I know that I could make my own version but I love the convenience of opening the bottle and having it ready to go. This mix of flavors is right up my alley! Read more about it here.
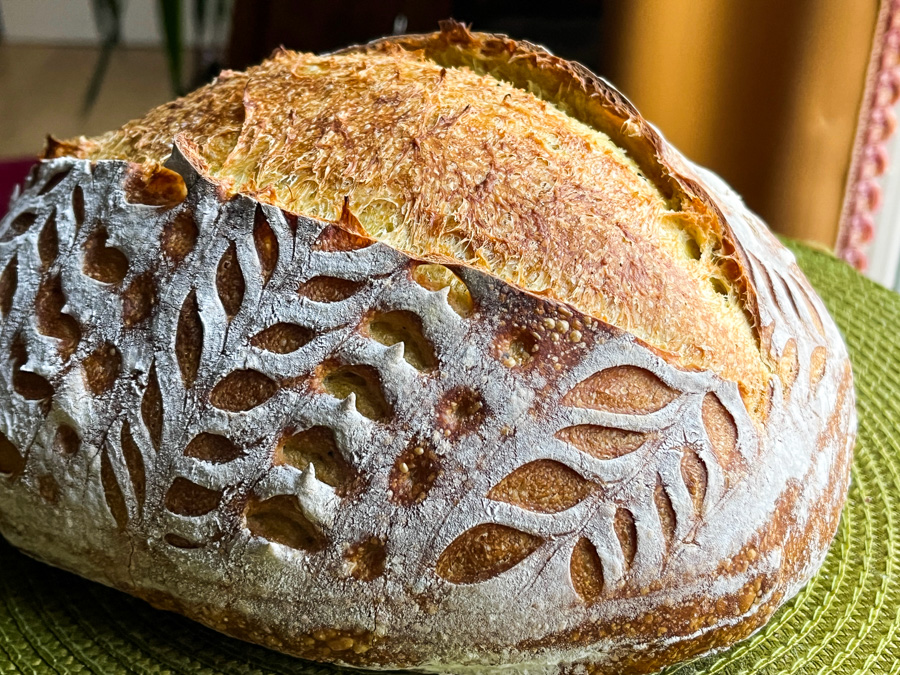
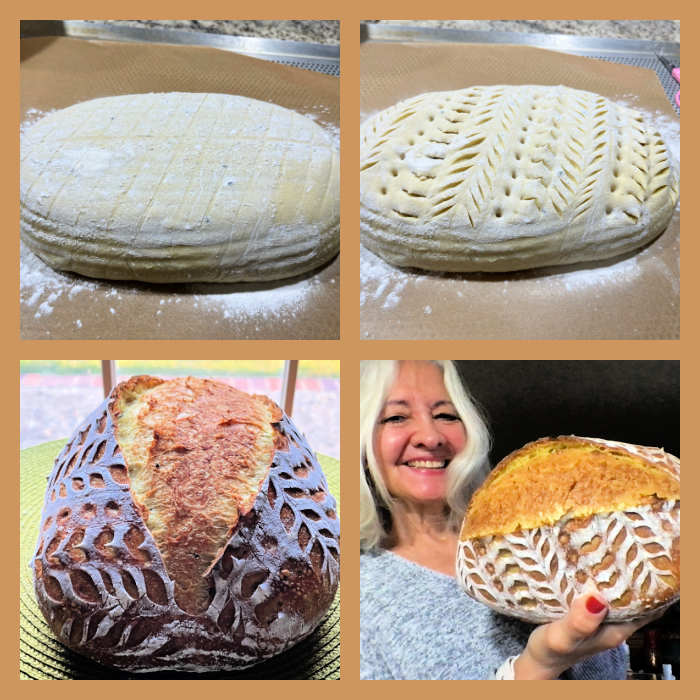
. HAWAIJ SOURDOUGH (from the Bewitching Kitchen)
365g water 75g sourdough starter at 100% hydration 470g white bread flour 30g spelt flour 1 tsp Hawaij spice mix 10g salt
Make the levain mixture about 6 hours before you plan to mix the dough. It should be very bubbly and active.
When you are ready to make the final dough, place the water in the bowl of a KitchenAid type mixer and dissolve the starter in it, mixing with a spatula briefly, then add the two types of flour, Hawaij mix, and salt. Turn the mixer on with the hook attachment and knead the dough for 4 minutes at low-speed all the time. You will notice the dough will gain quite a bit of structure even with just 4 minutes in the mixer. Remove from the machine, and transfer to a container lightly coated with oil, cover lightly with plastic wrap and allow it to ferment for 4 hours, folding every 45 minutes or so. Because the dough is already a bit developed from the initial time in the mixer, you should get very good structure after 3 and a half hours, or even sooner than that.
After four hours bulk fermentation, shape the dough as a ball, and place, seam side up, in a lightly floured banetton. Leave at room temperature one hour, and then place in the fridge overnight, from 8 to 12 hours.
Next morning, heat the oven to 450F.
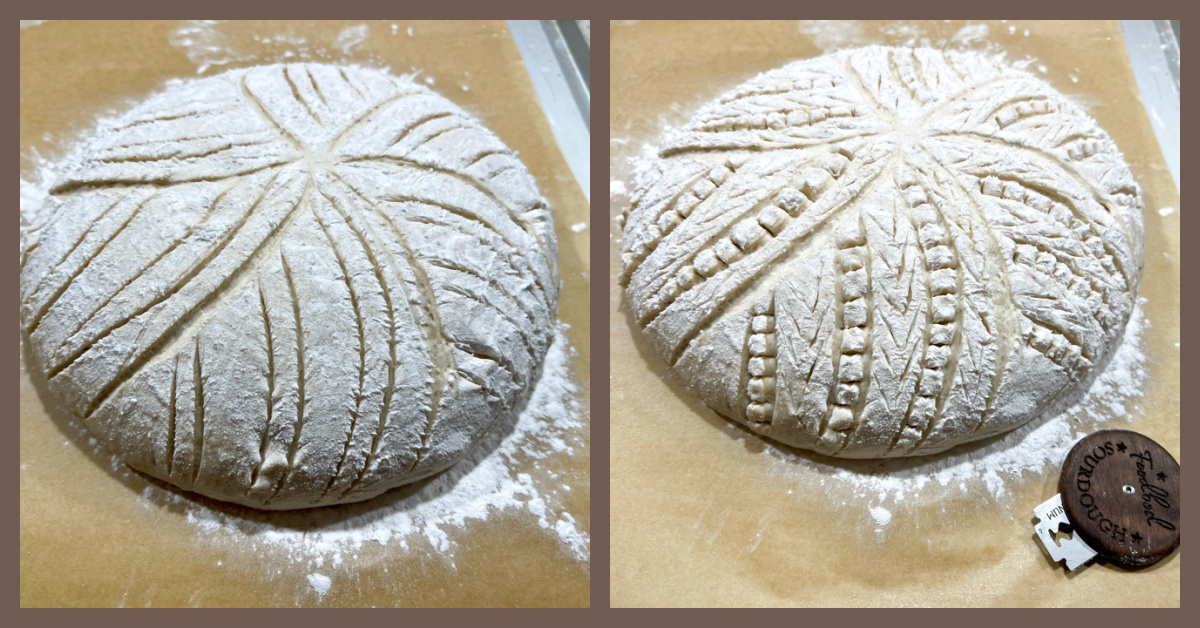
Invert the dough on a piece of parchment paper and score with a pattern with a new razor blade.
Bake at 450F for 5 minutes, quickly remove the bread from the oven, and slash it with the blade just where you want the bread to open. Cover the bread with the lid, place back in the oven for 30 minutes, uncover and bake for 15 more minutes. Cool completely over a rack before slicing.
Comments: I really love the way the bread opens up with the second slashing once the dough has been in the oven for 5 to 7 minutes, not longer. It is a bit tricky to open the pan and do the second scoring, but totally worth it. Just be careful not to burn yourself. I’ve seen this tip on several IG posts and I am quite fond of it now. Whenever you want to coach your bread to open in a specific spot to preserve your design, think about incorporating this step in your baking.
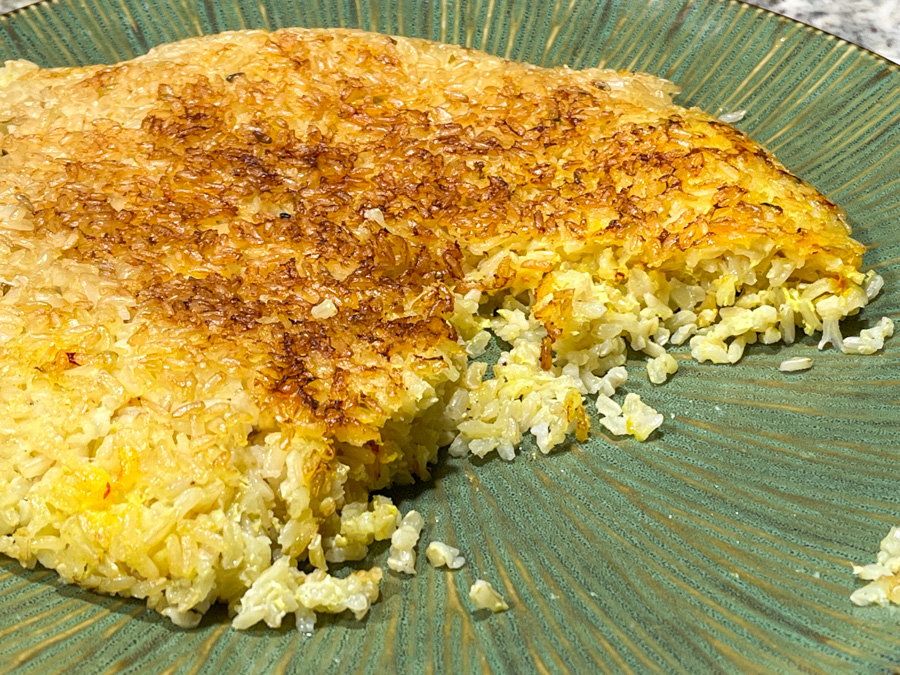
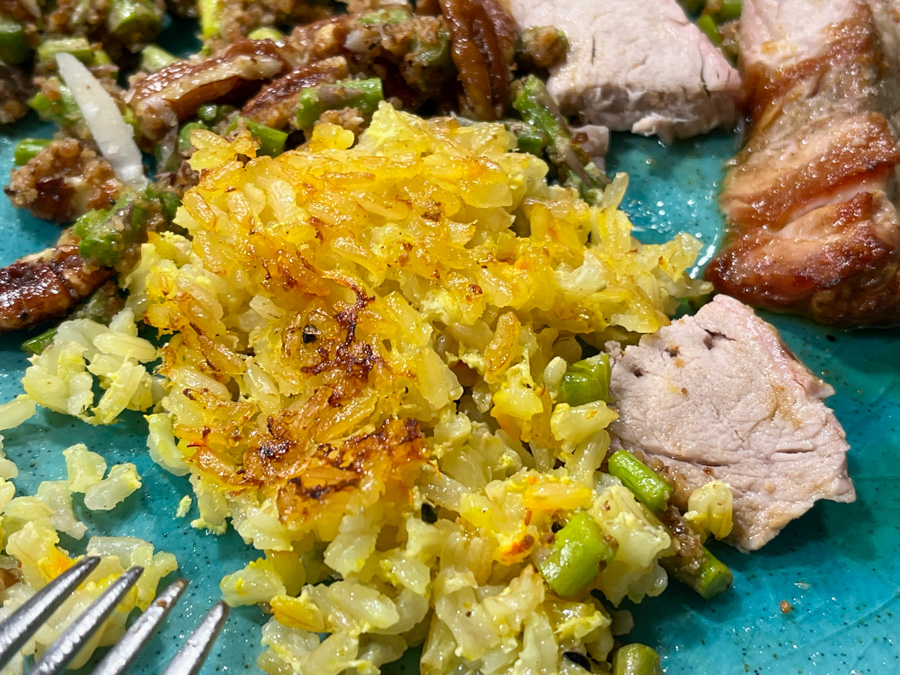
. QUICK BROWN RICE TAHDIG WITH HAWAIJ SPICE (from the Bewitching Kitchen)
1 cup brown rice 3 cups lightly salted water 1/3 cup full-fat yogurt 1/4 tsp salt 1/2 tsp Hawaij mix drizzle of olive oil
Mix the yogurt with the salt and Hawaij mix. Reserve.
Cook the rice for 20 minutes in salted boiling water and immediately drain and rinse with cold water to stop cooking. Rice and yogurt mixture can sit separately for a couple of hours before continuing.
Mix the rice with the yogurt. Heat a 10-inch non-stick skillet and add olive oil, swirling around the whole surface. When the oil starts to get hot, add the rice-yogurt mixture and spread it all over the pan, smoothing the surface with a silicon spoon. Cover the rice with a paper towel moistened with water, then place a lid. Don’t worry if the lid is not totally tight.
Place on a low-burner for exactly 30 minutes. At the end of 30 minutes check to see if the bottom is golden, if not, increase the heat lightly and remove the lid. Leave it for a minute or two, should be enough to make a nice crust at the bottom. Carefully place a platter on top and invert the rice on it. Cut in wedges to serve.
Comments: We love this quick version of tahdig made with brown rice instead of white. You will probably have to tweak the time to first parboil the rice a bit depending on the brand you use, but it is truly delicious. Again, not the most authentic version of tahdig out there, but we are hooked. I probably make it once a week ever since I first blogged about it (click here for flashback).
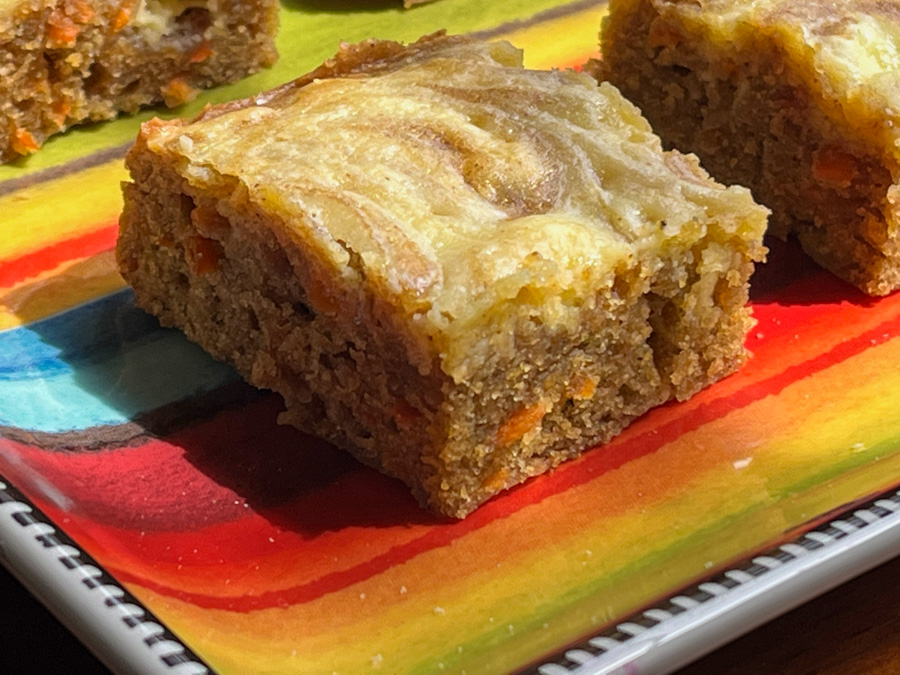
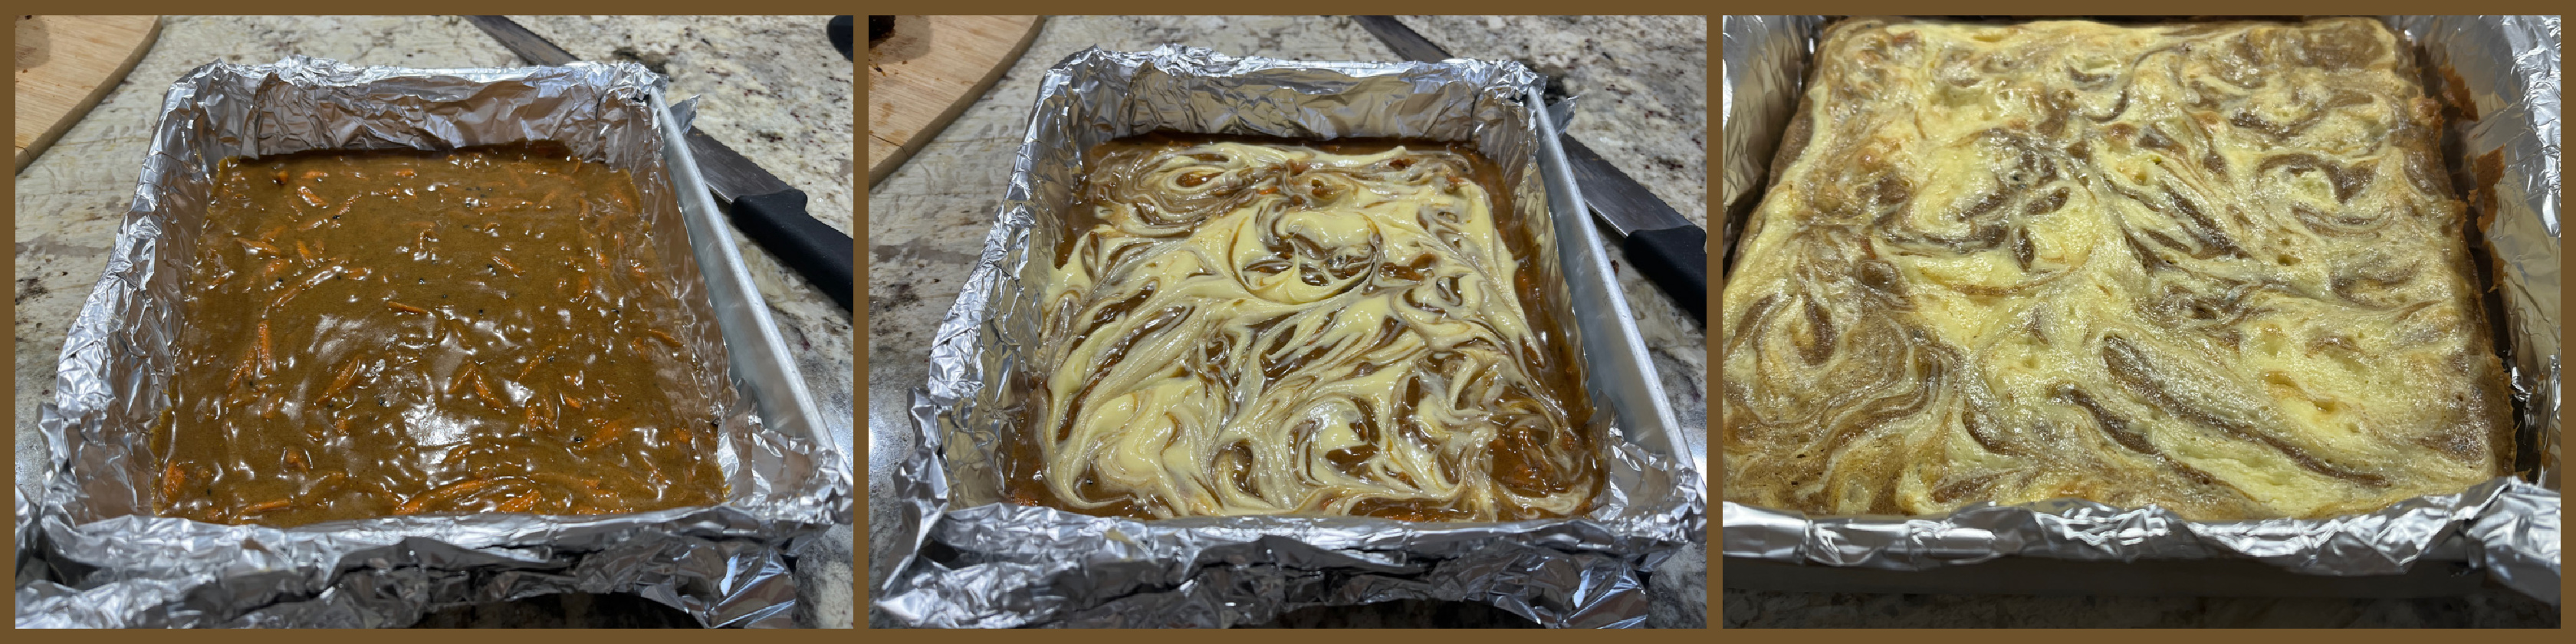
CARROT CAKE BARS WITH HAWAIJ MIX (adapted from Averie Cooks)
1/2 cup unsalted butter, melted 1 large egg 1 cup brown sugar, packed 1 teaspoon cinnamon 1 teaspoon Hawaij spice mix 1 teaspoon vanilla extract 1 cup all-purpose flour 1/2 teaspoon salt 1 cup grated carrots, loosely packed 4 ounces brick-style cream cheese, softened to room temp 1 egg yolk 1/4 cup granulated sugar
Heat oven to 350F, line an 8×8-inch pan with parchment paper, and spray with cooking spray.
To a large microwave-safe bowl, add the butter and heat on high power to melt, about 1 minute. Allow the melted butter to cool slightly, then whisk in the egg, brown sugar, spices, and vanilla. Once it is all smooth, add the flour and salt, mixing gently. Add the carrots, fold them in, then pour the batter into the prepared pan. Smooth the top with a spatula.
Prepare the topping: into a medium bowl, add the cream cheese, egg, sugar, and beat on high with a handheld electric mixer until smooth and fluffy, about 4 minutes. Turn the cream cheese out over the carrot batter using the blade of a butter knife or the tip of a spatula, and lightly swirl the cream cheese into the carrot batter. Bake for about 25 to 30 minutes, or until a toothpick inserted in the center comes out clean.
Allow to cool, uncovered in the pan, at room temp, for at least 2 hours (overnight is preferred) before slicing and serving.
Comments: These bars/blondies were a huge hit with our colleagues from the department, and I got a few emails of praise for them. They are not too sweet and the spice mixture goes perfectly with the carrot and cream cheese topping. I highly recommend you give them a try!
So that closes my first series of recipes using Hawaij. I do hope you’ve found something to inspire you!
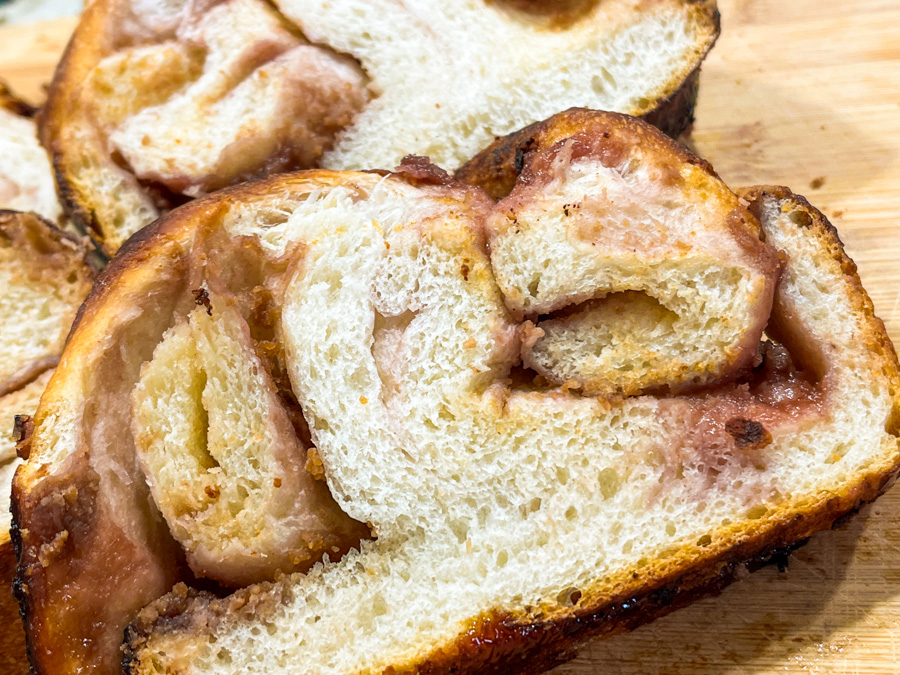
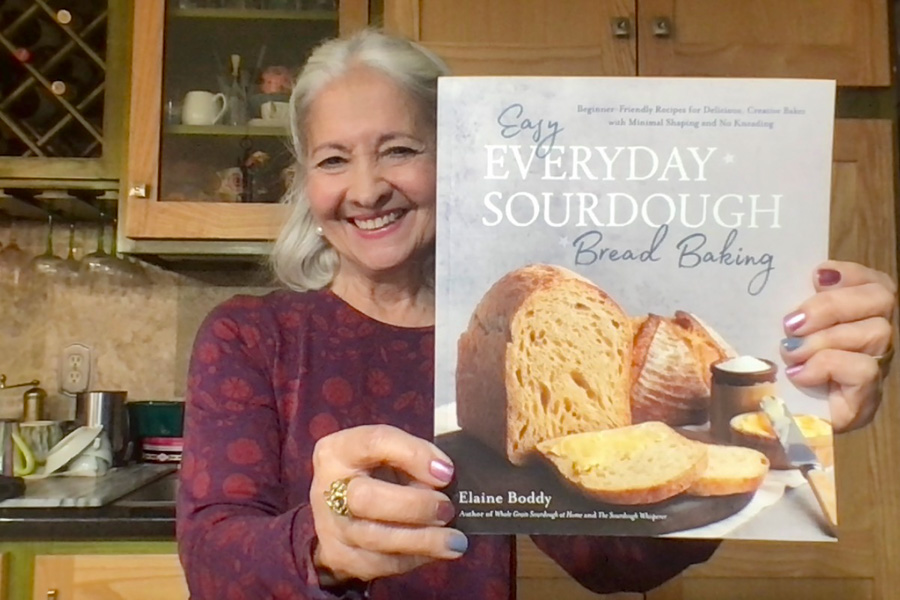
I am absolutely thrilled to share my review of a GREAT sourdough bread cookbook, published just this week by my friend Elaine! This is her third cookbook, I have reviewed her two first babies here and here. Let me tell you, this is her best one. I wanted to make every single one of her recipes, they all had some kind of intriguing twist, unexpected addition, or unusual shaping. But first, let me share the first recipe I made, the moment the book arrived at my doorstep. The husband is crazy for peanut butter and jelly, so of course that was an easy choice for me.
for the dough: 50 g active sourdough starter at 100% 350 g reduced-fat milk (I used full-fat) 500 g white bread flour 7g salt or to taste (up to 10 g)
for the filling: 50 g peanut butter, smooth or crunchy 100 g jelly of your choice (I used seedless raspberry)
In the early evening, mix all the dough ingredients in a large bowl until you have a rough dough. Cover with plastic wrap or a shower cap and leave in the counter for 2 hours. Perform a set of pulls and folds. The dough will be stiff at first, but will become smooth and come into a ball. At that point, stop, cover again and leave it on your center for one hour.
Perform one more set of pulls and folds, then leave over the counter at room temperature overnight (8 to 10 hours at around 68F). Our kitchen is warmer, but I had no issues with overnight fermentation.
Next morning place the bowl of the dough in the fridge, without touching it, for one hour. Prepare a 9 x 5 in loaf pan by spraying it with oil or lining it with parchment paper.
After one hour, sprinkle flour on the countertop and open the dough with your hands and/or a rolling pin to a dimension of 8 by 16 inches, making sure it has even thickness. Spread the peanut butter gently all over the dough, then the jelly. Roll up the dough from the shorter end. Once rolled, use a sharp knife to cut the sausage lengthwise down the middle in two equal pieces. Twist the two pieces together, then lift the dough and place it inside the prepared pan.
Allow the dough to proof again until it reaches the edge of the pan, 2 to 4 hours, depending on the temperature of the room. You can also proof in the fridge for up to 24 hours and bake straight from the fridge.
Bake at 400F for about 40 minutes, making sure to protect the surface with aluminum foil after about 30 minutes to prevent excessive darkening.
Remove the loaf from the oven and the pan, remove the paper, tap the base of the loaf and if it sounds hollow, it is baked, if not return it to the oven, out of the pan, directly into the oven rack to bake for a further 5 to 10 minutes. Allow it to cool before slicing.
Comments: The dough is a pleasure to work with. My only change was to use the KitchenAid for the initial mixing, just because I got so used to doing it that way for all my sourdough baking, that it became second nature. Of course, you can just mix by hand and it will be even simpler, less stuff to wash. Don’t worry about leaving the bread overnight at room temperature, it will be perfect. The amount of peanut butter and jelly is just right, don’t add more. Even though the peanut butter seemed to disappear once it baked, the taste was there, in the exact intensity needed. In the book Elaine gives alternatives to bake from cold oven, which is something she does often. In fact, every single one of her recipes offers the option of starting from cold oven.
The bread feels surprisingly rich, when you consider it has no butter or eggs in it. I love the texture, and because it has no sugar, you can definitely use the exact same formula and take it into savory territory with pesto, cheese, tapenade, or as Elaine herself did in her book with a surprising combo of flavors (check my summary of Chapter 2). I will definitely be doing that in the near future.
Of course, the husband loaded the bread with peanuts, because that’s what he does!
Now let’s dig into the review of Elaine’s beautiful cookbook shall we?
The book is divided into chapters, according to the general way, in which you will bake your breads and that in itself is unusual and fun. I will now go into each chapter and give you a few examples of the recipes you will find
Chapter 1: THE BREAD PAN COLLECTION In this set of recipes, you will be using a regular Dutch pan or enameled pan with the cover that if you are used to baking sourdough bread is pretty much the container of choice. She opens the chapter with her Easy Shape Crusty White Loaf, which is what she described as the archetypal sourdough loaf.
Many recipes called my attention, but my favorites would be Same-Day Chia Seed Boule, the Yogurt and Nut Boule, the Turkish-Style Seed-Topped Pide and her Cheesy Herby Pull Apart Rolls.
.
Chapter 2: THE LOAF TIN COLLECTION In the second chapter, you will be using loaf pans like the regular 9 x 5 in that is often used in bread baking. She will also bring into play the fun Pullman type pan, and will share formulas to get absolutley beautiful square loaves, that are so handy to make sandwiches. I wanted to bake pretty much everything! The chapter is divided in two sections, “Simplest” and “Flavored”. In the simplest section, the breads are made with seeds, ancient grains, or the super cool Whey and Honey Sandwich Loaf, that is calling my name really loud. In that recipe, the whey component can be the liquid that accumulates over yogurt. We consume A LOT of yogurt at home, so that is going to happen, trust me. The flavored section is unreal! The Peanut Butter and Jelly Babka I highlighted is from that part, but Elaine went wild on this brings all sorts of twists: Cheese and Ketchup Babka (I know this is a real winner because we talked about it when she first made it), Roasted Cumin, Coriander and Caraway Loaf, Dark Chocolate Chip, Hazelnut and Rye Loaf (be still, my heart!), Satay-Swirled Black Sesame Seed Loaf. Need I say more? The teaser recipe at the end of my post is also from this section.
.
Chapter 3: THE CAKE TIN COLLECTION She opens the chapter with a question: How many cake tins do you have? I have quite a few and I never bake cakes!
Well, I bake cakes and have more cake pans than I care to admit in public, so this chapter is dear to my baker’s heart. And we are not talking just big cake pans! Elaine makes these small cute loaves in circular 8 inch cake pans, so adorable! I a a bit lazy to adjust amounts to different sizes of pans, so it was nice to have it all laid down nicely for me. Also, she puts Bundt pans into the universe of sourdough baking. Yes you got that right Bundt pans are not just for cakes anymore! Many recipes tempting me, I give you just a few: Pumpkin Spiced and Shaped Loaf, Fast Coconut and Cherry Tea Loaf,Feta and Spinach Bundt Tin Loaf with Red Onion Topping,Holiday Chocolate Enriched Bundt Tin Loaf (!!!!), and wait for the last one… Gingerbread Cookie Enriched Bundt Tin Loaf (wow, just wow!).
.
Chapter 4: THE MUFFIN TIN COLLECTION Ok, now I really have to tell you, I was in Nirvana with this chapter. The whole idea is to use your muffin pan to bake sourdough in all kinds of cute shapes and flavors. Apple and Apricot Enriched Sourdough “Roses”, Sweet Potato Apple and Cheese Roll Ups, Stuffed Pizza Rolls (OMG), Sweet Potato, Za’atar and Tahini Rolls. And the last one almost took my breath away (the picture is amazing): Falafel-Spiced Chickpea Bites.
.
Chapter 5: THE OVEN TRAY COLLECTION This chapter lists a series of recipes you can bake in a simple, humble baking sheet. Same-Day Cheats Baguettes, Seeded Pide with Cheese, Red Pepper and Baked Eggs (the picture made me drool), Butternut Squash, Pecan and Fall Spiced Focaccia, Spiced Cheese Sandwich Crackers. After this chapter, what she calls a bonus recipe: Air-Fryer Pitas. Needless to say, that goes into my list to bake very very soon. .
The photography of the book is simply outstanding! Every single recipe has a picture, they are stylish, beautiful, and since I know Elaine personally, I realize that they convey her style perfectly. The method behind her recipes is the same of he previous books: simple, straightforward, instead of feeling intimidated by a bunch of parameters and temperatures and factors you need to control, she makes you feel confident and ready to go to the kitchen and play. A perfect book if you are a beginner and a total delight if you are an experienced sourdough baker.
and now, for the teaser recipe….
FAST SPELT, DRIED FRUIT, NUTS AND SEEDS LOAF (page 86)
I am going to tell you something pretty major: this was one of the tastiest breads I’ve made. It is ready in less than 2 hours, essentially you mix all the ingredients, sourdough starter, baking powder and baking soda, and bake. It is rich, loaded with nuts, seeds and dried fruits (figs, apricots, cranberries, raisins), and OMG SO SO GOOD! If you can wait until it is totally cool and slice it thinly, place it in the toaster and you will have a ticket to Nirvana. Absolutely wonderful!
Elaine, thank you so much for allowing me to publish one of the recipes in my blog! You outdid yourself with this cookbook, and I know I will have a blast making more recipes from it!
No, this is not a gluten-free bread, it is a regular sourdough with a small amount of almond flour (natural kind, with skin on during processing). You won’t be able to tell exactly what is in it, but the almond gives it a nice flavor component.
ALMOND FLOUR SOURDOUGH (from The Bewitching Kitchen)
470g bread flour 30g almond flour 20g spelt flour 10g salt 365g water 80g sourdough starter at 100% hydration tapioca flour for dusting dough
Make the levain mixture about 6 hours before you plan to mix the dough. It should be very bubbly and active.
When you are ready to make the final dough, place the water in the bowl of a KitchenAid type mixer and dissolve the starter in it, mixing with a spatula briefly, then add the three types of flour, and the salt. Turn the mixer on with the hook attachment and knead the dough for 4 minutes at low-speed all the time. If the dough is too sticky, add 1/4 cup bread flour, you want the dough to start clearing the sides of the bowl, but still be sticky at the bottom.
Remove from the machine, and transfer to a container lightly coated with oil, cover lightly with plastic wrap and allow it to ferment for 4 hours, folding every 45 minutes or so. After four hours bulk fermentation, shape the dough as a ball, and place, seam side up, in a lightly floured banetton. Leave at room temperature one hour, and then place in the fridge overnight, from 8 to 12 hours.
Next morning, heat the oven to 450F. Invert the dough over parchment paper, dust with tapioca flour and slash with a new razor blade, in any pattern you like.
Bake at 450F for 45 minutes, preferably covered for the first 30 minutes to retain steam. Cool completely over a rack before slicing.
Comments: I went a little blade-crazy with the scoring, using my new blade, this beauty with the logo of my dear friend Elaine, Foodbod Sourdough. Click here to get yours. The square cuts I made with small scissors, the same I use for cutting piping tips, very small blade.
A delicious bread, with a slightly softer crumb, as the almond flour contributes some fat and helps retain moisture.
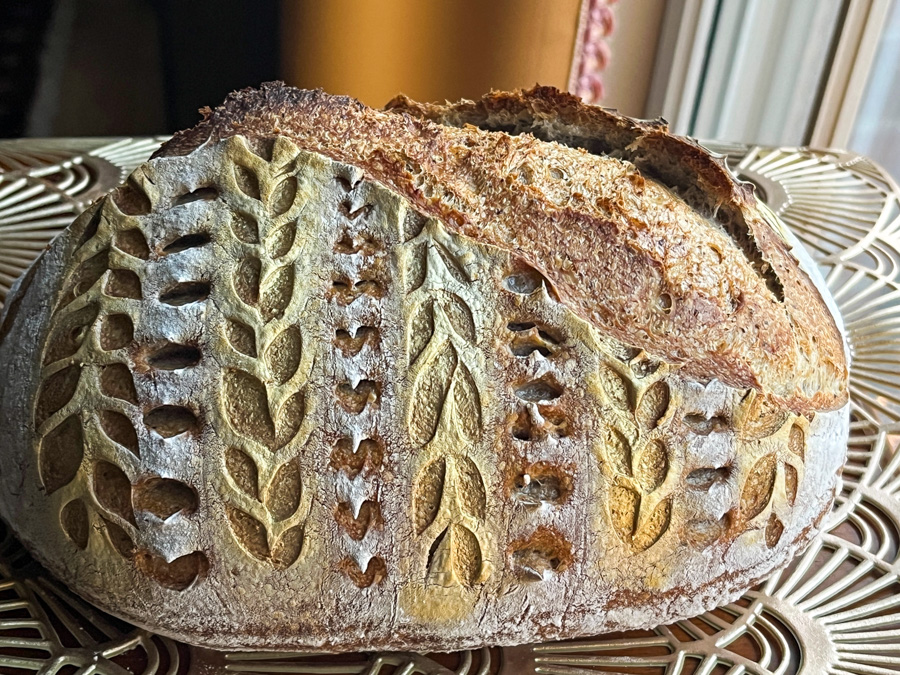
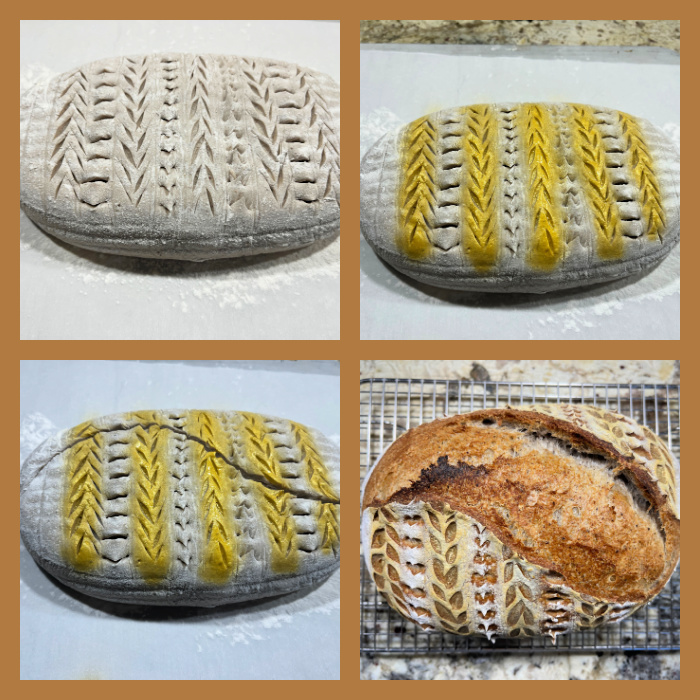
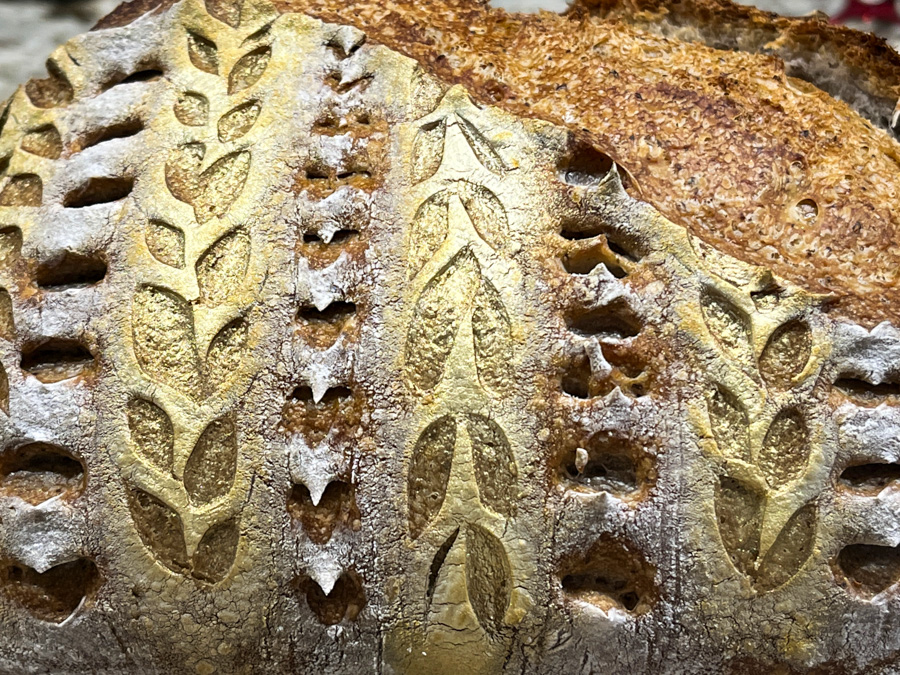
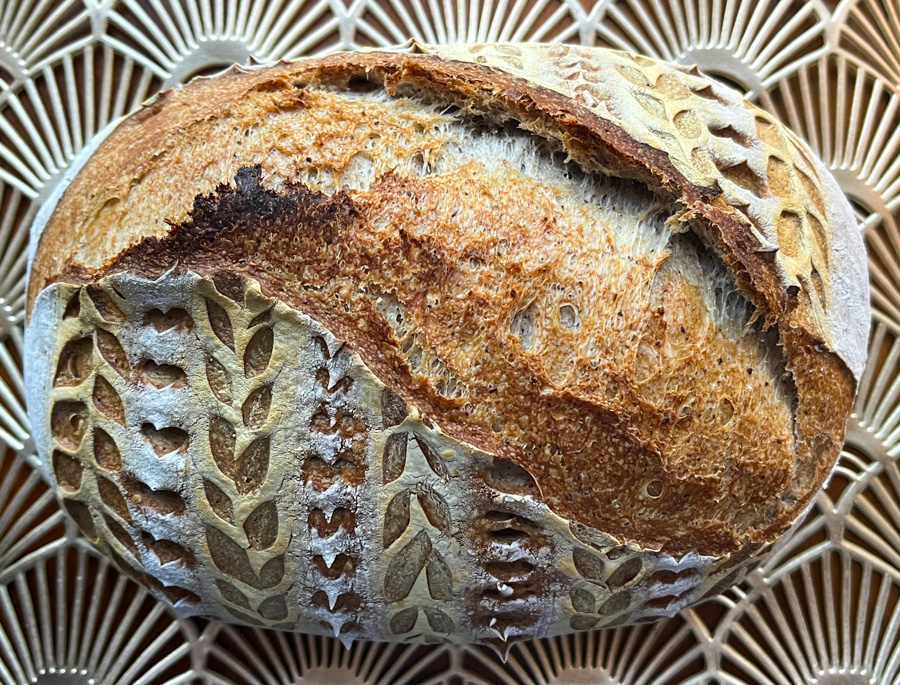
I’ve been having a lot of fun coupling the air-brush with sourdough baking. It is fast, simple and efficient to add a little bling to your bread. I used pecan flour in a small amount, because since it lacks gluten, I don’t want to risk compromising the structure of the bread.
PECAN SOURDOUGH (from the Bewitching Kitchen)
385g white bread flour 20g pecan flour 20g whole-wheat flour 8g salt 280g water 65g sourdough starter at 100% hydration
optional: gold air-brush dye
Make the levain mixture about 6 hours before you plan to mix the dough. It should be very bubbly and active.
When you are ready to make the final dough, place the water in the bowl of a KitchenAid type mixer and dissolve the starter in it, mixing with a spatula briefly, then add the three types of flour, and the salt. Turn the mixer on with the hook attachment and knead the dough for 4 minutes at low-speed all the time. If the dough is too sticky, add 1/4 cup flour, you want the dough to start clearing the sides of the bowl, but still be sticky at the bottom.
Remove from the machine, and transfer to a container lightly coated with oil, cover lightly with plastic wrap and allow it to ferment for 4 hours, folding every 45 minutes or so. After four hours bulk fermentation, shape the dough as a ball, and place, seam side up, in a lightly floured banetton. Leave at room temperature one hour, and then place in the fridge overnight, from 8 to 12 hours.
Next morning, heat the oven to 450F. Invert the dough over parchment paper, rub gently white flour on the surface. Score with the pattern of your choice and air-brush any region you want to highlight.
Bake at 450F for 45 minutes, preferably covered for the first 30 minutes to retain steam. Cool completely over a rack before slicing.
Comments: The golden tone was a little lost during baking, so I air-brushed it again once it came out of the oven. In the composite picture above you see it exactly as it came out of the oven, and below after the second round of air-brushing. A red color would have stayed better, or perhaps I could have used luster powder in copper and mixed with alcohol to use in the air-brush. Something fun to try next time. We love the flavor of this bread, the pecan flour contributes a lot and gives a little more moisture.
There is no flavor associated with the dye, at least not with the brand I use, which is this one. I buy it in the large bottle because it is a favorite that I tend to use all the time, especially in cookies.