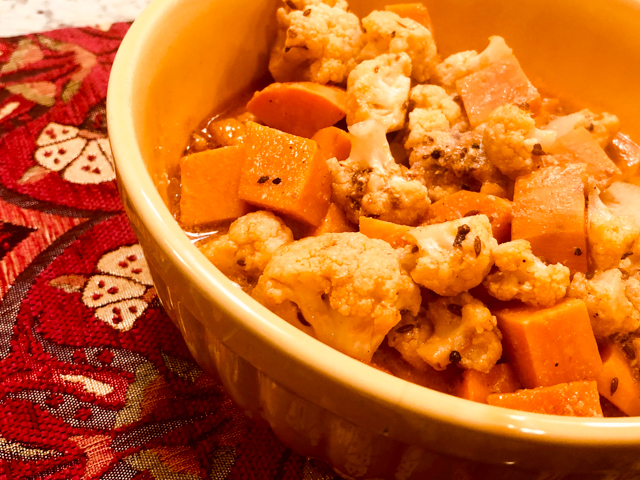
At the risk of being repetitive, I must tell you this was a total winner and yes, it will go into our regular rotation. Other veggies can be used, like potatoes, green beans, butternut squash. The method won’t change. This side dish is rich and light at the same time. Contrary to most curries that rely on heavy cream or coconut milk, the yogurt offers just that amount of creaminess you might crave. Use full-fat yogurt to make sure the sauce won’t separate.
2 tablespoons grapeseed oil, divided 1 medium size cauliflower, florets cut in small pieces 2 to 3 small sweet potatoes, cut in 1/2 inch pieces 1 teaspoon cumin seeds 1/2 inch piece fresh ginger, peeled and minced 1/3 cup tomato purée 1 tablespoon Sambal Oelek 1 tablespoon ground coriander 1 teaspoon salt 1 cup water 3/4 cup full-fat yogurt
Heat 1 tablespoon of grapeseed oil in a pan, add the cauliflower florets and sweet potatoes, a little sprinkle of salt, and cook on a medium-to-high heat until they start to brown. Remove to a bowl.
Add one more tablespoon of oil to the pan, heat and add cumin and ginger. Saute for 30 seconds to 1 minute, just until fragrant. Immediately add the tomato pure, Sambal Oelek, coriander and salt. Stir and keep in medium-heat. Mix the yogurt with water in a small bowl, then add to the pan, together with the reserved veggies.
Cover the pan and and simmer for about 20 minutes. If the sauce is too liquid, remove the lid and reduce it a bit before serving. Taste and adjust seasoning.
Comments: As I mentioned in the beginning, this recipe can be adapted to include many veggies. I would avoid zucchini because it would turn a bit too soft, although it could probably work if you roasted it and added in the very end.
The recipe was inspired by Chetna’s new book. Remember her from one of the greatest seasons of the Great British Bake Off? Chetna was often praised for her intuition with flavors. Her new book proves she is not only a great baker, but a fantastic cook. I got the idea of using yogurt as a base for the curry from one of her recipes. From her book I also recently made a delicious Tomato and Raisin Chutney.
It was my first time making chutney, and using this interesting ingredient called asafoetida. I loved it, and will definitely be making other chutneys in the future. Her book has quite a few options, all pretty unique.
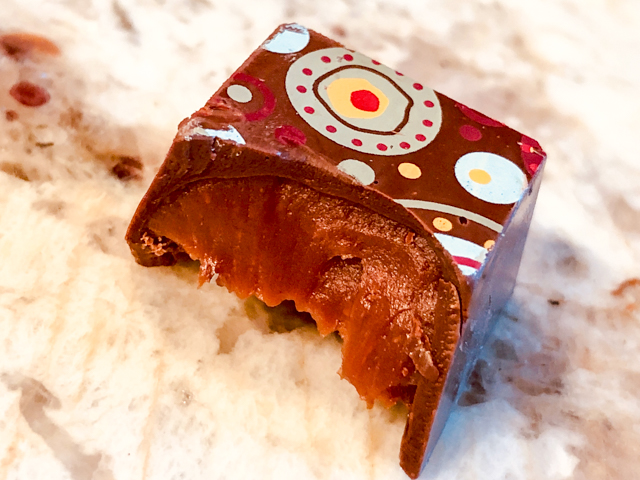
As I suspected, it did not take me too long to go back to making bonbons. This time I tried something new: transfer sheets to add a design to the top of the chocolate. As with anything new I try, there was a bit of trepidation, but I am very happy with the way they turned out, especially since it was my first time.
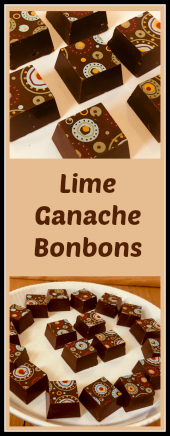
BONBONS WITH LIME GANACHE FILLING (from the Bewitching Kitchen, inspired by Making Artisan Chocolates)
equipment: magnetic mold with 24 slots (I used this one) chocolate transfer sheet (many available at etsy.com)
for making shells: 300g tempered dark chocolate 150g tempered dark chocolate for sealing
for lime ganache: 180g milk chocolate, chopped 56 g heavy cream juice and zest of 1 small lime 1 tsp corn syrup 7g butter pinch of salt 4 drops of lime oil (I used the one from this set)
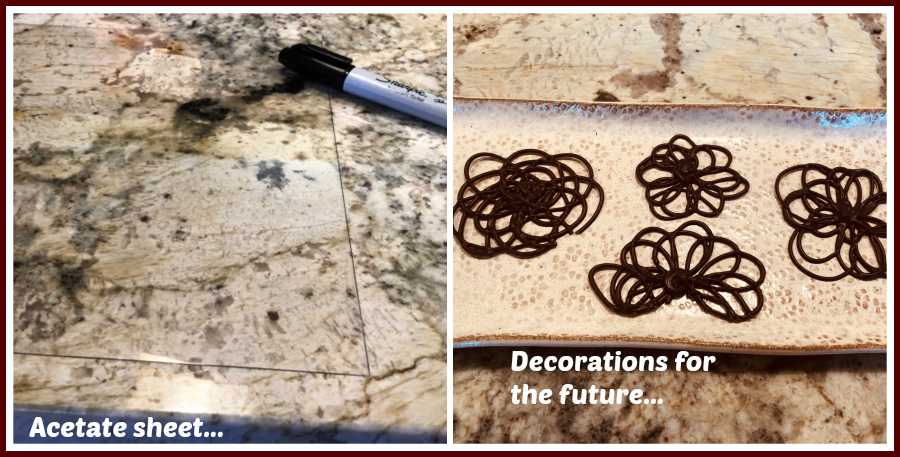
Make the shells by coating the mold lined up with the transfer sheet with 300g tempered chocolate. Use any leftover amount to make chocolate decorations or save to re-temper when closing the bonbons. Let the mold sit inverted for a couple of hours while you prepare the ganache.
Place the chopped chocolate in a bowl. Place the cream, lime zest and juice, and corn syrup in a heavy small saucepan and bring to a gentle boil . Immediately pour through a sieve over the chocolate. Let sit for 2 minutes then stir slowly to incorporate. Using a probe thermometer placed in the center of the bowl, check the temperature. Once the ganache has reached 95°F add the butter, and lime oil, and mix to combine. Pour the ganache into a piping bag and pipe into the molded shells, filling each shell three-quarters full. Gently tap the filled shells against the counter or table to release any trapped air bubbles. Let the ganache sit for a couple of hours at room temperature to dry (you can also leave it overnight).
Temper the chocolate for sealing. Right before using, warm up the edges of the open shells with a hair dryer or heat gun. You do that to make it easier for the shells to glue to the bottom. Place the tempered chocolate on top, and a little acetate sheet covering the base. Press the acetate very hard with a scraper as you hold it firmly on the top side, scraping all excess chocolate down. You can again collect it to make decorations, if you work fast. Let the shells sit at room temperature for 1 hour, then place in the freezer for exactly 15 minutes. You can also just leave them at room temperature for 24 hours for full crystallization to take place.
Remove the acetate, open the box, marvel at the design, and bravely invert the mold banging to release each bonbon.
Comments: Magnetic molds are not cheap, I admit. But they are very easy to use and once you invest in one, you can just get different designs for the transfer sheets and have a lot of fun with them. You can match the design with the filling, or go with a seasonal motif. I have a snowflake design that will be perfect for this coming winter. A very nice video on how to use magnetic molds can be found here. It helped me a lot to make this batch.
If you are a seasoned bonbon maker, nothing that I will state now will be a surprise, so feel free to skip it. But if you are new to the technique or a total “bonbon virgin”, here are some tips that I’ve learned so far, through messy mistakes.
#1 Cover the surface of your countertop with plastic wrap. I have a commercial size roll that is very convenient for that. The chocolate that drips can be easily collected from that surface and re-used.
#2 Before you start working, gather EVERYTHING you’ll need. Scraping tools to clean the molds, paper towels, small piping bags or paper cones ready to collect excess tempered chocolate, a surface to pipe chocolate decorations with any tempered chocolate you might have leftover.
#3 Prepare the set up to invert your mold above the surface of your countertop. Ideally, the tops of the shells (which will become the bottoms) should not touch anything, so sitting the tray over a cookie drying rack is not a good idea. Make sure you have the spacers or anything you use to raise up the mold set with the right placement, because once the mold is inverted and the chocolate is done dripping, your life will be much easier if it’s all ready to go.
#4 Tempered chocolate waits for no one. Make sure you won’t be interrupted by anything or anyone once you start working.
#5 Guitar sheets (acetate) are the best surface to pipe chocolate decorations, but they are hard to see once you set them over a surface. I simply run a black marker on the edges, so that the acetate margin becomes visible. Then I don’t have to worry about where to pipe. Small details help a lot when you are a newbie working with chocolate.
I am thrilled with these bonbons, but as I mentioned, it was a not a fully smooth process. I did not work fast enough with the tempered chocolate and it started to thicken and refused to pour freely from the cavities in the mold. I had to be pretty “assertive” with it, hitting the mold with a wooden spoon like crazy, sending chocolate in many directions, some not exactly over the plastic covering the countertop. I thought that the shell would end up too thick and maybe not even close perfectly, but considering the circumstances, I think it turned out pretty good.
After last year’s adventure in the tent – realizing how Paul Hollywood judges the concoctions – I became a lot more concerned with being able to clearly taste the main flavor. Case in point: if you say a bonbon is lime-flavored, it better taste like lime… I think that’s where the oil is important. It is concentrated and dissolves nicely in the ganache. Lemon extract is nice but not nearly as potent. The lime ganache had a nice citric tone, and perfectly creamy texture. I am looking forward to my next batch of bonbons, hopefully with less trepidation…
We arrive at mid-November and I must tell you that this simple recipe goes into the top 10 of this crazy year. For sure. I used the air-fryer, but it can be made in a regular oven adjusting time and temperature as I mention in the recipe. It was simple to put together, short list of ingredients, great flavor.
THAI-STYLE TURKEY & ZUCCHINI MEATBALLS WITH SPICY GLAZE (from The Bewitching Kitchen, inspired by several sources)
for the glaze: 1/4 cup rice vinegar 3/4 cup water 50g granulated sugar (about 1/4 cup) 1 tbsp soy sauce 1 tsp fish sauce (optional, but advisable) 1 tbsp sambal oelek 2 tsp cornstarch 1 Tbsp cold water
for the meatballs: 1 pound ground turkey (dark meat preferred) 1 cup zucchini, grated and squeezed as dry as possible 1/4 cup almond flour 1/4 cup cilantro leaves, minced 1 tablespoon grated fresh ginger zest of 1 lime 1 teaspoon salt ground black pepper to taste 1 egg, lightly beaten
Make the glaze. Add the vinegar, water, sugar, soy sauce, and fish sauce to a non-stick pan. Heat while stirring, until the sugar is dissolved. Simmer for about 3 minutes in medium-low heat. Add the sambal oelek, mix stirring gently until the sauce starts to thicken (about 3 minutes).
Make a slurry with the cornstarch and water, add to the sauce. Simmer, constantly stirring for another couple of minutes. The sauce will thicken quite quickly. Remove from heat, pour into a small bottle or bowl, cool and refrigerate until needed.
Make the meatballs. Combine the zucchini, ginger, cilantro, lime zest, salt, pepper, ground turkey and almond flour and mix them well with your hands. Add the beaten egg and gently finish incorporating it all. Mixture will be a bit loose. Shape as 12 golf-sized balls. Place over a baking sheet lined with parchment paper and refrigerate for 30 minutes or longer. If they seem too fragile to move around, stick them in the freezer for 10 minutes, it will not affect their roasting, maybe require just a couple of extra minutes.
Heat the air fryer to 390°F, and keep your regular oven at around 300F to keep the meatballs warm as you finish them. If not using an air-fryer, set your oven to 400F to roast the meatballs.
In the air-fryer, they will be ready in about 12 minutes, flip them over mid-way through. In a regular oven they will take 20 to 25 minutes.
As soon as the meatballs are finished cooking, coat them with the spicy glaze. If preparing them in batches, keep the first batch in a 300F oven as you cook the second batch. Serve with your favorite side dish, steamed rice and/or vegetables.
Comments: The glaze is the same kind used to dip Spring rolls made with rice paper. You can conceivably buy it ready in the grocery store, but making it from scratch is easy and the pay off is huge. If you like it really hot, add a touch of cayenne. For us, it was the perfect level of heat. Sambal oelek is a wonderful ingredient to keep in the fridge.
As to the zucchini, better avoid using a food processor to shred it. There is something about the size and texture of grating by hand that makes it perfect to combine with the meat. The only variable to keep in mind is the amount of water retained in the zucchini. Squeeze as much as you can, but consider increasing the amount of almond flour to have a consistency that allows you to form the meatballs. Use your intuition.
The meatballs can be formed in small size and served as appetizer with small lettuce leaves to grab them. We enjoyed them as a regular main dish, with white rice and sugar peas made in 5 minutes. Those must go into a future Incredibly Easy post. Stay tuned!
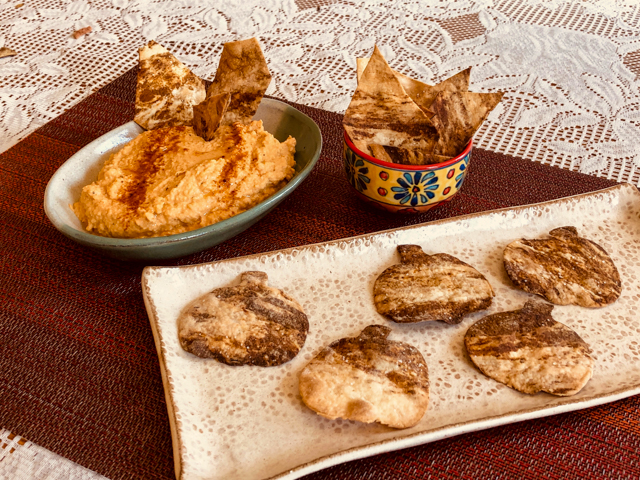
If you are like me, and learned how to ski as an adult, you are familiar with that fear as you slide downhill catching speed and see curves coming up, trees on both sides, overwhelmed by that feeling of “this might not have a happy ending.” That is pretty much what 2020 feels like. Eleven months and counting of sliding downhill feeling out of control. But 2020 cannot rob us of Thanksgiving. There are many things to be grateful for, including the fact that we are still hanging on to the ski poles, and braving the elements. To warm us all up for my favorite American holiday, the Home Bakers Collective got together to share a few recipes inspired by the season. Here is my little contribution. Pumpkin Crackers and hummus. To start your meal on a festive note.
PUMPKIN CRACKERS (from the Bewitching Kitchen)
for the white dough: 60g all-purpose flour 1 cup all purpose flour 1/4 tsp salt 1 tsp olive oil about 2 tablespoons water
for the pumpkin dough: 50g all-purpose flour 10g pumpkin flour (or all-purpose) 1 tablespoon pumpkin puree (canned) 1/4 tsp salt 1 tsp olive oil about 1 tablespoon water
Hheat the oven to 400 degrees. Prepare a baking pan by lining with parchment paper.
Make the white dough: in a small bowl, combine all ingredients and knead by hand to form a dough. Adjust water, you don’t want the dough to be too sticky. Reserve.
Make the pumping dough by mixing all the ingredients, again adjusting with more all-purpose flour in case it is too sticky (the pumpkin puree will add quite a bit of moisture). Reserve.
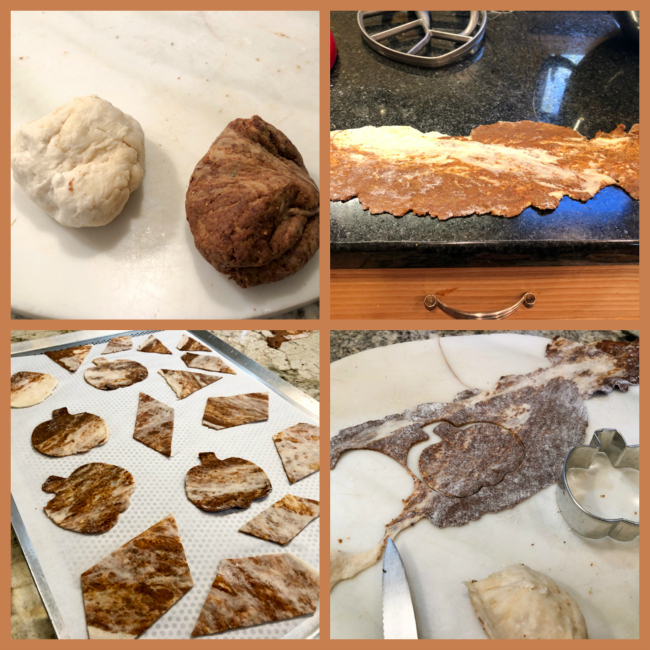
Allow both balls of dough to sit at room temperature for about 20 minutes. Divide each dough in two and marble the two colors. Roll each piece very thinly, the best way is using a pasta rolling machine or Kitchen Aid attachment, but you can definitely do it by hand. Cut in pumpkin shapes using a cookie cutter or simply in small pieces.
Bake for about 10 minutes, depending on how thin you rolled them, until they start to get brown and crisp. They will get slightly harder as they cool. Serve with your favorite dip.
Comments:Pumpkin flour is a great ingredient when you want to get flavor without adding too much moisture. It works well in cookies also. Since it contains no gluten, it behaves completely different from all-purpose flour. You will have to play a bit with the dough to get a similar texture in both the white and pumpkin components. As usual when you marble two colors, the dark will be dominant, so keep that in mind. You can always use more of the white dough and marble with 1/4 of the amount of dark. The recipe I shared makes a small batch of crackers. Since it is just me and the husband around, I did not want to make a huge amount. The recipe will double easily.
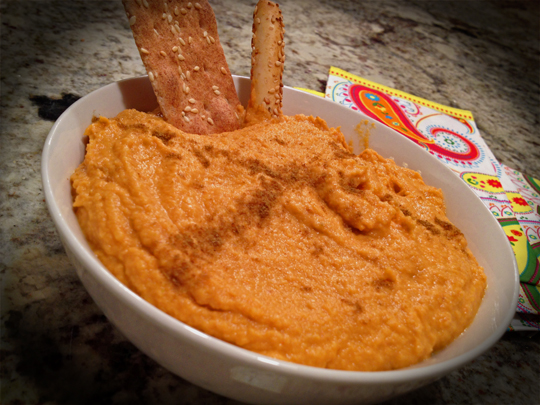
For the pumpkin hummus, visit my old blog post with a click here. And of course, stop by The Home Bakers Collective to see what everyone else decided to share. One blink of the eye and Thanksgiving will be here. Make sure you keep you and your loved ones safe.
(post might take a couple of hours to be published in the Collective, check later if not yet there)
Not too long ago I shared with you the youtube channel from Helen Rennie. I landed there through baking, but quickly realized her area of expertise covers pretty much all things cooking. Including sous-vide. The marinade I am blogging about today works wonders to finalize meat prepared by that method, but I also tried it for straight grilling and was equally blown away by how well it performed. It gives the meat a mixture of sweet, salty and umami. I now call it my default marinade for all things protein, and I bet it will do a great job on tofu. That shall be tested in the near future.
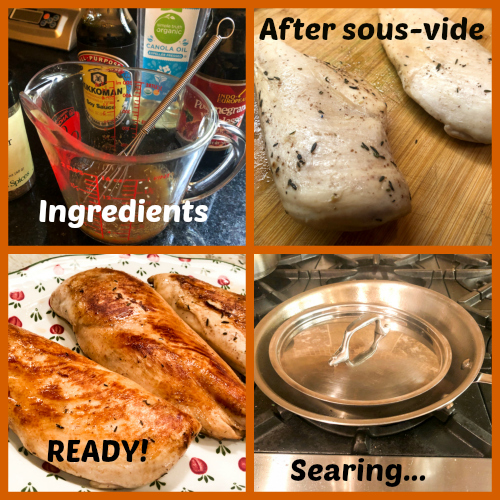
1 tablespoon soy sauce 1 tablespoon pomegranate molasses 1 tablespoon Dijon mustard 1 garlic clove, grated through a microplane (I omitted) 1 tablespoon za’atar (optional) 1/2 cup grapeseed or canola oil
Whisk all ingredients except the oil together in a small bowl until completely emulsified. Slowly add the oil, whisking constantly. Your sauce is ready to use.
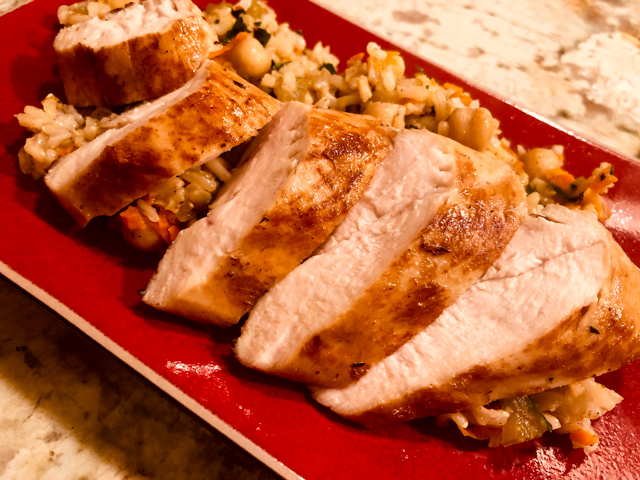
PERFECT SOUS-VIDE CHICKEN BREAST (adapted from Helen Rennie)
Place boneless, skinless chicken breasts in a bag appropriate for sous-vide cooking. Add 2 teaspoons of the magical marinade and rub it around the meat. Seal the bag and cook for 2 hours at 150F (or your preferred temperature).
Leave the meat to cool in the bag for 10 minutes. Remove from the bag, dry the surface blotting with a paper towel.
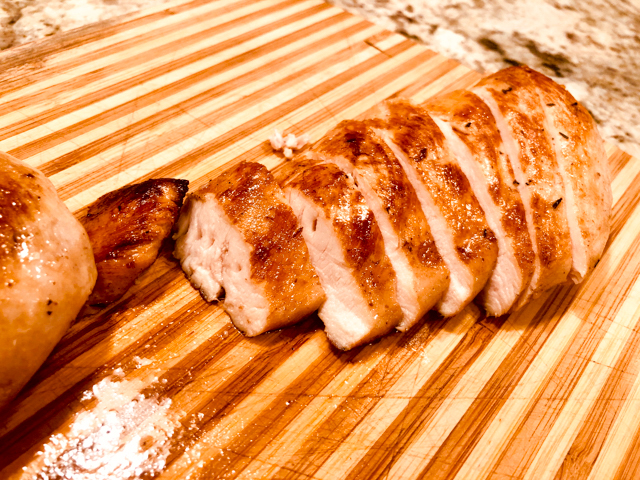
Finalize by searing on a hot skillet with a smidgen of olive oil, 30 seconds per side, pressing down with a lid. Marvel at the beautiful color, slice and serve.
Comments: The only drawback of this recipe is that it generates a bit of smoke during the final searing, and our kitchen has such poor ventilation that all fire alarms go crazy. I intend to use the outside grill next time, although it is really hard to beat the gorgeous sear from the skillet. The texture of the meat is perfect, no stringiness, it really elevates sous-vide to a new level.
Another way to use the chicken is to go from the sous-vide step into a stir-fry. I do that often, but with this magical marinade the result is even better. You can sous-vide a couple of days in advance, and just slice the meat and use it in any stir-fry recipe you are fond of.
For that version, I used zucchini, mushrooms and cashews, finishing the stir-fry with a soy-mustard sauce thickened with a touch of cornstarch. The texture of the meat is very similar to that obtained by velveting. Every week I cook some chicken breasts sous-vide and then incorporate in stir-fries. This marinade just makes it perfect.
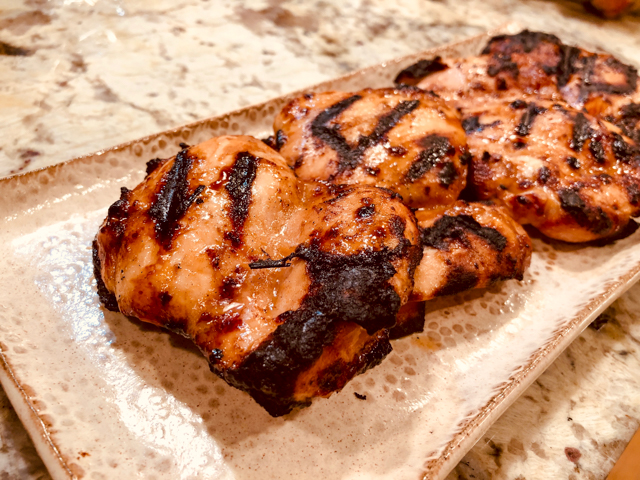
But what if you don’t own a sous-vide and don’t have any interest in investing in one? Just use the same marinade to grill meats. I share here my recent version with boneless chicken thighs. Place them with enough marinade to coat the surface well, and leave in the fridge for a few hours or even overnight. Then, remove from the bag, dry the surface, season lightly with more salt and slap on the grill…
Isn’t that a thing of beauty? So I hope I convinced you to bring that magical marinade into your life. And a sous-vide would not hurt either (wink, wink).