MINNIE MACARONS: A FUN PROJECT WITH A HAPPY ENDING

It all started with a very innocent email from my daughter-in-law. Inside a simple phrase and a single picture… The phrase: Something for you to try… The picture: a gorgeous Minnie Macaron sold at Disney. Miss G, our grand-daughter is crazy about all things Minnie. Basically, the universe conspired to make me  bake a batch.

MINNIE MACARONS
(from the Bewitching Kitchen)

for the shells:
198 g powdered sugar
113 g almond meal
113 g egg whites at room temperature
a pinch of cream of tartar
100 g granulated sugar
Pink Gel color from AmeriColor
2 drops vanilla extract

for the filling:

280 g strawberries, stems removed
140 g sugar
1 lemon, juiced
250 g white chocolate, chopped fine
1/3 cup heavy cream (about 80g)
1 tablespoon butter

to decorate:
pink bows (melted Candy Melts with a drop of pink gel color)
gold and pink sparkling sugar

Make the filling:  Prepare fresh strawberry jam by mixing strawberries, sugar and lemon juice in a small saucepan. Cook for 30 minutes, mixing every once in a while. After 30 minutes cool and refrigerate. Reserve (you will not need the full amount). You can also use store-bough strawberry jam, if more convenient. Make a white chocolate ganache by mixing very hot heavy cream with the white chocolate cut into small pieces. Mix until fully dissolved. To that, add 1/4 cup of the strawberry jam prepared before, and the butter. Mix well and refrigerate until it’s time to fill the macarons. If too thick, bring to room temperature for an hour or so, whisking a few times.

Make the pink bows: Melt about 1/3 cup candy melts in the  microwave. Whisk until smooth, add a tiny drop of pink gel color. Place in a silicone mold and freeze until solid. Un-mold the decorations, make another batch until you have enough. I made 14 Minnie macarons with this batch, and 16 regular round macarons that did not need the bow on top.

Make the shells: Line 2 or 3 heavy baking sheets with parchment paper or Silpat mats. Layer the powdered sugar and almond meal   in a food processor. Pulse until the mixture looks like fine meal, about 15 seconds. Pass through a sieve and transfer to a small bowl. Set aside.

Place the egg whites and pinch of cream of tartar in the bowl of a stand mixer fitted with the whisk attachment. Make sure that the bowl and the whisk are impeccably clean. Starting on low-speed, whip the whites with the cream of tartar until they look like light foam. The whites should not appear liquid. The foam will be light and should not have any structure.

Slowly rain in the granulated sugar, trying to aim the stream between the whisk and the side of the bowl. Turn the speed up to medium-high. Continue to whip the meringue until it is soft and shiny. It should look like marshmallow creme. Add the gel color and the vanilla. Staying at medium-high speed, whip the egg whites until the mixture begins to dull and the lines of the whisk are visible on the surface of the meringue. Check the peak. It should be firm. Transfer the whites to a medium bowl.

Fold in the almond meal mixture in three increments. Paint the mixture halfway up the side of the bowl, using the flat side of a spatula. Scrape the mixture down to the center of the bowl. Repeat two or three times, then check to see if the mixture slides slowly down the side of the bowl. Divide the mixture (eyeballing is fine) in two piping bags, one fitted with a 1/2 inch piping tip, the other fitted with a 1/4 inch tip. Pipe macaron rounds using the bigger tip, filling one full tray. Pipe small rounds as ears on each round using the smaller tip. Finish one full tray before starting another one.

Slam each sheet hard four to six times on the counter. Then fist bump each end of the sheet’s underside twice. If using sparkling sugar, sprinkle over the macarons. Let the unbaked macarons dry until they look dull but not overly dry. Drying time depends on humidity. Ina dry climate, the macarons can dry in 15 to 20 minutes; in a humid climate, it can take 35 to 40 minutes.

While the macarons are drying, heat the oven to 300 F (170 C/gas mark 3). Bake one sheet at a time on the middle rack. Check in 11 minutes. If the tops slide, then bake for 2 to 3 more minutes. The macarons should release without sticking. Check one or two. If they stick, put them back in the oven for 1 to 2 more minutes. Let the macaroons cool for 10 minutes before removing from the pan.

Assemble the macarons: find two macarons similar in size and add a good amount of filling to the bottom of one of them. Place the other on top and squeeze gently to take the filling all the way to the edge.  Glue to each macaron one little pink bow using melted white chocolate.

Store in the fridge for 24 hours for perfect texture.

ENJOY!

to print the recipe, click here

Comments: The macarons sold at Disney seem quite large, I decided to make them smaller. As to the filling, I opted for strawberry and white chocolate ganache for two reasons. First, Miss G. loves strawberries, it is one of her favorite fruits. Second, a ganache probably stands shipping better than buttercream. I used a lower proportion of heavy cream to make sure the ganache would set, especially considering the added strawberry jam.  I think a little bit of red food color to the filling would have been nice, but I only thought about that when I was done assembling them. Oh, well…

I got a pretty cute silicone mold at amazon.com to make the bows. You can use fondant, real chocolate, or candy melts, whatever you prefer. I have a bit of fondant-phobia, and never worked with it, so Candy melts seemed like a safer option. Worked like a charm. The only problem is having to make several batches, but each needed only 10 minutes in the freezer to un-mold properly. I made the bows the day before and kept them all frozen in a little plastic bag. I know, so organized!  Who could imagine that?

I made half the batch as regular macarons (large image of the composite photo above), and half Minnie-shaped. Those who are very skilled with a piping tip might be able to get by piping the ears with the same size tip as the face. I decided to play it safe, and poured some of the batter in a piping bag fitted with a smaller tip. For the body of the macaron I used a Wilton 2A tip, for the ears, a Wilton 12. With a more complex shape, it is important that the macaronage step be performed correctly.

My tip for perfect macaronage:  when I think I am almost at the right point of deflating the almond-meringue mixture, I get a teaspoon of batter and drop it on parchment paper. I lift the teaspoon, and the little blob that forms must disappear in about 20 seconds. If it does, the batter is ready, if it is still visible, I fold a few more times. Remember that you can always fold a few more times, but if you go overboard, the batter will be ruined. The macarons will spread too much, spread too thinly and it will be impossible to keep the Minnie shape as piped. Plus, they won’t form nice feet.  At the very least you will need a box of Kleenex. If the situation persists, therapy might be your only option.

I cannot tell you how happy I was with this project! It was fun to plan, to get the tools for the job, to make it, and to imagine the look on Miss G’s face when she opened the box and found a bunch of Minnie cookies inside. The filling turned out just as I expected, sweet, but with the right amount of tartness given by the jam, which by the way, I made with a lot less sugar than store-bought versions.

AND FOR THAT HAPPY ENDING….

ONE YEAR AGO: Nigella Lawson in the Bewitching Kitchen

TWO YEARS AGO: Walnut-Raisin Bran Muffins

THREE YEARS AGO: Gingersnaps with White Chocolate Chips

FOUR YEARS AGO: Turkey Chili with Almond Butter

FIVE YEARS AGO: Secret Recipe Club: Leek and Cheese Tart

SIX YEARS AGO: Secret Recipe Club; Triple Chocolate Brownies

SEVEN YEARS AGO: Shaved Asparagus Salad

EIGHT YEARS AGO: Indonesian Ginger Chicken

SaveSave

SaveSaveSaveSave

SaveSave

SaveSave

SaveSave

SaveSave

SaveSave

SaveSave

SaveSave

SaveSave

SaveSave

SaveSave

SaveSave

SaveSave

SaveSave

SaveSave

SaveSave

SaveSave

SaveSave

SaveSave

ROASTED BUTTERNUT SQUASH WITH CASHEW NUTS

Recipes for roasted veggies are always so similar, coat veggies with olive oil, season any way you particularly like, roast. Done. But this one has a little unexpected (to me) twist. Instead of olive oil, you’ll use butter. I know, so out of fashion, so frowned upon by the Health Police. This method was featured on a recent America’s Test Kitchen TV show, and I was obviously intrigued. I modified it a bit to our taste. The butter helps that gorgeous browning and adds a nutty flavor that goes well with the cashews.  It all works beautifully.

ROASTED BUTTERNUT SQUASH WITH CASHEW NUTS
(inspired by America’s Test Kitchen)

1 medium butternut squash, peeled and cut in slices (about 2 pounds)
3 tablespoons unsalted butter, melted
½ teaspoon salt
½ teaspoon ground paprika
for cashew topping:
1 tablespoons butter
⅓ cup cashew nuts
2 tsp fresh lemon juice
salt and pepper to taste

Heat oven to 425 degrees.

Toss squash slices with melted butter, season with  salt and paprika until evenly coated. Arrange seasoned slices on a rimmed baking sheet, if possible in a single layer, but some overlapping is ok. Roast for about 25  minutes, flip pieces and roast 15 minutes longer.

While squash roasts, melt butter with cashew nuts in a small skillet.  Cook until cashews start to get golden, keep a close eye on the pan. It will burn if you leave it cooking for longer than a couple of minutes. Remove skillet from heat and stir lemon juice. Season lightly with salt and pepper.

Transfer roasted squash to a serving dish, mix with the sautéed cashews and serve.

ENJOY!

to print the recipe, click here

Comments: I talked about this recipe on my Facebook page, and a dear friend mentioned that she had a similar dish at a restaurant and loved it, but in that preparation they included crumbled feta on top. I know exactly how I’ll make it next time, and urge you to do so if you make it yourself. Sounds perfect to me.

The butter definitely makes the roast butternut quite special, as it cooks in the oven it gets that “browned butter” quality that is so wonderful both in savory and sweet dishes. I know many people are anti-butter these days, but there’s nothing wrong with using it every once in a while in a dish like this one. Totally worth it.

ONE YEAR AGO: Mississippi Roast and the Open Mind

TWO YEARS AGO: Walnut-Raisin Bran Muffins

THREE YEARS AGO: A Star is Born!

FOUR YEARS AGO: Chestnut Flour Sourdough Bread

FIVE YEARS AGO: Kinpira Gobo and Japanese Home Cooking

SIX YEARS AGO: Walnut Sourdough

SEVEN YEARS AGO: Thai Chicken Curry

EIGHT YEARS AGO: Zen and the art of risotto


SaveSave

SaveSave

SaveSave

SaveSave

SaveSave

SaveSave

SaveSave

SaveSave

SOUP SATURDAY: SPRING HAS SPRUNG!

Third Saturday of the month, it’s time to share a post about soup. For this month our hostess Camilla picked a very nice theme: Spring Has Sprung… we should make and blog about a soup to celebrate a favorite season of mine. Unfortunately this year spring is taking its time to enter our universe in all its colorful glory, but little by little the harshness of the winter is fading away.  My soup centers on zucchini, makes it a bit more toothsome with a nice helping of cauliflower, and more mysterious with a swirl of tahini right before serving. Mysterious? Quite an adjective for foodstuff. But if you don’t tell your guests what’s the “unusual” ingredient in the soup, they will never be able to guess. So mysterious it is…

ZUCCHINI SOUP WITH TAHINI
(from the Bewitching Kitchen)

1 tablespoon olive oil
2 small shallots, minced
4 medium zucchini, sliced
1/4 of head of cauliflower, florets only
salt and pepper to taste
1 lemon, juiced (divided)
2 to 3 cups water
1/4 cup tahini
1/4 cup yogurt
additional yogurt and Sriracha for serving (optional)
toasted sesame seeds for garnish

Heat the olive oil in a large stockpot. Add the shallots, season lightly with salt and pepper, cook until fragrant. Add the zucchini and cauliflower, saute in medium-high heat until soft and the cauliflower starts to develop some golden color.

Add the water, half of the lemon juice, season with salt and pepper, cover the pan and reduce heat. Simmer for about 20 minutes.  Reserve 1 cup of liquid. Transfer the vegetables to a blender or food processor, and blend until fully smooth.  Return the pureed soup to the pan, add the reserved liquid until it reaches a consistency you like. Add yogurt, tahini, mix, and simmer just to heat through. Add the remaining lemon juice just before serving.

If desired, add a dollop of yogurt and Sriracha on the serving bowl, and sprinkle with toasted sesame seeds.

ENJOY!

to print the recipe, click here

Comments: I am thrilled to participate of this month’s soup event. I was not sure I could make it, as – putting it mildly – life has been a bit stressful lately. But here I am to share a delicious soup which was perfect  for a Friday lunch with a lot of sun and even more wind. I tell you, we get constant reminders that we live in tornado alley. When the wind blows in Kansas, it doesn’t hold anything back. Note to self: get some ruby slippers…

To see the soups my virtual friends cooked for this month’s event, click on the link at the end of the post.

Wendy, thank you for organizing Soup Saturday Event,

and

Camilla, thanks for hosting!

ONE YEAR AGO: Black Sesame Macarons

TWO YEARS AGO: Fine Tuning Thomas Keller

THREE YEARS AGO: Cauliflower Tortillas

FOUR YEARS AGO: Majestic Sedona, Take Two

FIVE YEARS AGO: Secret Ingredient Turkey Meatballs

SIX YEARS AGO: Swedish Meatballs and Egg Noodles

SEVEN YEARS AGO: Italian Easter Pie

EIGHT YEARS AGO: Black Olive Bialy


SaveSave

SaveSave

SaveSave

SaveSave

SaveSave

SaveSave

SaveSave

SaveSave

https://static.inlinkz.com/cs2.js

SaveSave

SaveSave

SaveSave

SECRET RECIPE CLUB REUNION 2018

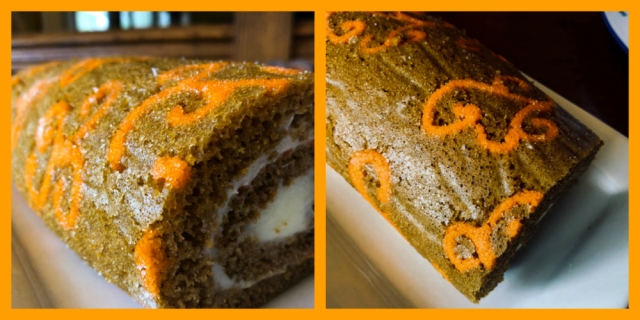
Talk about a flash back!  Those who follow my blog for a while might remember my favorite group virtual event, The Secret Recipe Club.  Food bloggers were paired in secret, and had a few weeks to stalk the assigned blog, pick a recipe and blog about it on Reveal Day. Every post would go live at the exact same time, midnight of the first Monday of the month, New York time. I was a member for years, and had a lot of fun with it. Not only for the cooking aspect, but for its social component. SRC had it’s last appearance in November 2016, but our beloved organizer, Sarah, had the idea of a special encore that celebrates the 10th year anniversary of its creation. So here we are, one final time! I was assigned pure royalty in food blog shape. I got Sarah’s food blog, Fantastical Sharing of Recipes!  Can you believe it? The queen behind my favorite event!  I was assigned her blog in the past as pretty much every member rotated through every blog in the group.  At that time, I made a fantastical recipe as you can see here.  Now I share another fantastical recipe, a Carrot Cake Roll with Cream Cheese Icing. OMG OMG OMG. Because this is such a special occasion, I felt like dressing it up a little, and tried my hands at adding a pattern on the surface of the cake. One word: THRILL!

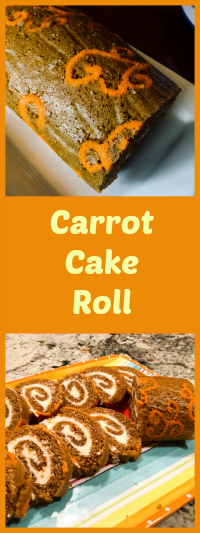
CARROT CAKE ROLL
(from Fantastical Sharing of Recipes)

for the decoration (optional):
50g  butter, softened
50g powdered sugar
50g  egg whites
50g  all-purpose flour
orange food coloring (I used gel)

for the cake:
3 eggs
2/3 cup granulated sugar
1 tsp. vanilla extract
1/2 tsp. salt
1 tsp. baking powder
1 tsp. ginger
1/4 tsp. nutmeg
2 tsp. cinnamon
3/4 cup flour
2 cups shredded carrots (about 2 medium carrots, pat dry)
Powdered sugar

for the filling:
6 oz. cream cheese, at room temp
4 Tbsp. unsalted butter, at room temp
2 cups powdered sugar
1 tsp. vanilla

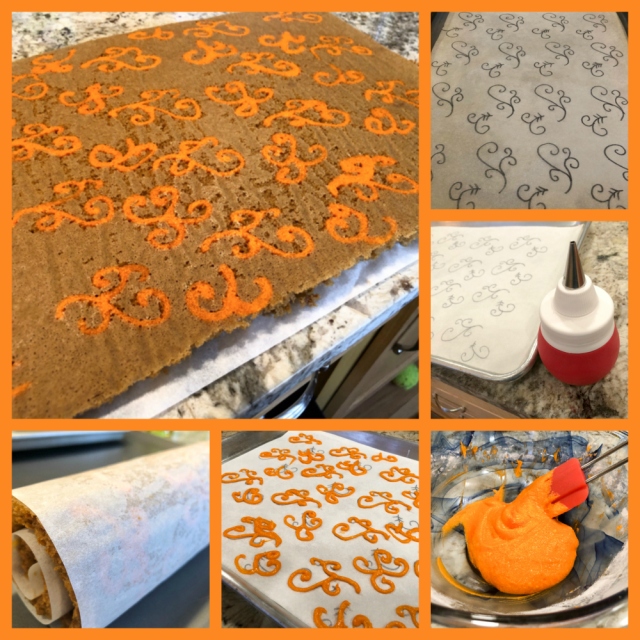
Make the piping decoration by beating the butter with powdered sugar in a small bowl until fully combined. I used a hand-held electric mixer. Add the egg whites and beat for a couple of minutes. Add the flour and mix by hand with a spoon, add a couple of drops of orange food color.  Reserve.

Draw the design you want to have on the surface of the cake with a pencil on parchment paper that fits a half-sheet baking pan. Invert the paper so that the pencil mark is at the bottom. Pipe the icing using a very thin piping tip. Freeze the whole tray with the decoration for at least one hour. When the time is almost up, prepare the cake batter.

Heat the oven to 350F.

Beat eggs on high-speed for 5 minutes until they are dark yellow and frothy. Add sugar and vanilla and beat. In a medium bowl, whisk together salt, baking powder, ginger, nutmeg, cinnamon, and flour. Stir dry ingredients into wet until just combined. Then stir in carrots.

Remove baking sheet from the freezer, and quickly spread the batter on top of the decorations. Gently bang the pan so that the batter gets well into the design.  Bake for about 15 minutes until done, it should spring back gently when you press your finger at the center of the cake.

You will need to flip the cake twice, first time the pattern will be up, but you will need to flip it again so that it will be down, and once the cake is rolled, it will be on the outside surface. On the second time, flip it over parchment paper sprinkled with sugar. Roll the cake while still warm, and let it cool completely, about one hour.

Make the filling: beat butter and cream cheese together until smooth. Add powdered sugar and vanilla, and beat again until nice and smooth. Unroll cake, spread filling evenly, then roll it back. Chill in fridge for at least one hour to firm it up.

ENJOY!

to print the recipe, click here

Comments: Public thank you goes for my dear friend Gary, Patissier Extraordinaire, for his advice on the piping technique. I used my new gadget, the silicone bulb with a very fine piping tip (featured here), and was pretty pleased with the way it worked. The amount of piping icing made would be enough to cover three cakes, but particularly on my first time doing it, I decided that having extra icing was better than not enough. And, by the way, this was also my first time making a rolled cake!  I was quite happy with the outcome, although as usual, there is room for improvement. A small crack happened in one side of the cake, but it was not too bad. Considering the types of tragedy I’ve endured during cake baking, this was nothing.

Our departmental colleagues loved the cake! It was very moist, warm due to all spices, and the cream cheese filling takes it over the top. I cannot wait to try another type of rolled cake and a bit more elaborate patterns. The trickiest part of this recipe was flipping the cake twice, I think it would be easier to wait maybe a few more minutes before doing that, the crack actually happened during flipping, not rolling. The cake was a bit too warm and still very moist from the oven. Live and learn.

Sarah, I am so thrilled I got your blog for this special reunion!  
Really felt like closing the Secret Recipe Club chapter with a golden key!

I invite all my readers to browse through the recipes posted by all members of SRC following the link at the end of my post.

ONE YEAR AGO: Parsnip and Tomato Soup

TWO YEARS AGO: A Retro Dessert

THREE YEARS AGO: Cauliflower Tortillas: Going low-carb and loving it!

FOUR YEARS AGO: Clementines in Cinnamon Syrup

FIVE YEARS AGO: In My Kitchen, April 2013 

SIX YEARS AGO: Thrilling Moments

SEVEN YEARS AGO: Maple-Oatmeal Sourdough Bread

EIGHT YEARS AGO: Pork Trinity: coffee, mushrooms, and curry

SaveSave

SaveSave

SaveSave

SaveSave

SaveSave

SaveSave

SaveSave

SaveSave

SaveSave

SaveSave

SaveSaveSaveSave

SaveSave

SaveSave

SaveSave

GILDING THE SOURDOUGH LOAF

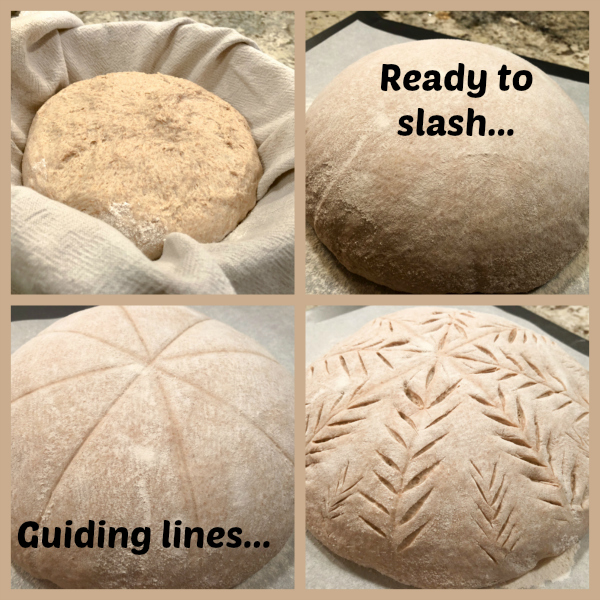
Two sourdough posts in a row! But this one brings back the subject to its most classic use: a rustic bread made less rustic with a razor blade and a ton of fun. Here is my baby, all dressed up for party!

CLASSIC SOURDOUGH BREAD
(adapted from Anna Gabur)

for the levain:
120g water
40g starter
40g whole-wheat flour
80g all-purpose white flour

for the final dough:
Half of the levain above (about 140g)
375g water
50g spelt flour
150g whole-wheat flour
300g bread flour
10g salt dissolved in 15g water

Make the levain mixture about 6 hours before you plan to mix the dough. It should be very bubbly and active.

When you are ready to make the final dough, dissolve half the prepared levain in water (375g), then add all flours. Save the remaining levain in the fridge for later.  Mix well with your hands until a shaggy dough forms.  Leave it at room temperature for 30 minutes.

Add the salt dissolved in the remaining water, and incorporate by folding repeatedly the dough over itself. Now let the dough ferment for a total of 4 hours, folding a few times every 40 minutes. You don’t have to be precise, but allow the full four hours fermentation to take place.

Shape as a round ball and place inside a banetton covered with a cloth and lightly floured. Keep it in the fridge overnight, from 8 to 12 hours.

Next morning, heat the oven to 450F.

Invert the dough on a piece of parchment paper and lightly, very lightly coat it with flour, then rub all over the surface with the palm of your hand. Score the guiding lines according to the desired pattern, use a razor blade to slash the dough with firm, short slashes.

Bake at 450F for 45 minutes, preferably covered for the first 30 minutes to retain steam.  Cool completely over a rack before slicing.

ENJOY!

to print the recipe, click here

Comments: I love a rustic sourdough that is left untouched, opens up in the oven according to its own desire, or one that gets a very basic crisscrossed slash at the top to get things started. But I must admit it’s nice to work a little magic on the crust. However, my previous attempts failed to match my expectations. In other words, I had issues to transfer to the razor blade the image I had in my mind for the baked loaf.

A couple of weeks ago I found an online course taught by a gorgeous woman named Anna Gabur on artistic bread slicing. I asked myself, do I really need this? Not sure what happened, but before I could give an honest answer to that question, my paypal account was activated and the online class was playing on my screen. Very odd. Must be a computer virus or something. At any rate, I am very glad this odd phenomenon happened, because I loved the class, learned a lot and was very pleased with the results of my very first attempt. I followed her design very closely, but maybe at some point I’ll feel confident to come up with my own creations (fingers crossed).

Between you and me, I can hardly believe this bread came out of our own oven… I was in total awe when I opened the lid and saw the oven spring, the pattern, the crust starting to get golden. A real baker’s thrill…

I highly recommend that you get Anna’s course if you are passionate about bread baking. You don’t need to make a sourdough, any bread formula will work, as long as it’s not very high in hydration. You need some structure to be able to slash it, so high-hydration formulas won’t work as well. Also, it helps a lot if the bread gets its final fermentation in the fridge, so that its surface is tight and easier to slash. My loaf went straight from fridge to pre-heated oven, it took me less than 10 minutes to finish the slashing, and I bet most people can do it much faster.  You’ll need a regular razor blade that you will hold between two fingers, not using a lame holder. And, according to Anna, one blade should last you for about 5 loaves. It needs to be truly sharp. She makes it seem so easy, it is a pleasure to watch her in real-time making a very elaborate design on the loaf. You can also marvel at all her photos on Instagram.

The bread had excellent taste and crust, the crumb was not super open, but that was expected from a bread with a lower hydration level.

Anna has quite a few articles about bread baking written on her blog, like this one that goes over basics of artistic slashing, and this one that shares her favorite bread formula. If you’d like to sign up for her online tutorial, follow this link.    She lives in Moldova, and often has to adapt her bread baking for the types of flour she can find. I often get a bit upset with “trendy” bread cookbooks that insist you must obtain the flour that was milled 4 days ago under a full moon, otherwise don’t bother making the recipe.   All you truly need is flour, water, a bit of yeast, a touch of salt, and the right amount of passion… Anna’s masterpieces prove this point!


ONE YEAR AGO: Lolita Joins the Bewitching Kitchen

TWO YEARS AGO: Cashew Cream Sauce

THREE YEARS AGO: Blood Orange Margaritas

FOUR YEARS AGO: Smoked Salmon Appetizer

FIVE YEARS AGO: Clementine Cake

SIX YEARS AGO: Springtime Spinach Risotto

SEVEN YEARS AGO: The end of green bean cruelty

EIGHT YEARS AGO: Torta di Limone e Mandorle

SaveSave

SaveSave

SaveSave

SaveSave

SaveSave

SaveSave

SaveSave

SaveSave

SaveSave

SaveSave

SaveSave

SaveSave

SaveSave

SaveSaveSaveSave

SaveSave

SaveSave

SaveSave

SaveSave

SaveSave

SaveSave

SaveSave

SaveSave

SaveSave

SaveSave

SaveSave

SaveSave