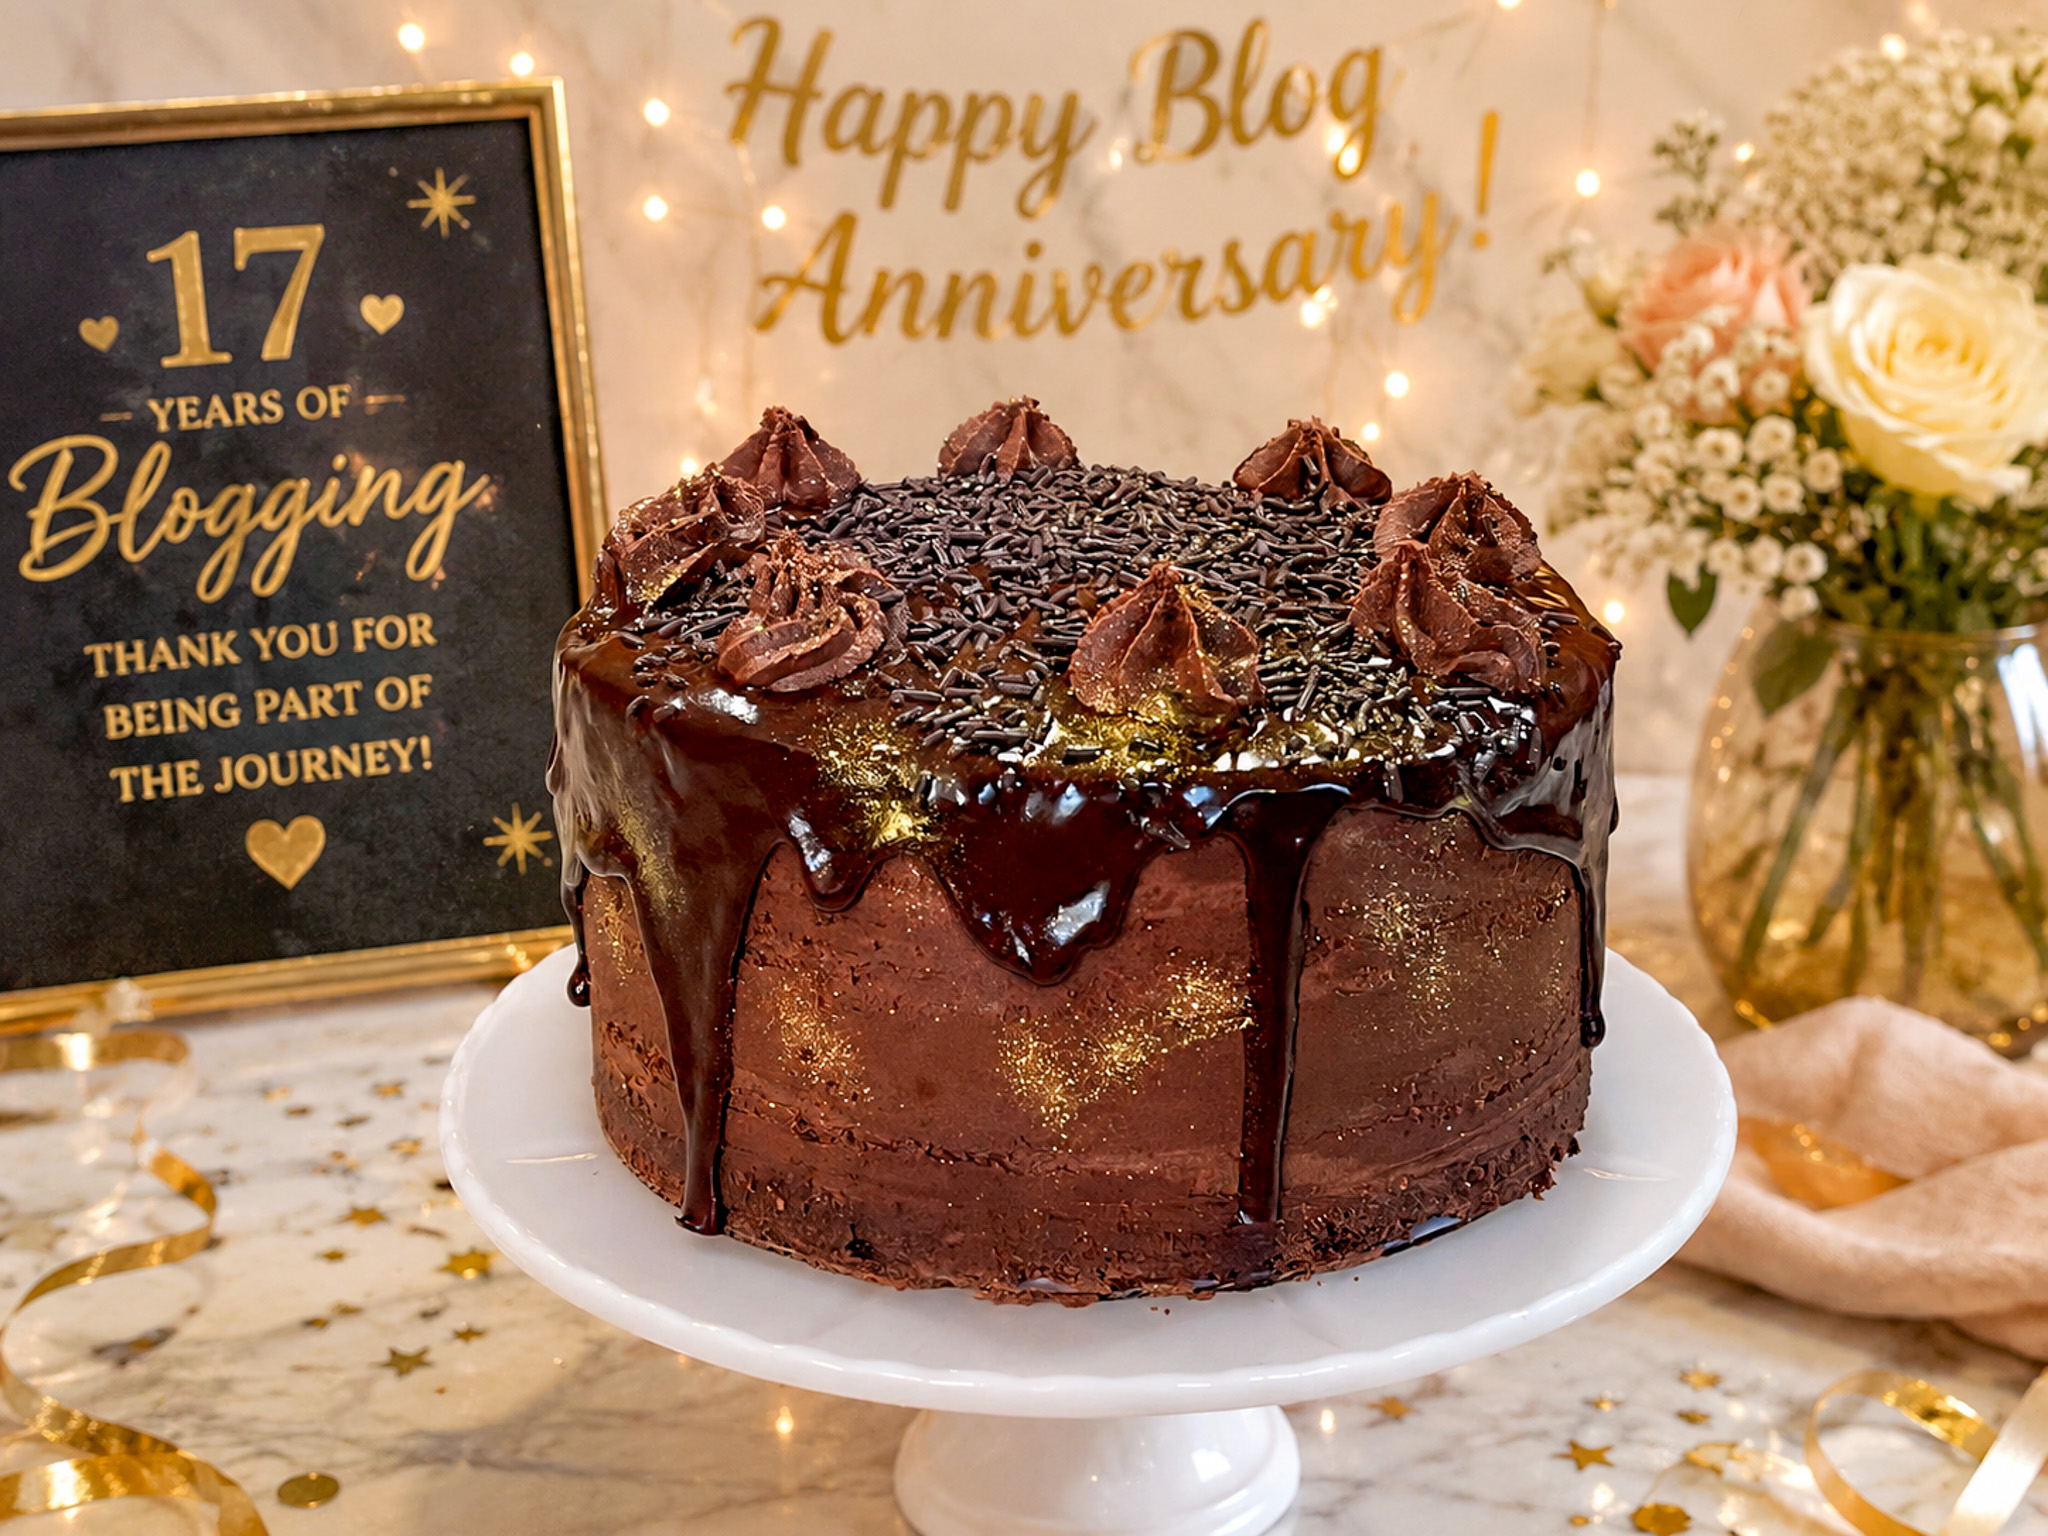
Sometimes I cannot quite believe that I’ve been doing this for seventeen years, but what is even more amazing to me, is that I still feel a wonderful thrill every time I hit “publish” on a new post. And yes, I realize I’ve said that before, after all, it’s been seventeen years of cooking and sharing joy. To celebrate the occasion, I baked a cake, but to be completely honest, there were a few issues, so I am not sharing the recipe. It comes from a pretty well-known cookbook. Enough said. Chocolate layer cake, with fudge buttercream and ganache drip. The issue was the buttercream, but I did my best to work around the problem.
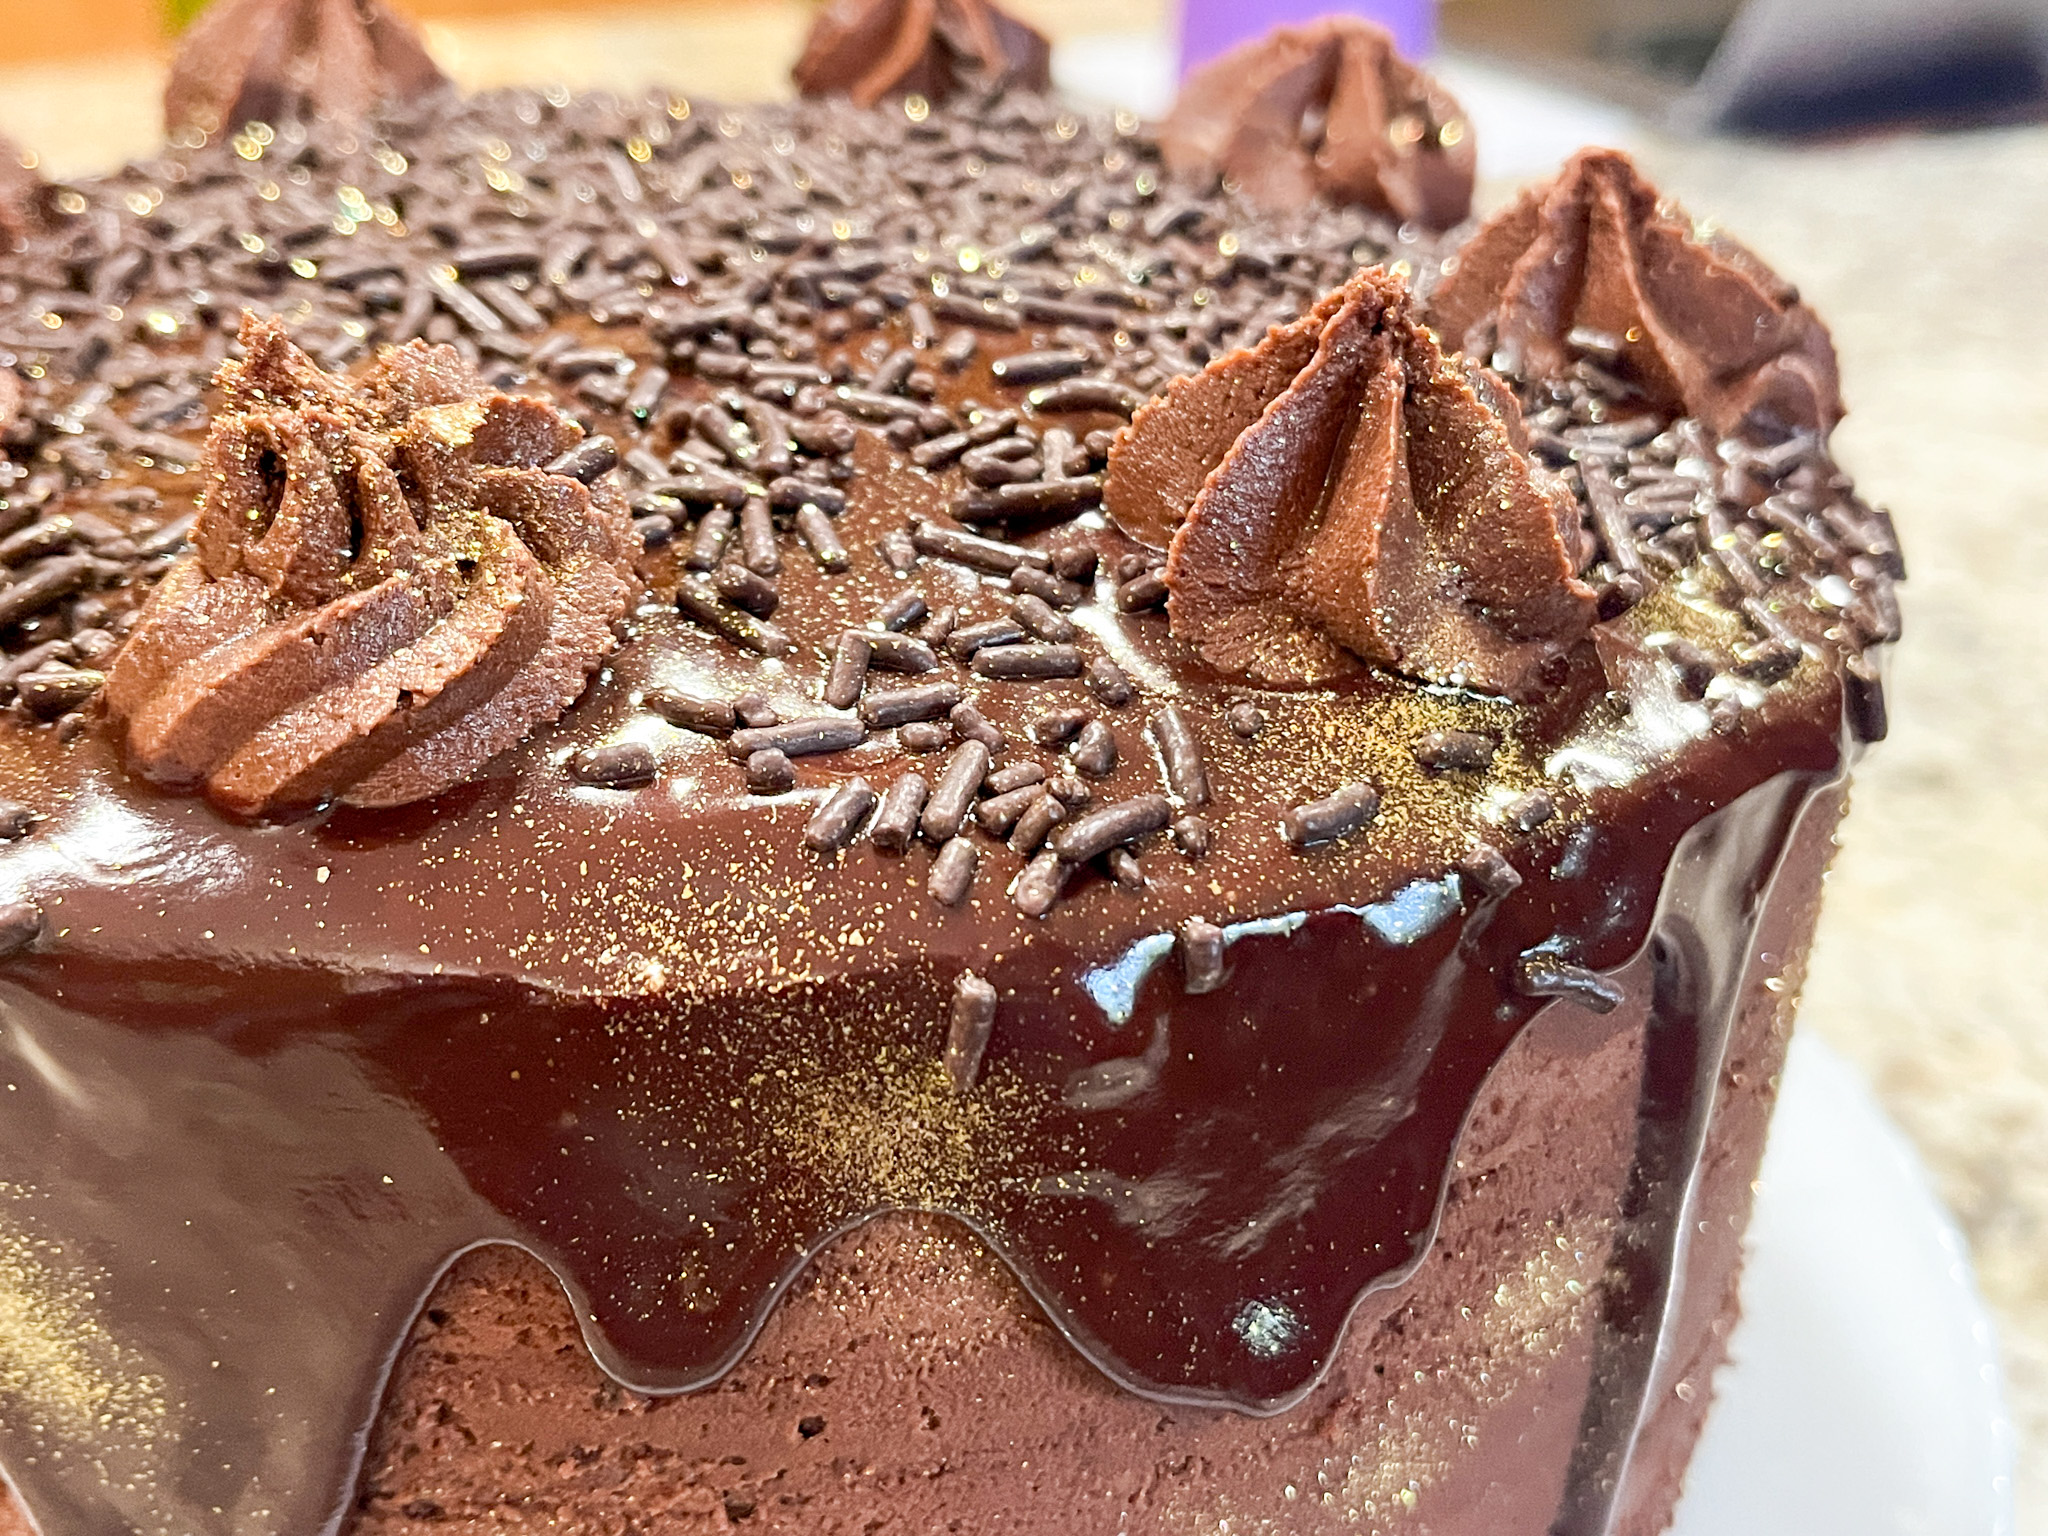
Four layers of chocolate cake, filling of fudge buttercream with bits of shortbread cookies, and a drizzle of caramel sauce. After frosting the cake, a dark chocolate ganache was poured on the flat top, allowing it to drip down the sides. A little extra buttercream to make rosettes on top, chocolate sprinkles and gold for good luck.
The cake was donated whole, so I cannot show the inside, but I heard it was very rich and delicious. As to the journey of blogging, mine will definitely keep going. Phil and I are officially retired for almost a full month, and want to expand a bit my horizon on cooking in general, attempting recipes that are a bit more exotic, maybe. Let’s see how it goes. If you’ve been here from the very beginning, thank you for hanging around for so long. If you are new to my little virtual spot, I hope you’ll find plenty of things to read about and maybe make in your own kitchen. Make it bewitching. And let’s step into the 18th year of food blogging, shall we?
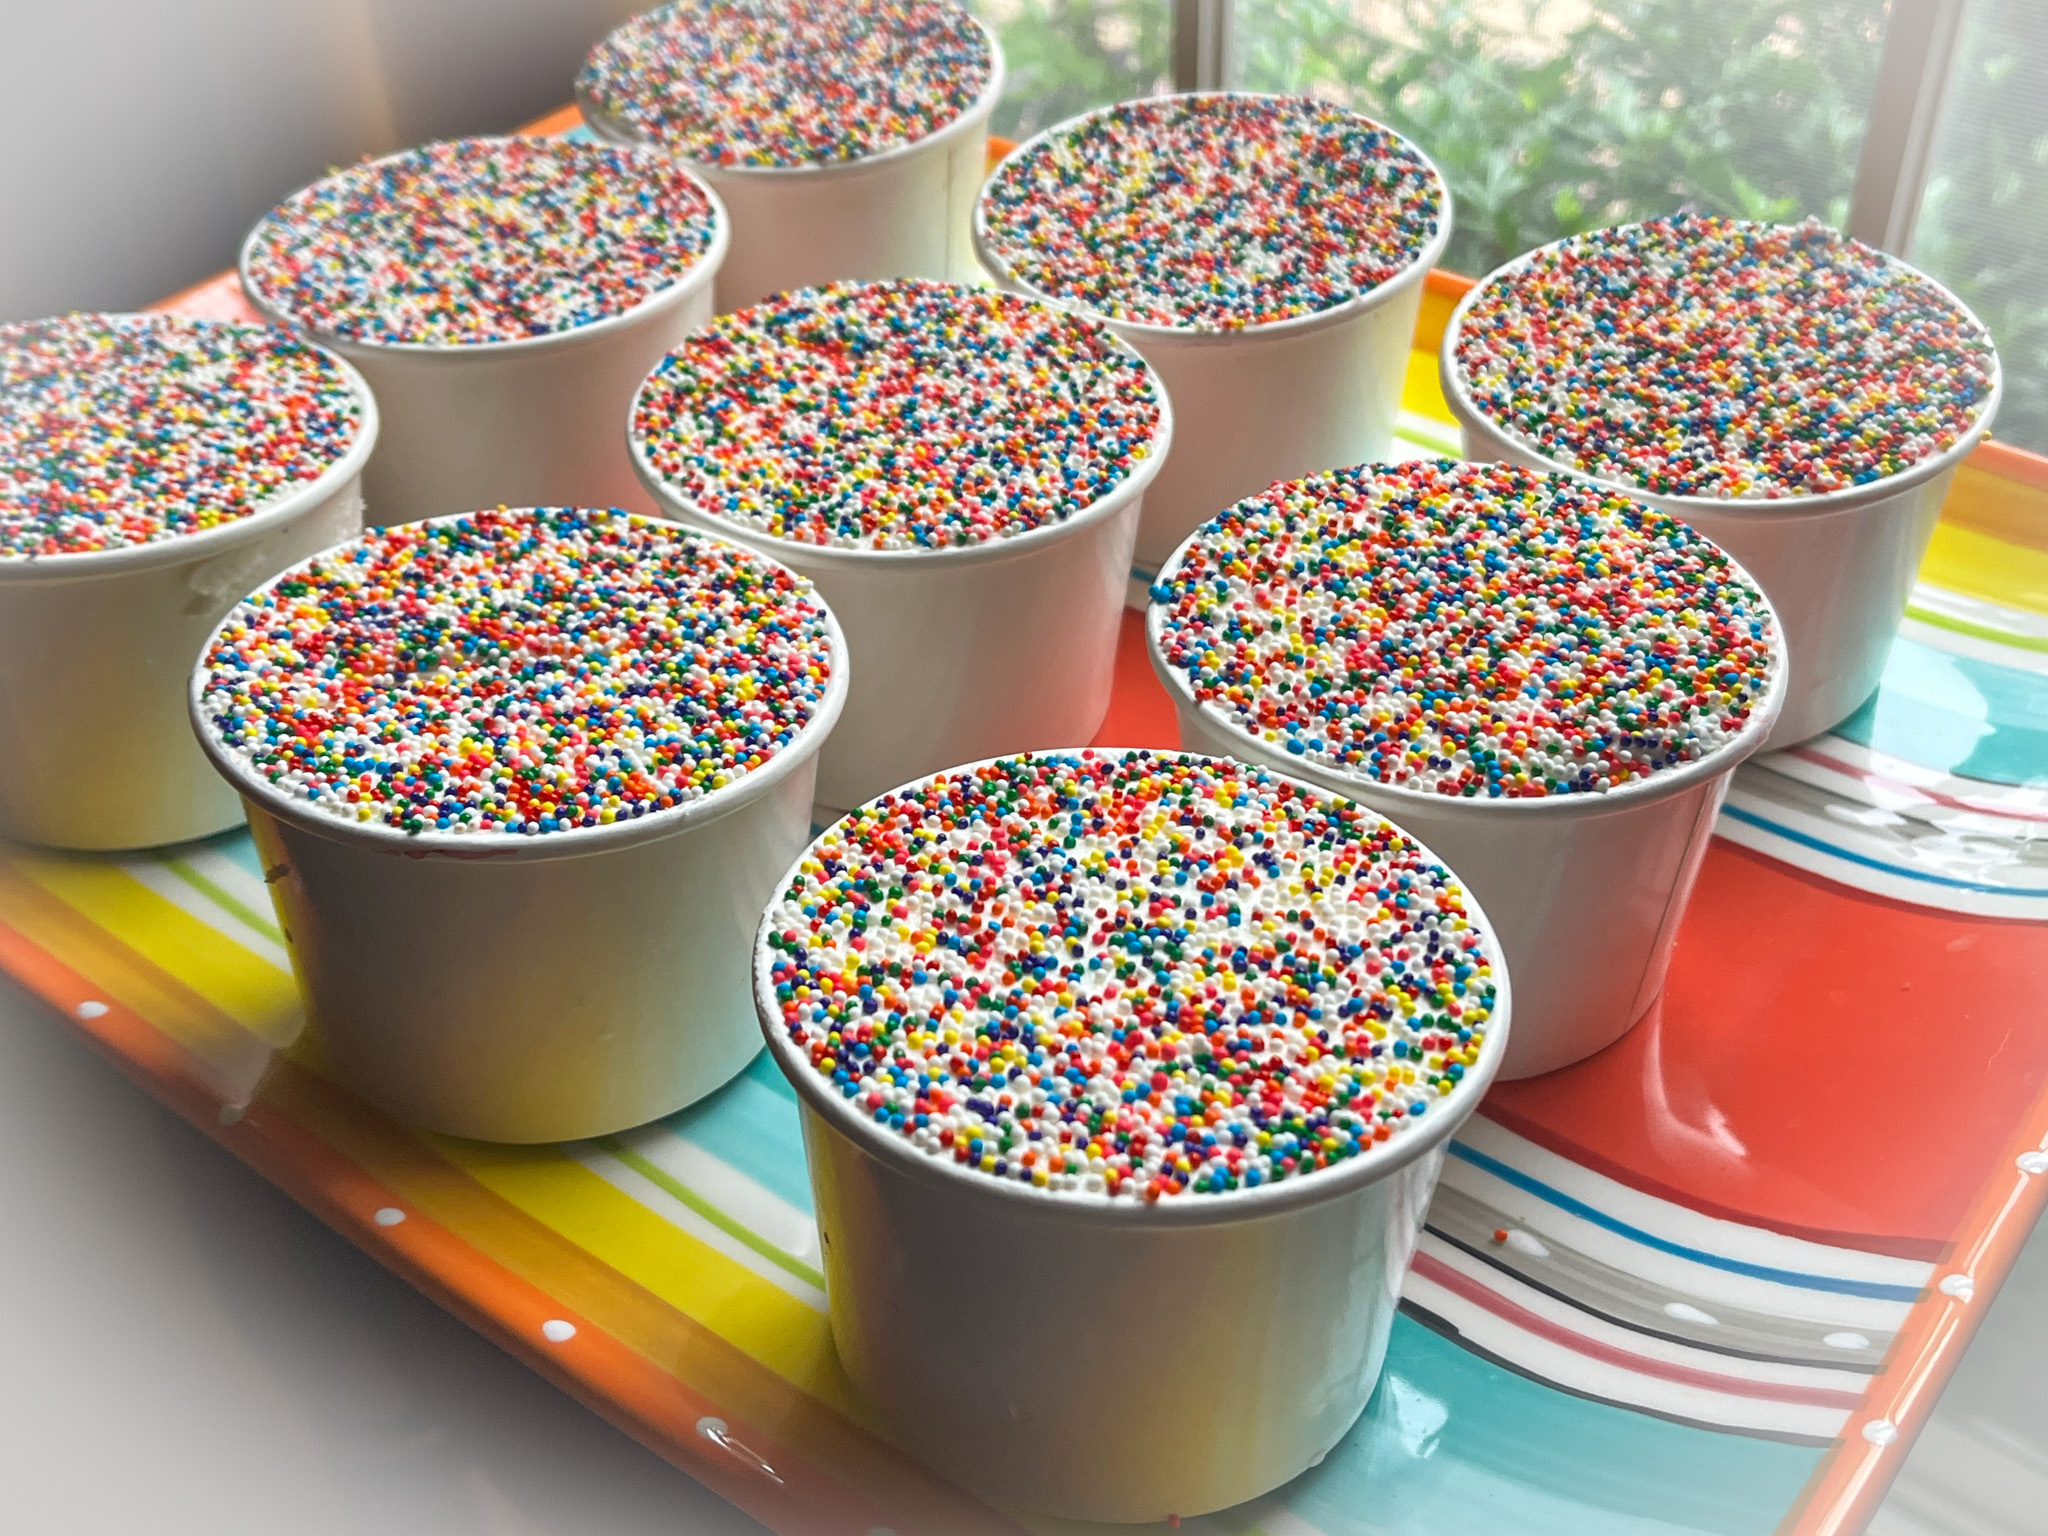
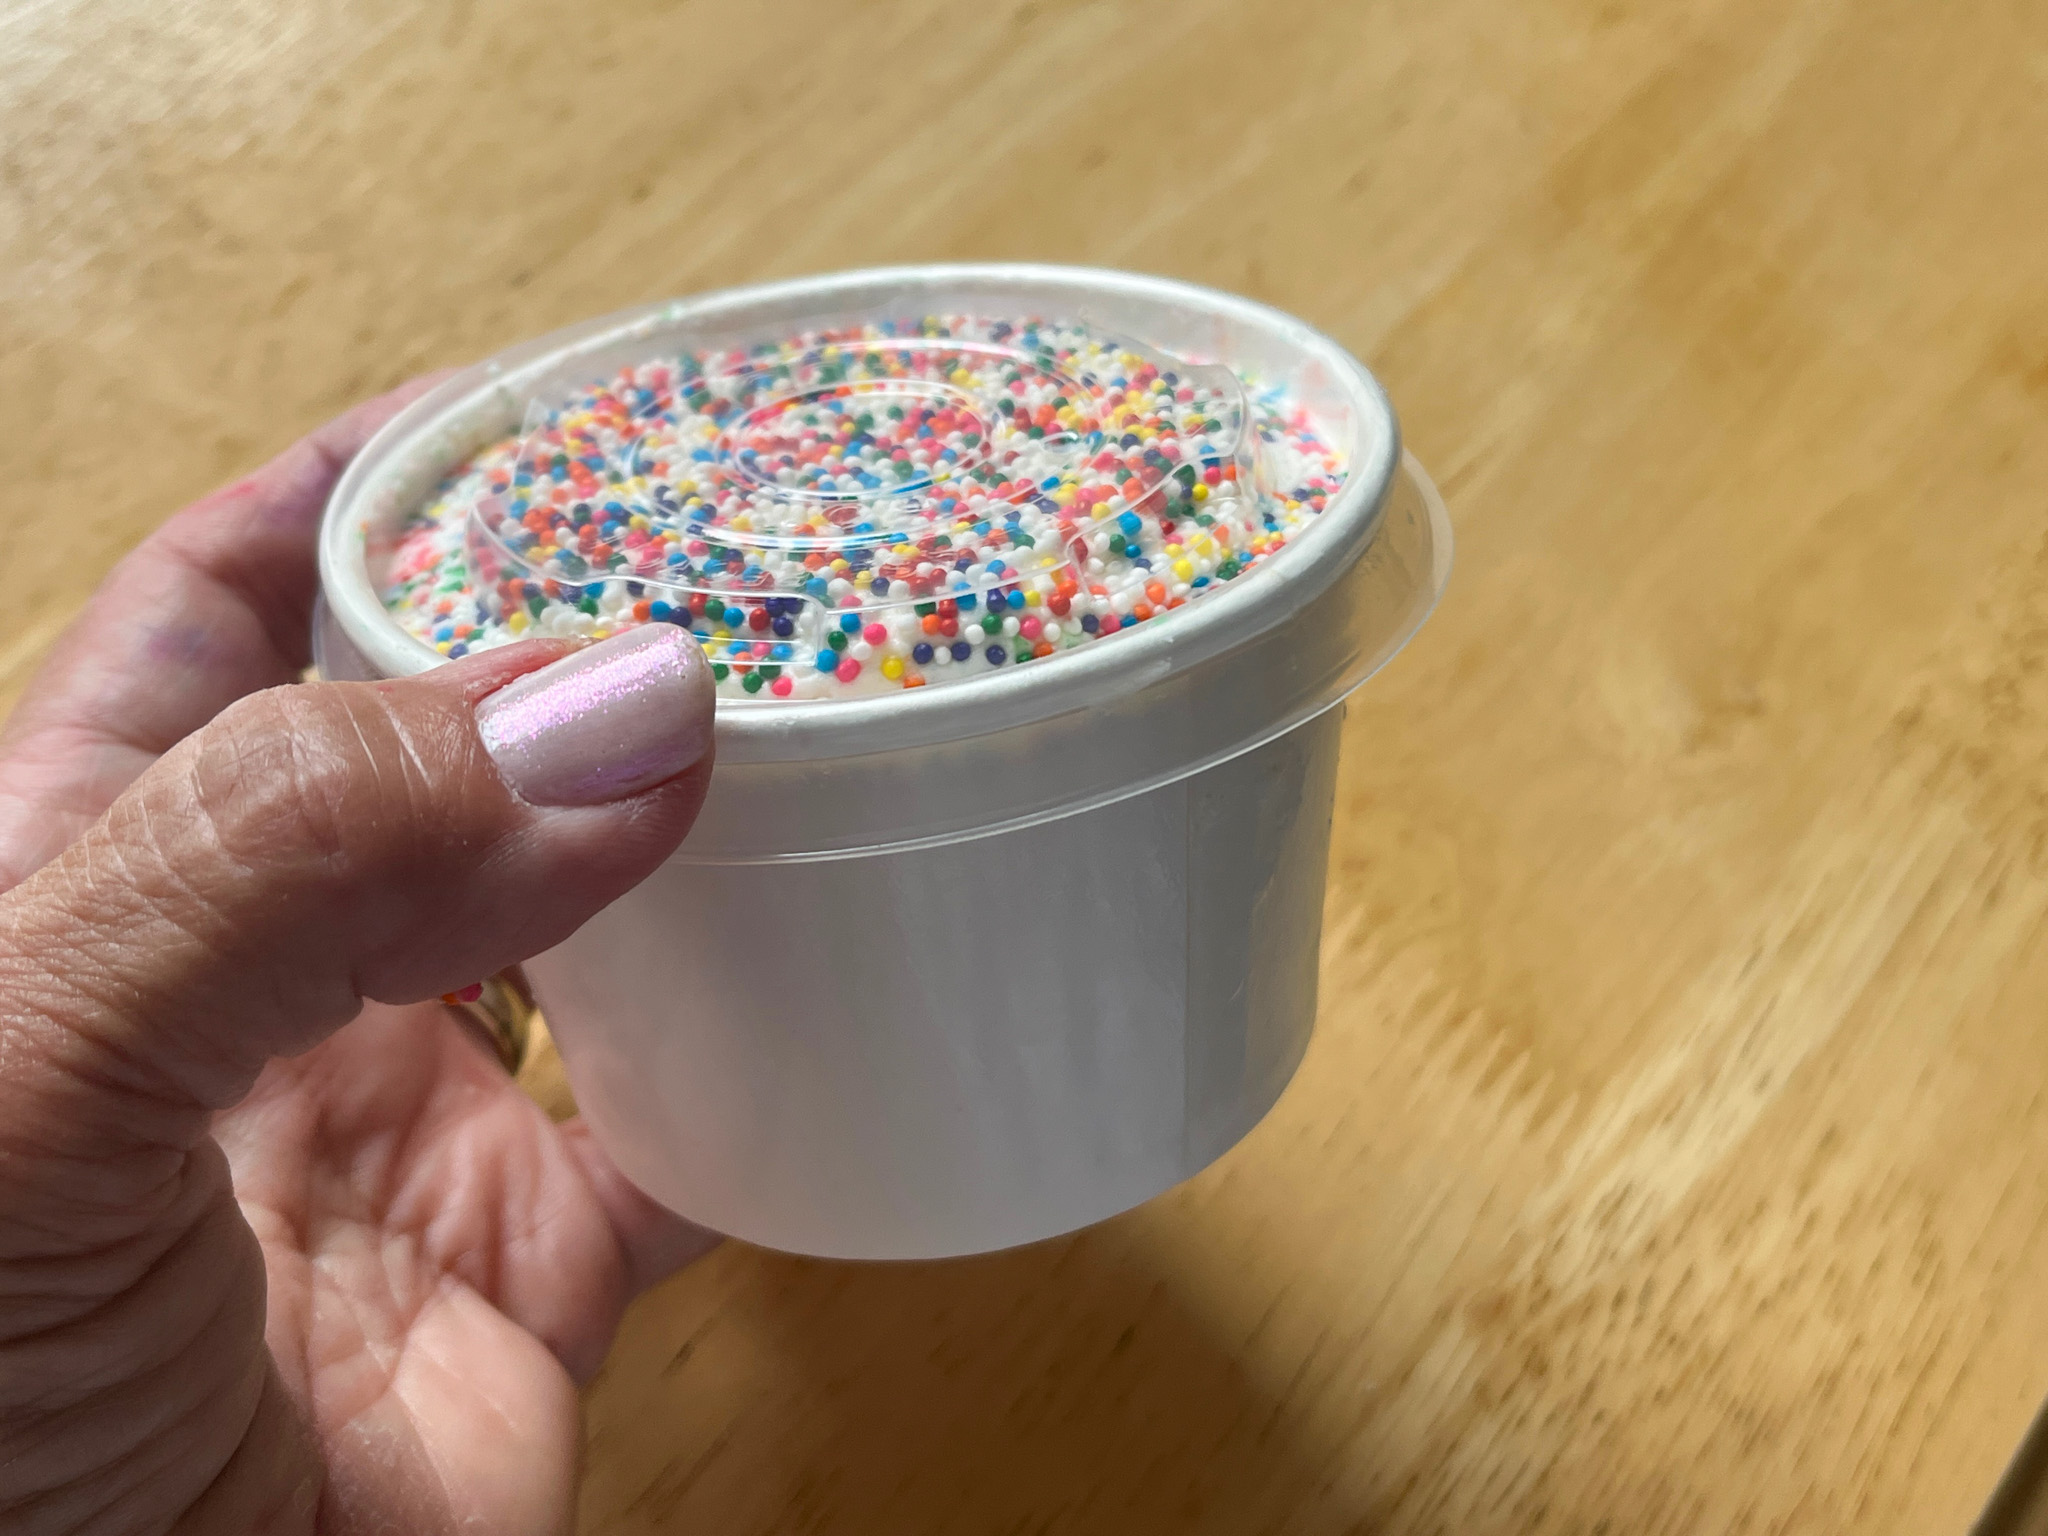
Have you heard of these? It all started at a bakery in Roslyn, New York, called -quite appropriately – The Dotcakes. They sell them in many different formats, including the popular cupcake, The whole idea behind them is a soft cake inserted in a paper or glass cup, filled to the brim with buttercream, and topped with nonpareils. Simple and effective. Apparently dot cakes are going viral on TikTok, I would not know because I never had the patience for the platform. But Susan, from The View from Great Island, recently made those and I jumped on that project shortly after reading her post. Well, first I had to visit The Super Evil Empire to get me some paper cups. THEN I jumped on it.
15 ounce lemon cake mix, prepared according to box directions. 1 cup salted butter, at room temperature 6 cups powdered sugar 8 Tbsp lemon juice 1/2 tsp vanilla extract nonpareil sprinkles
Preheat the oven to 350F and grease a 10×15 jelly roll pan.
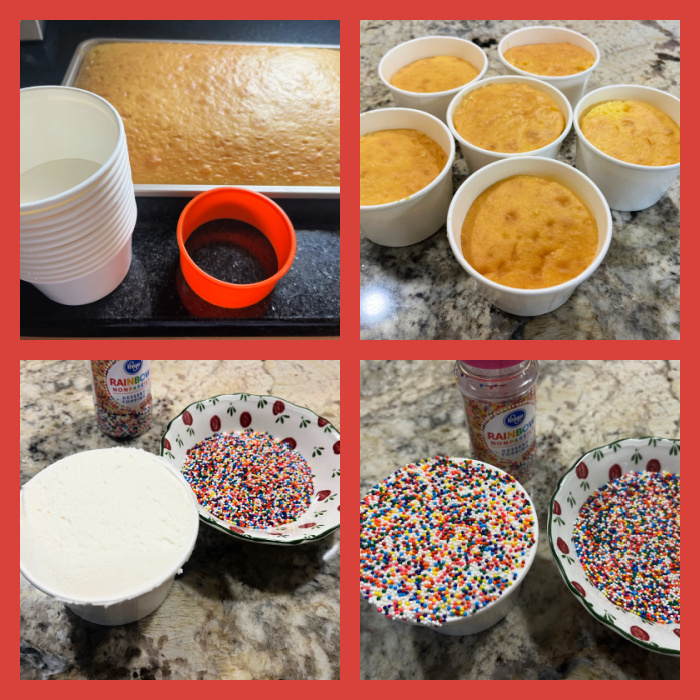
Prepare the cake mix according to its directions and spread into your prepared pan. Bake for about 18 minutes, or until it springs back when lightly touched in the center. A toothpick will come out without wet batter on it. Set aside to cool.
To make the frosting beat the softened butter until fluffy in a large bowl. Slowly add the sugar, a cup at a time, along with the lemon juice and vanilla. Beat until smooth and silky.
When the cake has cooled use your cookie cutter (in the same size as your cake cups) to cut out rounds of cake. Place a round of cake into each cup. Top with the frosting, and bring it right to the top. Smooth it out so that it is completely flat.
Place your sprinkles in a bowl and dip each cup headfirst down into the sprinkles so that they cover the whole surface.
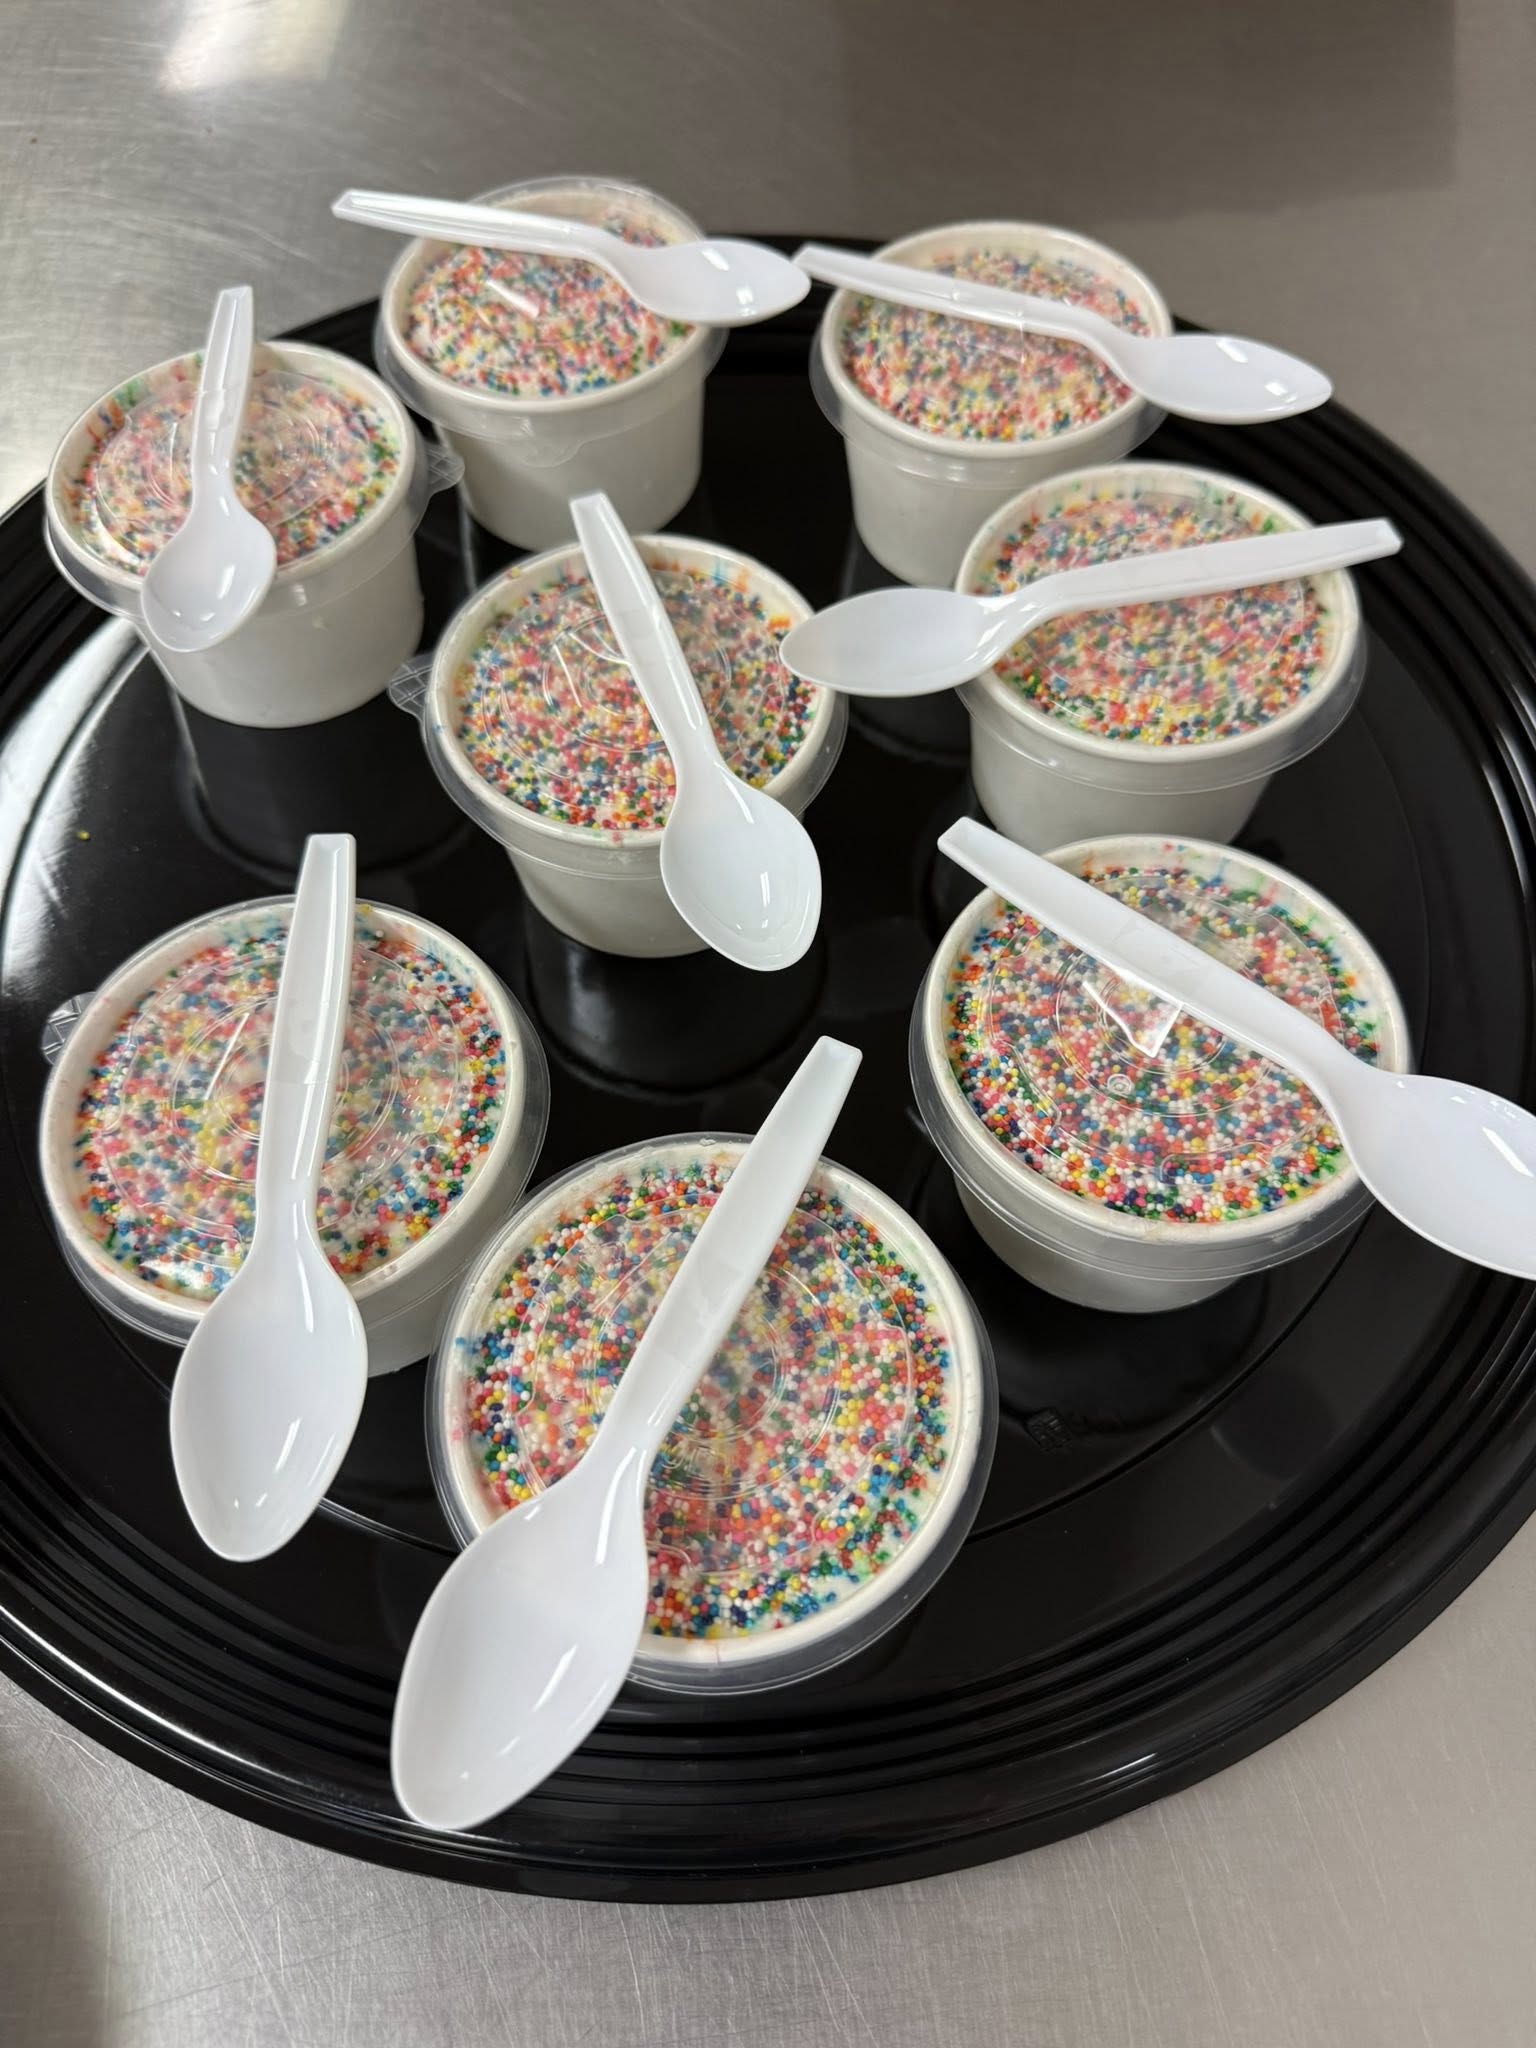
Comments: Please do not be upset about the use of a box cake. This is a simple, humble cake that just needs to be moist and flavorful. A box cake delivers that without issues. You can of course make the cake component from scratch. But sometimes simplicity wins in my kitchen. The little cups come with a lid that is perfect to donate these babies, otherwise the nonpareils could make it a bit messy, some always seem to fall off.
I donated the whole batch but I heard they turned out delicious. Each one was donated with a little spoon attached to the lid, to make it easier for the volunteers working that meal.
If you have a party coming up, particularly with kids, consider baking a batch of these dot cakes, they will be a huge hit… Many thanks to Susan for the inspiration!
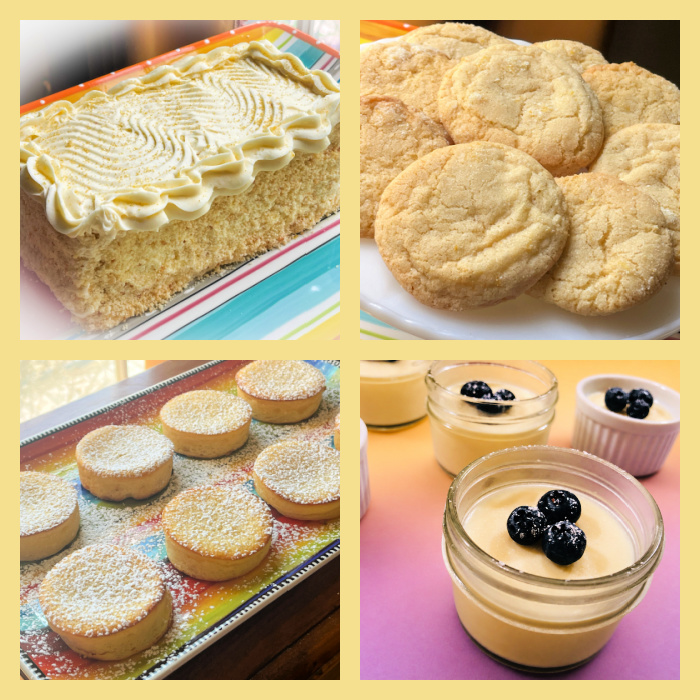
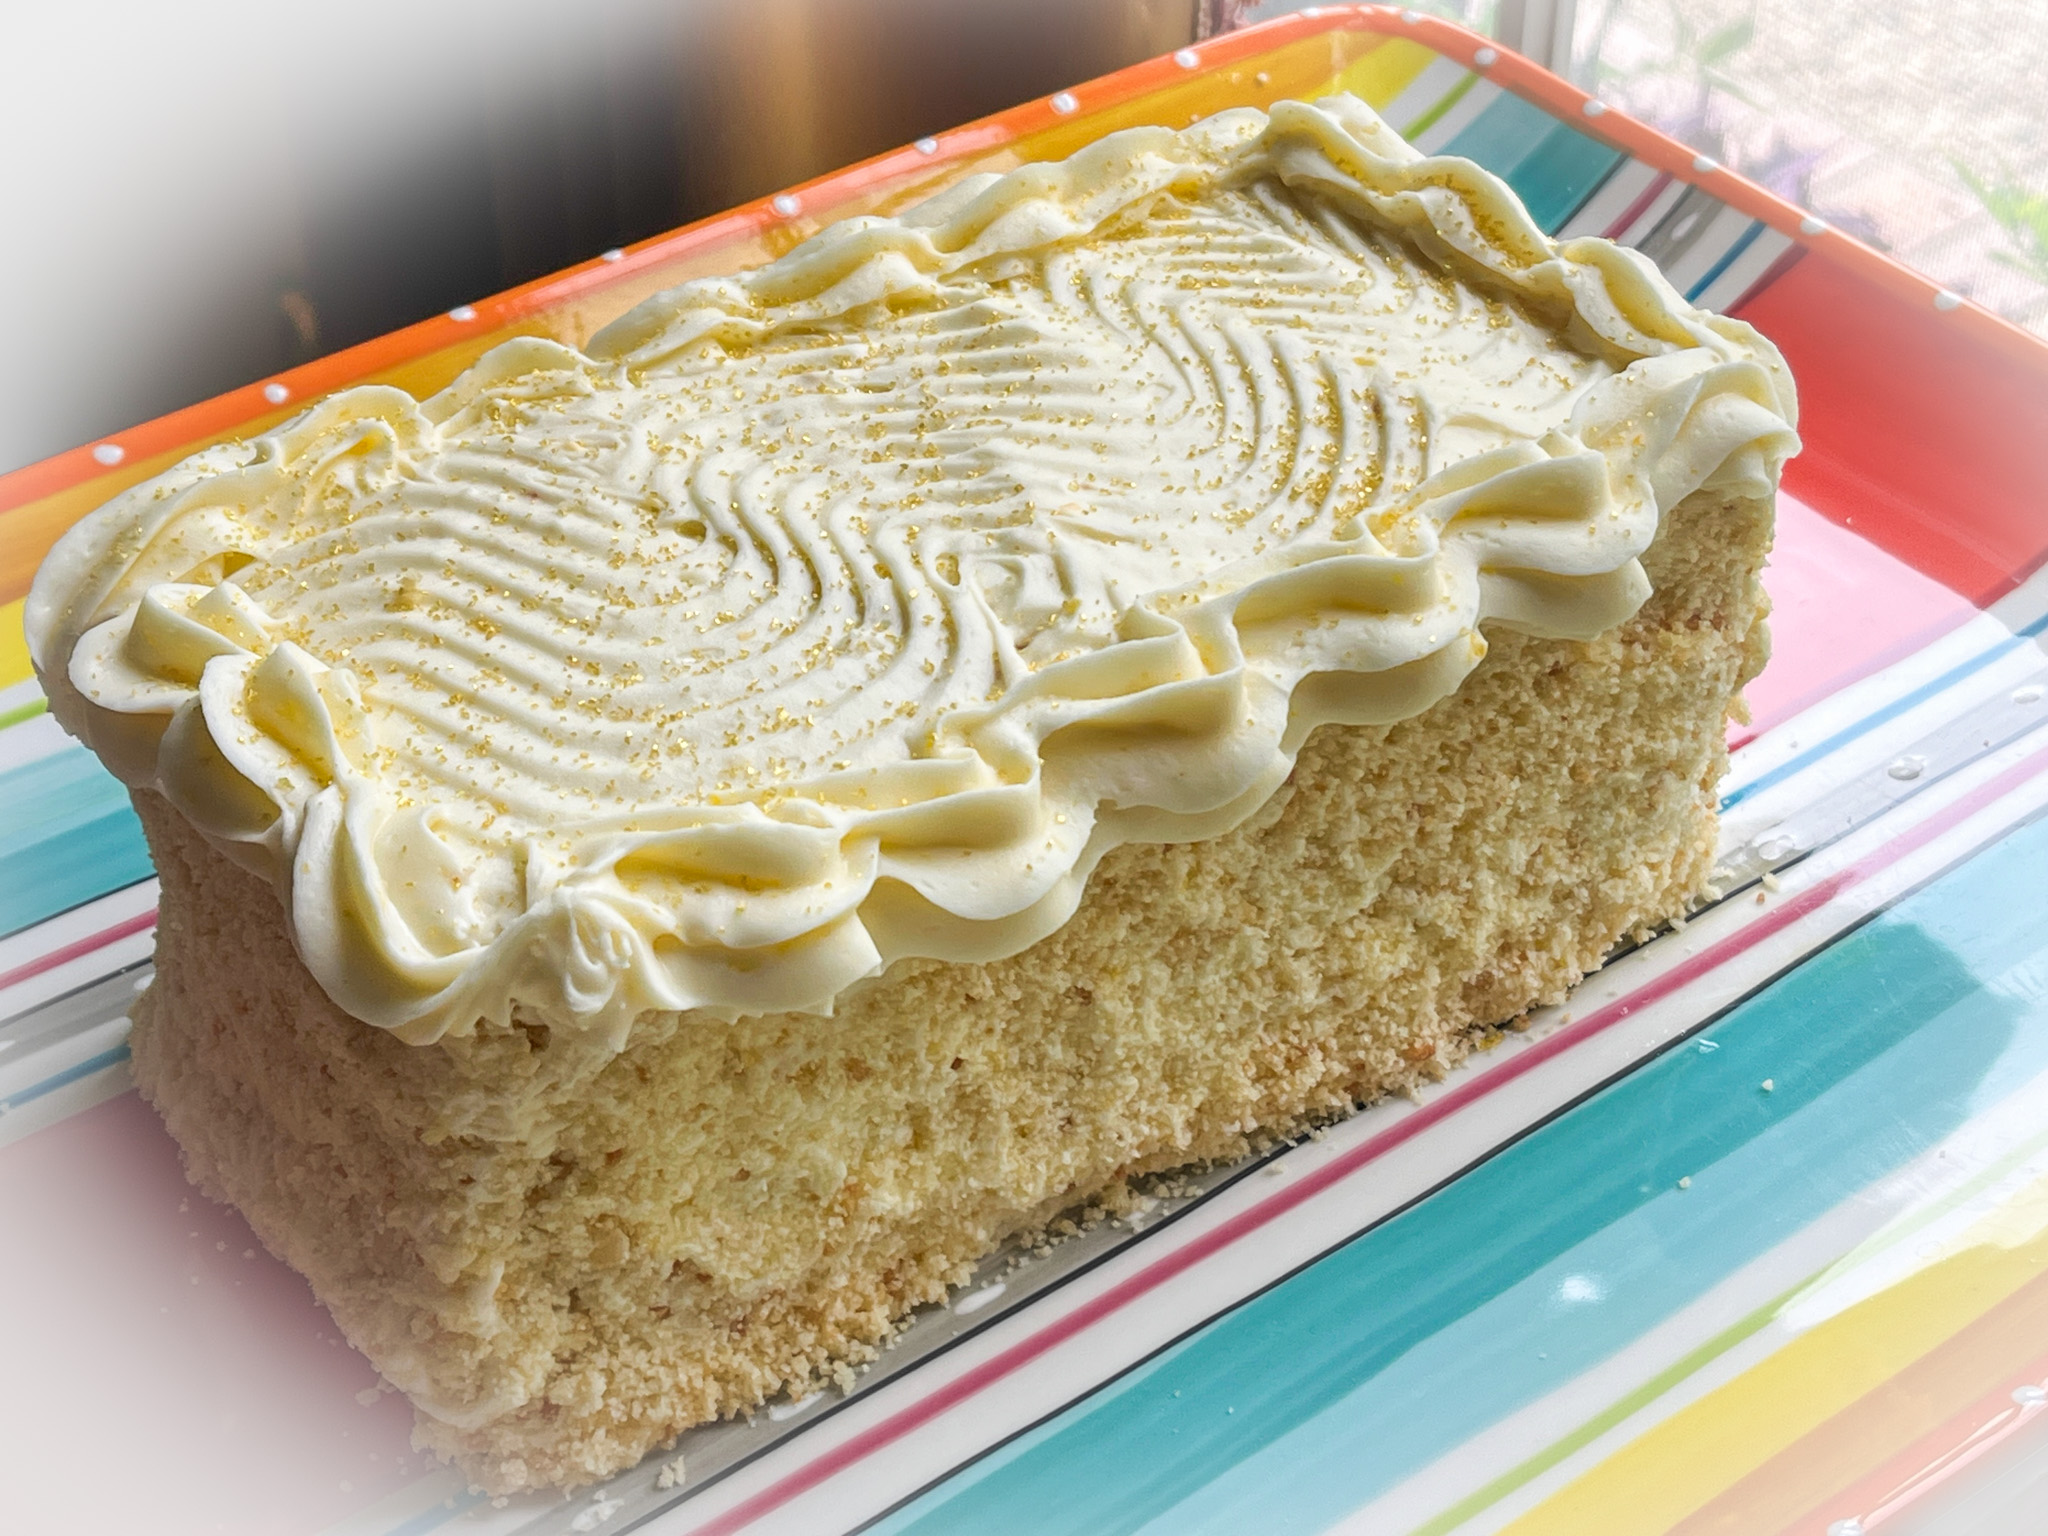
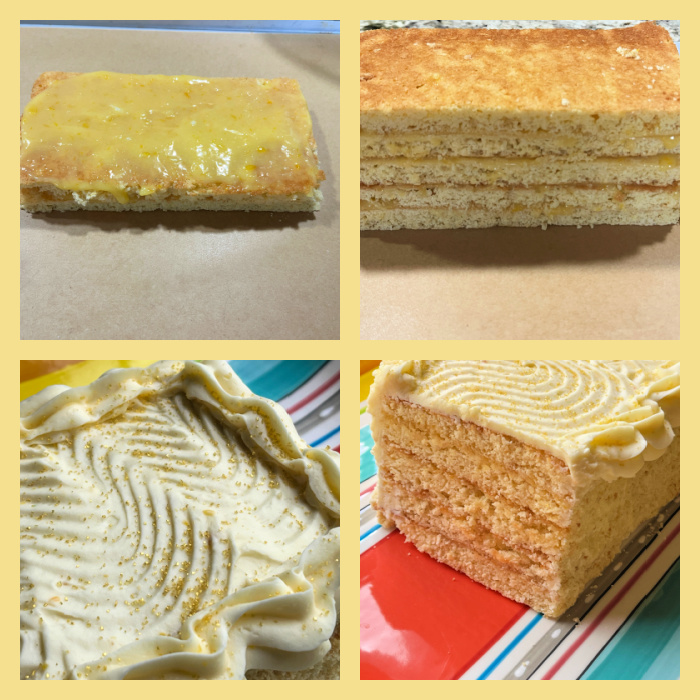
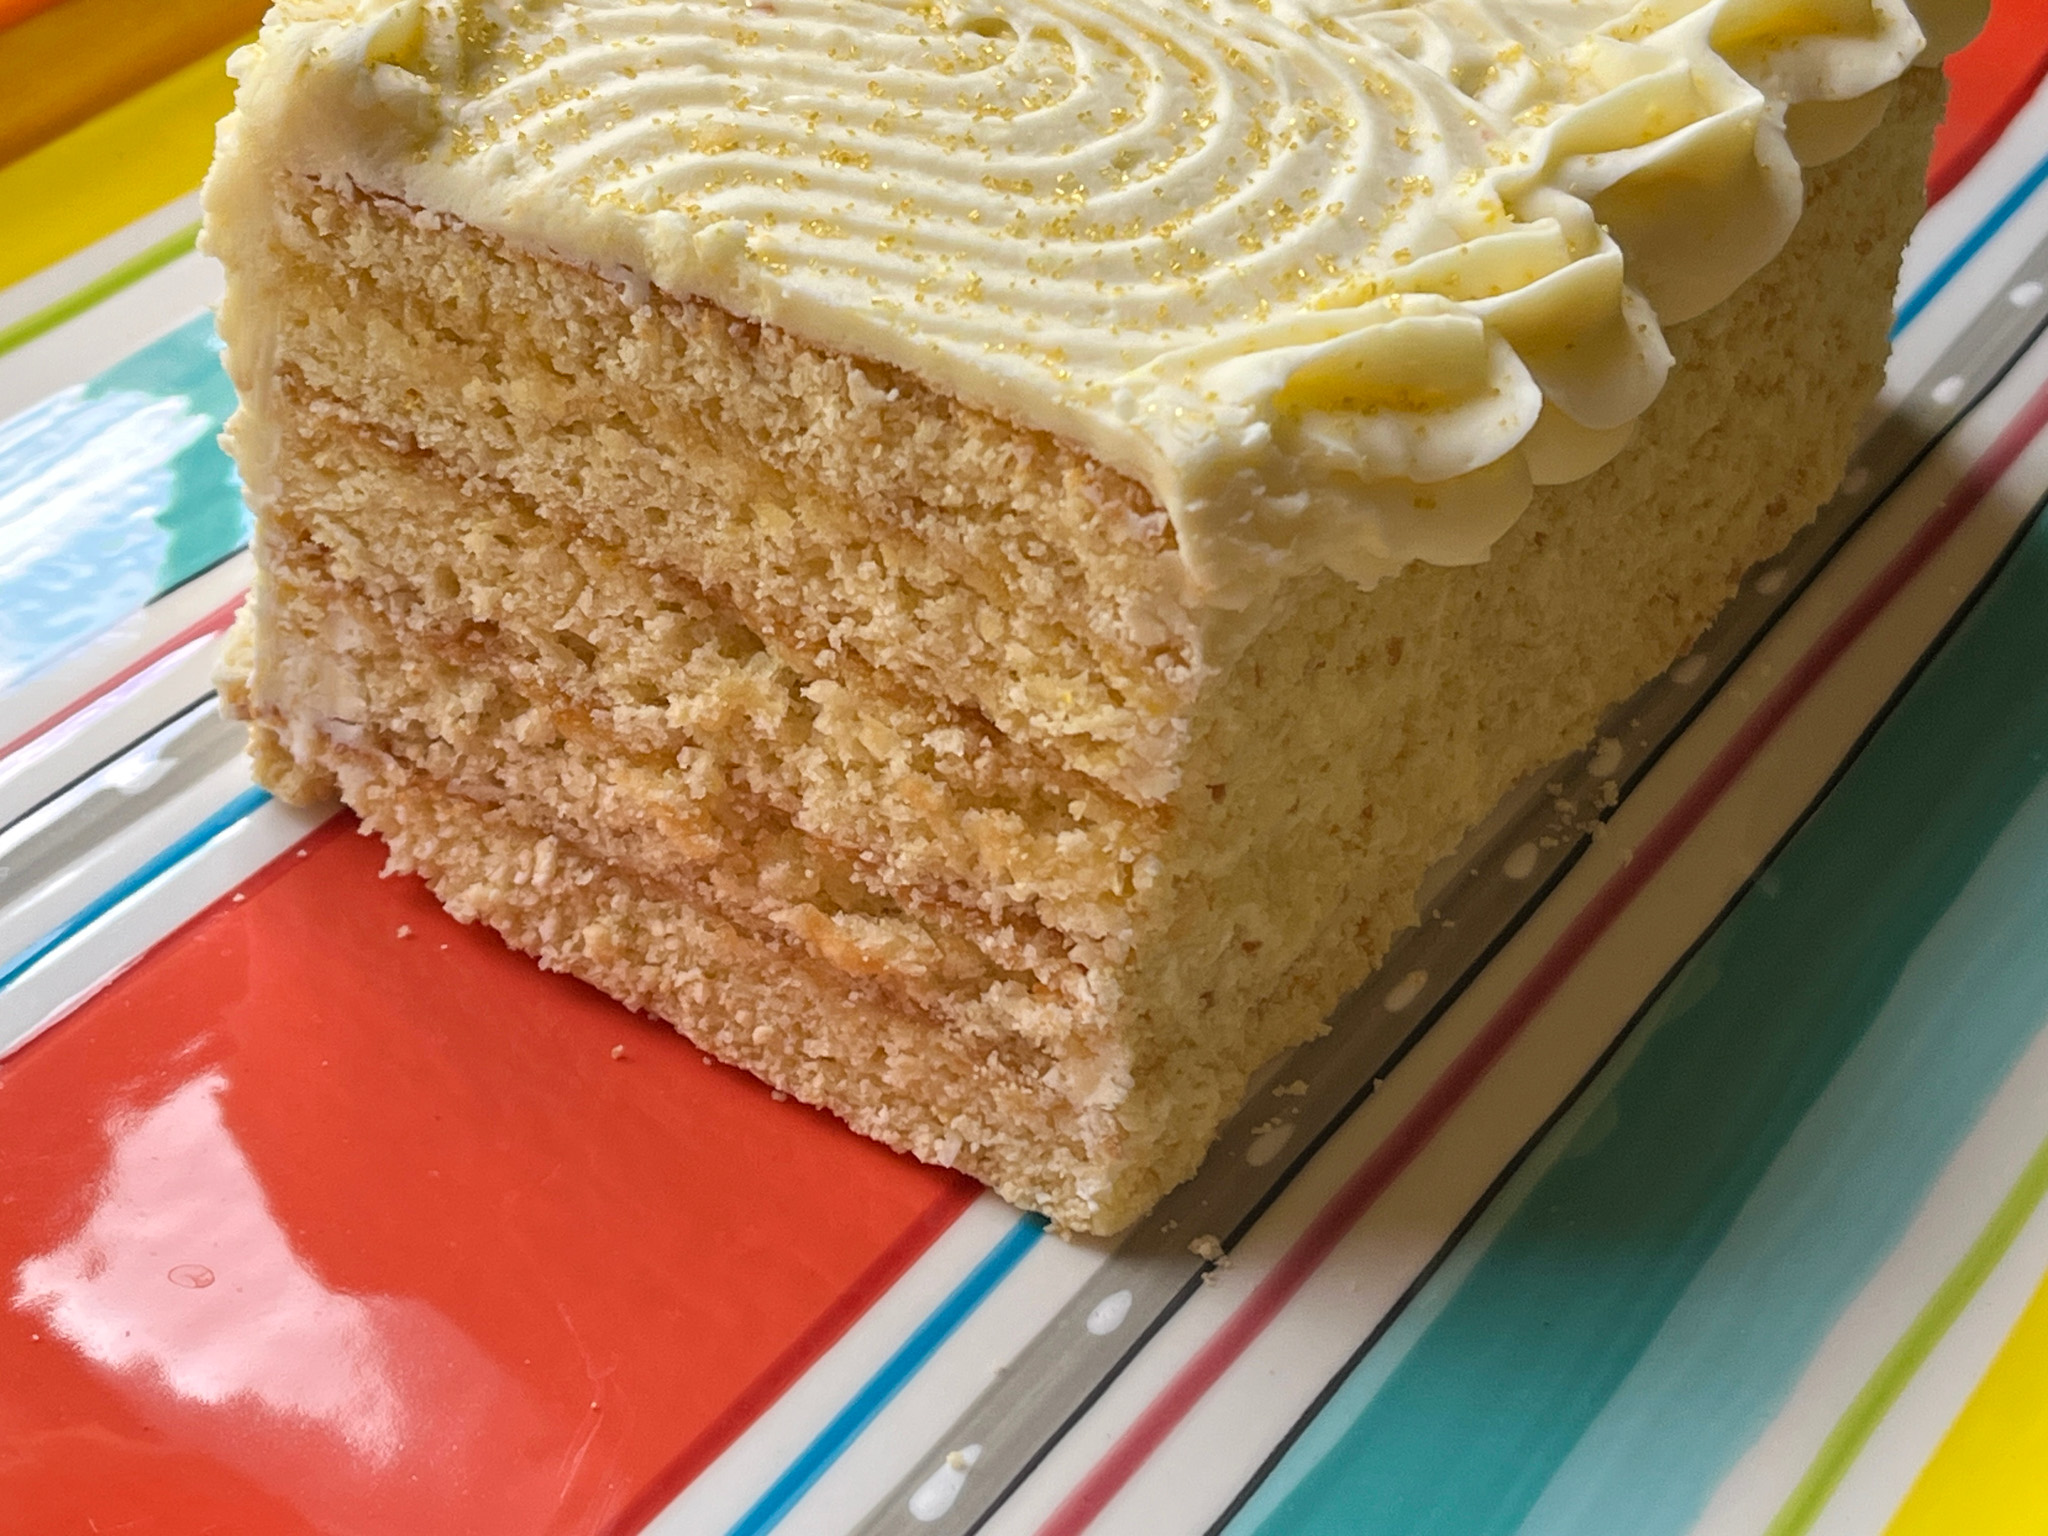
If you are a lemon lover, this post is for you. A fantastic five-layer cake, deliciously chewy cookies, baby little “pies”, and a posset. Let’s start with the cake, maybe my favorite of this series, courtesy of Helen Fetcher, my beloved baking guru…
for the lemon filling, to be made the day before: 4 large egg yolks 1 ¼ cups water 1 ¼ cups granulated sugar (250 grams) ⅓ cup cornstarch (45 grams) ½ teaspoon table salt 3 tablespoons unsalted butter (45 grams) 1 tablespoons lemon zest (from 1 large lemon)
for the cake: 3 large egg yolks 1 cup sour cream (225 grams) 1 teaspoon vanilla extract 3 cups sifted cake flour (300 grams) 1 ½ cups granulated sugar (300 grams) 1 tablespoon 1 teaspoon baking powder 2 tablespoons lemon zest (from 2 large lemons) ¾ cup unsalted butter, softened (170 grams)
for the lemon buttercream: 1 pound powdered sugar 1 cup lemon fillng ¼ cup butter, softened (60 grams or 4 tablespoons)
Make the lemon filling: Whisk everything together in a medium size sauce pan. Stirring constantly, bring to a boil and boil for 1 minute. Transfer to a storage container, cover the top of the filling with plastic wrap and let come to room temperature. Store in the fridge for 2 days. or at least overnight to firm up.
Make the cake: Heat the oven to 350°F. Line a half sheet pan with parchment paper and spray the paper only. Try not to spray the sides. If you do, wipe them with a paper towel. Set aside.
In a small bowl, whisk together the egg yolks, ¼ cup sour cream and vanilla. In the bowl of a mixer, combine the dry ingredients and mix on low for 30 seconds to blend. Add the softened butter and remaining ¾ cup sour cream. Mix on low until moistened. Then increase the speed to medium and beat for 1 ½ minutes. Add the egg mixture in three additions, beating on medium 30 seconds each time, scraping down as necessary.
Dollop the batter in the half sheet pan. Using and offset spatula, spread it out evenly. Bake for 20 to 22 minutes until a tester comes out clean. Place on a cooling rack until cold. At this point, it can be frozen in its pan well wrapped. Or you can refrigerate and continue assembling the cake later. It is easier to deal with layered cakes when they are very cold, so keep that in mind.
Make the lemon buttercream: Add all the ingredients to a mixing bow. Beat on low to bring together. Raise the speed to medium and beat until smooth. Raise it again to high and beat for 5 or more minutes until light and smooth with no grittiness from the powdered sugar.
Visit Helen’s site for a clear visualization on how to cut the cake to obtain 5 equal layers and one extra that will be processed for crumbs. You will use 1/4 cup of lemon filling spread over the layers, and then frost the cake with the buttercream, glueing cake crumbs to the sides and making a pattern with a cake comb on top. If desired, add some piped buttercream with a 1M tip or another one of your preference. Allow the cake to to sit in the fridge for a few hours before slicing.
Comments: I urge you to visit Helen’s site to get the detailed step-by-step photos. Helen makes the most complex bakes feel simple and approachable. This cake is spectacular, and the use of cake crumbs glued to the sides makes frosting a lot less stressful. It is incredibly lemony. Thank you, Helen!
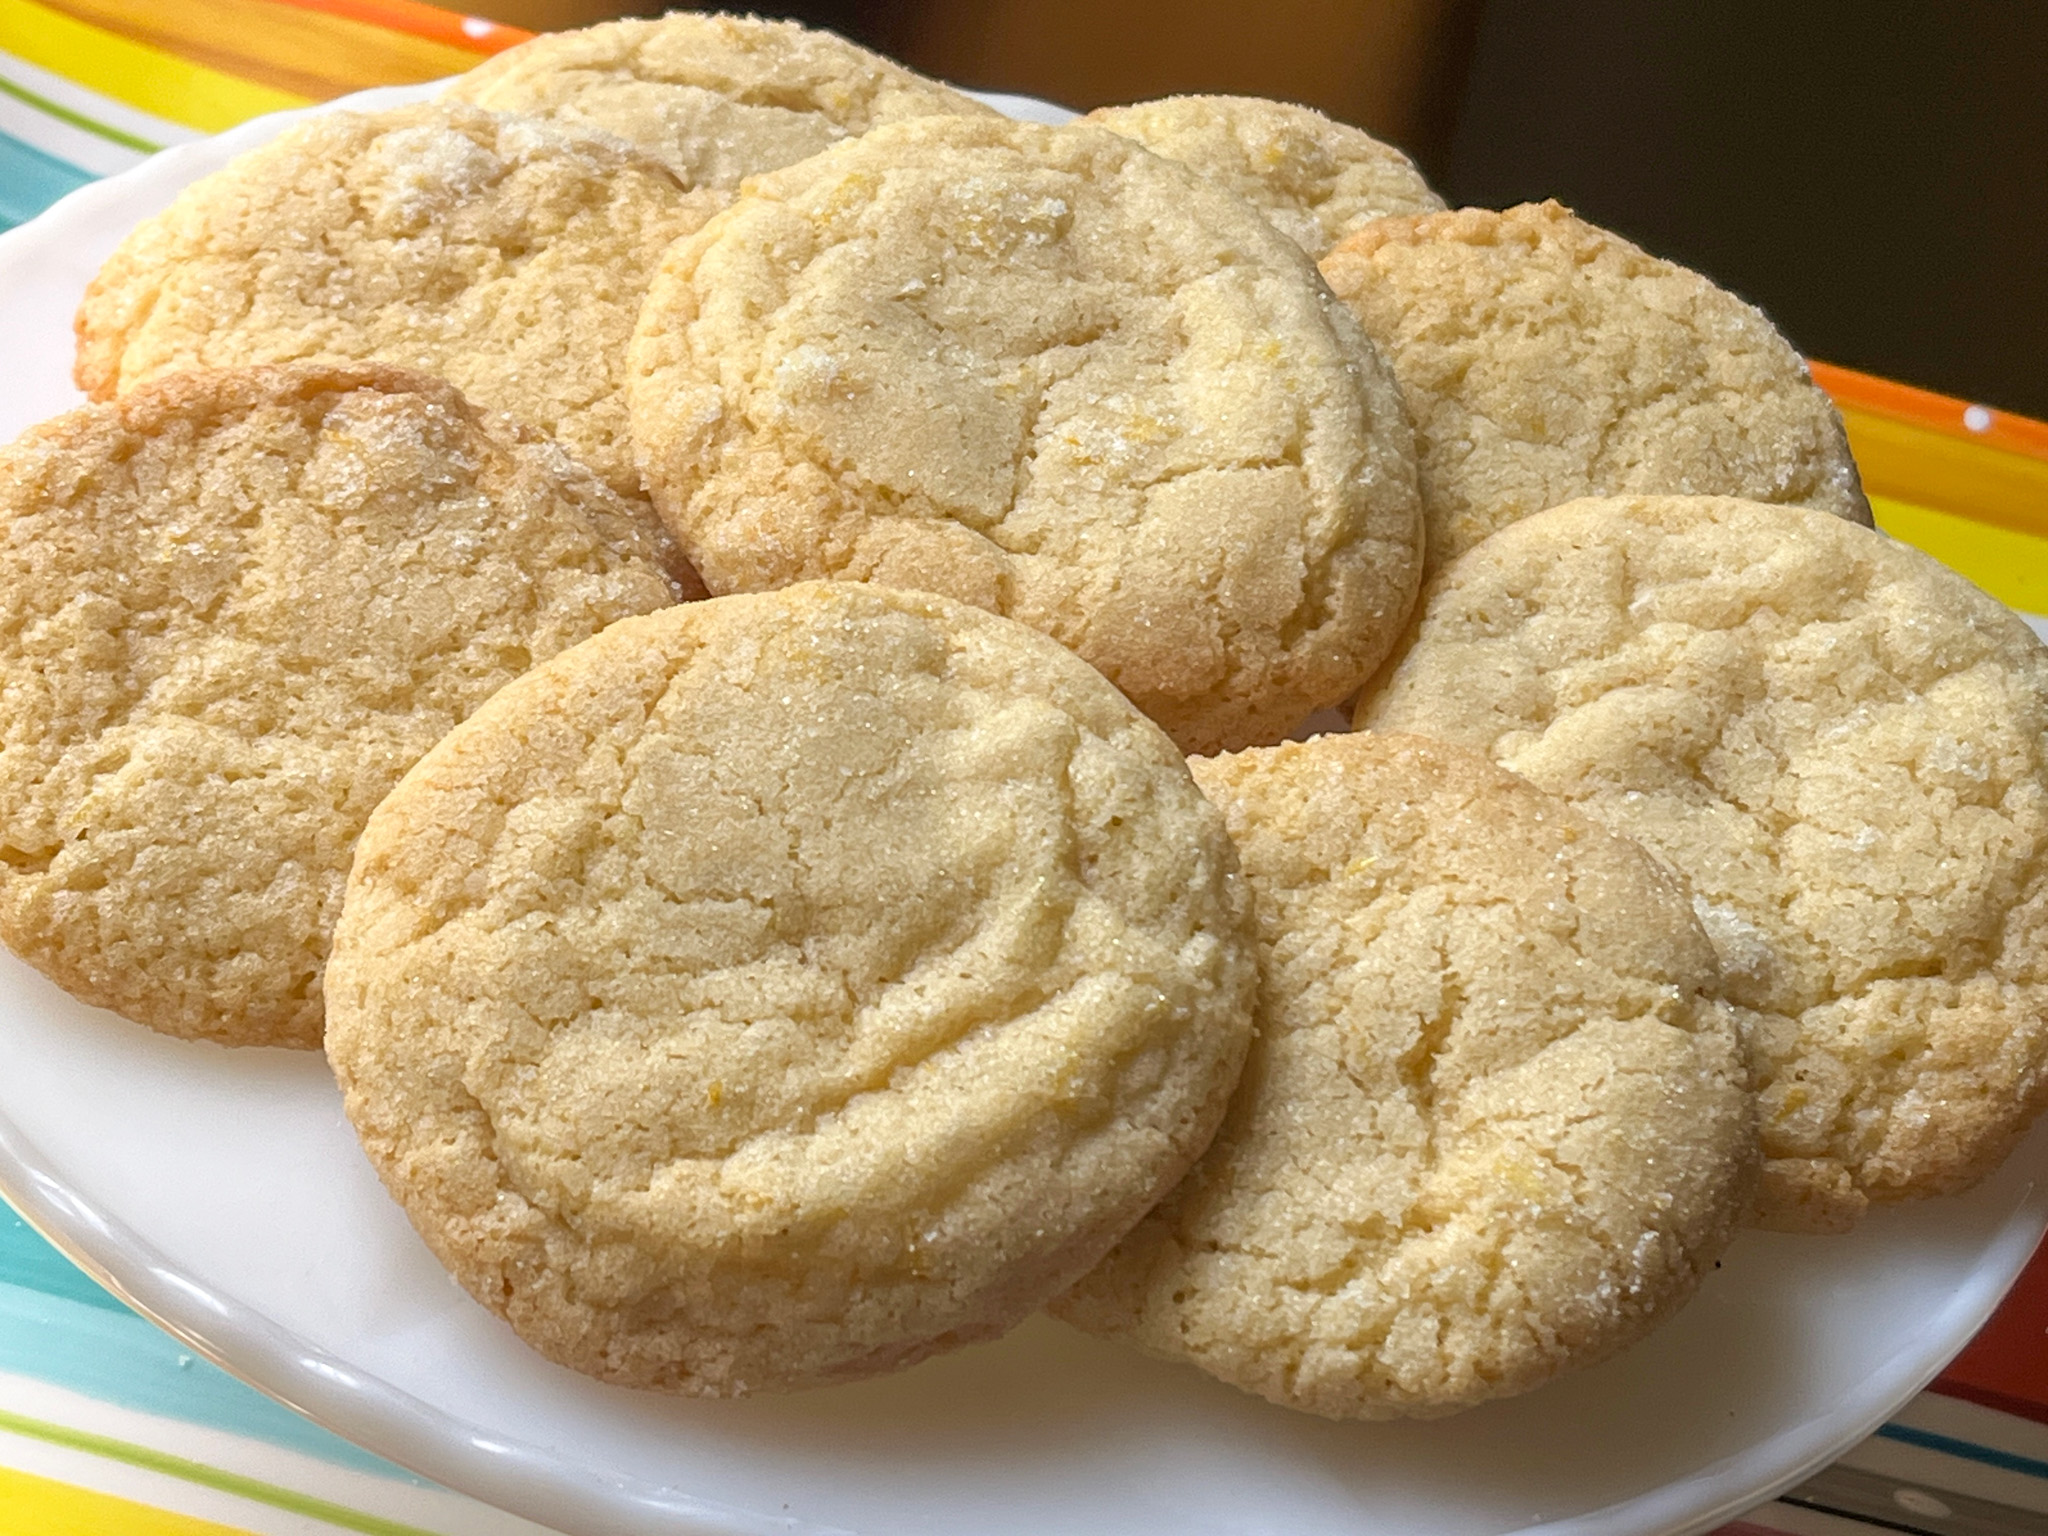
⅔ cup (150g) salted butter, softened 1 cup plus 2 tbsp (225g) granulated sugar 2 tablespoon lemon zest 1 large egg room temperature 1 large egg yolk room temperature 1 tablespoon (15ml) lemon juice 1 teaspoon (5ml) pure vanilla extract 2 cups (284g) all-purpose flour ¾ teaspoon baking soda ½ teaspoon baking powder ee notes in above FAQ section for baking powder quantity alternatives) ¼ teaspoon salt
Combine soft butter, sugar and lemon zest in a large bowl and use a stand mixer fitted with the paddle attachment, scraping down the sides of the bowl as needed.
Scrape down the sides and bottom of the bowl, then add the egg and mix until well incorporated. Add egg yolk, vanilla and lemon juice then mix until smooth and creamy.
Combine flour, baking soda, baking powder and salt in a medium bowl and whisk to blend evenly. Add the dry ingredients to the bowl with the butter mixture and fold it in until evenly incorporated. The dough will be soft but not sticky at this point.
Cover the bowl and refrigerate the dough for 2 hours.
Heat the oven to 350°F. Line two large cookie sheets with parchment paper. Make the lemon sugar. Combine sugar and lemon zest in a small bowl and rub it together until the sugar smells fragrant.
Use a cookie scoop to portion dough and roll into smooth balls. Roll the balls of dough in the sugar so they are evenly coated.
Place dough balls on the lined baking trays spacing them 3 inches apart and bake for 9-11 minutes until lightly golden on the edges and still slightly soft in the middle.
Comments: These cookies are addictive, they have a super clean and bright citric flavor, and perfect texture. I made them on a Wednesday and donated two days later, so I tried one to make sure it was still ok, and had to exercise self-control to keep my taste-test to a single cookie. Make them, and you can thank me later!
x
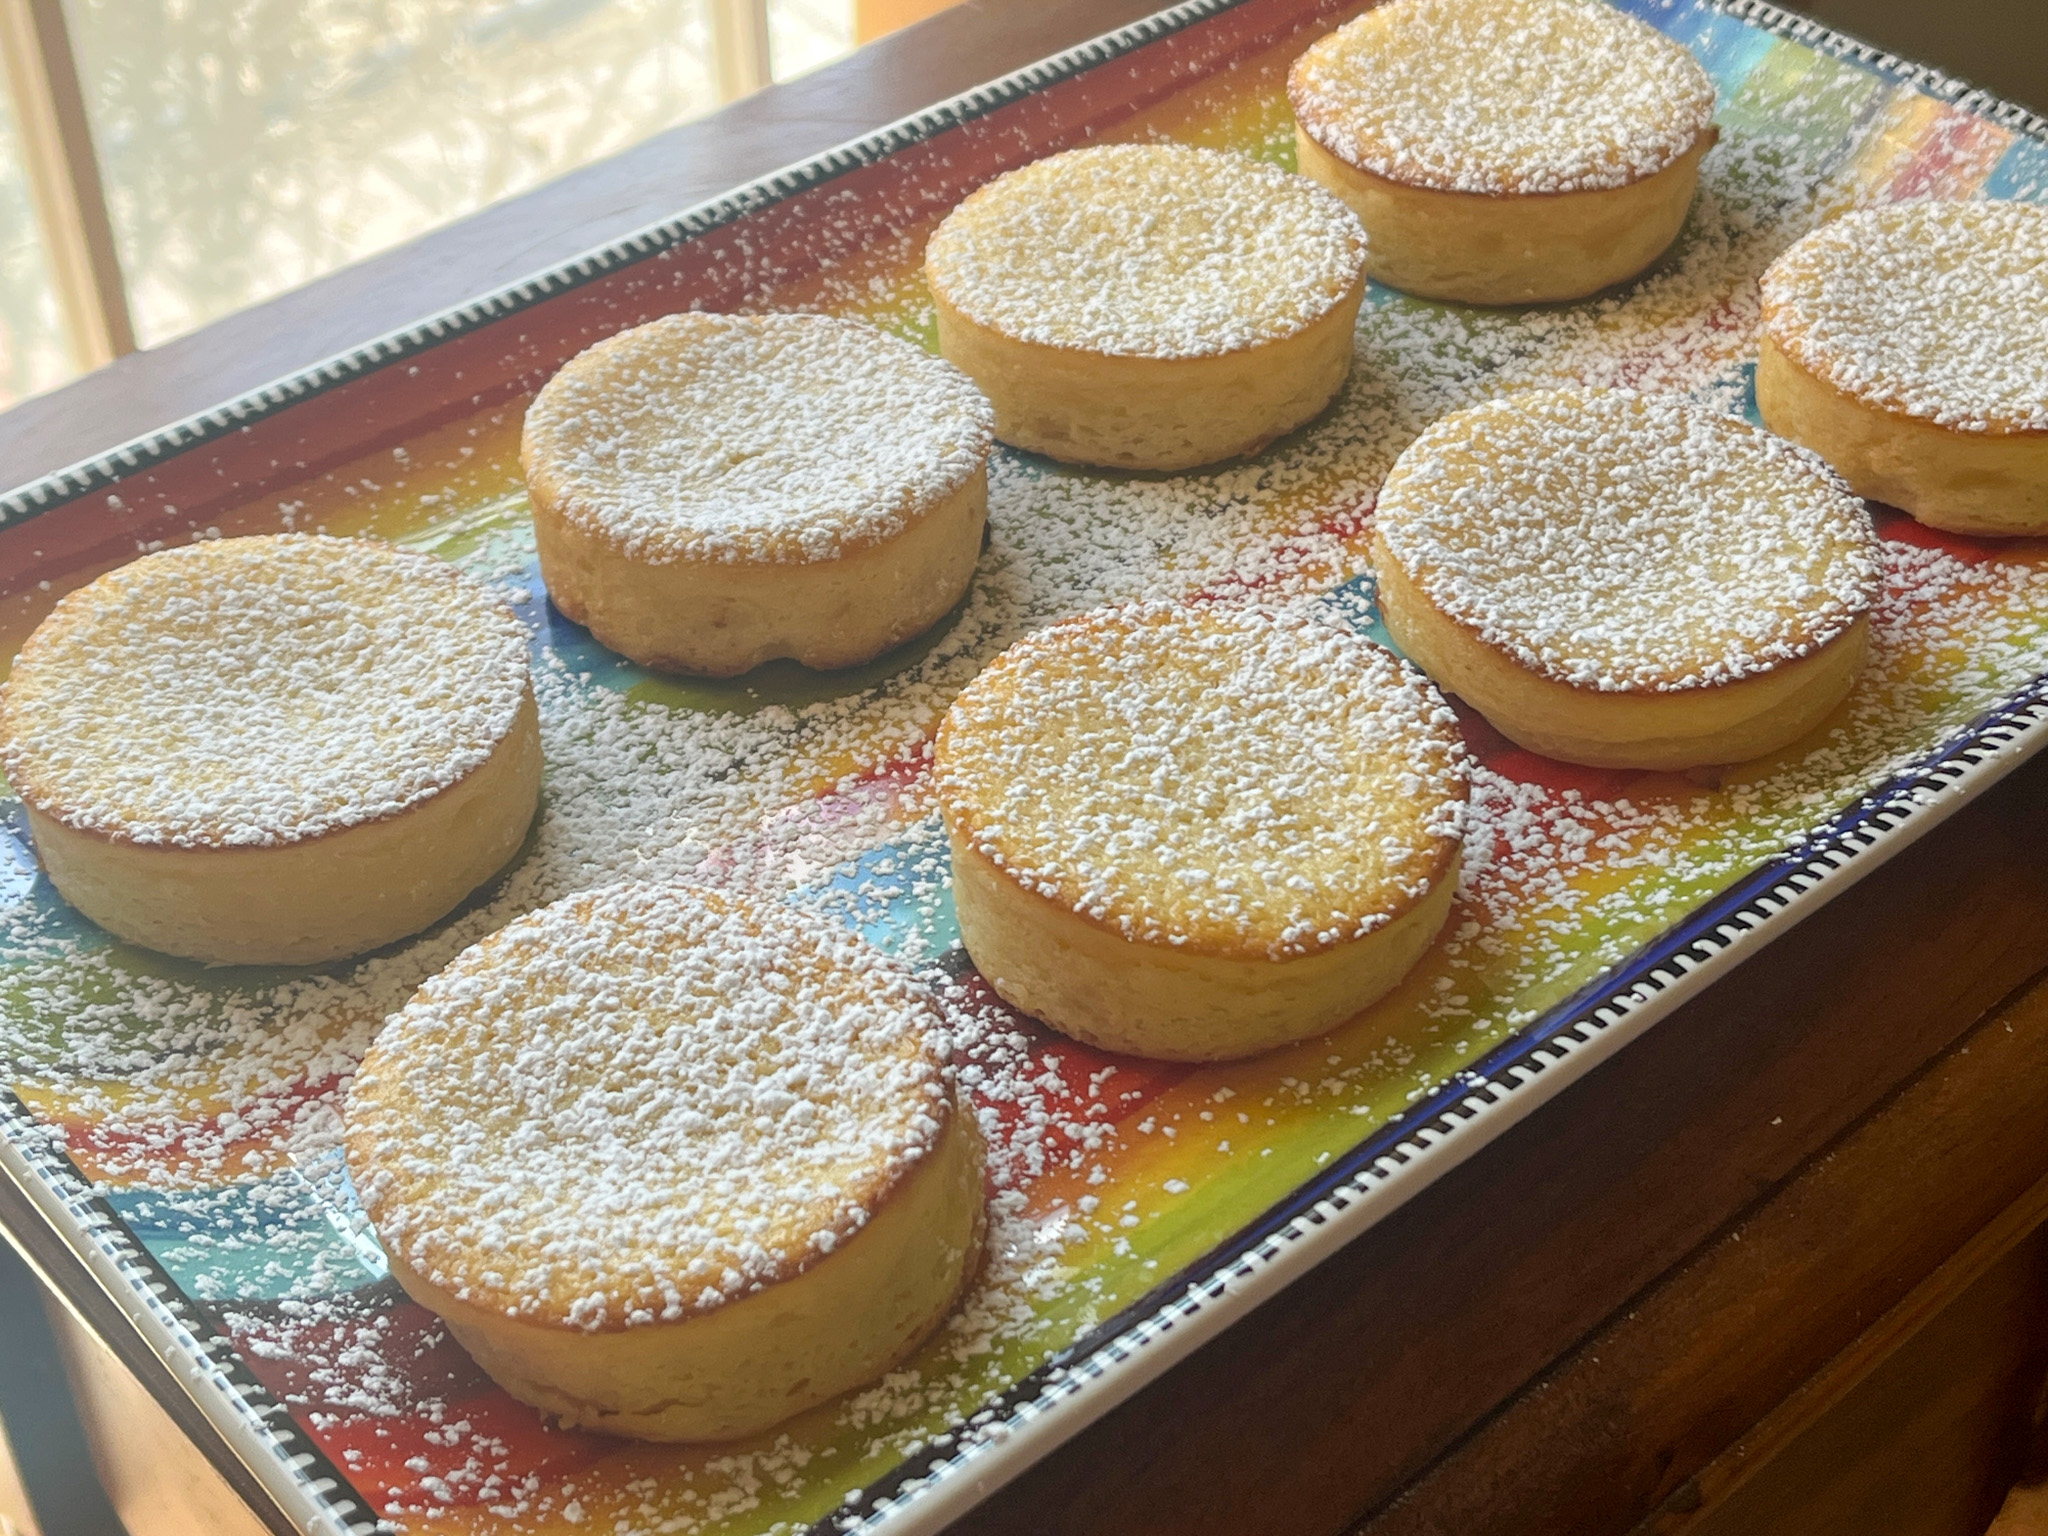
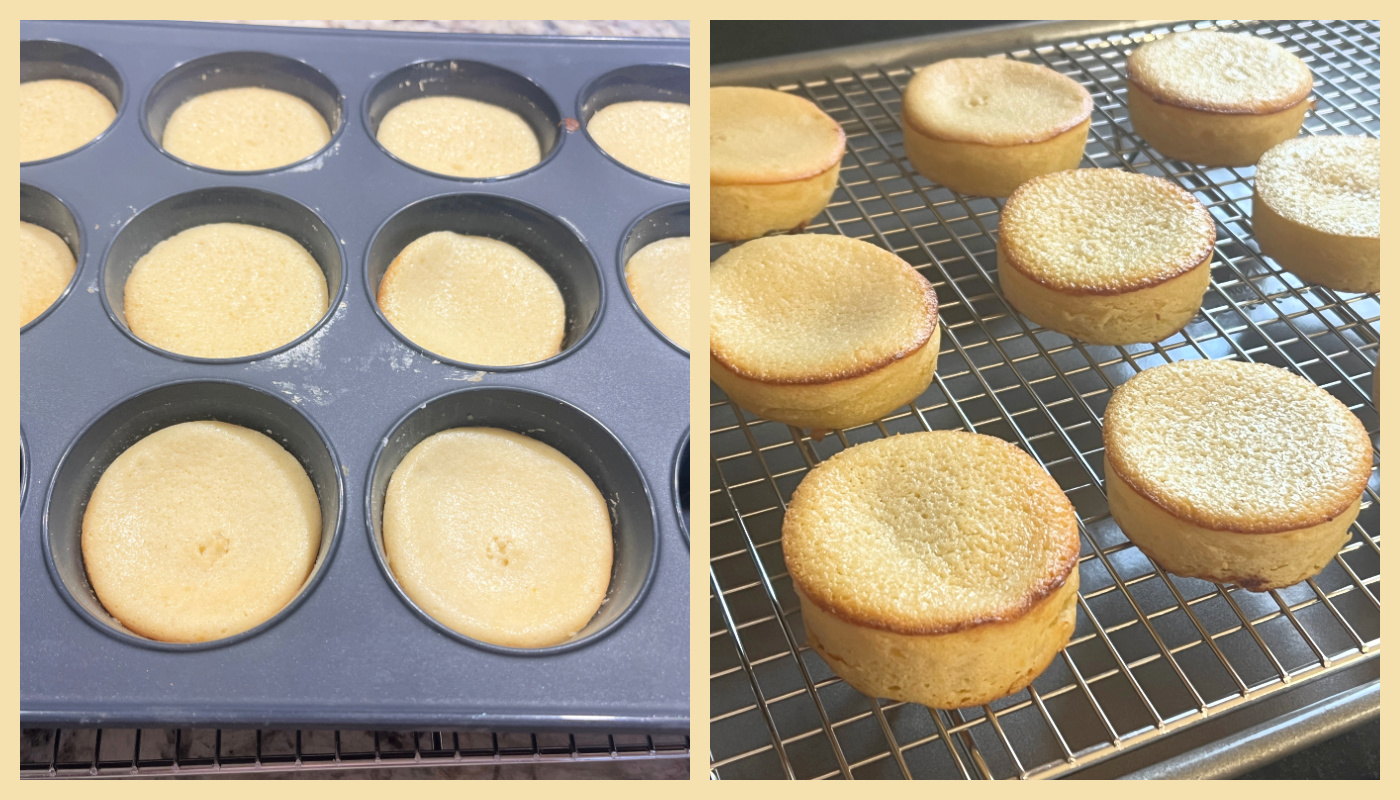
BABY LEMON IMPOSSIBLE PIES recipe can be found here
Those are simple to make, and a lot of fun to serve and enjoy… Not quite sure why they are called “pies” but whatever you call them, they won’t disappoint.
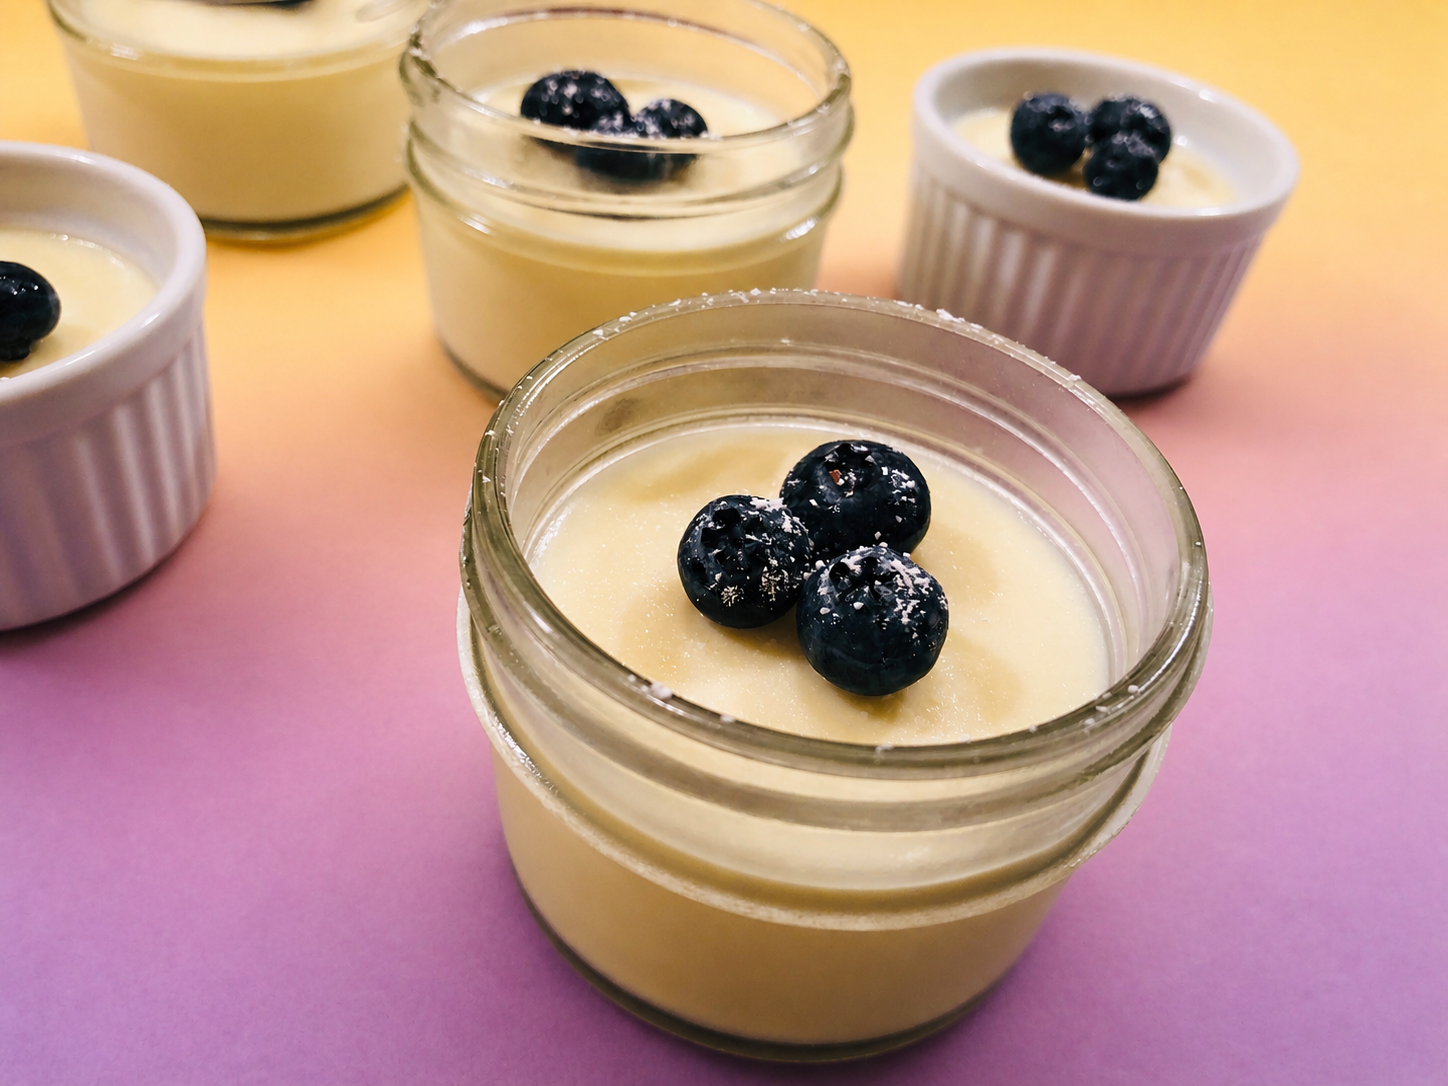
LEMON POSSET
LEMON POSSET (from The Bewitching Kitchen)
2 cups heavy whipping cream 2/3 cup granulated sugar 5 Tbsp lemon juice blueberries, optional for serving
In a small saucepan, heat the cream and sugar, stirring to dissolve the sugar. Bring to a boil, then adjust the heat so it doesn’t boil over and keep it at a medium boil for 5 minutes.
Remove the pan from the heat and stir in the lemon juice, then set aside to cool for 15 minutes. Strain the mixture through a fine mesh sieve set over a large measuring cup with a pouring lip. Divide the mixture between 6 ramekins, filling them about 3/4 of the volume.
Refrigerate for at least 4 hours or until fully set, then top with blueberries, if you like.
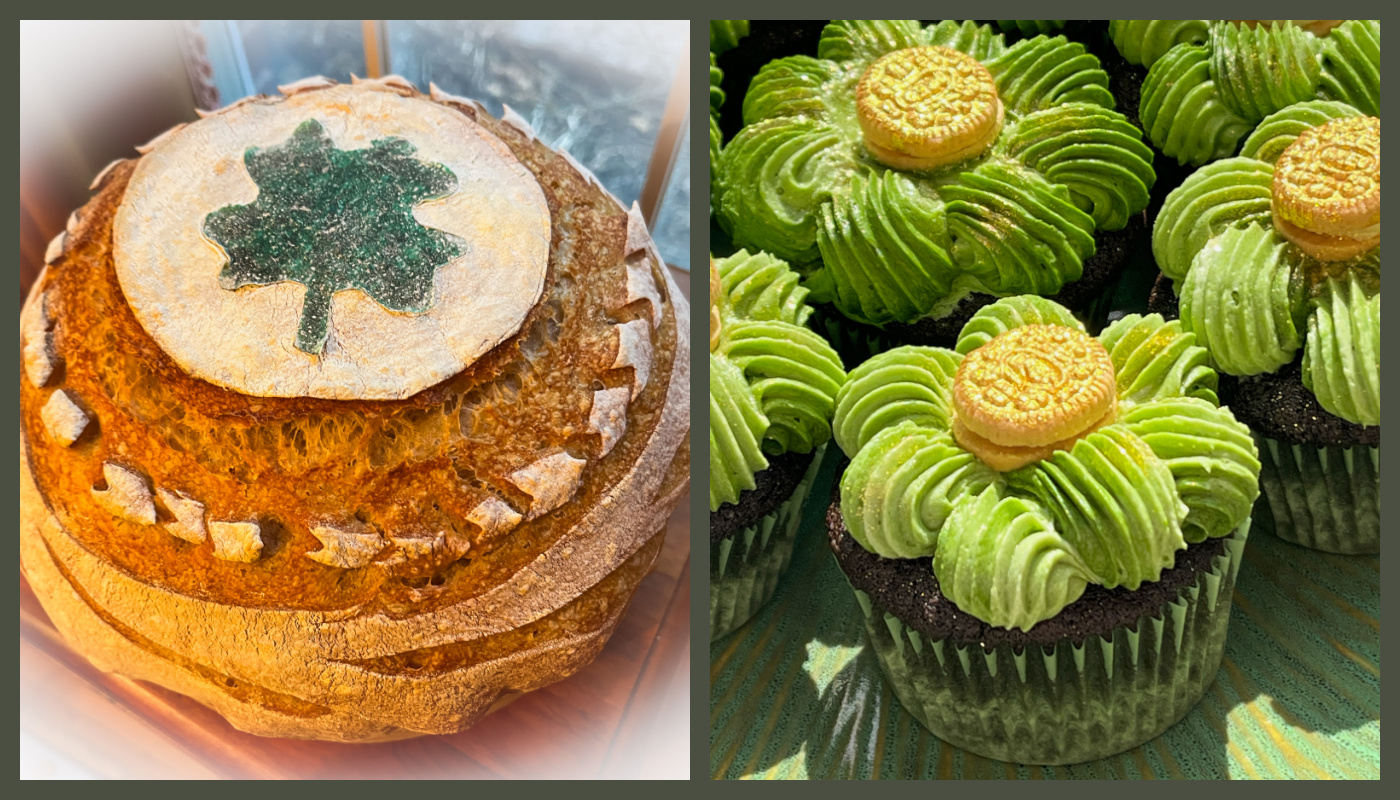
If you follow my baby blog, perhaps you’ve noticed I ran out of time to blog about St. Patrick’s cookies? It turns out I also got in trouble right here in the Bewitching Kitchen. Today I share a bread and a batch of cupcakes made in honor of that special holiday. Included in this post, a little cupcake decorating video, that you can find right after the recipe.
x
Better late than never, let’s start with the bread…
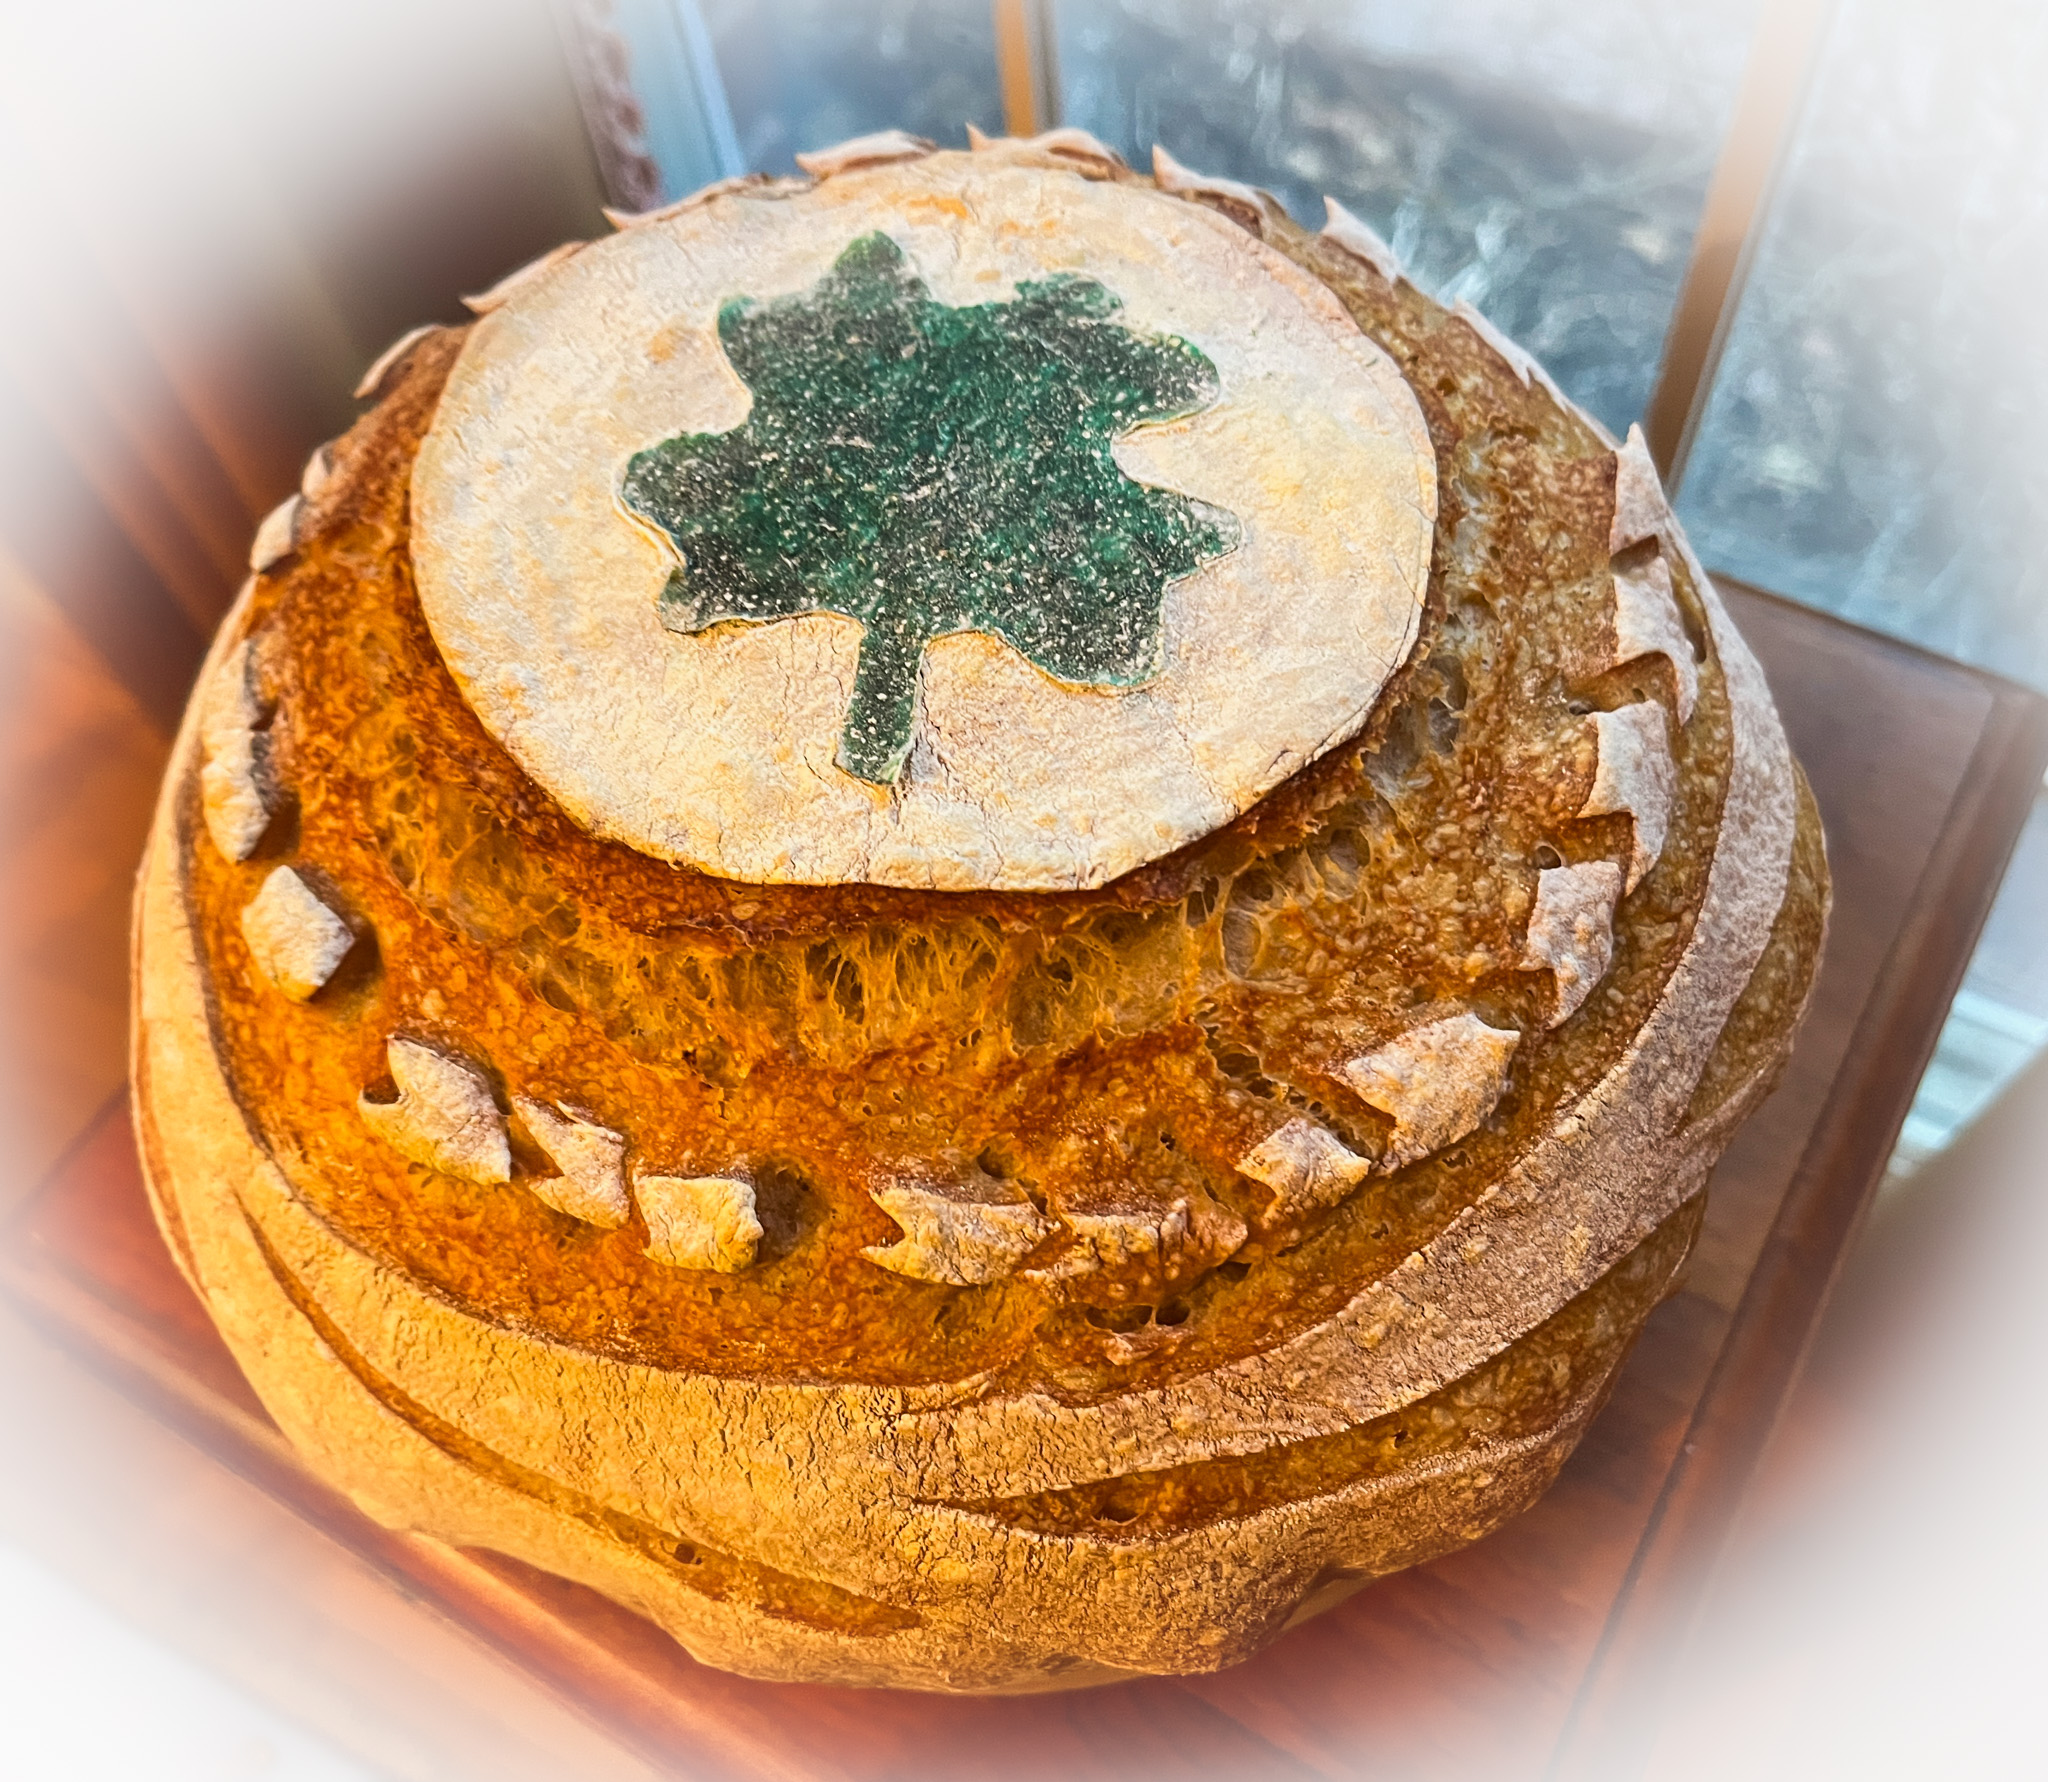
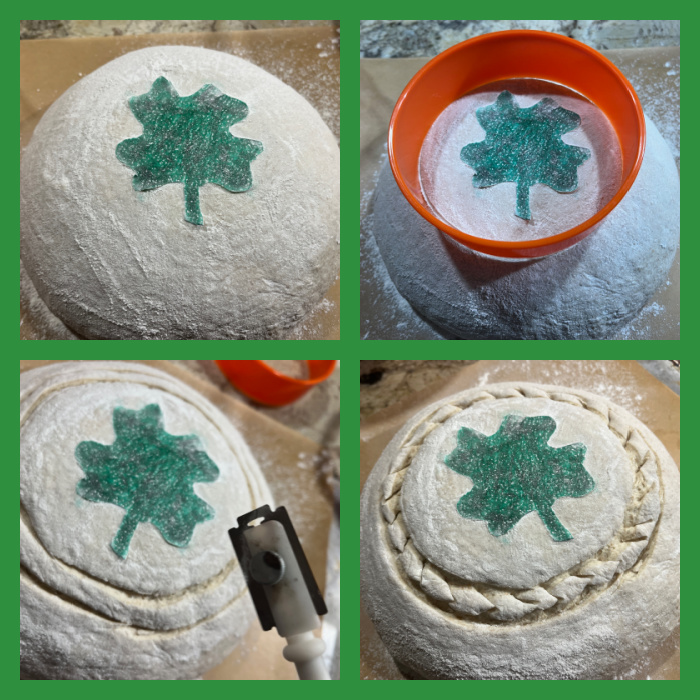
SHAMROCK SOURDOUGH (from The Bewitching Kitchen)
450g bread flour 25g spelt flour 25g dark rye flour 75g sourdough starter (stiff or 100% hydration) 10g salt 360g water Thai rice flour (or tapioca flour) shamrock shape cut from edible paper
Mix all ingredients in the bowl of a KitchenAid type mixer fitted with the dough hook. Knead gently for about 4 minutes (first or second speed maximum).
Transfer dough to a lightly oil bowl and do a bulk fermentation with 4 folds made 45 minutes apart. Before you start the fermentation , remove a very small amount of dough to a small glass container (like those that hold spices), and mark where the level of the dough is with a permanent marker. Keep that at room temperature to monitor fermentation.
After the last folding cycle, keep an eye on the fermentation using the small vial. Ideally you want to let the dough ferment until it is double in size. Depending on the day, temperature of your kitchen, it might take 8 hours or more.
Once bulk fermentation is over, shape the dough as a round ball. Place in the fridge overnight.
Next day, freeze the dough for 30 minutes in the banetton, to make it easier to score later. Invert the dough on a paper liner, add the shamrock shape in the center, and flour the region around it (I used Thai rice flour). To make the paper stick, you can spray the surface VERY LIGHTLY with water. Score the perimeter of the shamrock and the outer area of the dough, and place in a Dutch oven.
Close the pan and bake at 450F for 30 minutes, open and allow the bread to brown for a further 15 minutes.
Comments: I used my Supersonic blade to score the dough, but a sharp razor blade will do, of course. This composition of sourdough, with mostly white flour, but a touch of spelt and rye might very well be my favorite these days.
x
Moving on, time for cupcakes!
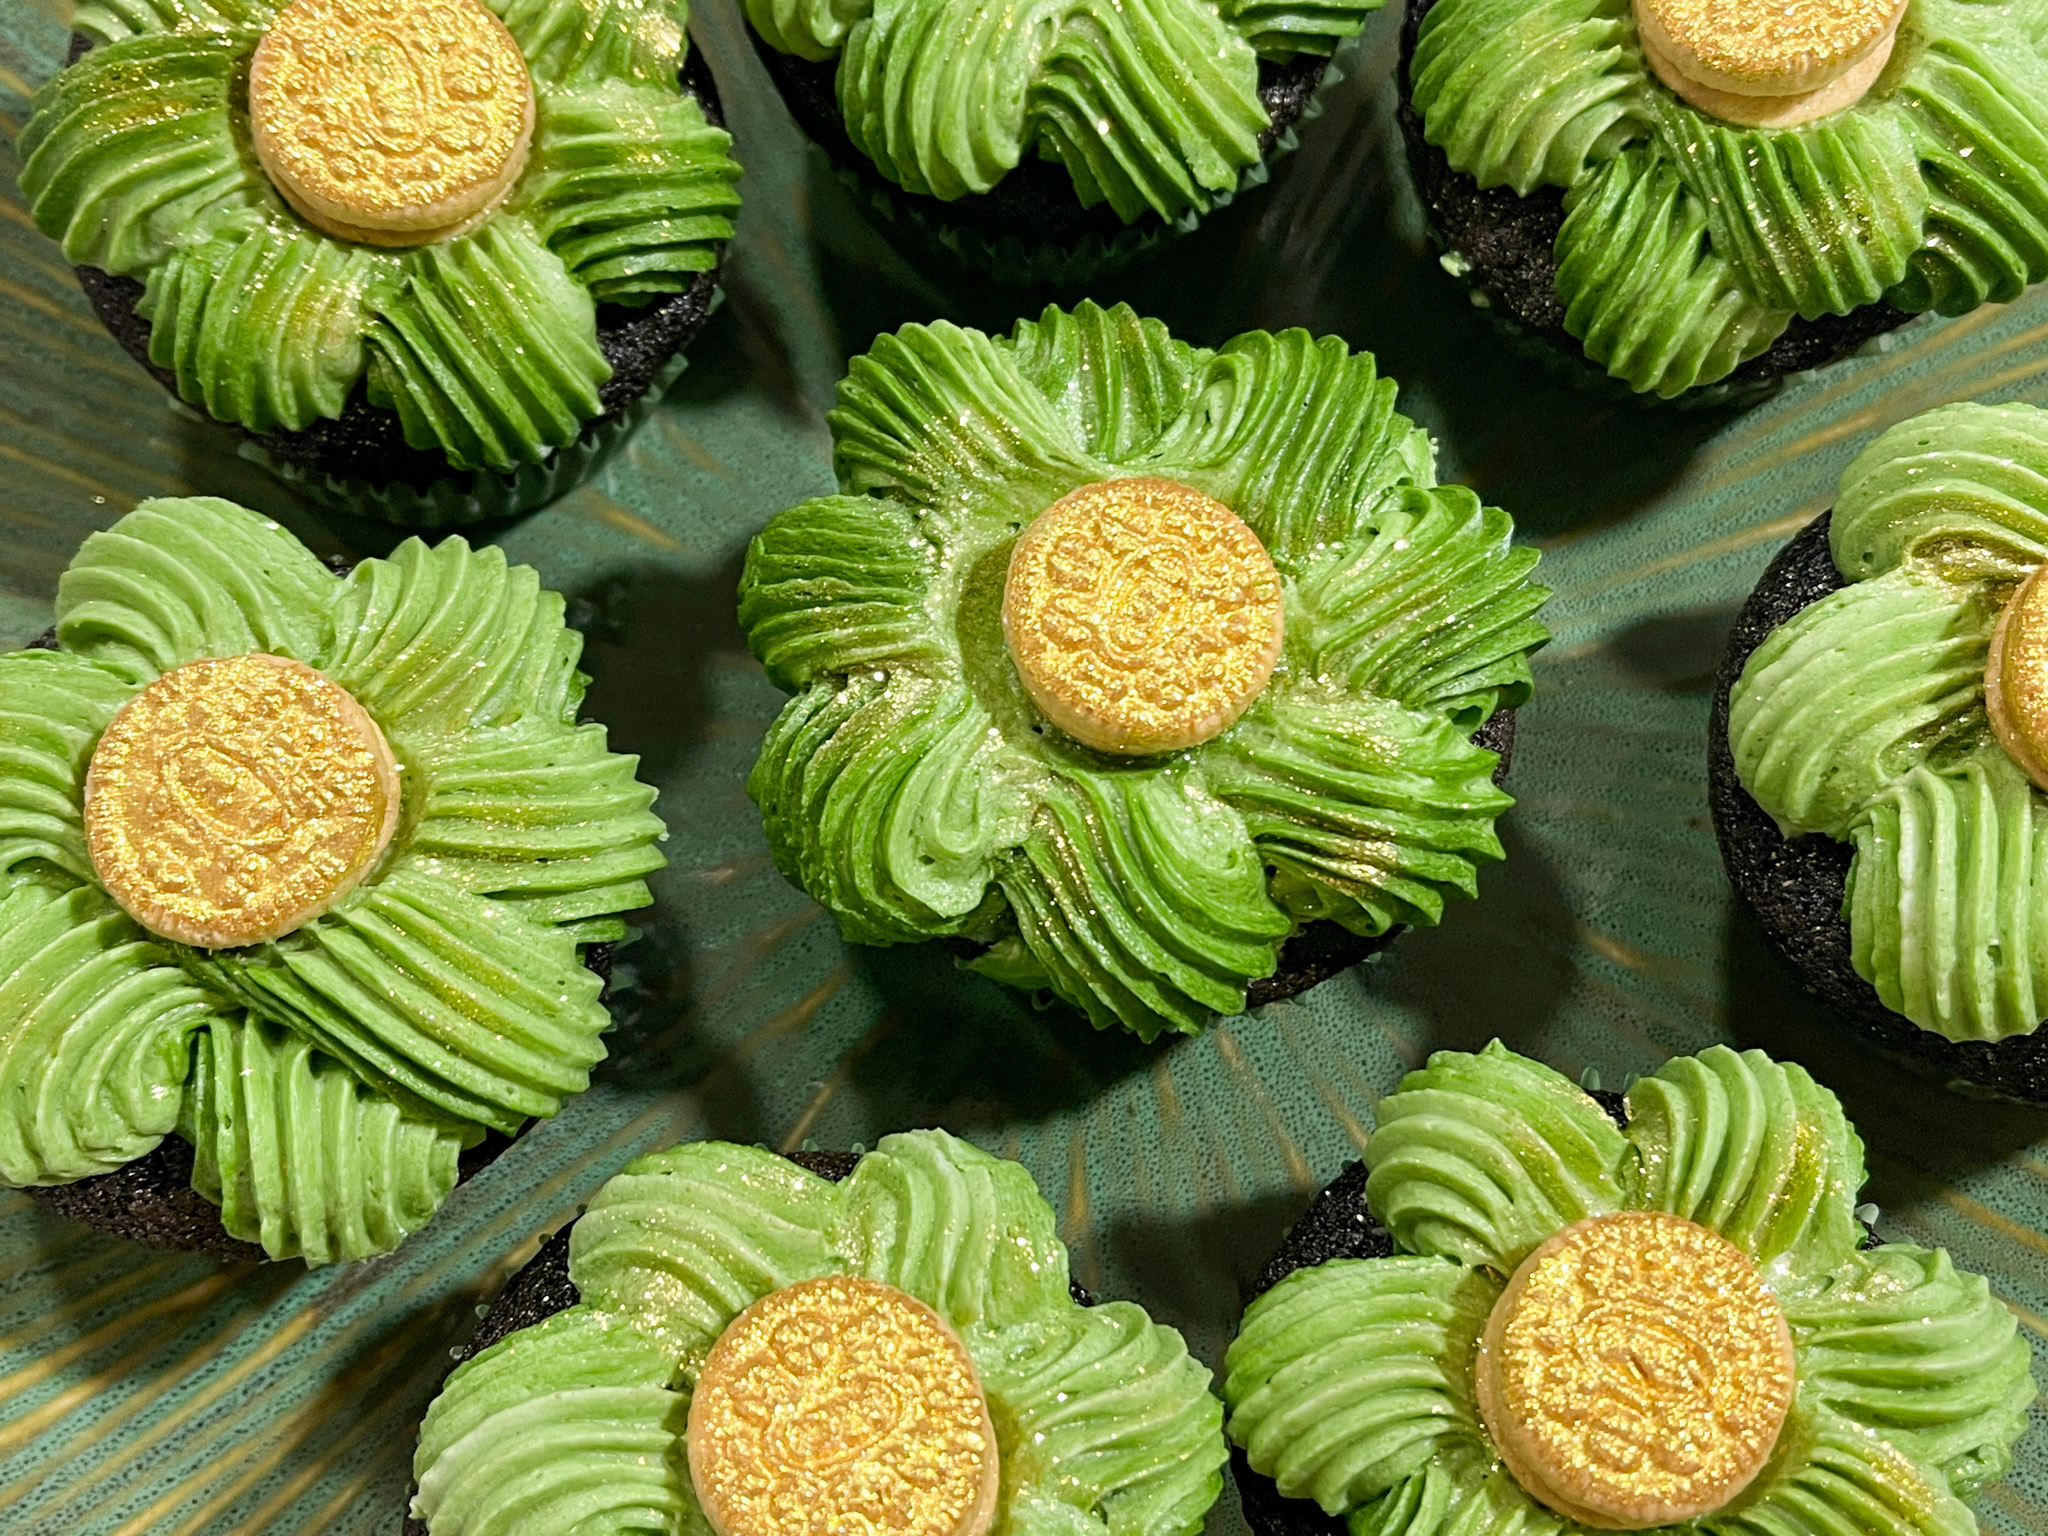
ST PATRICK CHOCOLATE CUPCAKES (from The Bewitching Kitchen)
makes 10 cupcakes
100g all-purpose flour 20g cocoa powder 140g granulated sugar 1/8 tsp salt 40g unsalted butter 1 large egg 120ml milk 1 + ½ tsp baking powder buttercream for topping Mini-golden Oreos painted with gold luster powder + vodka
Heat your oven to 350F and line a muffin tray with cupcake liners.
In a small, bowl, whisk the milk and egg with a fork. Reserve.
Put the flour, baking powder, cocoa powder, butter, sugar and salt into the stand mixer bowl with the paddle attachment. Mix on a medium speed until the butter turns into the consistency of sand.
Pour in half of the milk and egg mixture into the stand mixer bowl with your other ingredients and mix on a slow speed until it all fully combines and becomes a thick paste. Pour the remaining milk mixture and mix on low-speed until the batter is smooth.
Fill the lined pan with batter, a little more than halfway full. Bake for 16 minutes, testing with a toothpick. Leave to cool in the pan for 5 minutes, then remove the cupcakes to a rack to cool completely.
BASIC BUTTERCREAM FOR CUPCAKES
226g butter, unsalted, softened 452g powdered sugar pinch of salt Vanilla extract, about 1 tsp or more to taste a couple or more tablespoons of milk (to adjust consistency)
Place the softened butter in the bowl of a KitchenAid type mixer with the paddle attachment, add the pinch of salt, and whip at high speed for about 7 minutes. It needs to be really soft and lighter. Stop the mixer. Eyeball the amount of powdered sugar, add 1/3 and mix at low speed at first, once the sugar is starting to get incorporated, increase the speed to medium-high.
Add the second portion of the sugar, and incorporate the same way. Add the final portion, start at low speed, clean the sides of the bowl well with a spatula, add the vanilla and increase the speed slowly all the way to high. Whip it until very smooth. Add milk to desired consistency. Divide the buttercream in two portions, dye one with light green, one with darker green. Place both portions over a plastic wrap, enclose them as a sausage, drop inside a large piping bag fitted with an open star tip. Decorate the tops of the cupcakes as shown in the video. Add the gold Oreos.
Comments: I was pretty happy with the way these cupcakes turned out. It was fun to decorate, and to show the process in more detail, here is a little video for you.
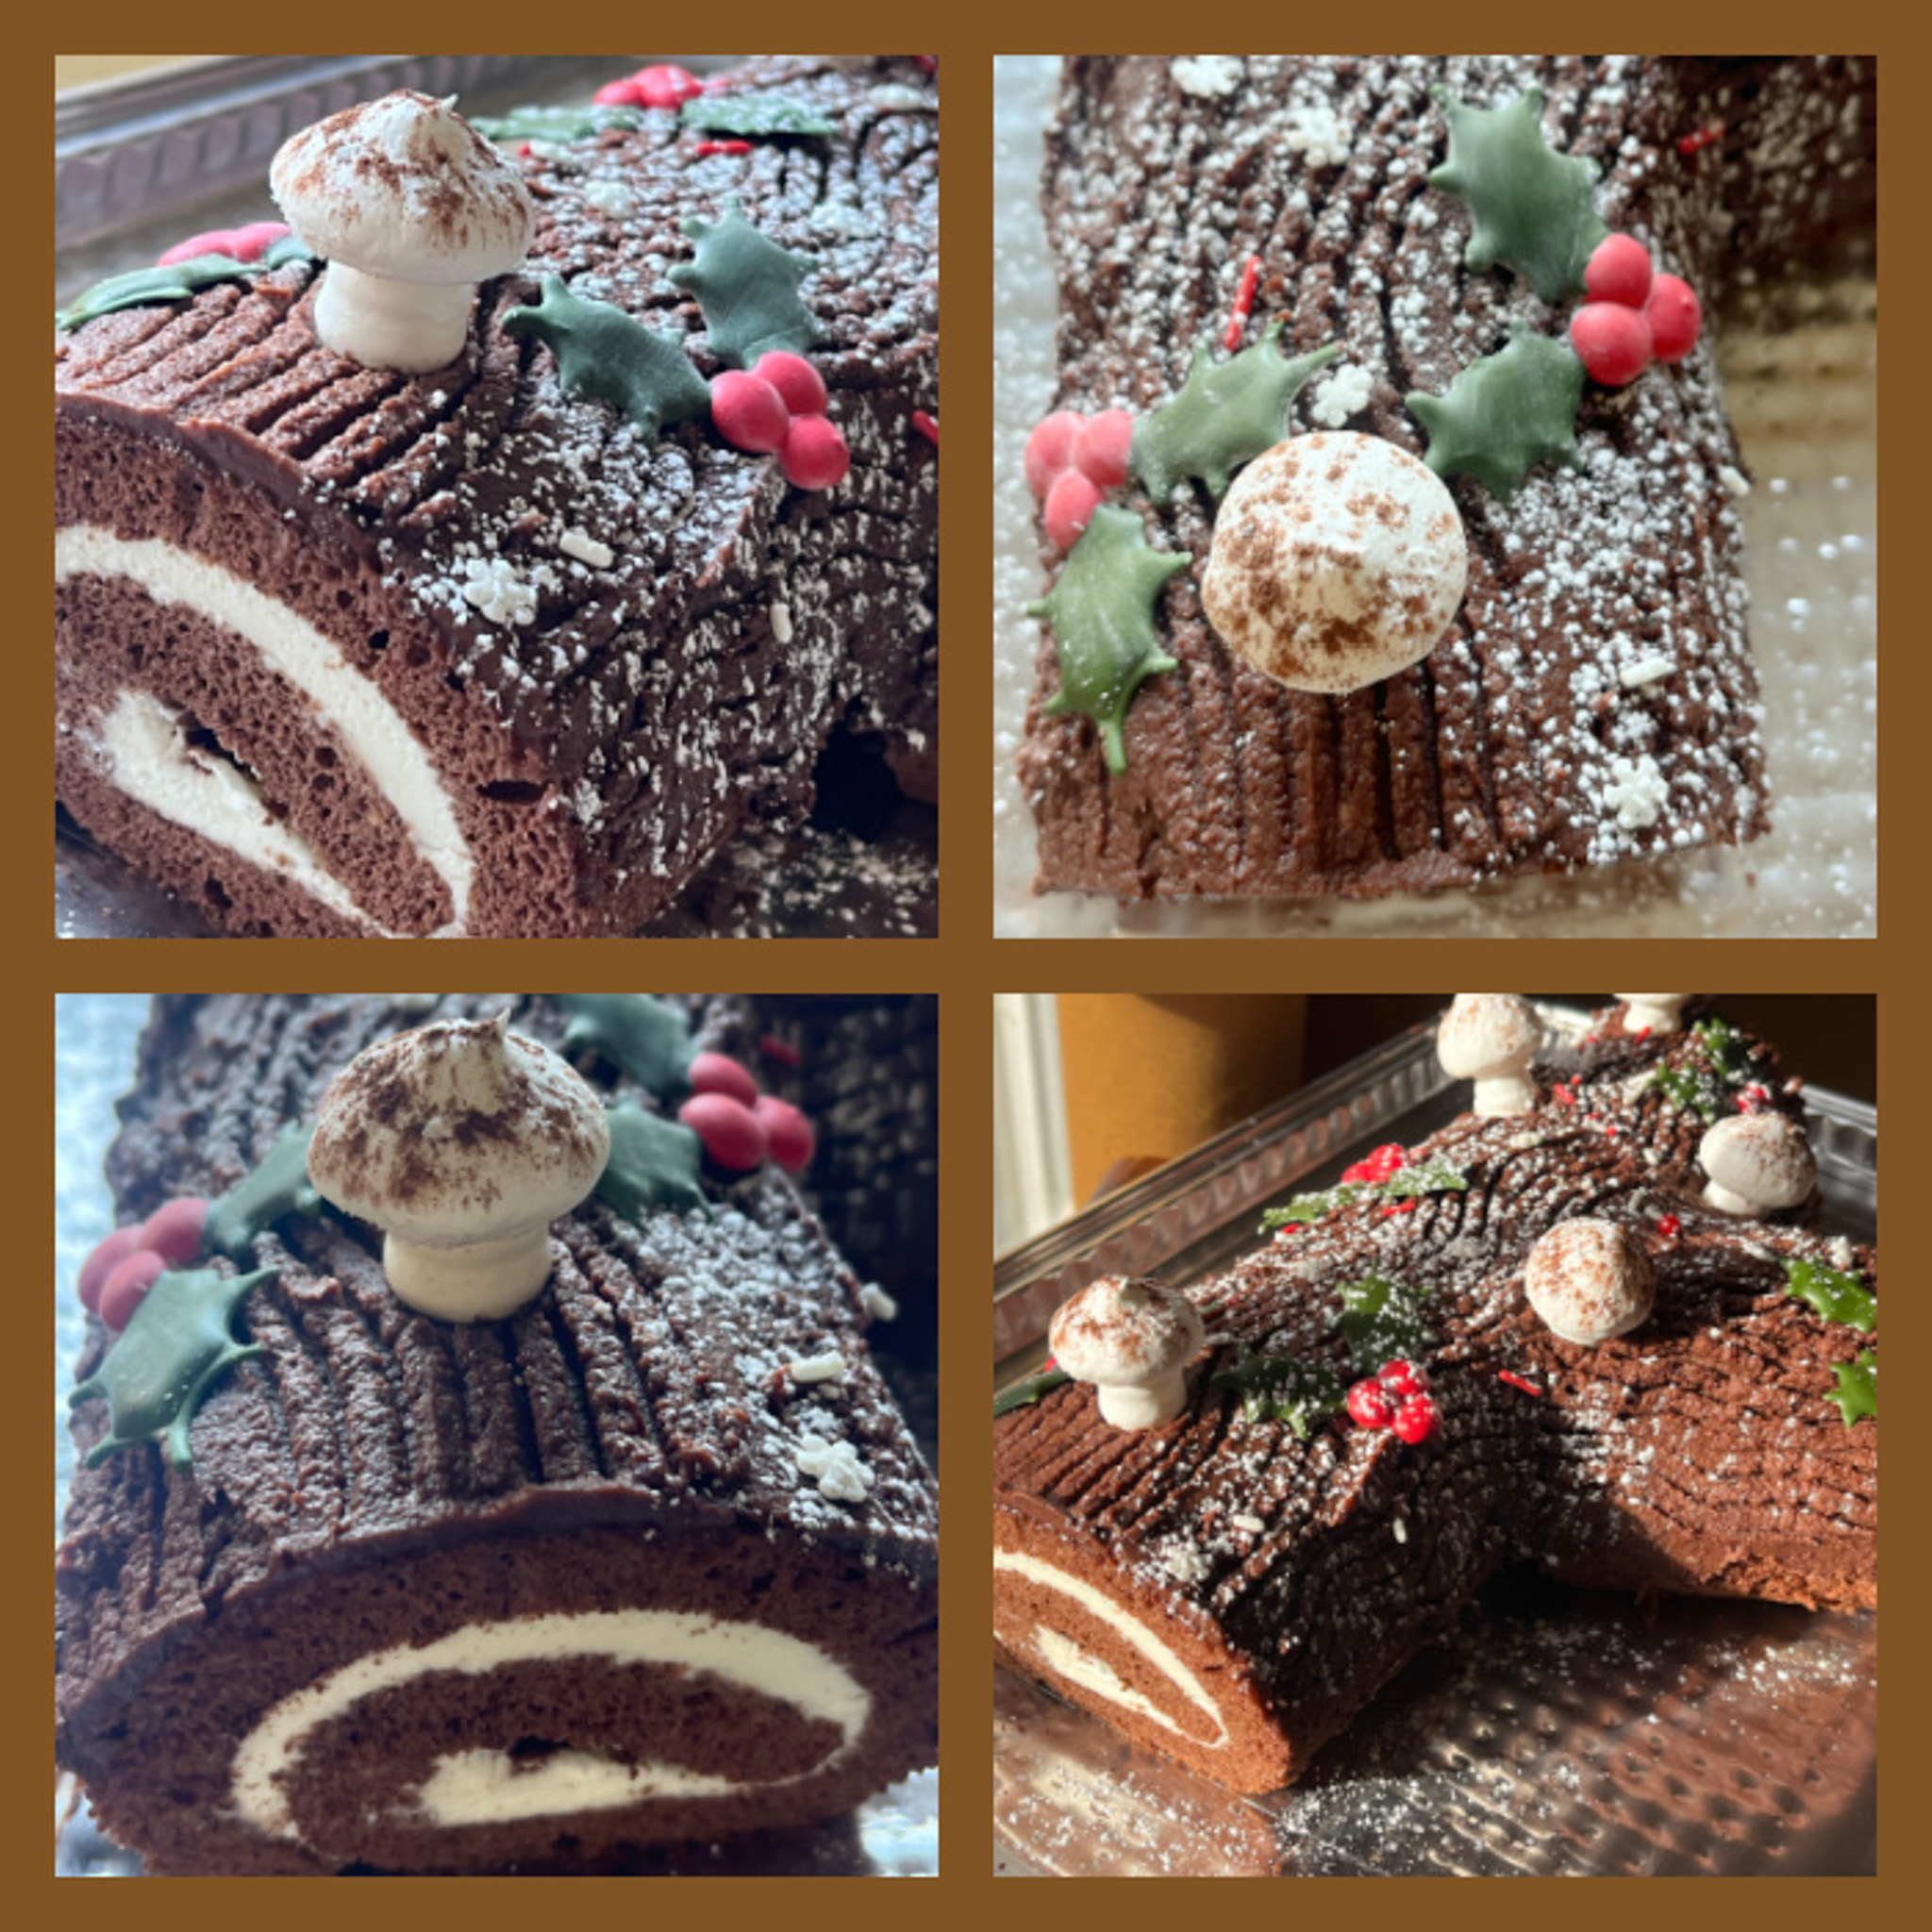
Not my first time, in fact it is my fourth, but it is hard to resist such a classic for the holiday season.
So many components, but apart from the decorations, nothing is that complicated, and of course even the decorations can be simplified to a minimum: a dusting of powdered sugar. Your cake, your choice!
for the chocolate sponge cake: ¾ cup sifted cake flour (75 grams) ¼ cup sifted cocoa (25 grams) ¼ teaspoon baking powder 6 eggs separated ⅔ cup sugar, divided (140 grams) 1 teaspoon vanilla
for the filling: 4 oz. cream cheese, at room temperature 1/2 cup powdered sugar (100g) 1 cup heavy cream 1 tsp. vanilla extract
for the buttercream frosting: 1 + ¼ cups unsalted butter softened (284g) ¼ teaspoon salt 8 tablespoons cocoa powder (48g) 2 + ¾ cups confectioners’ sugar sifted (330g) 1 teaspoon vanilla extract several tablespoons of heavy cream to adjust consistency
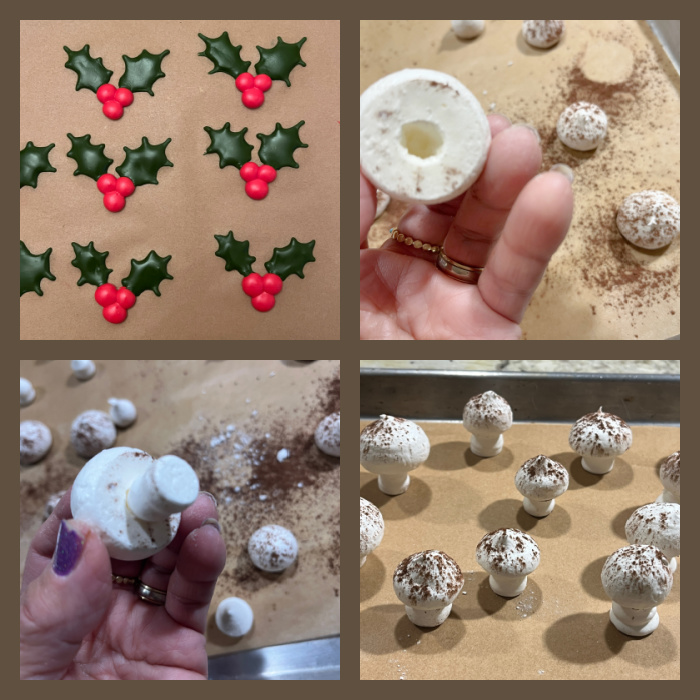
for the meringue mushrooms: 2 egg whites room temperature ⅛ teaspoon cream of tartar 6 tablespoons superfine sugar cocoa powder for dusting melted chocolate or Royal icing for assembling
Make the meringue mushrooms, the day before. In a large mixing bowl, combine the egg whites and cream of tartar. Beat on medium speed until frothy and doubled in volume. With the mixer running, slowly sprinkle in the sugar. Once all of the sugar is added, continue beating until stiff and glossy peaks form, about 5 minutes. Place the meringue in a piping bag fitting with a large round tip.
Pipe half of the meringue into stems by placing the piping tip on the parchment and squeezing the piping bag while slowly moving the tip up, creating a column of meringue. Pipe round tops. Dust the tops and stems very lightly with cocoa powder. Bake for about 2 hours or until the meringues easily release from the paper. Turn the oven off and let cool completely in the oven.
Once cool, use a sharp knife to make a little indentation on the bottom of the caps, brush with melted chocolate or Royal icing, and stick the stem into it. Set aside for at least one hour before moving them.
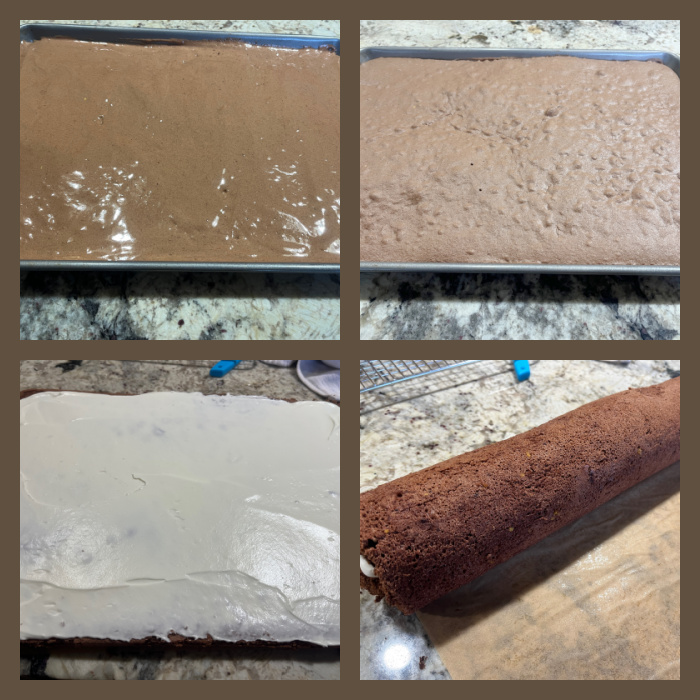
Make the cake: Heat the oven to 350. Spray the bottom of ½ sheet pan with cooking spray. Line with parchment paper and spray the paper. Do not spray sides of pan. Set aside.
Whisk together the flour, cocoa and baking powder, mixing well. Set aside. Combine the egg yolks, ⅓ cup sugar and vanilla in a mixing bowl fitted with the whisk attachment. Beat until very thick and very pale yellow.
In a clean mixing bowl with a clean whisk, beat the egg whites until soft peaks form. Slowly add the remaining ⅓ cup sugar and beat until fairly stiff. Place the egg yolks over the egg whites and sift half the flour/cocoa mixture over the beaten eggs. Fold together. Fold in the remaining flour/cocoa. Gently pour into the prepared pan and spread out evenly. Bake 10 to 12 minutes. The top will spring back when lightly touched. Immediately cover directly with foil and place on a rack to cool completely. When ready to assemble, it will roll out easily.
Make the filling: In a large bowl, beat the cream cheese with an electric mixer on low speed until just smooth. Add the powdered sugar and beat until smooth, about 1 minute. Gradually beat in the heavy cream 1/4 cup at a time. Increase the speed to medium high and beat until stiff peaks form, 2 to 4 minutes. Add the vanilla and beat just to combine.
Make the frosting: Place the butter and salt in a mixing bowl and beat on medium speed until smooth. Add the cocoa powder and beat until well combined, stopping to scrape down the bowl a few times, about 2 minutes. With the mixer on low, beat in the confectioners’ sugar and vanilla. Slowly stream in the heavy cream while beating. Increase mixer speed to medium and beat until fluffy and easily spreadable, about 2 minutes.
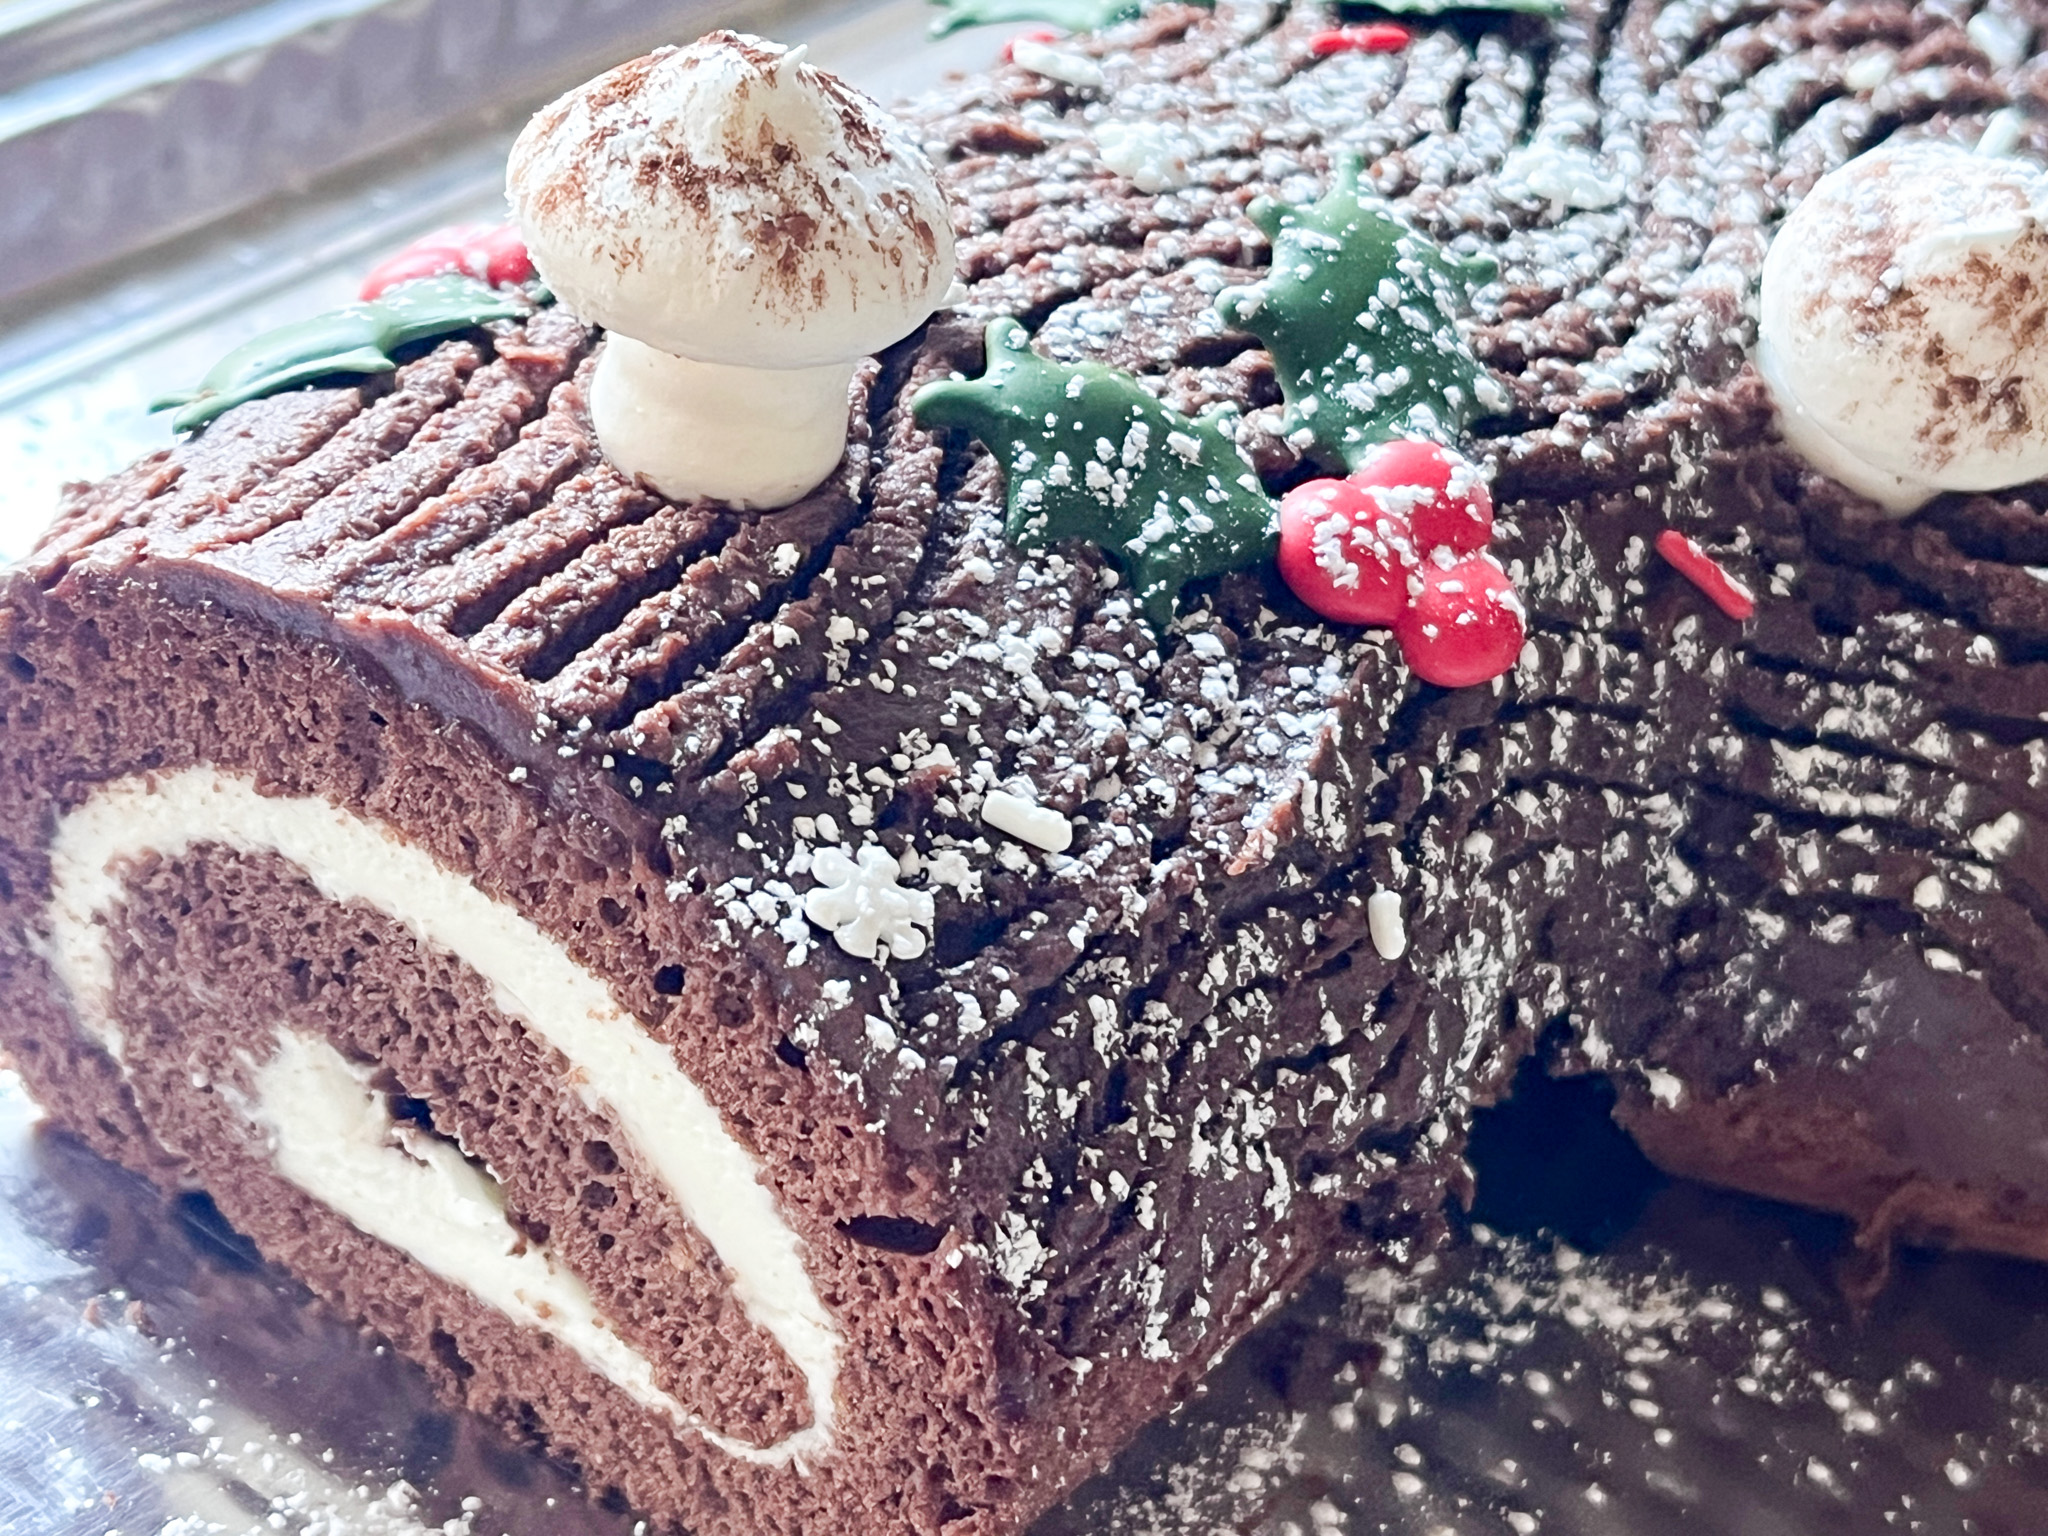
ASSEMBLE THE CAKE: Remove the cake from the pan, invert over parchment paper. Peel off the bottom paper. Add filling to the whole extension of the cake, then roll from the long side. Place in the fridge preferably overnight to completely set the rolled cake.
Cutting at a diagonal, cut about two inches off of one end. Place the log on a serving plate. Spread a few tablespoons of frosting onto the end of the cut-off and stick to the side of the log. Spread the remaining frosting all over the cake roll, leaving the ends exposed.
Run fork tines through frosting in one direction to give the appearance of bark. Trim the un-cut end of the log to expose a perfect swirl. Refrigerate the cake until ready to serve.
Just before serving, decorate the log with your choice of goodies.
Comments: I love the method of cooling the cake completely, covered with aluminum foil. It rolls like a dream and the cake is not at all soggy from the steam generated during cooling. I am quite fond of the cream cheese filling, a nice contrast with the chocolate sponge cake.
The decorations are a lot of fun to plan and make. I used Royal icing piped as transfers, made several days earlier, and meringue mushrooms which are of course a classic.