MINNIE MACARONS: A FUN PROJECT WITH A HAPPY ENDING

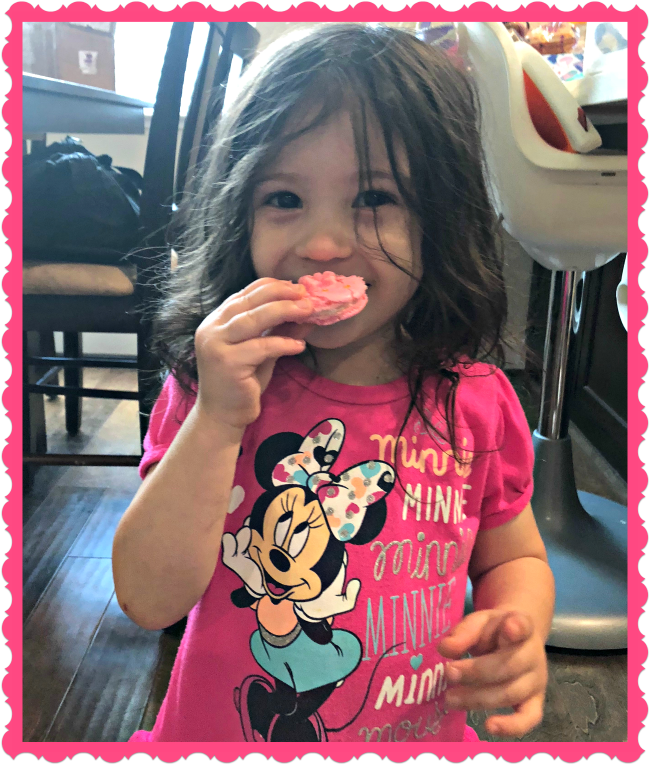
It all started with a very innocent email from my daughter-in-law. Inside a simple phrase and a single picture… The phrase: Something for you to try… The picture: a gorgeous Minnie Macaron sold at Disney. Miss G, our grand-daughter is crazy about all things Minnie. Basically, the universe conspired to make me  bake a batch.
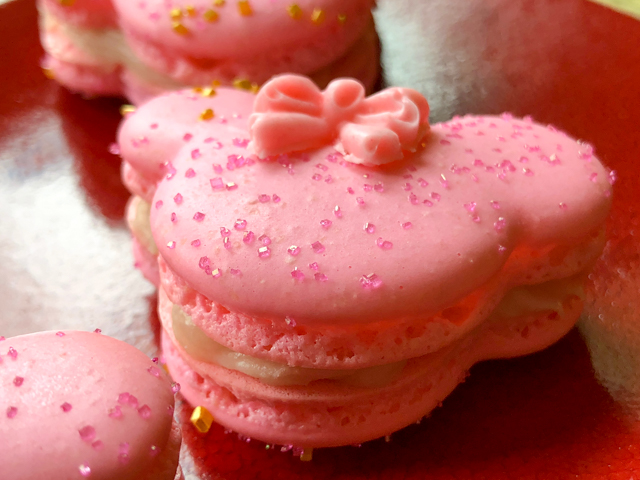
MINNIE MACARONS
(from the Bewitching Kitchen)

for the shells:
198 g powdered sugar
113 g almond meal
113 g egg whites at room temperature
a pinch of cream of tartar
100 g granulated sugar
Pink Gel color from AmeriColor
2 drops vanilla extract

for the filling:

280 g strawberries, stems removed
140 g sugar
1 lemon, juiced
250 g white chocolate, chopped fine
1/3 cup heavy cream (about 80g)
1 tablespoon butter

to decorate:
pink bows (melted Candy Melts with a drop of pink gel color)
gold and pink sparkling sugar

Make the filling:  Prepare fresh strawberry jam by mixing strawberries, sugar and lemon juice in a small saucepan. Cook for 30 minutes, mixing every once in a while. After 30 minutes cool and refrigerate. Reserve (you will not need the full amount). You can also use store-bough strawberry jam, if more convenient. Make a white chocolate ganache by mixing very hot heavy cream with the white chocolate cut into small pieces. Mix until fully dissolved. To that, add 1/4 cup of the strawberry jam prepared before, and the butter. Mix well and refrigerate until it’s time to fill the macarons. If too thick, bring to room temperature for an hour or so, whisking a few times.

Make the pink bows: Melt about 1/3 cup candy melts in the  microwave. Whisk until smooth, add a tiny drop of pink gel color. Place in a silicone mold and freeze until solid. Un-mold the decorations, make another batch until you have enough. I made 14 Minnie macarons with this batch, and 16 regular round macarons that did not need the bow on top.

Make the shells: Line 2 or 3 heavy baking sheets with parchment paper or Silpat mats. Layer the powdered sugar and almond meal   in a food processor. Pulse until the mixture looks like fine meal, about 15 seconds. Pass through a sieve and transfer to a small bowl. Set aside.

Place the egg whites and pinch of cream of tartar in the bowl of a stand mixer fitted with the whisk attachment. Make sure that the bowl and the whisk are impeccably clean. Starting on low-speed, whip the whites with the cream of tartar until they look like light foam. The whites should not appear liquid. The foam will be light and should not have any structure.

Slowly rain in the granulated sugar, trying to aim the stream between the whisk and the side of the bowl. Turn the speed up to medium-high. Continue to whip the meringue until it is soft and shiny. It should look like marshmallow creme. Add the gel color and the vanilla. Staying at medium-high speed, whip the egg whites until the mixture begins to dull and the lines of the whisk are visible on the surface of the meringue. Check the peak. It should be firm. Transfer the whites to a medium bowl.

Fold in the almond meal mixture in three increments. Paint the mixture halfway up the side of the bowl, using the flat side of a spatula. Scrape the mixture down to the center of the bowl. Repeat two or three times, then check to see if the mixture slides slowly down the side of the bowl. Divide the mixture (eyeballing is fine) in two piping bags, one fitted with a 1/2 inch piping tip, the other fitted with a 1/4 inch tip. Pipe macaron rounds using the bigger tip, filling one full tray. Pipe small rounds as ears on each round using the smaller tip. Finish one full tray before starting another one.

Slam each sheet hard four to six times on the counter. Then fist bump each end of the sheet’s underside twice. If using sparkling sugar, sprinkle over the macarons. Let the unbaked macarons dry until they look dull but not overly dry. Drying time depends on humidity. Ina dry climate, the macarons can dry in 15 to 20 minutes; in a humid climate, it can take 35 to 40 minutes.

While the macarons are drying, heat the oven to 300 F (170 C/gas mark 3). Bake one sheet at a time on the middle rack. Check in 11 minutes. If the tops slide, then bake for 2 to 3 more minutes. The macarons should release without sticking. Check one or two. If they stick, put them back in the oven for 1 to 2 more minutes. Let the macaroons cool for 10 minutes before removing from the pan.

Assemble the macarons: find two macarons similar in size and add a good amount of filling to the bottom of one of them. Place the other on top and squeeze gently to take the filling all the way to the edge.  Glue to each macaron one little pink bow using melted white chocolate.

Store in the fridge for 24 hours for perfect texture.

ENJOY!

to print the recipe, click here

Comments: The macarons sold at Disney seem quite large, I decided to make them smaller. As to the filling, I opted for strawberry and white chocolate ganache for two reasons. First, Miss G. loves strawberries, it is one of her favorite fruits. Second, a ganache probably stands shipping better than buttercream. I used a lower proportion of heavy cream to make sure the ganache would set, especially considering the added strawberry jam.  I think a little bit of red food color to the filling would have been nice, but I only thought about that when I was done assembling them. Oh, well…

I got a pretty cute silicone mold at amazon.com to make the bows. You can use fondant, real chocolate, or candy melts, whatever you prefer. I have a bit of fondant-phobia, and never worked with it, so Candy melts seemed like a safer option. Worked like a charm. The only problem is having to make several batches, but each needed only 10 minutes in the freezer to un-mold properly. I made the bows the day before and kept them all frozen in a little plastic bag. I know, so organized!  Who could imagine that?

I made half the batch as regular macarons (large image of the composite photo above), and half Minnie-shaped. Those who are very skilled with a piping tip might be able to get by piping the ears with the same size tip as the face. I decided to play it safe, and poured some of the batter in a piping bag fitted with a smaller tip. For the body of the macaron I used a Wilton 2A tip, for the ears, a Wilton 12. With a more complex shape, it is important that the macaronage step be performed correctly.

My tip for perfect macaronage:  when I think I am almost at the right point of deflating the almond-meringue mixture, I get a teaspoon of batter and drop it on parchment paper. I lift the teaspoon, and the little blob that forms must disappear in about 20 seconds. If it does, the batter is ready, if it is still visible, I fold a few more times. Remember that you can always fold a few more times, but if you go overboard, the batter will be ruined. The macarons will spread too much, spread too thinly and it will be impossible to keep the Minnie shape as piped. Plus, they won’t form nice feet.  At the very least you will need a box of Kleenex. If the situation persists, therapy might be your only option.

I cannot tell you how happy I was with this project! It was fun to plan, to get the tools for the job, to make it, and to imagine the look on Miss G’s face when she opened the box and found a bunch of Minnie cookies inside. The filling turned out just as I expected, sweet, but with the right amount of tartness given by the jam, which by the way, I made with a lot less sugar than store-bought versions.

AND FOR THAT HAPPY ENDING….

ONE YEAR AGO: Nigella Lawson in the Bewitching Kitchen

TWO YEARS AGO: Walnut-Raisin Bran Muffins

THREE YEARS AGO: Gingersnaps with White Chocolate Chips

FOUR YEARS AGO: Turkey Chili with Almond Butter

FIVE YEARS AGO: Secret Recipe Club: Leek and Cheese Tart

SIX YEARS AGO: Secret Recipe Club; Triple Chocolate Brownies

SEVEN YEARS AGO: Shaved Asparagus Salad

EIGHT YEARS AGO: Indonesian Ginger Chicken

SaveSave

SaveSaveSaveSave

SaveSave

SaveSave

SaveSave

SaveSave

SaveSave

SaveSave

SaveSave

SaveSave

SaveSave

SaveSave

SaveSave

SaveSave

SaveSave

SaveSave

SaveSave

SaveSave

SaveSave

SaveSave

SECRET RECIPE CLUB: GLUTEN-FREE & VEGAN RASPBERRY BARS

Last Monday of March, a month that makes me happy for several reasons. I was born in March, Phil and I got married 15 years ago in March, and the month also welcomes the beginning of Spring.  Can you fully grasp the unmeasurable joy associated with it? It means I survived another winter, and here I am, alive and kicking to share with you one more adventure as part of The Secret Recipe Club.   You know, that event that pairs two food bloggers in secret, and then the whole group posts about their chosen dish at exactly the same time. My assignment this month was the blog Without Adornment, hosted by Bean. She has a degree in Chemical Engineering, and her hobbies are cooking/baking, and photography, so of course her blog is a perfect venue to showcase her talent.  I was thrilled by this assignment, because Bean is a very accomplished baker who must make exclusively gluten-free recipes. Those of you who have gluten allergies know how tricky it can be to try and mimic the delicious cookies, breads, pies, and muffins that rely on gluten for perfect texture and taste. Browsing her blog really opened my horizons and the list of goodies I wanted to try was extensive.  To name a few, I was inclined to bake a batch of her White Chocolate Oatmeal Cookies with Cranberries,  then almost chose her Gluten-Free Pear Clafoutis, Another amazing option that I will bake soon: Dairy Free Creme Brulée (using coconut milk, how sweet is that?). As usual, savory stuff appeals a lot to me, so I also saved her Vegan Walnut Zucchini Crackers for final consideration. After a little bit of a mental struggle,  I went with her Raspberry Bars, in part because they use quinoa flakes and I had a box sitting in my pantry begging to come out and play.  I could not miss the opportunity…

RasberryBars

GLUTEN FREE VEGAN RASPBERRY SQUARES
(from Without Adornment)

1/2 cup almond flour
1/2 cup brown rice flour
1/4 cup tapioca starch
1/4 cup coconut flour
1 tsp. baking powder
1/4 tsp. salt
1 cup oats
1/2 cup quinoa flakes
3 tbsp. palm sugar
1/2 – 2/3 c. coconut oil
3 cup thawed raspberries, with as much of the liquid drained as you can.
3 – 4 tbsp. honey
1 tsp. cinnamon
1/2 tsp. nutmeg
1/2 tsp. cardamom
1/2 tsp. pure vanilla extract

Heat oven to 350F.

Whisk together flours, baking powder and salt. Add oats, quinoa flakes and palm sugar and mix until evenly distributed. Add in unmelted coconut oil. Using your fingers, work the coconut oil into the flour mixture until there are no lumps remaining and the mixture is crumbly.

In a separate bowl, stir together raspberries, honey and spices. Add more sweetener to reach desired sweetness. Press over half of the crumb mixture into a greased 8″ square pan. Scoop the raspberries onto the pressed bar mixture and distribute evenly. Sprinkle the remaining crumb mixture on top of the raspberries and pat lightly.

Bake for 30 – 40 minutes or until topping is light brown.

Cool completely before cutting into squares.

ENJOY!

to print the recipe, click here

composite1

Comments:  I changed the recipe slightly by using a mixture of raspberries and blueberries, as the price tag on the raspberries was a little high. I don’t think it hurt anything, it just made the color of the filling darker than Bean’s concoction, and also a bit more chunky, as the blueberries retain their shape. The cute box of quinoa flakes was one of those classic impulse buys that I am often a victim of. But I knew the flakes would come in handy, and was glad to be able to use them in this recipe.

composite2

Gluten-free baking is really a huge challenge, because without gluten to provide that nice, elastic structure, baked goods tend to be dry, and much less pleasant to eat. However, using the right mixture of flours and grains, one can get close enough to the “real thing” and these bars are a perfect success story.  I took the squares to the department and did not mention they were gluten-free. Nobody seemed to notice, and they were inhaled in a little over one hour.  I call it a success story indeed.

Bean, I hope you had as much fun with your assignment as I had with mine!  And for those reading my blog, make sure to click on the blue amphibian smiling at you at the very end.  She (or he, who knows?) will take you to a new page showing all the tasty concoctions made by my virtual friends of The Secret Recipe Club.  Enjoy the collection!

ONE YEAR AGO: Lasserre, a French Classic

TWO YEARS AGO: Sourdough Bread with Walnuts and Dates

THREE YEARS AGO: Braised Brisket with Bourbon-Apricot Glaze

FOUR YEARS AGO: The Real Vodka Sauce

FIVE YEARS AGO: Pork Tenderloin and Blue Cheese

TWO APPETIZERS FOR THOSE WHO LIKE IT HOT

These appetizers would be great for a tapas party or to share with guests before a Tex-Mex meal.  They are very simple to prepare and both can be assembled in advance. Conveniently, both recipes are baked at the same temperature, 375 F.   When your guests arrive, stick the dishes in the oven, and they will be done by the time everyone is settling down, getting ready to enjoy the evening. I cannot decide which one I liked more, but chorizo has been a favorite ingredient these days, so maybe I lean towards the stuffed mushrooms as the winner. The recipe I’m sharing with you today came from Melissa’s blog,  “I Breathe I am Hungry“, which is a great site for those into low-carb and gluten-free nutrition. Even though I don’t fall into any strict category, whenever I  host a dinner party I like to include options that are lower in carbs, especially when it comes to appetizers because carbo-loading before a full meal seems a bit excessive.  The second recipe I won’t be sharing with you, but you can get it by ordering Melissa’s e-book The Gluten-Free Low Carber, which is a fantastic source of recipes, many of them not available in her blog.  Remember that  even if you do not own an iPad or Kindle, e-books can be assessed from your laptop.

ChorizoStuffedMushroomsCHORIZO, SPINACH & MANCHEGO STUFFED MUSHROOMS
(very slightly modified from I Breathe I am Hungry)

12 – 15 button mushrooms
6 ounces (about 3 links) chorizo
1 shallot, chopped
2 ounces cream cheese
1/2 cup grated Manchego cheese (or sharp Cheddar)
3 cups fresh baby spinach leaves
salt to taste (you will need very little)

Remove chorizo from its casing and saute in a medium frying pan for a few minutes. Add the chopped shallot and cook for about 3 minutes until translucent. Meanwhile, clean off the mushrooms and remove the stems. Place the caps on a large plate and microwave for 2 minutes to soften.

Add the cream cheese, shredded cheese, and baby spinach leaves to the chorizo mixture. Stir well and cook for a minute or two until the spinach wilts. Remove from the heat. Stuff the mushrooms with about a tablespoon each of the filling. Place on a cookie sheet and bake in a 375 F oven for about 10 minutes. Longer if you like your mushrooms really soft. Remove and cool for a few minutes before eating.

ENJOY!

to print the recipe, click here

composite

Comments: These are addictive. Now, Melissa herself warned about how hot they are once baked. Be careful and give them a little time to cool down before you bite into these babies. If you are serving them to company, I suggest offering small appetizer forks, so your guests can cut them in half with the fork.  It is hard to keep your composure if you bite into these and find out that the center feels like molten lava on your tongue. Please, don’t ask me how I know… (sigh)

And now the second appetizer: a Jalapeno Popper dip, creamy, spicy, truly delicious!

JalapenoDip

Of course, you could send the low-carb for a walk and dive into this dip with crackers, toasted baguette rounds, and tortilla chips.  But if that’s not acceptable think about slicing jicama very thinly and using the slices as a chip.  Whatever rocks your boat.

For the full recipe get Melissa’s e-book, The Gluten-Free Low Carber. I highly recommend it!   Her recipes are very creative, and even if you don’t worry about carbs and gluten, you will find plenty of stuff to drool over. Some of my favorites: Spaghetti Squash Carbonara (a happy accident in her kitchen). three versions of Flax Crackers, Buffalo Balls (don’t worry, it calls for ground chicken… ), Ham and Spinach Calzones (yes, gluten-free, very interesting dough using cream cheese), Faux-lafel with Tahini Sauce (creative twist on a classic) and of course I absolutely must make her Brazilian Chicken Pies. She also offers recipes for gluten-free pie and pizza crust, as well as low-carb ketchup, barbecue sauces, and salad dressings.

ONE YEAR AGO: Baked Ricotta, Take Two

TWO YEARS AGO: Pumpkin Uncanned

THREE YEARS AGO: Pork Ragu

FOUR YEARS AGO: Friendly Kuri Squash

FIVE YEARS AGO: Celery and Apple Salad


CHESTNUT BROWNIES & A BLOG AWARD!

As you might remember from a recent post, I was looking forward to playing with what was left of my precious chestnut flour, born and raised in Corsica, matured in Paris, and lovingly transported all the way to Kansas, USA.  Celia, my dear virtual friend who blogs at Fig Jam and Lime Cordial, urged me to try her chestnut brownies, so on a warm Tuesday evening, I went right to work. By the way, these are gluten-free, so if you have allergies or other wheat-related-issues, go ahead and indulge!

ChestnutBrownies

CHESTNUT BROWNIES
(from Fig Jam and Lime Cordial)

90g (6 tablespoons) unsalted butter
225g (8oz) 50 – 60% cacao semisweet chocolate (I used Zoet 57%)
150g (¾ cup) sugar
1 teaspoon vanilla extract
2 large eggs, at room temperature
40g (¼ cup) chestnut flour (sifted)
150g (1 cup) chocolate chips (you can substitute toasted walnuts, same amount) 

Heat oven to 175C/350F or 160C/320F with fan.

Measure out all your ingredients and have them ready to go.  Line a 20cm (8″) baking pan with parchment paper.

In a medium saucepan, melt the butter, then add the chocolate and stir over low heat until melted and smooth.  Remove from the heat and stir in the sugar and vanilla until combined.

Stir in the eggs one at a time.  Add the sifted chestnut flour all at once and stir vigorously until you can feel the batter “snap”. The batter starts out grainy and fairly loose.  As you beat it by hand, it will initially feel like nothing is happening, and then it will suddenly feel a bit stiffer – that’s when you’ll know a state change has occurred.  This might take one minute, or it might take several.  Stop occasionally to check how it’s going. Unlike true fudge, it’s not a huge “snap”, but the texture will definitely change noticeably – it will feel stiffer, look smoother, and pull away from the sides and bottom of the pan.

Gently stir in the chocolate chips (or walnuts).

Scrape the batter into the lined pan and smooth out the top.  Bake for 25 minutes until just firm.   Do not over-bake. Allow the brownies to cool completely before lifting them out of the pan and slicing.

ENJOY!

to print the recipe, click here

ChocolateZoet
It is not very easy to find chocolate with less than 60% cocoa where I live, but one store carried Zoet, a brand I had never heard of.  So, that’s what I used, and the brownies turned out delicious! My beloved husband is very hard to please as far as brownies are concerned (and cakes, and muffins, and pies – I’m clearly a martyr), but he was totally in love with them, and insisted I should write an email to Celia right away to say “Phil is giving these brownies two thumbs waaaaay up“.

WithCoffee

We started the morning savoring a piece with our cappuccino – can you recognize perfection when you see it?  That was it.  The rest of the batch was offered to our colleagues at the department. That Wednesday started gray and rainy, a bit on the cold side, but I hope the  brownies helped face it with a smile. Did you notice?  Baked them on a warm Tuesday evening, served them on a cool Wednesday morning… that’s Kansas spring in all its glory… 😉

++++++++++++++++++++++++++++++++++++++++++++++++++++++++++++++++++++++++++

And now it’s celebration time!  I was recently nominated by Tuscas Värld for the Dragon’s Loyalty Award.   I love dragons, I think they are a good match for a bewitching site, don’t you agree?

award-dragon-from-mark

The rules for the award are simple, you have to link back to the blogger who nominated you – done! – post the logo on your site – done! – and tell 7 interesting things about yourself.  Not sure they will be that interesting, but here they are:

1. Every time I see a recipe with a title that starts with “Healthy”, I roll my eyes to the ceiling. Every. Single. Time.

2. I pay as much attention to movie reviews as I do to wine ratings: none. 

3. I went through a phase of intense fear of flying that lasted for a couple of years.  I managed to get over it, but a little turbulence still sends me into panic mode. Interestingly enough, I would love to learn to fly a plane. It’s all about control, I suppose…   (sigh)

4. If I had to choose between having a root canal or going to a live performance by Celine Dion I would set the dentist appointment right away.

5. I don’t like to be away from Phil, a trip without him has no appeal for me whatsoever. Even if it involved Paris.

6. We started watching Breaking Bad (disclosure: 90% of the time I say Baking Bread) a couple of weeks ago and we are hooked!  For other fans of this amazing series, take a look at this letter from Anthony Hopkins to Bryan Cranston. Awesome!

7. I am terrified of heights, but this video mesmerized me!  Phil and I watch it over and over. The song is great, the people super cool… It’s decided: on my next life I won’t be a wimp! 😉

 Again, thank you for the Dragon’s Loyalty Award, I do realize that I should pass the award for other 15 bloggers, but as I explained in the past, I do not forward awards, I hope it’s not a serious drawback.   One of the ways I like to show my appreciation for bloggers is doing what I just did in this post: cooking a recipe from their site.

 Celia, thank you for the constant inspiration not only in cooking, but through your approach of “Living well in the urban village”. You do that like a pro!

DSC_0003

ONE YEAR AGO: Quinoa with Cider-Glazed Carrots

TWO YEARS AGO: Celebrate Wednesday: Heirloom Tomatoes Steal the Show

THREE YEARS AGO: Pain de Provence

FOUR YEARS AGO: Golspie Loaf, from the Scottish Highlands

CHOCOLATE INTENSITY

Last week we hosted a reception at our home, but the guest of honor had a serious gluten allergy, so I chose a flourless chocolate cake as the dessert.  I’ve made this type of cake several other times, but on this occasion I went with a new recipe whose name I couldn’t resist:  Chocolate Intensity Cake.  Nothing beats that! The cake bakes in a water bath to ensure its fudgy texture, and then it gets smothered in chocolate ganache, as a double dose of goodness.  If you’re a cake-pro,  go for a completely smooth icing and perhaps some decoration with ganache on top. I went with swirls, for reasons that I won’t discuss in public.

CHOCOLATE INTENSITY CAKE
(from The Cake Book, by Tish Boyle)

for the cake                                                                              
8 ounces 62% bittersweet chocolate, finely chopped
1 + ½ cups (3 sticks) unsalted butter
1 cup granulated sugar
½ cup strong brewed coffee
6 large eggs
1 teaspoon vanilla extract
⅛ teaspoon salt

for the glaze
6 ounces  bittersweet chocolate, finely chopped
⅔ cup heavy cream
1 teaspoon vanilla extract

Heat the oven to 350F. Grease the bottom and sides of a 9-inch springform cake pan.

Place chopped chocolate in a large bow and set aside. Place the butter, sugar, and coffee in a medium saucepan and cook over medium high heat, stirring occasionally until the butter is melted and the mixture begins to boil. Pour the hot butter mixture over the chopped chocolate, let it sit undisturbed for one minute, then whisk until the chocolate is fully melted and smooth.

In another bowl, whisk the eggs until completely blended.  Add the vanilla extract and salt, mix again.  Pour a small amount of the hot chocolate mixture into the eggs, whisk gently, and add all the egg mixture into the bowl with the hot chocolate.

Pour the batter into the springform pan.  Wrap the outside with three layers of aluminum foil, place it inside a large roasting pan and pour enough hot water to come halfway up the sides of the cake pan  Bake cake in the water bath for 35 to 45 minutes, until the center is still a bit shiny but almost set  Carefully transfer the cake pan to wire rack and let the cake cool for 20 minutes. Run a thin bladed paring knife around the edge of the pan to loosen the cake, open the springform, and place the cake over a plate still on the bottom of the pan.  Refrigerate for at least  2 hours before adding the glaze.

Make the glaze by adding the chopped chocolate in a bowl. Heat the cream almost to a boil in a small saucepan.  Remove from the heat and pour over the chocolate. Stir until completely smooth, add the vanilla, and stir again.  Let it sit for 5 minutes at room temperature, then slowly pour the glaze over the chocolate cake, starting from the center. Smooth the surface and sides with an offset spatula.   Refrigerate the cake, and bring to room temperature for 1 hour before slicing it.

ENJOY!

to print the recipe, click here

I was nervous about serving this cake at the reception, because I hadn’t yet tested the recipe.  So, I stressed over the baking time, stressed over glazing, stressed over when to remove it from the fridge, and if that wasn’t enough, I  stressed about how to serve it without completely butchering the slices. That last part was easy, I handed the knife to my beloved husband.  😉

To my relief, the compliments kept coming, two guests said it was THE BEST cake they had ever had, and they were using all caps for the statement.  Two commented on the pleasant “smokiness,” wondering where that could be  coming from, and indeed, it was the coffee singing in the background.  Coffee and chocolate, hand in hand, a perfect match.

I must say that this cake was awesome.  The ganache becomes a single entity with the cake, making a velvety, smooth texture.  A tiny slice will be enough because it’s so rich, but the intense chocolate flavor will linger in your mind, and you may find yourself reaching for a second slice, just to make sure you weren’t dreaming!

ONE YEAR AGO:  Semolina Barbecue Buns

TWO YEARS AGO: Lavash Crackers

Add to FacebookAdd to DiggAdd to Del.icio.usAdd to StumbleuponAdd to RedditAdd to BlinklistAdd to TwitterAdd to TechnoratiAdd to Yahoo BuzzAdd to Newsvine