SECRET RECIPE CLUB REUNION 2018

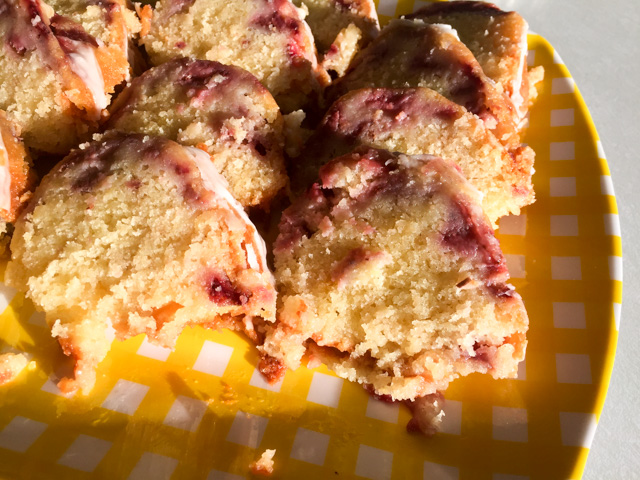
Talk about a flash back!  Those who follow my blog for a while might remember my favorite group virtual event, The Secret Recipe Club.  Food bloggers were paired in secret, and had a few weeks to stalk the assigned blog, pick a recipe and blog about it on Reveal Day. Every post would go live at the exact same time, midnight of the first Monday of the month, New York time. I was a member for years, and had a lot of fun with it. Not only for the cooking aspect, but for its social component. SRC had it’s last appearance in November 2016, but our beloved organizer, Sarah, had the idea of a special encore that celebrates the 10th year anniversary of its creation. So here we are, one final time! I was assigned pure royalty in food blog shape. I got Sarah’s food blog, Fantastical Sharing of Recipes!  Can you believe it? The queen behind my favorite event!  I was assigned her blog in the past as pretty much every member rotated through every blog in the group.  At that time, I made a fantastical recipe as you can see here.  Now I share another fantastical recipe, a Carrot Cake Roll with Cream Cheese Icing. OMG OMG OMG. Because this is such a special occasion, I felt like dressing it up a little, and tried my hands at adding a pattern on the surface of the cake. One word: THRILL!

CARROT CAKE ROLL
(from Fantastical Sharing of Recipes)

for the decoration (optional):
50g  butter, softened
50g powdered sugar
50g  egg whites
50g  all-purpose flour
orange food coloring (I used gel)

for the cake:
3 eggs
2/3 cup granulated sugar
1 tsp. vanilla extract
1/2 tsp. salt
1 tsp. baking powder
1 tsp. ginger
1/4 tsp. nutmeg
2 tsp. cinnamon
3/4 cup flour
2 cups shredded carrots (about 2 medium carrots, pat dry)
Powdered sugar

for the filling:
6 oz. cream cheese, at room temp
4 Tbsp. unsalted butter, at room temp
2 cups powdered sugar
1 tsp. vanilla

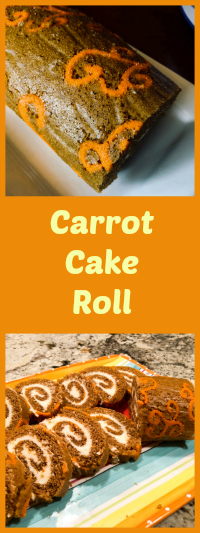
Make the piping decoration by beating the butter with powdered sugar in a small bowl until fully combined. I used a hand-held electric mixer. Add the egg whites and beat for a couple of minutes. Add the flour and mix by hand with a spoon, add a couple of drops of orange food color.  Reserve.

Draw the design you want to have on the surface of the cake with a pencil on parchment paper that fits a half-sheet baking pan. Invert the paper so that the pencil mark is at the bottom. Pipe the icing using a very thin piping tip. Freeze the whole tray with the decoration for at least one hour. When the time is almost up, prepare the cake batter.

Heat the oven to 350F.

Beat eggs on high-speed for 5 minutes until they are dark yellow and frothy. Add sugar and vanilla and beat. In a medium bowl, whisk together salt, baking powder, ginger, nutmeg, cinnamon, and flour. Stir dry ingredients into wet until just combined. Then stir in carrots.

Remove baking sheet from the freezer, and quickly spread the batter on top of the decorations. Gently bang the pan so that the batter gets well into the design.  Bake for about 15 minutes until done, it should spring back gently when you press your finger at the center of the cake.

You will need to flip the cake twice, first time the pattern will be up, but you will need to flip it again so that it will be down, and once the cake is rolled, it will be on the outside surface. On the second time, flip it over parchment paper sprinkled with sugar. Roll the cake while still warm, and let it cool completely, about one hour.

Make the filling: beat butter and cream cheese together until smooth. Add powdered sugar and vanilla, and beat again until nice and smooth. Unroll cake, spread filling evenly, then roll it back. Chill in fridge for at least one hour to firm it up.

ENJOY!

to print the recipe, click here

Comments: Public thank you goes for my dear friend Gary, Patissier Extraordinaire, for his advice on the piping technique. I used my new gadget, the silicone bulb with a very fine piping tip (featured here), and was pretty pleased with the way it worked. The amount of piping icing made would be enough to cover three cakes, but particularly on my first time doing it, I decided that having extra icing was better than not enough. And, by the way, this was also my first time making a rolled cake!  I was quite happy with the outcome, although as usual, there is room for improvement. A small crack happened in one side of the cake, but it was not too bad. Considering the types of tragedy I’ve endured during cake baking, this was nothing.

Our departmental colleagues loved the cake! It was very moist, warm due to all spices, and the cream cheese filling takes it over the top. I cannot wait to try another type of rolled cake and a bit more elaborate patterns. The trickiest part of this recipe was flipping the cake twice, I think it would be easier to wait maybe a few more minutes before doing that, the crack actually happened during flipping, not rolling. The cake was a bit too warm and still very moist from the oven. Live and learn.

Sarah, I am so thrilled I got your blog for this special reunion!  
Really felt like closing the Secret Recipe Club chapter with a golden key!

I invite all my readers to browse through the recipes posted by all members of SRC following the link at the end of my post.

ONE YEAR AGO: Parsnip and Tomato Soup

TWO YEARS AGO: A Retro Dessert

THREE YEARS AGO: Cauliflower Tortillas: Going low-carb and loving it!

FOUR YEARS AGO: Clementines in Cinnamon Syrup

FIVE YEARS AGO: In My Kitchen, April 2013 

SIX YEARS AGO: Thrilling Moments

SEVEN YEARS AGO: Maple-Oatmeal Sourdough Bread

EIGHT YEARS AGO: Pork Trinity: coffee, mushrooms, and curry

SaveSave

SaveSave

SaveSave

SaveSave

SaveSave

SaveSave

SaveSave

SaveSave

SaveSave

SaveSave

SaveSaveSaveSave

SaveSave

SaveSave

SaveSave

SECRET RECIPE CLUB: PAALAK PANEER, A FAREWELL POST

the-end11Not sure even how to break this to my readers. This will be my last post with The Secret Recipe Club. Not because I am leaving, but because the club as a whole will be shutting down. It is sad, very sad, I’ve been a member for a long time. My first post was in October 2011. Five long yeas, and I enjoyed every single month of it. But, many members were quitting, not enough new members joining, so that is that, folks. We knew about this for over a month, and I’ve been dreading this post with the bitter taste of farewell. Farewell to a good thing. Anyway, my last assigned blog was My Hobbie Lobbie, hosted by Trisha and I can say it allowed me to close this blogging chapter with a golden key. I learned so much by stalking her site, Trisha cooks a lot of authentic Indian food, a cuisine I adore but find a bit intimidating.  I had a mile-long list of stuff bookmarked, will share a few of my choices to give you a taste (pun intended) of what her site is all about.  For starters, her take on Tiramisu…   But then, she tempted me with Homemade Samosas (sigh). Or Methi Namakpare, something you probably don’t know what to make of, but jump over there to start dreaming about it.  Her take on Chicken Tikka is another show-stopper. But the one that I really wanted to make and if life was a little less frantic I would have: Chicken Biryani, the very best according to Trisha. I even bought all the ingredients to make it, just never got to it. Not yet, that is…  Another heavy contender – a very unusual daal using black chickpeas. Guess what? I found those in our Oriental market, so stay tuned, it will be on the blog sometime soon. Anyway, you can see how much I adored getting her blog for my final assignment.  Final assignment. This is really sad.

Note added after publication. For this final adventure in SRC, my blog was assigned to Sawsan, from Chef in Disguise. I woke up today to read her post that shall stay with me forever.  I am touched beyond words. If you’d like to see what she cooked from my blog (it’s a great bread!), visit her wonderful site.

paneer


PALAAK PANEER
(slightly modified from My Hobbie Lobbie)

750 g spinach, washed and drained
3 tbsp vegetable oil
1 tsp cumin seeds
1 shallot, chopped
1 1/2 tbsp finely chopped ginger
1 green chile, whole
2 tsp coriander powder
250g Paneer cheese, cut into cubes
1/2 – 1 tsp garam masala powder
6 tbsp whole milk
1-2 tsp lemon juice, or to taste
Salt, to taste

Blanch the spinach in hot water till wilted. This should take about 3 minutes.

Drain using a colander and run under some cold water till it cools down. This will help maintain its lovely color and will prevent it from cooking any further. Blend it to a smooth paste and set aside.

Heat oil in a large pan. Add the cumin and fry till it is fragrant. Don’t let it burn. Add the shallot and let it fry on low heat till it turns soft. This should take about 5-6 minutes. Add the ginger  and chile and cook for another minute.
Add the coriander powder and salt and cook for 30 seconds.

Add the spinach puree and a tiny splash of water if necessary. The puree should be loose, but not watery.  Bring this to a boil and simmer for 3 minutes. Add the garam masala powder, paneer cubes and milk. Stir and cook for a few minutes till the spinach is nice and creamy. Add lemon juice to taste. Serve over rice.

ENJOY!

to print the recipe, click here

composite
Comments: I’ve had Paalak paneer in Indian restaurants quite often. Love the stuff. The creaminess, the spices, but I never attempted to make it at home. Like sushi, palaak paneer is something I reserved for dining out. Once I got this assignment and spotted the recipe on Trisha’s site, I could not quite get it out of my mind. Plus, our Oriental market carries paneer cheese, so the trickiest ingredient involved did not pose a problem. My only advice is, get a lot of spinach. A LOT. I did not bother weighing, but I just got a lot more than I thought I needed, and that was a wise decision. I intended to  make some of her Jeera rice, but ended up serving it with normal, plain Basmati. My favorite rice in the whole wide world.

served

After we enjoyed it at dinner, there was a little bit of Paalak left. Not enough to stand on its own as a side dish. I considered adding to a frittata or omelette for my lunch next day, but then it hit me: why not use it as the flavoring base for a soufflé? At first I tried to fight that idea. The spices seemed wrong and out-of-place. But shouldn’t we try to open our horizons instead of accepting preconceptions?  I went ahead with it. Used my basic Julia Child’s method, and… one word for you: WOW!

indiansoufflee
We devoured this soufflé with abandon… it was spectacular. So, yes, I recommend that you not only make the Paalak paneer, but then save a little bit of it to use in this quite successful fusion cuisine experiment.  It was creamy, tasty, the spices made it absolutely special.

creamyDinner is served: Paalak Soufflé with grilled flank steak and mushrooms… 
Life is good!

goodnight

Well, folks this is it for the Secret Recipe Club. It was great while it lasted, that’s for sure.
Like the beautiful full moon that was shinning the night we enjoyed the Paalak Paneer…

A big thank you to the organizers, moderators, members,
that kept such great atmosphere in the background.
I had a blast with all of you.

palaak-paneer-souffle-from-bewitching-kitchen

Add to FacebookAdd to DiggAdd to Del.icio.usAdd to StumbleuponAdd to RedditAdd to BlinklistAdd to TwitterAdd to TechnoratiAdd to Yahoo BuzzAdd to Newsvine

ONE YEAR AGO: In My Kitchen, November 2015

TWO YEARS AGO: Helen Fletcher’s Oatmeal Cookies

THREE YEARS AGO: Thai-Style Pesto with Brown Rice Pasta

FOUR YEARS AGO: Shrimp with Spicy Orange Sauce

FIVE YEARS AGO:  A Simple Appetizer (Baked Ricotta)

SIX YEARS AGO: Sour Cream Sandwich Bread

SEVEN YEARS AGO: Pasta with Zucchini Strands and Shrimp

SECRET RECIPE CLUB: FRESH STRAWBERRY YOGURT BUNDT CAKE & A BONUS RECIPE

First Monday of August, summer going at full blast, many many days in the triple digits which means triple joy for yours truly. I know it will end too soon, but for the time being, allow me to celebrate the joys of this fantastic season…  Apart from the weather, I have even better reasons to celebrate: this month at The Secret Recipe Club I was paired with a food blogger who is very dear to my heart, Dorothy from Shockingly Delicious. Both Dorothy and I are “old timers”  with the group, we’ve been members for many years, together first in Group D, and now in Group A. A lot goes on behind the curtains in the club, did you know that? For instance, we have a closed Facebook page in which announcements are made, reminders are sent by the moderators so that no one forgets to sign up for next assignment, or to post on Reveal Day. And of course there is a bit of chit-chat that goes on.  Years ago I noticed that Dorothy is incredibly efficient. Assignments would go out, and within a day or two she would come back and say that her post was pretty much ready to go. Everyone else was perhaps only starting to stalk the assigned blog. To make a long story short, we  became fierce friendly competitors, every month trying to beat each other  in picking the recipe, cooking it and composing the post.  I always have a ton of fun with it, although she is pretty hard to beat. But seriously, now, she is a top-notch blogger, with 25 years of experience in food writing. Did you get that part? Twenty-five years. And she is quite active in recipe development, as you can tell by the many recipes listed here.  I urge you to read her About page, because it reflects so well the type of person she is: witty, positive, intelligent, upbeat. We almost met in person last month, but unfortunately she had family issues that prevented her from joining a fun lunch I had with two other fellow secreters, Karen, from Karen Kitchen’s Stories, and Lauren from Sew you Think you can Cook. We had a blast! Next time, I hope she can join us…   But, back to her blog, I’d like to quote one paragraph from her About page, one I could sign below with gusto (literally!):

Even if I trim the fat, or salt, or sugar, it has to taste fabulous. If it tastes like cardboard, I don’t care how healthy it is, no one will eat it. And where’s the joy in that?

I have a shockingly long list of stuff that I bookmarked as possibilities for this post. A few examples to water your mouth are: Farro Date Salad with Mango and ArugulaChicken Brie and Apple TurnoversSticky Lemon Oregano ChickenPopeye Pasta… World’s Best Smoky Burger (oh, yeah…), Angel Hair Pasta with Lemon, Kale, and PecansFlourless Oat Caramel Cookies (swoon!)…  Crunchy Granola Bars better than Nature Valley… or how about Slow-Cooker Paleo Ribs in Tablecloth Stainer Sauce? So, what did I pick? I had to go with two recipes, just because…. first, a Fresh Strawberry Yogurt Bundt Cake, because if you cannot face your cake baking demons in the name of a great food blog, there’s gotta be something wrong with you! And the following week I made the cutest meatloaves ever: Cherry Chipotle Meat Loaf Cupcakes.  Both were… how should I put it?  Shockingly Delicious!  

Fresh Strawberry Bundt Cake

FRESH STRAWBERRY YOGURT BUNDT CAKE
(from Shockingly Delicious)

for the cake:
2 1/2 cups all-purpose flour
1/2 teaspoon baking soda
1/2 teaspoon salt
Zest of 1 lemon
1 cup (2 sticks) butter, at room temperature
2 cups sugar
3 eggs
1 tablespoon lemon juice
1 teaspoon almond extract
8 ounces plain or vanilla Greek yogurt
12 ounces fresh strawberries, diced
for the glaze:
1 1/4 cups powdered sugar
1-2 tablespoons lemon juice
.
Heat oven to 325 degrees. Grease and flour a 10-inch Bundt pan and set it aside.
.
In a bowl, stir together flour, baking soda and salt. Mix in the lemon zest and set aside.
With an electric mixer, cream together the butter and sugar until light and fluffy. Beat in the eggs one at a time, then stir in lemon juice and almond extract. Alternate beating in the flour mixture and the yogurt, mixing just until incorporated. Gently stir strawberries into the batter.
.
Pour the batter into the Bundt pan. Bake for 70-75 minutes, or until a wooden pick inserted into the center of the cake comes out clean. Allow to cool 25 minutes in the pan, then turn out onto a wire rack and cool completely. Once cooled, whisk together the powdered sugar and lemon juice in a small bowl. Drizzle glaze over top of the cake, letting it drip down the sides.

Makes 12-16 slices.

ENJOY!

to print the recipe, click here

compositecake

Comments: One of the things I loved about this cake is that the recipe calls for enough batter to actually fill the Bundt pan to the appropriate level. More often than not, I face the problem of the disappearing cake batter: no matter how closely I follow the instructions, it seems the amount is never adequate. Not this time. And the smell, while baking was intoxicating, in the best possible way…   Of course, un-molding a cake from a Bundt pan can be quite stressful, I could feel my heart pounding as I negotiated the big hot pan, the rack underneath it, the kitchen cloth, and the hot pad. Tap, tap, tap, hope, hope, hope, and voilà the thing of beauty, smooth and fragrant, out of the pan in a single piece!  There was a happy dance. With a shriek (a la Karen).  I glazed the cake next morning, very early, then sliced it and took the full batch to our department, because the best part of baking a cake is sharing it. The cake disappeared fast. It was exactly what Dorothy promised it to be, very moist, excellent lemony flavor, the sweetness of the strawberries a perfect addiction to the smooth crumb.

pieces

Of course, where there is cake, there is agony. Turning the Kitchen Aid on with the paddle still up, that was a mistake. Flour in the eyebrows, anyone? And the correct place for icing is definitely not the human thigh, although the pups could disagree. They were following me around for a while even after I washed it all off.

compositecake2

Strawberry Bundt Cake, from Bewitching Kitchen

Before I say goodbye, one more featured recipe from Dorothy’s great blog!


BONUS RECIPE


Meatloave Cupcakes221

CHERRY CHIPOTLE MEATLOAF CUPCAKES
(slightly modified from Shockingly Delicious)

2 teaspoons olive oil
1 medium shallot, finely chopped
3 carrots, peeled, trimmed, finely chopped
2 celery stalks, trimmed, finely chopped
1 cup sliced mushrooms
1/2 yellow bell pepper, chopped mini sweet bell peppers, stemmed, finely chopped
1 teaspoon dried oregano
1 teaspoon dried thyme
1/2 teaspoon sea salt
A few grinds black pepper

1 pound organic ground grass-fed beef
1/4 cup almond flour (or almond crumbs, see notes)
1 tablespoon Dijon mustard
1 egg, beaten
1/4 cup Cherry Chipotle Not Ketchup
1/2 cup minced Italian parsley

Heat oven to 375 degrees. Make vegetable mixture: Heat oil in a skillet on medium heat. Add shallots, carrots, celery, mushrooms, peppers, oregano, thyme, salt and pepper and sauté until vegetables are soft, about 5 minutes.  Turn heat off and remove pan from burner; set aside to cool for 5-10 minutes.

Make meat loaf cupcakes: In a large mixing bowl, combine vegetable mixture, beef, almond flour, Dijon, egg, Not Ketchup, and parsley. Use hands to combine well. Lightly oil 8 muffin tins. Divide meat loaf mixture among 8 muffin cups. Bake for 25 minutes or until cooked through. Remove pan from oven and cool for a couple of minutes.

ENJOY!

to print the recipe, click here

quadruple

Comments: How could I resist meatloaves in cupcake format? User friendly, impossibly cute, and giving me the chance to try a new product, the “Not Ketchup”, praised by Dorothy in her blog. Not Ketchup comes in several flavors and is  produced by another food blogger I follow, Erika from Erika’s Kitchen.  It is very tasty, like a grownup ketchup with very complex flavor and not as sweet as your regular kind.  I loved it so much that I placed another order for her Tangerine Hatch Chile version, apparently even lower in carbs.  For the meatloaves I replaced regular breadcrumbs with Toasted Almond & Pecan Breading, a product that was a bit of an impulse buy on amazon. They often show a list of suggestions based on your previous searches, and I fell for this one. I do realize I could make my own almond-based crumbs, but every once in a while I like to splurge. I was very pleased by this product, actually. It smells amazing, and offered the right texture to the loaves, not dry at all.  If you’d like to try it, click here. (I am not affiliated with amazon, and will not make a single penny from your purchase).

We loved these little loaves!  The recipe made eight little servings, half of them were gone for our dinner, the others enjoyed for lunch two days in a row, they re-heat beautifully in the microwave. Between you and me, they taste fantastic straight from the fridge, but if you do that, be discreet and take tiny morsels from the bottom, so no one will notice.

Cherry Meatloaf Cupcakes, from Bewitching Kitchen

Dorothy, as you imagine, I could hardly contain  my excitement when the email arrived with your blog as my assigned site to stalk…  I hope you had a blast with yours too this month!  And be ready to jump on the next one, because I am revving my engines, baby…. 

As usual, my readers are invited to browse through the collection of recipes posted by other members of Group A of The Secret Recipe Club. Just poke the frog and be ready for some virtual fun!

ONE YEAR AGO: Quinoa Salad with Red Grapes and Avocado

TWO YEARS AGO: Strawberry Coffee Cake

THREE YEARS AGO: Lemon-Poppy Seed Muffins

FOUR YEARS AGO: Mascarpone Brownies

FIVE YEARS AGO: Salmon Tacos

SIX YEARS AGO: Cinnamon Turban Bread

SEVEN YEARS AGO: Summertime Gratin


SECRET RECIPE CLUB: FALAFEL & A BONUS RECIPE

The Secret Recipe Club is an event that pairs two food bloggers in secret. Once we get our “assignment”, we have about 3 weeks to browse through the site, choose a recipe from it, cook and blog about it at midnight of Reveal Monday. I’ve been a member for a long time, but I still remember exactly how it felt when I joined. Those “newbie” feelings, never quite sure if your write-up, photos, chosen recipe were good enough. I got to know amazing food blogs through the SRC, and that is a bonus like no other. Long before I joined the club, I was a faithful follower of a very unique blog, called Chef in Disguise. At some point in the not too distant past, Sawsan, the hostess of that site, joined The Secret Recipe Club, and when I learned about that, my heart missed a beat, out of pure thrill. And then it missed another beat, from disappointment. Disappointment because she was not in my group. At that time there were four different groups. I was part of Group D, she was placed in Group A. Bummer. But it so happens that major changes took place, instead of four separate groups we now have three, bloggers moved around, and voilà: I found myself sitting in Group A.  But, what’s even better, today I have the greatest honor and pleasure of cooking from her site.  Those are incredibly big shoes to fill, Sawsan is an outstanding cook, photographer, and writer. But having interacted with her over many years through emails and comments I also know she is an amazing human being. Kind, generous, loving, devoted to her family, friends, profession, and culture. Through her blog, I learned so much more than cooking. Just to offer you a very small but representative example: in this post she explains Ramadan and does so in a beautiful, profound and touching way.  But that’s just one example. Sawsan’s mission is to open her kitchen and home to people all over the world. You’ll find stories of her family as she grew up, stories of her kids adventures in school or how they are all dealing with moving from Jordan to UAE.  You will also find recipes ranging from straightforward to incredibly sophisticated. There is simply nothing she won’t try and then excel at. You don’t believe me? Take a look at this cake she made for her son. Or this one for her daughter. And when she does this type of challenging projects, she makes sure that anyone can follow her steps, by writing very detailed tutorials.  These “how to” posts are amazing sources of information, a bit like having a teacher holding your hand.

As usual, I like to make a list of the recipes that I considered for this Reveal Day. From Chef in Disguise, my list was a mile long, but I will take a minimalist approach: Pão de Queijo (because I was thrilled to see her making a typical Brazilian concoction),  Date Bread Rings, Cheese and Anise Flat Bread,  Mille-feuille for home-made Napoleon, Braided Date Bread (almost made this one…), Lavender Chicken, Pavlova (always wanted to give this one a try), Kabsa (irresistible rice and meat concoction from the Arabian gulf).  But I also want to offer you four examples of tutorials that are a must-read: How to make Labneh Cheese How to make Feta Cheese…  How to make mozzarella and armenian string cheese… and another one very dear to my heart: Sourdough starter 101: how to create your sourdough starter from scratch.

So, what did I pick? For starters, Falafel. Not an easy choice, because a couple of years ago I had an epic disaster in the kitchen attempting to make them. Our dear friend Cindy had traveled all the way from Oklahoma to visit us and one of our goals was to make falafel together. Things seemed to be going well, but when we got to the part of frying them, they disintegrated in the oil, every single one of them!  It was a royal mess, we had to resort to a plan B for our dinner. I confess that when I have this type of problem with a recipe, I usually avoid attempting it again for a while (in Sally’s speak: for a while = forever).  But Sawsan’s post was my chance to do it right.  I was quite nervous about it, but here I am to report back: HUGE SUCCESS!  A personal culinary demon has been exorcised for good!

(Just when I finished editing and scheduling this post, Sawsan published a new article.
I won’t say a word about it. Because once again, she’s said it all).

served-3


FALAFEL
(slightly adapted from Sawsan’s Chef in Disguise)

This recipe makes 35 falafel patties

500 g soaked chickpeas (measured after soaking)
125 g soaked peeled fava beans (measured after soaking)
½ cup parsley leaves (remove stems)
½ cup cilantro leaves (remove stems)
1 medium shallot
¾ teaspoons salt
¾ teaspoons ground cumin
¾ teaspoons ground coriander
½ teaspoon all spice
½ teaspoon black pepper

to add 10 minutes before cooking
¼ teaspoon baking powder
¼ teaspoon baking soda

for the tahini sauce:
2 Tablespoons of yogurt
1 tablespoon Tahini
1 teaspoon lemon juice
a dash of salt

Prepare the Falafel Mix: Soak the fava beans and the chickpeas in water in separate containers overnight. The following day drain the fava beans and the chickpeas, rinse them with fresh water. You should weigh them after soaking, and place the required amount in the bowl of a food processor. Process the grains together until smooth, remove from the processor and add the shallot, parsley, cilantro, salt, peppers, and spices to the empty processor. Process until a paste forms, add the grains back and process everything together until very smooth.  Scrape the sides of the bowl a couple of times so that  you’ll end up without large chunks of grains.  You can freeze the mixture at this point or place it in the fridge for a few days.

Ten minutes before frying, sprinkle baking soda and baking powder on the falafel mix, knead and let rest.

When ready heat 1 inch deep of cooking oil in the frying pan on medium heat. Scoop the falafel by using a specialized Falafel scoop, an ice cream scoop, or by using 2 spoons whereby you scoop the falafel paste in one, and press the other spoon against it to compact it into an oval shape. You can also use your hands to roll the falafel into balls. Drop the falafel gently into the frying pan. no more than 4-5 because if you add too many the oil will cool down and the falafel will fall apart Fry for a few minutes until the falafel turns brownish, flipping it once to brown both sides.  Take the falafel out and place it on a paper towel to get rid of excess oil.

Make the sauce: mix the Tahini sauce ingredients in a small bowl until you get the right texture, you can add a bit more water or lemon juice if necessary. Taste and adjust seasoning. Serve as a dip or spoon some over the falafel on your plate.

ENJOY!

to print the recipe click here 

falagelcomp

Comments: To make this wonderful recipe, you’ll need two special items. First dried, peeled fava beans (although you could use all garbanzo beans if you cannot find fava). I will add a little note here. Sawsan once offered to send me a bag of dried favas straight from Jordan, so that I could have the best possible product to make falafel from scratch!  Can you imagine? I told you she is very kind… So, for this recipe I searched for the very best product I could find through amazon.com as far as reviews from customers go.  The second item, which is not mandatory, is a falafel maker. You can see what it looks like in the photo below  I advise you to buy a large one, because some available are way too small. The one I got is this model. It is described as extra-large. Trust me, you don’t want anything smaller. Of course, you can make falafel shaped with spoons or your hands, but I wanted to make sure I did a good job. Remember, it’s Sawsan’s blog I am talking about…

gadget1
I made the falafel mixture two days before actually frying them.  Kept the bowl in the fridge, then kneaded the baking powder and baking soda right before cooking them, as instructed by Sawsan. To my amazement, not a single one dissolved in the oil, and the taste… out of this world delicious! I used a heavy hand with the herbs, so mine turned out a bit more green than Sawsan’s.

ontheplate

These tender, flavorful little morsels were perfect served with the tahini sauce…

Falafel, from Beiwtching Kitchen


BONUS RECIPE

And now that we got the Falafel talked about, I must share with you a bonus recipe. In part, I made it because I wanted to have a backup post in case the falafel turned into oily crumbs. But I am so glad I picked this salad, because it was one of the best things I cooked so far this year.  Grilled peaches ROCK!

Grilled Peach Salad with Lavender Dressing

GRILLED PEACH FETA SALAD WITH LAVENDER DRESSING
(slightly modified from Sawsan’s Chef in Disguise)

for the salad:
3 cups greens (I used a spring mix)
3 tablespoons of feta crumbled, or to taste
2 peaches cut into segments

for the lavender dressing:
4 tablespoons lemon juice
5 tablespoons olive oil
1/2 teaspoon sea salt
1 teaspoon mustard
½ teaspoon dried lavender flowers
2 tablespoons balsamic vinegar (I used white balsamic)

Make the dressing: In a bowl add the lemon juice, salt, mustard ,lavender, and balsamic vinegar and whisk Slowly drizzle the olive oil while you continue whisking until you have added the entire amount.

Prepare the salad: On the grill or in a pan on the stove top, lightly grill the peach segments. In your serving plate, arrange the greens, topped with the grilled peach segments. Crumble the feta cheese on top.

Drizzle the dressing on the salad right before serving.

ENJOY!

to print the recipe, click here

saladcomp

Comments: What a wonderful salad this was!  I made the dressing one hour before dinner, because I wanted to make sure the lavender taste would sip through the dressing, and I think that was a good move… I coated the grill pan very lightly with a coconut oil spray, and the peaches were done in a couple of minutes, beautiful marks all around. I allowed the slices to come to room temperature before assembling the salad. A winner, all the way!  I am definitely incorporating grilled peaches in our diet, and might even be daring and grill some fresh apricots next time, use a mixture of the two fruits…


Grilled Peach Salad, from Bewitching Kitchen

Sawsan, I cannot tell you how happy I was to get your blog to cook from! Having been a reader for so long, your place feels like home in the blogosphere…  I hope you also enjoyed your assignment this month!  Happy Reveal Day!

I invite my readers to click on the blue frog. She will take you to the collection of recipes my virtual friends prepared this month. And of course, I wish everyone in the USA a Happy 4th of July!


ONE YEAR AGO: In My Kitchen, July 2015

TWO YEARS AGO: Sous-vide Pork Chops with Roasted Poblano Butter

THREE YEARS AGO: Roasted Strawberry Buttermilk Sherbet

FOUR YEARS AGO: Amazing Ribs for the 4th of July!

FIVE YEARS AGO: Baby Back Ribs on the 4th of July

SIX YEARS AGO: Blueberry Muffins

SEVEN YEARS AGO: A Pie for your 4th of July

SECRET RECIPE CLUB: BUCKLE UP FOR RASPBERRIES

First Monday of the month, it’s time to share with my readers one more post as part of The Secret Recipe Club. If you don’t know what it’s all about, the club joins two food bloggers in secret, one is the stalker, the other the stalkee… When Reveal Day comes, everyone blogs about a chosen recipe at the exact same time. A virtual thrill like no other, right?  The blog I was assigned to this month was Things I Make (for Dinner), hosted by Sarah from Ontario. I’ve only been to Canada once and fell in love with it and its people, although the snowstorm in the middle of the summer trip was a bit uncalled for. I am sure I told this story before, but for newcomers, here we go with the short and sweet of it: the late June snowstorm caught me wearing shorts and a tank top. My mood dropped to what in temperature would be approaching zero Kelvin. Anyway, I digress. Sarah has a great sense of humor, her posts are a delight to read. I found myself smiling and nodding my head all the way through the lengthy stalking process. Keep in mind she’s been blogging since 2007, so there’s a ton of stuff to choose from in her fun site. Obviously, I had a hard time settling on a recipe.  Take a look at my “short” list: Chicken Tikka Kebabs, Soft Pretzels (I cannot believe I still haven’t try to make those, they’ve been on my to make soon list for a decade!), Spicy Chicken Skewers, Thai-Style Steak Salad,  Lemon Bonbon Cookies (I actually bought all ingredients for it), Blueberry Cheesecake, Nutella Ice Cream (triple sigh of pure desire), Upside Down Black Forest Cake (yes, you read that right). So, what do I have for you? A Raspberry Buckle. Love the name.  Buckle is a dessert that has been around for centuries, very popular in New England. It refers to a coffee cake in which fresh fruit is mixed with a yellow cake batter. Very easy to make and I tell you it was a huge success in one of the several receptions we hosted last month. Believe it or not, I made it after arriving home from work, still had time to clean up the kitchen and serve it for the reception at 8pm. I felt like Super Woman after a successful mission. And, that – quoting Martha Stewart – is a good thing.

Raspberry Buckle1

RASPBERRY BUCKLE
(from Things I Make for Dinner)

1/2 cup butter
1 cup sugar
3 eggs
1 cup flour
1/2 tsp salt
1/2 tsp baking powder
1 pint fresh raspberries
Heat oven to 350F. Grease a 9″ square baking pan. Clean raspberries. Stir together flour, salt and baking powder in a small bowl and set aside.

Cream butter and sugar with an electric mixer. Add eggs, one at a time, until well incorporated. Gradually add flour mixture, being careful not to over mix. Spread in prepared pan, and scatter raspberries over the surface. Bake at 350 for 35 minutes, or until golden brown and a tester comes out clean.

Cool 20 minutes, sprinkle with icing sugar and serve with whipped cream, if so desired.

ENJOY!

to print the recipe, click here

bucklecomposite

Comments: Life has been busier than ever for us. For those who do not know, when we moved from OU to KSU four years ago, Phil became the Head of the Department of Biochemistry and Molecular Biophysics. With that, commitments and challenges intensified more than we anticipated. Not only he has our research lab to consider in his professional life, but all the other things associated with running a department, from budget problems to teaching issues, from hiring new faculty to personnel evaluations. The list is huge, and the deadlines and pressure just keep building up. It is challenging for both of us, but I must say we enjoy it all.  The underlying feeling that we are trying to accomplish something on several fronts pump us up, keeps us on our toes. Recently he went through an intense process to hire a director for a particular center at KSU. Every candidate’s visit involved a reception in our home. I wanted to prepare something special for each of the three candidates, and this Raspberry Buckle was my best choice ever. If you need something simple and delicious, look no further. Sweet, tart, melt-in-your-mouth good…

Sarah, thanks for a great recipe that pleased all the guests who had a chance to try it. Nothing was left next morning to take to the department, which is a huge compliment to your Raspberry Buckle!

baked2

As usual, I invite my readers to click on the smily blue frog at the end of this post. She will direct you to a list of blog posts published by my virtual friends at The Secret Recipe Club.  Enjoy the ride!

Raspberry Buckle


ONE YEAR AGO: Seafood Gratin for a Special Dinner

TWO YEARS AGO: Cooking Sous-Vide: Sweet and Spicy Asian Pork Loin

THREE YEARS AGO:  Farewell to a Bewitching Kitchen

FOUR YEARS AGO: In My Kitchen. June 2012

FIVE YEARS AGO: Goodbye L.A.

SIX YEARS AGO: 7-6-5 Pork Tenderloin