IN MY KITCHEN, SUMMER 2025

In My Kitchen posts are hosted by Sherry, from  Sherry’s Pickings. Please visit her site to see what everybody else is sharing this month. I join four times each year, on the first day of January, April, July and October. If you are a food blogger, consider taking part of this fun event. It is a chance to share those little things you bought or received as gifts and that make your life in the kitchen easier.  I open this post with one amazing shot taken by my beloved, when he was at the golf course. The world is a beautiful place and I wish humans would work harder to keep it that way.

It is not very easy to find raw pistachios unsalted at the grocery store. This product was recommended by a cookbook author and I decided to give it a try. They are indeed excellent and I think you will be very happy by ordering from this company.

This is a very interesting cooking oil that I heard about recently and decided to try (available here). It is very low in saturated fat and has a super high smoking point so it is perfect to sear meat on top of the stove or use it in any kind of recipe that calls for sauteing in high heat. It has absolutely no after taste. Interestingly enough a couple of weeks after I bought them I saw Jeffrey Zakarian recommending it on the Food TV show The Kitchen.

This little cupcake stands were a surprise find at our Marshall Store. Of course, I put them to use very quickly once I brought them home.

.

I am totally in love with this one! A product just launched by Evil Cake Genius, it cuts 2” circles that are perfect to use in molds to make Chocolate Covered Oreos. No more cutting the chocolate transfer sheets by hand, a tedious process that is also not easy to turn into a perfect circle. Ordering info here.


Another lucky find at Marshalls which I HAD to bring home… It now hosts some of my food safe pens and I always smile when I grab the box to play.

We saw this basket for berries and fruits at my brother-in-law’s home. I had to get one for us, as it is perfect for storage in the fridge after washing them. Available at amazon.com.
A note about washing berries: the husband is the official fruit handler in the house. He makes a 3% salt solution (about 1/8 cup salt in a quart of water, if you don’t have a scale), and soaks the fruits for 5 minutes. Then he rinses in cold water to remove the salt. This gets rids of impurities and also deals with any pesticide residue present. Below you see the color of the water after soaking.

This is such a cool ingredient! It is great drizzled over cheese, used in salad dressings, not too hot, just deliciously spicy. Available here.

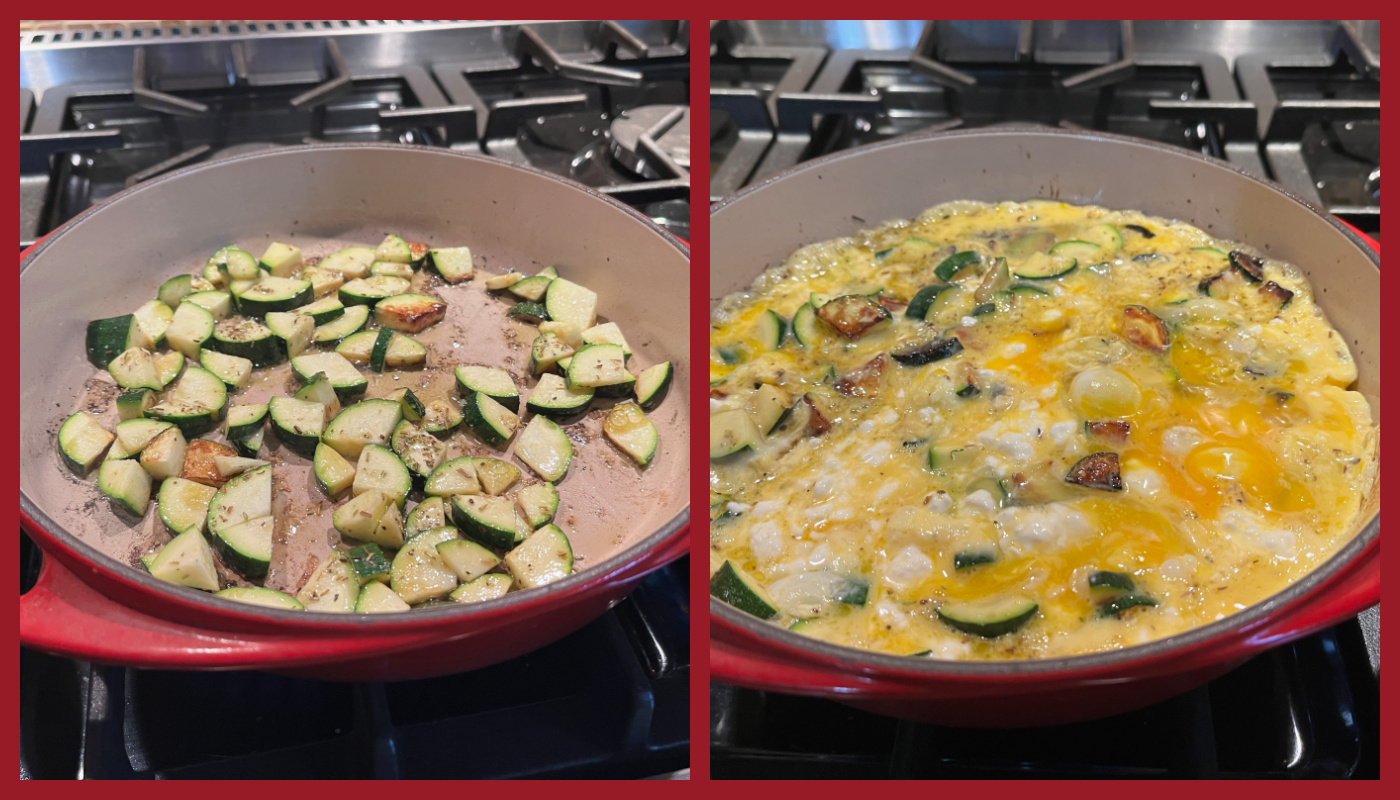
What are the odds on that? Should we play the lotto? TWO double-yolk eggs on a single pan! Those were for our lunch on a Saturday, so definitely made the weekend start on a great note…

I love scented candles (although I am very picky about their scent) and light them almost every evening. On the other hand, I absolutely despise grocery store matches like the infamous Diamond brand. They come in a box of 300, but after match #20 you can’t make a single one light on your first attempt. These are a pleasure to use, and the boxes are little works of art… (different styles available here).


Sometimes, serendipity happens… and the outfit of the baker matches the bake!
.

Apparently some four-legged friends are anxious to bark their piece, so without further ado, let’s welcome them to this edition of In My Kitchen…

Prince Freckles of Tatarrax is the resident countertop surfer. Osky is too short and too feeble, Star does not seem to be interested in standing on her back legs to inspect the surroundings. Prince misses absolutely nothing. On the back you see braided chews that are too big and too hard, so we soak them for a few hours in warm water, untwist them, and cut in small pieces. The three pups get one small piece every evening while we watch TV, but Prince seems to think that he can make them levitate into his mouth if he stares at them long enough. He will stare, turn around and look at us, stare some more. Can you say adorable?


Please, spare me. Nothing adorable about that. He is being silly, immature, and endlessly annoying.


Star, on the other hand, could not care less about Osky’s opinion on the brother. She tends to keep herself busy, by taking power naps around the Kingdom.


and yes, sometimes the power nap will take place in the middle of a ball game…

Oscar is quick to point out that Star’s approach to handling a ball – to put it mildly – SUCKS. That is how it is done! And while you are at it, FIX your ear, it is not a dignified look.

The Black Spotted Heroes in fact know very well how to play…

.
And things can get quite intense…. much more intense than Osky could handle!


Obviously, after so much activity, they do need to take it easy, preferably enjoying the scent of one of their favorite humans….

So all was going well with the year 2025,
but dark clouds accumulated on the horizon. Very fast.

Yes, unfortunately they were forced to spend some time in the kennel, It is not fun for anyone, we hate to leave them behind, but sometimes there is no other way…. At least they get to ride in the pickup truck in style!


Before you accuse us of playing favorites, Osky has never enjoyed car rides, he gets the shakes, hates every minute of it. Prince and Star go with us to the grocery store, run a few errands, and we imagine it is pretty cool for anyone driving behind us to see the license plate and two Dalmatian heads sticking out of the window.

True, I could not care less about their fancy rides. “I” am the only one to get professionally groomed, which is the true mark of being special…


BUT BACK TO WHAT MATTERS! The pups have a hard time believing we struggled with being away. Yeah, that’s what they say… But does it look like they are struggling? Zenless even got to cheat on us with other pups! THE NERVE!

Well, what can we say? We enjoyed our time away, but once we were back, we absolutely spoiled them rotten…


Bed privileges were not uncommon….

Osky got as many belly rubs as he could handle….

.

.

ONE YEAR AGO: In My Kitchen, Summer 2024

TWO YEARS AGO: In My Kitchen, Summer 2023

THREE YEARS AGO:  In My Kitchen, Summer 2022

FOUR YEARS AGO: In My Kitchen, July 2021

FIVE YEARS AGO: In My Kitchen, July 2020

SIX YEARS AGO: In My Kitchen, June 2019

SEVEN YEARS AGO: In My Kitchen – July 2018

EIGHT YEARS AGO: In My Kitchen, July 2017

NINE YEARS AGO: Secret Recipe Club: Falafel and a Bonus Recipe

TEN YEARS AGO: Chocolate Toffee Banana Bread

ELEVEN YEARS AGO: In My Kitchen, June 2014

TWELVE YEARS AGO:  Strawberry Frozen Yogurt

THIRTEEN YEARS AGO: Baked Coconut and “The Brazilian Kitchen”

FOURTEEN YEARS AGO: Honey-Glazed Chicken Legs

FIFTEEN YEARS AGO: French-Style Rolls

SIXTEEN YEARS AGO: Chicken Breasts, Coffee, and Serendipity

SPAETZLE, A CLASSIC MADE LIGHTER

I am a bit shocked that in 16 years of blogging life, this recipe has not been featured yet. I used to make it often in the early years of our marriage, but truth is, that marriage is now over 25 years young. So there you go. Better late than never, here I am to share my favorite method to make spaetzle. With a very light hand on saturated fat, but still super tasty.


SPAETZLE
(from the Bewitching Kitchen)

1 + 1/2 cups all-purpose flour
1 tsp kosher salt, plus more for the water
1/4 teaspoon ground nutmeg
3 large eggs
6 tablespoons low-fat milk
olive oil and olive spray
Panko bread crumbs to taste

Place the flour, salt and nutmeg in a large bowl. Whisk to combine. Make a well in the center. Mix the eggs with the milk in a small bowl and whisk well until fully blended. Pour into the flour well and stir until no bits of dry flour are present. Cover the bowl with plastic wrap and refrigerate for 30 minutes or longer.

Bring a large pot of salted water to a boil. Spray a large rimmed baking sheet with oil. Reserve.

When the batter is ready, place a spaetzle maker over the boiling water. Pour the batter into the metal basket, over the holes. Run the plastic component back and forth over the holes. I cooked mine in three batches.

Once the all spaetzle floats to the top, simmer for 1 minute more. Transfer with a slotted spoon to the oiled baking sheet. You can enjoy them now with butter if desired, or pan-fry it like I did, with olive oil.
To fry, heat a large non-stick skillet over medium-high heat. Add 2 tablespoons of oil and the spaetzle. Add some bread crumbs as you sautee the spaetzle, season with more salt if needed. Serve while still warm.

ENJOY!

to print the recipe, click here

Comments: It was so nice to make this recipe again, after such a long hiatus. Not even sure why it took me so long to re-visit it. It is a wonderful side dish that goes well with meat, poultry, seafood. We enjoyed it with roasted chicken thighs and some green beans. If you don’t have a spaetzle-maker, you can use a colander. Works perfectly well, just rub the batter into the holes with a rubber spatula over the boiling water.

ONE YEAR AGO: Chicken Roll-ups with Asparagus

TWO YEARS AGO: Flower-Shaped Dinner Rolls

THREE YEARS AGO: Pride Macarons

FOUR YEARS AGO: Blood Orange Macarons

FIVE YEARS AGO: One-Two-Three Macarons

SIX YEARS AGO: Marshmallow Macarons

SEVEN YEARS AGO: Fujisan Bread

EIGHT YEARS AGO: Air-Fried Tomatoes with Hazelnut Pesto & Halloumi Cheese

NINE YEARS AGO: Red Velvet Layered Cake

TEN YEARS AGO: Lemon-Lavender Bars

ELEVEN YEARS AGO: Quinoa Fried Rice

TWELVE YEARS AGO: Carrot Flan with Greens and Lemon Vinaigrette

THIRTEEN YEARS AGO: The Secret Recipe Club: Granola Bars

FOURTEEN YEARS AGO:  Awesome Broccolini

FIFTEEN YEARS AGO:  A Twist on Pesto

SIXTEEN YEARS AGO: Ciabatta: Judging a bread by its holes

THE BEWITCHING KITCHEN TURNS 16!


Cake is pretty much mandatory, right? This blog anniversary caught me by surprise, as we are currently away. I got a bit confused and thought that the big day was later in the month. My plan was to bake for the occasion once we arrived back home. Good thing I double-checked… Full disclosure: this cake was produced in a bit of a hurry as we prepared to leave for a 2-week trip to the East Coast. Without further ado, I share with you today a lemon cake with raspberry filling and Swiss meringue buttercream. Maybe made in a hurry, but with a huge amount of love!


LEMON LAYER CAKE WITH RASPBERRY FILLING
(adapted from The New York Times)

¾ cup/170 grams unsalted butter, softened
3 cups/385 grams all-purpose flour 
2 cups/400 grams granulated sugar, divided
3 medium lemons
1½ cups/360 milliliters whole milk
2 teaspoons baking powder
½ teaspoon baking soda
1½ teaspoons kosher salt 
¼ cup/60 milliliters neutral oil (I used grapeseed)
4 large eggs, at room temperature

1 cup raspberry jam (store-bought or home-made)

1 recipe for Swiss meringue buttercream, starting with 400g butter (details here)

Heat oven to 325 degrees. Spray three (8-inch) cake pans with baking spray and line each with parchment paper. 

Make the cake: Add 350 grams of the granulated sugar to the bowl of a stand mixer fitted with the paddle, then zest the lemons directly into the sugar. Use your fingers to rub the zest into the sugar until it looks moist and sandy.

Juice the zested lemons into a small bowl. Transfer ¼ cup of juice to a large measuring cup and stir in the milk. Let it sit while you prepare the rest of the cake, reserving the remaining juice for the lemon syrup. 

To the bowl with the lemon sugar, add the flour, baking powder, baking soda and salt, and mix on low to combine. Add the softened butter to the bowl all at once. Mix on low until the butter is evenly distributed and the mixture looks sandy. Add the oil and eggs to the measuring cup with the milk mixture and mix with a fork to combine. With the mixer on low, slowly stream in the milk mixture. When the batter is moistened, stop the mixer and scrape the bottom and sides of the bowl to ensure there aren’t any dry pockets. Adjust mixer speed to medium and mix for 1 minute more. Divide the batter among the prepared pans, spread evenly and tap the pans on a countertop to release any large air bubbles.


Bake the cakes until slightly risen and a toothpick inserted in the center comes out clean, 20 to 25 minutes. Set the pans on a wire rack and let the cakes cool for about 15 minutes. Then, run a thin knife along the edges of the pan and carefully turn the cakes out onto the rack to cool completely. 

While the cakes cool, make the syrup: Measure ¼ cup lemon juice from the remaining reserved juice. Combine the juice and the remaining 50 grams sugar in a small saucepan and bring to a boil over medium-high, stirring occasionally. Cook until the sugar has dissolved, then pour into a heat-safe container to cool.

Make the Swiss meringue buttercream. Reserve 1/3 of the amount and dye red (I used Tulip Red). Dye a very small amount with green for the stems. I used Laurel color. Dye the rest of the buttercream with Fuchsia or any other color you like.

Assemble the cake: Place one layer of cake onto a serving plate, top side up. Brush the cake with lemon syrup. Spread raspberry jam over the top of the cake. Repeat with the second layer on top of the filling, top side down, and press gently. Add the final layer. Brush the cake with syrup, then cover the top and sides of the cake with a thin layer of fuchsia frosting. Refrigerate until firm, about 30 minutes. Frost the cake with fuchsia, smoothing the surface. Let that set for 30 minutes, then pipe stems with green buttercream and a tip 3. Using the tulip red buttercream, pipe the flowers with a petal 101 tip, a border at the bottom with an open star tip (like #20) and a border on top with 1M tip.

ENJOY!

to print the recipe, click here

Comments: Hard to believe it’s been 16 years. Hard to find what to say about it without getting cheesy or highly predictable. So I won’t say much. I’m still having fun blogging, I’m still excited every time I hit “publish” on a new post. I am not stopping quite yet. Let’s step into the 17th year of my blogging journey, and if you’ve been following me for a while, THANK YOU! If you are new here, I hope you’ll find things that inspire you to cook, bake, and be passionate about. Life is too short not to enjoy what each day brings.

Apologies for not showing pictures of the cake cut to reveal the layers and filling. It was donated whole, so I also never got to see it. And that ends up as being part of its charm… Or so I hope…

.
ONE YEAR AGO: The Bewitching Kitchen turns 15 years old!

TWO YEARS AGO: The Bewitching Kitchen turns 14!

THREE YEARS AGO: The Bewitching Kitchen turns 13!

FOUR YEARS AGO: The Bewitching Kitchen Turns 12!

FIVE YEARS AGO: The Bewitching Kitchen turns 11!

SIX YEARS AGO: The Bewitching Kitchen Turns 10, and a Giveaway…

SEVEN YEARS AGO: The Bewitching Kitchen turns 9!

EIGHT YEAR AGO: The Bewitching Kitchen turns eight!

NINE YEARS AGO: The Bewitching Kitchen Turns Seven!

TEN YEARS AGO: Bewitching Kitchen Turns Six!

ELEVEN YEARS AGO: The Bewitching Kitchen turns Five!

TWELVE YEARS AGO: The Bewitching Kitchen turns Four!

THIRTEEN YEARS AGO: The Bewitching Kitchen Turns Three! 

FOURTEEN YEARS AGO:  The Bewitching Kitchen turns Two!

FIFTEEN YEARS AGO:  Bewitching Birthday!

SIXTEEN YEARS AGO: Welcome to my blog!

ZUCCHINI FRITTATA

I might be on a roll concerning special gadgets. Case in point, I have a pan that is designed to make Tarte Tatin (!!!), but today I am incredibly proud to show you how to use it to make a nice frittata. Do you need that pan? No. But are you going to be the coolest cook in town if you use it? YES, YOU ARE.

ZUCCHINI FRITTATA
(from The Bewitching Kitchen)

2 Tbsp. olive oil or unsalted butter
2 shallots, minced
2 medium zucchini, sliced and each slice quartered
4 large eggs
1/4 cup whole milk
4-6 pieces of fresh mozzarella
1/2 tsp salt
1/2 tsp Herbes de Provence
¼ tsp. freshly ground black pepper

Place rack in middle of oven; heat oven to 350°. Heat 2 Tbsp. olive oil or unsalted butter in an oven-proof skillet. Add the shallots and zucchini, sauté, stirring occasionally, until softened, about 5 minutes. Meanwhile, whisk the large eggs in a medium bowl with the milk, salt, pepper and spices mix.

Pour egg mixture into the skillet. Add the pieces of mozzarella. Cook, stirring occasionally, just until edges pull away from sides of pan, about 5 minutes. Transfer skillet to oven and bake until set, 10–15 minutes. Serve immediately or at room temperature within an hour or so.

ENJOY!

to print the recipe, click here

Comments: You can flip the frittata off the pan and serve it with the brown side up, or cut it straight in the pan, anything works. It turned out creamy, light and fluffy. The pan makes it a breeze to invert and flip the frittata onto a serving plate. We will be enjoying this type of meal in many variations on a regular basis… Mushrooms, red bell peppers, maybe even some smoked salmon in the mix.

ONE YEAR AGO: Chocolate-Covered Oreos Strike Again

TWO YEARS AGO: Sesame-Miso Yakitori

THREE YEARS AGO: Marinated Chickpeas with Slow-Roasted Red Peppers

FOUR YEARS AGO: Mini-Pullman Sourdough Bread

FIVE YEARS AGO: Gibassier

SIX YEARS AGO: Sundried Tomato Twist Bread

SEVEN YEAR AGO: And now for something completely different….

EIGHT YEARS AGO: Parsnip, Coconut, and Lemongrass Soup

NINE YEARS AGO: In My Kitchen, October 2016

TEN YEARS AGO: Paleo Moussaka

ELEVEN YEARS AGO: In My Kitchen, October 2014

TWELVE YEARS AGO: In My Kitchen, October 2013

THIRTEEN YEARS AGO: Crimson and Cream Turkey Chili

FOURTEEN YEARS AGO: Taking a break from the nano-kitchen

FIFTEEN YEARS AGO: Chocolate Chip Cookies

CORNBREAD ÆBLESKIVER

As I mentioned recently, I do love gadgets, and this pan has been sitting and waiting for too long. However, the moment I saw Karen’s post on this cool recipe, I grabbed it to play!

CORNBREAD ÆBLESKIVER
(slightly adapted from Karen’s Kitchen Stories)

140 grams (1 cup) all purpose flour
70 grams (1/2 cup) medium grind cornmeal
70 grams (1/3 cup + 1 tbs) sugar
1 tablespoon baking powder
1/2 teaspoon salt
1 cup buttermilk
2 large eggs
100 grams canned corn kernels
olive oil spray for the pan

Whisk together all of the dry ingredients in a large bowl. In another bowl, mix the wet ingredients, plus corn kernels with a fork. Pour the wet ingredients over the dry ingredients, and mix until just combined.

Heat your aebleskiver pan on medium low and spray each cavity with olive oil.
Using an ice cream scoop, fill each cavity almost to the top with the batter. Cook until the bottom begins to brown. Using a thin skewer turn the aebleskiver part way and continue to cook. Be sure to push any overflow back into the wells.

After that, add a little more batter to top them off before “closing” them, moving the opening to the bottom of the pan. Continue to cook until evenly golden brown and the center is cooked through. Serve right away or keep warm in a 200 degree F oven.

ENJOY!

to print the recipe, click here

Comments: First things first, I highly recommend this cookbook if you want to expand your Æbleskiver horizons… My main modification of the recipe was cutting the sugar by a bit more than half, and using canned corn because I had some in the pantry and got lazy to scrape fresh corn off the cob. Using the pan takes a bit of practice, I filled the cavities too much in my first batch, but the second half was perfect. I still need to perfect moving the little fritters to cook the second side, but they turned out very tasty.

.

Karen, thanks so much for inspiring me to finally make something with my pan…

.

ONE YEAR AGO: Lemon Ganache Macarons

TWO YEARS AGO: Fresh Dill and Feta Sourdough

THREE YEARS AGO: Marinated Chickpeas with Slow-Roasted Red Peppers

FOUR YEARS AGO: Passionfruit Millionaire’s Shortbread

FIVE YEARS AGO: Chai-Mango Rosette Macarons

SIX YEARS AGO: Common Table, Something New in My Life

SEVEN YEARS AGO: The Daisy, a Bread with Brioche Alter-Ego

EIGHT YEARS AGO: Pork Tenderloin, Braciole Style

NINE YEARS AGO: Raspberry Buckle

TEN YEARS AGO: Seafood Gratin for a Special Dinner

ELEVEN YEARS AGO: Cooking Sous-Vide: Sweet and Spicy Asian Pork Loin

TWELVE YEARS AGO:  Farewell to a Bewitching Kitchen

THIRTEEN YEARS AGO: In My Kitchen. June 2012

FOURTEEN YEARS AGO: Goodbye L.A.

FIFTEEN YEARS AGO: 7-6-5 Pork Tenderloin