My favorite season is almost over, no way to deny it, even if the temperatures outside still give me plenty of reasons to smile. Before Autumn vibes arrive in full force, I share a couple of cupcakes that embrace and celebrate the warmth of the Summer.
ORANGE-VANILLA CUPCAKES (adapted from several sources)
for the buttercream use this recipe (scaled down to 150g butter)
120g all-purpose flour 150g granulated sugar + zest of 1 orange 40g butter, unsalted, removed from the fridge for 30 minutes 1 large egg 120mL milk 1 + 1/2 tsp baking powder 1/2 tsp vanilla paste or extract 1/2 tsp orange emulsion (I use LorAnn) 1/4 tsp salt
Heat the oven to 350F and line a cupcake pan with paper baking cups. Recipe makes 9 to 10 cupcakes.
Rub the sugar with the orange zest and let it sit for a few minutes.
Put the flour, baking powder, sugar/orange, salt and butter cut in small pieces in the bowl of a KitchenAid type mixer fitted with the paddle attachment. Mix on medium-low until the butter is in very small pieces, almost like sand.
Whisk the egg with the milk, vanilla, and orange emulsion, add slowly to the mixer running in low-speed. Once it is almost smooth, increase the speed to high for a couple of minutes, scraping the bottom of the bowl once.
Stop the mixer and make sure the batter is fully smooth, mixing by hand with a spatula. Add batter to the 9 cupcakes, filling half-way full only. Bake for 15 to 18 minutes, until a toothpick comes out clean when inserted in the center.
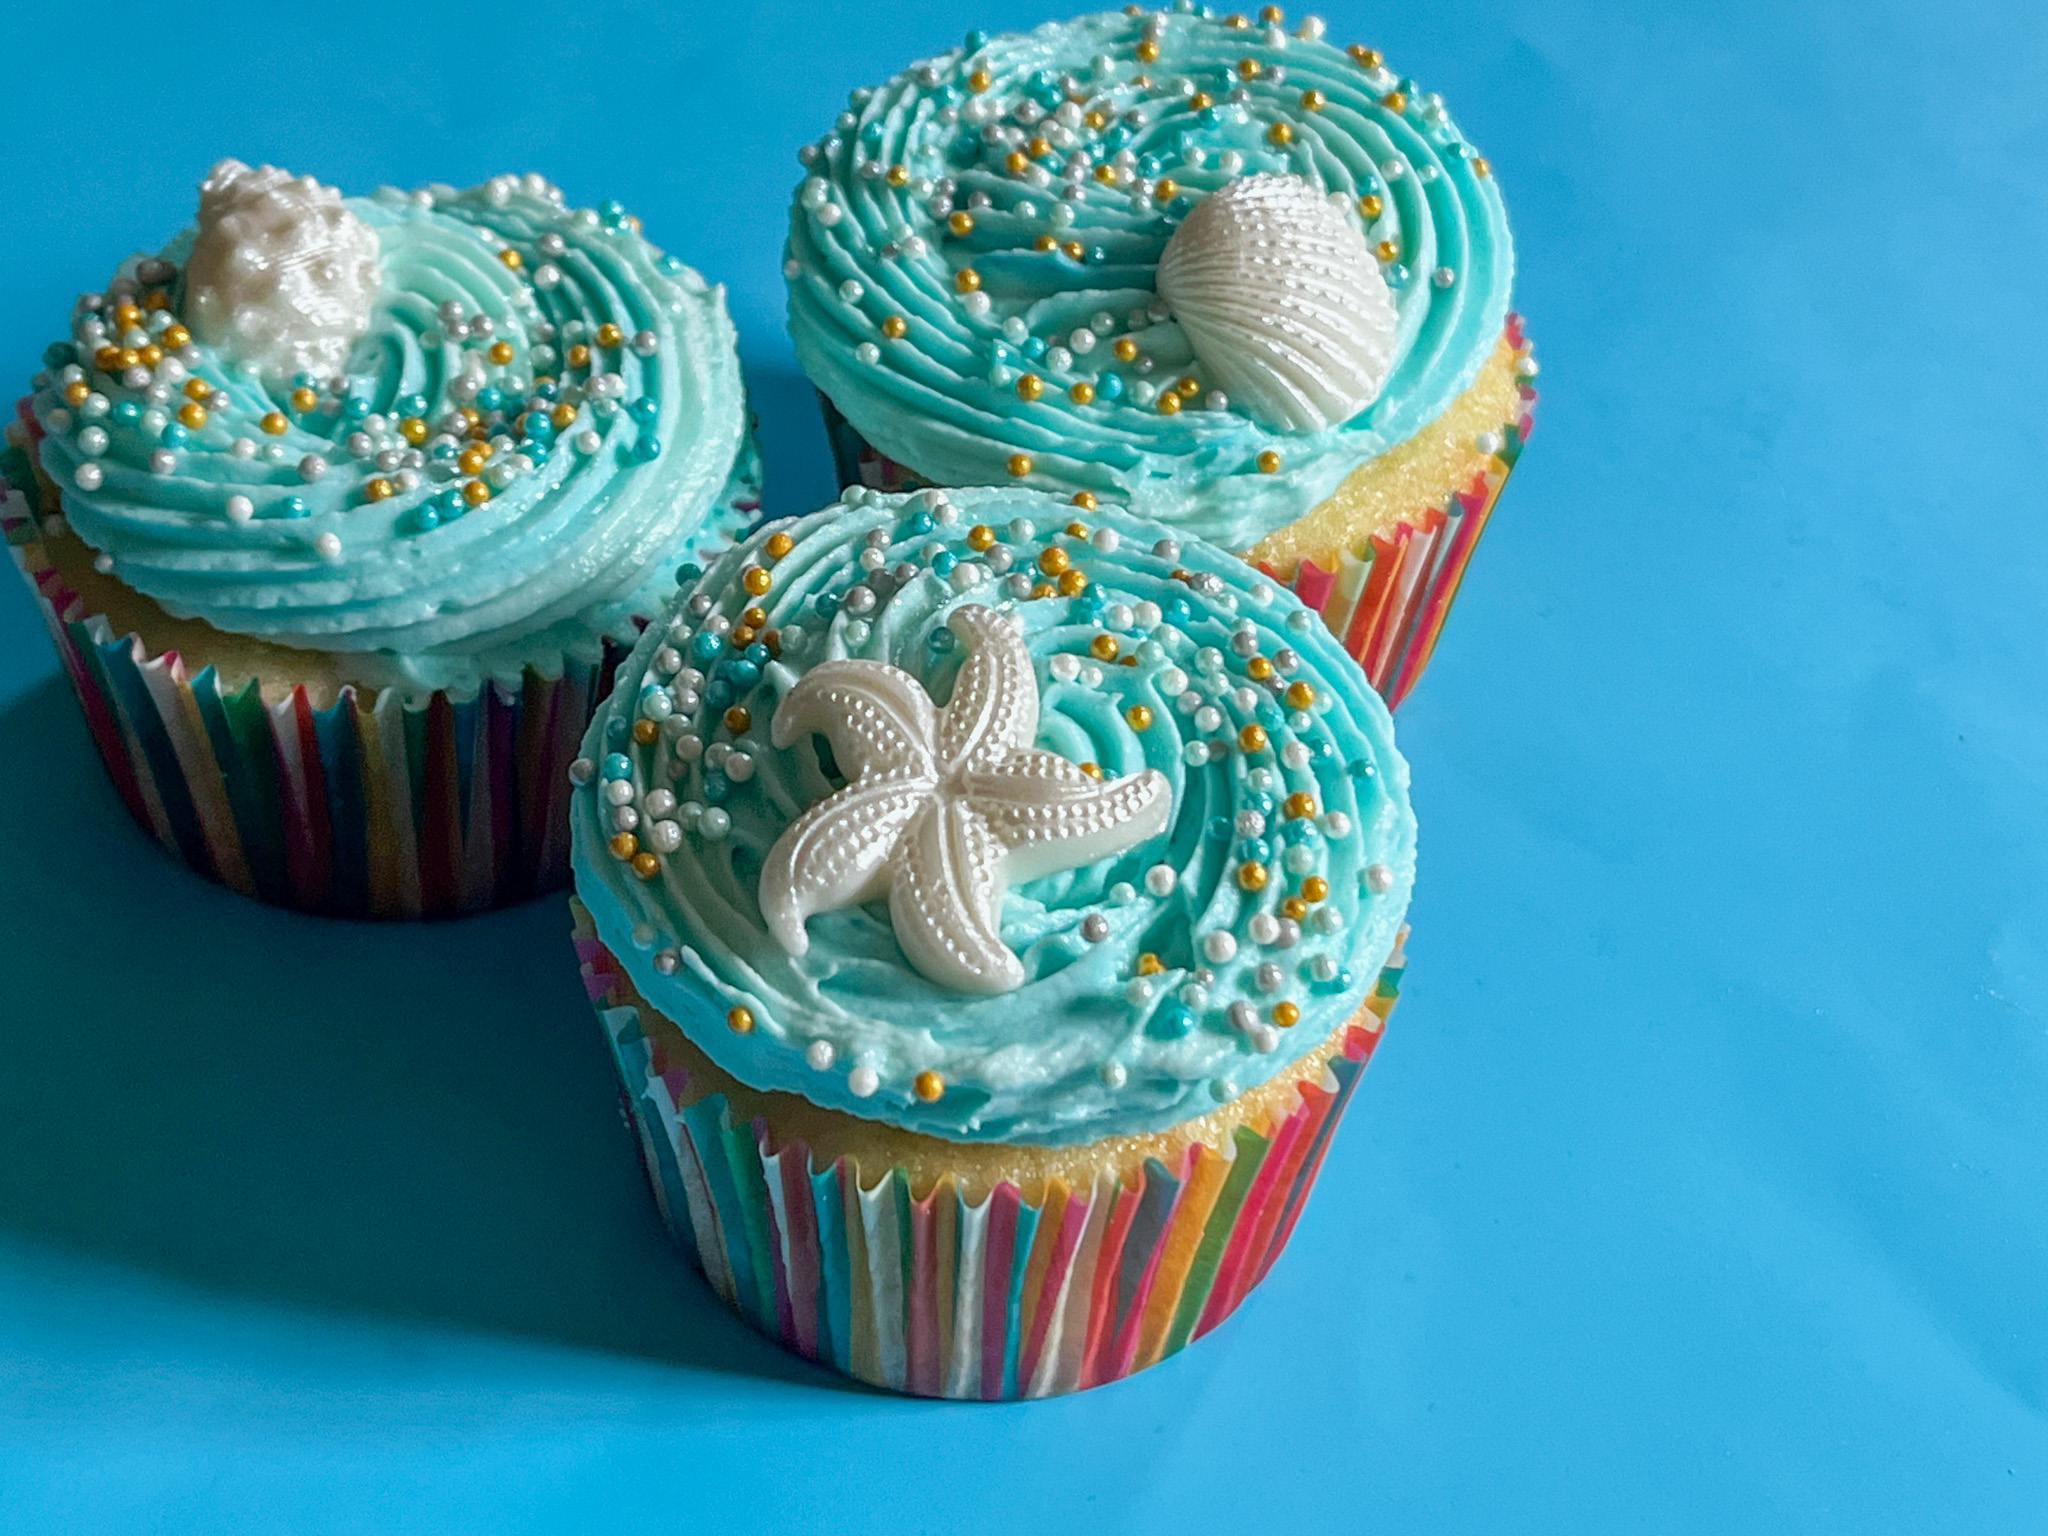
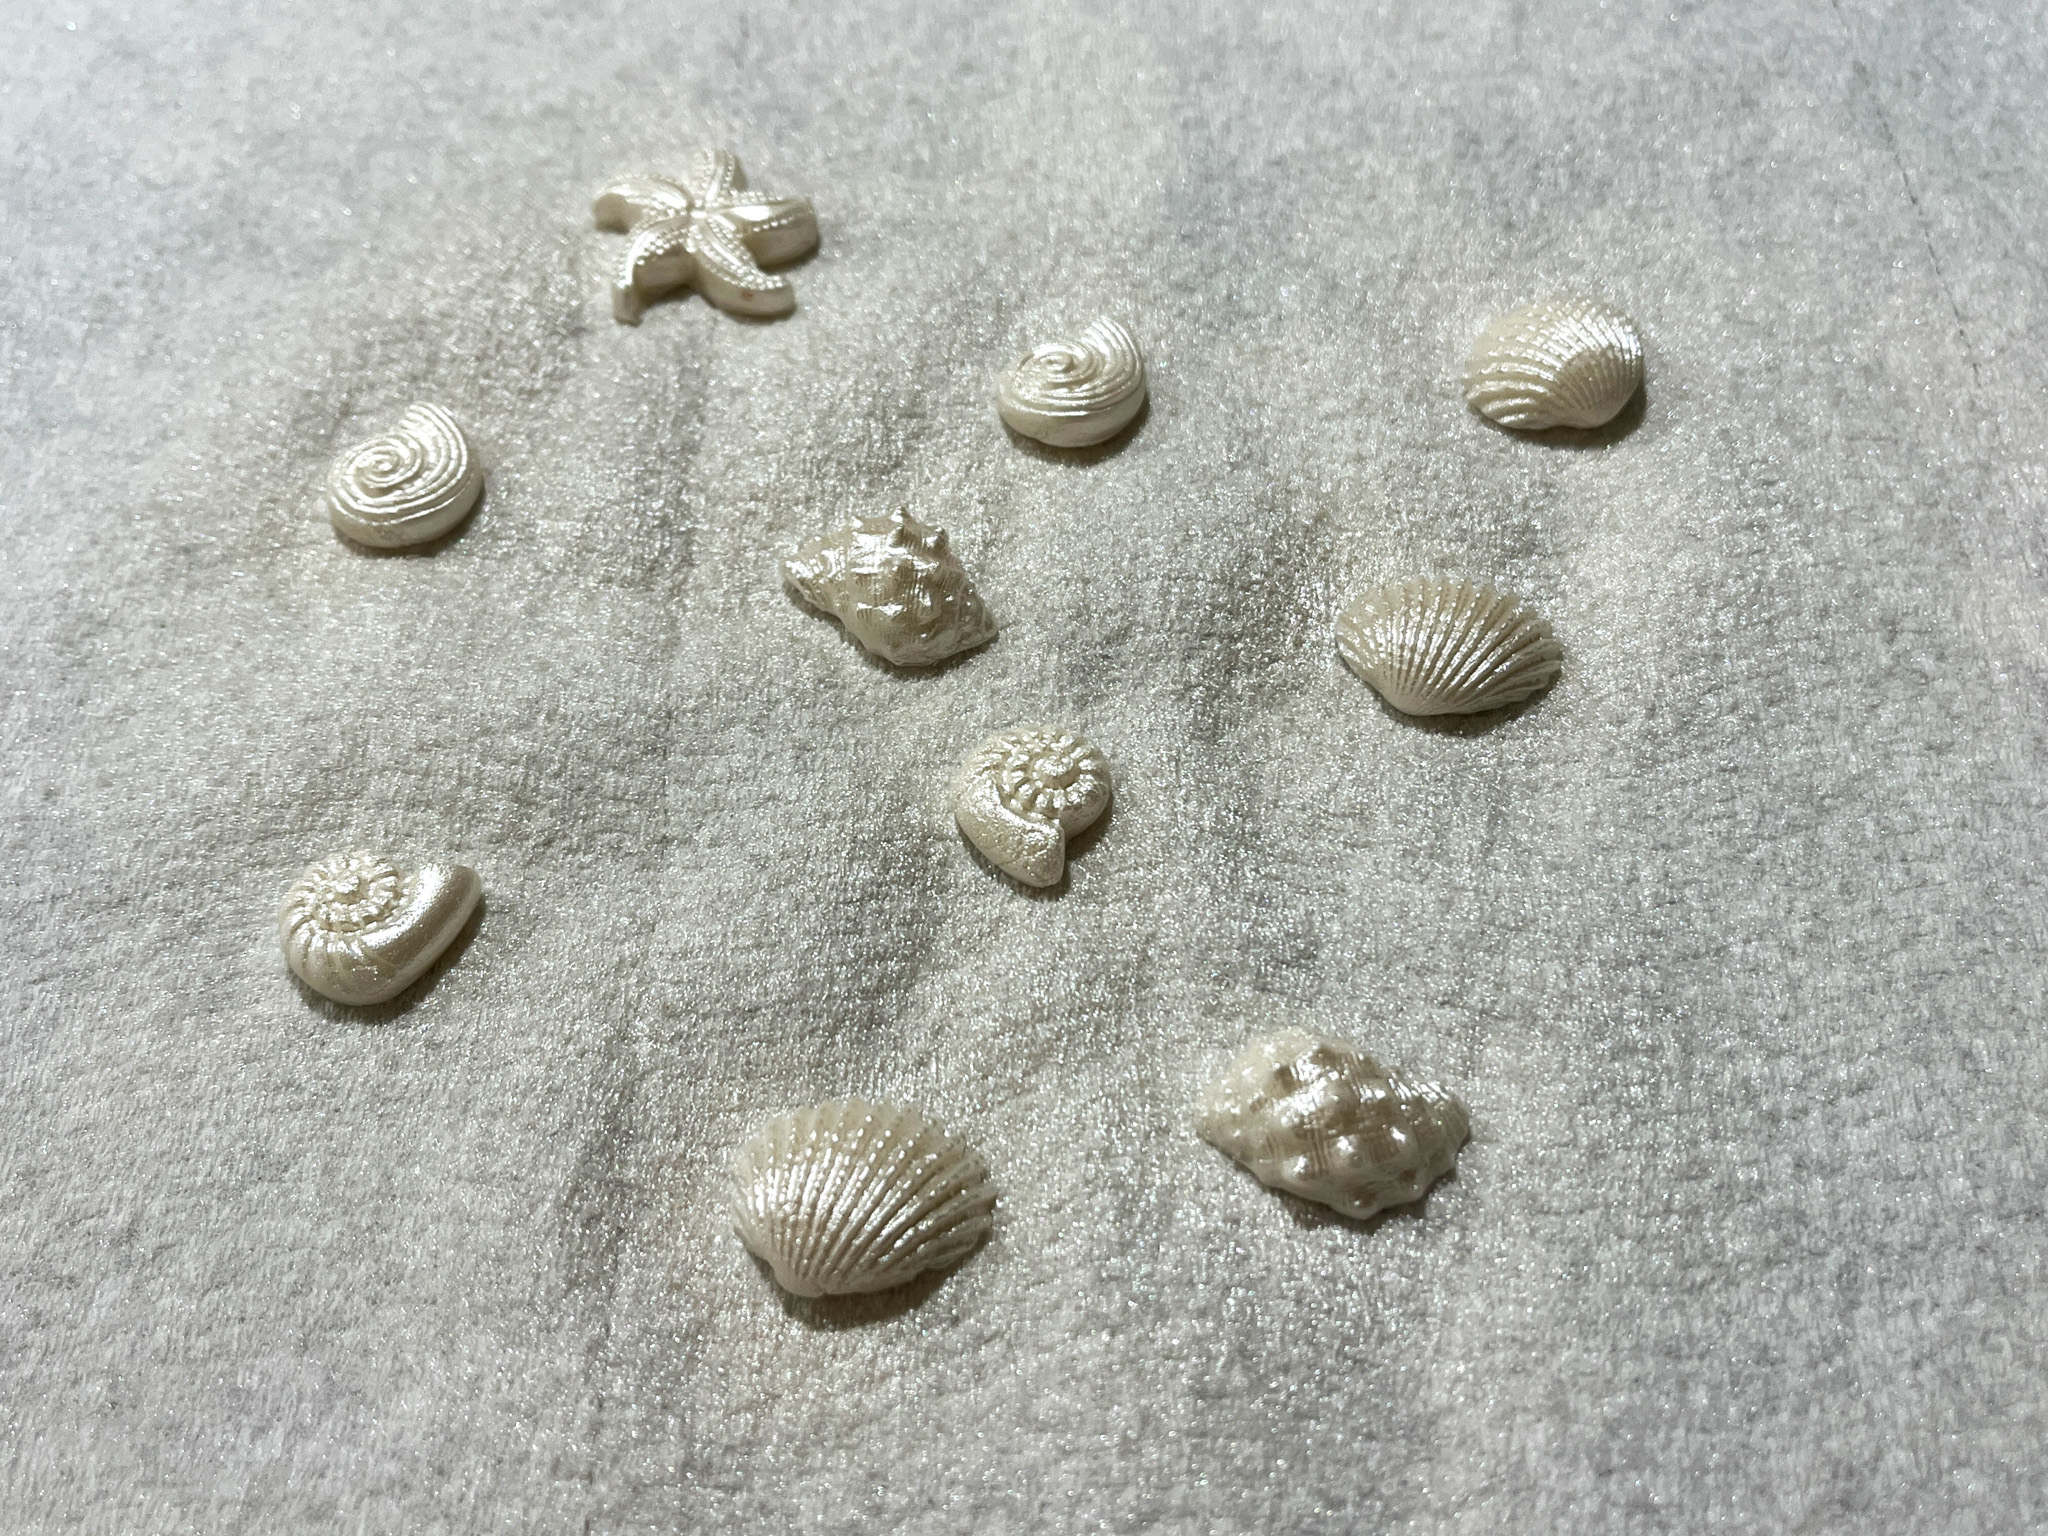
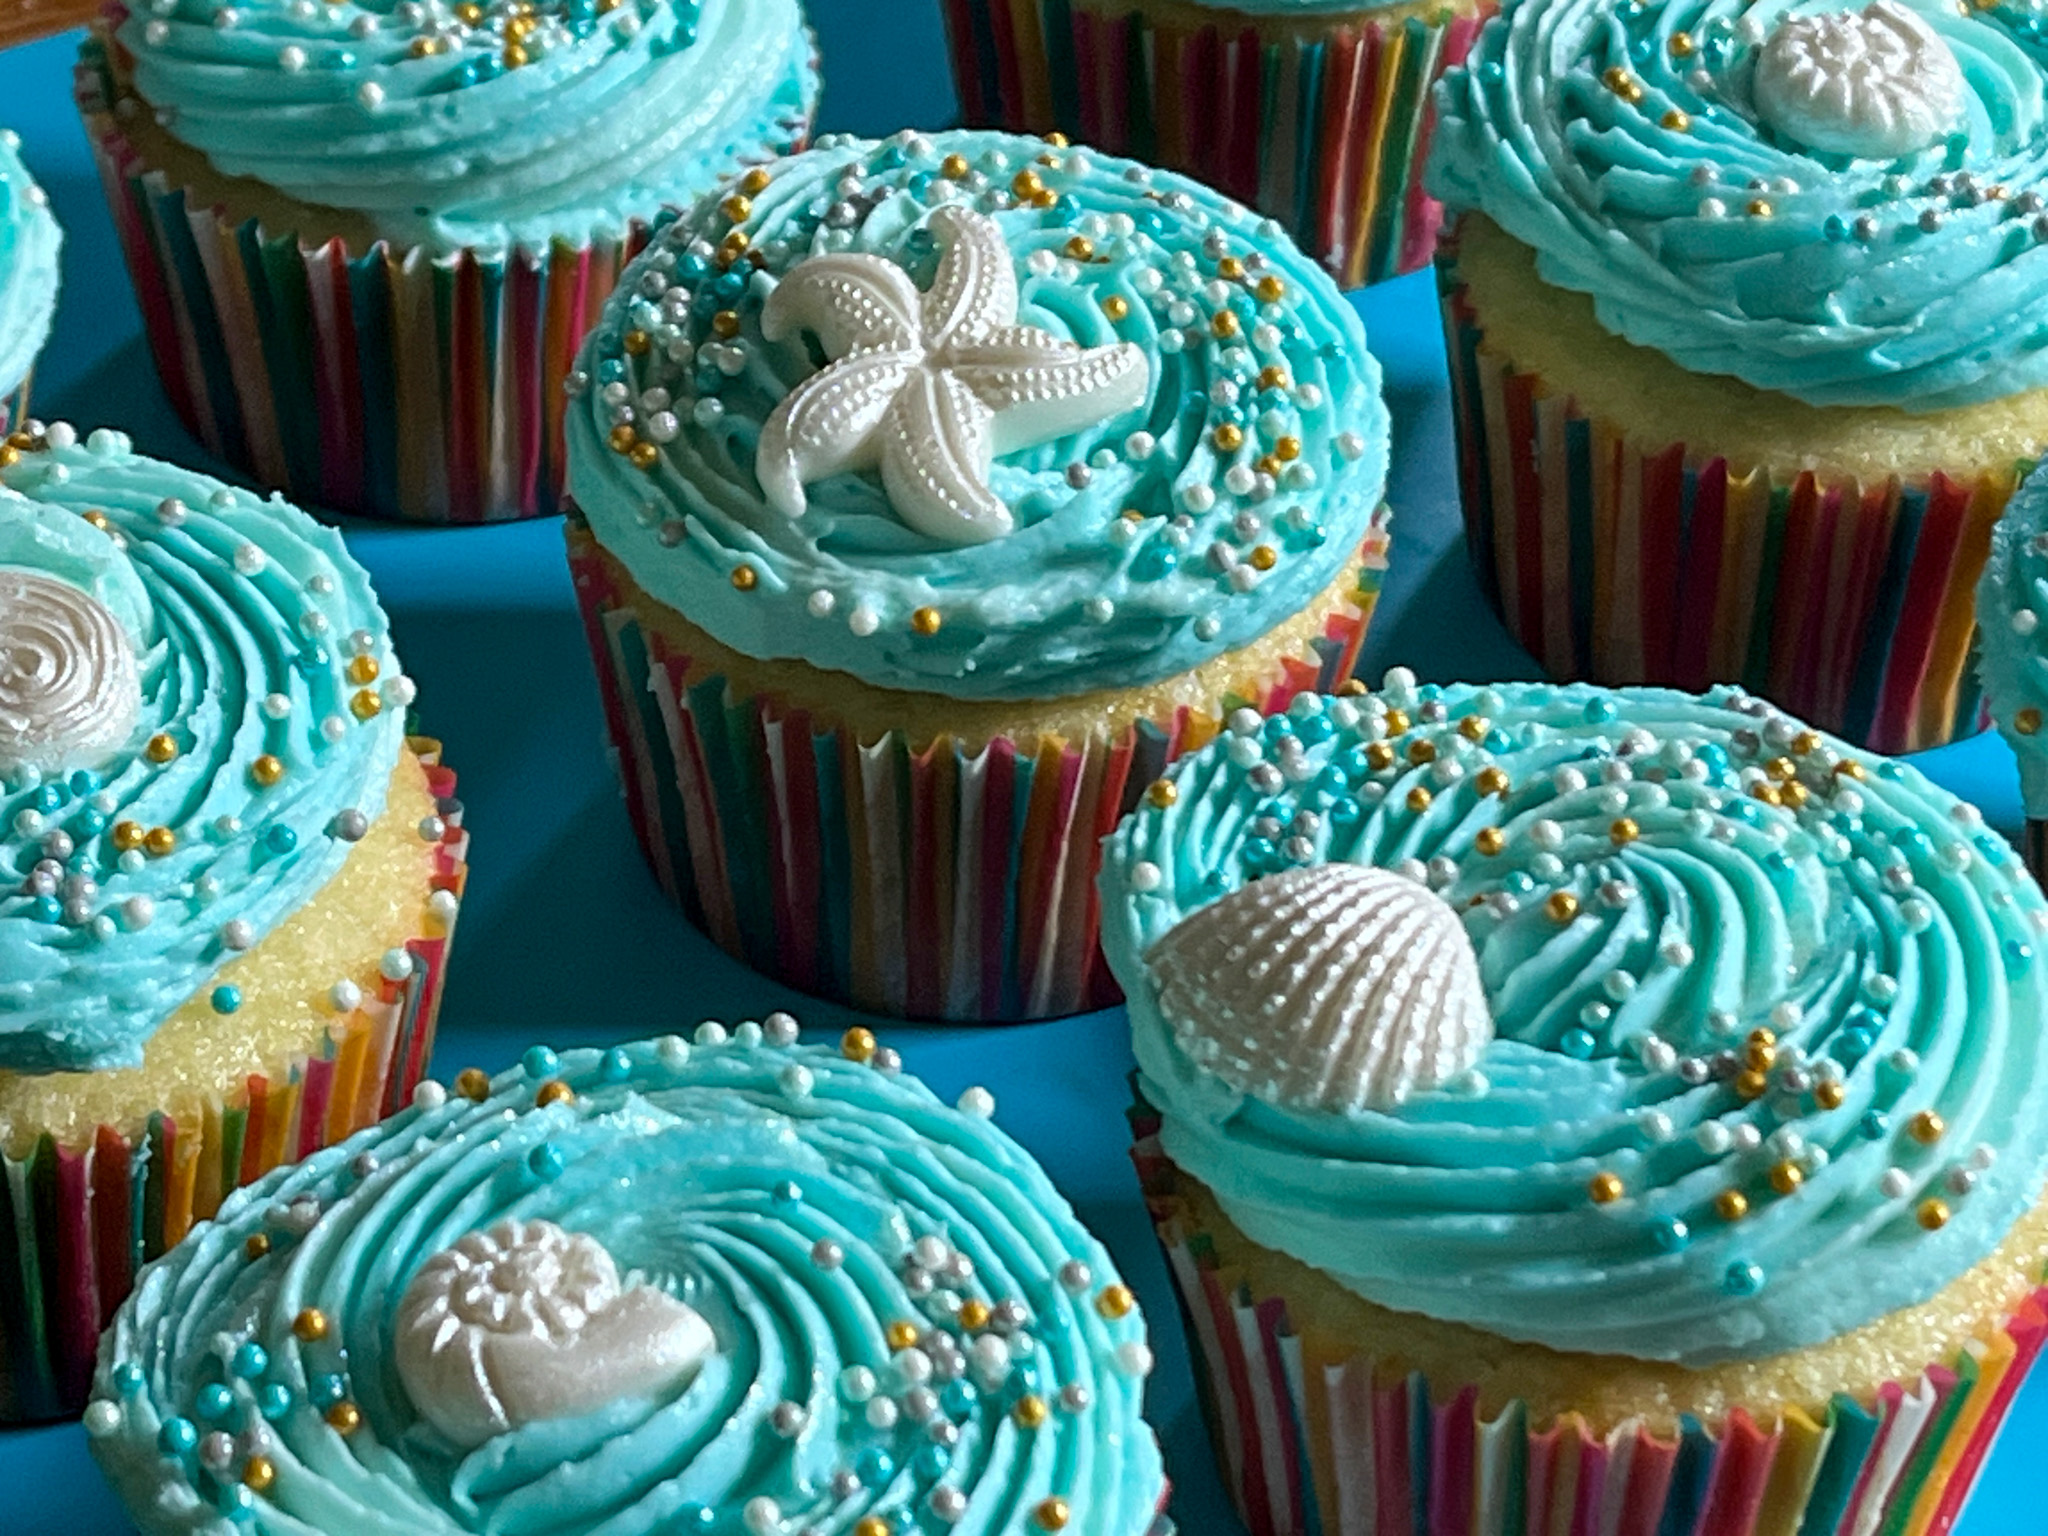
For the beach cupcakes, I used buttercream in three shades of blue, but sadly not different enough to give a nice contrast. There is always next time… The decorations were made with fondant and a silicone mold, plus a final spray with PME pearl luster.
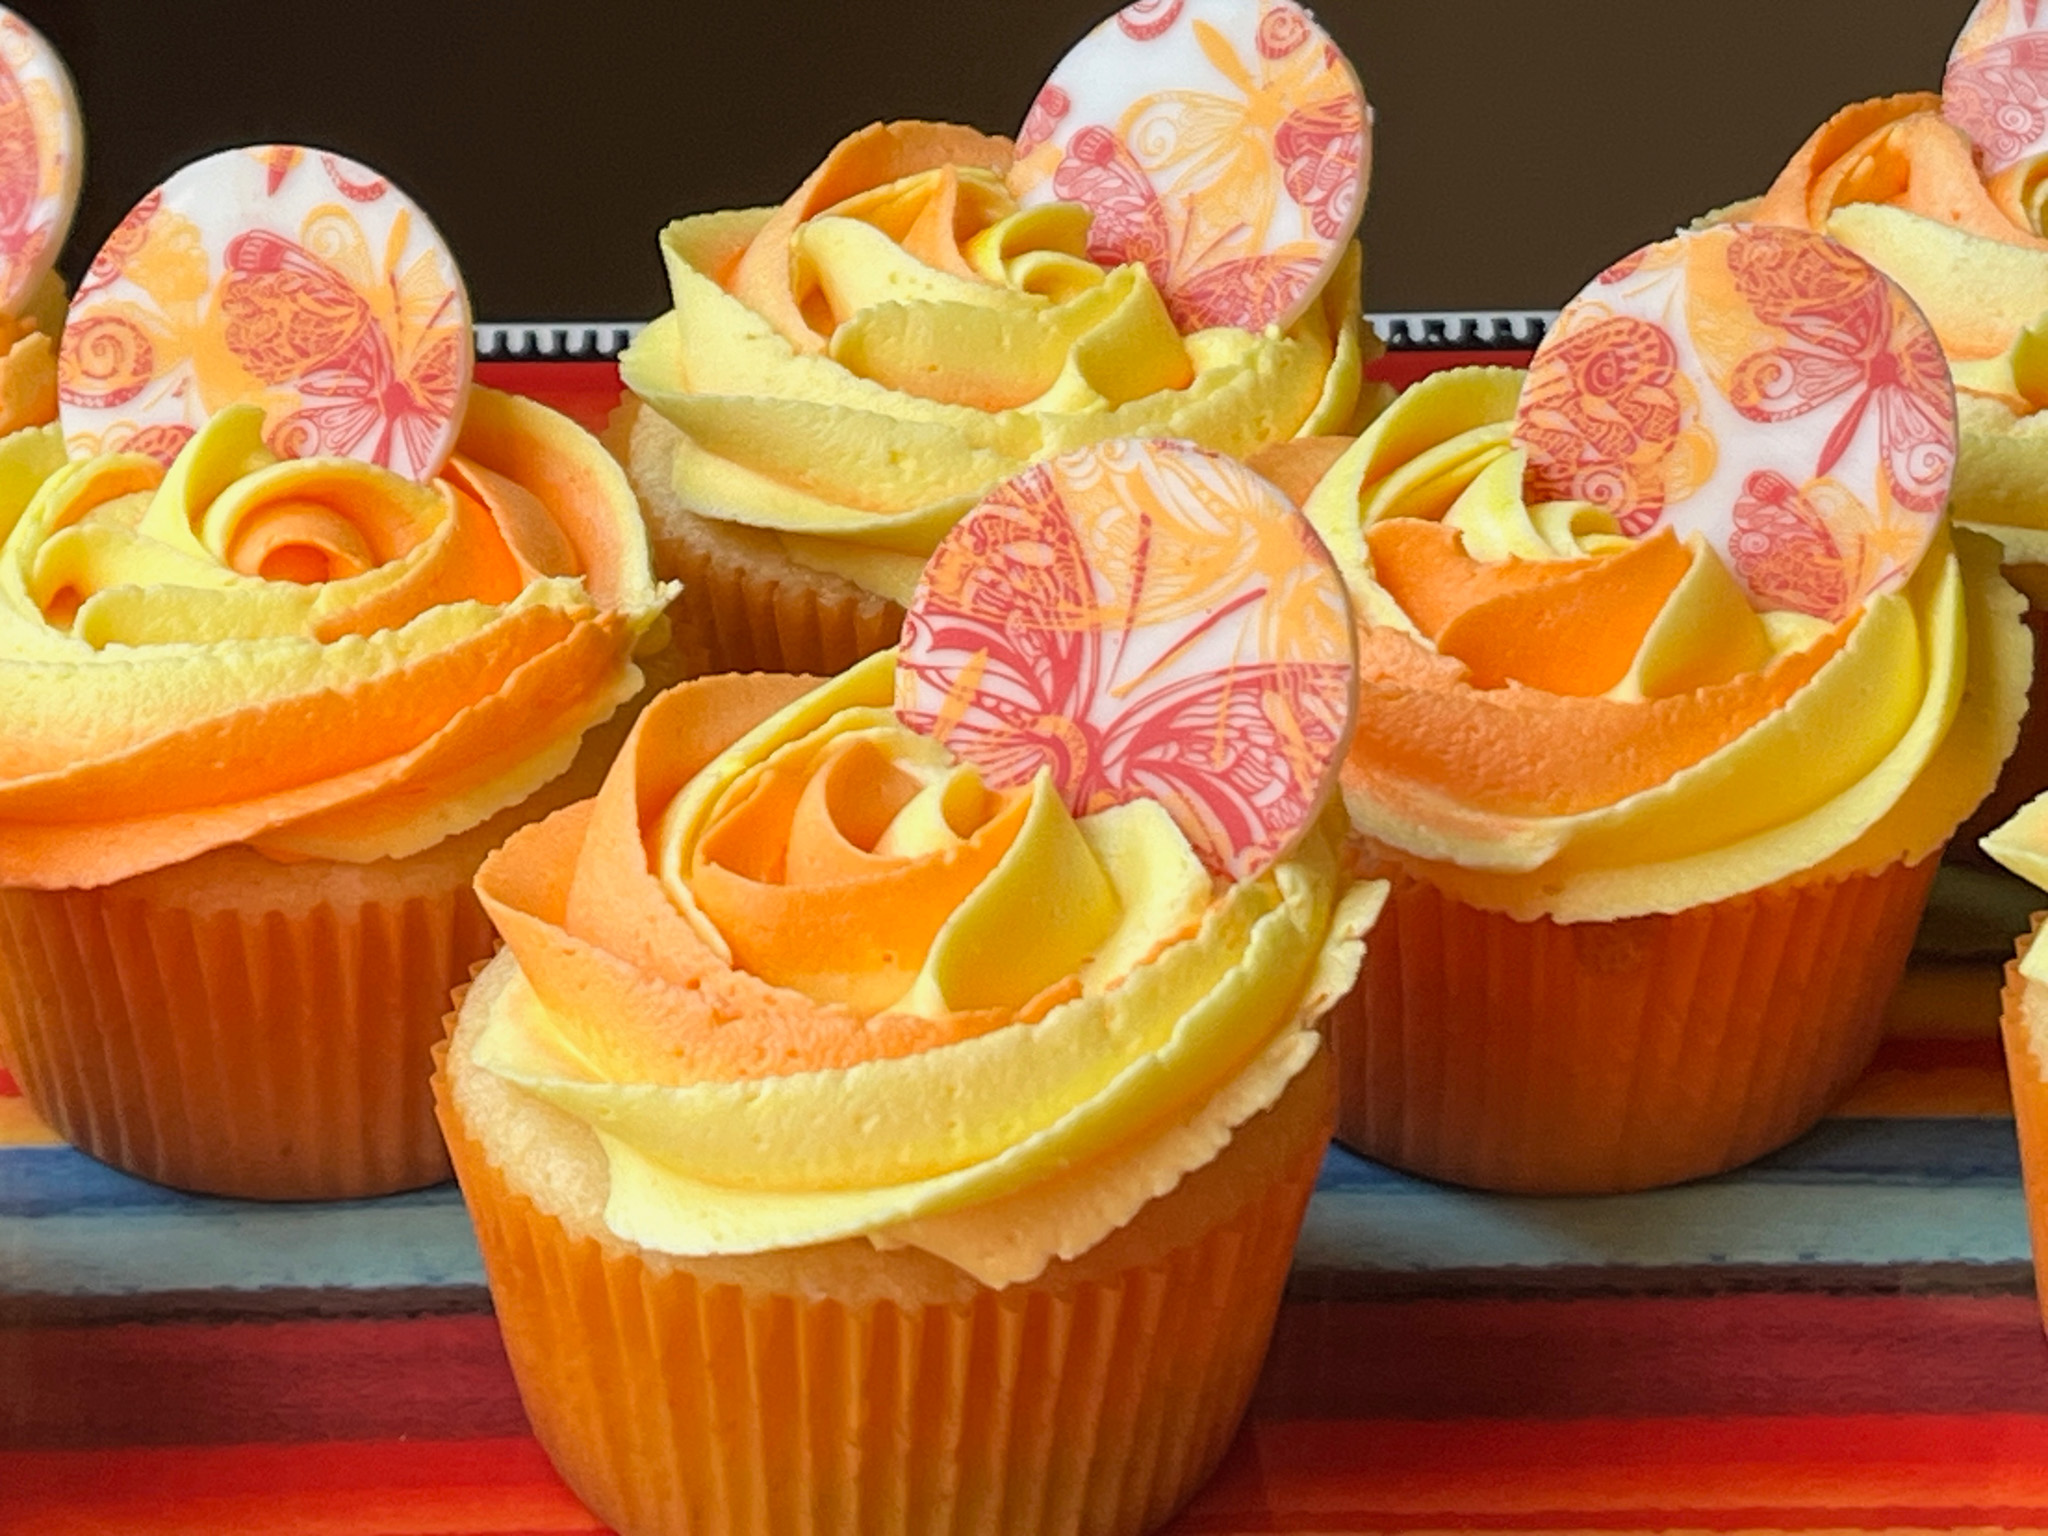
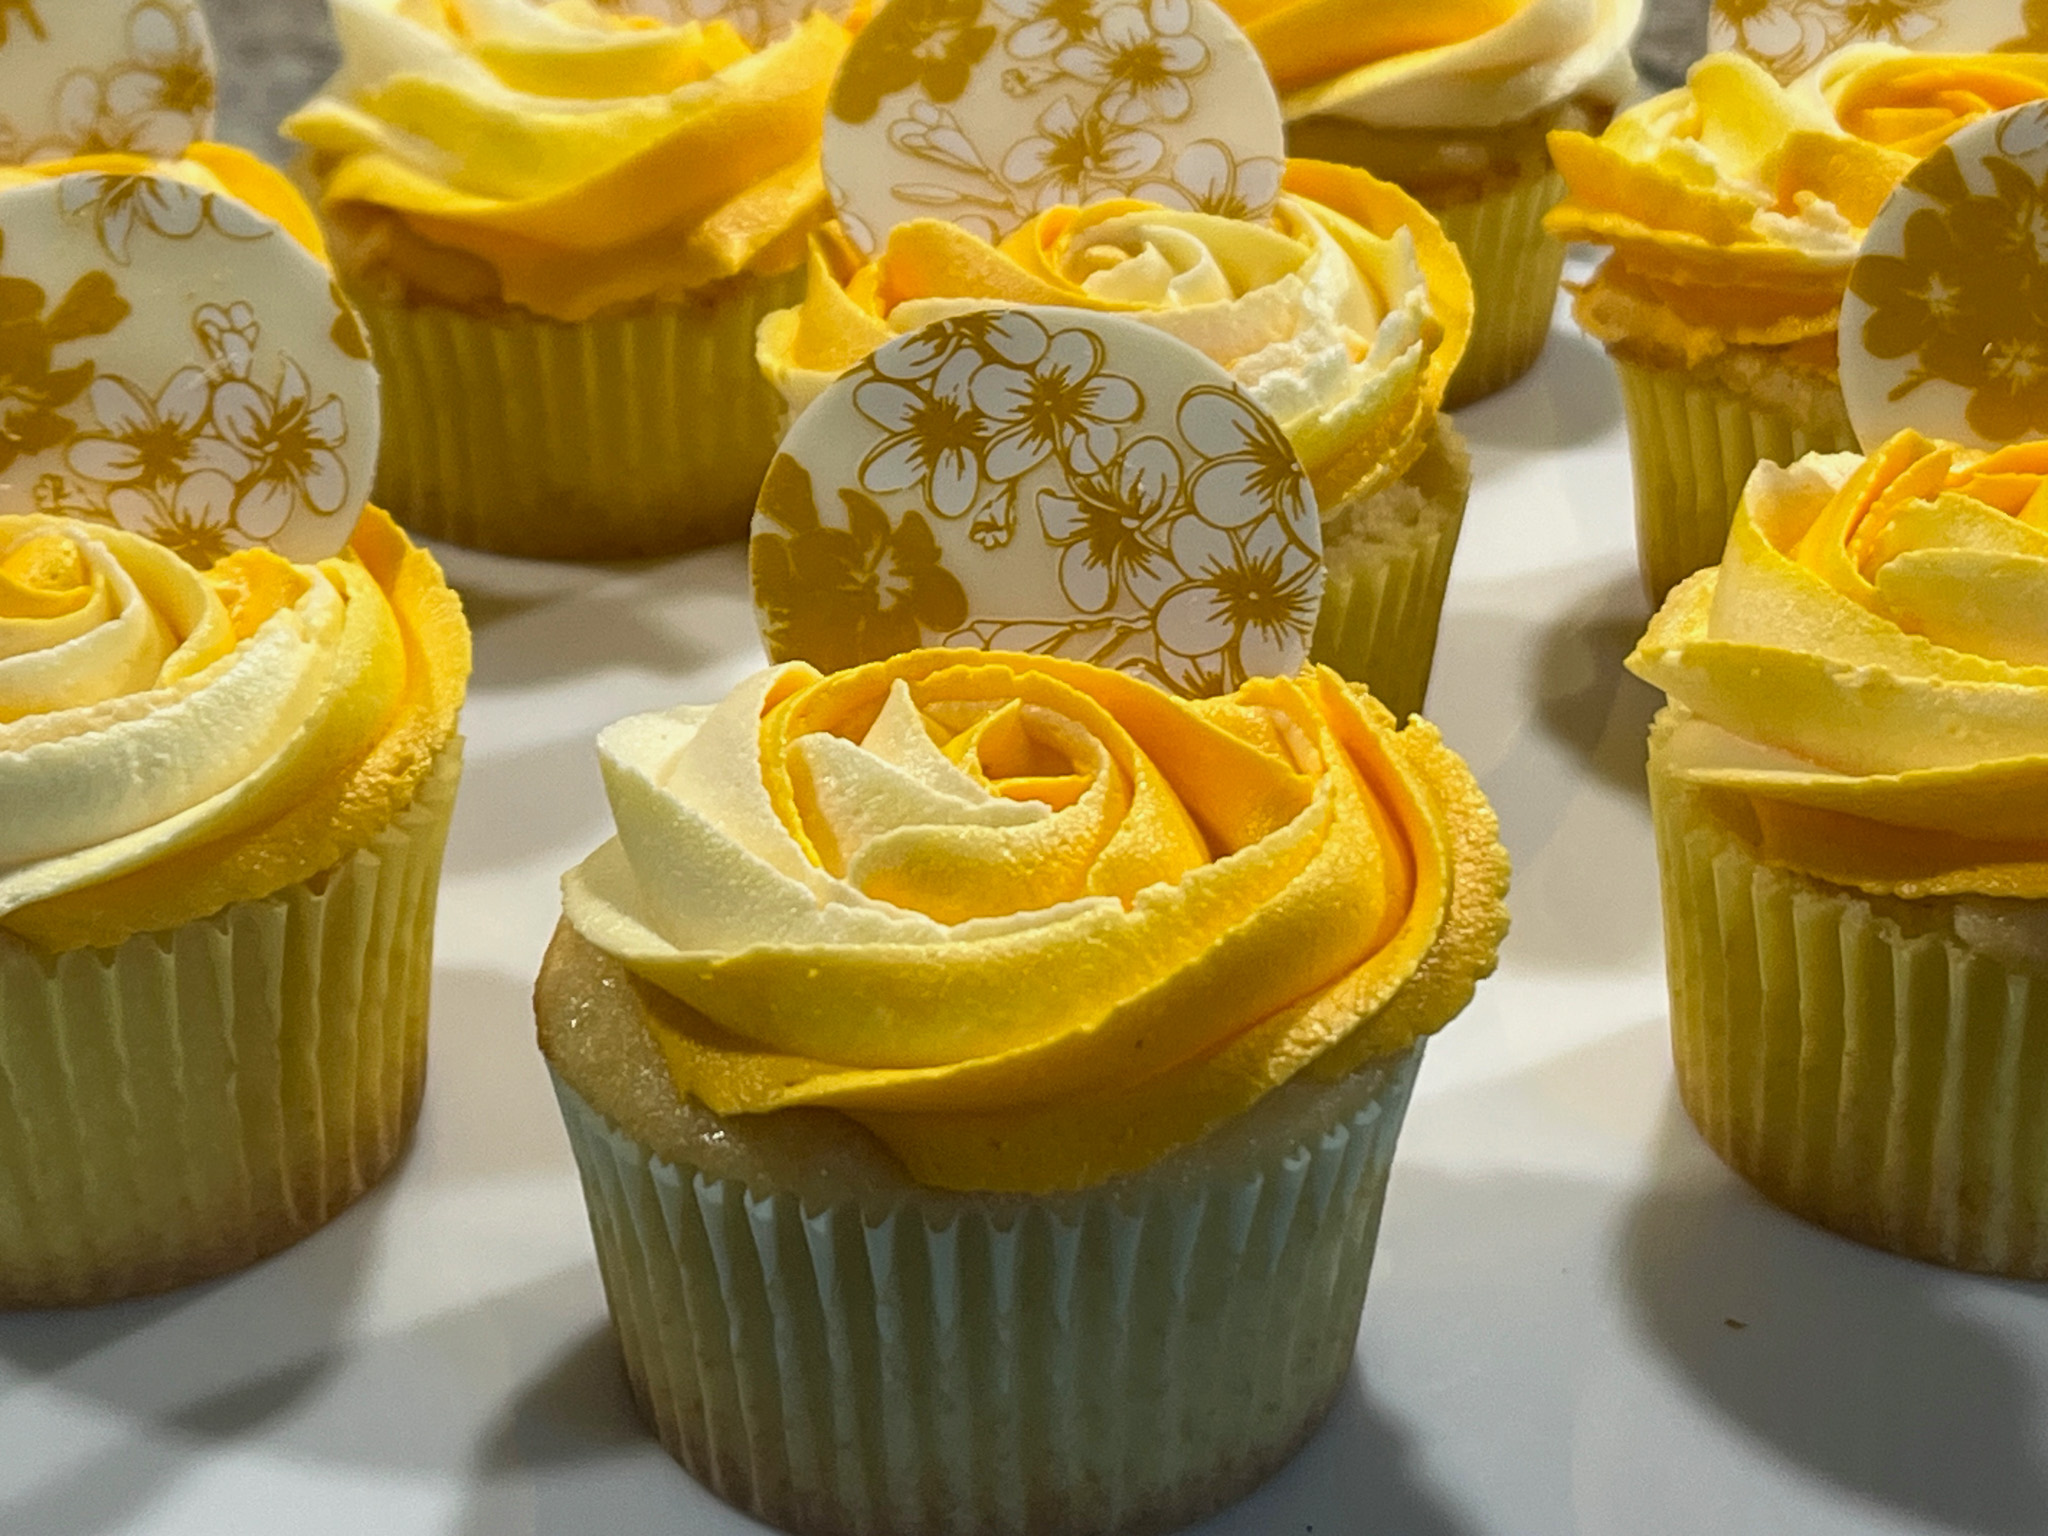
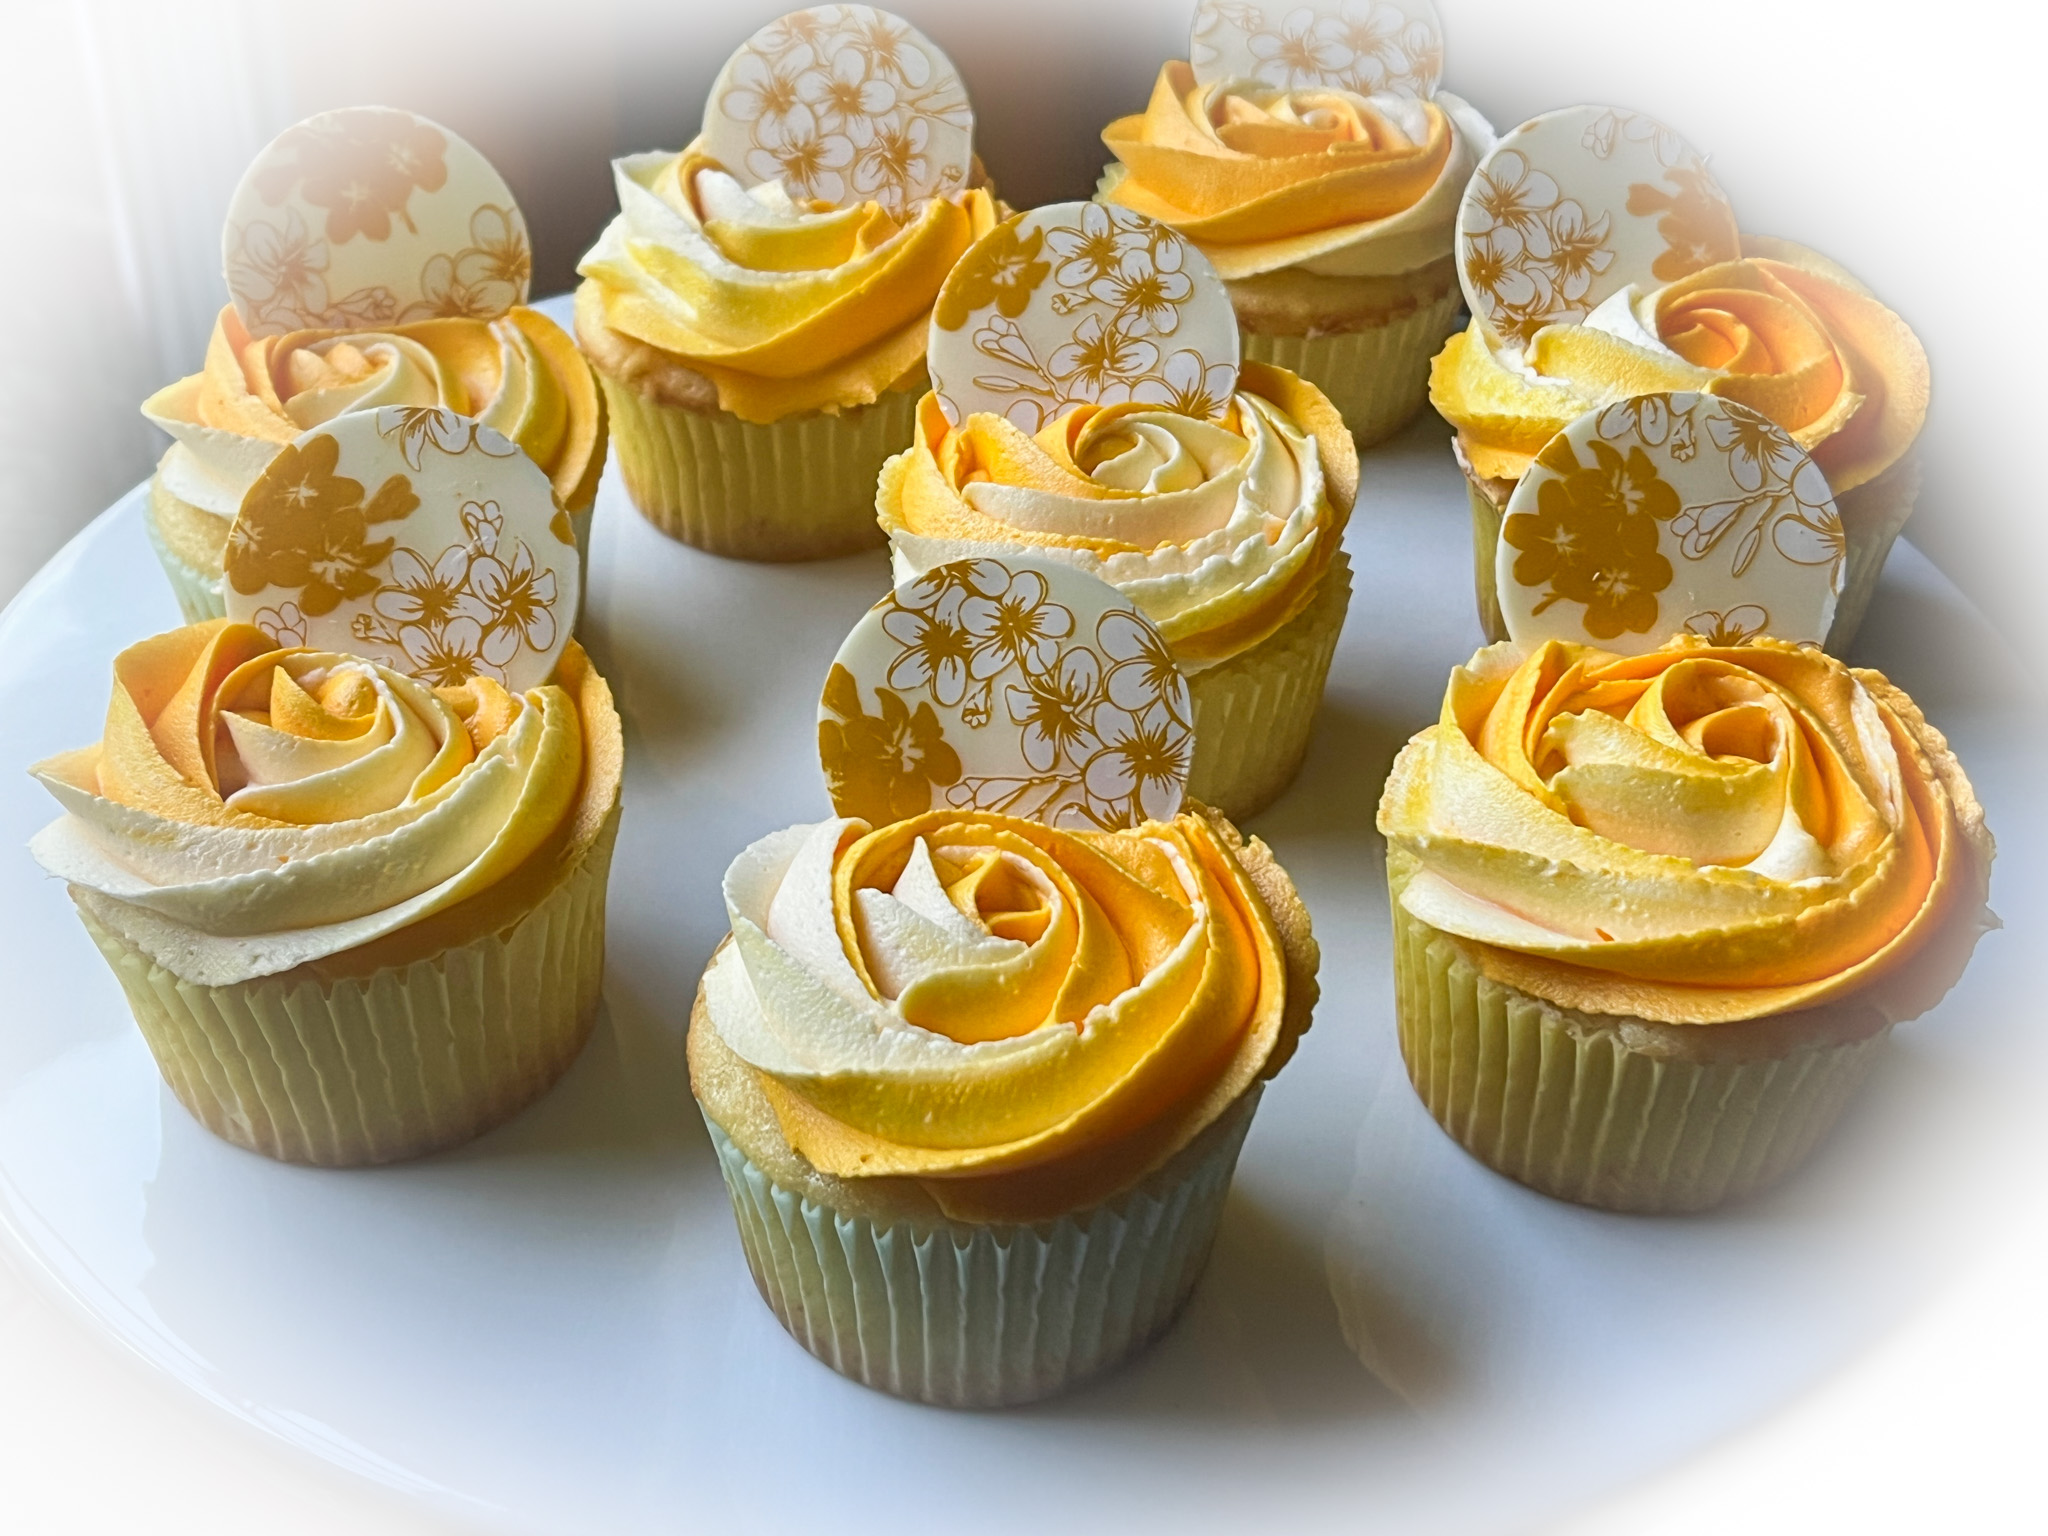
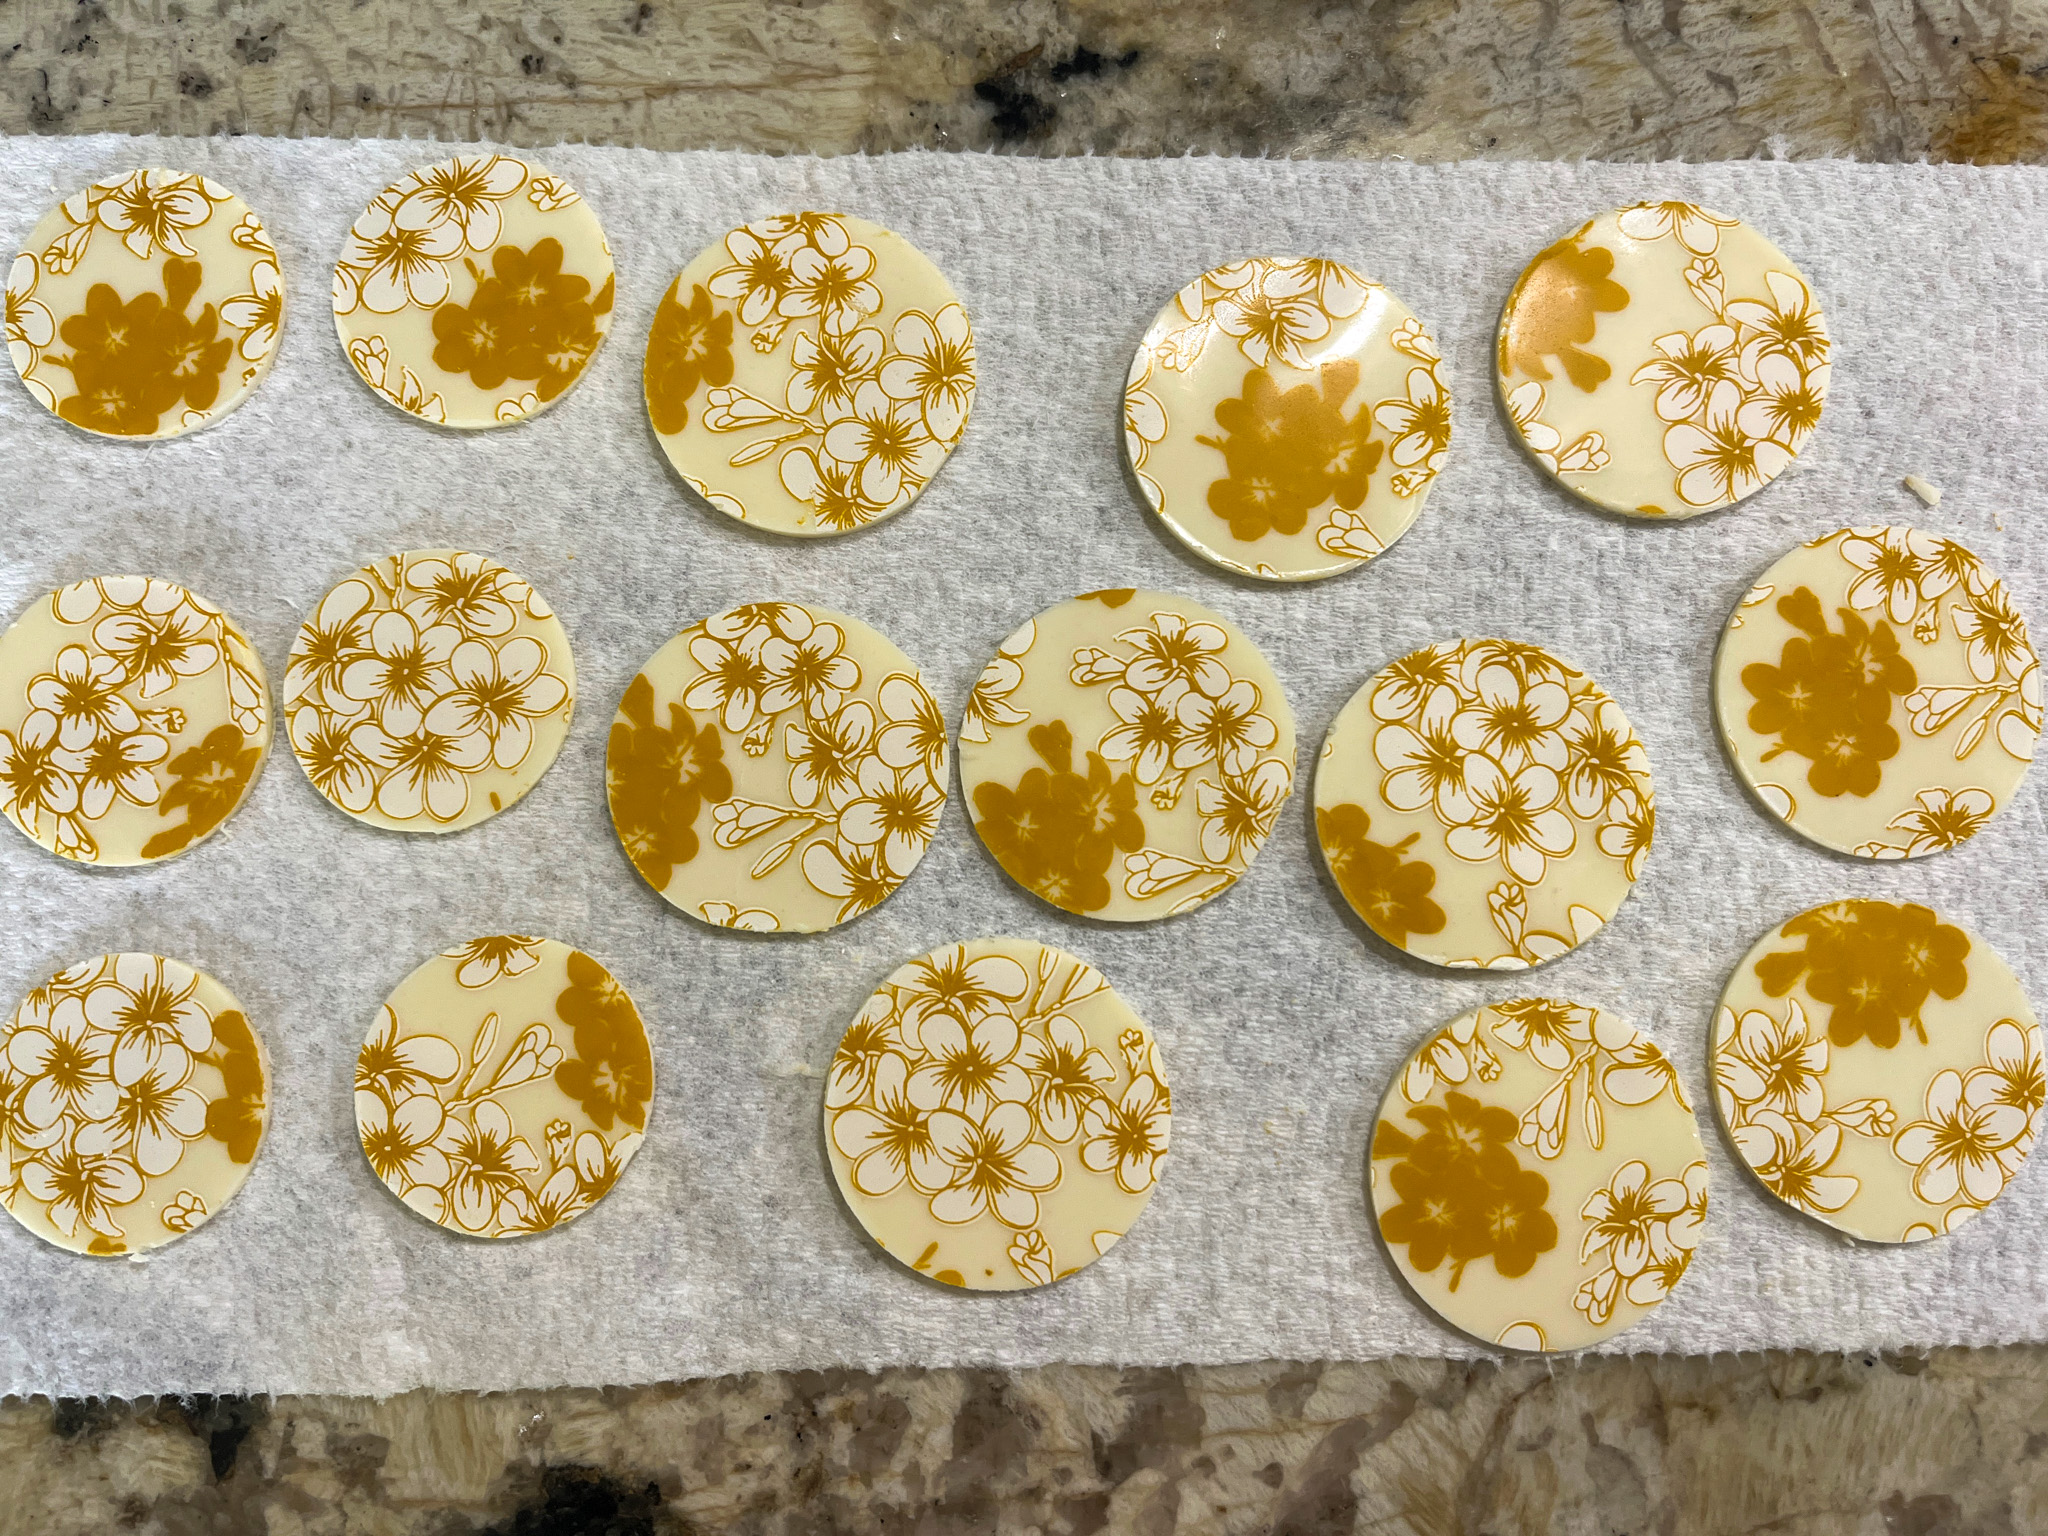
For the butterfly-decorated cupcakes, I used two colors of buttercream, orange and yellow. The chocolate discs were made with transfer sheets and a cookie cutter.
I hope you enjoyed this little duet of cupcakes, and maybe bake a batch or two…
These cupcakes are like little bursts of sunshine on a plate… apart from a marbled buttercream, I added compound chocolate discs made by spreading the melted product over transfer sheets (click here for my favorite source), allowing to set and cutting small circles with a cookie cutter.
BANANA CUPCAKES WITH HONEY BUTTERCREAM FROSTING (adapted from several sources)
makes 16 cupcakes
2 cups ( 260g) all-purpose flour 1 teaspoon baking soda 1 teaspoon ground cinnamon 3/4 teaspoon salt 1 and 1/2 cups (350g) mashed bananas 1/2 cup (113g) unsalted butter, softened to room temperature 1/2 cup (100g) packed dark brown sugar 1/2 cup ( 100g) granulated sugar 2 large eggs, at room temperature 1/4 cup ( 60g) sour cream at room temperature 2 teaspoons pure vanilla extract 1/2 cup (120ml) buttermilk, at room temperature
Heat the oven to 350°F. Line muffin pans with cupcake liners.
Whisk the flour, baking soda, cinnamon, and salt together. Set aside. Cream the butter and both sugars together on high speed until smooth and creamy, about 2 minutes. Add the eggs, sour cream, and vanilla, then beat on medium-high speed until combined. Beat in the mashed banana. With the mixer on low speed, add the dry ingredients until just incorporated. With the mixer still running on low, slowly pour in the buttermilk until combined.
Spoon the batter into the liners to no more than 2/3 full. Bake for 18-20 minutes, or until a toothpick inserted in the center comes out clean. Allow the cupcakes to cool completely before frosting.
HONEY BUTTERCREAM FROSTING
2 + ½ cups (300g) confectioners’ sugar 1 cup (2 sticks) unsalted butter, room temperature 2 tablespoons honey ¼ teaspoon ground cinnamon
With an electric mixer on medium speed, beat all ingredients until smooth.Divide in two portions, leave one white, and yellow food coloring to the other half. Add both batters side by side into a piping bag fitted with a tip 1M to add a swirl to the top of each cupcake. Stick a little decoration if so desired.
Comments: I have not tried the cupcakes but got very nice reviews once I donated them. The chocolate decor is a nice touch, but of course, can be omitted to make life easier. I usually make the discs every time I use chocolate transfer sheets to make chocolate-covered Oreos, so I simply save them in a little plastic container at room temperature.
I cannot pick a favorite. Ok, one is not technically a brownie, but a blondie. Tomatoes, tomahtoes… They are all delicious, luscious, satisfying, rich, borderline decadent.
BISCOFF BLONDIES
If you are a lover of Biscoff cookies, these will bring a huge smile to your face. The recipe comes from thebiteofthebakes.com but for some reason it is unavailable, so I will cut and paste it from the file I had previously saved. I linked to the main site, but for some reason it won’t work in Safari, only in Chrome.
170g butter 170g white chocolate 110g brown sugar 110g granulated sugar 2 large eggs 1 egg yolk 30ml heavy cream 250g all-purpose flour 25g cornstarch 200g chocolate chips 150g chopped Biscoff cookies 200g Biscoff spread
Heat your oven to 350F. Line a 9×11″ rectangular baking dish with baking paper.
In a microwaveable bowl, melt together unsalted butter and white chocolate. Melt in short bursts stirring well each time until smooth. In a large bowl or stand mixer add your melted chocolate, butter and sugar and mix until combined.
Add the eggs, egg yolk and double cream and stir until combined, then add the flour, cornstarch, fold gently. Add the chocolate chips and Biscoff pieces. Pour the mixture into your lined baking tin and swirl on some melted biscoff spread and top with more biscoff biscuits.
Bake for 25-30 minutes. Once baked, let the blondies cool completely in the pan, then place the blondie (still in the tin) in the fridge for a few hours or overnight before slicing.
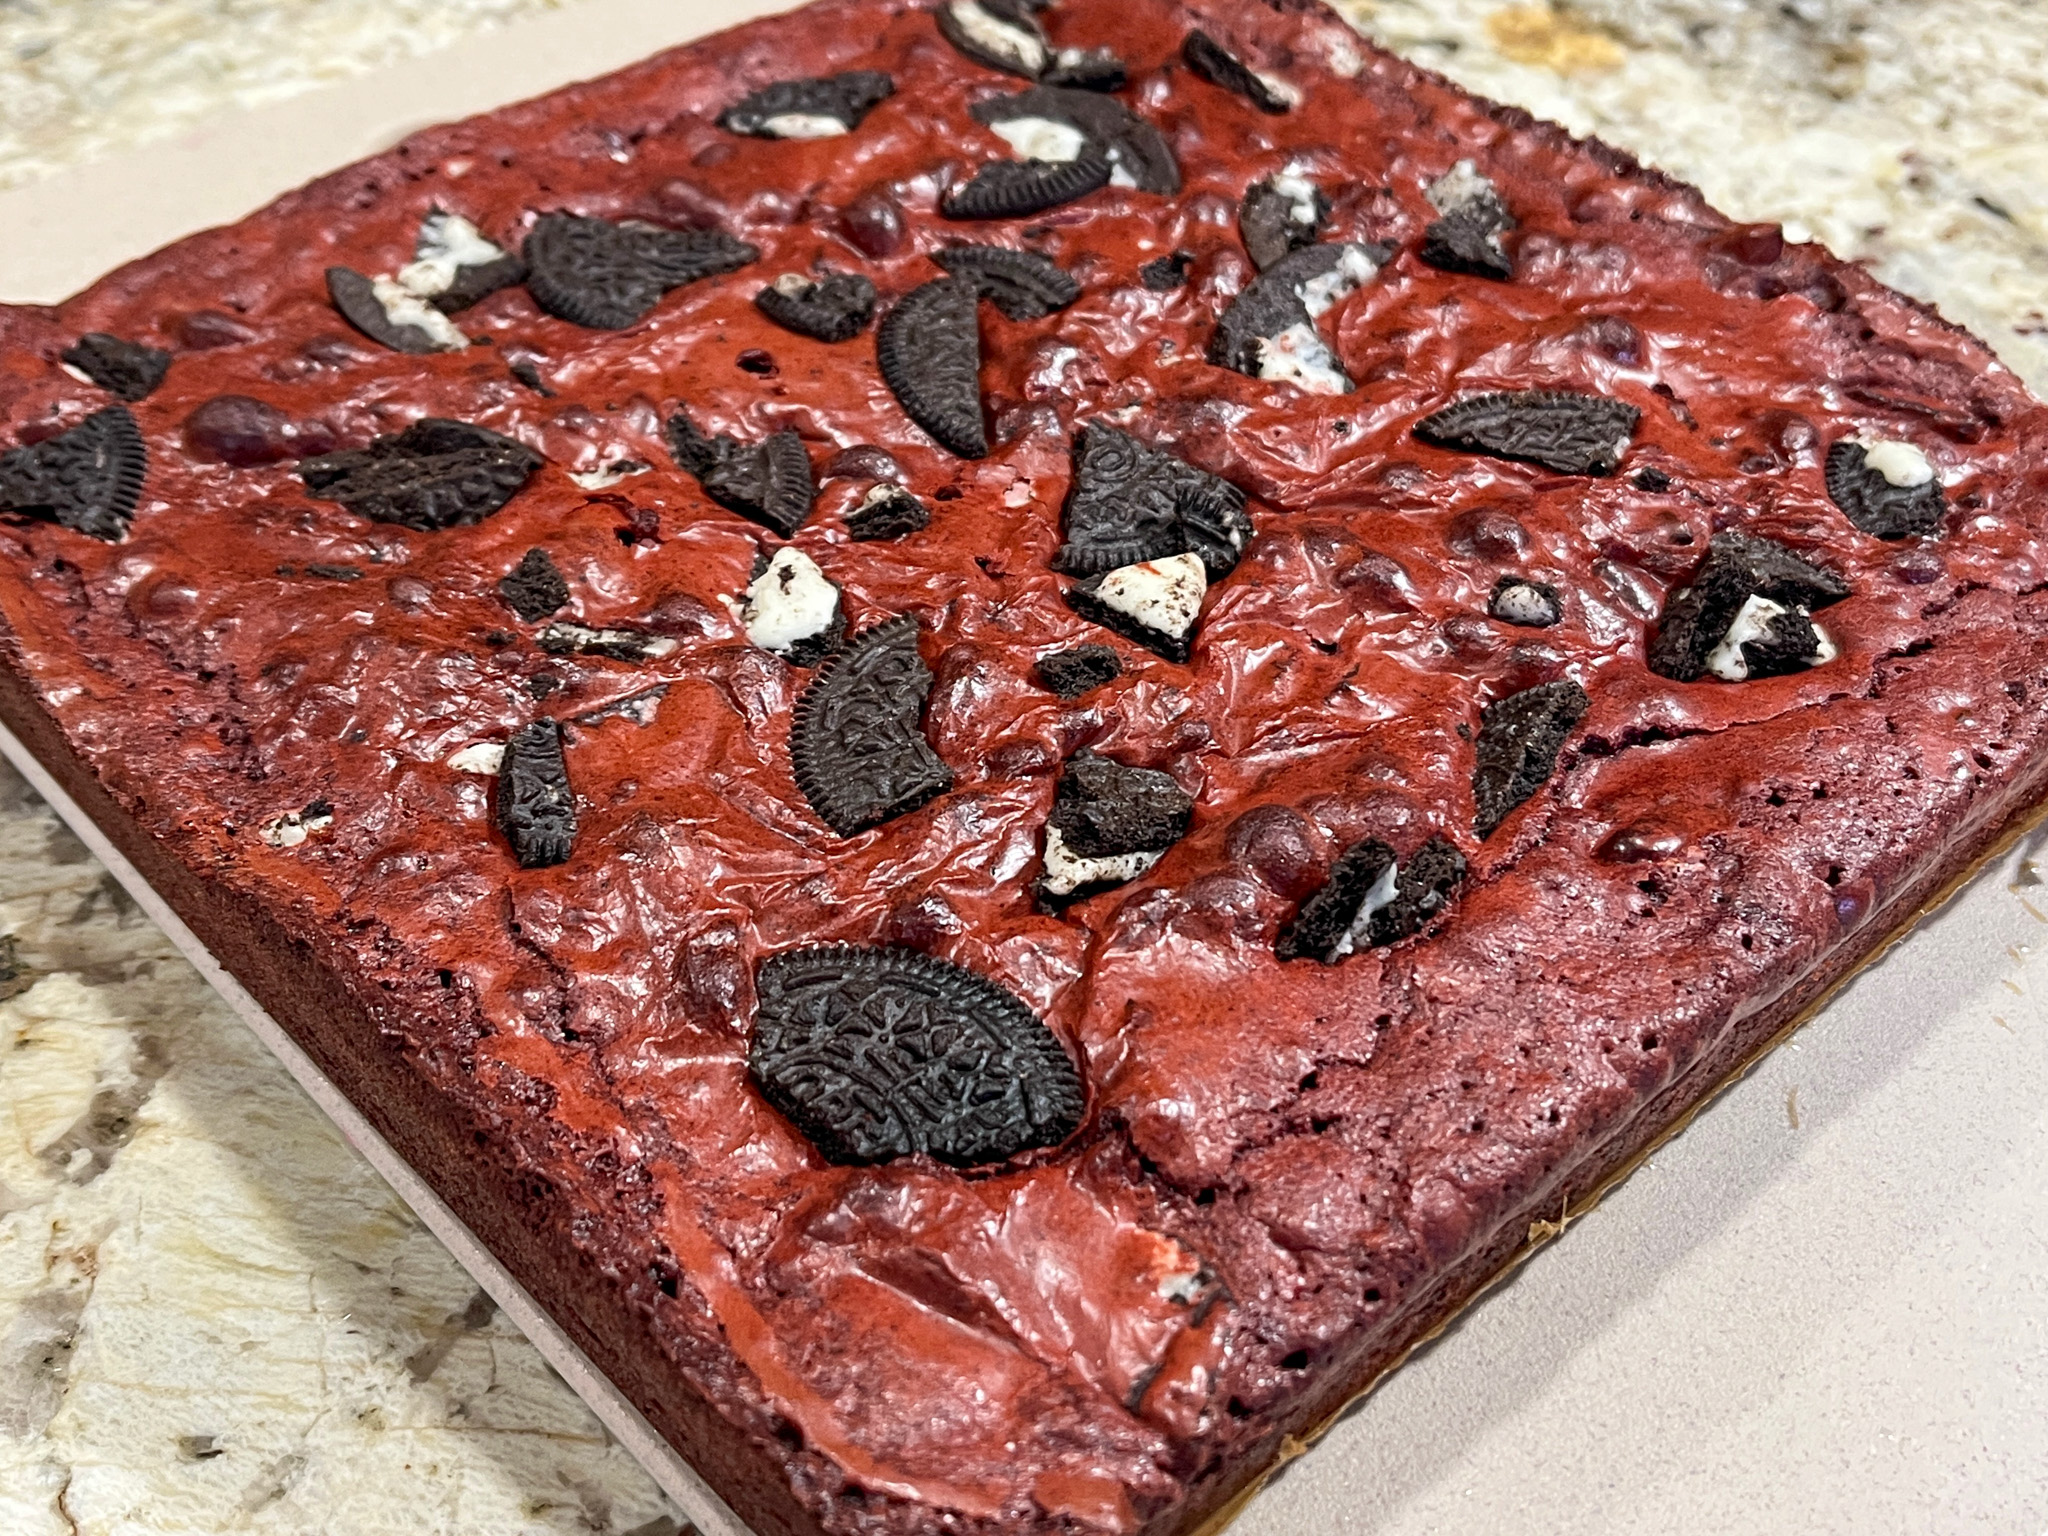
½ cup unsalted butter ½ cup light brown sugar ¾ cup granulated sugar 2 large eggs room temperature 1 large egg yolk room temperature ¼ cup vegetable oil 2 tsp vanilla extract 2 tsp red gel food coloring ½ tsp white vinegar 1 cup all-purpose flour ¼ cup unsweetened cocoa powder ½ tsp salt 1 ½ cups roughly chopped Oreo cookies 8 Oreo cookies
Heat the oven to 350℉. Prepare a 9×9 baking pan with nonstick cooking spray and cover with parchment paper.
In a microwave-safe bowl, combine the unsalted butter and brown sugar. Microwave for 90 seconds until the butter is melted, and then whisk until the mixture is well combined and smooth. Set aside.
In a large mixing bowl, combine the granulated sugar, eggs, and egg yolk. Use an electric hand mixer to whip the eggs and sugar for 2 to 3 minutes until light and pale. While mixing on low speed, slowly drizzle in the brown sugar mixture to temper the egg mixture. Add in the vegetable oil, vanilla extract, red gel food coloring, and white vinegar and mix until well combined.
Add in the all-purpose flour, cocoa powder, and salt, and mix on low speed until combined and smooth. Scrape the sides and bottom of the bowl. Fold in the roughly chopped Oreo cookies.
Pour the red velvet brownie batter into the prepared baking pan and spread evenly with an offset spatula. Add additional broken Oreo cookies to the top of the brownie batter. Bake the brownies for 24-26 minutes until set. An inserted toothpick in the center of the brownies should come out with moist crumbs. Remove the pan from the oven and cool the brownies to room temperature. Cut the brownies into 16 squares.
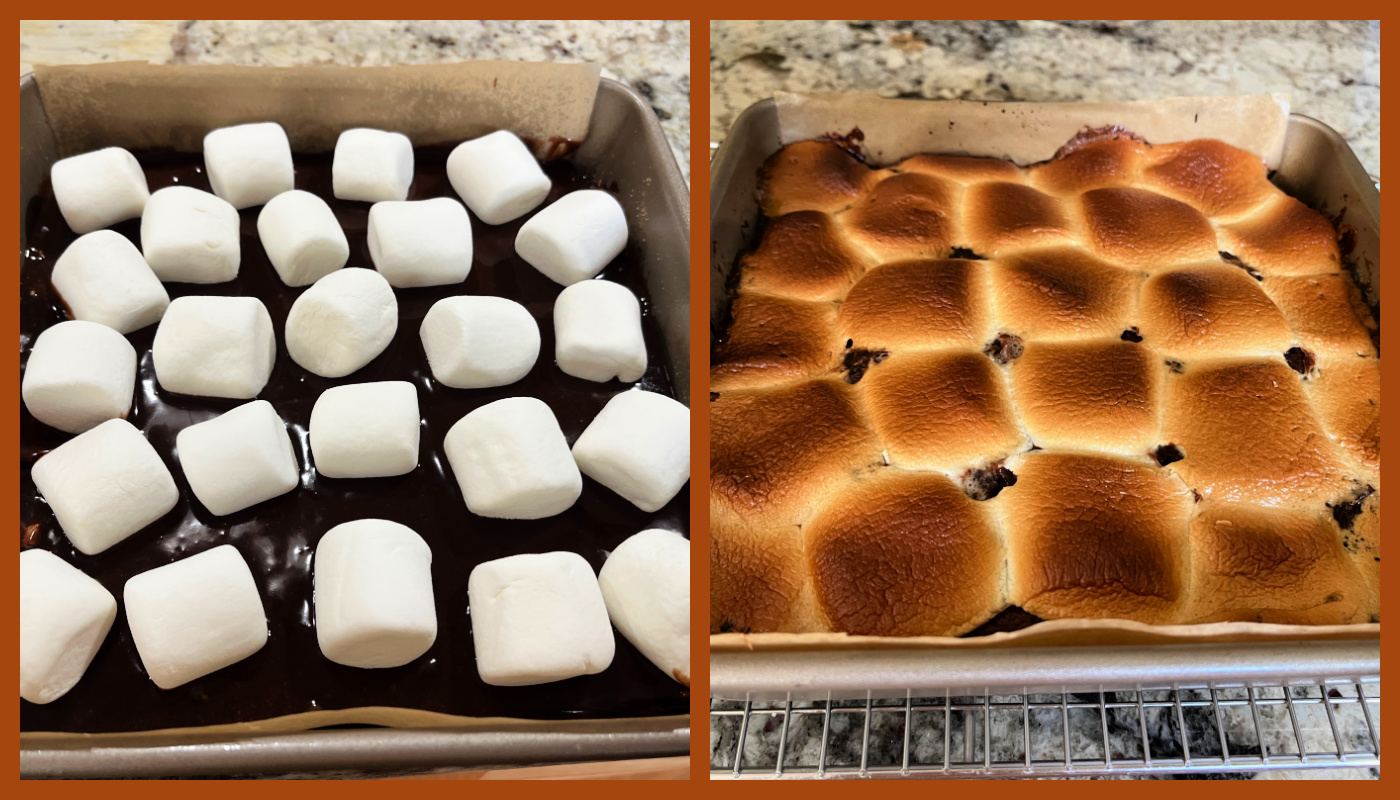
½ cup/113 grams unsalted butter, at room temperature, divided 135 grams honey graham crackers (about 9 whole crackers) 1 tablespoon granulated sugar 113 grams semisweet chocolate, broken into pieces ½ cup (100 grams) packed dark brown sugar ½ teaspoon salt 2 large eggs 1 tablespoon vanilla extract ½ cup (60 grams) all-purpose flour 170 grams marshmallows
Heat oven to 400 degrees.
Grease a 9-inch square metal baking pan with ½ tablespoon of the butter. Line the pan with parchment paper leaving an overhang to make it easier to remove the brownies after baking. Use another 1/2 tablespoon of butter to grease the paper.
Line the bottom of the pan with a single layer of graham crackers, breaking them as needed to fit, then crush the rest of the crackers over and sprinkle with the granulated sugar.
Melt the remaining 7 tablespoons butter and chocolate gently in the microwave at 50% power. Stir in the brown sugar and salt, then let the mixture cool slightly until the bowl is no longer hot to the touch. Whisk in the eggs and vanilla, then continue whisking until smooth and shiny, about 1 minute. Whisk in the flour until no white streaks remain. Pour the batter over the graham crackers lining the pan.
Top the brownie batter with the marshmallows in a single layer and bake until the top is toasted and a toothpick or cake tester inserted into the center of the brownie comes out smudged with a little chocolate, 15 to 20 minutes. Cool completely, then refrigerate in the pan until ready to serve.
To serve, lift the brownie out of the pan and slice into squares or bars. Enjoy chilled, or at room temperature.
Cake is pretty much mandatory, right? This blog anniversary caught me by surprise, as we are currently away. I got a bit confused and thought that the big day was later in the month. My plan was to bake for the occasion once we arrived back home. Good thing I double-checked… Full disclosure: this cake was produced in a bit of a hurry as we prepared to leave for a 2-week trip to the East Coast. Without further ado, I share with you today a lemon cake with raspberry filling and Swiss meringue buttercream. Maybe made in a hurry, but with a huge amount of love!
LEMON LAYER CAKE WITH RASPBERRY FILLING (adapted from The New York Times)
¾ cup/170 grams unsalted butter, softened 3 cups/385 grams all-purpose flour 2 cups/400 grams granulated sugar, divided 3 medium lemons 1½ cups/360 milliliters whole milk 2 teaspoons baking powder ½ teaspoon baking soda 1½ teaspoons kosher salt ¼ cup/60 milliliters neutral oil (I used grapeseed) 4 large eggs, at room temperature
1 cup raspberry jam (store-bought or home-made)
1 recipe for Swiss meringue buttercream, starting with 400g butter (details here)
Heat oven to 325 degrees. Spray three (8-inch) cake pans with baking spray and line each with parchment paper.
Make the cake: Add 350 grams of the granulated sugar to the bowl of a stand mixer fitted with the paddle, then zest the lemons directly into the sugar. Use your fingers to rub the zest into the sugar until it looks moist and sandy.
Juice the zested lemons into a small bowl. Transfer ¼ cup of juice to a large measuring cup and stir in the milk. Let it sit while you prepare the rest of the cake, reserving the remaining juice for the lemon syrup.
To the bowl with the lemon sugar, add the flour, baking powder, baking soda and salt, and mix on low to combine. Add the softened butter to the bowl all at once. Mix on low until the butter is evenly distributed and the mixture looks sandy. Add the oil and eggs to the measuring cup with the milk mixture and mix with a fork to combine. With the mixer on low, slowly stream in the milk mixture. When the batter is moistened, stop the mixer and scrape the bottom and sides of the bowl to ensure there aren’t any dry pockets. Adjust mixer speed to medium and mix for 1 minute more. Divide the batter among the prepared pans, spread evenly and tap the pans on a countertop to release any large air bubbles.
Bake the cakes until slightly risen and a toothpick inserted in the center comes out clean, 20 to 25 minutes. Set the pans on a wire rack and let the cakes cool for about 15 minutes. Then, run a thin knife along the edges of the pan and carefully turn the cakes out onto the rack to cool completely.
While the cakes cool, make the syrup: Measure ¼ cup lemon juice from the remaining reserved juice. Combine the juice and the remaining 50 grams sugar in a small saucepan and bring to a boil over medium-high, stirring occasionally. Cook until the sugar has dissolved, then pour into a heat-safe container to cool.
Make the Swiss meringue buttercream. Reserve 1/3 of the amount and dye red (I used Tulip Red). Dye a very small amount with green for the stems. I used Laurel color. Dye the rest of the buttercream with Fuchsia or any other color you like.
Assemble the cake: Place one layer of cake onto a serving plate, top side up. Brush the cake with lemon syrup. Spread raspberry jam over the top of the cake. Repeat with the second layer on top of the filling, top side down, and press gently. Add the final layer. Brush the cake with syrup, then cover the top and sides of the cake with a thin layer of fuchsia frosting. Refrigerate until firm, about 30 minutes. Frost the cake with fuchsia, smoothing the surface. Let that set for 30 minutes, then pipe stems with green buttercream and a tip 3. Using the tulip red buttercream, pipe the flowers with a petal 101 tip, a border at the bottom with an open star tip (like #20) and a border on top with 1M tip.
Comments: Hard to believe it’s been 16 years. Hard to find what to say about it without getting cheesy or highly predictable. So I won’t say much. I’m still having fun blogging, I’m still excited every time I hit “publish” on a new post. I am not stopping quite yet. Let’s step into the 17th year of my blogging journey, and if you’ve been following me for a while, THANK YOU! If you are new here, I hope you’ll find things that inspire you to cook, bake, and be passionate about. Life is too short not to enjoy what each day brings.
Apologies for not showing pictures of the cake cut to reveal the layers and filling. It was donated whole, so I also never got to see it. And that ends up as being part of its charm… Or so I hope…
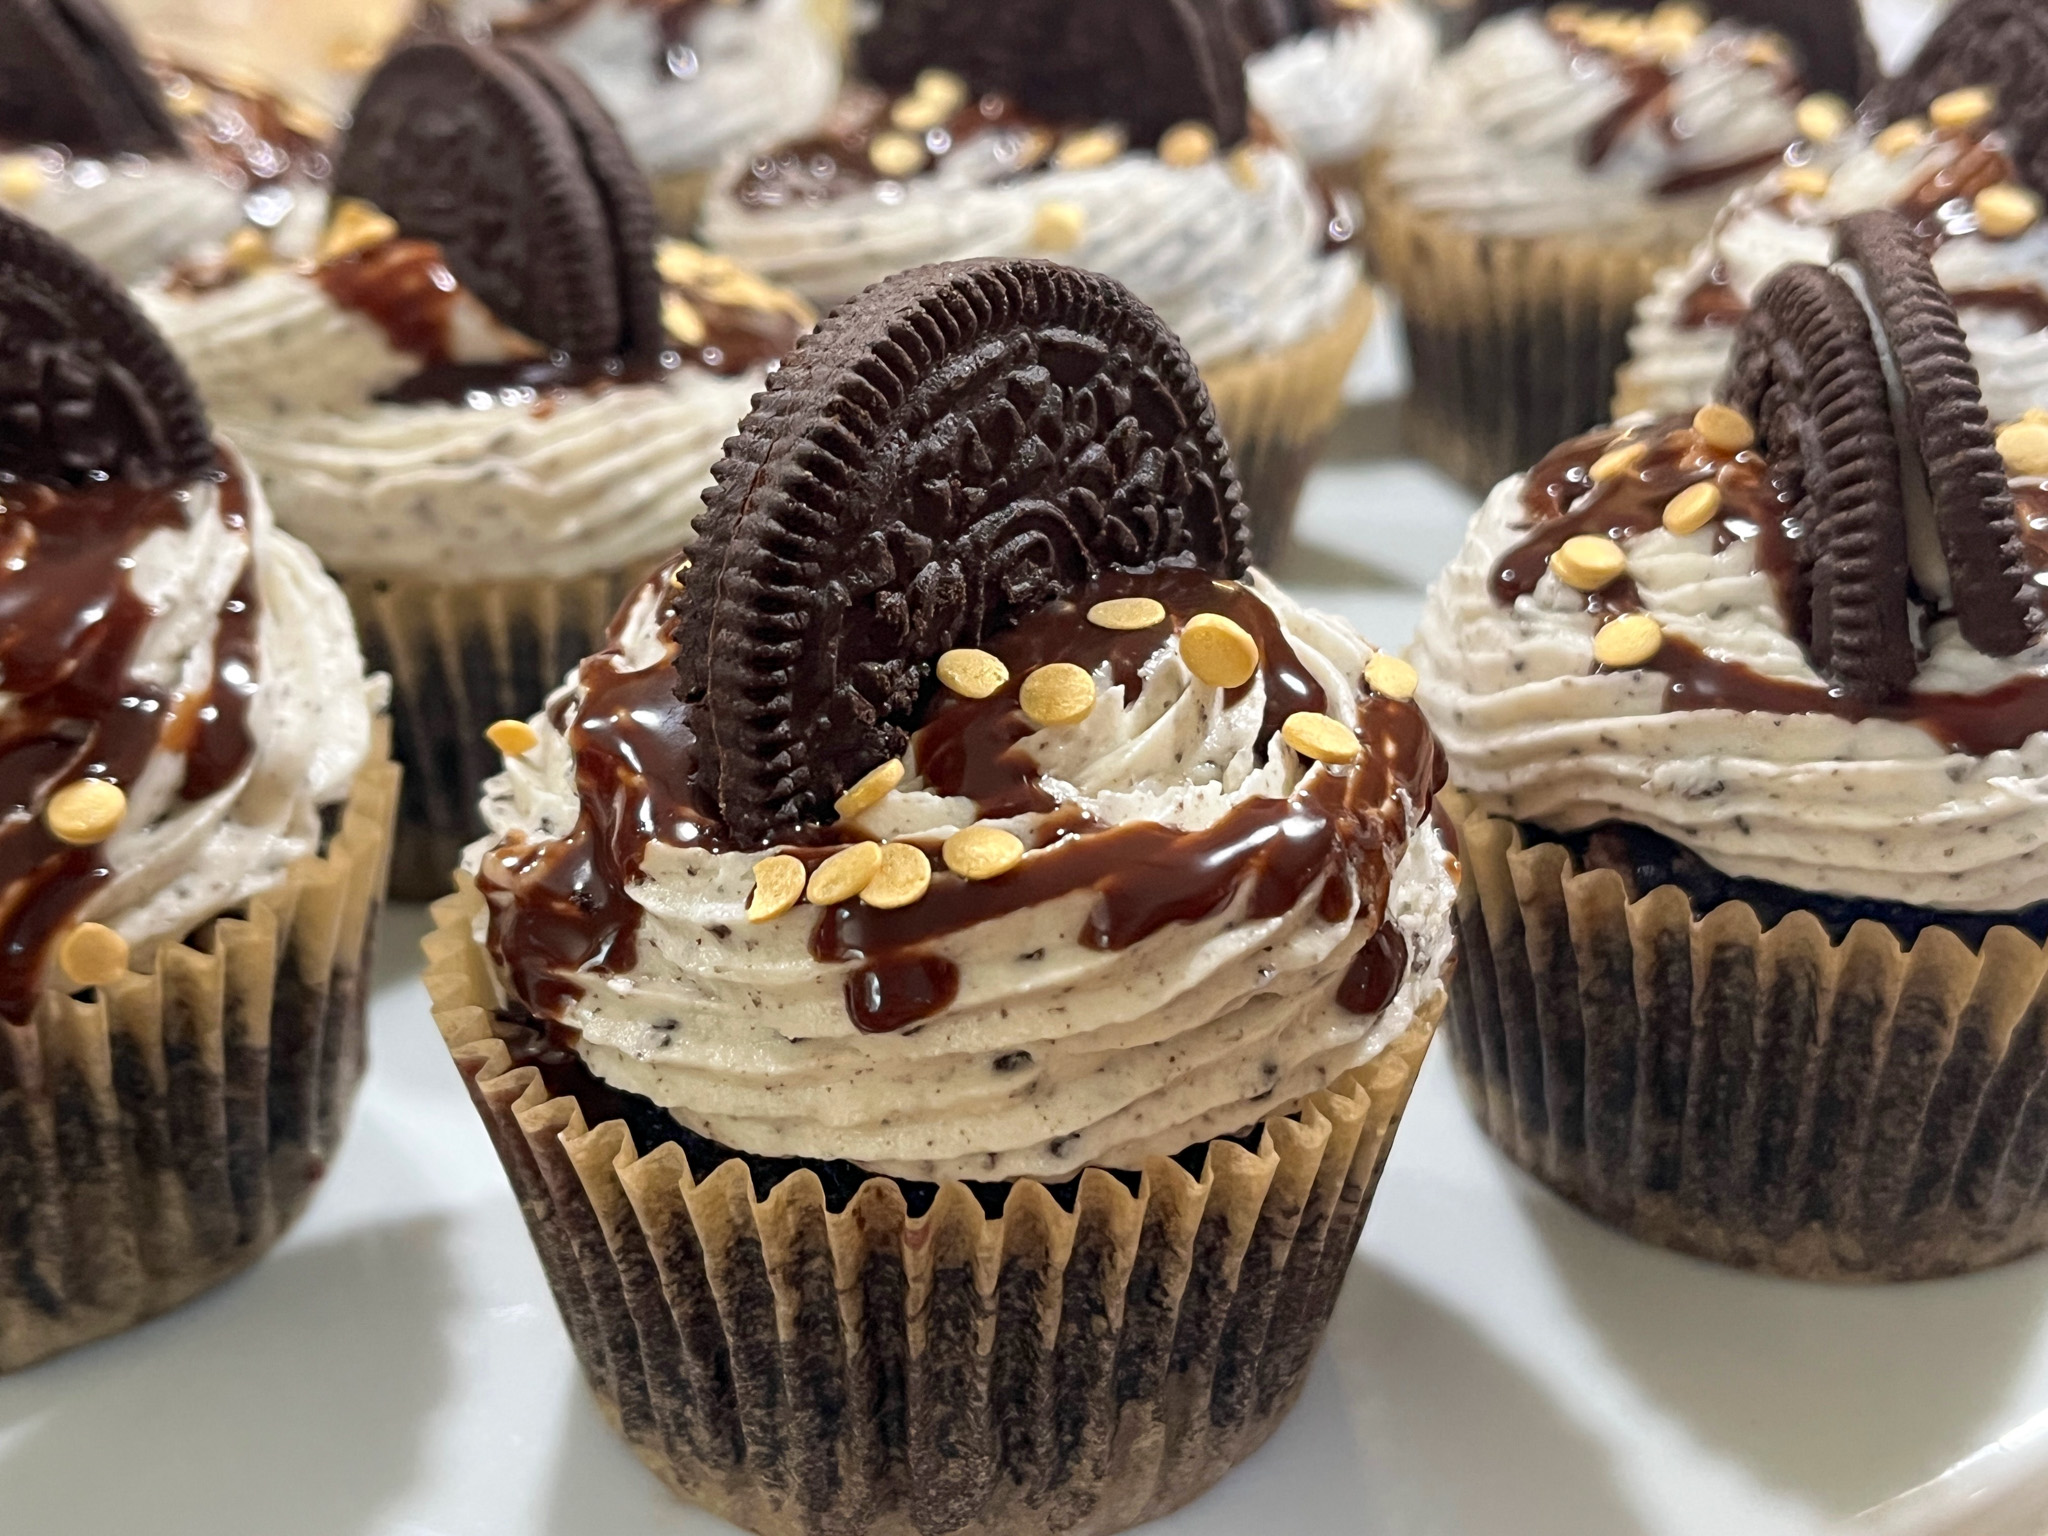
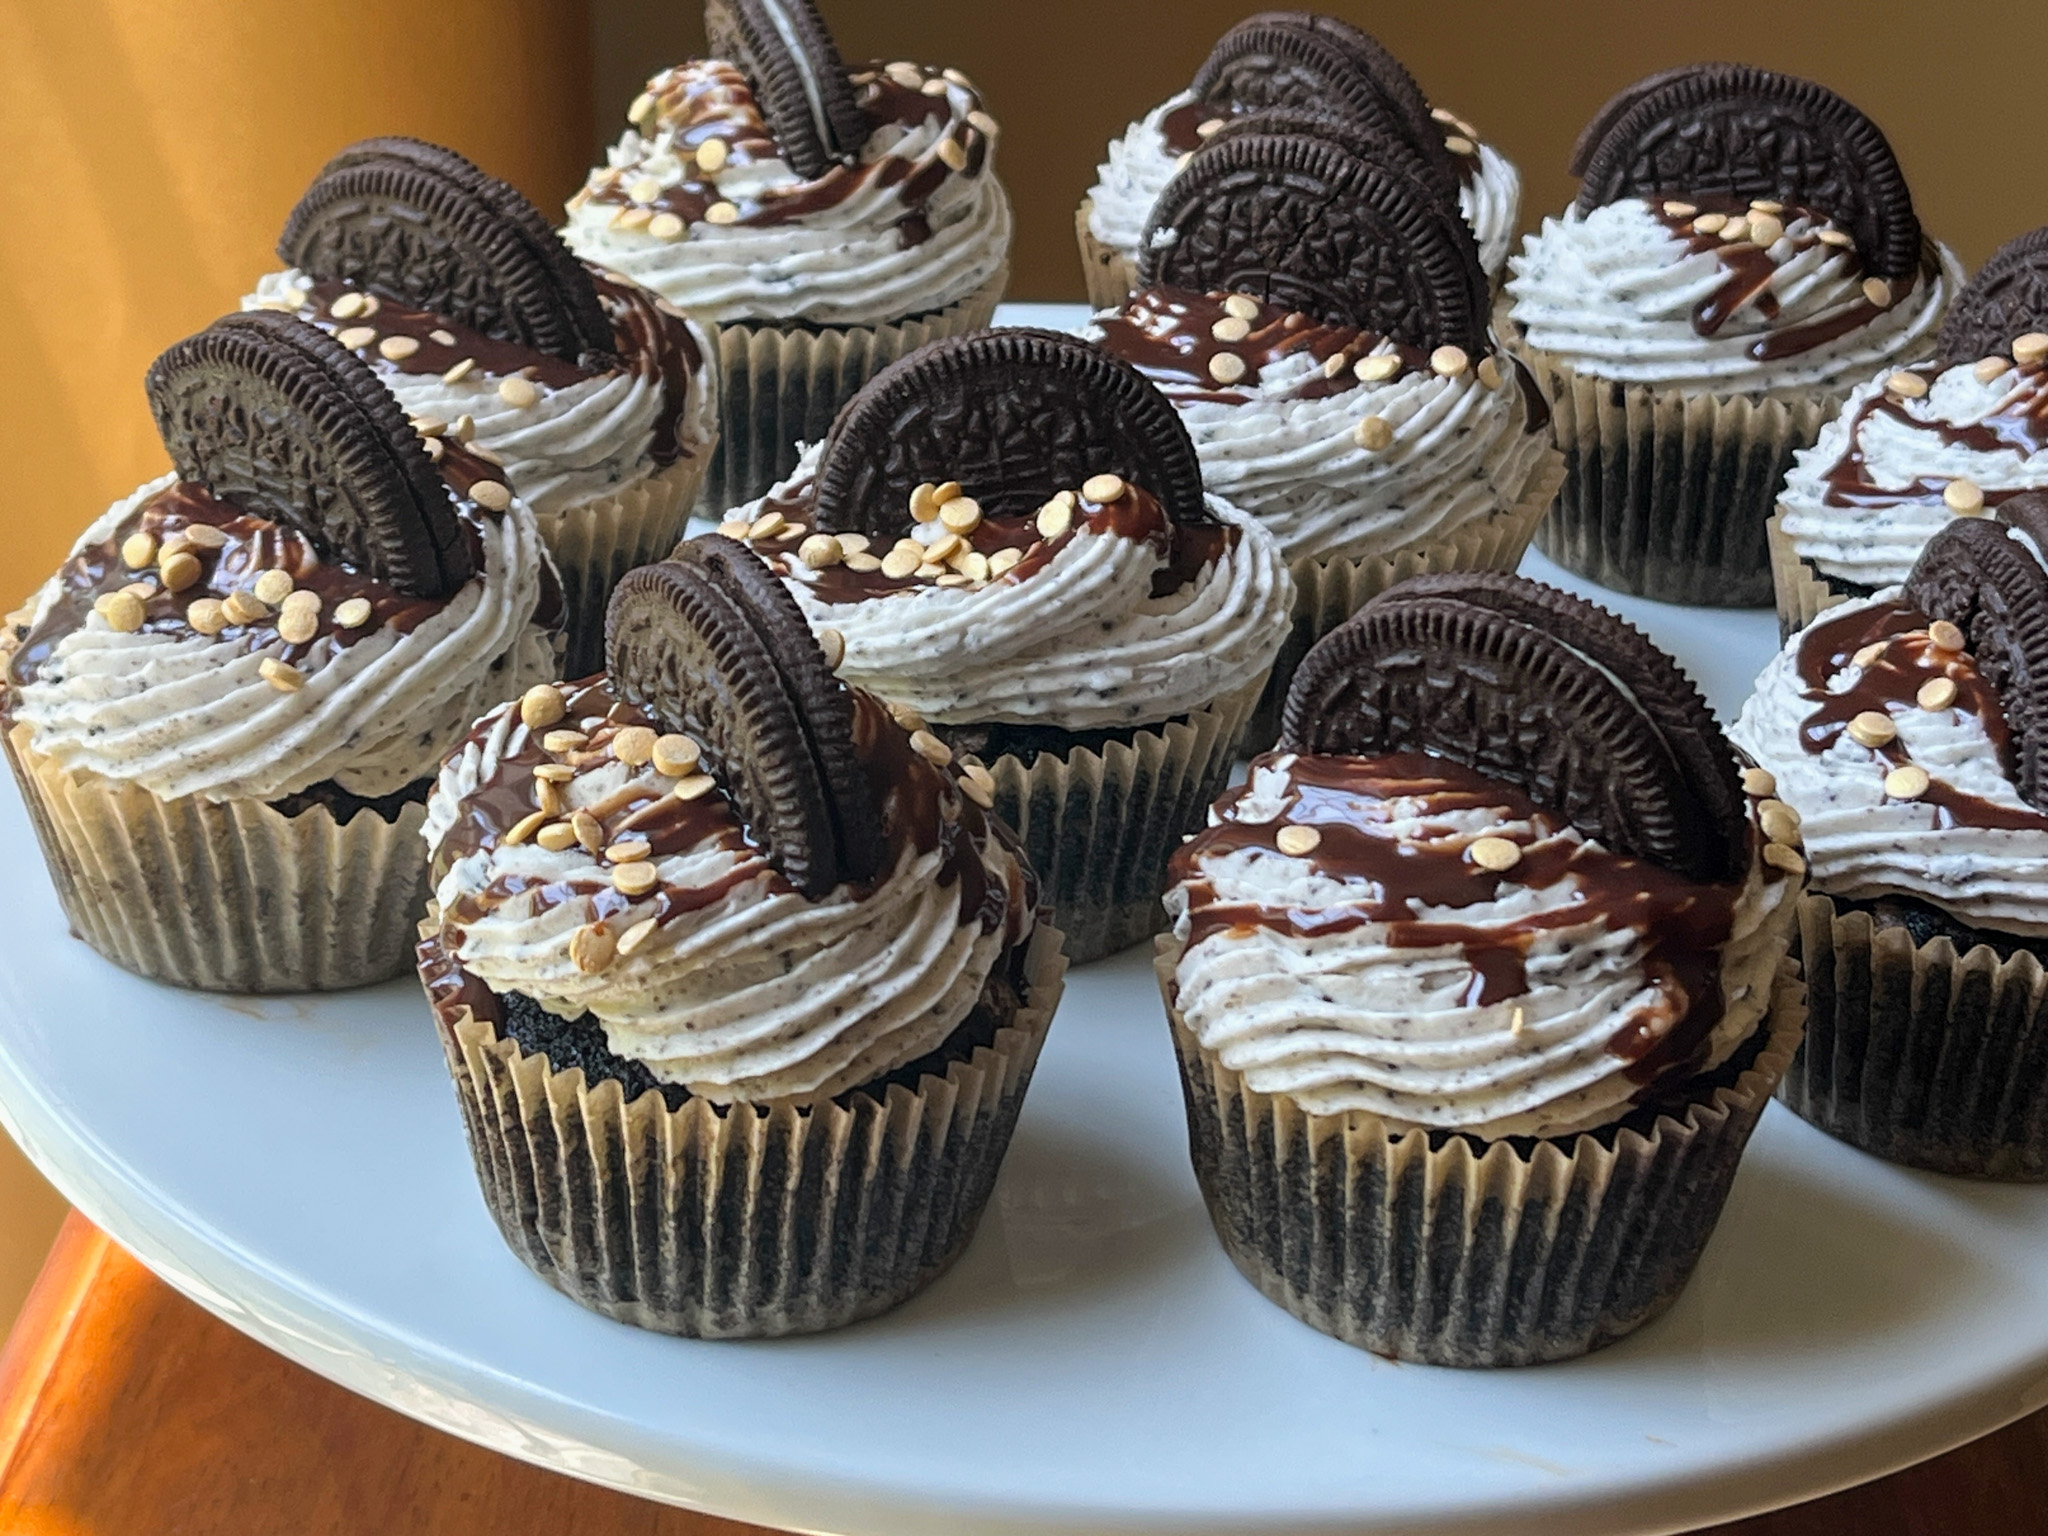
A fun departure on the classic chocolate cupcake, I added some crushed Oreos to a favorite recipe of mine, and some also went into the buttercream. If there was any doubt about the nature of these babies, I dealt with the issue by sticking half an Oreo on top. The drizzle of ganache is optional, but why would you skip it?
OREO CUPCAKES (from The Bewitching Kitchen)
for the cupcakes: 120 grams (1 cup) all-purpose flour 50 grams (1/2 cup + 2 Tablespoons) natural cocoa powder 225 grams (1 + 1/8 cups) granulated sugar 1 teaspoons baking powder 1/2 teaspoon baking soda 1/2 tsp Kosher salt 85 grams (about 1/2 cup) grapeseed oil 2 large eggs, room temperature 2 teaspoons vanilla extract 75 grams (1/3 cup) milk, room temperature 170 grams (3/4 cup) very hot water 4 Oreo cookies, crushed
for the Oreo buttercream: 1 cup (227 g)) unsalted butter, at room temperature 2 + ½ cups (300 g) powdered sugar 1 tsp vanilla extract 1/8 tsp salt 1 to 2 tbsp heavy cream 1/3 cup Oreo cookie crumbs
for the ganache drizzle: ¼ cup (42 g) semisweet chocolate chips 2 tbsp heavy cream
Makes12 cupcakes
Heat oven to 350F.
In a large mixing bowl, add the flour, cocoa powder, granulated sugar, baking powder, baking soda and salt. Whisk very well to fully combine the dry ingredients.
Add the oil into the mixing bowl and mix on medium speed with a hand mixer until well combined. Add the eggs and vanilla extract to the bowl and continue mixing until smooth.
With the mixer still running, slowly pour in the milk and then the hot water. Continue mixing until everything is evenly incorporated, the batter will be super thin, do not worry about it. Fold in the crushed Oreos. Place the batter in cupcake pan and bake until a toothpick inserted in the center comes clean. This will take 20 to 25 minutes. Cool completely before frosting.
Make the ganache and allow it to cool. Place the chocolate in a heatproof bowl. In another small bowl, heat the cream in a microwave for about 30 seconds, or until bubbling. Pour the hot cream over the chocolate chips and allow the mixture to sit for 2 minutes to melt the chocolate. Stir the mixture until smooth and shiny. Use it when barely warm, so that you won’t melt the buttercream.
Make the buttercream. Whip the softened butter for 5 minutes with a paddle attachment. Add the powdered sugar, vanilla and salt and mix until incorporated, in low-speed. Add the heavy cream to adjust consistency, then the crumbs of Oreos. Mix at medium-high for a minute or so until smooth. Frost the fully cool cupcakes. Place in the fridge for 15 minutes to set. Then add the drizzle, and a half of Oreo on top. Sprinkles are optional.
Comments: Most Oreo cupcakes call for black cocoa, but I prefer a less intense version, so I used a considerably milder recipe. The addition of crushed Oreos was my way to amplify the chocolate taste. Because these cakes rely on oil, they are super moist to start with and stay this way for a few days. Crushed Oreos in the buttercream give a super pleasing texture. Make sure they are finely crumbed. And yes, you crumble the cookie and the filling. Easy!