HONEY-OAT PAIN DE MIE

Simple pleasures make me happy: a new cookbook to read in bed before falling asleep, a new pair of earrings (another obsession of mine), a new cooking gadget, like this gorgeous item I succumbed to last week.  It’s a beautiful pan to make sandwich bread, that kind that looks like store-bought, but tastes  two orders of magnitude better.  I bought it with one specific recipe in mind, and in record-breaking speed, the dough was mixed 24 hours after the package from King Arthur arrived.

HONEY-OAT PAIN DE MIE
(from King Arthur)

3 cups (12 3/4 ounces) all purpose flour
2 + 1/4 teaspoons instant yeast
1 cup old-fashioned rolled oats
1 + 1/2 teaspoons salt
4 tablespoons melted butter
3 tablespoons honey
1 cup + 2 Tbs lukewarm water

Combine all of the ingredients in the bowl of a KitchenAid mixer, and mix until it comes together in a shaggy mass. Cover the bowl, and let the dough rest for 20 minutes. Then knead for 8 to 10 minutes on second speed (you can also knead by hand until smooth, it will take longer).

Place the dough in a lightly greased bowl, or in an 8-cup measure (so you can track its progress as it rises), and let it rise for 90 minutes. It should be noticeably risen, but not necessarily double in bulk. Mine definitely doubled after 90 minutes, take a look by clicking here.

Gently shape the dough into a 9″ log. Place the log in a lightly greased 9″ pain de mie (pullman) pan, pressing it gently to flatten. Cover the pan with a plastic wrap and let the dough rise until it’s about 1 inch from the top of the lid. This should take 60 to 90 minutes.

Remove the plastic wrap, close the lid, and bake the bread in a 350 F oven for 30 minutes.  Carefully remove the lid (wear mittens), and bake for 5 more minutes to brown the surface.  If you want, you can remove the bread from the pan and bake it for another 5 minutes to get a crispier crust.   Internal temperature should be at least 190 F.

Remove the bread from the oven, allow it to completely cool before slicing.

ENJOY!

to print the recipe, click here
Two important pointers for success:

1. Use a recipe that was written for your pan’s dimensions, so that the dough will rise to its full capacity during baking.  For instance, this recipe is for a 9 inch long Pullman pan. They all have similar widths, by the way.

2. When placing the shaped loaf inside the pan, allow it to rise until it is 1 inch from the top, as the recipe states.  I was a bit impatient (big surprise! ;-))  and also worried about the dough overflowing, so I cut the final rise a bit short.  By doing so, my bread was not fully squared, as the top edges never touched the lid.   It didn’t compromise the taste or texture of the crumb, but the shape was slightly off.

This bread is absolutely delicious, the oats don’t make it hard or crunchy, it is a perfect bread for simple sandwiches, and also great to slice and bake as home-made Melba type toasts.

I am submitting this post to Susan’s Yeastspotting event…

ONE YEAR AGO: Carrot and Leek Soup

TWO YEARS AGO: Chicken Parmiggiana 101

Add to FacebookAdd to DiggAdd to Del.icio.usAdd to StumbleuponAdd to RedditAdd to BlinklistAdd to TwitterAdd to TechnoratiAdd to Yahoo BuzzAdd to Newsvine

SAN FRANCISCO SOURDOUGH

Talk about an American classic!  The sourness of this bread is quite unique,  but not everyone is fond of it.  For some, it’s a little excessive, but I happen to love it.  In fact, I’ve considered buying a commercial SF sourdough starter  to try and mimic this bread at home.  However,  the fact that soon that population would change by incorporating yeast and bacteria present in our own environment, made me reluctant to go for it.   Sure, it would be nice to bake a few loaves with a “close to the original” taste, but then I’d be left babying three starters instead of the two I own… and I already take care of way too many strains of bacteria in the lab!  😉

Browsing through the pages of “Bread Alone,” I spotted a recipe for San Francisco Sourdough, and almost did not pay attention to it, thinking that it would involve the authentic starter.  Nope.  Daniel Leader developed his own recipe for it, coaching a regular starter into a slightly increased level of acidity, resulting in a bread that, according to him, would be very  close to the original.

SAN FRANCISCO SOURDOUGH
(from Daniel Leader’s Bread Alone)

for the poolish
4 oz starter (mine was at 100% hydration)
4 oz bread flour
4 oz water

for the dough
8 oz water
all the poolish
13.5 to 16 oz bread flour
1/2 Tbs salt

Make the poolish the day before you want to bake the bread, by combining all the ingredients in a small bowl and leaving at room temperature for 24 hours, preferably from 74 F to 80 F, covered with plastic wrap.

Next day, pour the water at room temperature in the bowl of a KitchenAid, mixer, and add the poolish, breaking it up gently with a wooden spoon, and stirring until dissolved.  Add about 1 cup (5 oz)  of the total flour and the salt, and stir until combined.   Place the dough hook in, keep adding the rest of the flour (you may not need all of it), and knead for about 12 minutes at the second speed of the machine.

Remove the dough to a slightly floured surface, knead it by hand a few times, place it in an oiled bowl, cover loosely with plastic wrap, and let it rise for 2.5 hours, with quick cycles of folding after 45 minutes and 1 hour and 30 minutes. After the second folding cycle, leave the dough undisturbed for the final 60 minutes of bulk fermentation.

Place the risen dough over a slightly floured surface, and without de-flating it too much, form it into a ball.  Let it rise 45 minutes.  Shape the dough as a boule or any other shape you prefer, place it in an appropriate container for the final rise, and leave it at room temperature for 1 hour.

Bake it in a pre-heated 450 F, with steam, for a total of 45 minutes, decreasing the temperature to 425 F after 10 minutes of baking.  If using a cover to create steam, remove the cover after 30 minutes.    Let it cool over a rack for a couple of hours before slicing it.

ENJOY!

to print the recipe, click here

My main modification of the recipe was to include two folding cycles after kneading in the KitchenAid because I felt the dough lacked structure and strength.   I used regular, supermarket bread flour, so it’s possible that it behaved differently from the book’s description.   For the most part, I tend to bake my breads with regular bread flour, not going out of my way to find the one with “a touch of germ,”, or “harvested during Spring, under a full moon.”    😉

Did the bread deliver the promise in the taste department?  YES!  When I tried a piece all by itself to get the real taste of the crumb, it immediately hit me as VERY similar to a San Francisco sourdough, so if you live hundreds of miles away from the Bay Area and develop a craving for that bread, this recipe will soothe you.

A more authentic shape would  be a torpedo type loaf, but I have a weakness for round bread, so that’s how I shaped mine.  Round, oblong, it doesn’t really matter. It hit the spot.  Awesome bread!

I am submitting this post to Yeastspotting

ONE YEAR AGOA Real Oscar Winner  

TWO YEARS AGO: Pane Siciliano

Add to FacebookAdd to DiggAdd to Del.icio.usAdd to StumbleuponAdd to RedditAdd to BlinklistAdd to TwitterAdd to TechnoratiAdd to Yahoo BuzzAdd to Newsvine

SPELT AND CORNMEAL ROLLS

Rustic, toothsome, flavorful, and if all that wasn’t enough, these rolls are a cinch to make.  In a classic Dan Lepard’s approach, the recipe calls for minimal kneading, and because they are baked as small rolls, shaping is  a breeze.  The rolls also freeze quite well,  individually wrapped, then placed in a low oven to come back to that freshly baked feel.

Per Mr. Lepard’s request,  I won’t post the full recipe.  But you can find it in the database of “The Guardian”  through a quick jump here.

I will, however, give you a quick outline of how this recipe comes together….

The cornmeal needs to be soaked in boiling water for a few minutes, once you do that, all ingredients – soaked cornmeal, spelt flour, water, honey, and yeast – are added to a large bowl, mixed quickly, and left standing for 10 minutes.

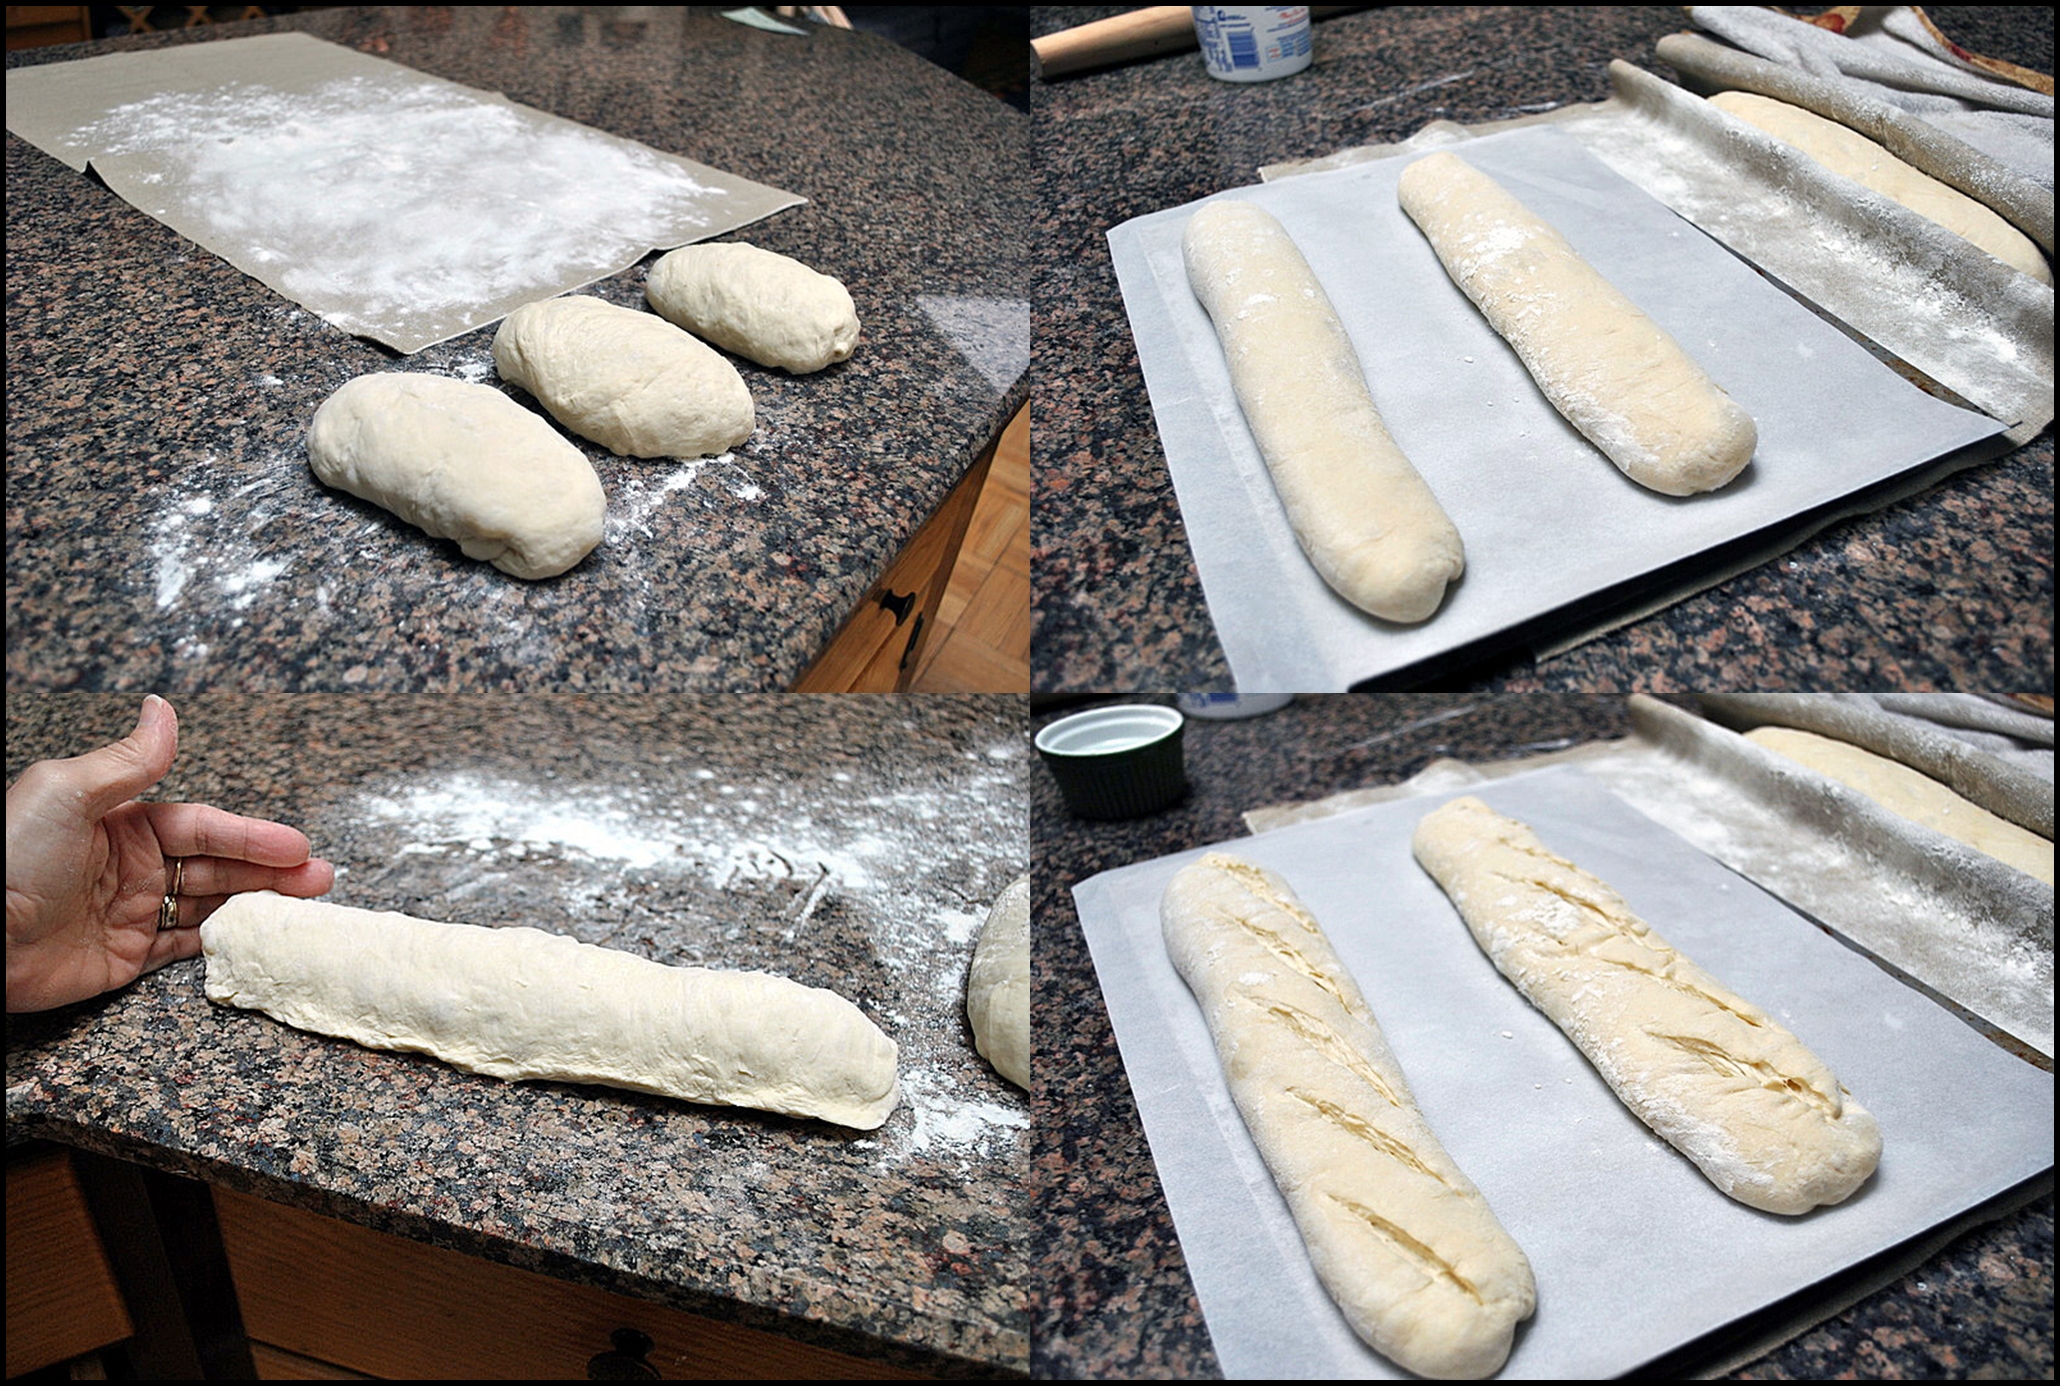
A kneading cycle of 30 seconds, a 20-minute rise (yes, that fast…), and you are ready to divide and conquer… rather, divide and shape in 8 rolls.

After shaping, they rest on a baking sheet lined with parchment paper and dusted with flour.  Only 45 minutes to go before baking time!

Once they bake, they will more or less join together, let them cool this way, breaking them apart at serving time.

Adorable little rolls, dense, but in a good way… 😉  We enjoyed them in  sandwiches – smoked turkey & provolone,  ham, cheese, tomato & pesto sauce – but also as plain small bites with our dinner of roast chicken. They will certainly be a favorite in your home too!

I am submitting this post to Susan’s Yeastspotting event…

ONE YEAR AGO: Roasted Potato and Olive Focaccia (another Dan Lepard recipe, another winner!)

TWO YEARS AGO: Salmon Curry

Add to FacebookAdd to DiggAdd to Del.icio.usAdd to StumbleuponAdd to RedditAdd to BlinklistAdd to TwitterAdd to TechnoratiAdd to Yahoo BuzzAdd to Newsvine

WHEAT GERM & SAGE SOURDOUGH BREAD

Another example of a recipe that blew the doors of the competition once I spotted it at The Fresh Loaf forum. They highlighted this bread on their front page, since it is so unique and gorgeous. My starter was eagerly waiting for a chance to shine, I had wheat germ in the freezer, the only departure from the original recipe was the use of sage instead of rosemary.   Not for gastronomic preference, but because a “certain dog” – who used to wander the streets of Hollywood – destroyed our rosemary plant. The dog has a good lawyer, and is presently free on bail.


TOASTED WHEAT-GERM AND SAGE SOURDOUGH
(adapted from Ross’ recipe at The Fresh Loaf Forum)

150 g starter (white, 80% hydration)
335 g  water
490 g bread flour
20 g toasted wheatgerm
2 Tbs  fresh sage leaves, finely chopped
9 g  salt
Mix all ingredients, except the salt, until they form a shaggy mass, no need to worry with kneading yet.   Let it rest undisturbed for 40 minutes at room temperature.

Place the dough on a lightly oiled surface,  open flatten it out slightly, sprinkle the salt all over, and knead a few times to distribute the salt.  Place the dough in an oiled bowl, cover, let it sit for 1 hour.    Knead by stretching and folding a few times –  it will feel very smooth and easy to fold – put back in the bowl and let it rise 1 hour.   Repeat the stretch and fold one more time, cover the dough and let it rise for 2 hours and 20 minutes.

Form the dough into a ball, place it in a floured banetton type container, cover it and place in the fridge overnight.

Remove from the fridge 1 hour and 30 minutes before baking.  Bake in a 450F oven, using your favorite method to generate steam.  After 20 minutes, reduce the temperature to 425F, and bake for a total of 40-45 minutes. If you baked the bread covering with a roasting pan, remove the cover after 30 minutes.

Let it cool for at least 2 hours before slicing.

ENJOY!

to print the recipe, click here

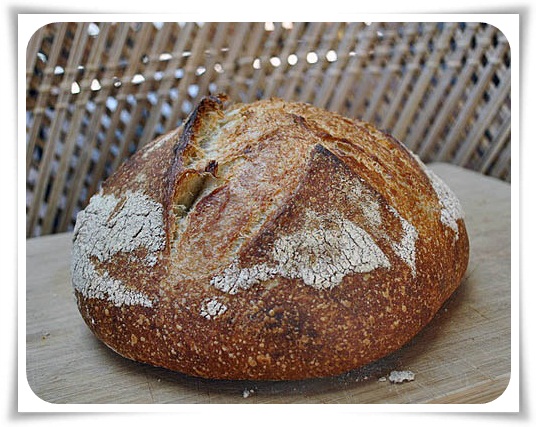
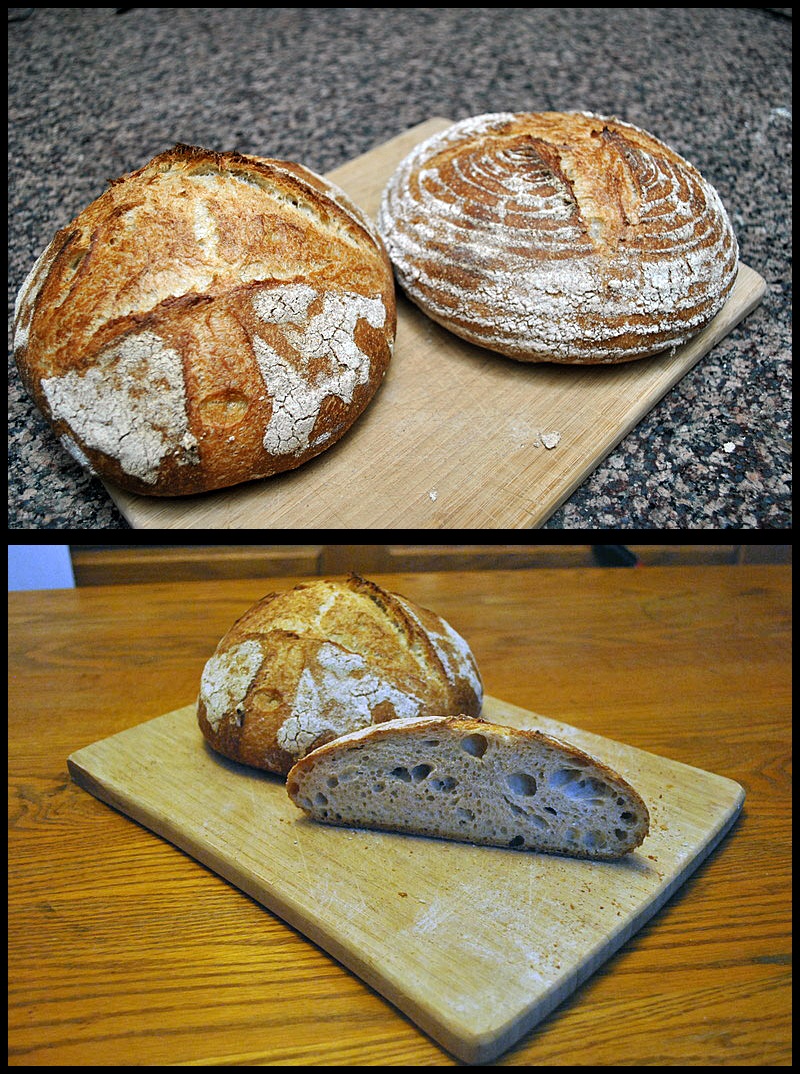
What a delicious loaf of bread this one turned out to be!  I used very little sage because it is such a strong-tasting herb, so its flavor was barely noticeable.  This bread would be great at a Thanksgiving dinner.  The wheat germ lends a bit of moisture to the crumb, allowing it to last longer than your regular sourdough.

The crust, hearty and crunchy, was covered with those tiny blisters that make the baker very happy.  Inside, the crumb was open, airy, and light. Cannot ask for much more than that…  😉

I am submitting this post to Susan’s Yeastspotting, please make sure to stop by and marvel at her weekly display of breads. I know my Friday is not complete without it!

ONE YEAR AGO: Polenta-Crust Tomato Loaf

TWO YEARS AGO: Watermelon Granita

Add to FacebookAdd to DiggAdd to Del.icio.usAdd to StumbleuponAdd to RedditAdd to BlinklistAdd to TwitterAdd to TechnoratiAdd to Yahoo BuzzAdd to Newsvine

FIVE GRAIN SOURDOUGH BREAD

Before I even start talking about last weekend’s bread, I urge you to visit Joanna’s blog to see her wonderful article about one of my favorite bread baking books, Bread.  Her post is a  must-read for anyone who might feel intimidated by  Hamelman’s masterpiece.  Great job, Joanna!

After the cracked wheat sandwich bread, our cravings for bread with grains incorporated in the dough only intensified.  As usual, on Thursday evenings I start considering the possibilities for baking in the weekend, so I grabbed Hamelman’s book, and opened it at random.  To my delight, the recipe on that particular page read: Five Grain Levain.  Seemed too fitting to ignore.  Plus, for a sourdough bread, the recipe could not be much simpler, the secret behind its simplicity lying in the use of commercial yeast to speed up fermentation.   All I had to do the day before was soak the grains, and give a final feeding to my starter.

FIVE GRAIN LEVAIN
(adapted from Hamelman’s Bread)

for the liquid levain
4 oz bread flour
5 oz water
2 Tbs mature sourdough starter

for the grains mixture
1.5 oz cracked rye
1.5 oz flaxseeds
1.2 oz sunflower seeds
1.2 oz oats
6.5 oz boiling water
1/2 tsp salt

for the final dough
8 oz bread flour
4 oz whole-wheat flour
4.2 oz water
1/2 Tbs salt
1/2 tsp instant yeast
all soaker prepared
all liquid starter prepared

Prepare the liquid levain 12 to 16 hours before you plan to start the dough.  Let it stand at room temperature, preferably around 70 F.  When you make the levain, prepare the grains too, by pouring boiling water over the grains and the salt in a small bowl.  Leave at room temperature.

Make the dough by adding all the ingredients into the bowl of a KitchenAid type mixer, knead on first speed for 3 minutes, then increase the speed to the second level and mix for 5 minutes.  Place the dough in a slightly oiled bowl, cover, and let it ferment for 1.5 hs, folding the dough on itself three times after 45 minutes to increase elasticity.

Shape the dough as a boule or batard, place in a banetton or appropriate container of your choice, and let it rise for 1 hour.

Bake at 460 F for 40 to 45 minutes, generating steam in the beginning, by either covering the dough with an inverted roasting pan, or adding ice cubes to an empty pan at the bottom of your oven.   Allow it to cool completely before slicing.

ENJOY!

to print the recipe, click here

Comments:   This loaf of bread lasted 5 days, and held up pretty well up to its end.  Usually, after the second day we opt for toasting, but this particular loaf was good enough with a very brief warming in our electric oven.  We kept it at room temperature over the cutting board with the cut side down, and sliced only what we were going to consume right away.  It goes well with pretty much anything, from ham to turkey, jam to peanut butter, or butter with paper thin slices of radishes and a little sea salt… delicious!

I am submitting this post to Susan’s Yeastspotting event…

ONE YEAR AGO: The Nano-Kitchen

TWO YEARS AGO:  Kaiser Rolls

Add to FacebookAdd to DiggAdd to Del.icio.usAdd to StumbleuponAdd to RedditAdd to BlinklistAdd to TwitterAdd to TechnoratiAdd to Yahoo BuzzAdd to Newsvine