SOURDOUGH FUN, THREE WAYS

Today I share three recipes to put your sourdough starter to use. Opening with hamburger buns, moving on to a no-knead, no-fuss sandwich type bread (courtesy of Karen, from Karen’s Kitchen Stories), and wrapping the post with my favorite type, a rustic, spicy loaf.

SOURDOUGH HAMBURGER BUNS
(from the Bewitching Kitchen)

80 grams bubbly, active sourdough starter at 100% hydration
240 grams whole milk, warm
1 egg
6g salt
20g sugar
430g all-purpose flour, divided
45g butter, softened
egg wash (1 egg beaten with a little water)
sesame seeds, black and white


In the bowl of an electric mixer with the paddle attachment, mix sourdough starter, milk, 1 egg, yeast, salt, sugar and 300 grams of flour on medium speed until a loose, shaggy dough is formed. Cover the dough with a damp cloth and let rest in the bowl for 30 minutes.


Change to the dough hook, knead the dough for 7-8 minutes, gradually adding an additional 130 grams flour and the butter in small amounts. The dough should be soft and slightly sticky, but pulling away from the edges of the bowl as it kneads. Transfer the dough to an oiled bowl and keep at room temperature for the bulk proof for 4 to 5 hours. It will not double in size, but it should expand and feel “lighter.

Divide the dough into six portions (about 120 g each). Form into tight little balls and allow to proof at room temperature for 2 to 3 hours. Heat the oven to 375F, brush the surface of the rolls with egg wash and sprinkle sesame seeds. Bake for about 20 minutes, until golden brown and internal temperature of 190F. Cool completely on a rack before slicing.

ENJOY!

to print the recipe, click here

Comments: My only issue with the recipe is that the dough took a very long time to proof and did not seem to expand that much. The enrichment of the dough with added fat slowed things down a bit. However, they had excellent oven spring. I still want to do the tangzhong method with sourdough, so stay tuned for that. I see recipes that add a touch of instant yeast to speed things up, but I decided to go through a pure sourdough method this time.

Moving on, a recipe from my friend Karen, which I made right after she blogged about it, but as usual, it takes me a little time to make things show up in the blog. If you are in the initial steps of your sourdough journey, this is a very relaxing bake, I urge you to give it a try.

SOURDOUGH NO-KNEAD SANDWICH BREAD

for recipe, visit Karen’s site

Sometimes it is nice to have a bread in the traditional loaf format, perfect for sandwiches and also to make croutons, if you so desire. I want to bake another loaf again very soon. Thank you, Karen!

Finally, a sourdough with a lot of flavor, thanks to Penzey’s, my favorite online source for all things spice…

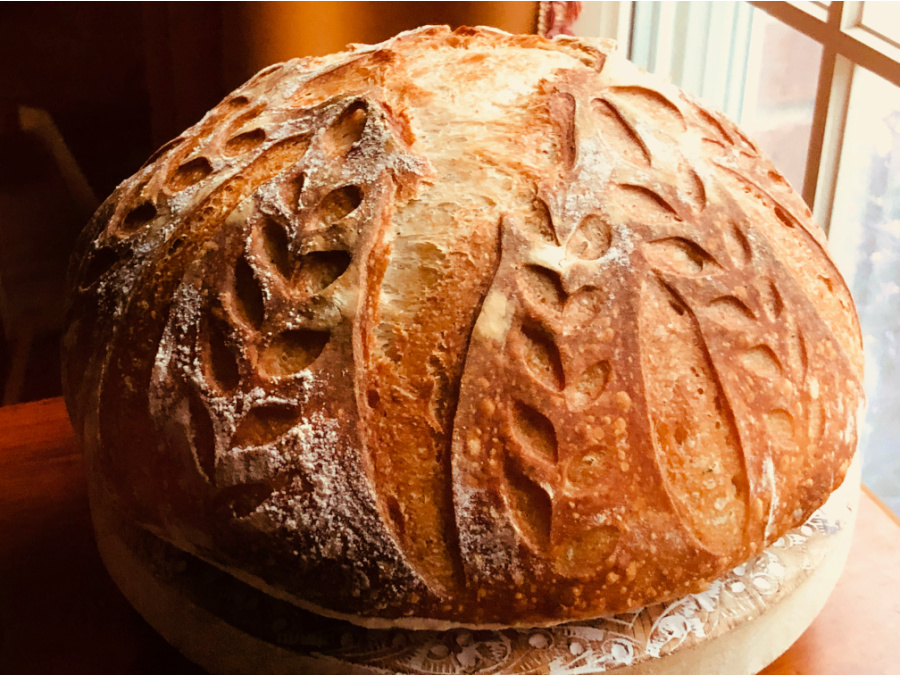
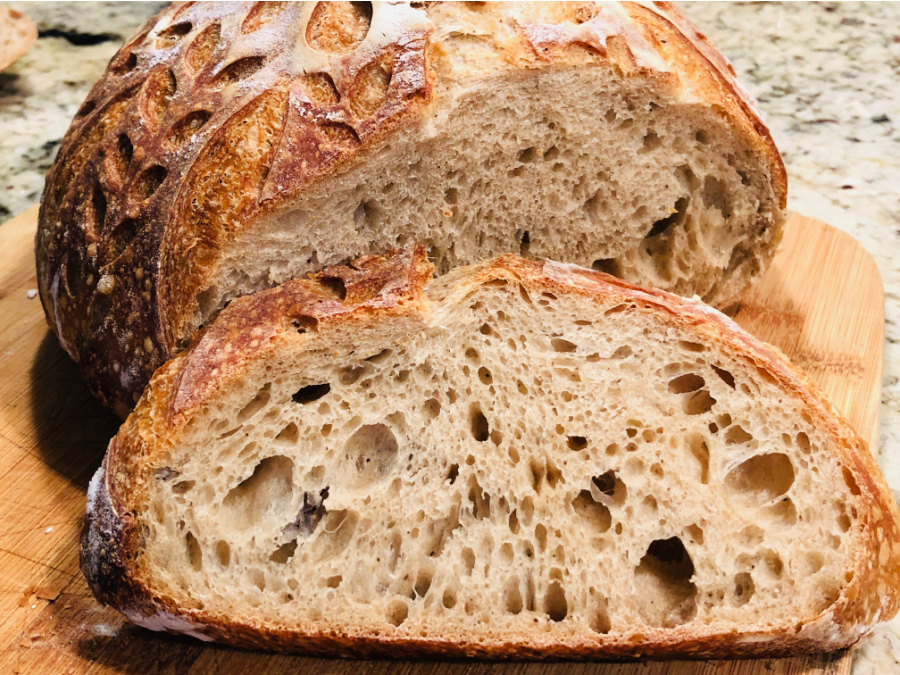
SOUTHWEST SPICE SOURDOUGH LOAF
(from The Bewitching Kitchen

385g white bread flour
16g whole-wheat flour
1 + 1/2 to 2 tsp Southwest Seasoning Mix (Penzey’s)
8g salt
280g water
65g sourdough starter at 100% hydration

Make the levain mixture about 6 hours before you plan to mix the dough. It should be very bubbly and active.

When you are ready to make the final dough, place the water in the bowl of a KitchenAid type mixer and dissolve the starter in it, mixing with a spatula briefly, then add the two types of flour, the spice mix and the salt. Turn the mixer on with the hook attachment and knead the dough for 4 minutes at low-speed all the time. If the dough is too sticky, add 1/4 cup flour, you want the dough to start clearing the sides of the bowl, but still be sticky at the bottom.

Remove from the machine, and transfer to a container lightly coated with oil, cover lightly with plastic wrap and allow it to ferment for 4 hours, folding every 45 minutes or so. After four hours bulk fermentation, shape the dough as a ball, and place, seam side up, in a lightly floured banetton. Leave at room temperature one hour, and then place in the fridge overnight, from 8 to 12 hours.

Next morning, heat the oven to 450F. Invert the dough over parchment paper, rub gently white flour on the surface. Score with the pattern of your choice using a brand new razor blade.

Bake at 450F for 45 minutes, preferably covered for the first 30 minutes to retain steam. Cool completely over a rack before slicing.

ENJOY!

to print the recipe, click here

Comments: I often run into the “problem” of excessive oven spring ruining my scoring. But I admit, it is not a bad problem to deal with, it just means your starter is doing its job. This was such a great bread, you can use other mixes if you like, or make your own, paprika, cumin, oregano, garlic, onion, are some of the components of Penzey’s mix.

I hope you like this trio of sourdough options. Now that the weather is turning cooler, it’s definitely time to bring the starter to play more often.

ONE YEAR AGO: Spooky Bakes, a Farewell

TWO YEARS AGO: Fall-Inspired Baking

THREE YEARS AGO: On a Halloween Roll

FOUR YEARS AGO: Pumpkin Macarons

FIVE YEARS AGO: Zucchini, Lemon & Walnut Cake

SIX YEARS AGO: Paleo Energy Bars

SEVEN YEARS AGO: Pecan-Crusted Chicken with Honey Mustard Dressing

EIGHT YEARS AGO: Mozzarella Stuffed Turkey Burgers

NINE YEARS AGO:  Cashew Chicken Lettuce Wraps

TEN YEARS AGO: Clay-pot Pork Roast

ELEVEN YEARS AGO: Panmarino

TWELVE YEARS AGO: A Classic Roast Chicken

CARROT AND SESAME SANDWICH LOAF

From the one and only Dan Lepard, a loaf to satisfy your cravings for a hearty sandwich bread, with the slightly nutty flavor of sesame seeds and a very subtle sweetness from grated carrots in the crumb.  Very easy to make, very easy to love…    You can find the full recipe on The Guardian site, by clicking here.

loaf
Here’s a little virtual tour of the process, starting with a quick preparation of your loaf pan.  You might be surprised to learn that I am a complete disaster when it comes to using scissors. I cannot make a straight cut to save my life.  So I was proud of my job here, although truth be told, it took me almost 15 minutes to do this.

prepbowl

You weigh your ingredients, and make a nice, smooth round of dough…
weighingdough
Thanks to the use of Rapid Rise Yeast (which is unusual for me, I normally go for the regular kind), you will end up with a shaped loaf that will threaten to escape its container, so make sure not to leave the house to run a few errands as the dough rises…  😉
risingslashed

The carrots are very evident in the dough, but they get baked into the crumb in a wonderful way. They won’t disappear, but you won’t feel any harsh bits of carrots as you bite into the bread.  A very soft crumb, with a nice crunchy top given by the sesame seeds.  Make sure to follow Dan’s tip on adding them: wet the surface of the slashed dough with a little water so that the seeds can stick better.  He used black sesame seeds, for quite a dramatic look.  I could swear I had black sesame seeds somewhere, but I could not find them, so I used regular, white seeds.
crumb

And I share with you a favorite lunch option: an open-faced sandwich made with  this bread, slightly toasted, some smoked ham, and cottage cheese with enough salt and black pepper to make it all shine…  Perfection, if you ask me!

sandwich

I am submitting this post to Susan’s Yeastspotting

ONE YEAR AGO: Border Grill Margaritas

TWO YEARS AGO: Goodbye L.A.

THREE YEARS AGO: Vermont Sourdough

HONEY-OAT PAIN DE MIE

Simple pleasures make me happy: a new cookbook to read in bed before falling asleep, a new pair of earrings (another obsession of mine), a new cooking gadget, like this gorgeous item I succumbed to last week.  It’s a beautiful pan to make sandwich bread, that kind that looks like store-bought, but tastes  two orders of magnitude better.  I bought it with one specific recipe in mind, and in record-breaking speed, the dough was mixed 24 hours after the package from King Arthur arrived.

HONEY-OAT PAIN DE MIE
(from King Arthur)

3 cups (12 3/4 ounces) all purpose flour
2 + 1/4 teaspoons instant yeast
1 cup old-fashioned rolled oats
1 + 1/2 teaspoons salt
4 tablespoons melted butter
3 tablespoons honey
1 cup + 2 Tbs lukewarm water

Combine all of the ingredients in the bowl of a KitchenAid mixer, and mix until it comes together in a shaggy mass. Cover the bowl, and let the dough rest for 20 minutes. Then knead for 8 to 10 minutes on second speed (you can also knead by hand until smooth, it will take longer).

Place the dough in a lightly greased bowl, or in an 8-cup measure (so you can track its progress as it rises), and let it rise for 90 minutes. It should be noticeably risen, but not necessarily double in bulk. Mine definitely doubled after 90 minutes, take a look by clicking here.

Gently shape the dough into a 9″ log. Place the log in a lightly greased 9″ pain de mie (pullman) pan, pressing it gently to flatten. Cover the pan with a plastic wrap and let the dough rise until it’s about 1 inch from the top of the lid. This should take 60 to 90 minutes.

Remove the plastic wrap, close the lid, and bake the bread in a 350 F oven for 30 minutes.  Carefully remove the lid (wear mittens), and bake for 5 more minutes to brown the surface.  If you want, you can remove the bread from the pan and bake it for another 5 minutes to get a crispier crust.   Internal temperature should be at least 190 F.

Remove the bread from the oven, allow it to completely cool before slicing.

ENJOY!

to print the recipe, click here

Two important pointers for success:

1. Use a recipe that was written for your pan’s dimensions, so that the dough will rise to its full capacity during baking.  For instance, this recipe is for a 9 inch long Pullman pan. They all have similar widths, by the way.

2. When placing the shaped loaf inside the pan, allow it to rise until it is 1 inch from the top, as the recipe states.  I was a bit impatient (big surprise! ;-))  and also worried about the dough overflowing, so I cut the final rise a bit short.  By doing so, my bread was not fully squared, as the top edges never touched the lid.   It didn’t compromise the taste or texture of the crumb, but the shape was slightly off.

This bread is absolutely delicious, the oats don’t make it hard or crunchy, it is a perfect bread for simple sandwiches, and also great to slice and bake as home-made Melba type toasts.

I am submitting this post to Susan’s Yeastspotting event…

ONE YEAR AGO: Carrot and Leek Soup

TWO YEARS AGO: Chicken Parmiggiana 101

Add to FacebookAdd to DiggAdd to Del.icio.usAdd to StumbleuponAdd to RedditAdd to BlinklistAdd to TwitterAdd to TechnoratiAdd to Yahoo BuzzAdd to Newsvine

CRACKED-WHEAT SANDWICH BREAD

My original idea was to do a sourdough cracked-wheat bread, I had the recipe printed out, and my starter going. Woke up on Saturday bright and early, in great spirits to attack the preparation. Surprise number 1: recipe called for a whole-wheat starter. Mine wasn’t. Surprise number 2: recipe suggested an overnight fermentation in the fridge before baking, but I absolutely had to start and finish the bread on the same day.   Not sure how many times in my life I’ve made the mistake of NOT reading a recipe carefully enough before baking day, and/or before shopping for ingredients  (sigh). Plan B had to be set in place, and quickly.  I found a recipe for cracked-wheat bread with a very interesting technique: spreading a dry mixture of flour, sugar and yeast over a fermenting “sponge”, forming a sort of a protective blanket over it.  All of a sudden my Saturday was bright again, and the best was that the bread turned out fantastic!


CRACKED-WHEAT SANDWICH BREAD
(adapted from The Bread Bible, by Rose Levy Beranbaum)

To make the sponge:
1/2 cup bread flour (78 g)
1/2 cup  whole wheat flour (72 g)
3/4 tsp instant yeast (2.4 g)
1/2 tbsp sugar (6.2 g)
1 tbsp nonfat dry milk (8 g)
1 tbsp agave nectar (20 g)
1 cup plus 2 tbsp  water at around 80F (266 g)

Flour mixture for topping the sponge:
2 cups bread flour (312 g)
1/2 tbsp sugar (6.2 g)
1/4 tsp instant yeast (0.8 g)

For the final dough:
1/2 cup cracked-wheat
1/2 cup  boiling water
1 tbsp vegetable oil
1 + 3/4 tsp salt
1 tbsp melted butter

In a medium bowl combine the sponge ingredients and whisk until very smooth, about 2 minutes, trying to incorporate as much air as possible as you stir.

 In another medium bowl, whisk together the flour mixture ingredients. Sprinkle on top of the sponge to cover it completely. DO NOT MIX TOGETHER. Cover tightly with plastic wrap and allow it to ferment for 1-4 hours at room temperature. The longer you allow it to ferment, the better. I fermented mine for 2 hours.

Place the cracked-wheat in a small bowl and pour the boiling water over it. Cover with plastic wrap and allow to sit in the water until all the water is absorbed, about 1 hour.

With your stand mixer, add the bulghur  and the oil  to the bowl and then add the dough and starter. Mix with the dough hook on low speed for a couple of minutes, until no dry bits remain, but do not overmix.  Cover with plastic wrap and allow the dough to rest for 20 minutes. Sprinkle on the salt and knead the dough on medium speed for 12  minutes. The dough should be very elastic  but still slightly moist.

Scrape the dough into a  greased container. Lightly spray or oil the top of the dough. Cover with lid or plastic wrap and let it rise until doubled in size, 1 to 2 hours (mine took 90 minutes).  Scrape the dough onto a floured surface and press down very gently to form a rectangle, don’t try to get all the air out of it. Give it a business letter fold, turn it 90 degrees and do another business letter type fold. Smooth the edges and return the folded dough to the bowl.  Cover, and rise until doubled, 1 to 1.5 hours (mine took only 45 minutes).

Turn the dough onto a lightly floured surface and shape it as a loaf.  Place into oiled loaf pan. Cover loosely with oiled plastic wrap and let it rise until the center is about 1 inch higher than the rim of the pan.

Preheat the oven to 350 degrees for 30 minutes before baking. Place oven rack at the lowest shelf and place baking stone on top. Place a sheet pan on the floor of the oven and  have some ice cubes handy.

Once the dough has risen, brush the top with the melted butter, then cut a 1/2″ deep slash down the middle of the dough. Quickly set the load pan on the baking stone. Take a 1/2 cup of ice cubes and quickly throw them onto the sheet pan. Bake for 45-55 minutes, until golden brown and the internal temperature is 200 F.  Remove pan from oven, remove bread from pan and set on wire rack. Brush with remaining melted butter. Let it cool completely (yeah, right… 😉 before eating.

ENJOY!

to print the recipe, click here

Comments:  Cracked-wheat (an ingredient similar, but not exactly the same as bulghur, for a nice explanation click here), gives this bread a perfect texture, and just the right amount of ‘grain-feel’.  You can substitute bulghur if you have trouble finding cracked wheat.

It is a very easy dough to handle, as most of the kneading is done with a mixer. It would be possible to knead by hand, but it would take a lot longer and you must develop the gluten fully to get the right texture – go for the Kitchen Aid, is my advice.   It is fun to make, the photos below show the sipping of the fermenting sponge after 1.5 hours, the addition of cracked-wheat, and the amazing first rise, probably due to the temperature in our home these days.

If you make this bread during warm weather, as soon as you shape the dough  start heating your oven, because mine took only 35 minutes to fully rise. You don’t want to risk overproofing, so that the bread will still rise during baking. Catch it around this stage, brush it with butter, slash the top and place it in the oven.

Sandwiches with cheese, ham, lettuce, a light touch of mustard were absolute heavenly!

I’m submitting this post to Susan’s Yeastspotting event…  Nice to be able to join that party after what seemed like too long a break!  😉

ONE YEAR AGO:  Au Revoir, My Bewitching Kitchen (hard to  believe it’s been one year already!)

TWO YEARS AGO: Teriyaki Chicken Thighs

Add to FacebookAdd to DiggAdd to Del.icio.usAdd to StumbleuponAdd to RedditAdd to BlinklistAdd to TwitterAdd to TechnoratiAdd to Yahoo BuzzAdd to Newsvine

SOUR CREAM SANDWICH BREAD

A simple but delightful sandwich bread, made with white flour, commercial yeast, and a bit of sour cream to provide a mildly tangy note, and a moist and tender crumb.   If you are baking under challenging conditions (that is, in a small oven), watch out for quite  an impressive oven spring: the bread might touch the heating element on top and… you don’t want that to happen.  Protect it with aluminum foil if needed.     The recipe comes from the one and only Dan Lepard, you can find it here.

SOURCREAM SANDWICH BREAD
(from Dan Lepard, published at The Guardian)

General method:
Sour cream is mixed with water, a little salt and sugar, and yeast.  Bread flour is added to form a sticky dough.

Dan uses minimal kneading, just 10 seconds every 10 minutes over half an hour, then the dough rises for 1 hour.

After shaping as a loaf, place in a pan and allow it to rise for 60 to 90 minutes.  The bread is baked in a 390F oven for about 45 minutes.

(for the detailed recipe, and printable version, click here)

Comments:  This is a great  recipe for those times in which you want a simple loaf for day-to-day sandwiches.  A slice, slightly toasted, with cottage cheese, salt and pepper, is a perfect way to start the day, next to a steaming cup of green tea.  Or, if you prefer to play on my husband’s team, make it a thin spread of blackberry preserves,.  Either way, Dan Lepard came up with yet another winner!

I am submitting this post to Susan’s Yeastspotting

ONE YEAR AGO: Pasta with Zucchini Strands and Shrimp