AUVERGNE COURONNE FROM LOCAL BREADS

First bread post of 2013!

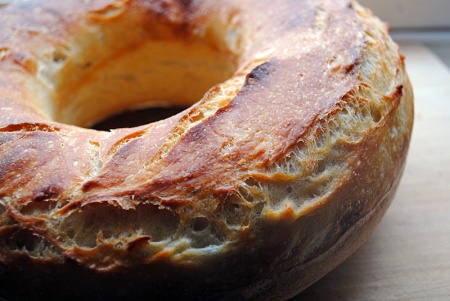
closeup

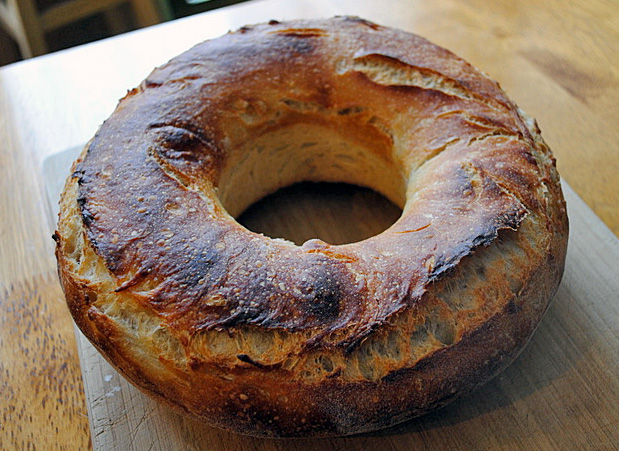
A change from the usual boule or batard, this bread is fun to make, beautiful to look at, and a pleasure to eat!   The recipe comes from Local Breads, by Daniel Leader (with Lauren Chattman), a book that any serious bread baker should own.  I actually have his first book too, Bread Alone, and keep both volumes together on the shelf as lovely siblings.  Bread Alone is an excellent starting point for beginner bread bakers as well as those who want to try their hands at baking with wild yeast. Local Breads is perhaps slightly more “advanced”,  lots of sourdough, with formulas that  focus on regional recipes that Leader collected through his  travels around Europe. Reading his books is like having a master bread baker giving you a private lesson, going through the details that make a difference between a so-so loaf of bread and one that makes you dream.

I wanted my first bread post for 2013 to be special, and this loaf surpassed my expectations. It is surprisingly simple, no special flours, no grains, no seeds.  Just a well-fed sourdough starter, the best quality flour you can find, and a little tender loving care to shape the dough and bake it.
bread2AUVERGNE CROWN
(formula from  Local Breads, published with permission from Daniel Leader)

Levain Starter (you will not use the full amount prepared):
45g levain starter, firm (about ¼ cup)
95g unbleached all-purpose flour
5g stone-ground whole wheat flour
50 g tepid water

for the bread:
500g  unbleached all-purpose  flour
340g water
125g levain (less than the amount prepared above)
10g sea salt

Prepare the levain: Pinch ¼ cup of your stiff levain and place in a bowl with 50 mL water.  Mash the levain with a whisk  until it dissolves, then add both types of flour and stir.  Turn the mixture onto a work surface and knead to fully incorporate the flour.  Place the levain in a covered container and let it sit at room temperature (70 to 76°) for 8-12 hours or until it has doubled in volume and the surface is domed.

Make the bread: Pour the water into a large mixing bowl or the bowl stand mixer. Combine the flours until all the ingredients are incorporated. Cover and let it rest for 20 minutes, while the flour hydrates.Uncover the dough, add the salt and the levain and incorporate with your hands or a spatula using a fw firm strokes.  Knead the dough with the dough hook by mixing on low-speed (2 on a KitchenAid) for a minute.  Increase speed to medium (4 on a KitchenAid) and knead until smooth and muscular; an additional 8 to 9 minutes. Transfer the rounded dough to a lightly oiled container, preferably clear, so you can mark the level of the dough with a masking tape.  Let the dough ferment until doubled in size, 3 to 4 hours at a temperature of 70 to 75 F.

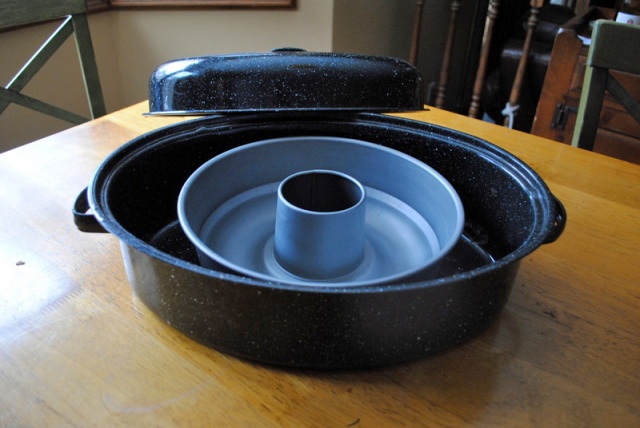
Shape the crown.  Cover a surface with a little flour.  Place the risen dough over the counter and roll it very gently into a long fat rope, about 8 inches long and 3 inches wide. Connect the ends of the rope overlapping by about 4 inches. Press the ends together to seal. Dust a ring baking pan with flour and carefully drop the shaped dough inside.  Allow it to proof at 70 to 75 F until it looks “pillowy”,  1 to 1 and a half hours. When you press your finger tip into the dough, it should spring back slowly.  As the bread proofs, heat your oven to 425 F and place a large roasting pan, without the lid, inside.

Bake the bread. Once the bread is proofed, slash the outer edge of the round with a razor blade, and place the ring pan inside the roasting pan, and close with the lid slightly moist with tap water.   Bake covered for 30 minutes, uncover, remove the ring pan from the oven, carefully invert it to remove the bread, and finish baking the bread sitting on the oven rack, for 15 to 20 more minutes.

Let it cool completely on a rack before slicing through.

ENJOY!

 to print the recipe, click here
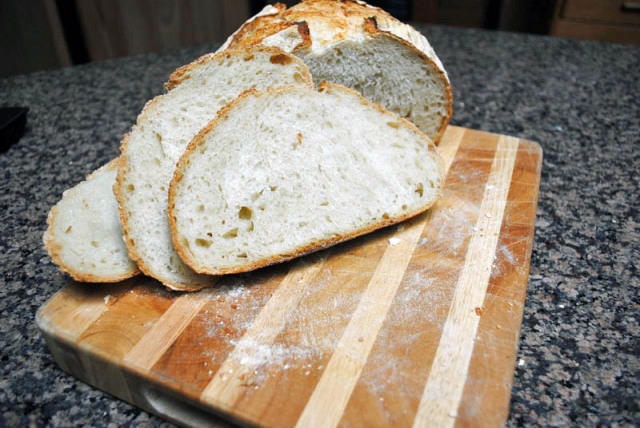
bread1
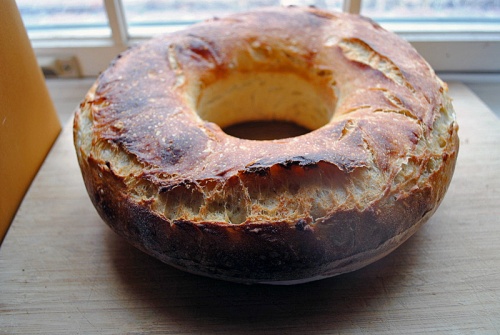
Comments: In the past, I’ve made a few loaves of ring-shaped breads, and had problems moving the bread to the oven after the final rise. I ended up deflating the dough too much and also messing its shape.  This time, I tried something a little different: after shaping the loaf, I placed it in a well-floured ring baking pan, and let the dough go through the final proofing in the pan.  When it was time to bake, I quickly scored the outside edge of the dough, and placed the pan and all inside a pre-heated, large roasting pan.   The next couple of photos should help explain my strategy, which, I am thrilled to inform, worked quite well!
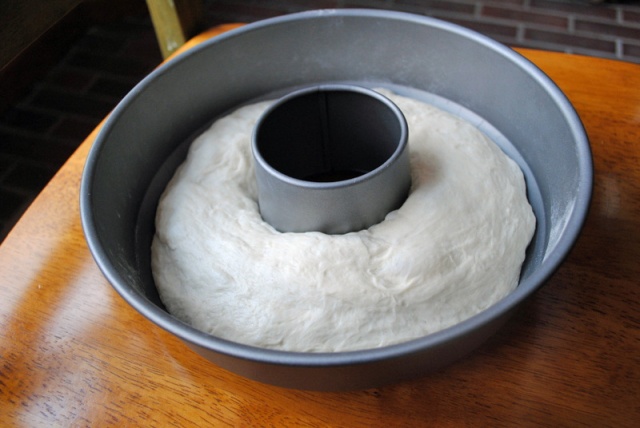
doughbakingpan
After 30 minutes baking with the lid closed, I removed the lid, took the ring pan carefully out, inverted it quickly over the counter to release the bread, and placed the bread on the oven rack, without any baking sheet underneath, so that the crust would get a final roasting free of constraints.   I like to bake my bread until it’s really dark, because that’s when the taste of the crust delivers the punch I like, the one that transports me to a Parisian bakery…

ABOUT LOCAL BREADS: Ten years passed between Leader’s publication of his first book, Bread Alone, and Local Breads. During that period, he worked with many master bakers in Germany, Italy, and Eastern Europe. In the first chapter of his book, he talks about his bread journey and how he’s gained a special respect for simple but crucial details such as the choice of flour. After a couple of chapters devoted to general lessons on equipment and technique (a must read, by the way), he shares his many recipes in sections divided  according to region. He will take you from France to Italy, stop in Germany, Poland, Austria, and the Czech Republic, sampling some of their unique yeast concoctions.

If you enjoy baguettes, you’ll be happy to know that Leader offers recipes for French, Italian, and German baguettes, so you can bake them all and compare their “personalities”. He also shares his recipe for the famous miche from Pain Poilane in France, as well as German Rye Sourdough, two examples of bread that, in my humble opinion,  can be quite intimidating.  With his detailed instructions, you’ll feel ready to tackle any project, Pain Poilane included!  So, if you don’t have Local Breads on your shelf, correct this severe cookbook handicap with a simple click here.  😉

I would like to thank Dan Leader for his permission to publish this great recipe. This post goes straight to Susan’s Yeastspotting!

ONE YEAR AGO: Orange-Pomegranate Chicken

TWO YEARS AGO: The Getty Museum

THREE YEARS AGO: Crowd-Pleasing Pulled Pork

SAN FRANCISCO SOURDOUGH

Talk about an American classic!  The sourness of this bread is quite unique,  but not everyone is fond of it.  For some, it’s a little excessive, but I happen to love it.  In fact, I’ve considered buying a commercial SF sourdough starter  to try and mimic this bread at home.  However,  the fact that soon that population would change by incorporating yeast and bacteria present in our own environment, made me reluctant to go for it.   Sure, it would be nice to bake a few loaves with a “close to the original” taste, but then I’d be left babying three starters instead of the two I own… and I already take care of way too many strains of bacteria in the lab!  😉

Browsing through the pages of “Bread Alone,” I spotted a recipe for San Francisco Sourdough, and almost did not pay attention to it, thinking that it would involve the authentic starter.  Nope.  Daniel Leader developed his own recipe for it, coaching a regular starter into a slightly increased level of acidity, resulting in a bread that, according to him, would be very  close to the original.

SAN FRANCISCO SOURDOUGH
(from Daniel Leader’s Bread Alone)

for the poolish
4 oz starter (mine was at 100% hydration)
4 oz bread flour
4 oz water

for the dough
8 oz water
all the poolish
13.5 to 16 oz bread flour
1/2 Tbs salt

Make the poolish the day before you want to bake the bread, by combining all the ingredients in a small bowl and leaving at room temperature for 24 hours, preferably from 74 F to 80 F, covered with plastic wrap.

Next day, pour the water at room temperature in the bowl of a KitchenAid, mixer, and add the poolish, breaking it up gently with a wooden spoon, and stirring until dissolved.  Add about 1 cup (5 oz)  of the total flour and the salt, and stir until combined.   Place the dough hook in, keep adding the rest of the flour (you may not need all of it), and knead for about 12 minutes at the second speed of the machine.

Remove the dough to a slightly floured surface, knead it by hand a few times, place it in an oiled bowl, cover loosely with plastic wrap, and let it rise for 2.5 hours, with quick cycles of folding after 45 minutes and 1 hour and 30 minutes. After the second folding cycle, leave the dough undisturbed for the final 60 minutes of bulk fermentation.

Place the risen dough over a slightly floured surface, and without de-flating it too much, form it into a ball.  Let it rise 45 minutes.  Shape the dough as a boule or any other shape you prefer, place it in an appropriate container for the final rise, and leave it at room temperature for 1 hour.

Bake it in a pre-heated 450 F, with steam, for a total of 45 minutes, decreasing the temperature to 425 F after 10 minutes of baking.  If using a cover to create steam, remove the cover after 30 minutes.    Let it cool over a rack for a couple of hours before slicing it.

ENJOY!

to print the recipe, click here

My main modification of the recipe was to include two folding cycles after kneading in the KitchenAid because I felt the dough lacked structure and strength.   I used regular, supermarket bread flour, so it’s possible that it behaved differently from the book’s description.   For the most part, I tend to bake my breads with regular bread flour, not going out of my way to find the one with “a touch of germ,”, or “harvested during Spring, under a full moon.”    😉

Did the bread deliver the promise in the taste department?  YES!  When I tried a piece all by itself to get the real taste of the crumb, it immediately hit me as VERY similar to a San Francisco sourdough, so if you live hundreds of miles away from the Bay Area and develop a craving for that bread, this recipe will soothe you.

A more authentic shape would  be a torpedo type loaf, but I have a weakness for round bread, so that’s how I shaped mine.  Round, oblong, it doesn’t really matter. It hit the spot.  Awesome bread!

I am submitting this post to Yeastspotting

ONE YEAR AGOA Real Oscar Winner  

TWO YEARS AGO: Pane Siciliano

Add to FacebookAdd to DiggAdd to Del.icio.usAdd to StumbleuponAdd to RedditAdd to BlinklistAdd to TwitterAdd to TechnoratiAdd to Yahoo BuzzAdd to Newsvine

A GOLDEN SANDWICH BREAD

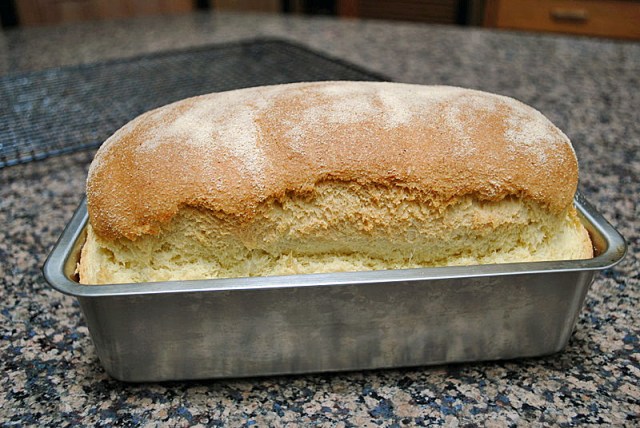
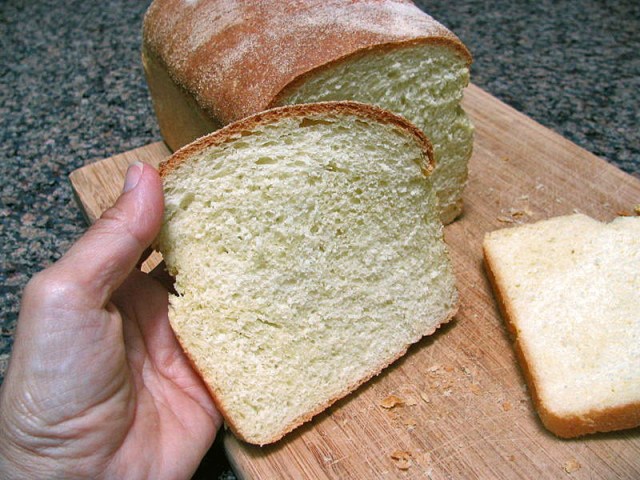
The past couple years of sourdough baking turned me into a wild yeast purist, to the point that using commercial yeast feels like cheating. So, it’s time for a confession: I cheated last weekend and used commercial yeast to bake my bread. However, instead of penance, I got a beautiful, golden loaf to enjoy the rest of the week! 😉

SEMOLINA SANDWICH LOAF
(from Daniel Leader, Local Breads)

300 grams water (1 + 1/2 cups)   at 70 to 78  F
5 grams instant yeast (1 tsp)
500 grams fine semolina (durum) flour (3 + 1/4 cup)
15 grams granulated sugar (1 Tbs)
50 grams extra-virgin olive oil (1/4 cup)
10 grams sea salt (1 + 1/2 tsp)

Pour the water into the bowl of a stand mixer. Add the yeast, flour, sugar, olive oil and salt and stir just until a rough dough forms.

Use the dough hook and mix the dough on medium speed (4 on a KitchenAid type mixer) until it is very smooth and elastic, about 9 minutes. Transfer the dough to a lightly oiled container, cover and leave to rise at room temperature until it doubles (1.5  to 2 hours).

Optional: go for a run during this time and come back to find out that 1 hour and 10 minutes later your dough is about to walk out the door to greet you).


Grease a loaf pan (8 1/2 x 4 1/2) with oil. Lightly dust the counter with semolina flour, place the dough on it, and shape it as a loaf. Insert it into the pan, with the seam side down. Dust the top lightly with semolina flour, and cover the pan. Let the loaf rise at room temperature (70 to 75 degrees) until it crowns just above the rim of the pan, 1 to 1 1/2 hours. (my loaf got there in only 45 minutes – must be the phase of the moon 😉

Bake in a 375 F oven until the loaf pulls away from the sides of the pan, and the crust is golden brown – 35 to 45 minutes.

Carefully remove the bread from the pan, and cool it over a rack for at least one hour before slicing it. Marvel at the beautiful, golden crumb, and…..

ENJOY!

to print the recipe, click here

Comments: I highly recommend this recipe if you are new to bread making.  The dough handles very well, and has impressive oven spring, baking into a gorgeous loaf that rises way above the pan. The semolina flour allows the  bread to last slightly longer than most homemade breads would – just store it at room temperature, inside a paper bag. Slightly toasted slices are delicious as part of a sandwich or just spread with jam or butter.

I am submitting this post to Susan’s Yeastspotting… make sure you stop by on Friday to see her weekly collection of breads.

ONE YEAR AGO: Tomato Confit with Arugula and Zucchini

Add to FacebookAdd to DiggAdd to Del.icio.usAdd to StumbleuponAdd to RedditAdd to BlinklistAdd to TwitterAdd to TechnoratiAdd to Yahoo BuzzAdd to Newsvine

LOCAL BREADS: AUVERGNE RYE WITH BACON

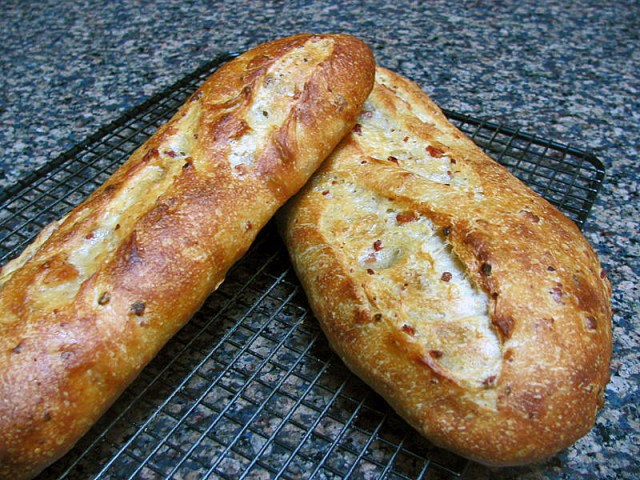
Auvergne rye, also known as “baguette aux lardons” is, simply put, bread with bacon bits all through the crumb. Bread… and…. bacon. I know, I know… unless you are a very committed vegetarian you are salivating already.

The recipe comes from Daniel Leader’s Local Breads, and requires the preparation of a very stiff sourdough starter made with both whole wheat and regular flour, and a final dough with a small amount of rye, which, in my opinion, always gives a sourdough bread a touch of depth hard to achieve with any other flour.

Yes, those brown spots are pieces of bacon….  😉


AUVERGNE RYE WITH BACON

(Local Breads)

Sourdough starter build

45 g stiff sourdough starter
50 g water
95 g bread flour
5 g whole wheat flour

Mix everything together, forming a stiff dough.  Allow it to ferment at room temperature for 8 to 12 hours, until doubled in volume.


Final dough

280 g thick cut bacon
350 g water
450 g bread flour
50 g white rye flour
125 g starter (you will not use the full amount made)
10 g salt

Cut the bacon in 1/2 inch pieces and cook over medium heat.  Do not let it brown, just cook until most of the fat is released.  Drain over paper towels and dice finely.

Mix the water, bread flour, and rye flour in a large bowl, let it stand for 20 minutes.  Add the sourdough mix (remember: only 125 g of it!), bacon, and salt.  Knead with a Kitchen Aid type mixer on speed 4 for about 8 minutes.  Ferment the dough for 1 hour, fold it a couple of times, place it to rise for another 2 to 3 hours.

Cut the dough in 4 equal pieces, shape as baguettes, and retard them in the fridge for 12 to 24 hours.

Remove the baguettes from the fridge 3 hours before baking.  Heat the oven to 450F, slash the baguettes and bake them with initial steam, for 20 to 25 minutes.  Cool over a rack for a couple of hours before slicing them.

ENJOY!

to print the recipe, click here

Comments: The recipe makes 4 baguettes, but I chose to make two baguettes and a larger, batard-type loaf. I haven’t yet perfected the shaping of my baguettes, in part because I end up baking round loaves a lot more often, and rarely practice this elusive shape. But, what really matters – the taste – was superb! You would think that so much bacon in the dough could be overpowering, but quite the contrary, they had a very mellow taste.   I was pleasantly surprised by how copper-colored the crust turned out, probably due to the bacon fat playing its magic.   The smell was intoxicating, even our dogs were restless…    😉

Note to self:  This bread would be a very good match for a bowl of chili…

I am submitting this post to Susan’s Yeastspotting….

Add to FacebookAdd to DiggAdd to Del.icio.usAdd to StumbleuponAdd to RedditAdd to BlinklistAdd to TwitterAdd to TechnoratiAdd to Yahoo BuzzAdd to Newsvine

PIERRE NURY’S RUSTIC LIGHT RYE: BOUGNAT

I’ve browsed the pages of Leader’s “Local Breads” countless times over the past year, but taking part in “The Bread Baker’s Apprentice” challenge prevented me from indulging in many other bread books. Once the  challenge finished, I felt excited to attack other projects, but also somewhat paralyzed.   Not anymore: last weekend I dove into my first Local Breads recipe, a three-day project that led to a couple of delicious loaves of a rustic, toothsome bread.

PIERRE NURY’s RUSTIC LIGHT RYE
(from Local Breads)

Levain (sourdough starter)

45 g firm sourdough starter
50 g water
95 g bread flour
5 g whole wheat flour

Mix all the ingredients until they form a stiff dough, trying to incorporate all the flour into it. Place the dough in a container, marking its level with a tape or pen. Allow it to ferment at room temperature for 8 to 12 hours, until it doubles in volume. This recipe will make more levain than used in the bread.

Bread dough

400 g water
450 g bread flour
50 g rye flour
125 g levain
10 g salt

Pour the water into the bowl of a Kitchen Aid type mixer. Add the bread and rye flours, stir with a spatula until it begins to form a dough. Cover the bowl and let stand at room temperature for 20 minutes.

Uncover the bowl, add the levain (only 125 g of it) and the salt, and start kneading with the dough hook on medium speed for 12-14 minutes, or until you have good gluten development (do a windowpane test). Transfer the dough to a slightly oiled bowl and keep it at room temperature for 1 hour. Scrape the dough into a floured surface and fold it a couple of times to induce gluten development. You can see how to fold the dough by clicking here. Repeat the folding again after 1 more hour. After the second folding cycle, let the dough rise for 1 to 2 hours at room temperature until doubled in volume. Transfer to the refrigerator for 12 to 24 hours.

After 14 hours, my dough looked like this….

“Shaping” and baking
Remove the dough from the fridge 3 hours before baking. Heat the oven to 450F and place a baking stone (or tiles) on the middle rack.

Heavily dust the counter with flour, scrape the dough onto the counter, and open it gently into a 10 inch square shape, trying not to deflate it too much. I like to mark the dimensions on the flour, to have an idea of how much to open the dough.

Transfer each piece to a rimless baking sheet covered with parchment paper, stretching the dough to about 12 inches long. Let it fall naturally, without worrying about a precise shape. If baking both loaves at the same time, separate them by at least 2 inches.

Bake with initial steam for 20 to 30 minutes, until a dark walnut color develops on the crust. Let the loaves cool on a rack for at least an hour before slicing.

ENJOY!

to print the recipe, click here

for a detailed discussion on this particular bread, visit this link

Comments: The recipe was quite involved and challenging, but the gods of Bread were on my side and things went smoothly.  A dough with this much water (in baker’s terms it’s called a high hydration ratio) is tricky to deal with, but extra flour on the work surface helps. As some of the bakers in The Fresh Loaf put it “it feels like you’re making pancakes” when transferring the “bread” to the baking sheet. It’s impossible to shape it, so don’t even try. Lift it, gently stretch it  (it will almost stretch itself as it’s lifted), place it on the baking sheet and transfer it to the oven.   It’s a delight to witness its impressive oven spring (yet another fancy term to indicate that the dough rises a lot during baking).

The crumb almost made me shed a few tears… I know, I know… it’s pathetic, but bread make’s me emotional!  (In a good way.)  😉

I am submitting this post to Yeastspotting….

Add to FacebookAdd to DiggAdd to Del.icio.usAdd to StumbleuponAdd to RedditAdd to BlinklistAdd to TwitterAdd to TechnoratiAdd to Yahoo BuzzAdd to Newsvine