SUGAR COOKIES FOR THE HOLIDAYS

Until my participation in a certain show, I was not too wild about decorating sugar cookies with Royal icing. Indeed, in the comfort of my kitchen I would always refer to that white, impossible to tame substance as Royal Pain in the Icing, which indicates how I felt about it. But those intense weeks of preparation for the different episodes of the show forced me into areas of baking I had happily ignored and avoided. Much to my own amazement, I now love everything about cookie decorating, from baking the base to planning the design and trying to make it happen. On that note, I highly recommend that you go through my trilogy of posts on the subject from last month and the detailed tutorials by Tanya which I shared at the time. For all the holiday cookies in this post, I went with a flavor that is deeply ingrained in the season: Fiori di Sicilia, the Italian magical potion that is the classic addition to panettone. As to the decorations, apart from the wet-on-wet which I find the most user-friendly, I will share three methods that were new to me, requiring just a tad more involvement: Crackled Gold Christmas Tree, Reindeer (a clever twist starting from a common cookie cutter), and Stained-Glass Cookies.

FIORI DI SICILIA SUGAR COOKIES
(from the Bewitching Kitchen)

360 g all-purpose flour (3 cups)
2 teaspoons baking powder
200 g granulated sugar
¼ tsp salt
227 g cup butter, cold and cut in pieces
1 egg
3/4 tsp Fiori di Sicilia extract
zest of 1 lemon
¼ tsp cardamom

Heat oven to 350F. Combine the flour, baking powder and salt, set aside. Cream the sugar and butter. Add the egg, Fiori di Sicilia, lemon zest and cardamom, mix well. Scrape the sides of the bowl. Add the flour mixture in two steps, and beat just until combined.

Dough can be rolled right away in between sheets of parchment paper. Roll to about 1/4″ thick, and cut into shapes. Place on parchment-lined baking sheets, freeze for 10 minutes. Bake for about 12 minutes. Transfer to cooling rack and cool to room temperature before icing.

(for Royal Icing, I used Tanya’s recipe, which you can find here)

ENJOY!

to print the recipe, click here

Comments: This is definitely my default recipe for sugar cookies because I adore Fiori di Sicilia and I do flips for cardamon. As far as extracts go, Fiori di Sicilia is not cheap, but it is hard to replace with something else. Some say that orange extract + vanilla does a good enough job playing its part. Your kitchen, your rules, feel free to flavor your cookies the way you like. Just make sure not to roll the cookies too thin. Thin sugar cookies don’t stand up to the icing.

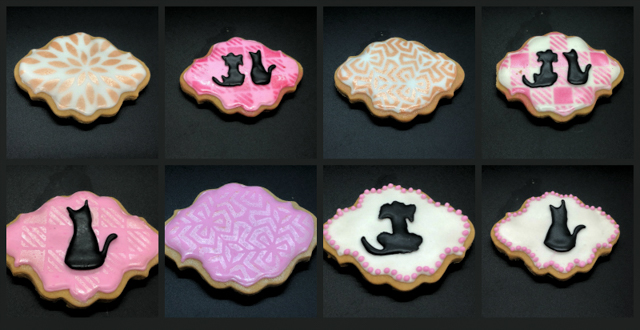
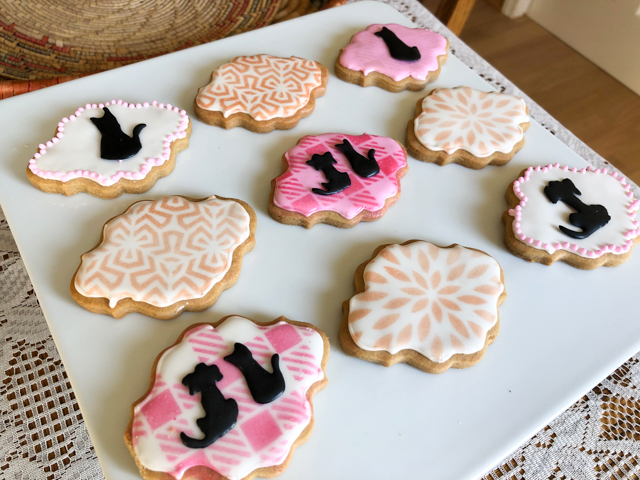
With the basic Christmas colors (red and green, plus white for flooding) you can do a lot…

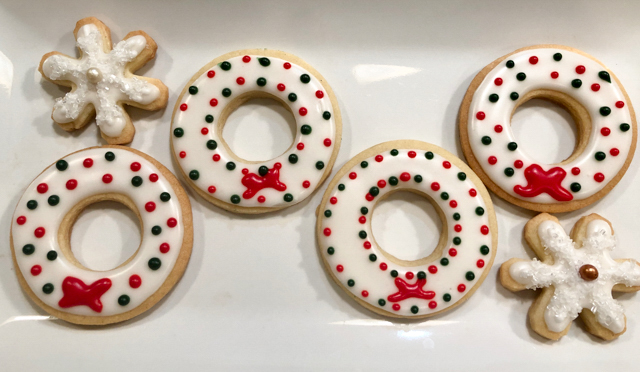
I used two cookie cutters, one for the basic shape, a smaller to cut a circle in the center, turning it into a wreath. From there, nothing fancy. Flooded with white, allowed to set for just 10 minutes and then a few green and red dots added on top. The little bow added in the very end. Yes, I realize that could be a lot better, and I intend to work on it.

A new cookie cutter I got this year stole my heart. I find it so cute and a bit unusual. A Christmas light bulb, which once again can be made quite simply with only two colors of icing and if you like to gild the lily, some luster gold painted on the “metal” part next day.

By bringing one more color – black – you can expand a bit more the horizons, so that Mr. Snowman has a nice hat and black, profound eyes. The baby deer are also super easy, flooding with white, waiting until it sets a bit and piping the details. The little snowflakes were flooded with white and immediately showered with white sparkling sugar. And one day I will understand why I seem to always type “spanking” sugar before getting it correctly (sigh).

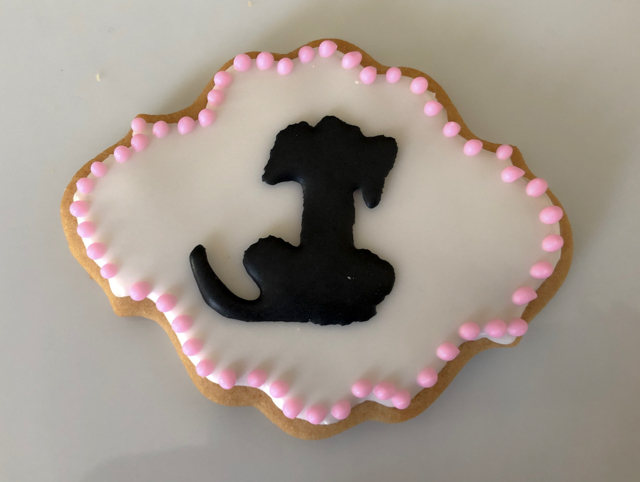
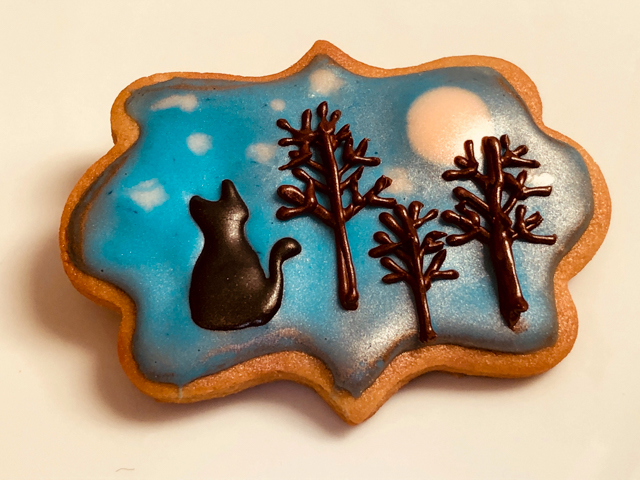
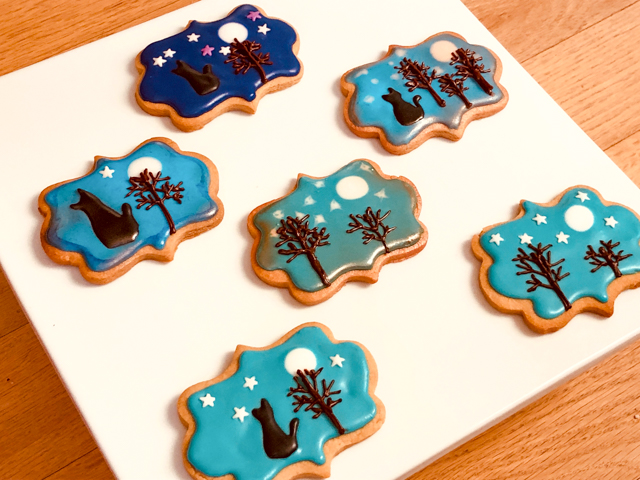
And since there was black Royal Icing around… why not immortalize one of our faithful companions, who has been with us every step of the way in this crazy year? The black dots were placed before the white set (wet-on-wet), then the nose and the red collar were added later, just to have a bit of a 3D effect. Same process went into the snowflakes.

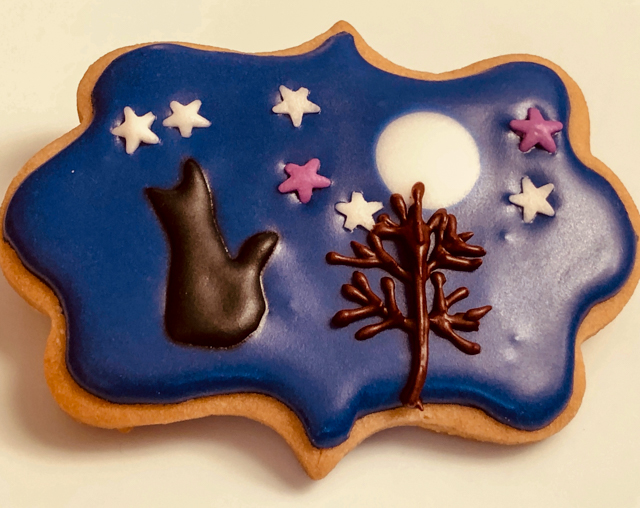
Holiday Baking is not complete without Christmas Trees…

Some of the designs were again wet-on-wet, but then I did something new that blew my little mind when I saw it on a tutorial on youtube. A technique called “Crackled Gold” and you can visualize better in this picture:

It is so cool, I cannot quite believe how creative people can be, figuring these little tricks. What you do is flood the cookie with the base color and wait until it starts to crust. Average will be 15 minutes. Then you use the handle of a painting brush, or what I used: a fondant ball-shaper. I have a set of several sizes and picked one to make the indentations that seemed most appropriate for the size of the tree. Press the ball gently to make a mark on the icing. Let it dry completely and if desired you can add details with gold luster. Or you can leave it without the gold accent, for a simpler look.

To see exactly how that is made, you can check the wonderful tutorial by The Graceful Baker in youtube clicking here. The “crackled gold” starts at 33 min and 10 sec. I already anticipate the same approach in other styles, like crackled heart shapes for Valentine’s…. Wouldn’t that be awesome?

Moving on…. another technique I learned from Stephanie on youtube, and you absolutely MUST check her site. What I loved about this one is the clever use of a cookie cutter that most people have in their little treasure box: a gingerbread man, any size will do. If you turn it upside down you can use it to make a Reindeer!

Am I adorable or what?

I swear, I love this little guy! I admit his ears ended a bit pathetic, and if you watch her video you’ll realize I forgot to add the hair on top of his cute head, but overall I am thrilled with the way he turned out. I will make some more again in the near future, hoping to do a better job.

The final details (eyebrows and smile) are made with a very fine food pen but if you can also try royal icing, I don’t dare going for such fine details using it. Poor Reindeer, he would look like roadkill.

Please make sure you visit Little Cookie co. youtube channel. I already have three different techniques on my list of projects to try soon, in fact it is quite likely that by the time you read this I will be already working on one of them….

And finally… a technique I’ve been flirting with for the longest time: Stained Glass Window Cookies. First time I did it, I was not very happy with the outcome. I liked the overall design but the stained component was not as I expected.

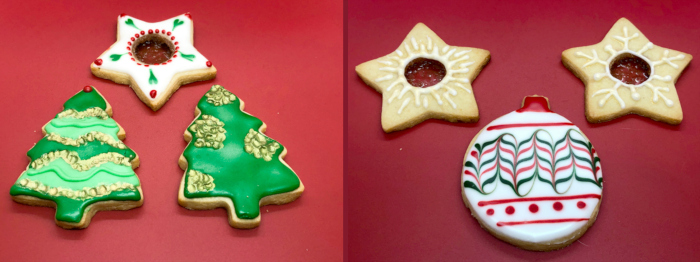
To have the stained glass effect, many recipes will tell you to simply crush hard candy in the color you want and make a little pile in the cut out part right before you bake. I found it hard to time the full melting of the candy with the cookie baking, and also the candy shrinks quite a bit and gets cloudy. Just not the type of effect I had in mind. I consulted with Tanya about it, and she advised me to use a totally different method, her favorite. Essentially you make the sugar syrup yourself, dye any color you want or leave it plain, and spoon it gently in the cut out part after the cookies are already baked. The result is so much better! Nothing like getting advice from a pro…

Here is the recipe I used, it makes enough for many many cookies, but it is hard to scale it down, so I advise you to keep the amounts as written.

SYRUP FOR STAINED GLASS COOKIES
(from The Honey Blonde)

100g sugar (1/2 cup)
3 tablespoons corn syrup
1/4 cup water
gel food color, if desired

Combine sugar, corn syrup, and water into a small sauce pan. Place over medium high heat and bring to a boil. Do not stir sugar while boiling. Continue to boil until mixture reaches about 290-300 degrees. Remove from heat and gently stir gel food color.

Place the cookies on a foil lined baking sheet lightly sprayed with oil, or use a non-stick foil. Spoon the candy into the center of the cookie, using the spoon the spread the candy into the edges of the cut out region.

Let set for about 10 minutes, or until candy is completely hardened.

ENJOY!

to print the recipe, click here

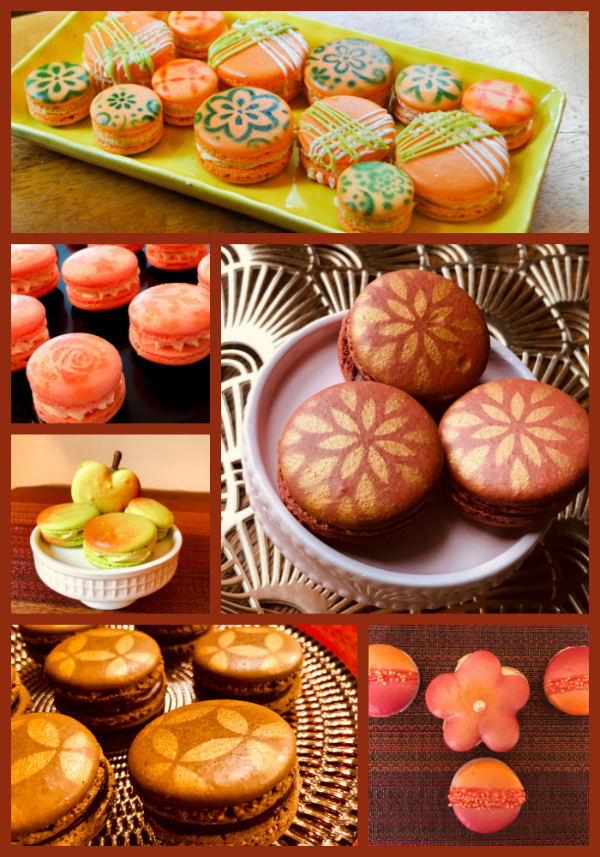
I hope you enjoyed this little collection of Holiday-inspired sugar cookies. Next I will share macaron ideas also inspired by this festive season. Stay tuned!

ONE YEAR AGO: Just a few hours to go!

TWO YEARS AGO: Broccoli Souffle

THREE YEARS AGO: Panettone Time!

FOUR YEARS AGO: How the Mighty Have Fallen

FIVE YEARS AGO: Festive Night at Central

SIX YEAR AGO: The Perfect Boiled Egg

SEVEN YEARS AGO: Light Rye Sourdough with Cumin and Orange

EIGHT YEARS AGO: Homemade Calzones

NINE YEARS AGO: Plum-Glazed Duck Breasts

TEN YEARS AGO: Holiday Double-Decker

ELEVEN YEARS AGO: New York Deli Rye

LESSONS FROM TANYA, THE FINAL CHAPTER

Third post of a series of three on Sugar Cookie Decorating

In this post, I won’t share a recipe, as I will be using the exact same one posted yesterday. I made another set of silhouettes because the pups were beyond upset by my use of felines as cookie decoration.

Please do not laugh of my pink dotted border. That is the one technique Tanya demonstrated and I simply could not succeed. She does the beaded border pulling the piping tip and dragging a bit alternating the direction, it looks soooo adorable. I’ve tried in two cookies, and they ended in my belly because I was forced to eat the evidence. So I just went with little dots and even that has plenty of room for improvement.

I made dogs and cats of two sizes, to either stand alone in a cookie or side by side as best friends. At least in the cookie world, such relationship is possible.

The planning stage…

In this batch of cookies, I brought my air-brush into play. So I started from the flooding technique, and allowed that to fully dry for 24 hours. Once the surface is truly solid, you can lay a stencil on top and air-brush any color and/or pattern you fancy.

After that, simply glue the silhouette, if using, or any other piping with Royal icing you feel like adding.

If you are new to air-brushing, I highly recommend this one. It has a cup that is bigger than other brands, and can also be used for cocoa butter for spraying bonbon molds (I intend to try that in the near future).

You will also need air-brush dyes, and my favorite brand is Cookie Countess. The most useful colors are the pearl types, white, gold, silver or my favorite: Rose’ Gold (which I used in the cookies without silhouettes in the group picture above).

Below a little sampling of bakes from old posts and a few not yet blogged about, all decorated with air-brushing, some with stencils, some without. Speaking of stencils, etsy.com is a great source to get them.

It is really a very nice tool to play with, so if you are over the fence about getting one, consider this post a little encouragement…

I hope you enjoyed this little Trilogy of Sugar Cookies. Sugar Cookies and macarons are almost always part of my weekly bakes for Common Table meals, so I am constantly trying to find new ways to decorate them and new flavors to explore. Stay tuned for more in the near future…

LESSONS FROM TANYA: SUGAR COOKIE SILHOUETTES

Second post of a series of three on Sugar Cookie Decorating

For one of her bake-along tutorials, Tanya showed how to make little silhouette details using Royal icing. They can be made way in advance (pretty much last forever) and saved to add to your cookies previously flooded and fully dry. The possibilites are endless, as you can imagine. And the great thing for us who cannot draw to save their lives, is that you can find clipart to download and print for free, adjust them to the size you want and use them to pipe your little decor. She demonstrated with a gorgeous deer’s head, I went first with a cat. She also demonstrated how to make a winter scene with a full moon and trees, so I joined both techniques in a single cookie.

BROWN SUGAR AND SPICES SUGAR COOKIES
(adapted from Bake at 350)

360g all-purpose flour
2 tsp baking powder
1/2 tsp cinnamon
1/4 tsp ginger
1/8 tsp nutmeg
1/8 tsp allspice
1/8 tsp cardamon
150g granulated sugar
50g brown sugar
226g butter, cut into chunks
1 egg
1/4 tsp salt

Heat oven to 350.

Whisk the flour, baking powder and spices, set aside.

Cream the sugars and butter. Add the egg and salt and mix until well-blended. Gradually add the flour mixture and beat just until combined. Roll on a floured surface to about 1/4″ and cut into shapes. Place on parchment lined baking sheets and freeze for 10 minutes.

Bake for 10-12 minutes, depending on the size of your cutter. Let sit a few minutes on the sheet, then transfer to a cooling rack.

Use Royal icing to decorate, recipe in previous post.

ENJOY!

Comments: There are countless sites that offer free downloadable templates for all sorts of drawings. You can then print them side by side and place a sheet of parchment paper on top of the printout. Using Royal icing with the consistency Tanya demonstrates in her tutorial and a very fine piping tip, carefully outline the drawing. Make more than you need, because they are obviously very fragile. They are best if allowed to dry overnight.

For the stars, in some cookies I used sprinkles… and in others I followed the technique demonstrated by Tanya, pulling small white dots with a needle.

That surface is allowed to dry overnight, and then the silhouette is glued, and the trees piped. In the cookie above, I used some silver air-brushing just for fun.

Here they are, all my babies! Before watching Tanya’s tutorials, I would never dream of making cookies with so many little details.

I will be back tomorrow with the final post about sugar cookies, using the same recipe (Brown Sugar and Spices). and a slightly different way to decorate them.

ONE YEAR AGO: Cherry-Chipotle Chicken Thighs

TWO YEARS AGO: White Chocolate Mini-Mousse with Sugared Cranberries

THREE YEARS AGO: You Say Ebelskiver, I say Falafel

FOUR YEARS AGO: Happy Thanksgiving!

FIVE YEARS AGO: Two Takes on Raspberries

SIX YEARS AGO: Spice Cake with Blackberry Puree & The Global Pastry Review

SEVEN YEARS AGO: Own Your Kitchen with Cappuccino Panna Cotta

EIGHT YEARS AGO: Chicken Parmigiana, the Thriller

NINE YEARS AGO: Wild Mushroom Risotto

TEN YEARS AGO: Tartine Bread:  Basic Country Loaf 

ELEVEN YEARS AGO:  Pugliese Bread

LESSONS FROM TANYA: APPLE CIDER SUGAR COOKIES

First post of a series of three on Sugar Cookie Decorating

One of the greatest benefits of being part of The Great American Baking Show was getting to know 11 baking addicts with no interest in treating their condition. A year later, we still exchange constant messages that often go beyond what is cooking in our ovens. Each of us has areas in baking we feel reasonably confident about, and areas we feel the need to improve. Tanya is amazing at gingerbread sculptures (insert a discreet tear here), and cookie decorating in general. Recently she made a series of video tutorials and by watching them and working with her favorite Royal icing recipe, I believe I improved my skills a bit. I still have issues with some techniques – those tricky beaded borders come to mind – but I will keep practicing. This is the time of the year that screams for sugar cookies and fun decorations, so visit Tanya’s site and join the spirit!

APPLE CIDER SUGAR COOKIES
(slightly modified from Global Bakes by Tanya)

226 grams unsalted butter, at room temperature
160 grams granulated sugar
1 large egg, at room temperature
1 Tablespoon vanilla extract
2 Tablespoons milk, any kind
375 grams all-purpose flour
42 grams (2 packets) Apple Cider Mix
3/4 teaspoon baking powder
1/2 teaspoon salt

In the bowl of a stand mixer, beat the butter and sugar on medium speed until smooth and creamy. Beat in the egg, vanilla, and milk until well blended.

Combine the flour, apple cider mix powder, baking powder, and salt in a medium bowl. Gradually add to the butter mixture on low speed until combined. Divide the dough in half and wrap in plastic wrap. Chill for 1 hour or for up to 3 days. The dough freezes well also.

Heat the oven to 350F. Roll one piece of dough at a time between two pieces of parchment paper (I did 4mm thickness). Cut dough with floured cookie cutters. Place 1-inch apart on silpat or parchment-lined baking sheets. Freeze for 10 minutes.

Bake until edges begin to brown, 10 to 12 minutes. Cool 2 minutes. Remove to wire rack to cool completely.

ROYAL ICING
(from Global Bakes by Tanya)

900 grams (2 pounds) powdered sugar
156 grams pasteurized egg whites
1/4 teaspoon cream of tartar
1 Tablespoon light corn syrup
Gel colors of your choice

In the bowl of a stand mixer, add the powdered sugar and cream of tartar and whisk together to combine. Add the egg whites and corn syrup and stir gently with a rubber spatula until the powdered sugar is moistened.

Put the bowl on the stand mixer and, using the paddle attachment, whisk for 1 to 2 minutes until smooth and bright white in color.
At this point, you can use the icing to assemble a gingerbread house. To outline shapes for flooding, put about 1 cup of the royal icing in a small bowl and add about ½ teaspoon water. Add another ½ teaspoon if needed to allow smooth piping. Stir until smooth.

To flood cookies inside the dried outline, put about 1 cup of the royal icing in a small bowl and add about 1 teaspoon of water. Add another ½ teaspoon water to allow smooth spreading. Stir until smooth and combined.

Add gel colors as needed for your planned decorations.

ENJOY!

to print the recipe, click here

Comments: This was the first time I managed to work with different consistencies of Royal icing and get them to behave the way I hoped. Tanya shares quite a few tips to judge the consistency and adjust it, so I highly recommend you to watch her videos, particularly the ones that she made for a Bake Along session last month.

For this pumpkin, the yellow had a stiff consistency so that a rosette piped with a little open star tip would retain the ridges well. The green and brown were just a tad softer, and the orange more fluid (what is usually described as flooding consistency). The segments of the pumpkin are flooded independently so that they don’t join together. So for the example above, there are 4 sections, and just like Tanya demonstrates in her video, the idea is to flood area #1 and #3, wait about 10 minutes and flood regions #2 and #4. Ten minutes more and you will be ready to add the brown and a little later the final details in green and yellow.

You can also make rosettes and let them fully dry, adding them to the cookie with a little drop of royal icing as glue. These rosettes had been made months ago (remember this post?) and I just brought them to play.

In her Bake Along tutorial, Tanya taught a pretty cool alternative style for a pumpkin cookie, and I loved her idea. Start with a white pumpkin, and go with piping dots for the details. How cute is that?

Once again, segments are piped independently (#1 and 3 first, #2 and #4 last) and once that sets a bit, the brown stem and the colorful dots are added.

If you watch Tanya in action and see her finalized cookies, you’ll see I need a lot more practice, but… baby steps are still steps, right?

That’s all for now. Tomorrow I will share two other techniques I learned from Tanya, so stay tuned!

ONE YEAR AGO: Cherry-Chipotle Chicken Thighs

TWO YEARS AGO: White Chocolate Mini-Mousse with Sugared Cranberries

THREE YEARS AGO: You Say Ebelskiver, I say Falafel

FOUR YEARS AGO: Happy Thanksgiving!

FIVE YEARS AGO: Two Takes on Raspberries

SIX YEARS AGO: Spice Cake with Blackberry Puree & The Global Pastry Review

SEVEN YEARS AGO: Own Your Kitchen with Cappuccino Panna Cotta

EIGHT YEARS AGO: Chicken Parmigiana, the Thriller

NINE YEARS AGO: Wild Mushroom Risotto

TEN YEARS AGO: Tartine Bread:  Basic Country Loaf 

ELEVEN YEARS AGO:  Pugliese Bread

VALENTINE’S DAY SWEETHEART COOKIES

Back in December, I made a batch of cookies and “decorated” them. After that experience it became clear that the road to hell is paved with Royal icing. Since it was a real roller coaster, I decided I was done with it for the rest of my existence. Having said that, I don’t know exactly why I woke up one day thinking that the combination of sugar cookies with Royal icing would be the best way to start Valentine’s week. A real sucker for punishment I am. Was it that bad? Sort of. Let’s say it had some ups and some dark and scary downs.

SWEETHEART SUGAR COOKIES WITH ROYAL ICING
(adapted from Alton Brown and Sweet Sugarbelle)

what you’ll need:
heart-shaped cookie cutter
scribe tool
piping bags
icing tips size 2 or 3
rubber bands for piping bags (2 per bag)
paper towels and water for constant clean-up
a Zen attitude
a very understanding partner in case you run out of previous item

for the cookie dough:
3 cups all-purpose flour (360 g)
3/4 teaspoon baking powder
1/4 teaspoon salt
1 cup unsalted butter, softened (225 g)
1 cup sugar (225 g)
zest of 1 lemon
1 egg, beaten
1/2 tsp vanilla paste
1 tablespoon milk

for the icing:
2 pounds confectioner’s sugar {907 grams}
5 tablespoons meringue powder {approximately 53 grams}
2 teaspoons vanilla bean extract (I used clear vanilla extract)
1/2-3/4 cups warm water

Sift together flour, baking powder, and salt. Set aside. Place butter and sugar in large bowl of electric stand mixer and beat until light in color. Add egg, lemon zest, milk and vanilla, beat to combine. Put mixer on low-speed, add flour, and mix just until the mixture starts to form a dough. Do not over mix or your cookies might be tough. Remove the dough from the mixer and finish mixing it by hand, gently.  Divide the dough in half, flatten each portion as a square or rectangle and wrap in plastic foil. Refrigerate for 1 hour minimum.

Heat oven to 350 degrees. Remove one wrapped pack of dough from refrigerator at a time, sprinkle rolling-pin with powdered sugar, and roll out dough to 3/8-inch thick. Cut into heart shapes, place on baking sheet over parchment paper, and refrigerate for 30 minutes. Bake for 10 to 12 minutes or until cookies are just beginning to turn brown around the edges, rotating cookie sheet halfway through baking time. Let sit on baking sheet for 2 minutes after removal from oven and then move to cool on a rack. Ice the cookies when completely cool, or on the following day.

Make the icing (you can make the day before and store well covered at room temperature). Stir the vanilla into half of the water and reserve. Keep the other half of the water measured and ready to go.

Using a paddle attachment gently mix the sugar and meringue powder. With the mixer on the lowest setting slowly add the water/flavoring mix to the dry ingredients. As the water is added, the icing will become thick and lumpy. Continue to add the remaining water {this may or may not be the entire amount} until the mixture reaches a thick consistency. At this point, turn the mixer to medium speed and whip 2-4 minutes until the mixture is thick and fluffy. When it forms a soft peak, it has been beaten enough. Avoid mixing further, as you don’t want to incorporate too much air in the icing. Too much air might result in bubbles forming after icing.

Adjust the consistency that you need for flooding the cookies, separate the icing in portions, add dye according to your planned decoration. Store in air-tight containers at room temperature. If needed, re-adjust the consistency before piping.

Add the different colors of icing to piping bags fitted with the appropriate icing tips. I like number 3 for the basic color used for flooding, and a number two for the details. Flood each cookie, make the edges as neat as possible with the scribe tool. Decorate with the design you like, one cookie at a time, as the base color needs do still be wet, unless you prefer to do a wet-on-dry method. In this case, the base needs to dry for several hours before proceeding with the decoration.

Dry the cookies for at least 6 hours before handling them.

ENJOY!

to print the recipe, click here

Comments: I had no issues with the cookie component, I prefer the taste of a sablé type cookie, but as far as sugar cookies go, these are very nice. They retain a little chewiness upon baking (especially if you don’t let them get too dark), and the lemon zest brightens them up considerably. Now let’s talk Royal icing. I watched online classes and youtube videos. I read cook books.

Here is my advice for those who are as inexperienced as myself and for some irrational motive decide that a naked cookie must be dressed for party.

  1. Make the icing and the cookies the day before decorating them. Not only it is better to ice cookies that are not freshly baked (I am echoing some experts here), but it will save you a lot of trouble and make decorating day easier.
  2. Keep things simple. White icing plus two or at most three colors. Trust me on this. You will need bags and icing tips for each color you want to work with. Some people can make those cute piping bags from parchment paper. I am not one of those people. Sometimes I get them right, more often than not there is drama.
  3. Prepare all materials you will need and have them ready on a neat and clean counter top. Paper towels and a bowl with water are two best friends of the rookie-decorator.
  4. Tie your hair up if you have long hair. Wear gloves if you prefer to avoid stained fingers.
  5. Get rubber ties for your piping bags like these. They are indispensable and work better than improvised methods. Tie the bag close to the icing tip before you fill it. Tie the top after you fill it (see my composite image, middle photo in the bottom row). Remove the band closest to the tip when you are ready to ice your cookies. This simple measure prevents quite a bit of mess from happening.
  6. Have a rack ready to spread the freshly iced cookies with enough surface to accommodate them all. They take hours to fully set and should not touch each other. Be very careful not to grab them touching the icing. Often the surface looks dry but it’s still soft and fragile (don’t ask me how I know).
  7. Let your inner Rembrandt fly. Or Monet. If all fails, go Pollock. Not that there’s anything wrong with him. Obviously not.

But, the most important thing is obviously the most elusive for beginners: the consistency of the icing. Nothing is more frustrating than filling the piping bag and realizing the icing is a tad too thick. Or worse yet, too thin, which will cause the icing to roll off the cookie and tears to roll down the baker’s face. There are tricks to judge the perfect consistency. For instance you can run a spatula or small knife into the icing bowl, and in about 15 seconds it should go back to a smooth, leveled surface. I was probably off by 20 seconds on my first attempt, which led me to say a few choice words, empty the bag, thin the icing, and start all over. Sadly, it was still a bit thick, but I could not bring myself to empty the bag again. So the white icing used to flood most of the cookies was not top-notch. Getting the consistency perfect is probably something that comes with practice. Perhaps I’ll get there before 2019 is over.

I developed a huge respect for those who do this type of stuff for a living. It is really time-consuming, and I imagine the profit margin is very low. Especially if a baker uses the best ingredients and does intricate decorations, he or she will have to charge a lot more than the stuff you can by at the grocery store in those big plastic boxes. But I guess that is a problem professional bakers are forced to deal with.

Several of my cookies had small boo-boos, but some made me very happy. So happy that I created a little composite photo with them.

HAPPY VALENTINE’S DAY!

ONE YEAR AGO: Fesenjan, Fast-Food Style

TWO YEARS AGO: Lavender Macarons with White Chocolate Ganache

THREE YEARS AGO: Raspberry Chocolate Truffles

FOUR YEARS AGO: Red Velvet Cupcakes

FIVE YEARS AGO: Happy Valentine’s Day!

SIX YEARS AGO:  A Few Blogging Issues

SEVEN YEARS AGO: Dan Dan Noodles

EIGHT YEARS AGO:  Sophie Grigson’s Parmesan Cake

NINE YEARS AGO: Antibiotics and Food