Four top-notch cookie decorators. Two from the US, one from Canada, one from Spain. Marlyn and Amy get together virtually on Tuesdays for Cookie Therapy (I am undergoing treatment). On Fridays, Marlyn, Haniela and Amber join efforts in their Cookie Lunch Break (videos available here). Both virtual events showcase cookie decorating techniques live, as they chat, share tips, and answer eventual questions from those watching. It starts at noon where I live, so it is now a nice routine for me, I have my lunch and cookie therapy at the same time. Today I share two examples of goodies that were recently showcased by Marlyn and Amy in their Tuesday series. They have in common the use of wafer paper flowers. Needless to say, I fell in love with the technique…
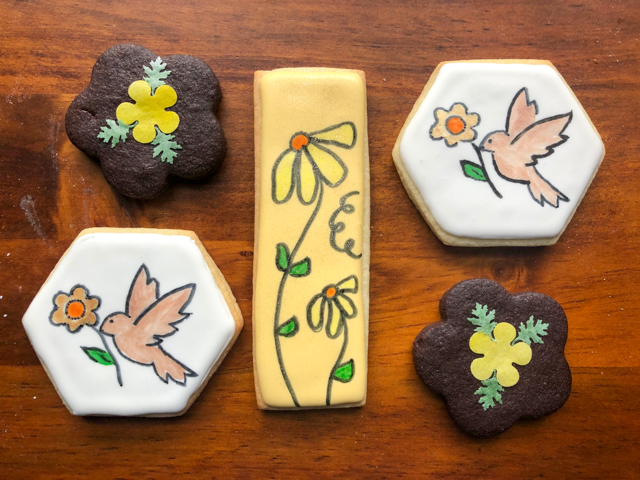
HONEY SUGAR COOKIES WITH WAFER PAPER FLOWERS (from the Bewitching Kitchen, decoration following Amy’s tutorial)
1 cup butter (226g), cut in pieces, cold 200g sugar zest of 1/2 lemon 2 eggs 1 tsp honey extract (Olive Nation) 1/2 tsp vanilla extract 420 g all-purpose flour 60 g cornstarch 1/2 tsp salt 1/4 tsp baking powder
Mix the flour, cornstarch, salt and baking powder and reserve.
Cream sugar, butter and lemon zest in the bowl of a Kitchen Aid for a couple of minutes until the sugar is incorporated well and does not feel gritty. Add the eggs, honey emulsion and vanilla extratc slowly and mix until incorporated, but don’t over-mix.
Add the flour mixture slowly, mixing in low-speed. If needed, add a little more flour, up to 1/4 cup. Once the dough comes together, stop, and form three discs. You should have three discs with about 330g each. Dough can be rolled out immediately or placed in the fridge to roll out later. It also freezes extremely well.
Cut in shapes, freeze the cut-outs for 10 minutes, then bake in a 350F oven for about 13 minutes. Ice and decorate as desired.
For my favorite Royal Icing recipe, visit Tanya’s blog with a click here.
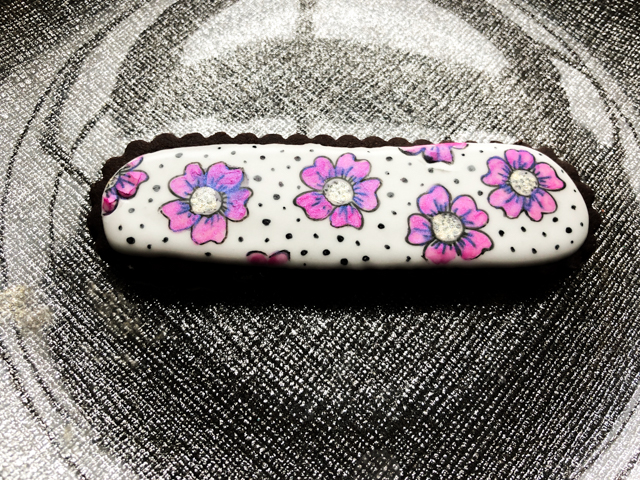
Comments: The hexagonal cookie tutorial with detailed explanation on making the flowers, starts at 41 min this video. Wafer paper sheets are available from the seller of all things, amazon.com. To make the flowers and leaves, you’ll need mini puncher cutters, (several other kinds available like this) or a considerable amount of patience to cut the shapes by hand. The wafer paper is white, so you have two options to color it: before or after cutting the shapes. I strongly advise that you spray paint or brush color on the sheet, let it dry and then cut the shapes, because they are very delicate and harder to paint after cutting. When you cut them, they will be flat. To give a tri-dimensional look, you can gently wrap them around the tip of a small plastic bottle (eye-drop bottles will work great), or what Amy suggests, using the tip of an air-brush dye bottle like these. Both methods work like a charm, just be gentle. Even if the center rips a little bit, when you add the centers it will hide the boo-boo. As to the centers, they can be dry Royal icing transfers, or you can just pipe a little blob of icing when you glue the flowers on the cookie’s surface. The great thing about these decorations, is that they last a long time, so you can make a little treasure chest with flowers, leaves, and save them for a cookie (or cupcake) emergency.
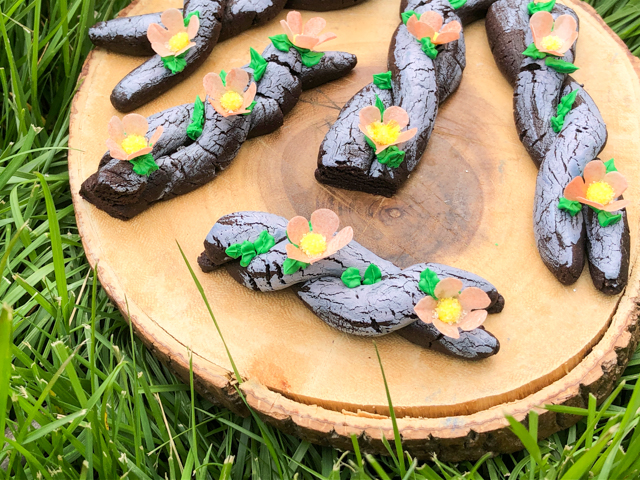
CHOCOLATE TWIG COOKIES
I find these cookies absolutely adorable! I cannot share the exact recipe I used, as it is available exclusively for Marlyn’s supporters through her Patreon site. You can certainly use your favorite chocolate cookie recipe, as long as it does not have leavening agent. It is also a good idea to pick a recipe that calls for some brown sugar, so that the dough will be more flexible and smooth.
Detailed method for shaping and decorating can be found here starting at 32 min and 30 seconds. Her flowers are logs above mine, with added details that I felt were beyond my skill level. She performs magic with the air-brush! They end up looking exactly like cherry blossoms, but I am still pretty thrilled with my little babies.
The secret to get the bark look, is brushing the cookies with Americolor Ash right before baking. This step is optional but I believe it adds a lot of charm.
As you might notice, I re-use parchment paper. The twigs were baked right after the hexagonal cookies from Amy’s tutorial, as well as some stick cookies, you can still see their ghost images in there…
After baking, you’ll need green Royal icing in stiff consistency to pipe leaves and glue the flowers over the surface.
Another way to use the wafer paper is sticking them on the surface of a freshly baked cookie, the residual heat will make the decoration stick and lay flat on it.
Now, I should also mention that the decorations look very nice, but not everyone will enjoy the mouthfeel of the wafer paper. So tell your guests or whoever will be enjoying the cookies that they can just peel off the decorations if they prefer. You can also minimize the amount of wafer paper by coupling the flower with Royal icing leaves.
I hope you’ll consider joining Cookie Therapy on Tuesdays, or Friday Cookie Lunch Break, at 1PM EST. They are always coming up with interesting things that will open your horizons to cookie making and decorating. I promise you will love it!
Watch it at 13:00hs EST (or anytime later) via youtube here..
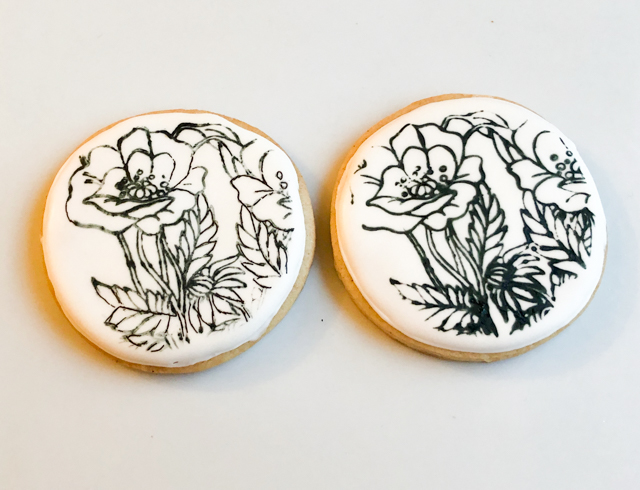
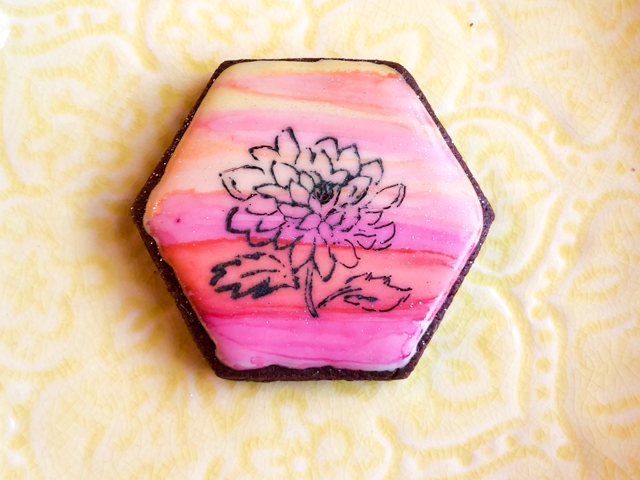
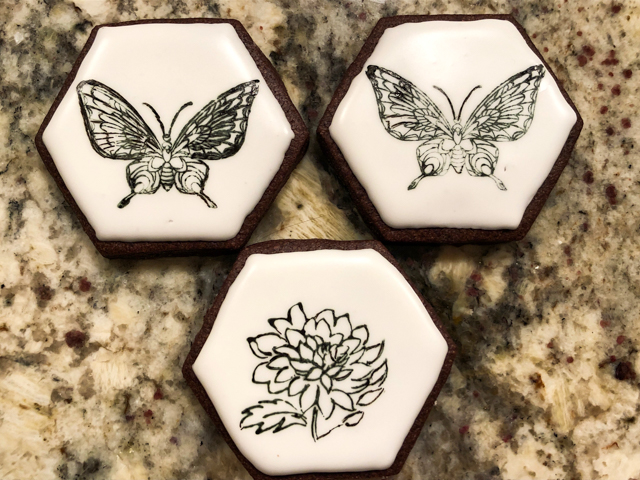
I try hard to avoid repeating myself, but sometimes I cannot help it: I am soooo excited about this! Rubber stamping is one cool method to decorate cookies for the artistically-challenged like myself. Truth is, if someone asks me to draw something or else face the guillotine I will simply tell them to make sure it is well-sharpened. Make it quick. Now, rubber stamping? Anyone can do it! All you need is to flood your cookies in any color you like, but I normally go for white. Let it sit overnight. Do not rush. I repeat: do not rush! The surface needs to be fully set and hard so that you can press the stamp on top and make sure the maneuver is not going to hurt the icing. If you go to a store such as Michael’s or Jo-Ann, visit the section on scrapbooking and pick your weapons. Some stamps work better than others, so it is a bit of a trial and error thing. But… so much fun!
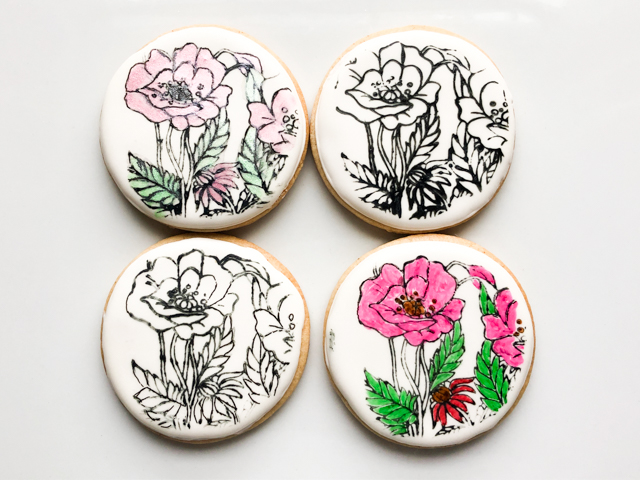
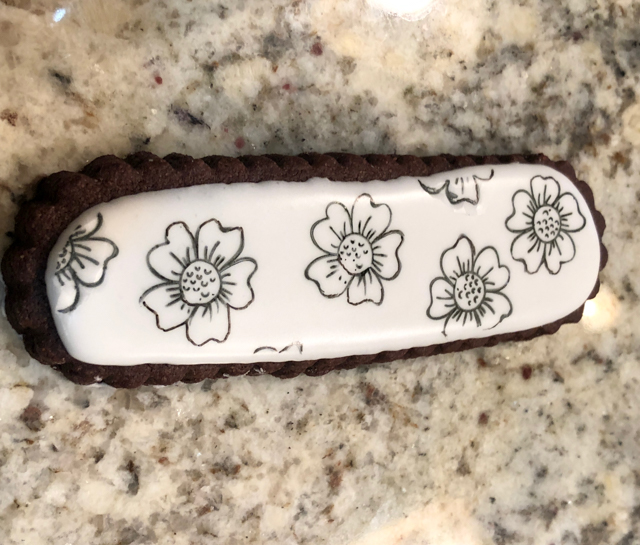
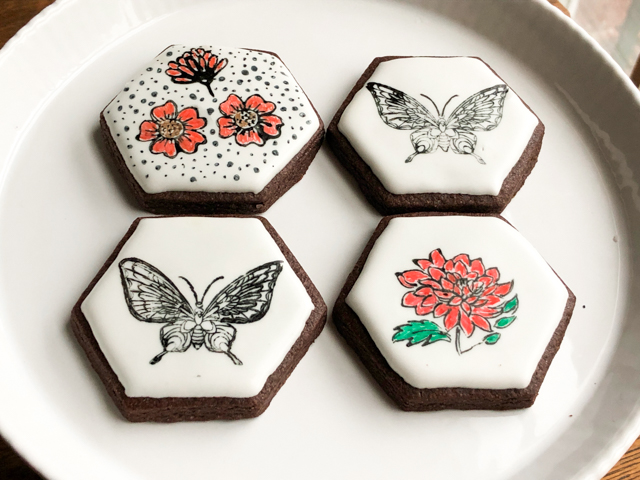
For this set, I used a type of stamp that I had never heard of, but apparently is very popular with the crowd that does serious scrapbooking. They are made of plastic and come glued to a type of acetate sheet. You can find them on amazon or etsy, I have not seen them for sale in stores where I live. For the one I used in these cookies, click here. Usually one sheet comes with several different designs. I find it easier to cut the acetate and isolate the image I want to work with. Then, I spread with a brush a small amount of food gel dye on kitchen paper, either black or another dark color like gun metal from Americolor, a bit more subtle. Press the stamp on it, and practice on a sheet of paper to check that the whole extension of the design was properly covered with dye. It does take a bit of playing with it. If you look at the set of four cookies above, you’ll notice that the design transferred better in some than others. If the design does not transfer completely, you can fill the missing lines with a very fine food pen like Tweets Cookie Connection 03. The cookies look nice in black and white, but I also made a couple painted either with luster powder (top left) or food pens (bottom right). Food pen is a lot easier and faster but I think I prefer the subtle look of luster powder.
Regular rubber stamps also work very nicely and tend to have simpler designs that are more user-friendly.
For this design I started with a flooded white icing and painted a background of striped in warm colors, using food gel dye and alcohol, just like described in a recent blog post.
The amount of dye to add to the paper is something you’ll need to adjust as you go. I don’t like the idea of buying a pad as used in scrapbooking because you need a lot of dye to soak it, and I am not sure how well it keeps for future uses, so I believe you waste too much dye.
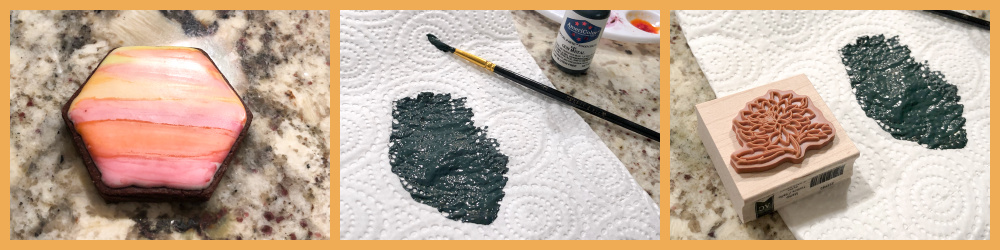
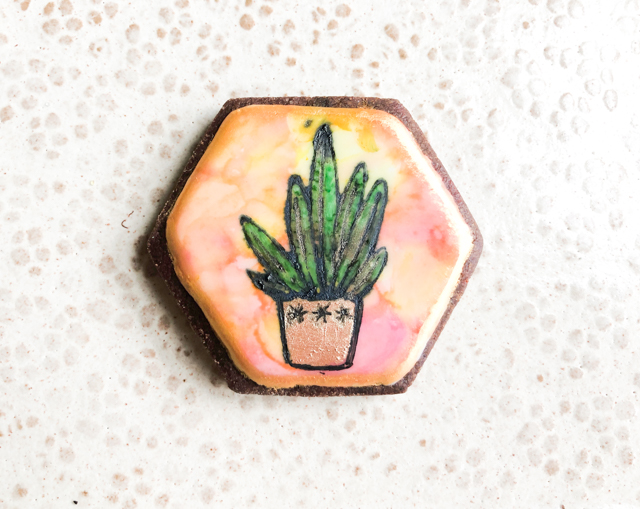
This is another stamp, also the traditional type, rubber with a wooden base. I colored the icing as before, but using a tie-dye instead of stripes. And in this design I went with colors: leaves painted with a food pen, and the little vase with gold luster powder. After painting, you might have to go back to the outline and touch it up with a fine tip black pen. Make sure the paint is fully dry, which happens quite quickly anyway.
Another way to deal with the stamp is using a food pen with a thicker point (I like this kind), paint the stamp, then quickly press it on the iced cookie. You need to work a bit faster because the amount of dye is going to be less than by soaking the paper, therefore it might dry quickly as you paint the stamp. The advantage of this method is reducing the probability of smearing, and saving quite a bit of dye. Below you see what it looks like.
Very sharp lines, no smearing at all. Again, you can leave it black and white or go wild with the design….
Some drawings like the butterfly are a bit too “busy” and not easy to transfer. I still think they are worth playing with, because the end result is quite striking. You need a very steady hand and be very assertive when laying the stamp on the cookie. Any hesitation and you’ll have a smudged design. If that happens, just eat the evidence when no one is looking.
In the set above, the butterfly was a plastic-acetate stamp, the other two were the traditional rubber kind. The top left, a composite using two very small stamps.
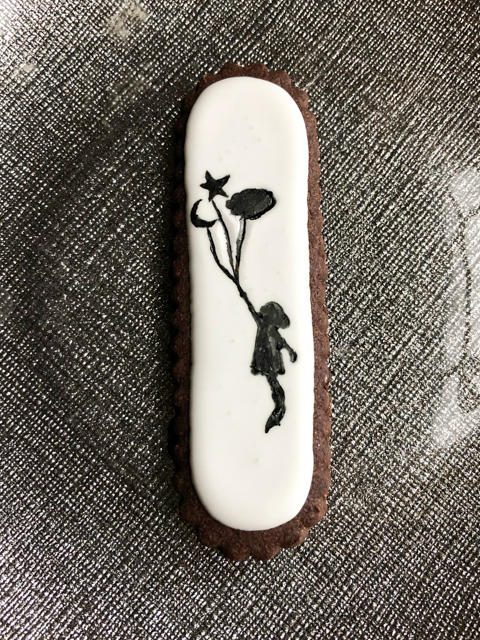
My most recent “experiment” with stamping was with a design that proved a bit tricky. It involved a silhouette type stamp, and it was almost impossible to get it uniform and without blurry edges. This was the best I could do. I think silhouettes might be better left for a projector.
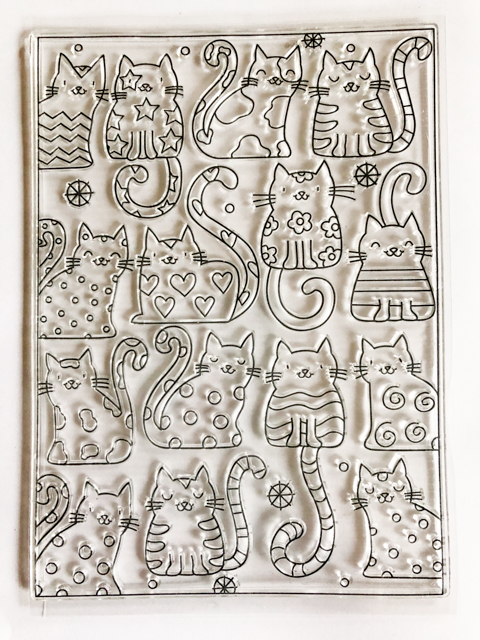
I close this post with something I got in the mail just as I finished writing this article.. Available here.
This is a plastic-acetate stamp sheet. It measures 4 1/2 x 6 in. Each kitten is a little different, so you can either stamp a series together or cut them individually and add to your cookie as a central image, which is what I intend to do. I suspect those images will work very well, as they are overall simple. My last attempt with a complicated image was a beautiful hummingbird (you can see it here), but I could not make it work on the surface of the cookie. Too bad, it is a stunning image. Maybe I’ll conquer it at some point.
I hope you’ll consider rubber stamping as a nice alternative for cookie decorating. It does take some experimenting and playing with it, but the possibilities are endless, and once you get the hang of it, you’ll be hooked.
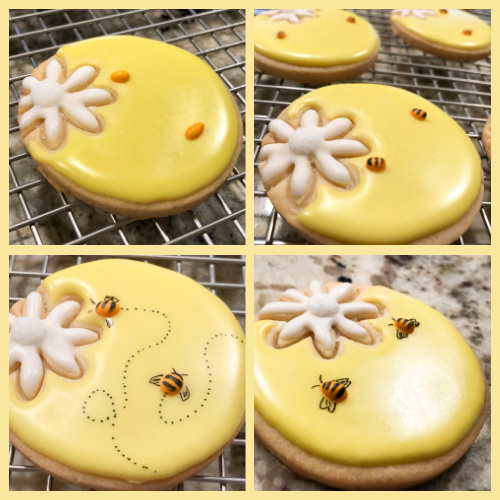
Not too long ago I made some macarons decorated with little bees (view post here). I really wanted to send some to a friend, but in the past I’ve been burned badly trying to ship macarons. What to do? What to do? Turn them into sugar cookies instead! Much more mail-friendly. I adapted the decoration to give those bees a flower to fly to, and to get busy. Then I got busy myself… The cookie dough recipe is a recent incorporation into the Bewitching Kitchen. It produces very sharp edges and I also like the texture of the cookie after baking.
1 cup (227g) unsalted butter,cubed, cold 1 cup (200g) granulated sugar zest of 1 lemon or half an orange 2 eggs 3 1/2 cups (420g) all-purpose flour 1/2 cup (60g) cornstarch 1/2 teaspoon kosher salt 1/4 tsp baking powder 1 teaspoon Fiori di Sicilia extract (or vanilla, or lemon extract)
to decorate: your favorite recipe of Royal Icing (I use Tanya’s) sprinkles food-safe pen
Heat the oven to 350 F and line baking sheets with parchment. Sift the flour, cornstarch, baking powder and salt, and set aside. Mix the sugar with the zest rubbing it well to release the oils. Cream the butter with the flavored sugar, just until smooth and combined.
Mix in the eggs and Fiori di Sicilia (or other flavoring extract) until incorporated. Add the flour mixture on low-speed, in three portions. The mixture will seem very dry and sandy at first, but after a couple of minutes the mixer it will start to pull away from the sides of the bowl.
Remove the dough from the bowl, cut in two pieces and wrap one in plastic. Roll the second piece of dough out between 2 sheets of parchment paper, to a thickness of 1/4 inch. Cut into rounds, press a detail flower using another type of cutter, and freeze for 10 minutes. Bake for 10 to 15 minutes, depending on the size of the cookie. I like to have a slight golden tone at the edges.
Cool on a rack and decorate as desired. For the bee decoration you’ll need yellow, and white Royal Icing with flooding consistency, and orange Royal Icing in orange (very small amount, just for the bee’s body).
Comments: At the risk of sounding repetitive, I must say I had a considerable amount of fun making these cookies. Perhaps because I made those according to my own imagination, did not follow any design found in the internetic world. I am usually not fully satisfied with my bakes, but this batch of cookies ended up just the way I wanted. What more can a poor baker wish for?
For Royal Icing, I used my default recipe, which you can find in Tanya’s blog. I started flooding the white flower, let it crust. Added a layer of additional icing to the center, and some sanding sugar. Then I flooded the yellow part. Waited for it to crust and piped the bee body. Then, patience was called for. I placed the cookies away from sight and did not touch them until next day. You really want to have the icing fully set before moving on to the next step. A food pen does the rest, details of bee body, wings, and flight path. Finally, I painted the center of the flower with gold.
As to the cookie dough recipe, I’ve settled on this one for the past 6 weeks or so. I’ve tweaked it quite a bit, and this version is probably my favorite, although by now you probably know I rarely leave a recipe alone for too long… The amount of cornstarch can vary from 1/2 cup to 1/3 cup (60 to 40g), and the edges will show a slight difference in sharpness depending on how much you use. I suggest you play around with it and decide what is the magical combination that suits your needs and taste. I prefer to add a tiny amount of baking powder, rather than leaving the recipe without.
Before I leave you, a little announcement. Since I’ve been making sugar cookies on a weekly basis, I will publish posts that group my favorite designs under the title “Joy Cookie Club.” There will be no recipe, just a brief description of the techniques used to decorate them. I hope you will enjoy those posts, the first one should be published in the near future.
For almost two years now I’ve been baking for weekly homeless meals, in a church-organized project called Common Table. Before pandemic times they had a sit-down dinner in a big room, so I could bake whatever I felt like it, including regular cakes, pies, tarts. With Covid-19 in the equation, everything changed. They show up and grab a bag with their meal, so any sweets must be individually wrapped and packed together with their main meal. This has obviously restricted my choices of things to bake, and I find myself making more cookies and less of everything else. But, there is always a silver lining. Focusing on cookies made me decide to improve my decorating skills, so that sweets could also bring a smile, especially for families with kids. Every week I include about a dozen iced sugar cookies, so that I can practice different styles of decoration, and at the same time not get too overwhelmed by the process. Visiting Youtube University I try to learn from the great cookie decorators out there. In this post I show you a few of my favorite recent adventures and include the video tutorials I followed to make them. The basic cookie recipes were either gingerbread (this post) or variations of my default recipe for sugar cookies.
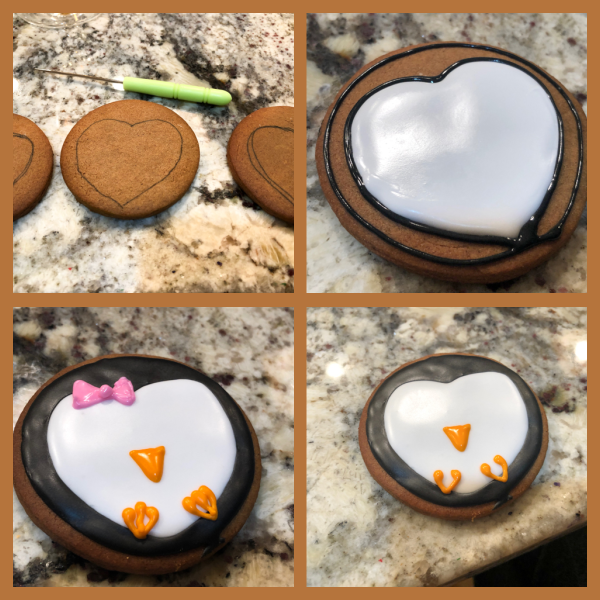
PENGUIN GINGERBREAD COOKIE
To make these cutie pies I followed Haniela’s tutorial found in this link. Starting with a simple round cookie I drew a heart shape with a food pen. Then I used four different colors of Royal Icing: black and white with flood consistency, and orange and pink with thick consistency. For Royal icing I recommend the wonderful recipe from my tent-baking friend Tanya. All piping was done without icing tips, just bags cut with sharp scissors.
After flooding with white, I waited for it to crust, flooded with black and waited for it to crust also. A couple of hours later I made the details of nose, feet, and the little bow. For the feet, it is better to pipe the two external parts, wait 10 minutes and pipe the central one, so that they don’t join together. Next, just like in the video, I drew the eyes, and added red luster powder to the cheeks with a soft brush. Finally, I piped an outline of white royal icing, and immediately touched the wet surface of the cookie into a plate with black sanding sugar. I love my little penguin girls.
SANTA’S HEAD
To make these sleepy Santas, I followed the tutorial from Little Cookie Co. Just three colors of Royal Icing are needed: white, peach and red. Her tutorial explains it all very well, and I was just a little nervous to make the mustache, because it had to be piped free hand and I have a hard time making things symmetrical. I guess it turned out ok, maybe Santa had a bit too much eggnog the night before, but these are trying times for all.
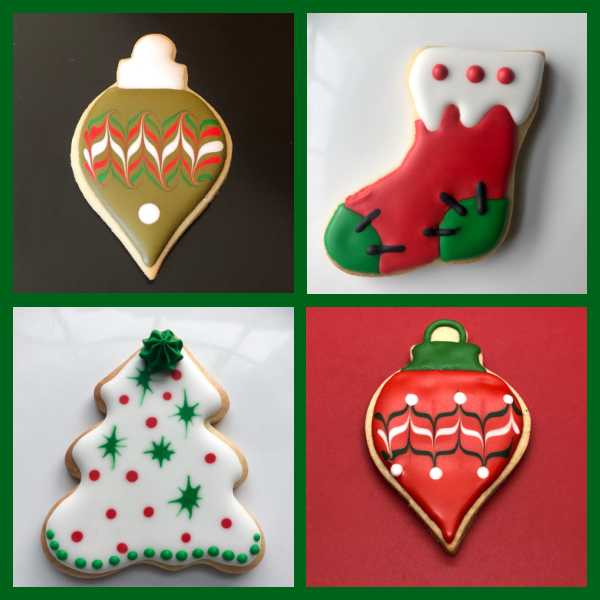
SNOWGLOBE SUGAR COOKIE
Another wonderful tutorial by Little Cookie Co. I made quite a few of those during the month of December, some smaller containing just a small snowman, some with a Christmas tree as Royal icing transfer (shown in the composite picture that opened this post). If you watch the tutorial, you’ll see she pipes the tree with icing free-hand (check it out at 4 min and 5 seconds), but I simply could not bring myself to even try. This is a more elaborate cookie to make, many layers, a lot of waiting, a work of patience. But I do think the result is pretty nice!
SWAN SUGAR COOKIE
I followed part of the tutorial shown in this link, but added my own feathers… oops my own design of feathers. I am actually featherless. I modified it because I don’t care for the taste (or texture) of fondant, although I admit it looks absolutely stunning. It seems also quite a bit of work, as each feather must be shaped individually using small silicone molds. I decided to just pipe some white Royal Icing and immediately shower it with white sanding sugar.
The cookie is actually quite simple to make. Flood the body with white, let it crust. Add the orange beak leaving a small space between the beak and body. Right away add a small band of black royal icing, and pull with a scribe tool very lightly towards the beak and towards the body. A small dot of black for the eye, and just the tiniest touch of white off center on the eye. It is a small detail that makes eyes look a lot more realistic.
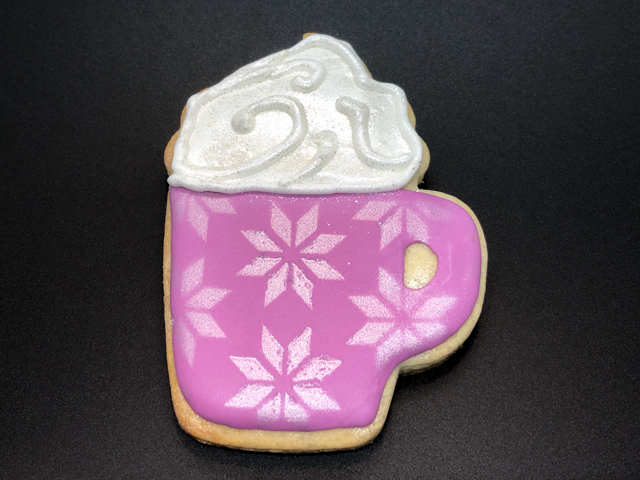
HOT CHOCOLATE MUG COOKIE
To make these cookies I followed the tutorial from this link (at 4 min 20 sec). For the decoration of the mug itself, I opted for three different styles. Two are shown above: royal icing transfer of a snowflake, or wet-on-wet white icing over the basic blue. After the mug crusted, I added the whipped cream part, let that crust and hours later added the white swirls + mandatory sanding sugar coating.
The third style was air-brushing with white pearl dye and a stencil. The top was sprayed with Diamond dust, a product I featured recently on In My Kitchen.
REINDEER LITTLE STAR
For these cookies I did not follow a tutorial, just saw them somewhere in the internet, saved a screenshot and improvised my version. Flooded the white part, waited about 10 minutes, flooded the upper brown, waited a couple of hours and added the triangle white for ears, black for antlers, and red for nose. Next morning it was time to draw the eyes and add red powder dust for the cheeks. Perhaps this was my favorite cookie of this series, although I do love the Penguin Girls…
I tell you one thing, I already miss holiday baking!