Pfeffernüsse translates in English as “pepper nuts”, and they are one of the most traditional cookies made during the holidays in many countries in Northern Europe. It is a perfect cookie to offer as a gift, as they are best when consumed a few days after baking. The recipe is found in the cookbook “Classic German Baking“, but it is also available online (click here). I made half the amount of spice mix, and still had plenty leftover.
For the cookie dough: 2½ cups all-purpose flour 1 teaspoon cocoa powder ¼ teaspoon kosher salt ½ cup honey ¼ cup, plus 2 tablespoons, granulated sugar 2 teaspoons lebkuchengewürz ⅛ teaspoon white pepper 1 teaspoon baker’s ammonia 1 tablespoon rum, slightly warmed 1 egg
for glazing: ¾ cup confectioners’ sugar lemon juice added to desired consistency
Make the lebkuchengewürz: In a small bowl, whisk together the lebkuchengewürz spices until well combined. Makes about ½ cup. Store in an airtight container.
Make the pfeffernüsse: Heat the oven to 375° and line a sheet pan with parchment paper. In a medium bowl, whisk together the flour, cocoa powder and salt to combine. In a small saucepan, combine the honey and granulated sugar over medium-high heat. Stir until the sugar is completely dissolved, 2 minutes, then remove from the heat and stir in the lebkuchengewürz and white pepper.
In a small bowl, dissolve the baker’s ammonia in the rum, then stir into the honey mixture. Transfer this mixture to a large bowl and add the flour mixture and the egg. Stir until a smooth dough forms.
Roll the dough into 1-inch balls and place ½ inch apart on the prepared sheet pan. Bake until the cookies have domed and dried, 10 minutes.
Meanwhile, in a small bowl, whisk together the confectioners’ sugar and lemon juice. If you want a thick glaze, add very little juice, if you want a transparent, thin glaze, add lemon juice and thin further with water. When the cookies come out of the oven, immediately brush them with the glaze. Let the cookies cool completely, then store in an airtight container for 2 days before serving.
Comments: I have a very warm spot in my heart for any sweets containing spices, Speculaas probably being at the very top. These cookies were a huge hit with my beloved husband and his golfing friends. You can approach the glaze in two different ways, thick as I made, or very very thin. Some say that the traditional type has super thin glaze, but I prefer the way they look with a thicker coating. Your kitchen, your rules, do whatever feels right for you. They pack a lot of flavor, and because they are so small, you don’t really feel guilty having one. Maybe two. I would advise you to stop before you inhale the fifth one. That might be harder than you anticipate…
Remember Tina, the winner of The Great American Baking Show, season 4? She is still baking up a storm, doing TV cooking demos, sharing recipes on her blog, and interacting with her fans online. She is not only a superb baker, but a wonderful person! One of the great things about that “tent adventure” is that I got to interact with several of the previous contestants, both in the American and the British show. I think once you go through that experience, a surprising bonding takes place. But I digress. Today I share one of Tina’s many Italian recipes from the holiday season: Cuccidati. They are delicious bar cookies, but can you believe that she forgot to add one important step in the recipe? Do not try the filling before using. You may not have enough left…
Pasta Frolla Dough: 260 Grams of All-Purpose Flour 60 Grams of Granulated Sugar 1/2 Teaspoon of Baking Powder 1/2 Teaspoon of Kosher Salt 114 Grams of Cold Unsalted Butter 2 Large Eggs
Filling: 1/4 Cup of Toasted Almonds 2 Tablespoons of Toasted Pine Nuts (I used sunflower seeds) 1 Cup of Diced Dried Figs (stems removed) 2 Teaspoons of Orange Zest 1/2 Teaspoon of Ground Cinnamon 1/4 Cup of Mini Semi-Sweet Chocolate Chips 2 Tablespoons of Honey 2 Tablespoons of Apricot Preserves 2 Tablespoons of Water 1/2 Teaspoon Rum Extract
Icing: 3/4 Cup of Powdered Sugar 3-4 Teaspoons of Milk 2-3 Tablespoons of multicolored sprinkles
Heat oven to 350 degrees Fahrenheit.
Place the flour, sugar, baking powder and salt into a food processor and pulse about 5 times until combined. Cut the butter into 6 pieces and add to the flour. Pulse 10-15 times until the butter is incorporated and the mixture looks powdery or sandy. Add the eggs and pulse until the dough comes together. Dump the dough out onto a lightly floured surface and knead 5-6 times to form a smooth dough. Divide the dough in half and roll each piece between 2 pieces of parchment paper to an approximately 8” square. The thickness should be about 3/16”. Place both pieces on a cookie sheet and place in the freezer for about 15-20 minutes.
Make the filling: Place the almonds in a food processor and pulse until they are coarsely chopped. Add the remaining ingredients and process until all the ingredients are combined and the mixture is a paste but with still some visible pieces of chocolate and almonds. Set aside. AVOID SAMPLING IT.
Assemble the cookies: Spread the filling as a 8 inch square over plastic wrap over a cookie sheet. Place in the fridge as you prepare the cookie component. Line the bottom of an 8” square pan with parchment paper so that some of the paper overhangs the sides. Remove one piece of the dough from the freezer and trim it into an 8” square or the size of the bottom of your pan. Place it in the bottom of the pan. If the dough softens a bit place it back in the freezer. You want the dough to firm when you spread the filling or it could tear. Carefully lay the filling over the dough, using the plastic wrap to help you out. Gently spread the filling to the edges with a spatula. Remove the second piece of dough from the freezer and trim it to the size of the pan and place it on top of the filling and gently press.
Bake for 23-25 minutes or until the top is a light golden brown.
Remove from the oven and place the pan on a rack to cool. When completely cool, remove the bars form the pan, peel off the parchment paper and place on a board. Mix together the powdered sugar and milk until smooth. Pour the icing on top of the bars and spread with an offset spatula. Scatter the sprinkles over the top. When fully set, cut in diamond shapes or any other shape you prefer.
Comments: I tell you one thing, the filling is spectacular. I envision it in small tartlets, bite-size, in a future adventure. It is sweet, nutty, complex. This was my first time making cuccidati, so I was not quite sure if the amount of filling was too much but I am glad with the way it turned out. I used the full amount for the 8-inch square pan. These are cookies perfect for the holiday season, but if you change the color of the sprinkles, it will be a Birthday-Easter-4th of July-Valentine’s-whatever you feel like it cookie. It is that good!
Until my participation in a certain show, I was not too wild about decorating sugar cookies with Royal icing. Indeed, in the comfort of my kitchen I would always refer to that white, impossible to tame substance as Royal Pain in the Icing, which indicates how I felt about it. But those intense weeks of preparation for the different episodes of the show forced me into areas of baking I had happily ignored and avoided. Much to my own amazement, I now love everything about cookie decorating, from baking the base to planning the design and trying to make it happen. On that note, I highly recommend that you go through my trilogy of posts on the subject from last month and the detailed tutorials by Tanya which I shared at the time. For all the holiday cookies in this post, I went with a flavor that is deeply ingrained in the season: Fiori di Sicilia, the Italian magical potion that is the classic addition to panettone. As to the decorations, apart from the wet-on-wet which I find the most user-friendly, I will share three methods that were new to me, requiring just a tad more involvement: Crackled Gold Christmas Tree, Reindeer (a clever twist starting from a common cookie cutter), and Stained-Glass Cookies.
FIORI DI SICILIA SUGAR COOKIES (from the Bewitching Kitchen)
360 g all-purpose flour (3 cups) 2 teaspoons baking powder 200 g granulated sugar ¼ tsp salt 227 g cup butter, cold and cut in pieces 1 egg 3/4 tsp Fiori di Sicilia extract zest of 1 lemon ¼ tsp cardamom
Heat oven to 350F. Combine the flour, baking powder and salt, set aside. Cream the sugar and butter. Add the egg, Fiori di Sicilia, lemon zest and cardamom, mix well. Scrape the sides of the bowl. Add the flour mixture in two steps, and beat just until combined.
Dough can be rolled right away in between sheets of parchment paper. Roll to about 1/4″ thick, and cut into shapes. Place on parchment-lined baking sheets, freeze for 10 minutes. Bake for about 12 minutes. Transfer to cooling rack and cool to room temperature before icing.
(for Royal Icing, I used Tanya’s recipe, which you can find here)
Comments: This is definitely my default recipe for sugar cookies because I adore Fiori di Sicilia and I do flips for cardamon. As far as extracts go, Fiori di Sicilia is not cheap, but it is hard to replace with something else. Some say that orange extract + vanilla does a good enough job playing its part. Your kitchen, your rules, feel free to flavor your cookies the way you like. Just make sure not to roll the cookies too thin. Thin sugar cookies don’t stand up to the icing.
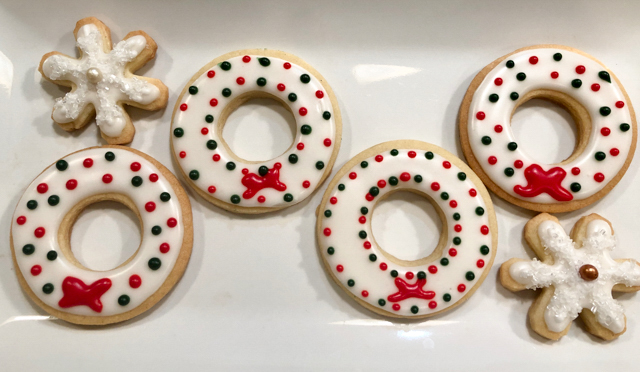
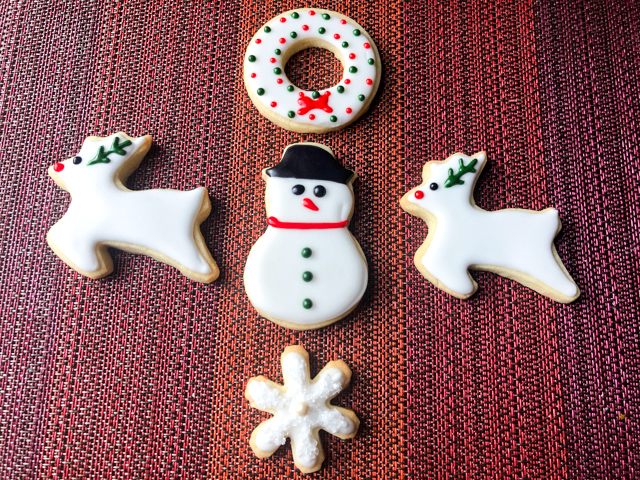
With the basic Christmas colors (red and green, plus white for flooding) you can do a lot…
I used two cookie cutters, one for the basic shape, a smaller to cut a circle in the center, turning it into a wreath. From there, nothing fancy. Flooded with white, allowed to set for just 10 minutes and then a few green and red dots added on top. The little bow added in the very end. Yes, I realize that could be a lot better, and I intend to work on it.
A new cookie cutter I got this year stole my heart. I find it so cute and a bit unusual. A Christmas light bulb, which once again can be made quite simply with only two colors of icing and if you like to gild the lily, some luster gold painted on the “metal” part next day.
By bringing one more color – black – you can expand a bit more the horizons, so that Mr. Snowman has a nice hat and black, profound eyes. The baby deer are also super easy, flooding with white, waiting until it sets a bit and piping the details. The little snowflakes were flooded with white and immediately showered with white sparkling sugar. And one day I will understand why I seem to always type “spanking” sugar before getting it correctly (sigh).
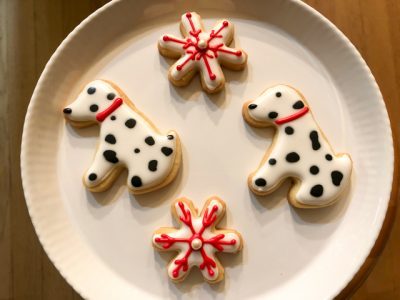
And since there was black Royal Icing around… why not immortalize one of our faithful companions, who has been with us every step of the way in this crazy year? The black dots were placed before the white set (wet-on-wet), then the nose and the red collar were added later, just to have a bit of a 3D effect. Same process went into the snowflakes.
Holiday Baking is not complete without Christmas Trees…
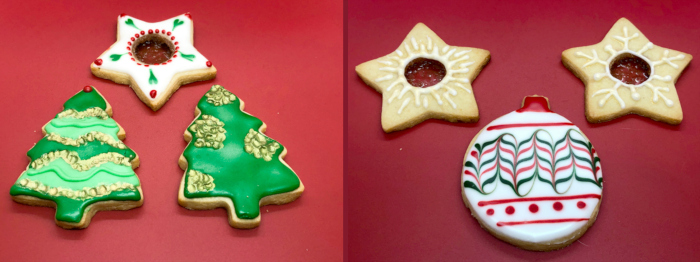
Some of the designs were again wet-on-wet, but then I did something new that blew my little mind when I saw it on a tutorial on youtube. A technique called “Crackled Gold” and you can visualize better in this picture:
It is so cool, I cannot quite believe how creative people can be, figuring these little tricks. What you do is flood the cookie with the base color and wait until it starts to crust. Average will be 15 minutes. Then you use the handle of a painting brush, or what I used: a fondant ball-shaper. I have a set of several sizes and picked one to make the indentations that seemed most appropriate for the size of the tree. Press the ball gently to make a mark on the icing. Let it dry completely and if desired you can add details with gold luster. Or you can leave it without the gold accent, for a simpler look.
To see exactly how that is made, you can check the wonderful tutorial by The Graceful Baker in youtube clicking here. The “crackled gold” starts at 33 min and 10 sec. I already anticipate the same approach in other styles, like crackled heart shapes for Valentine’s…. Wouldn’t that be awesome?
Moving on…. another technique I learned from Stephanie on youtube, and you absolutely MUST check her site. What I loved about this one is the clever use of a cookie cutter that most people have in their little treasure box: a gingerbread man, any size will do. If you turn it upside down you can use it to make a Reindeer!
Am I adorable or what?
I swear, I love this little guy! I admit his ears ended a bit pathetic, and if you watch her video you’ll realize I forgot to add the hair on top of his cute head, but overall I am thrilled with the way he turned out. I will make some more again in the near future, hoping to do a better job.
The final details (eyebrows and smile) are made with a very fine food pen but if you can also try royal icing, I don’t dare going for such fine details using it. Poor Reindeer, he would look like roadkill.
Please make sure you visit Little Cookie co. youtube channel. I already have three different techniques on my list of projects to try soon, in fact it is quite likely that by the time you read this I will be already working on one of them….
And finally… a technique I’ve been flirting with for the longest time: Stained Glass Window Cookies. First time I did it, I was not very happy with the outcome. I liked the overall design but the stained component was not as I expected.
To have the stained glass effect, many recipes will tell you to simply crush hard candy in the color you want and make a little pile in the cut out part right before you bake. I found it hard to time the full melting of the candy with the cookie baking, and also the candy shrinks quite a bit and gets cloudy. Just not the type of effect I had in mind. I consulted with Tanya about it, and she advised me to use a totally different method, her favorite. Essentially you make the sugar syrup yourself, dye any color you want or leave it plain, and spoon it gently in the cut out part after the cookies are already baked. The result is so much better! Nothing like getting advice from a pro…
Here is the recipe I used, it makes enough for many many cookies, but it is hard to scale it down, so I advise you to keep the amounts as written.
100g sugar (1/2 cup) 3 tablespoons corn syrup 1/4 cup water gel food color, if desired
Combine sugar, corn syrup, and water into a small sauce pan. Place over medium high heat and bring to a boil. Do not stir sugar while boiling. Continue to boil until mixture reaches about 290-300 degrees. Remove from heat and gently stir gel food color.
Place the cookies on a foil lined baking sheet lightly sprayed with oil, or use a non-stick foil. Spoon the candy into the center of the cookie, using the spoon the spread the candy into the edges of the cut out region.
Let set for about 10 minutes, or until candy is completely hardened.
I hope you enjoyed this little collection of Holiday-inspired sugar cookies. Next I will share macaron ideas also inspired by this festive season. Stay tuned!
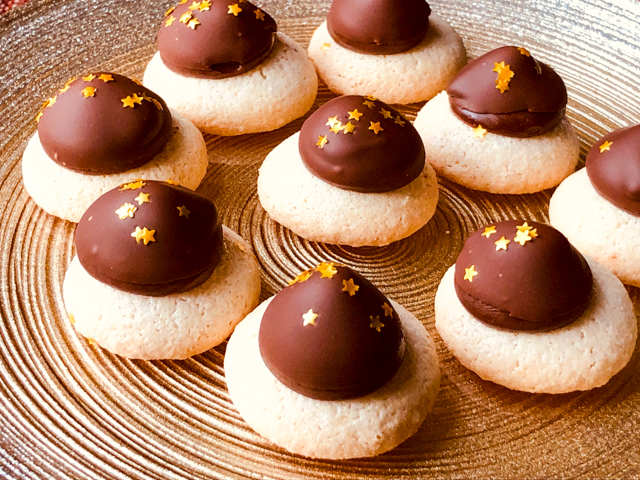
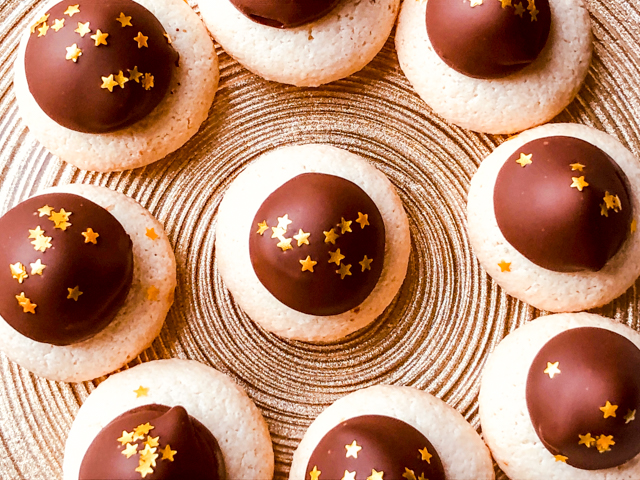
Don’t you love a cookie with a nice story behind it? Sarah Bernhardt was one of the greatest French actresses of the last century. During a trip to Denmark at the height of her career she had a cookie from an upscale bakery and fell totally in love. She was so passionate about that delicacy that in 1911, after her memoirs were published in Denmark, Chef Johannes Steen named this spectacular chocolate cookie after her. Read more about it here. You will find many versions around, but count on Helen Fletcher to bring you the authentic. The cookie joins an almond base, and a chocolate truffle enrobed in a chocolate shell. Many versions cover the whole thing in chocolate, but if you want to do the real thing, cover just the truffle. You should still see the cookie underneath and it will be much more elegant to eat. Worthy of a dame like Sarah Bernhardt.
for the cookie base: 100g almond flour 150g granulated sugar 2 large egg whites 1/2 teaspoon almond extract
for the chocolate truffle topping: 1/2 cup cream 2 tablespoons unsalted butter (28g) 2 tablespoons sugar (25g) 140g semisweet chocolate 1 teaspoon vanilla
to coat the truffle: 114g semisweet chocolate (114 grams) 1 tablespoon shortening Gold Leaf, optional
Make the cookie base. Draw a template with 1 in diameter circles on parchment paper to pipe the cookies, flip the paper so that you can pipe on the back.
Combine the almond flour and sugar in the bowl of a food processor, and run it for a few seconds to combine. Add the egg whites and vanilla, process until a paste forms. Place the mixture in a piping bag fitted with a 1/2 in round tip. Pipe rounds of cookie batter on the parchment paper, going just to the circle drawn. They will puff up during baking. Leave the piped cookie sitting at room temperature while you heat the oven to 300F. Bake the cookies for 20 minutes or until they just start to get some color on the edges. Let cool completely on the paper before removing to a cooling rack.
Make the chocolate truffles. Heat cream, butter and sugar until the butter is melted and the sugar is dissolved. The mixture should be very hot, but not boiling. Submerge the chocolate under the cream and let sit for 4 or 5 minutes. Whisk gently until smooth. Add vanilla.
pour it into a rimmed baking sheet, cover the top with plastic wrap and let it sit at room temperature until it sets up. If it is too soft to pipe and hold a shape, refrigerate briefly until it can be piped.
If making up to a week ahead, pour into a container, cover the surface with film and chill store in the refrigerator. Bring to room temperature to pipe. Follow the instructions above if it gets too soft.
Fit a pastry bag with a 5/8 inch tip. Fill the bag the truffle mixture. Pipe a kiss shaped mound in the center on top of each macaroon about 1” high and within about 1/4″ from the edge. If there is a pointed tip, press it gently with your finger to smooth the surface out.
Place in the freezer to harden. If not finishing within a day or so, place these in a covered container and keep them frozen for a month or so until time to finish.
Finish the cookies. Combine the chocolate and shortening in a short, wide mouth glass or other small container and microwave at 50% power for 1 minute. Stir to mix. If the chocolate isn’t completely smooth, microwave for 10 seconds at a time. Do not let it get too hot.
Remove the cookies from the freezer. Dip them upside down to cover the kisses, just short of their bottoms. Let the excess chocolate drip off. The chocolate finish should cover the kiss but not touch the cookie base. The fact they are frozen will stop the chocolate from running. If the kisses start to warm, pop them back into the freezer. Right after coating, add golden leaf decoration or sprinkles.
Cookies should be kept in the fridge and be brought to room temperature for serving. They can sit at room temperature for a few hours.
Comments: Helen’s post about these cookies is extremely detailed, so I recommend you visit her site if you’d like to bake a batch. She decorated them with gold leaf, I went the easier route and resorted to my trustworthy golden stars. You’ll need to work fast, because the chocolate coating sets almost immediately upon contact with the frozen truffle component.
These are festive and luscious, the type of cookie that will brighten up any holiday table. There is something about the contrast of the cookie base with the melt-in-your-mouth truffle that explains why Ms. Bernhardt went crazy for them.