INCREDIBLY SIMPLE SHRIMP AND SQUASH DINNER

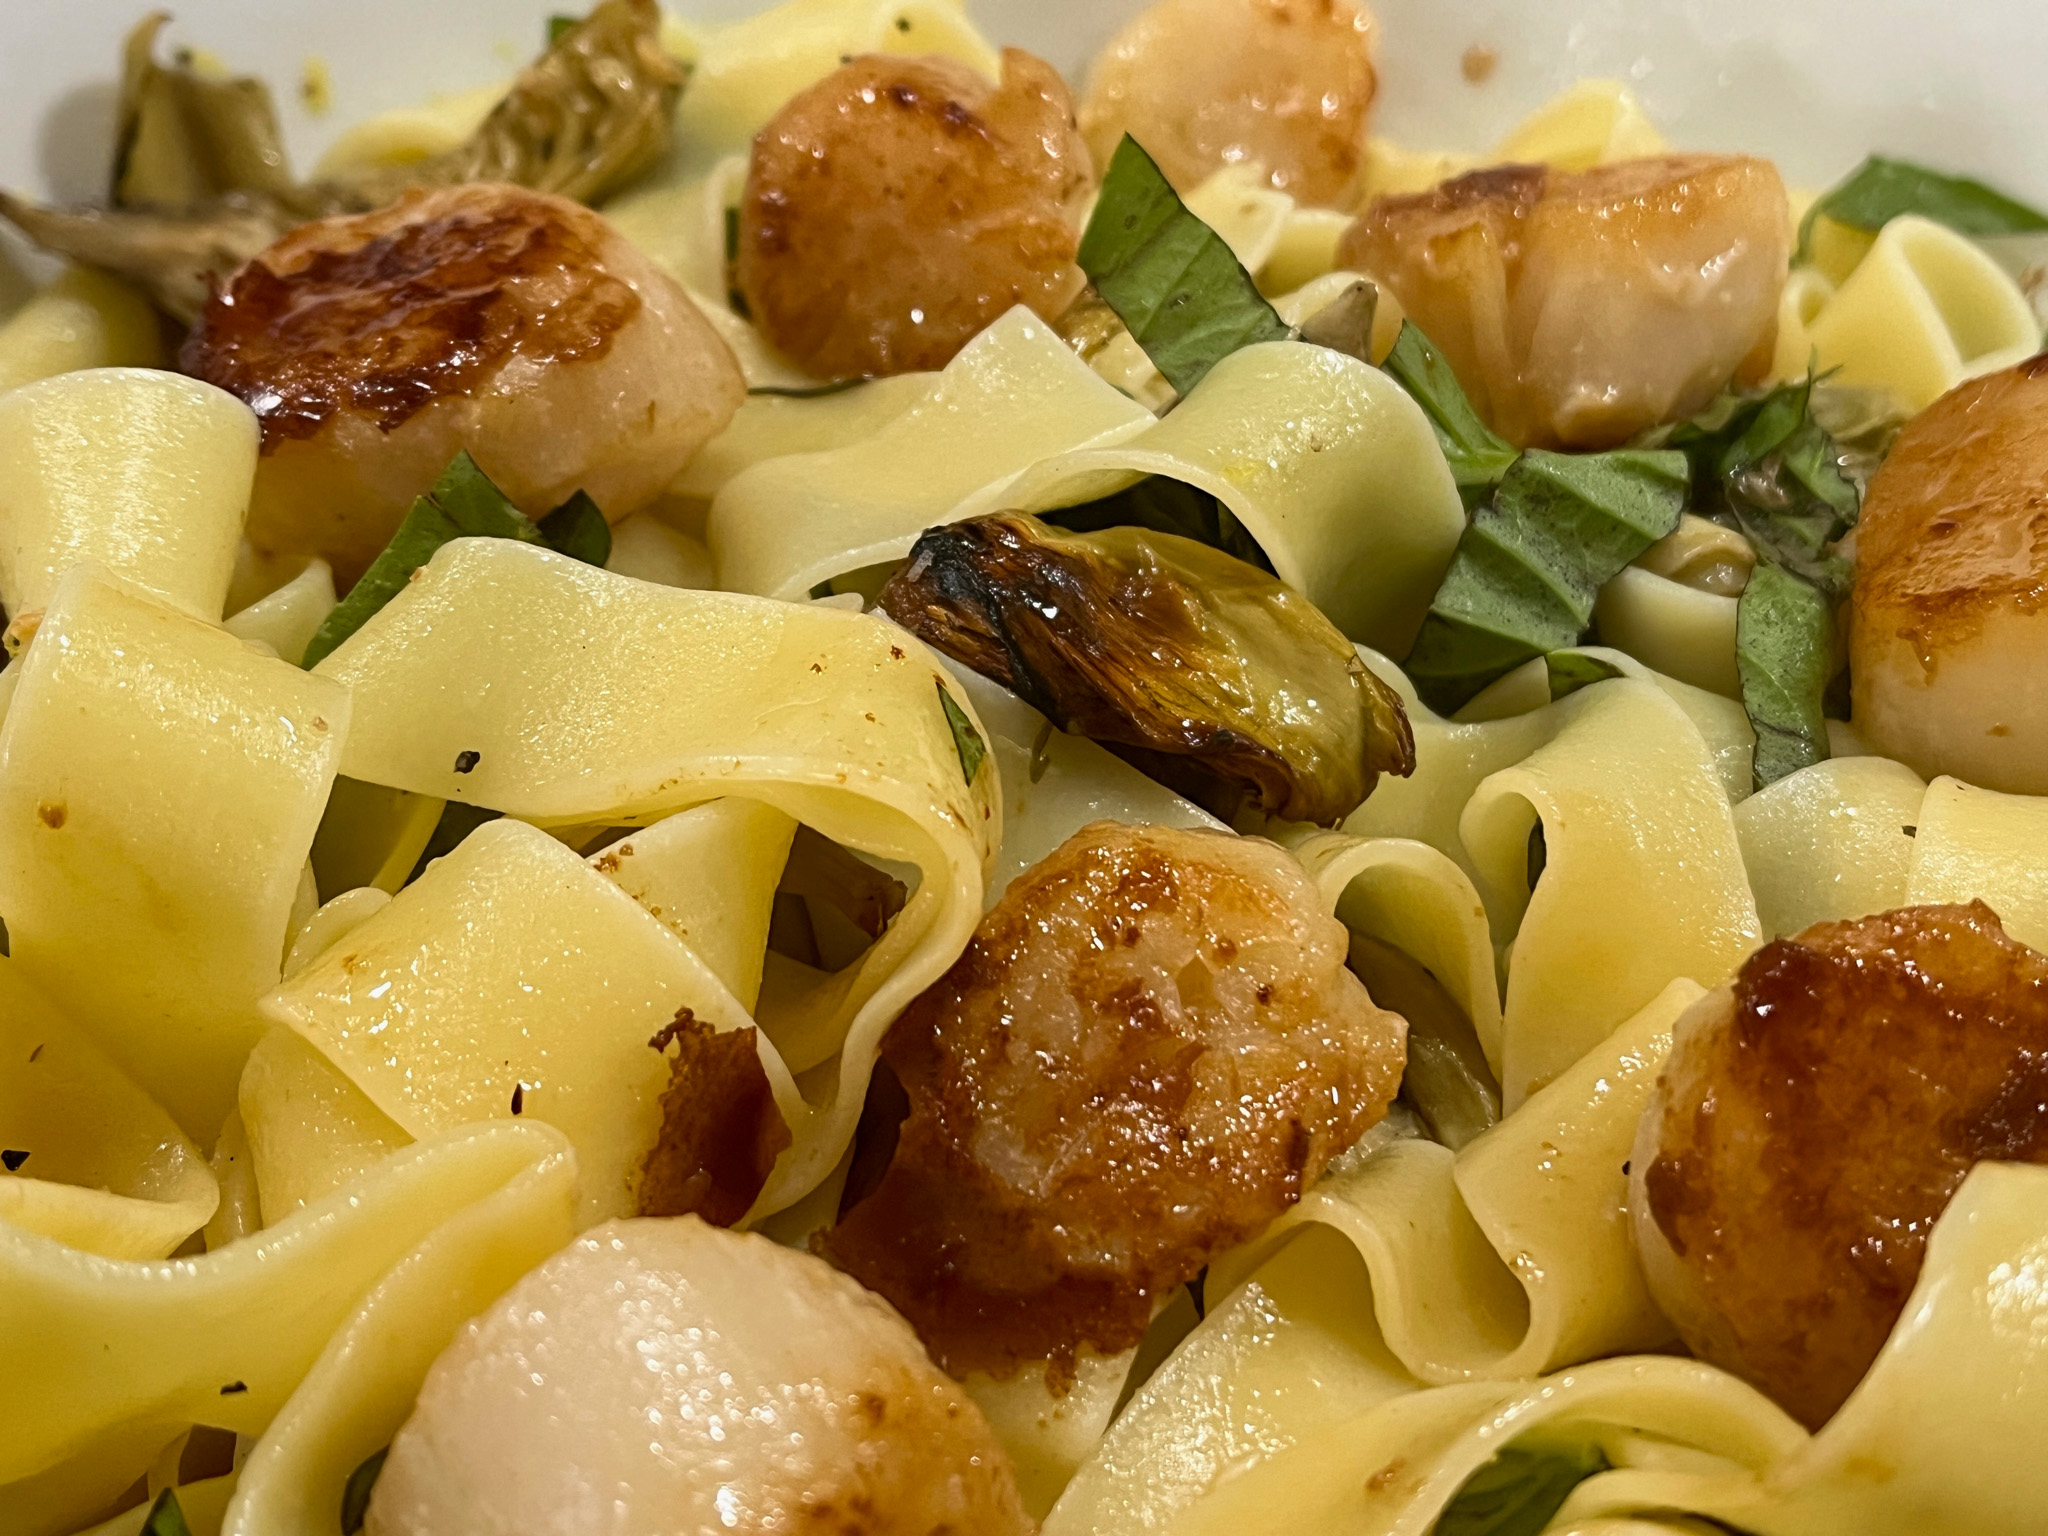
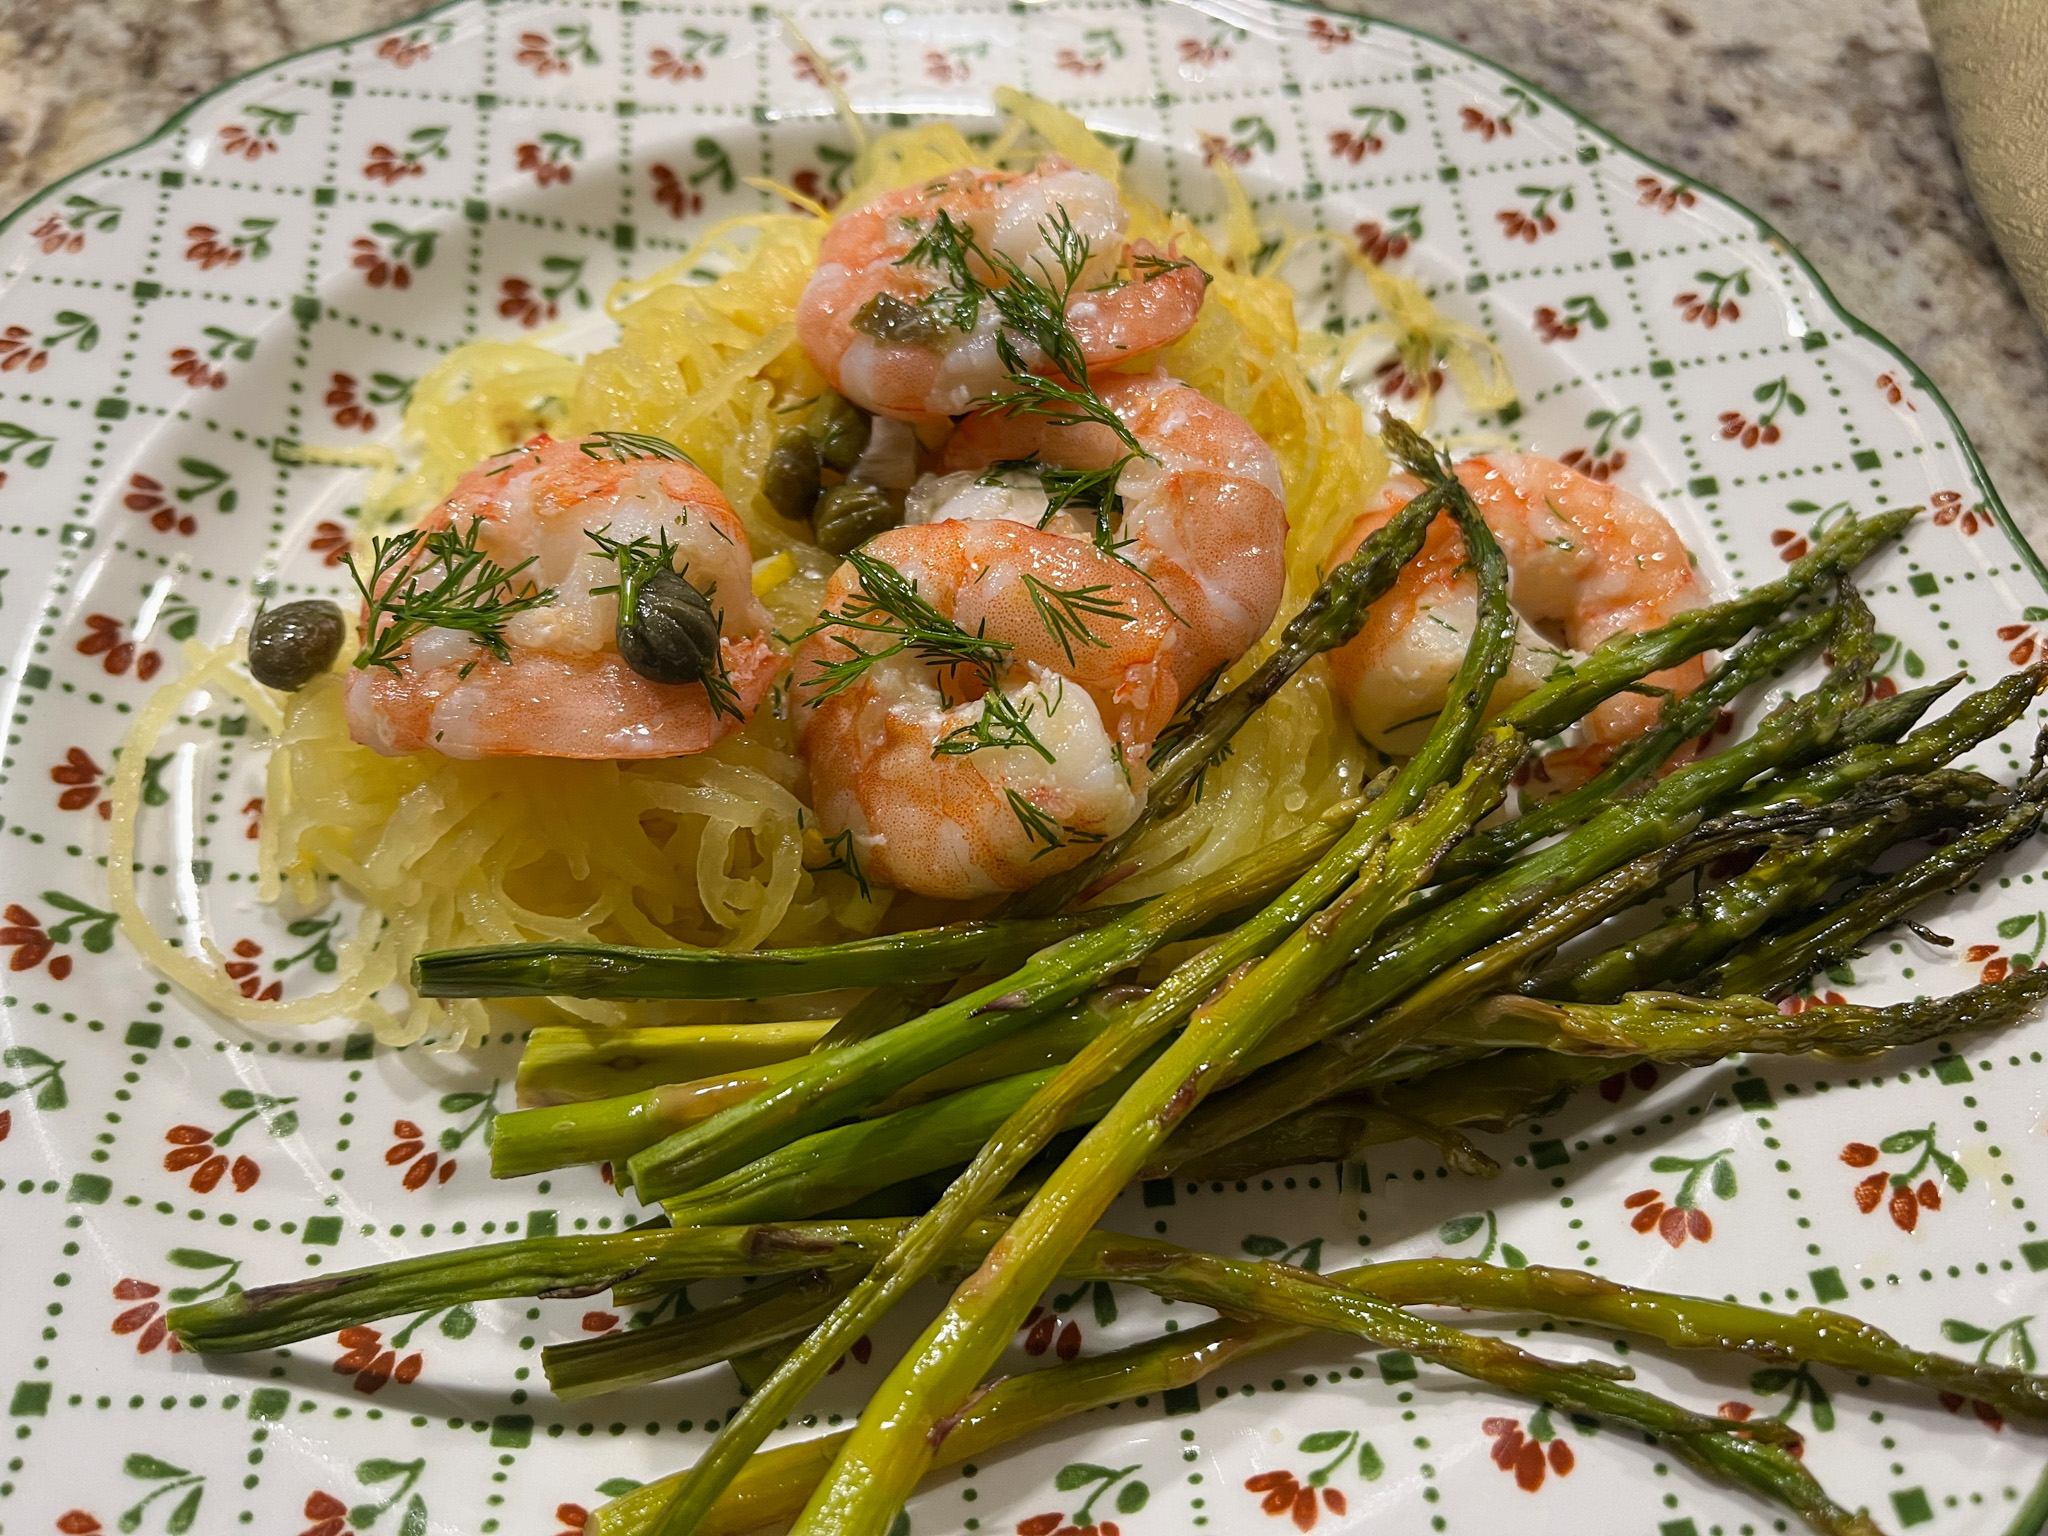
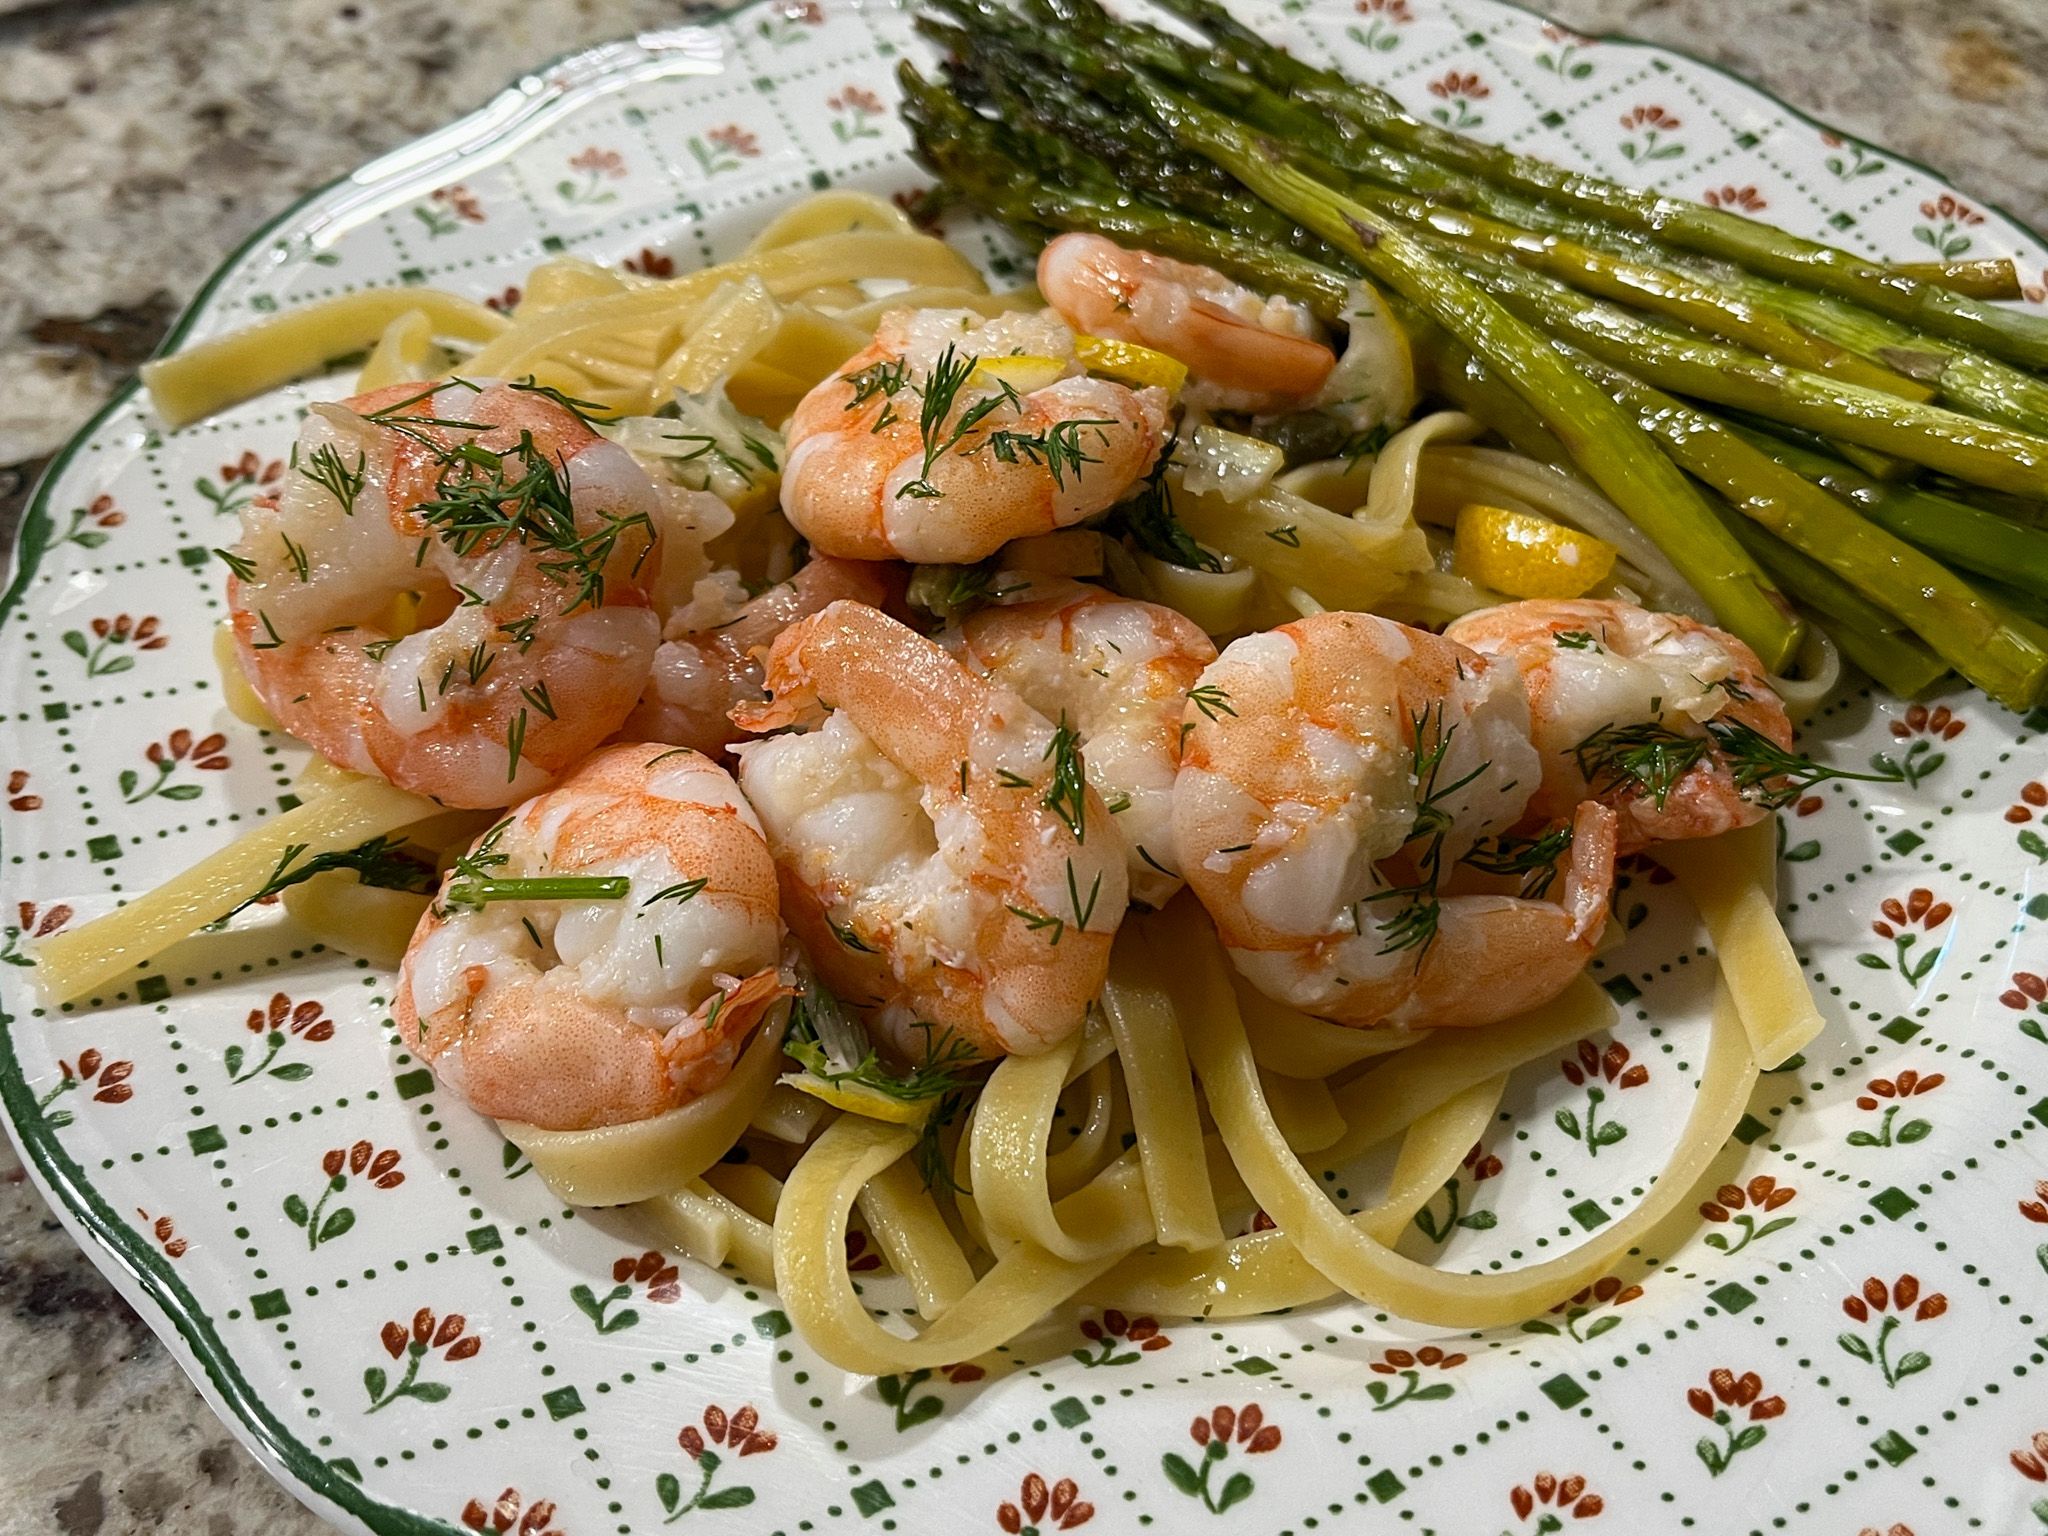
For a light version, pair the shrimp with spaghetti squash. To go for the kill, serve with a hearty helping of fettuccine… Two super easy recipes that we absolutely loved!

.

Let’s start with the main dish…


SAUTEED SHRIMP WITH LEMON-CAPER DRESSING
(adapted from The New York Times)

4 tablespoons olive oil, divided
¼ cup lemon juice
2 very thin slices of lemon, deseeded and coarsely chopped
2 tablespoons coarsely chopped dill
1 tablespoon capers or more, coarsely chopped
1 pound large shrimp, peeled and deveined
Kosher salt

to brine the shrimp (optional, but recommended)
1 qt water
1/4 cup Kosher salt
squeeze of lemon juice

Brine the shrimp by soaking in the solution for 30 to 45 minutes. Drain, rinse lightly and pat dry with a paper towel. Reserve.

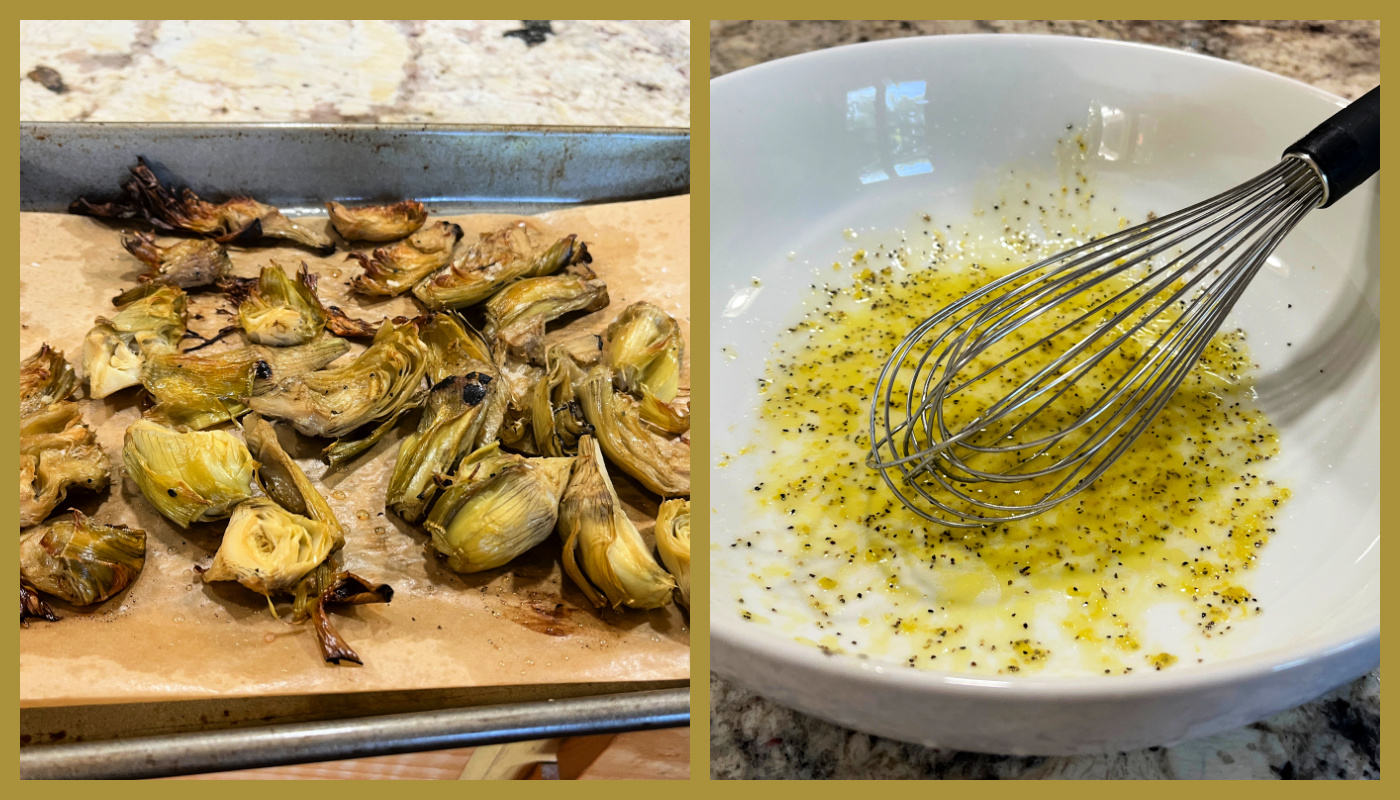
In a large bowl, whisk together 3 tablespoons olive oil with the lemon juice, chopped lemon, dill, and capers; set aside.

Heat the remaining 1 tablespoon olive oil in a medium skillet over medium. Add the shrimp and cook, stirring occasionally, until pink and lightly browned on the edges, 3 to 4 minutes.

Transfer the shrimp to the bowl with the lemon dressing and toss to coat. The shrimp can be served right away, over pasta, rice, or any side dish you desire.

ENJOY!

to print the recipe, click here

.

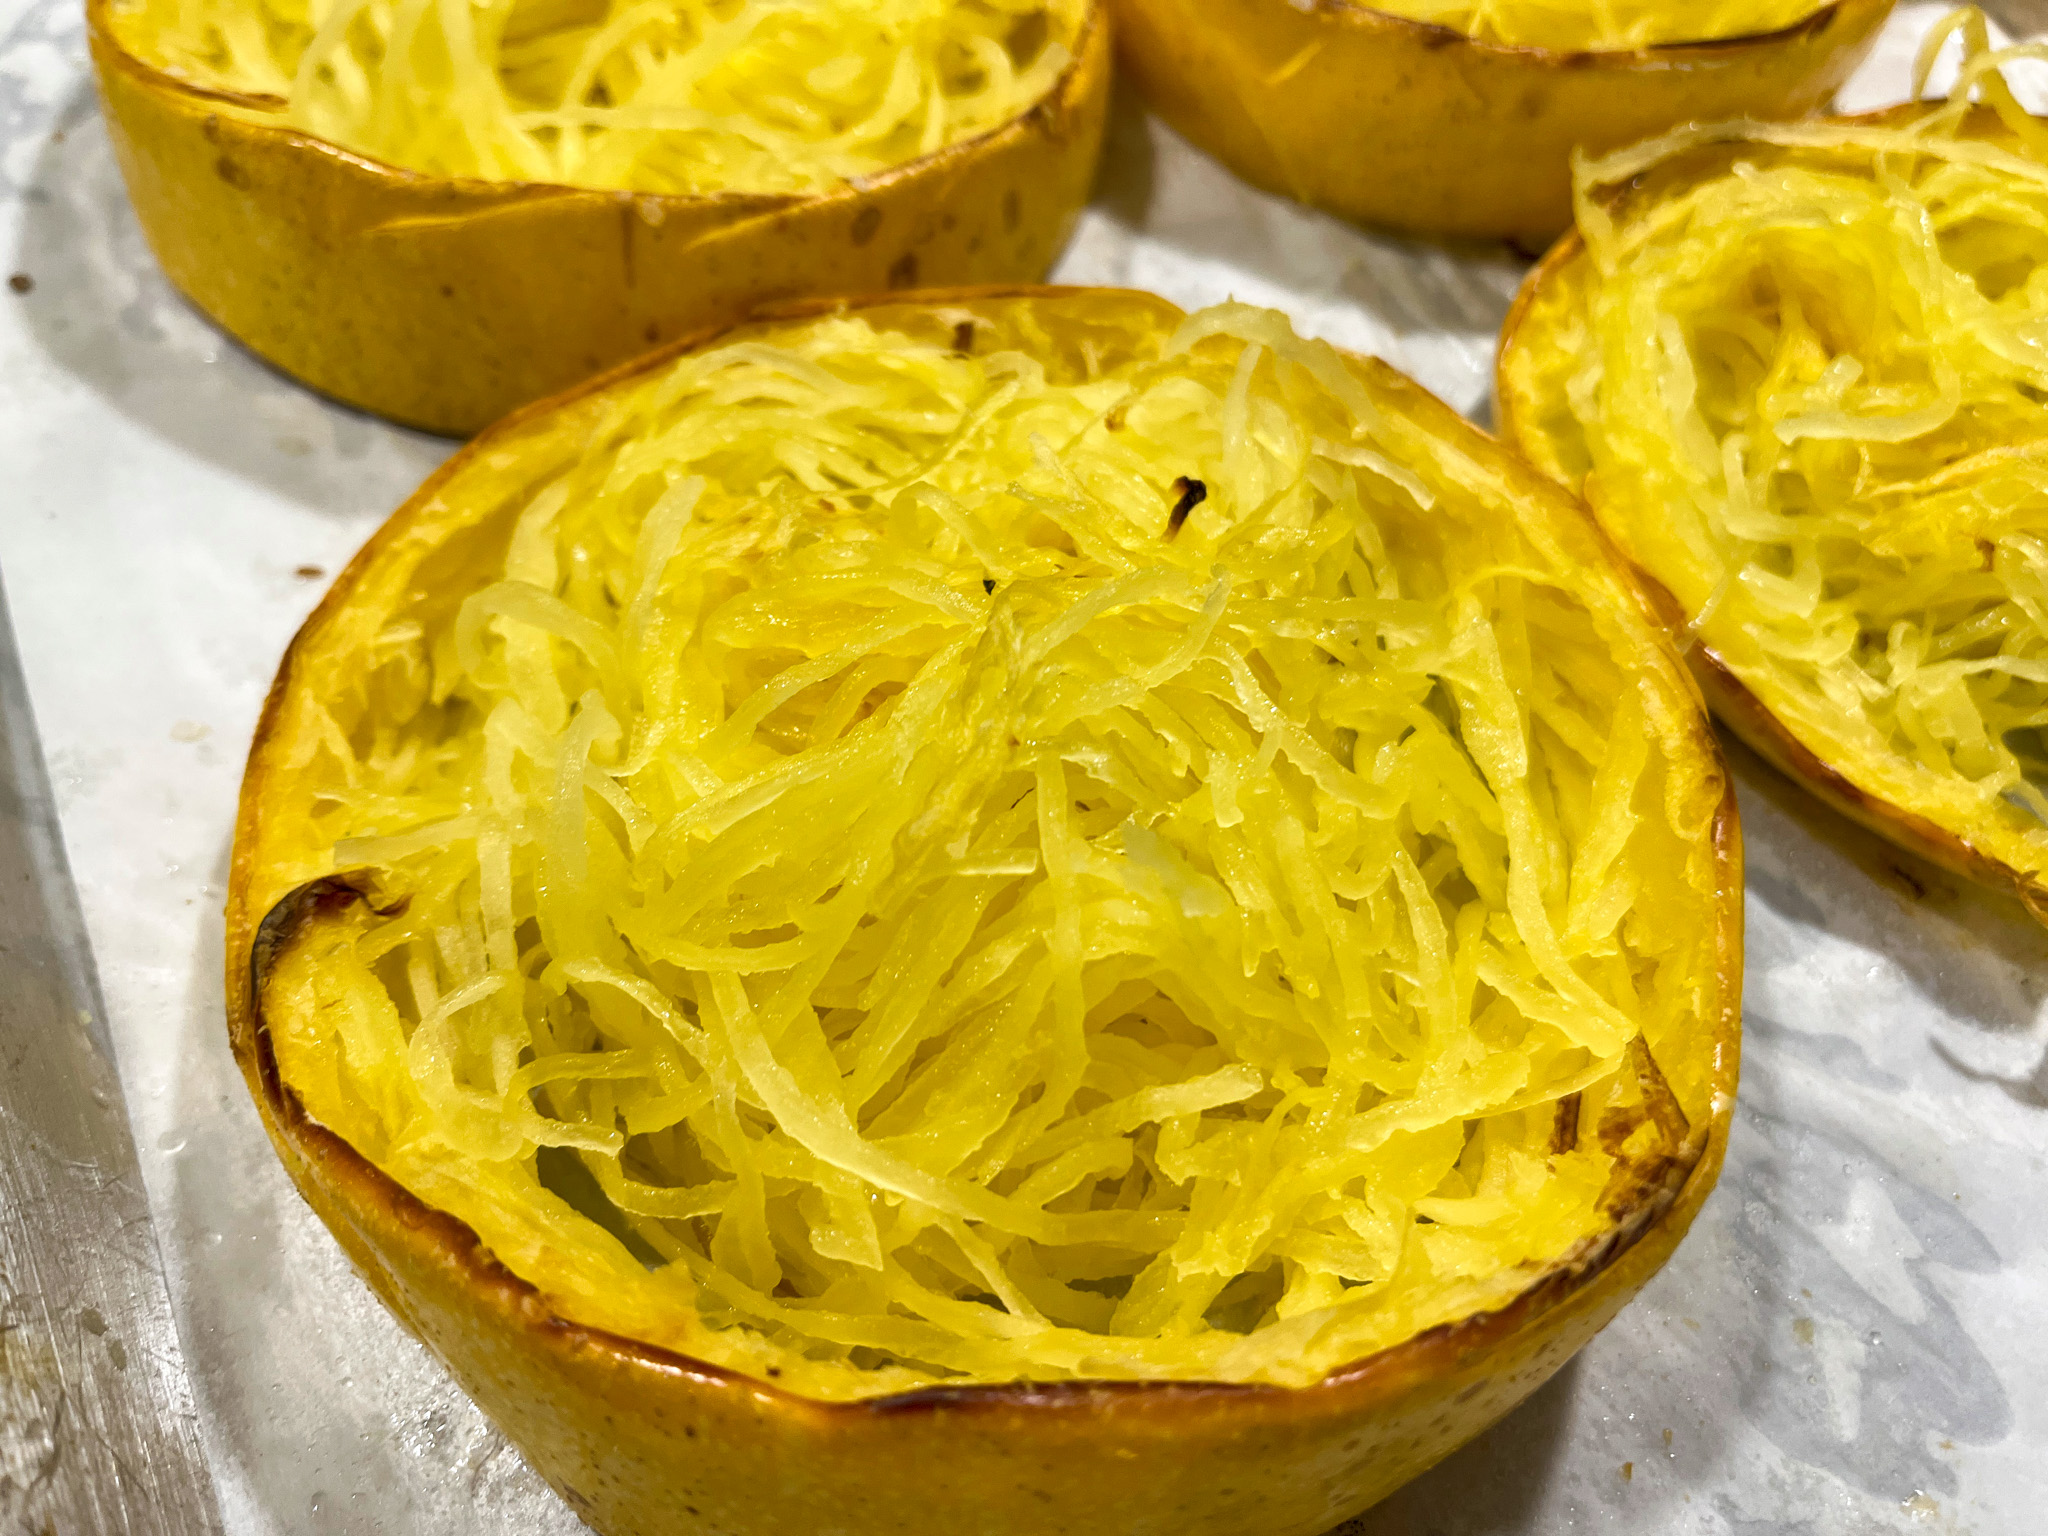
SUPER SIMPLE SPAGHETTI SQUASH

To get the original recipe, click here

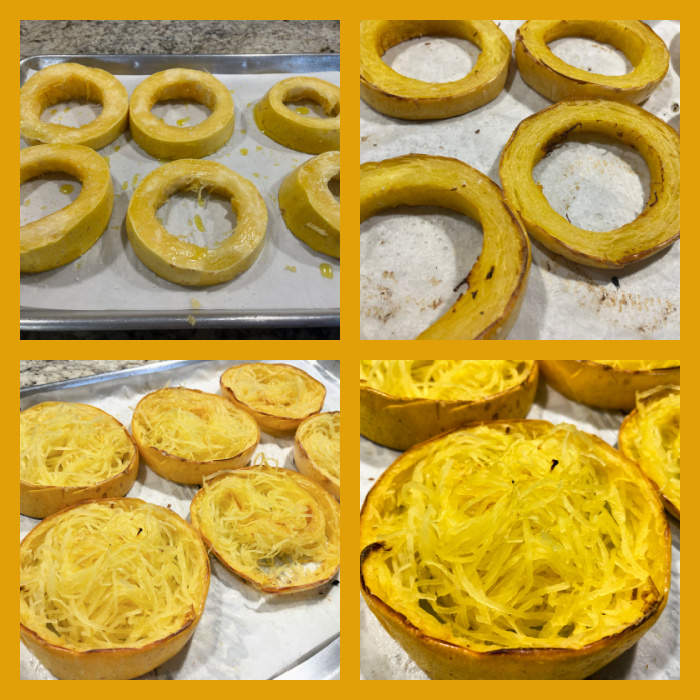
I don’t think I will ever use another method to make it. The only tricky part is slicing it, BUT if you poke a few holes with a fork around the skin and microwave it for 5 minutes, slicing is easy.

Place crosswise slices (about 1.5 inches thick) over a baking sheet lined with parchment paper. Remove the seeds with a spoon. Drizzle some olive oil, salt and pepper, rubbing the slices to coat slightly.

Bake at 400F for about 40 minutes, flipping the slices midway through roasting.

Use a fork to shred the squash while still warm in the pan.

Comments: The shrimp preparation is delicious, I’ve made it three times in the past month, so I highly recommend you give it a try. As to the squash, I love how each little portion is perfect for a single serving. You can do that and follow with recipes that use the squash in little muffin tins with a bit of tomato sauce, or an egg, there are countless options out there in the blogosphere and Pinterest universe. It ends up with perfect texture.

ONE YEAR AGO: Japanese Vegetarian Curry

TWO YEARS AGO: Butter Chicken Meatballs

THREE YEARS AGO: Lace-Decorated Sourdough

FOUR YEARS AGO:  Incredibly Simple Carrots

FIVE YEARS AGO: Sarah Bernhardt’s Cookies

SIX YEARS AGO: A Really Big Announcement

SEVEN YEARS AGO: Stir-Fried Chicken in Sesame-Orange Sauce

EIGHT YEARS AGO: Monday Blues

NINE YEARS AGO: A New Way to Roast Veggies

TEN YEARS AGO: Two Takes on Raspberries

ELEVEN YEARS AGO: Spice Cake with Blackberry Puree

TWELVE YEARS AGO: Own Your Kitchen with Cappuccino Panna Cotta

THIRTEEN YEARS AGO: Chicken Parmigiana, the Thriller

FOURTEEN YEARS AGO: Wild Mushroom Risotto

FIFTEEN YEARS AGO: Tartine Bread:  Basic Country Loaf 

SIXTEEN YEARS AGO:  Pugliese Bread

PAPPARDELLE WITH SCALLOPS AND ROASTED ARTICHOKES

Since I’ve found out you can get a jar of artichokes hearts, drain it and roast the pieces until brown at the edges, I cannot stop using them. As topping for pizza, addition to pasta, even salads. In this recipe, it joins lemons and scallops. A wonderful dinner for a Saturday night…


PAPPARDELLE WITH SCALLOPS AND ROASTED ARTICHOKES
(from The Bewitching Kitchen)

1 or 2 bottles of artichoke hearts, in brine, oil or water, drained
4 tablespoons extra-virgin olive oil
Kosher salt and black pepper
1 pound pappardelle
1 large lemon, zested and juiced
¼ cup torn basil leaves
12 large scallops seasoned to taste with salt and pepper
1 tablespoon olive oil + 1 tablespoon butter

Heat oven to 425 degrees. Line a baking sheet with parchment paper. Gently pat the artichoke hearts with a paper towel to remove excess moisture. If they were packed in oil, simply roast them as they are. If they were in brine or water, drizzle one tablespoon of olive oil all over the pieces and proceed to roasting for 20 minutes in a single layer. Flip the pieces and roast for 5 to 10 minutes longer, until edges are turning golden. Reserve. You can do this step in advance.

Meanwhile, bring a large pot of well-salted water to a boil. Add the pasta and cook until al dente, about 10 minutes or according to package directions. While the pasta cooks, in a serving dish large enough to accommodate it, add the lemon juice, lemon zest, 3 tablespoons of olive oil, 1/2 tsp salt, 1/2 tsp black pepper, whisk to combine.

Cook the scallops. Dry them very well, season with salt and pepper. Add the tablespoon of oil and butter to a skillet, once very hot, cook the scallops, 2 minutes per side, until golden brown. Reserve.

Once the pasta is cooked, remove 1/2 cup of the cooking water. Drain the pasta and add to the bowl with lemon, seasonings and olive oil. Toss well, adjust consistency with the reserved pasta water, add fresh basil and serve with the scallops and the roasted artichokes.

ENJOY!

to print the recipe, click here

Comments: Pappardelle is pretty substantial, so this is by no means a light pasta dish. But everything worked well together. I am pretty addicted to roasting artichoke hearts. If they are packed in brine, the roasted artichokes get almost like a little hint of capers and olives, which of course is just the brine speaking. I love it. But you can also use frozen artichoke hearts and add herbs of your liking.

ONE YEAR AGO: Butterfly Pea Flower Accordion Bread

TWO YEARS AGO: Slow-Cooker Pineapple Carnitas

THREE YEARS AGO: Three Little Cakes

FOUR YEARS AGO: From our Garden to You

FIVE YEARS AGO: Lady Bug Macarons

SIX YEARS AGO: Five-Stranded Braided Bread

SEVEN YEARS AGO: Green Olive Salad

EIGHT YEARS AGO: Coffee Macarons Dressed up to Party

NINE YEARS AGO: Blogging Hiatus

TEN YEARS AGO: Tomato Tatin

ELEVEN YEARS AGO: Headed to Colorado!  

TWELVE YEARS AGO: Farofa Brasileira

THIRTEEN  YEARS AGO: Thai-Inspired Pork Tenderloin

FOURTEEN YEARS AGO: A yummy Brazilian cake: Bolo de Fuba’

FIFTEEN YEARS AGO:  Summer’s Tomatoes

SIXTEEN YEARS AGO: Leaving on a jet plane… 

THE BEWITCHING KITCHEN TURNS 16!


Cake is pretty much mandatory, right? This blog anniversary caught me by surprise, as we are currently away. I got a bit confused and thought that the big day was later in the month. My plan was to bake for the occasion once we arrived back home. Good thing I double-checked… Full disclosure: this cake was produced in a bit of a hurry as we prepared to leave for a 2-week trip to the East Coast. Without further ado, I share with you today a lemon cake with raspberry filling and Swiss meringue buttercream. Maybe made in a hurry, but with a huge amount of love!


LEMON LAYER CAKE WITH RASPBERRY FILLING
(adapted from The New York Times)

¾ cup/170 grams unsalted butter, softened
3 cups/385 grams all-purpose flour 
2 cups/400 grams granulated sugar, divided
3 medium lemons
1½ cups/360 milliliters whole milk
2 teaspoons baking powder
½ teaspoon baking soda
1½ teaspoons kosher salt 
¼ cup/60 milliliters neutral oil (I used grapeseed)
4 large eggs, at room temperature

1 cup raspberry jam (store-bought or home-made)

1 recipe for Swiss meringue buttercream, starting with 400g butter (details here)

Heat oven to 325 degrees. Spray three (8-inch) cake pans with baking spray and line each with parchment paper. 

Make the cake: Add 350 grams of the granulated sugar to the bowl of a stand mixer fitted with the paddle, then zest the lemons directly into the sugar. Use your fingers to rub the zest into the sugar until it looks moist and sandy.

Juice the zested lemons into a small bowl. Transfer ¼ cup of juice to a large measuring cup and stir in the milk. Let it sit while you prepare the rest of the cake, reserving the remaining juice for the lemon syrup. 

To the bowl with the lemon sugar, add the flour, baking powder, baking soda and salt, and mix on low to combine. Add the softened butter to the bowl all at once. Mix on low until the butter is evenly distributed and the mixture looks sandy. Add the oil and eggs to the measuring cup with the milk mixture and mix with a fork to combine. With the mixer on low, slowly stream in the milk mixture. When the batter is moistened, stop the mixer and scrape the bottom and sides of the bowl to ensure there aren’t any dry pockets. Adjust mixer speed to medium and mix for 1 minute more. Divide the batter among the prepared pans, spread evenly and tap the pans on a countertop to release any large air bubbles.


Bake the cakes until slightly risen and a toothpick inserted in the center comes out clean, 20 to 25 minutes. Set the pans on a wire rack and let the cakes cool for about 15 minutes. Then, run a thin knife along the edges of the pan and carefully turn the cakes out onto the rack to cool completely. 

While the cakes cool, make the syrup: Measure ¼ cup lemon juice from the remaining reserved juice. Combine the juice and the remaining 50 grams sugar in a small saucepan and bring to a boil over medium-high, stirring occasionally. Cook until the sugar has dissolved, then pour into a heat-safe container to cool.

Make the Swiss meringue buttercream. Reserve 1/3 of the amount and dye red (I used Tulip Red). Dye a very small amount with green for the stems. I used Laurel color. Dye the rest of the buttercream with Fuchsia or any other color you like.

Assemble the cake: Place one layer of cake onto a serving plate, top side up. Brush the cake with lemon syrup. Spread raspberry jam over the top of the cake. Repeat with the second layer on top of the filling, top side down, and press gently. Add the final layer. Brush the cake with syrup, then cover the top and sides of the cake with a thin layer of fuchsia frosting. Refrigerate until firm, about 30 minutes. Frost the cake with fuchsia, smoothing the surface. Let that set for 30 minutes, then pipe stems with green buttercream and a tip 3. Using the tulip red buttercream, pipe the flowers with a petal 101 tip, a border at the bottom with an open star tip (like #20) and a border on top with 1M tip.

ENJOY!

to print the recipe, click here

Comments: Hard to believe it’s been 16 years. Hard to find what to say about it without getting cheesy or highly predictable. So I won’t say much. I’m still having fun blogging, I’m still excited every time I hit “publish” on a new post. I am not stopping quite yet. Let’s step into the 17th year of my blogging journey, and if you’ve been following me for a while, THANK YOU! If you are new here, I hope you’ll find things that inspire you to cook, bake, and be passionate about. Life is too short not to enjoy what each day brings.

Apologies for not showing pictures of the cake cut to reveal the layers and filling. It was donated whole, so I also never got to see it. And that ends up as being part of its charm… Or so I hope…

.
ONE YEAR AGO: The Bewitching Kitchen turns 15 years old!

TWO YEARS AGO: The Bewitching Kitchen turns 14!

THREE YEARS AGO: The Bewitching Kitchen turns 13!

FOUR YEARS AGO: The Bewitching Kitchen Turns 12!

FIVE YEARS AGO: The Bewitching Kitchen turns 11!

SIX YEARS AGO: The Bewitching Kitchen Turns 10, and a Giveaway…

SEVEN YEARS AGO: The Bewitching Kitchen turns 9!

EIGHT YEAR AGO: The Bewitching Kitchen turns eight!

NINE YEARS AGO: The Bewitching Kitchen Turns Seven!

TEN YEARS AGO: Bewitching Kitchen Turns Six!

ELEVEN YEARS AGO: The Bewitching Kitchen turns Five!

TWELVE YEARS AGO: The Bewitching Kitchen turns Four!

THIRTEEN YEARS AGO: The Bewitching Kitchen Turns Three! 

FOURTEEN YEARS AGO:  The Bewitching Kitchen turns Two!

FIFTEEN YEARS AGO:  Bewitching Birthday!

SIXTEEN YEARS AGO: Welcome to my blog!

LEMON LAYER CAKE WITH DULCE DE LECHE FILLING

This post is dedicated to my friend Margie
(she will understand why).

I’ve been making layer cakes every other week to donate on Fridays. A couple of weeks ago I was trying to decide which cake flavor to make and my beloved husband told me “I’ve got one for you!” He then showed me a recipe published in the New York times. It sounded really good and I decided to go for it except that I changed the filling and the frosting. Layers had store-bought dulce de leche and I used Swiss meringue buttercream as the frosting because I’ve been having so much fun making it. The cake turned out with the springtime feel I was hoping for and I heard that everybody loved it. A win-win situation for sure!


LEMON LAYER CAKE WITH DULCE DE LECHE FILLING
(adapted from The New York Times)

¾ cup/170 grams unsalted butter, softened
3 cups/385 grams all-purpose flour
2 cups/400 grams granulated sugar, divided
3 medium lemons
1½ cups/360 milliliters whole milk
2 teaspoons baking powder
½ teaspoon baking soda
1½ teaspoons kosher salt
¼ cup/60 milliliters neutral oil (I used grapeseed)
4 large eggs, at room temperature

1 can of La Lechera dulce de leche (you won’t use the full amount)

1 recipe for Swiss meringue buttercream, starting with 400g butter (details here)

Heat oven to 325 degrees. Spray three (8-inch) cake pans with baking spray and line each with parchment paper.

Make the cake: Add 350 grams of the granulated sugar to the bowl of a stand mixer fitted with the paddle, then zest the lemons directly into the sugar. Use your fingers to rub the zest into the sugar until it looks moist and sandy.

Juice the zested lemons into a small bowl. Transfer ¼ cup of juice to a large measuring cup and stir in the milk. Let it sit while you prepare the rest of the cake, reserving the remaining juice for the lemon syrup.

To the bowl with the lemon sugar, add the flour, baking powder, baking soda and salt, and mix on low to combine. Add the softened butter to the bowl all at once. Mix on low until the butter is evenly distributed and the mixture looks sandy. Add the oil and eggs to the measuring cup with the milk mixture and mix with a fork to combine. With the mixer on low, slowly stream in the milk mixture. When the batter is moistened, stop the mixer and scrape the bottom and sides of the bowl to ensure there aren’t any dry pockets. Adjust mixer speed to medium and mix for 1 minute more. Divide the batter among the prepared pans, spread evenly and tap the pans on a countertop to release any large air bubbles.


Bake the cakes until slightly risen and a toothpick inserted in the center comes out clean, 20 to 25 minutes. Set the pans on a wire rack and let the cakes cool for about 15 minutes. Then, run a thin knife along the edges of the pan and carefully turn the cakes out onto the rack to cool completely.

While the cakes cool, make the syrup: Measure ¼ cup lemon juice from the remaining reserved juice. Combine the juice and the remaining 50 grams sugar in a small saucepan and bring to a boil over medium-high, stirring occasionally. Cook until the sugar has dissolved, then pour into a heat-safe container to cool.

Make the Swiss meringue buttercream. Reserve 1/3 of the amount without any dye. That will be used as a crumb layer and for the white flowers. Dye a small amount green for the leaves. Dye the rest of the batter yellow.

Assemble the cake: Place one layer of cake onto a serving plate, top side up. Brush the cake with lemon syrup. Spread dulce de leche over the top of the cake. Repeat with the second layer on top of the filling, top side down, and press gently. Add the final layer. Brush the cake with syrup, then cover the top and sides of the cake with a thin layer of frosting. Refrigerate until firm, about 30 minutes. Frost the cake with yellow buttercream, add details on the sides wiht a comb if so desired. Pipe roses and leaves. A little pumping of gold luster powder is optional but nice…

ENJOY!

to print the recipe, click here

Comments: The layers baked like a dream, flat and beautiful. Cake smelled amazing, I really wish we could have sampled a small slice. Oh, well… I used my little electric turntable to frost it and again loved the process. Makes life very easy. Thank you, Phil! Your gifts are always perfect! The only thing I would change if I was to make this cake again, is use a lighter green for the leaves. Well, there is one more thing I would change. I would actually brush the layers with the lemon syrup instead of forgetting all about it and staring at the syrup sitting at the countertop next to the fully frosted cake.

.

If you have a special occasion to celebrate now that Spring is in full swing, think about this cake…

ONE YEAR AGO: A Duet of Springtime Macarons

TWO YEARS AGO: Fiesta Bakes for Cinco de Mayo

THREE YEARS AGO: Thai-Meatballs Over Wilted Bok-Choy

FOUR YEARS AGO: Asparagus with Gunpowder Masala

FIVE YEARS AGO: The Home Bakers Collective, April Project

SIX YEARS AGO: Asian-Style Eggplant Meatballs

SEVEN YEAR AGO: Uzbek Flatbread

EIGHT YEARS AGO: First Monday Favorite – Black Sesame FOUR

NINE YEARS AGO: Chocolate Orange Mini-Cakes

TEN YEARS AGO: In My Kitchen, May 2015

ELEVEN YEARS AGO: P90X3, a Review of Tony Horton’s Latest Fitness Program 

TWELVE YEARS AGO: Pasta and Mussels in Saffron Broth

THIRTEEN YEARS AGO: Triple Chocolate Brownies

FOURTEEN YEARS AGO: Shanghai Soup Dumplings

FIFTEEN YEARS AGO: Bite-sized Chocolate Pleasure

LEMON BUNDT CAKE, A REAL WINNER

Lemon Cakes can be a bit tricky as far as flavor goes. I have made a cake from a super reputable source that promised to deliver the most intense, most lemony flavor coupled with a moist and tender cake. It was tremendously convoluted, a ton of work and to be absolutely honest with you, the America’s Test Kitchen version delivered it all for 1/10 of the trouble. Which is saying a lot, as they are known for never cutting corners.


They are super strict about copyright issues, and rarely reply to requests asking permission to publish their recipes, however I was able to find this one online. If you’d like to make this deliciously lemony cake, pay a visit to this site. No difference from the recipe found in The Perfect Cake (2018), a cookbook I highly recommend. To bake this particular version, I used the Bavaria Bundt pan from Nordicware, but any pan with 10 to 12-cup capacity will do the job. I just love the way they un-mold like a dream!

When I make a Bundt cake, I donate it whole, so I cannot share a picture of the crumb, but I’ve had excellent feedback about this baby. In fact, I’ve made it three times already, using different Bundt pan shapes. Always a winner!

ONE YEAR AGO: Aji-Amarillo Roasted Chicken Thighs

TWO YEARS AGO: Karen’s Quick Shrimp Fried Rice

THREE YEARS AGO: OMG Peanut Butter Bars

FOUR YEARS AGO: Kansas Sunflower Seed and Black Walnut Macarons

FIVE YEARS AGO: Curry Turmeric Sourdough

SIX YEARS AGO: Black Olive Tapenade and Deviled Eggs

SEVEN YEARS AGO: Blueberry Crumble Coffee Cake

EIGHT YEARS AGO: Fresh Strawberry Yogurt Bundt Cake

NINE YEAR AGO: Quinoa Salad with Red Grapes and Avocado

TEN YEARS AGO: Strawberry Coffee Cake

ELEVEN YEARS AGO: Lemon-Poppy Seed Muffins

TWELVE YEARS AGO: Mascarpone Brownies

THIRTEEN YEARS AGO: Salmon Tacos

FOURTEEN YEARS AGOCinnamon Turban Bread

FIFTEEN YEARS AGO: Summertime Gratin