BICOLOR RAVIOLI

My cookie ravioli fiasco left me staring at the mold and wondering if that impulse buy was going to sit in a drawer neglected for eternity months. No, that could not possibly happen. To counteract the bad taste in my mouth, I jumped on another crazy adventure right away: making ravioli from scratch, but adding a little twist to the whole thing. The pasta dough would have two colors. I’ve made pasta from scratch a few times, it is a messy process but quite gratifying. I am overjoyed to report that my mental sanity was not badly affected and we had a very delicious dinner that Saturday night…


BICOLOR RAVIOLI WITH MUSHROOM-ALMOND FILLING
(from The Bewitching Kitchen, filling inspired by this post)

white dough:
125g all-purpose flour
75g semolina flour
2 eggs
pinch of salt

red dough:
125g all-purpose flour
75g semolina flour
50g cooked beets (I used canned, slivered)
2 tsp paprika
2 eggs

for the filling:
8 ounces (226g) mushrooms, finely chopped
2 tablespoons olive oil
1 cup (142g) almonds
½ cup (112g) water
1 teaspoon (6g) sea salt
1 teaspoon lemon juice

The day before you want to make ravioli, prepare the filling.

Fill a medium sized saucepan with 1 cup (142g) of almonds and enough water to cover the almonds. Turn the heat to high. Once it starts to boil, turn the heat down, boil the almonds for 15 minutes, then pour the almonds and water into a colander. Rinse them well. Sauté chopped mushrooms in 1-2 tablespoons of olive oil until all the liquid has cooked out. 

Blend the boiled almonds, salt, lemon juice and water in a blender or food processor until a paste forms. Add the mushrooms and blend a few more times so that they are in very small pieces. Transfer the filling to a colander sitting on a bowl and let it drain for several hours in the fridge, then cover and store it in the fridge until needed. You can do this a couple of days in advance. 

Make the white pasta. Add both flours and salt to the food processor, mix for a few seconds. Add the 2 eggs and process until a dough ball forms. If too dry, add water. If too loose, add flour. Remove the dough from the processor, form into a disc, wrap in plastic and let it rest at room temperature for 1 hour.

Make the red dough. Add the eggs, beets and paprika to the food processor and process until smooth. Add the flours and salt, process until a dough ball forms. You will probably need to add more flour to this dough. Reserve at room temperature like you did for the white dough.

Cut the pasta dough in three equal parts, and roll them several times in the widest setting of your roller. Try to go for a nice rectangle shape. Do the same for the colored dough. Cut stripes in both colors or just one if you prefer to use the second method. Carefully roll the bicolor dough to the desired level, I stopped at setting #3. Lay the pasta on the mold, add the filling and close the ravioli. Once they are made, sprinkle a little flour and freeze until cooking time.

Simmer them gently for about 4 minutes then add the sauce of your choice to serve. I used just a little olive oil, lemon, parsley and water from cooking the ravioli. Serve immediately.

ENJOY!

to print the recipe, click here

Comments: These are the tips I consider most important. First, make the filling one day before, so that it is super cold and you do take the time to cook most of the moisture out. That will avoid minimize risks of failure when you form and cook the ravioli. Second, be ready to either cook the ravioli right after you make it, or freeze them right away with a light coating of flour. Considering that making pasta from scratch it is a bit of a messy process, I rather make them earlier in the day, clean the kitchen, and cook them later.


There are two different ways to make the striped pattern. You can roll the pasta through the widest setting of your roller, then cut strips and join them side by side. That is shown in the photo below, to the left. The problem with that method, is that sometimes the strands will not join tightly enough and when you pass the sheet through the roller to make it thinner, they will separate. It is maddening. It worked well on the first set I made, but the second one was almost totally ruined. I had enough pasta dough to try one more time, and used the second method. In this case, one sheet of pasta is kept whole, and the other used to make stripes, that are laid on top of the first. It is shown below, on the right side of the panel.


I really favor the second method, which is also nice to make other patterns. Think polka dots, stars, squares… So many possibilities! Once you have the striped sheet ready, it will go through the thinner settings of the roller. You should end up with a beautiful concoction waiting for the filling… I was afraid to roll it too thin and have it burst with the filling, maybe next time I can take it through one more setting.


The mold worked super well to fill and form the ravioli…

The ravioli must be cooked in water that is brought to a full boil but kept simmering because fresh pasta is so delicate…

For my next adventure, my goal is to get a darker red pasta, so I will use more beets and maybe also add beet powder. Or maybe I will go for green with spinach, black with charcoal powder. Whatever color combination, I intend to make the strips thinner so that I will have more stripes per ravioli. Stay tuned! 

ONE YEAR AGO: Crispy Asparagus Salad with Toasted Bread Crumbs

TWO YEARS AGO: Low-Carb Super Fast Chicken Parmigiana

THREE YEARS AGO: Sundried Tomato Spelt Sourdough

FOUR YEARS AGO: A Duet of Chocolate Bonbons

FIVE YEARS AGO: Chocolate Tartlets with Honey-Caramel Filling

SIX YEAR AGO: Zucchini Soup with Tahini

SEVEN YEARS AGO: Black Sesame Macarons

EIGHT YEARS AGO: Fine Tuning Thomas Keller

NINE YEARS AGO: Cauliflower Tortillas

TEN YEARS AGO: Majestic Sedona, Take Two

ELEVEN YEARS AGO: Secret Ingredient Turkey Meatballs

TWELVE YEARS AGO: Swedish Meatballs and Egg Noodles

THIRTEEN YEARS AGO: Italian Easter Pie

FOURTEEN YEARS AGO: Black Olive Bialy


KAREN’S SAUTEED SHRIMP WITH CAPERS AND OLIVES

If you need a great dinner that will be ready in less than 30 minutes, look no further… I have actually made this recipe several times after Karen published it in her blog, and I bet it will become a favorite with your family too. Something about capers and black olives together makes my mouth water.


SAUTEED SHRIMP WITH CAPERS AND OLIVES
(slightly modified from Karen Kitchen Stories)

1/4 cup olive oil
1/2 cup chopped, pitted black olives
2 tablespoons capers
1 + 1/2 pounds peeled and deveined extra large or jumbo shrimp
1 (14 oz) can chopped tomatoes (I used fire roasted)
Salt and pepper to taste

In a large skillet, heat the olive oil over medium low heat. Add the olives and capers, and cook for another minute or two.Add the shrimp and tomatoes to the pan, and sauté until the shrimp turns pink, about 5 minutes. Season with salt and pepper to taste and serve immediately.

ENJOY!

to print the recipe, click here

Comments: I really think the best way to serve this seafood preparation is over pasta, in this case just a simple spaghetti with fresh lemon and olive oil. Normally I brine the shrimp before sautéing but this time I skipped that step and just made sure not to cook it for too long. It is ready super fast, and all flavors go wonderfully together. Give it a try and then go thank Karen for it!

ONE YEAR AGO: Kashmiri Chicken Thighs

TWO YEARS AGO:  A Vegan Trilogy

THREE YEARS AGO: The Mystifying Hurricane Roll

FOUR YEARS AGO: Pop-Tarts with Strawberry Balsamic Jam

FIVE YEARS AGO: Ptichye Moloko, a Russian Dessert

SIX YEARS AGO: Cheesy Low-Carb Zucchini Tarts

SEVEN YEARS AGO: Blogging Hiatus

EIGHT YEARS AGO: Apricots, Three Ways

NINE YEARS AGO: Up Close and Personal with Kale

TEN YEARS AGOBlack Berry Cherry Sorbet

ELEVEN YEARS AGO: Asparagus Pesto

TWELVE YEARS AGO: Chocolate and Chestnut Terrine

THIRTEEN YEARS AGO: Under the spell of lemongrass

FOURTEEN YEARS AGO: Greens + Grapefruit + Shrimp = Great Salad!

INCREDIBLY SIMPLE TIMES FOUR: MAY 2018

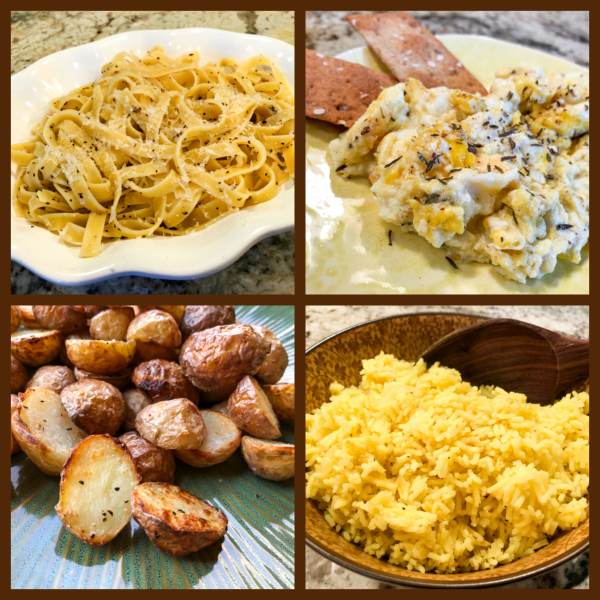
Time to showcase recipes that are so simple they hardly qualify as such.

INCREDIBLY SIMPLE #1

CACIO E PEPE

Hard to believe I had never made this dish until now. It is such a classic, but for one reason or another I only had it in restaurants and not even that often. Guess what? After inaugurating it, I enjoyed it three more times over the following month. It is so simple and so delicious!  You must make it. I tried it with zoodles a couple of times, works wonders too. I was inspired by Geoffrey Zakarian in a recent Kitchen episode.

CACIO E PEPE

pasta of your choice
Kosher salt
2 tsp freshly ground (coarse) pepper (or to taste)
grated Pecorino-Romano cheese to taste
drizzle of extra-virgin olive oil

Two genius touches: first, you will cook the pasta in a pan just large enough to hold it, with about 1 inch water from the bottom. Add a little salt to the water. Cook without closing the pan until al dente.

Second: toast the pepper in a small skillet until fragrant, just a minute or so.

The pasta will be cooked with just a little water left, a water full of starch from the pasta.  Turn off the heat, add the pepper and cheese. Stir well, adjust seasoning with salt.

Serve and enjoy!

to print the recipe, click here 

INCREDIBLY SIMPLE #2

SCRAMBLED EGGS WITH RICOTTA, TURMERIC & ZA’TAR

Another non-recipe for you. This simple concoction was my lunch more often than I care to admit. I tend to have these “phases” in which I might enjoy the exact same recipe over and over and over, not getting tired of it. Amazing what a little ricotta does to add creaminess to a simple scrambled egg. Add a couple of crackers, and I am a happy camper. For those who eat breakfast, this is a must-try. In a way, it’s my breakfast too, I just happen to “break-my-fast” a lot later than most people…

Heat some oil or butter in a non-stick pan. Don’t let it heat too much, add 2 eggs, slightly beaten, immediately drop in the center about 1/4 cup ricotta cheese, season with salt, pepper, and 1/4 tsp of turmeric. Cook, stirring gently over low-heat to your liking. Sprinkle za’tar when it’s almost ready to serve. Enjoy with bread or crackers.

INCREDIBLY SIMPLE #3

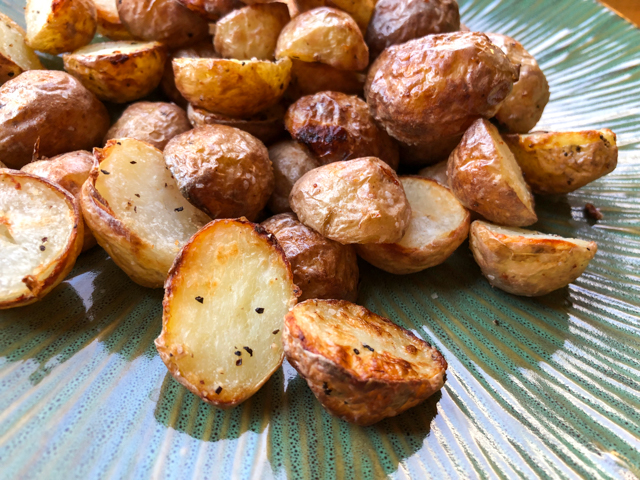
AIR-FRIED NEW POTATOES

Cut new potatoes in half. Add to a pan with a little cold, salted water. Bring to a boil, cook for about 8 minutes. Drain. Drizzle a little olive oil, salt, and Herbes de Provence. Place in the air-fryer, cook at 390 F (or as high as your machine will go) until crispy, 15 to 20 minutes maximum. Shake occasionally. The pan, not necessarily yourself, but depending on what’s playing I say go for it.

INCREDIBLY SIMPLE #4

RICE WITH TURMERIC AND CARDAMON

We eat rice often, usually plain. But every once in a while it’s nice to guild the lily a bit. I love the color of turmeric and the flavor of cardamon. Together they make a simple bowl of rice shine. Literally.  Inspiration came from the newest book by Nigella Lawson, At My Table.

RICE WITH TURMERIC AND CARDAMON

1.5 cups of rice, rinsed and drained
2.5 cups water
1/2 tsp salt
1/8 to 1/4 tsp turmeric
3 cardamon pods, crushed

Add all ingredients to a pan. Bring water to a boil, reduce heat close tightly the lid.

Simmer for 20 minutes without opening the pan. Turn off the heat, open the lid, add a tea towel on the surface of the rice, close the lid again.

Let it rest for 10 to 30 minutes if you have the time, but it’s still nice if served right away.

ENJOY!

to print the recipe, click here

I hope you enjoyed these simple recipes. It’s nice to have a bunch of quick choices that you can make without even thinking too much. The scrambled egg, for instance, I don’t even measure anything. I sprinkle some turmeric, I add ricotta until I feel it’s going to be creamy enough, sometimes I add za’tar, sometimes Herbes de Provence, it’s never exactly the same twice in a row, but whatever you do it will be delicious.

New Potatoes: if you don’t have an air-fryer, you can still do the same on top of the stove or even roasting them in a super hot oven. The texture I get with the air-fryer is pretty unique, though, and allows that fried aura without too much fat. Love it.

ONE YEAR AGO: Tangential Quiche with Asparagus and Fennel

TWO YEARS AGO: Fakebouleh

THREE YEARS AGO: Yellow Squash Soup

FOUR YEARS AGO: Grilled Chicken with Tamarind and Coconut Glaze

FIVE YEARS AGO: Chicken-Apricot Skewers

SIX YEARS AGO:  Asparagus Quiche

SEVEN YEARS AGO: Two-stage Pea and Prosciutto Risotto

EIGHT YEARS AGO: Mellow Bakers: Corn Bread


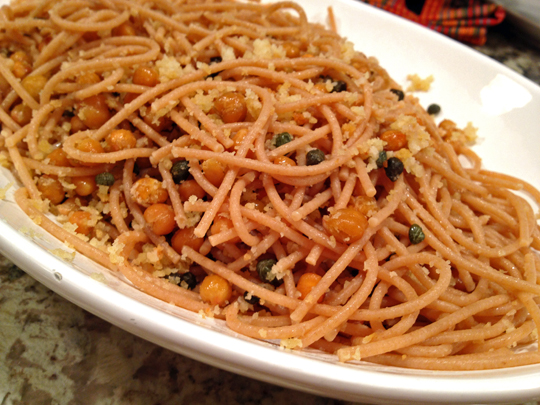
CRISPY CHICKPEA AND CAPER SPAGHETTI

Absolutely delicious and a cinch to put together, I dare say that even chickpea haters might appreciate these little creatures when presented this way.  This was my first time roasting capers, but it won’t be the last. Great boost of flavor for an ingredient that already has quite a strong personality.

Pasta with Roasted Chickpeas and Capers
CRISPY CHICKPEA AND CAPER SPAGHETTI
(slightly adapted from Real Simple)

3/4 pound spaghetti
1 can chickpeas (15 ounce)  rinsed and patted dry
1/2 cup panko bread crumbs
1/4 cup capers, drained
1/4 cup olive oil  (I probably used a little less)
1/2 teaspoon ground coriander
salt and black pepper
1/4 cup minced cilantro leaves
2 tablespoons lemon juice

Heat oven to 400° F.  Combine the chickpeas, panko, capers, oil, coriander, and ½ teaspoon each salt and pepper on a rimmed baking sheet. Roast, tossing once, until crispy, 18 to 22 minutes.

While the chickpeas are roasting, cook the pasta in plenty of salted boiling water. Once the pasta is cooked, drain it and return it to the pan.

Add the chickpeas, cilantro, and lemon juice to the pasta and toss to combine.

ENJOY!

to print the recipe, click here

roasted

Comments:  What a great, simple recipe this was! I’ve roasted chickpeas before, but they always turned a little mushy. The addition of panko-style bread crumbs brought a very pleasant crunch to the mixture.  Roasted capers were another very pleasant surprise. I love their sharp, pungent taste in any type of recipe. Roasting changes that sharpness quite a bit, I would say it takes some of it away, but at the same time intensifies the pure caper flavor.  Am I making sense?  😉  Make this pasta and see what you think.

served111Dinner is served! 
Grilled lemony chicken breasts and snow peas completed our meal…

ONE YEAR AGO: Leaving on a jet plane

TWO YEARS AGO: Crispy Herb-Crusted Halibut

THREE YEARS AGO: Almond Butter Cake

FOUR YEARS AGO: Bonjour!

SECRET RECIPE CLUB: LINGUINE WITH CAULIFLOWER PESTO

Linguini Cauliflower Pesto

A sensible person evaluates a situation and chooses a path of action that is compatible with it.  For example: a sensible food blogger whose kitchen is undergoing renovation would take a break from The Secret Recipe Club to be back once she actually has a place to cook.  I did consider that option for a while, say… 5 seconds.  😉 So, throwing caution to the wind, here I am to join once more the virtual party in which bloggers are paired in secret to cook recipes from their matched blog.
.
Last month was my 2nd anniversary with SRC, so this post opens my third year with the group. And what could be better for an “old-timer” than to be paired with a new member?  I was assigned Vintage Kitchen Notes, hosted by the beautiful  Paula, who just joined SRC. She cooks and blogs from Argentina, right next door to my home country. Paula blogs in English, but she also keeps another blog in Spanish – talk about blogging stamina!  I actually tried to include recipes in Portuguese for a while, but quickly realized it was too much of a struggle for me.  So, I am in awe that Paula can do it all!  Her photography is beautiful, I had a wonderful time browsing her site. Let me share a few of her concoctions that were particularly tempting to me: 8-Hour Cheesecake with Roasted GrapesLimoncello-Glazed Citrus Poppy Seed Cake, Chocolate-Hazelnut Mini-Bundt Cakes (gorgeous!), Pastel Azteca (gotta make that sometime), Roasted Radicchio and Provolone Risotto (go drool over the photo, will you?), and just to tempt my bread baking addiction, she has more than 40 different bread recipes listed on her index.  I will just mention one: Soft Pretzels with Spicy Beer Cheese Sauce.   I’ve always wanted to make soft pretzels at home, but that will have to wait for calmer days.
.
Since our kitchen looks like a war zone.  I ended up choosing a very intriguing recipe that required only the food processor and one pan to cook the pasta.  Seemed doable under the circumstances.  So, I am delighted to share with you my first experience with a cauliflower pesto!

closeup

LINGUINE WITH CAULIFLOWER PESTO 
(from Paula, at Vintage Kitchen Notes, originally adapted from The Smitten Kitchen Cookbook)
.
1 pound (450g) fresh cauliflower
1 medium shallot, quartered
pinch of red pepper flakes
½ cup toasted almonds
2 oz. (60g) Asiago cheese
4 sun-dried tomatoes, dried-packed
1 Tbs drained capers
2 Tbs chopped fresh parsley
salt and pepper to taste
1/3 cup olive oil (I used 1/4 cup)
1 teaspoon sherry vinegar (I added 2 tsp)
1 pound linguine
.
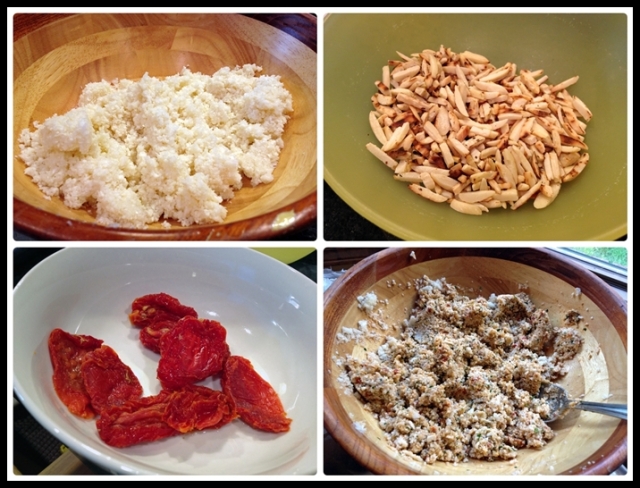
Cover the sun-dried tomatoes with boiling water in a small bowl and let them stand for 5 to 10 minutes to soften. Drain well and chop them coarsely. Rinse the cauliflower, cut off the leaves and hard stalks.  Cut the rest into chunks, and add to a food processor, processing them until they are more or less the texture of couscous. Transfer to a large bowl and reserve while you prepare the other ingredients.
.
Add to the food processor the pieces of shallot,  pepper flakes, almonds, cheese,  sun-dried tomatoes, capers and parsley. Process until they´re as fine as the cauliflower. Season with salt and pepper. Add oil and vinegar and pulse until a paste forms. If you feel it´s too dry for your taste, add another tablespoon of olive oil.
.
Transfer to the bowl with the cauliflower, check the mixture  for salt and pepper and add more if necessary.
Cook the linguini until al dente in plenty of salted boiling water.  Reserve some of the cooking liquid, and drain the pasta, transferring to a serving bowl.   Add some of the pesto and mix gently.  If necessary, add some of the reserved cooking liquid. Add the remaining pesto, sprinkle with grated cheese, a few parsley leaves and serve immediately.
.
ENJOY!
.
to print the recipe, click here
.

composite11

Comments:  You might remember that Phil is not too wild about cauliflower, so I  was hoping to prepare the pesto while he was doing something outside, maybe playing golf or trimming tree branches.  My plan almost worked but not quite. I had cleaned all the “remains” of the cauliflower from the crime scene,  but he caught a glimpse of the processed cauliflower, and…

What is this? some exotic type of rice?

This? No, not rice.
(quickly moving the bowl away from view)

Hummmmm… couscous?

 No, not really…

What IS it?

I cannot quite tell you.  It’s a surprise. It’s going to be a pesto..  A surprise pesto..    

Pesto? Great, I love pesto!

😉 😉 😉 😉

served

Verdict: Two very enthusiastic thumbs up for this pasta! I can understand why Paula made this dish twice in  the same week. One could imagine the raw cauliflower to be too sharp and omnipresent in the pesto, but it’s not.  It is just a perfectly balanced dish, with the capers, the vinegar, the sun-dried tomatoes, the parsley,  a real winner.  I divulged the “secret ingredient” of the Secret Recipe Club concoction to Phil, and he was amazed.  The heat of the pasta slightly changes the texture of the cauliflower, taming its raw taste.  I highly recommend you try this recipe.  If you use the reduced amount of oil I did, make sure to save some of the pasta cooking liquid to adjust the consistency at the end.  If it still seems too thick, swirl a little olive oil right at the table.

Paula, it was great to get your blog this month, I hope you had fun stalking and cooking from your assigned site!

For a delicious collection of tasty dishes prepared by my friends from Group D of SRC, click on the blue frog at the end of the post…

ONE YEAR AGO: Carriage House Apple-Walnut Pie

TWO YEARS AGO: Chicken Marsala

THREE YEARS AGO:  Home, sweet home

FOUR YEARS AGO: Levain Bread with Caramelized Onions