A MODERN TAKE ON TARTE TATIN

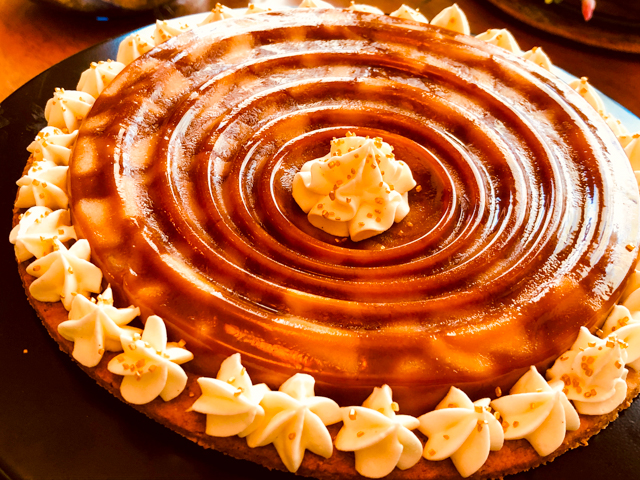
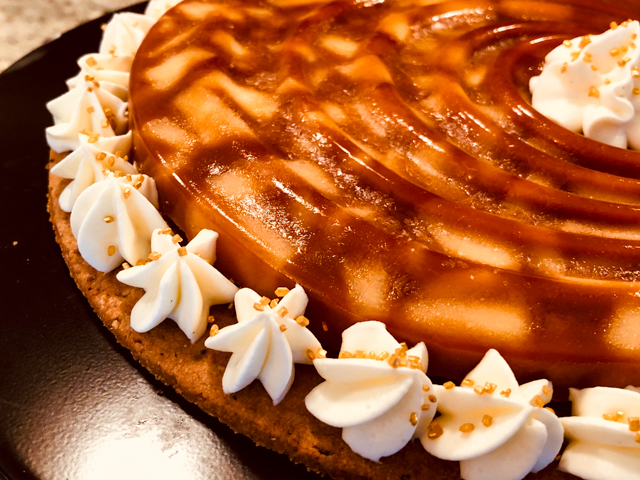
It started with Shepherd’s Pie. It continued with Avgolemono Soup and Moqueca. Clearly, I’ve been taking liberties with classics and not acting ashamed. Tighten your seatbelt and be prepared for another wild ride. I share with you a modernized version of Tarte Tatin. It has no flaky crust. It is not cooked on the stove top. It does not have a thick, gooey layer of caramelized apples on top. But the overall concept is similar enough. Or so I say. A cookie base replaces the flaky crust, and a layer of apples slowly cooked in caramel sits proudly on top of it. Don’t skimp on the whipped cream. It adds a creamy and refreshing counterpoint that goes perfectly with the other components.

A  MODERN TARTE TATIN
(slightly modified from J’en reste Baba)

mold used: Silikomart Vague, but you can also use a 20cm ring or cake pan

for the caramel-apple:
5 Golden Delicious apples
65g of honey
40g of sweet butter
125g granulated sugar
60g of whipping cream
5g of gelatin in sheets (I used Platinum strength)

for the cookie base:
220g all-purpose flour
30g cornstarch
1 pinch of salt
40g ground hazelnuts (or hazelnut flour)
90g powdered sugar
130g softened butter
1 egg

for the stabilized whipped cream:
1 cup whipping cream (232 g)
14 g powdered sugar
1 tsp gelatin (powder)
1/2 tsp vanilla (I used clear extract)
golden sprinkles to decorate (optional)

Prepare the apple topping: Peel the apples, core them, and cut them in small pieces (as shown in the composite photo below).

Put the butter and honey in a pan and melt them together. Add the apple pieces to the pan and coat with honey and butter mixture. Cook the apple slices over low heat until soft and slightly translucent, then set aside. If they released any juices, drain the liquid.

Soften the gelatin sheets in cold water while you make the caramel. Heat the cream gently in a saucepan or in a Pyrex container using the microwave. Heat another small saucepan and pour the powdered sugar into it, one-third at a time, turning the pan after each addition so that the sugar mixes well and turns into caramel, slowly. Watch the sugar like a hawk, do not allow it to burn, keep moving the pan off the heat if necessary. Do not use a spoon, or you might set up a catastrophic crystallization reaction and will have to start all over.

Remove the pan from the heat and gradually add the hot cream (beware of splashing), stirring with a spatula as you gently pour it on the caramel. Mix everything well, allow it to cool to about 80C and add the drained gelatin.  Once the gelatin is well dissolved, pour the whole thing on the apples reserved. Gently combine caramel and apples, and add to your silicone mold, or to a ring (make sure you use some type of acetate or plastic wrap to facilitate un-molding later.

Pack the layer of apples well, because you want that component to lay fully flat on the cookie base. Freeze the apple-caramel overnight.

Make the cookie base: Sift together the flour, cornstarch, powdered sugar, and salt into the bowl of a KitchenAid type mixer with the flat beater. Add the hazelnut powder, turn the mixer on and combine all ingredients lightly.  Mix the egg gently with a fork inside a cup and add to the bowl. Give it a few turns in low-speed. Add the softened butter in pieces and mix gently until the dough starts to form a ball. At this point stop the mixer and turn the dough into a countertop, finish mixing by hand. You do not want to develop gluten.

You should refrigerate the dough for at least 30 minutes before rolling it out 4 or 5mm thick.  Cut a circle 3 cm bigger than the diameter of your mold. Silikomart Vague is exactly 20cm in diameter, I cut my dough a bit larger than 23cm. Refrigerate the disc for 30 minutes or place it in the freezer for 15 minutes before baking.

As the dough cools, turn the oven at 370 F. Once the pastry is cool, bake it for about 20 minutes, until the edges start to get golden, and the center is fully set. Remove from oven and place on a rack to cool completely. Cookie base can be made a few days ahead.

Make the whipped cream.  In a small saucepan, combine the powdered sugar and gelatin. Gradually stir in ¼ cup  of the cream. Bring the mixture just to a boil, stirring constantly. It will thicken slightly. Scrape the mixture into a small bowl and allow it to cool just to room temperature. Stir in the vanilla. In a chilled mixing bowl, whip the remaining cream just until traces of the beater marks begin to show. Add the cooled gelatin mixture in a steady stream, beating constantly. Whip  just until stiff peaks form when the beater is raised.

Assembly: remove the frozen topping from the freezer and carefully un-mold it. Place the cookie base on the serving platter, set the frozen apple insert centered on top. Spoon the whipped cream in a piping bag fitted with a 1M tip or any other star tip of your choice. Decorate the sides and the center of the tart with the cream. You will have whipped cream leftover.  If you like, decorate with golden sprinkles.

Keep 1 to 2 hours in the fridge to defrost before serving.

ENJOY!

to print the recipe, click here

Comments: I wish I could take credit for this interpretation of The Tatin, but all credit must to go to the food blog that originally featured it over a year ago: J’en reste Baba. I followed her recipe to a T, except for the whipped cream, which I opted to stabilize with gelatin. As I’ve mentioned before, my desserts are all made the day before they are enjoyed, as I take them to the department on Mondays. That “Mondays with Sweetness” thing. I am normally out of the house by 7:15am, so the idea of fiddling with whipping cream and piping bags earlier than that would be a bit too crazy. Stabilizing the whipped cream works well, and this method my favorite by far. The taste is unchanged and the texture perfect.

The tart can be served straight from the fridge once it de-frosts, but keeping it at room temperature for a while makes the texture of the topping even better, so consider that option if you make it.

This preparation could be used in different types of presentation, don’t let the lack of a Silikomart mold stop you. You can do a simple round insert, or even make individual portions, cutting circles of cookies and using a dome or flat circle for the apple. Just make sure to cut the cookie base with enough space around to allow for the whipped cream piping.

I had a bit of trouble using the 5 apples. At first it seemed to me there was too much fruit for not enough caramel. I might have left 3/4 of the last apple out of the mixture. After having made it, I’d say it would probably have been ok to add them all, but I was afraid that too much fruit would interfere with un-molding the topping. Kind of a tough call. Weighing the fruit could be a better way to go. But if you start with 5 medium apples and use your best judgment, I anticipate no problems.

The dry caramel is the trickiest component. I had never made dry caramel before and things can degenerate quite quickly once it gets going. It does give it a stronger taste and if you go overboard, it could end up bitter. If I make this dessert again (so hard to repeat things when I have that mile long list of things to try), I might try a “regular” caramel made from sugar-water as a starting point.

I really loved the combination of the cookie, the apples and the whipped cream, and the tart was gone by 10am, which I suppose is a good endorsement of this modernized Tatin…

ONE YEAR AGO: Minnie-Macarons, a Fun Project with a Happy Ending

TWO YEARS AGO: Nigella Lawson in the Bewitching Kitchen

THREE YEARS AGO: Walnut-Raisin Bran Muffins

FOUR YEARS AGO: Gingersnaps with White Chocolate Chips

FIVE YEARS AGO: Turkey Chili with Almond Butter

SIX YEARS AGO: Secret Recipe Club: Leek and Cheese Tart

SEVEN YEARS AGO: Secret Recipe Club; Triple Chocolate Brownies

EIGHT YEARS AGO: Shaved Asparagus Salad

NINE YEARS AGO: Indonesian Ginger Chicken


A VALENTINE’S DAY OPERA

Not everyone is fond of opera. I go as far as saying that it is an acquired taste. But if you switch from music to cake, the polls are reversed: most people will go weak in the knees anticipating a slice. Opera Cake is often described as a dessert in six acts. Layers of thin cake, moist with a delicate coffee syrup, separated by luscious coffee buttercream and chocolate ganache. A real French classic. A real beauty. A perfect way to say I love you on February 14th. Or any other day of the year. Because this is a cake that creates its own moment. And thanks to Colette Christian and  Craftsy lessons online, Sally, the cake-o-phobe produced a version that made her very happy…


OPERA CAKE – RECIPE OVERVIEW

(based on Colette Christian’s Miniature French Desserts at Craftsy.com)


It all starts with the mis-en-place for a Joconde sponge cake. With a name like that, you know it’s going to be special. Joconde is a cake leavened exclusively by beaten eggs, with a nice proportion of ground almonds (or almond meal) in the batter. Colette gives very nice tips to make it homogeneous in thickness, because the Opera Cake is all about precision. Any small mistake in a step, and the outcome might suffer.

You can use any formula you like for the cake, I will give you one example from BBC food, very similar to the one I used from Colette.

JOCONDE SPONGE CAKE

3 whole eggs
15g sugar
100g almond flour
100g icing sugar
3 egg whites
20g granulated sugar
30g cake flour
30g unsalted butter, melted and cooled

Almonds and icing sugar are sifted into a large bowl, eggs added and whisked to combine.

A meringue is made with the egg whites, raining the granulated sugar slowly, until soft peaks form. Increase the speed to medium-high, and mix until the whites are at a firm peak. Add 1/3 of the meringue to the almond mixture. Add half the cake flour and half the melted butter.  Add another 1/3 of meringue, the rest of the flour and butter. Finally fold in the remaining third of the meringue.

Spread the batter as homogeneously as possible on a half-sheet pan. Try not to deflate it and bake it right away for about 15 minutes at 375 F. The cake should not get any color, but it should spring back lightly when touched at the center.


After baking, the cake is cut in three rectangles. Try to be precise, but don’t worry too much, as the cake will be trimmed at the very end. One layer is painted with melted chocolate and allowed to set. That layer of chocolate will be the very base of the final cake, preventing any soaking syrup from forming a puddle in the bottom.

You will also need to make a coffee buttercream, more specifically a French buttercream, in which a mixture of sugar and water is cooked to 236 to 240 F (soft-ball stage).  You can use this recipe, which is again very similar to the one I got from Craftsy. Just include 1 tablespoon of coffee extract together with 1 teaspoon of vanilla extract. You need coffee extract to make sure the flavor will come through without diluting the buttercream too much and affecting texture.

Apart from the buttercream, you’ll need chocolate ganache for one of the cake layers.  A regular kind, equal weights of chocolate and heavy cream, allowed to cool to room temperature and placed in a piping bag.  The buttercream also goes in a piping bag, the easiest and less messy way to assemble the cake. No need to use a piping tip, just cut the bag to form a 1/2 inch opening.

To assemble, first start with the cake painted with melted chocolate at the base. A nice soaking of coffee syrup (water, strong coffee extract and sugar, cooked until the sugar fully dissolves). A layer of buttercream. A second layer of cake. More soaking. Ganache lavishly spread on top. Final layer of syrup-soaked cake, final top layer of buttercream. Now, the assembled cake rests in the fridge for a couple of hours, waiting for the final step. Don’t worry about the way the sides look now. It will all be fine in the end…

The pouring ganache, perhaps better described as a chocolate glaze. A good formula would be 227g chocolate (at least 60% cocoa), 170g heavy cream, and 28g light corn syrup. The glaze cannot be too hot, and cannot be too cold. A little colder than body temperature will be perfect. Colette shows a nice technique to pour the glaze, so that it sits as a very smooth layer on top. Once all that is done, the cake is refrigerated for several hours so that all layers are nicely set. Do not dare cutting it before it sets, you will not have defined layers unless you exercise patience. That gave me a bit of a chuckle. Me, advising patience, the virtue I lack the most…

Then what? Then the final fun begins… I decided to cut the cake in 2 inch squares, and for that I used a very cool gadget. I tell you, just getting that tool ready made me feel like some heavy hitter baker… I know, I’m easily amused. But, seriously, just look at how cool that is:

I also used this tool to cut the laminated dough for croissants and pain au chocolat, but failed to get a picture at the time.  All you need to do is measure the precise dimension of what you want to cut (or score the surface, as in the case of the Opera Cake), and lock the rolling blades in place.  Gently roll them over the surface of the fully set cake, and you will have perfect squares, ready to be sliced with a serrated knife. The edges are trimmed off to reveal clean layers on all sides of the cut pieces. The secret is to place the knife in very hot tap water, and clean the blade after every cut you make. If you’d like to order one, here is a link to amazon.com (I do not make any profit from your purchase, by the way).

A little buttercream goes in a small piping bag couple with a star tip. And you are ready to decorate the top. Or, you can do the more authentic decoration, writing Opera on each slice. Since I opted to cut the cake small, I went with the buttercream instead. What do you think?

This cake was so much fun to make!  I started early on a Sunday morning, and tried to work as relaxed as possible. It is cake, after all, and they make me a little nervous. But, less now than in the past.

For those who celebrate…

HAPPY VALENTINE’S DAY!


I know I’ll be repeating myself, but I must give high praise to the online baking classes from Craftsy, particularly those taught by Colette Christian.  Without her guidance, making the Opera Cake would have been a tragedy in six acts… 


ONE YEAR AGO: Incredibly Simple Times Four

TWO YEARS AGO: Raspberry Chocolate Truffles

THREE YEARS AGO: Red Velvet Cupcakes

FOUR YEARS AGO: Valentine’s Day: The Finale

FIVE YEARS AGO: Almond Butter Chocolate Chip Cookies

SIX YEARS AGO: Dan Dan Noodles

SEVEN YEARS AGO: Sophie Grigson’s Parmesan Cake

EIGHT YEARS AGO: Antibiotics and Food

SaveSave

SaveSave

SaveSave

SaveSave

SaveSave

SaveSave

SaveSave

SaveSave

SaveSave

SaveSave

SaveSave

SaveSave

SaveSave

SaveSave

SaveSave

SaveSave

SaveSave

SaveSave

TIRAMISU

Some things do not make much sense. Take Tiramisú, for instance. It is definitely one of our favorite desserts, up there with Crème Brûllée and Oeufs a la Neige. However, after almost 8 years of food blogging, I do not have a single recipe for it in the Bewitching Kitchen. How could that be? I’ve made it in the past, but during this stretch of 8 years we’ve only enjoyed it in restaurants. To be completely honest, one example totally ruined us for other versions. A small Italian restaurant in Paris, called La Trappola, very near our apartment in the 7eme had simply the best, the very best, the most awesome, delicious, luscious, fantastic, superbly addictive Tiramisú in the known universe. Before we left Paris, I tried to convince the owner to share his secrets, but no matter how much batting of eyelashes and smiling I did, he was unmoved. Acted like a real gentleman, but kept saying he wanted us to come back to his restaurant whenever we were in town. Yeah, as if Paris was a cab ride from Manhattan, Kansas. The humanity! Oh, well. I don’t have his recipe, but David Lebovitz shared his online, and I can tell you it made Phil and a couple of friends we had over for dinner very very happy. Oh, and me too!

TIRAMISU
(slightly modified from David Lebovitz)

makes 4 servings
1/2 cup (125 ml) espresso, at room temperature
2 tablespoons dark rum
2  large eggs, separated, at room temperature
pinch of salt
7 tablespoons (90g) sugar, divided
1 cup (250g) mascarpone
twelve 3½-inch ladyfingers (70g)
optional: 1 ounce (30g) bittersweet chocolate
unsweetened cocoa powder, for serving
 .
Mix together the espresso and rum. The mixture should taste strongly of alcohol. If not, add more until it does.
In the bowl of an electric mixer beat the egg whites with a pinch of salt until they begin to get stiff. Beat in half of the sugar until stiff. Scrape the egg whites into a small bowl and reserve.
.
Beat the egg yolks with the remaining sugar until stiff and light-colored, about three minutes. Beat in the mascarpone (still cold from the fridge) until lump-free. 
Fold in half of the reserved beaten egg whites, then the remaining half, just until fully incorporated.
.
Submerge each ladyfinger in the espresso mixture for 3 seconds on each side, until soaked but not overly so. Layer them on the bottom of individual serving bowls. Top with mascarpone cream, grate semisweet chocolate on top. Add another layer of lady fingers, top with more cream. Cover and refrigerate for a few hours, preferably overnight.
.
Right before serving, shower with cocoa powder and shave some bittersweet chocolate on top.
.
ENJOY!

to print the recipe, click here

Comments: At first I intended to make a recipe from America’s Test Kitchen, but when I realized the huge amount it made, I quickly moved away from it, but kept some of their special tips in mind. One of them: contrary to what most recipes advise, do not bring the mascarpone cheese to room temperature before beating it. It has a tendency to separate. It will result in a perfectly creamy texture if you whip it while fridge-cold. Yeah, mind blown. So that’s what I did.  Worked like a charm. Also, I prefer not to over-soak the lady fingers, because I rather have a little bit of texture remaining in the cookie component. If you go by Lebovitz, he states “cut them in half to make sure they are saturated enough, they should be dropping wet.”  Decide how you like it best, and do it that way.

I wanted a recipe that would give us just enough for a dinner party with a couple of friends, and David’s version delivered exactly what I was looking for. I got the little glass dishes at Pier 1 Imports. They had only 6 left in stock, and by the time I left, their inventory dropped to two. It gave me a thrill to find exactly what I needed, one day before showtime. It’s not always the case, trust me on that.

Was it as good as La Trappola’s?  I am afraid nothing will match that version. Maybe being in Paris was part of it. Still, this was one spectacular dessert. At first I thought the portion was a bit too big. But next thing I knew, I was licking the spoon and staring at a clean little bowl. Such is life.  Woke up next morning and went for a nice jog. Order of the universe restored!

As I was composing this post, Phil found two photos from our past…
One at the entrance of La Trappola, and another of the Tiramisu of our dreams!  

(unfortunately La Trappola is not in business anymore)


Add to FacebookAdd to DiggAdd to Del.icio.usAdd to StumbleuponAdd to RedditAdd to BlinklistAdd to TwitterAdd to TechnoratiAdd to Yahoo BuzzAdd to Newsvine

ONE YEAR AGO: Pulled Pork, Slow-Cooker version

TWO YEARS AGO: The Pie of the Century

THREE YEARS AGO: Bon Bon Chicken

FOUR YEARS AGO: Leaving on a Jet Plane

FIVE YEARS AGO: A Pearfect Drink

SIX YEARS AGO: Ming Tsai Under Pressure

SEVEN YEARS AGO: Paris, je t’aime!

Save

PISTACHIO CREME BRULLEE

ÉA couple of months ago I invited you for a tour of our kitchen, and talked about a very special ingredient: pistachio paste. Pause for swoon. At the time I promised to share my first experiment with it, one that involved macarons, but I’m not quite ready to reveal that. Instead, I must tell you about my second adventure because I am feeling on top of the world about it. Pistachio Crème Brûllée.  It resulted in a heartfelt O.M.G., with a Happy Dance to boot!

pistachio-creme-brulle


PISTACHIO CRÈME BRûLLÉE
(from The Bewitching Kitchen)

2 cups heavy cream (about 460 g)
2 tsp pistachio paste
pinch of salt
5 egg yolks
1/3 cup sugar (65 g)
1 tsp vanilla extract
turbinado sugar for the surface

Heat the cream in a saucepan until bubbles start to form at the edge. Add the pistachio paste, whisk to fully dissolve it. Heat in low heat for a couple of minutes, then remove from the heat and cover the pan. Allow it to steep for 20 minutes.

Transfer the infused cream to a bowl, add the salt, egg yolks, and vanilla. Whisk to combine all ingredients. Add the sugar and mix until fully dissolved.  Pass the mixture through a fine sieve into a large measuring glass, preferably with a spout.

Divide the mixture into four ramekins, 6-ounce size.

Pour 1 cup of water inside a crock pot. Place the ramekins inside, and turn it on low.  Cook for 2  to 3 hours, checking the temperature after 2 hours with an instant thermometer. It should read 185 F for perfect texture. If you don’t have a thermometer, stop cooking when the custard is still a bit jiggly in the very center.

Remove the ramekins to a drying rack. When fully cooled, transfer to the refrigerator, covered with aluminum foil. Before serving, sprinkle turbinado sugar over the surface and burn it with a torch.

ENJOY!

to print the recipe, click here

comp

Comments: Cooking the custard in the crock pot is simply brilliant. Granted, it takes longer than in a regular oven, but the texture turns out perfect. The instant thermometer is a must to get it exactly right, though. Your cooking time may vary a little. Mine hit 185 F after 2 hours and 20 minutes. Overcooked crème brûllée would be a shame, but the crock pot considerably reduces that risk.

detail

When serving this delicacy, you’ll have two options: burning the top right before serving, or doing it earlier and placing the custards back in the fridge. The former allows you to show your skills with the culinary torch in front of your guests, for that wow moment… The latter lacks the awe factor, but results in a homogeneously firmer texture. When you burn the top, the custard right beneath it will be a bit soft.  Honestly, it doesn’t bother me. So I always go for the awe factor.  I realize that pistachio paste is not a common ingredient, and pretty pricey, but a little bit goes a long way, and it freezes well, in small, teaspoon size portions. Of course, you could infuse your heavy cream with other ingredients, make a maple, coconut, chocolate version. Whatever you do, try the crock pot if you have a chance. I can only fit four ramekins in mine, but I rather not have too many brûllées around anyway.  Four is a perfect number…

pistachio-creme-brullee-from-bewitching-kitchen

Add to FacebookAdd to DiggAdd to Del.icio.usAdd to StumbleuponAdd to RedditAdd to BlinklistAdd to TwitterAdd to TechnoratiAdd to Yahoo BuzzAdd to Newsvine

ONE YEAR AGO: Fast and Furious Bison Chili

TWO YEARS AGO: In My Kitchen, December 2014

THREE YEARS AGO: Braised Fennel with Saffron and Tomato

FOUR YEARS AGO: Revenge of the Two Derelicts

FIVE YEARS AGO: Grilling Ribbons

SIX YEARS AGO: Peppery Cashew Crunch

SEVEN YEARS AGO: Baked Shrimp and Feta Pasta

Save

CHOCOLATE AND CHESTNUT TERRINE

This delicacy deserves THE spotlight on the Hall of Fame of Desserts, perfect for closing with a golden key a very special dinner.  It is classy, looks absolutely gorgeous, and according to Claudio, our dear friend who prepared it, it’s not too complicated to make.  Granted, Claudio is a fantastic cook, so I wasn’t quite sure what to expect until he showed me the recipe.  In this case, I must agree with him: if you have access to canned pureed chestnuts, this will be one of the simplest desserts you’ll ever make, but even if you don’t,  making the puree is worth the effort, so you can taste this masterpiece and swoon with each bite.

TERRINE OF CHOCOLATE AND CHESTNUT PUREE
(from Le Cordon Bleu – Receitas Caseiras)

185 g  (6.5 oz) semisweet chocolate, chopped
90 g  (3.2 oz) butter, at room temperature
90 g (3.2 oz) granulated sugar
400 g (14 oz) canned chestnuts puree
¼ tsp instant coffee, diluted in 1 tsp warm water
¼ tsp vanilla
30 ml  (1/8 cup) rum
shaved semisweet chocolate
fresh fruits of your choice (strawberries, blueberries, aguaymantos)

Lightly grease a loaf type pan with oil, cover the bottom with parchment paper, and oil the paper.

Melt the chopped chocolate in a bowl over simmering water (without letting the water touch the bottom of the bowl), stirring often.  Once it is completely melted and smooth, allow it to cool for 5 minutes.

Beat the butter with the sugar in a KitchenAid type mixer until creamy.  Incorporate the chestnut puree, and the melted chocolate.  When the mixture is very smooth, add the vanilla, coffee, and rum.  Pour into the prepared loaf pan, smooth the surface with the back of a spoon or a small icing spatula, cover with plastic wrap and place in the fridge for at least 12 hours.

To unmold, carefully run a spatula around the edges, invert the terrine on a serving platter, and decorate with fresh fruits of your choice, shaving chocolate all over.

Cut in slices, and serve.  Count the seconds until the first compliment!   😉

ENJOY!

to print the recipe, click here

Comments:  This recipe is from a Brazilian edition of a Le Cordon Bleu publication from many years ago. I could not find a link to the specific book, but if you click here, you’ll be directed to the huge LCB  collection available at amazon.com.

Both Phil and I were blown away by this dessert!  It is creamy, rich, and even though I was firm on my intention of having a very small slice after the great dinner they had served us, I was powerless, unable to resist a second (bigger) slice.  It melts in your mouth, with the fresh fruits balancing the intense chocolate flavor.  The aguaymantos (fisalias in Portuguese) were a terrific touch, with their slightly tart taste and exotic look, they added extra pizazz to the dessert.
That’s what their garden looks like at winter time…  a tropical paradise indeed!

ONE YEAR AGO: Bewitching Farro Salad

TWO YEARS AGO: From sea to table: sushi

Add to FacebookAdd to DiggAdd to Del.icio.usAdd to StumbleuponAdd to RedditAdd to BlinklistAdd to TwitterAdd to TechnoratiAdd to Yahoo BuzzAdd to Newsvine