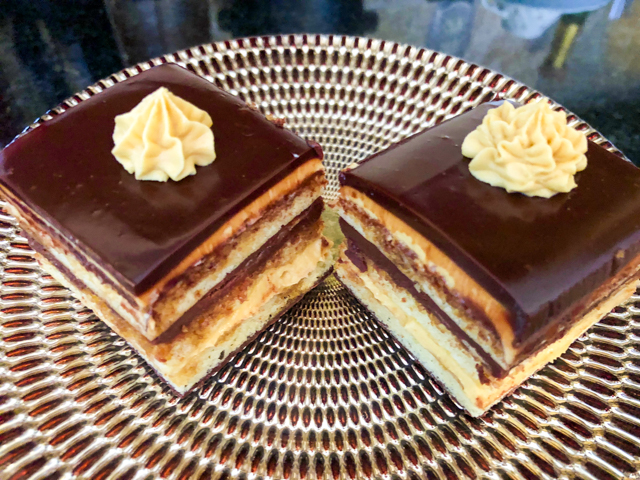
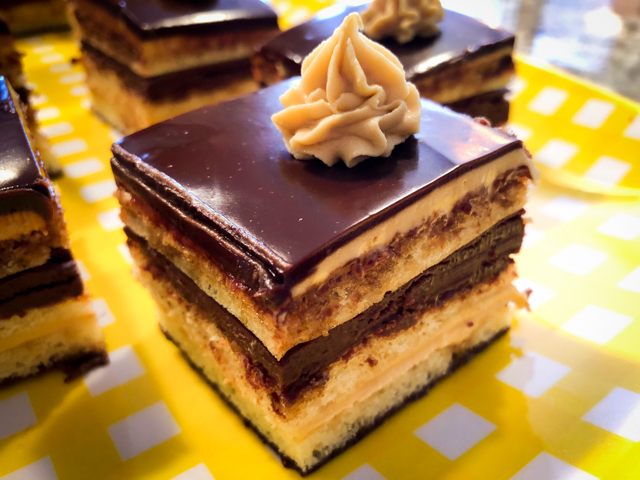
Not everyone is fond of opera. I go as far as saying that it is an acquired taste. But if you switch from music to cake, the polls are reversed: most people will go weak in the knees anticipating a slice. Opera Cake is often described as a dessert in six acts. Layers of thin cake, moist with a delicate coffee syrup, separated by luscious coffee buttercream and chocolate ganache. A real French classic. A real beauty. A perfect way to say I love you on February 14th. Or any other day of the year. Because this is a cake that creates its own moment. And thanks to Colette Christian and Craftsy lessons online, Sally, the cake-o-phobe produced a version that made her very happy…

OPERA CAKE – RECIPE OVERVIEW
(based on Colette Christian’s Miniature French Desserts at Craftsy.com)

It all starts with the mis-en-place for a Joconde sponge cake. With a name like that, you know it’s going to be special. Joconde is a cake leavened exclusively by beaten eggs, with a nice proportion of ground almonds (or almond meal) in the batter. Colette gives very nice tips to make it homogeneous in thickness, because the Opera Cake is all about precision. Any small mistake in a step, and the outcome might suffer.
You can use any formula you like for the cake, I will give you one example from BBC food, very similar to the one I used from Colette.
JOCONDE SPONGE CAKE
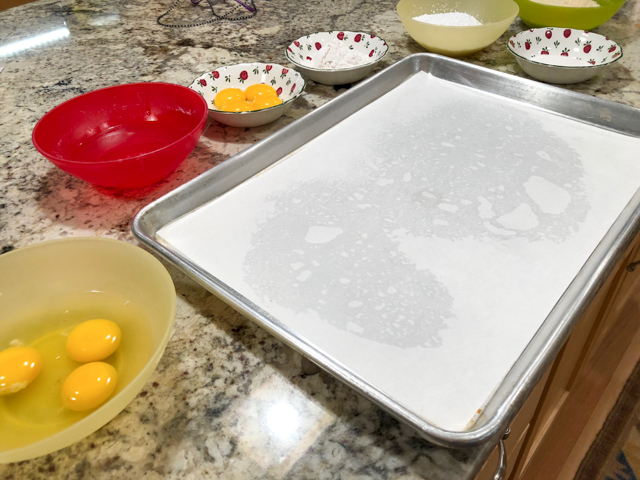
3 whole eggs
15g sugar
100g almond flour
100g icing sugar
3 egg whites
20g granulated sugar
30g cake flour
30g unsalted butter, melted and cooled
Almonds and icing sugar are sifted into a large bowl, eggs added and whisked to combine.
A meringue is made with the egg whites, raining the granulated sugar slowly, until soft peaks form. Increase the speed to medium-high, and mix until the whites are at a firm peak. Add 1/3 of the meringue to the almond mixture. Add half the cake flour and half the melted butter. Add another 1/3 of meringue, the rest of the flour and butter. Finally fold in the remaining third of the meringue.
Spread the batter as homogeneously as possible on a half-sheet pan. Try not to deflate it and bake it right away for about 15 minutes at 375 F. The cake should not get any color, but it should spring back lightly when touched at the center.

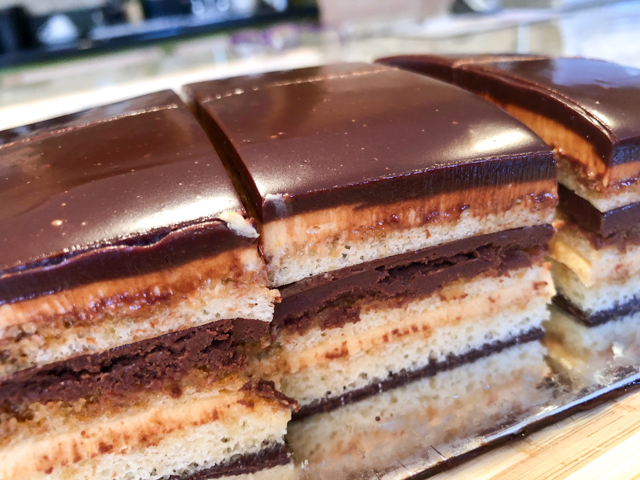
After baking, the cake is cut in three rectangles. Try to be precise, but don’t worry too much, as the cake will be trimmed at the very end. One layer is painted with melted chocolate and allowed to set. That layer of chocolate will be the very base of the final cake, preventing any soaking syrup from forming a puddle in the bottom.
You will also need to make a coffee buttercream, more specifically a French buttercream, in which a mixture of sugar and water is cooked to 236 to 240 F (soft-ball stage). You can use this recipe, which is again very similar to the one I got from Craftsy. Just include 1 tablespoon of coffee extract together with 1 teaspoon of vanilla extract. You need coffee extract to make sure the flavor will come through without diluting the buttercream too much and affecting texture.
Apart from the buttercream, you’ll need chocolate ganache for one of the cake layers. A regular kind, equal weights of chocolate and heavy cream, allowed to cool to room temperature and placed in a piping bag. The buttercream also goes in a piping bag, the easiest and less messy way to assemble the cake. No need to use a piping tip, just cut the bag to form a 1/2 inch opening.
To assemble, first start with the cake painted with melted chocolate at the base. A nice soaking of coffee syrup (water, strong coffee extract and sugar, cooked until the sugar fully dissolves). A layer of buttercream. A second layer of cake. More soaking. Ganache lavishly spread on top. Final layer of syrup-soaked cake, final top layer of buttercream. Now, the assembled cake rests in the fridge for a couple of hours, waiting for the final step. Don’t worry about the way the sides look now. It will all be fine in the end…

The pouring ganache, perhaps better described as a chocolate glaze. A good formula would be 227g chocolate (at least 60% cocoa), 170g heavy cream, and 28g light corn syrup. The glaze cannot be too hot, and cannot be too cold. A little colder than body temperature will be perfect. Colette shows a nice technique to pour the glaze, so that it sits as a very smooth layer on top. Once all that is done, the cake is refrigerated for several hours so that all layers are nicely set. Do not dare cutting it before it sets, you will not have defined layers unless you exercise patience. That gave me a bit of a chuckle. Me, advising patience, the virtue I lack the most…
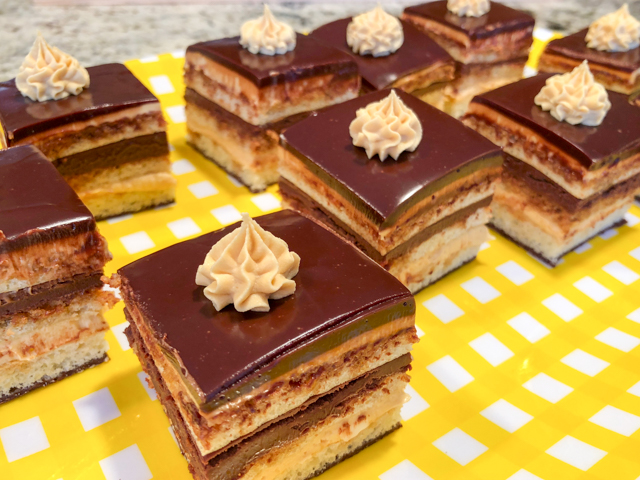
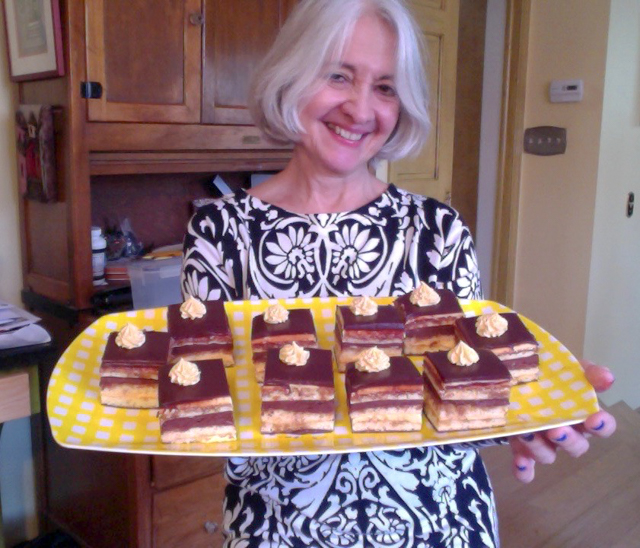
Then what? Then the final fun begins… I decided to cut the cake in 2 inch squares, and for that I used a very cool gadget. I tell you, just getting that tool ready made me feel like some heavy hitter baker… I know, I’m easily amused. But, seriously, just look at how cool that is:

I also used this tool to cut the laminated dough for croissants and pain au chocolat, but failed to get a picture at the time. All you need to do is measure the precise dimension of what you want to cut (or score the surface, as in the case of the Opera Cake), and lock the rolling blades in place. Gently roll them over the surface of the fully set cake, and you will have perfect squares, ready to be sliced with a serrated knife. The edges are trimmed off to reveal clean layers on all sides of the cut pieces. The secret is to place the knife in very hot tap water, and clean the blade after every cut you make. If you’d like to order one, here is a link to amazon.com (I do not make any profit from your purchase, by the way).

A little buttercream goes in a small piping bag couple with a star tip. And you are ready to decorate the top. Or, you can do the more authentic decoration, writing Opera on each slice. Since I opted to cut the cake small, I went with the buttercream instead. What do you think?

This cake was so much fun to make! I started early on a Sunday morning, and tried to work as relaxed as possible. It is cake, after all, and they make me a little nervous. But, less now than in the past.

For those who celebrate…
HAPPY VALENTINE’S DAY!

I know I’ll be repeating myself, but I must give high praise to the online baking classes from Craftsy, particularly those taught by Colette Christian. Without her guidance, making the Opera Cake would have been a tragedy in six acts…
ONE YEAR AGO: Incredibly Simple Times Four
TWO YEARS AGO: Raspberry Chocolate Truffles
THREE YEARS AGO: Red Velvet Cupcakes
FOUR YEARS AGO: Valentine’s Day: The Finale
FIVE YEARS AGO: Almond Butter Chocolate Chip Cookies
SIX YEARS AGO: Dan Dan Noodles
SEVEN YEARS AGO: Sophie Grigson’s Parmesan Cake
EIGHT YEARS AGO: Antibiotics and Food
SaveSave
SaveSave
SaveSave
SaveSave
SaveSave
SaveSave
SaveSave
SaveSave
SaveSave
SaveSave
SaveSave
SaveSave
SaveSave
SaveSave
SaveSave
SaveSave
SaveSave
SaveSave