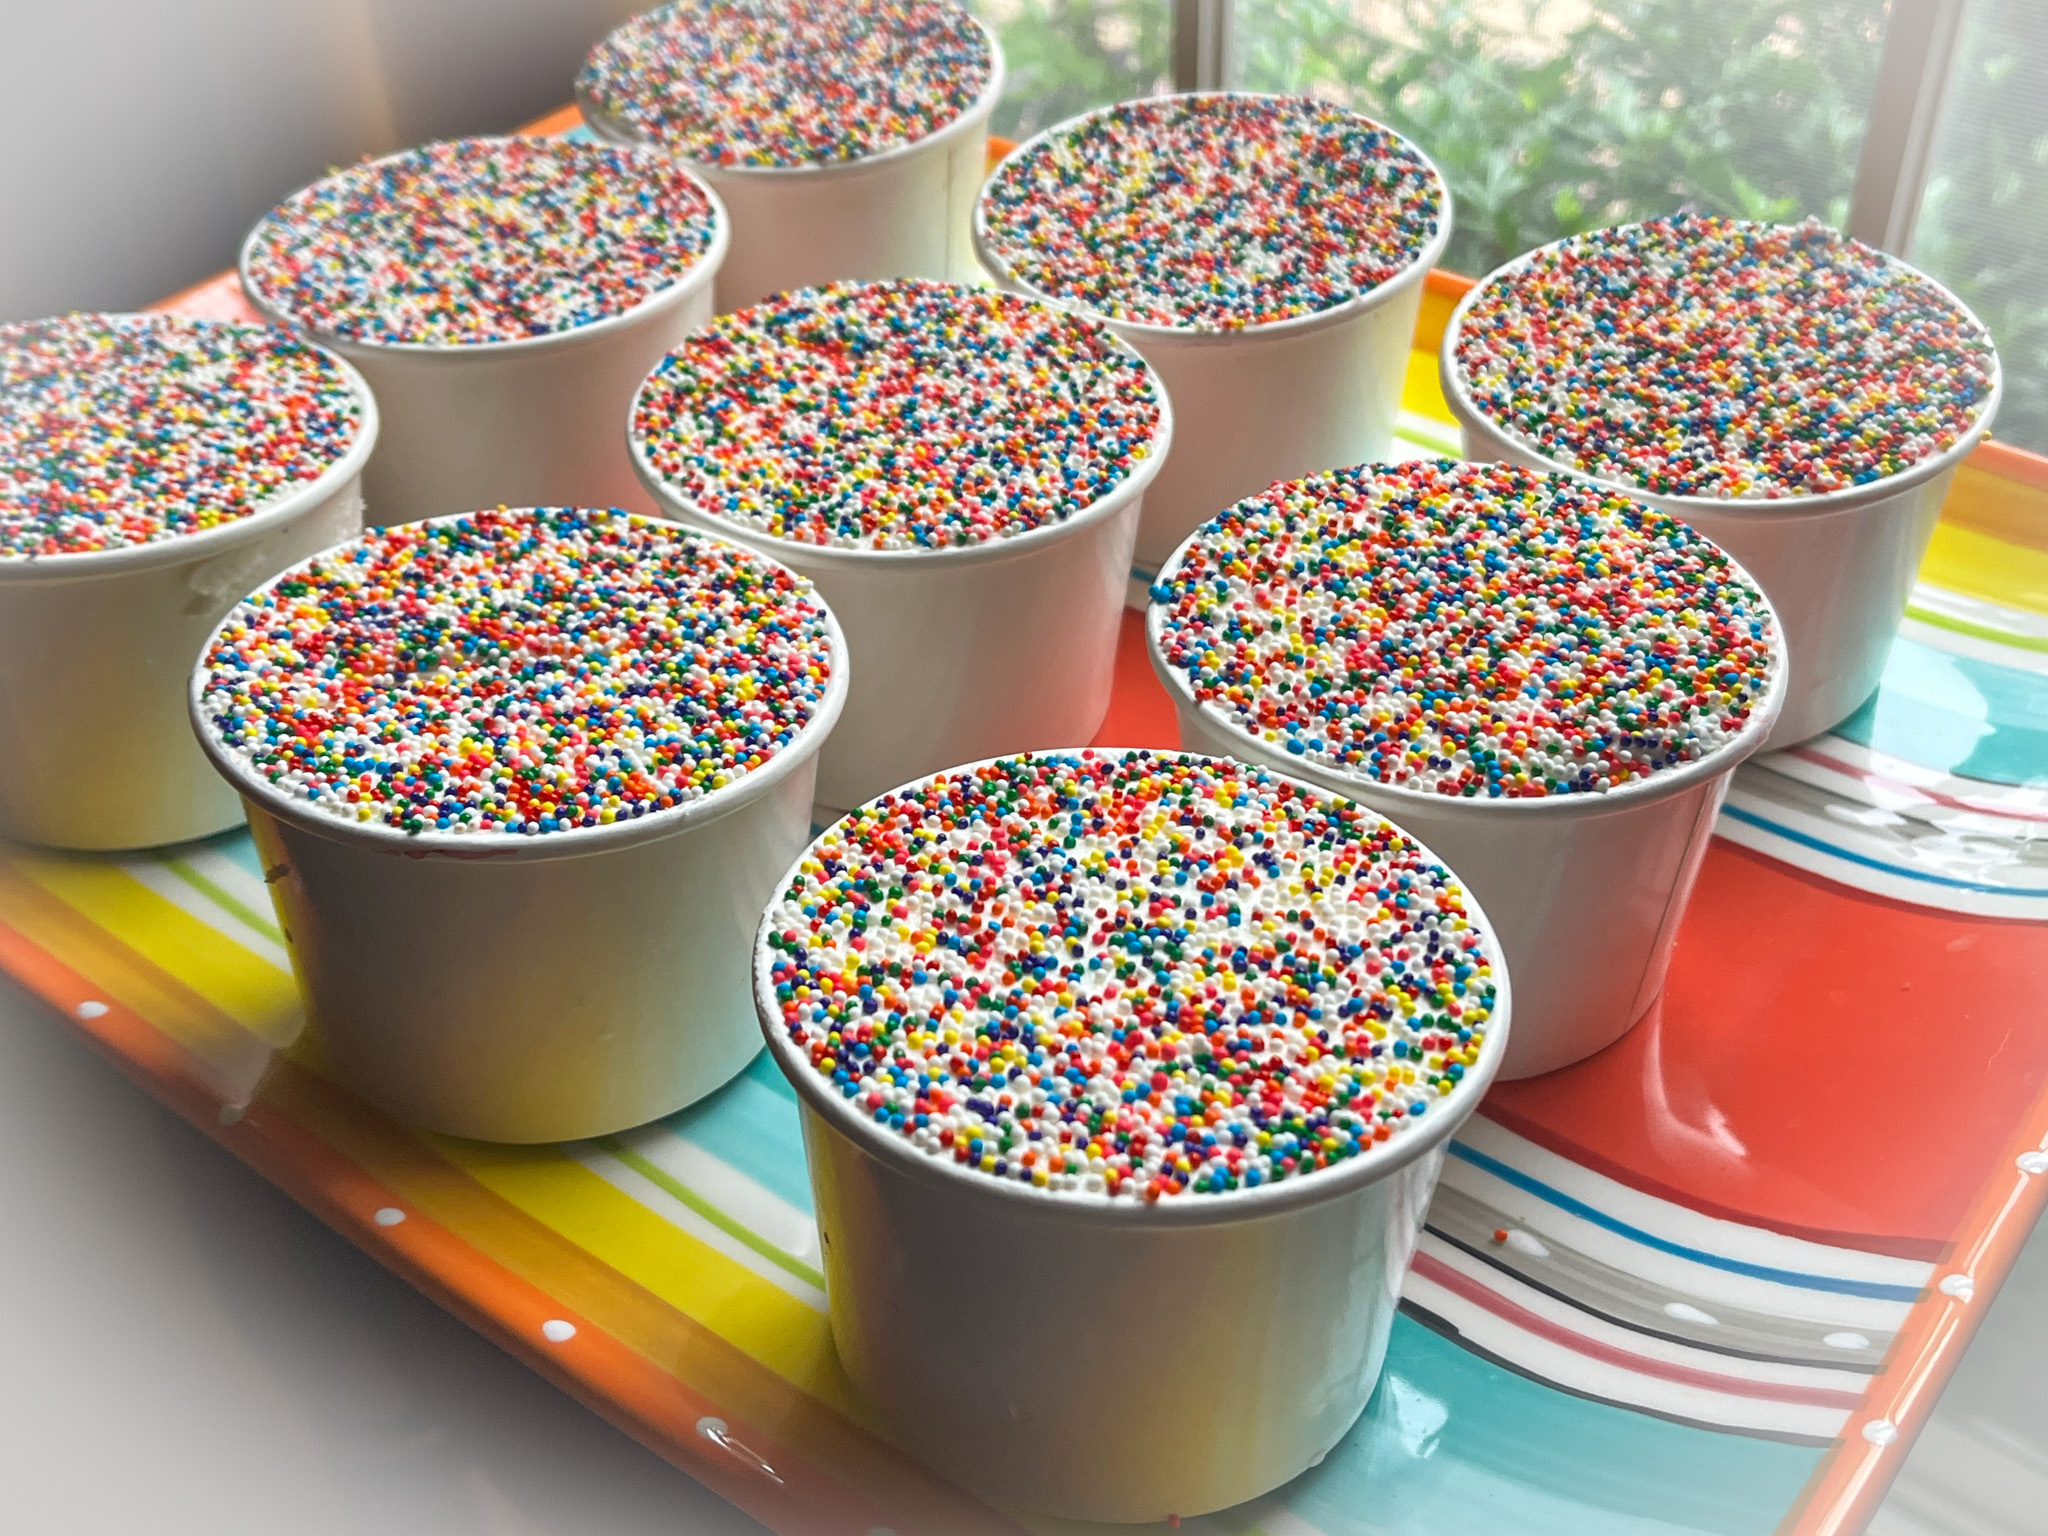
Have you heard of these? It all started at a bakery in Roslyn, New York, called -quite appropriately – The Dotcakes. They sell them in many different formats, including the popular cupcake, The whole idea behind them is a soft cake inserted in a paper or glass cup, filled to the brim with buttercream, and topped with nonpareils. Simple and effective. Apparently dot cakes are going viral on TikTok, I would not know because I never had the patience for the platform. But Susan, from The View from Great Island, recently made those and I jumped on that project shortly after reading her post. Well, first I had to visit The Super Evil Empire to get me some paper cups. THEN I jumped on it.
15 ounce lemon cake mix, prepared according to box directions. 1 cup salted butter, at room temperature 6 cups powdered sugar 8 Tbsp lemon juice 1/2 tsp vanilla extract nonpareil sprinkles
Preheat the oven to 350F and grease a 10×15 jelly roll pan.
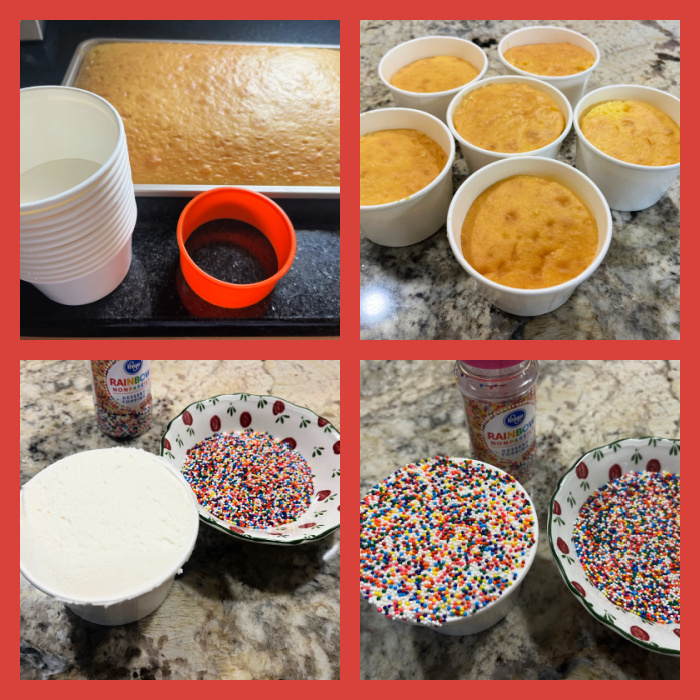
Prepare the cake mix according to its directions and spread into your prepared pan. Bake for about 18 minutes, or until it springs back when lightly touched in the center. A toothpick will come out without wet batter on it. Set aside to cool.
To make the frosting beat the softened butter until fluffy in a large bowl. Slowly add the sugar, a cup at a time, along with the lemon juice and vanilla. Beat until smooth and silky.
When the cake has cooled use your cookie cutter (in the same size as your cake cups) to cut out rounds of cake. Place a round of cake into each cup. Top with the frosting, and bring it right to the top. Smooth it out so that it is completely flat.
Place your sprinkles in a bowl and dip each cup headfirst down into the sprinkles so that they cover the whole surface.
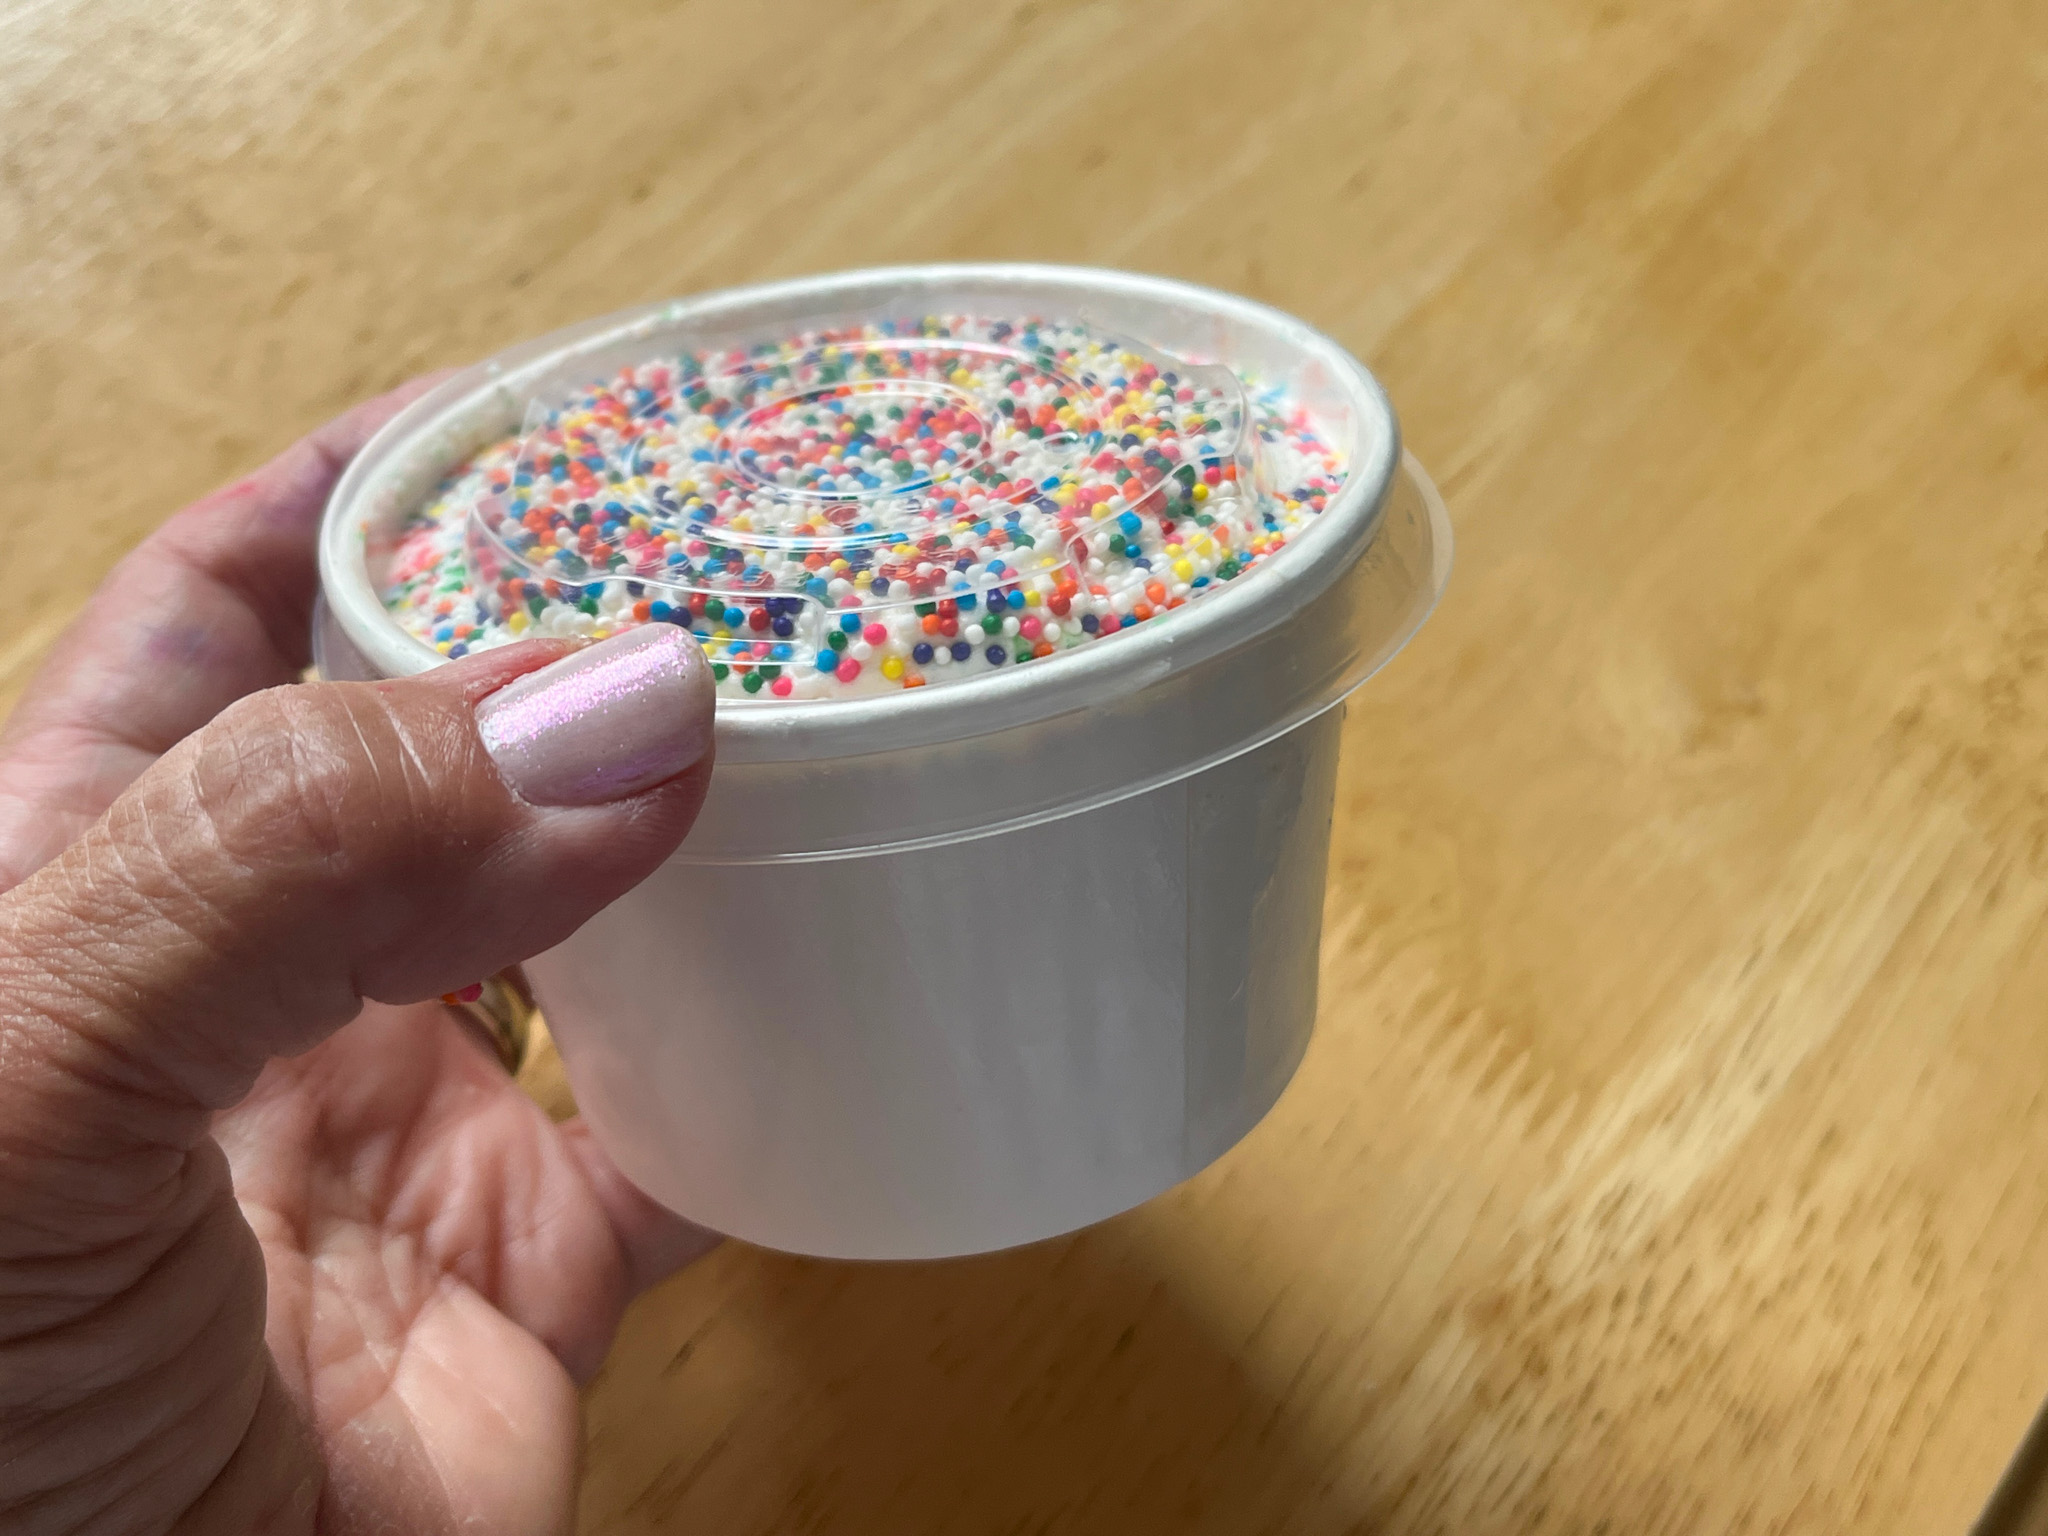
Comments: Please do not be upset about the use of a box cake. This is a simple, humble cake that just needs to be moist and flavorful. A box cake delivers that without issues. You can of course make the cake component from scratch. But sometimes simplicity wins in my kitchen. The little cups come with a lid that is perfect to donate these babies, otherwise the nonpareils could make it a bit messy, some always seem to fall off.
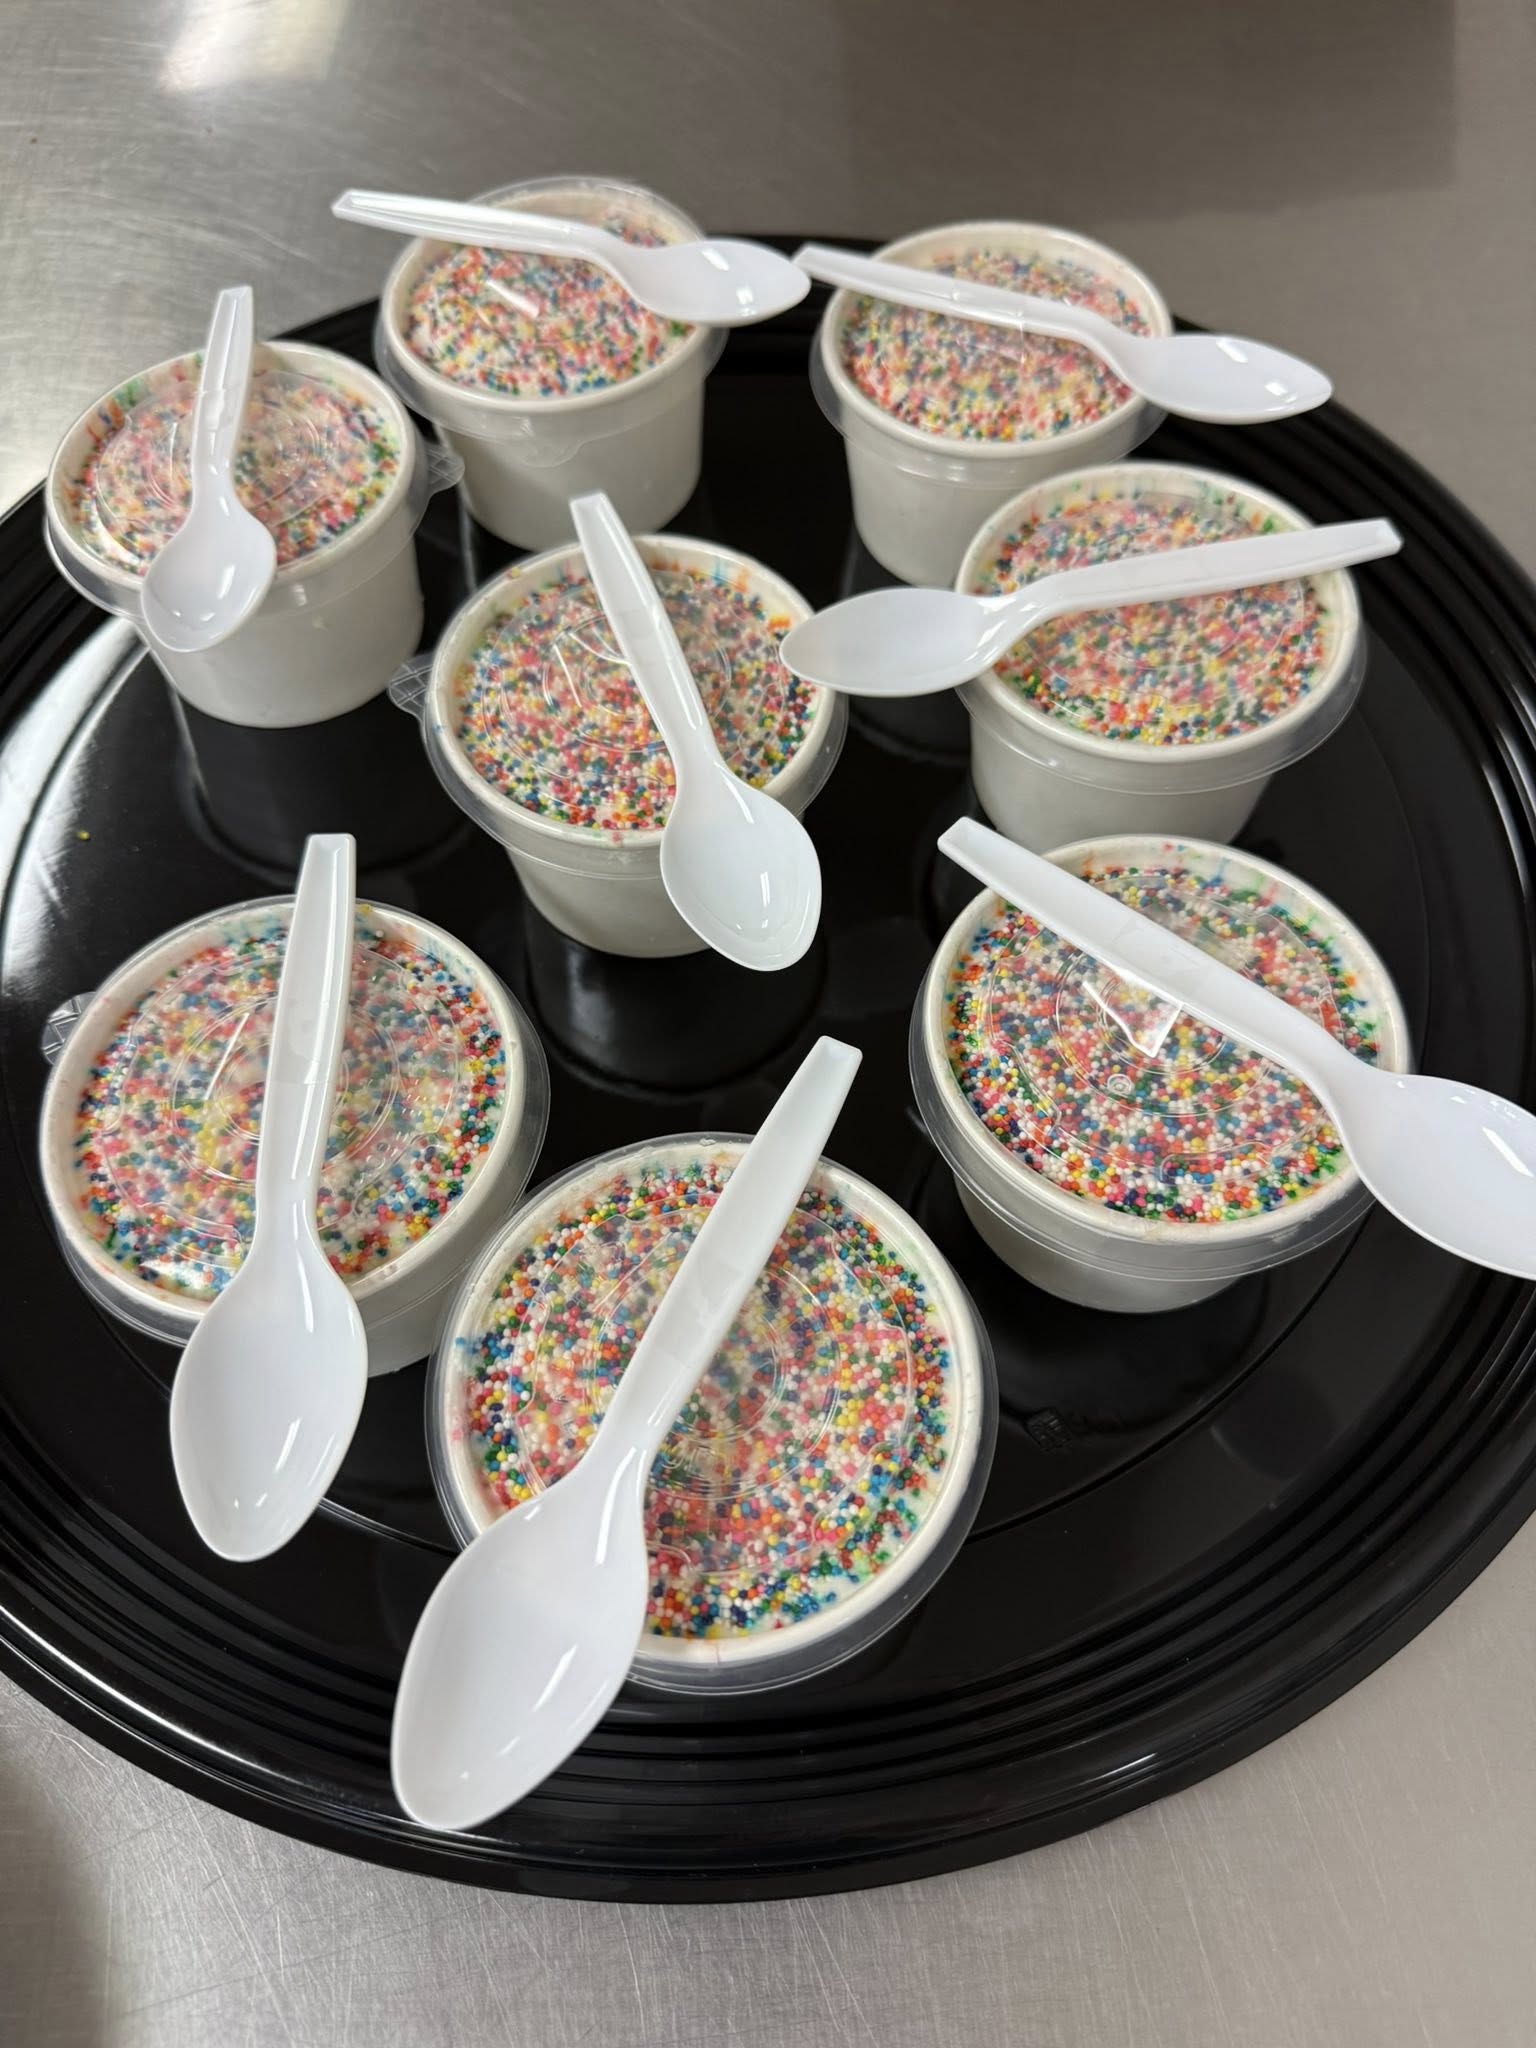
I donated the whole batch but I heard they turned out delicious. Each one was donated with a little spoon attached to the lid, to make it easier for the volunteers working that meal.
If you have a party coming up, particularly with kids, consider baking a batch of these dot cakes, they will be a huge hit… Many thanks to Susan for the inspiration!
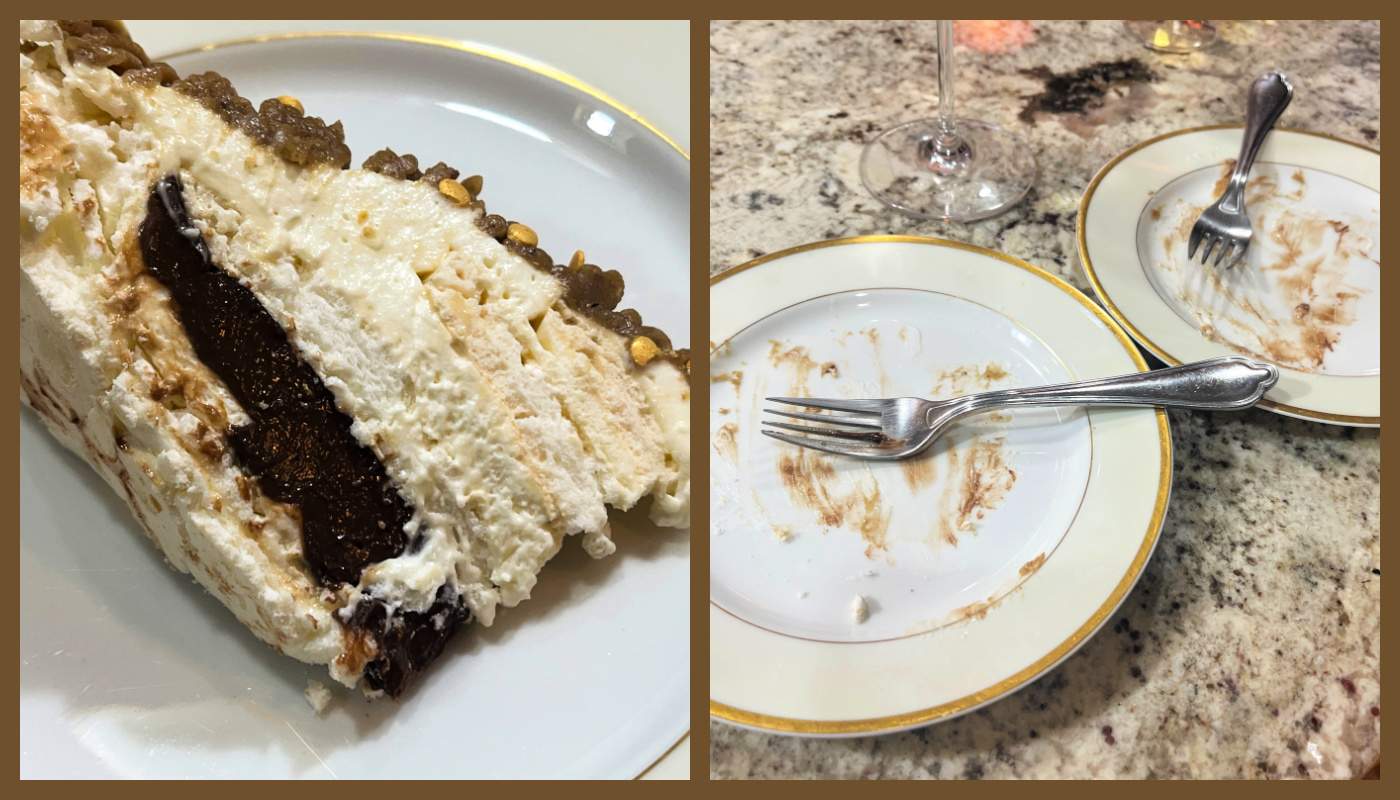
Early December, 2025. The husband sends me a text with a link and the words: we should make this. I agreed we definitely should. And so “we” did. Let me just add that this was quite likely one of the best desserts “we” ever made. I don’t say this lightly.
for the meringue discs: 4 large egg whites (122 grams) ⅛ teaspoon cream of tartar 1 + ⅓ cups (240 grams) granulated sugar
For the mocha cremeux: 4½ ounces milk chocolate, chopped into ½-inch pieces (about 1 cup) ¼ teaspoon fine sea salt 4 egg yolks (63 grams) 1 tablespoon cornstarch 2 teaspoons instant coffee ¾ cup whole milk
for the chestnut topping: ⅓ cup (60 grams) brown sugar Pinch of fine sea salt 1⅓ cups (200 grams) chopped canned or vacuum-packed chestnuts 1 tablespoon unsalted butter, softened
for the whipped cream: 1 cup (233 grams) heavy cream ½ cup (112 grams) mascarpone cheese, softened ¼ cup (30 grams) powdered sugar 2 teaspoons vanilla extract
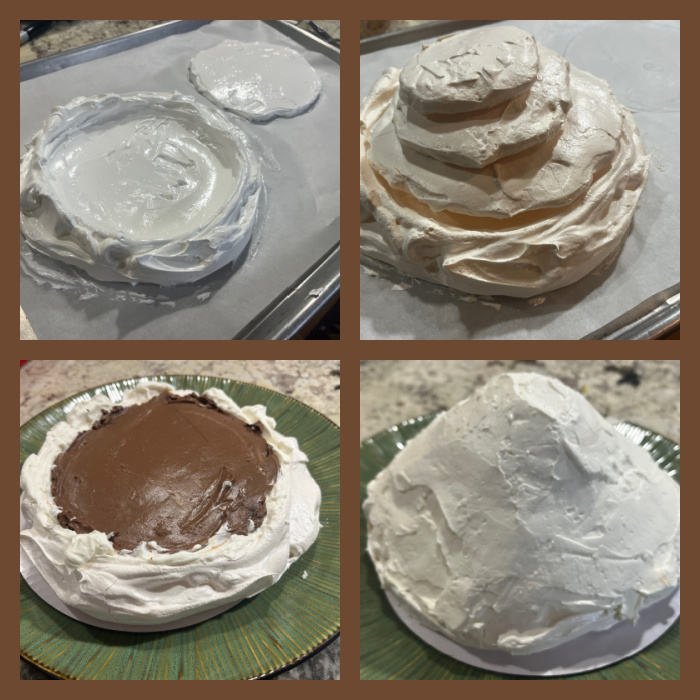
Make the meringues: Heat the oven to 225 degrees and line two large baking sheets with parchment paper. On one sheet of parchment, trace a 7-inch-wide circle and a 6-inch-wide circle. On the other sheet of parchment, trace a 4-inch-wide circle and a 2½-inch-wide circle. Flip the parchment papers upside down so the marks are underneath.
Place the egg whites in the bowl of a stand mixer fitted with the whisk attachment. Using an electric mixer, whisk the egg whites until frothy, 30 to 60 seconds. Add the cream of tartar, then, with the mixer on medium-high, gradually add the granulated sugar, 1 tablespoon at a time. Continue to beat until glossy and stiff peaks form, scraping down the bowl once or twice, 10 to 15 minutes. Spoon about 1 ½ cups (175 grams) of meringue into the 7-inch circle and, using circular movements with the back of a large spoon, shape a 1-inch-deep divot in the middle. Use the remaining meringue to fill the smaller circles, spreading about ½ cup (70 grams) into the 6-inch circle, ¼ cup (30 grams) into the 4-inch circle, and about 2 tablespoons (10 to 15 grams) into the 2½-inch circle. These three remaining meringues should be about ½ inch thick and fairly flat for neat stacking once baked.
Bake meringues for 1½ hours, until crisp and dry to the touch. Turn off the oven and leave the meringues inside with the door slightly ajar until completely cool, at least 2 to 3 hours but overnight if possible.
Meanwhile, make the mocha crémeux: Combine the milk chocolate and salt in a small bowl and set alongside the stove, along with an empty medium heatproof bowl. Whisk together the egg yolks, cornstarch and instant coffee in a small heavy-bottomed saucepan until smooth. Gradually whisk in the milk. Take care to make sure it’s well combined, giving extra attention to the edges of the pan as you whisk.
Cook over medium heat, whisking continuously, until the mixture comes to a gentle boil and thickens to a pudding-like consistency, 2 to 3 minutes. Turn the heat down to low and whisk rapidly as the mixture gently simmers for 30 seconds longer. Immediately turn off the heat and whisk in the milk chocolate and salt until the chocolate is melted and the mixture is glossy. Immediately pour the crémeux into the heatproof bowl and cover with plastic wrap or parchment paper directly against the surface to prevent a skin from forming. Once cool to the touch, transfer to the fridge to chill completely and set, about 2 hours minimum.
Make the chestnut topping: Combine the brown sugar, salt and ½ cup water in a small saucepan. Bring to a boil and cook for 1 minute, then turn off the heat and leave to cool for about 10 minutes. When the sugar syrup has cooled, blitz the cooked chestnuts in the food processor for about 30 seconds, until finely ground, then slowly pour in the cooled sugar syrup while the motor is running. Blend until completely smooth, 1 to 2 minutes, scraping down the sides of the food processor bowl as necessary. Add the butter and blend until incorporated. The purée needs to be smooth and soft enough to pipe easily without breaking. If the chestnut mixture doesn’t seem smooth, pass it through a fine-mesh sieve. Set aside until ready to use.
When you are ready to assemble, make the whipped cream: In a large bowl, whip the cream, mascarpone, powdered sugar and vanilla until very stiff peaks form, about 1 minute. To build the dessert, place the 7-inch meringue onto a serving plate. Using an offset spatula, spread a thin layer of whipped cream (½ cup) across the base, pushing it up and over the sides of the meringue so it slightly overhangs the sides. Give the mocha crémeux a quick stir, then dollop it into the hollow (it should fill it completely), smoothing it level with the cream.
Place the 6-inch meringue disk on top, pressing gently. Spread a thick layer of whipped cream over the meringue and top with the 4-inch disk. Repeat with another generous layer of whipped cream, then add the smallest disk. Finish with a final helping of the remaining whipped cream, shaping it into a conical peak with an offset spatula. Chill the Mont Blanc in the fridge for about 1 hour, until the cream has firmed up enough to support the chestnut strands you’ll add on top (be sure to give it a wide berth in the fridge).
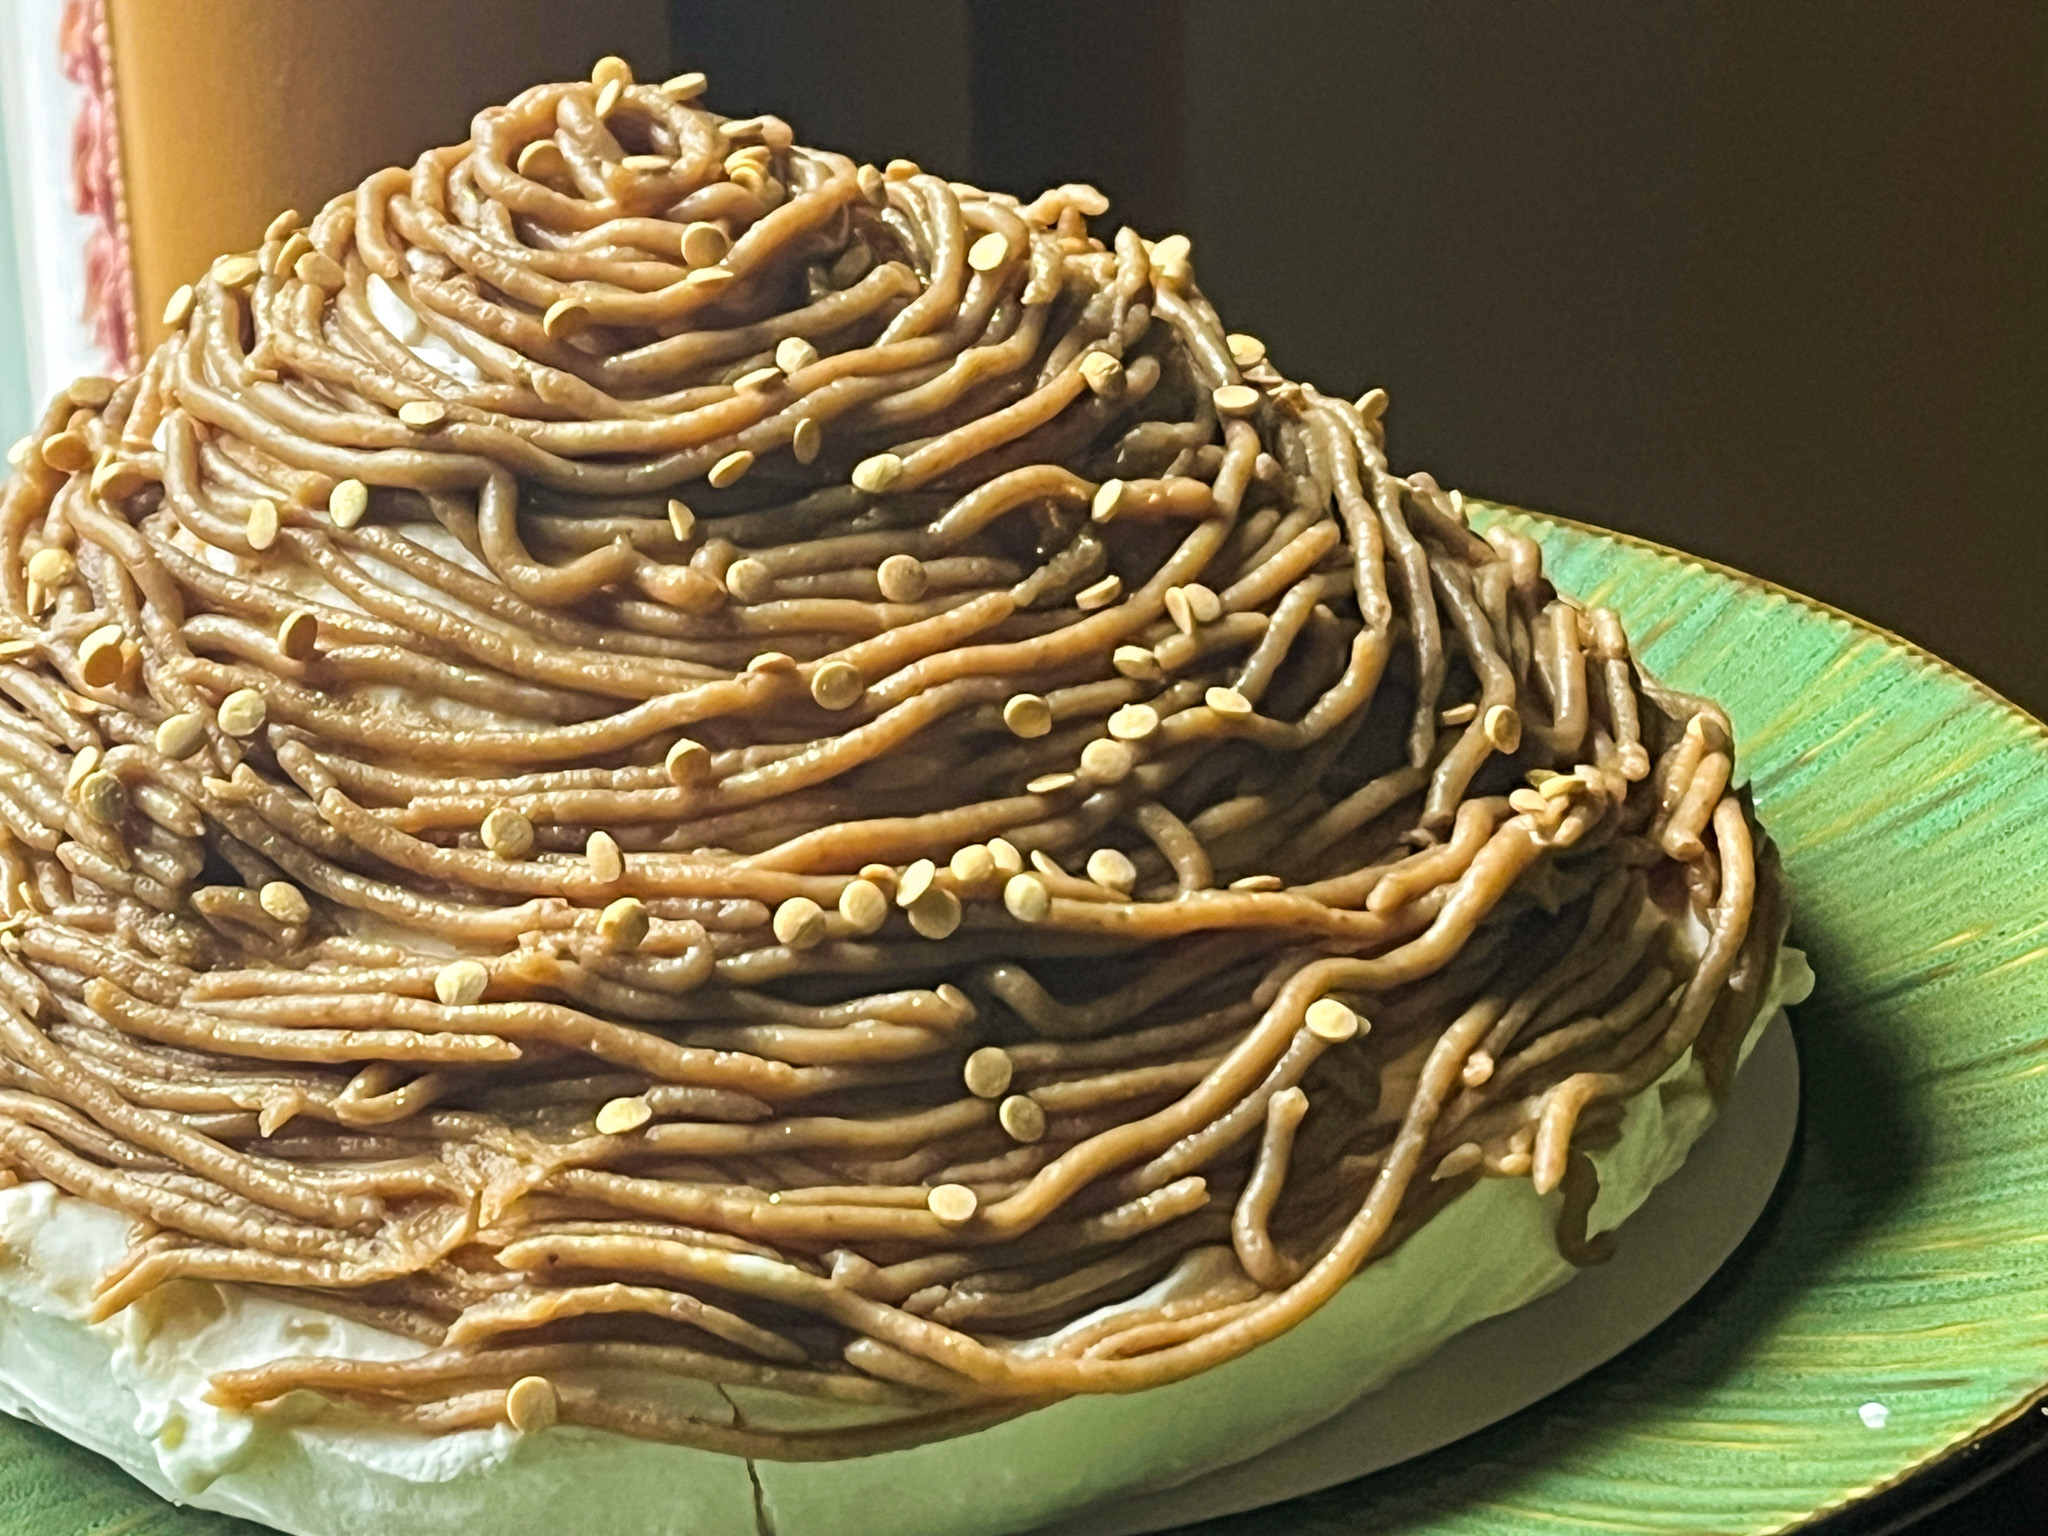
When the Mont Blanc has finished chilling, transfer chestnut cream to a piping bag fitted with a 2-millimeter-wide round tip. Starting from just above the overhang of cream at the base of the Mont Blanc, pipe the chestnut strands horizontally around the Mont Blanc, gradually working your way upward to cover the “mountain” completely with several layers of chestnut strands to create the look of a craggy mountain.
Store the Mont Blanc in the fridge until ready to serve: 2 to 4 hours is best, but up to 24 hours.
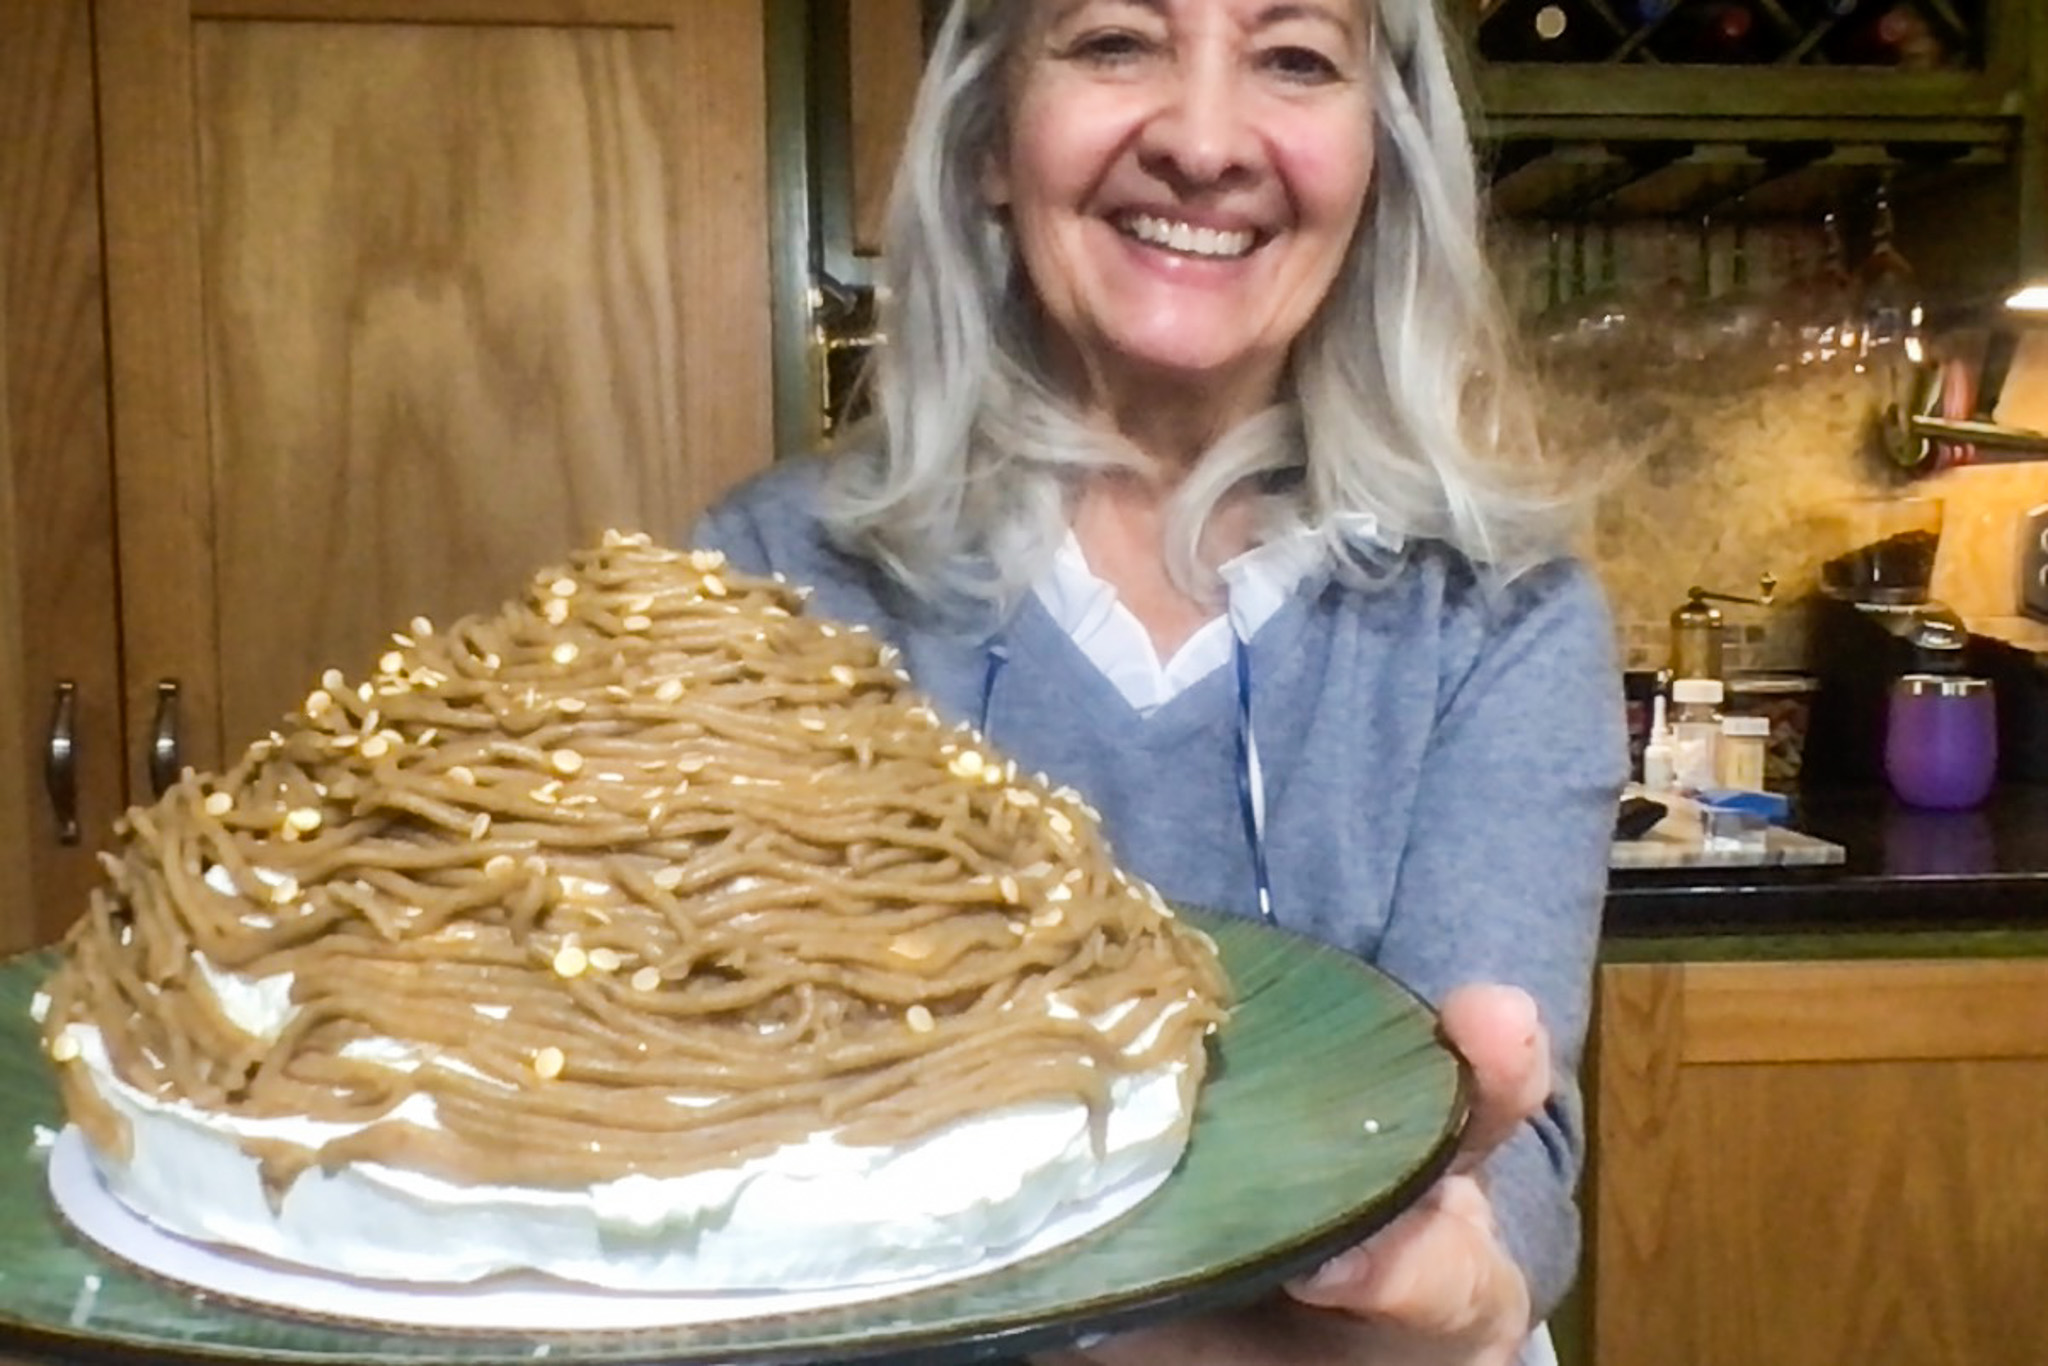
Comments: This was a complete, total labor of love, but I am so glad Phil suggested this recipe for our Christmas meal. I must tell you that the recipe is perfectly written, instructions were flawless and everything worked exactly as it should have. The baker was in Nirvana.
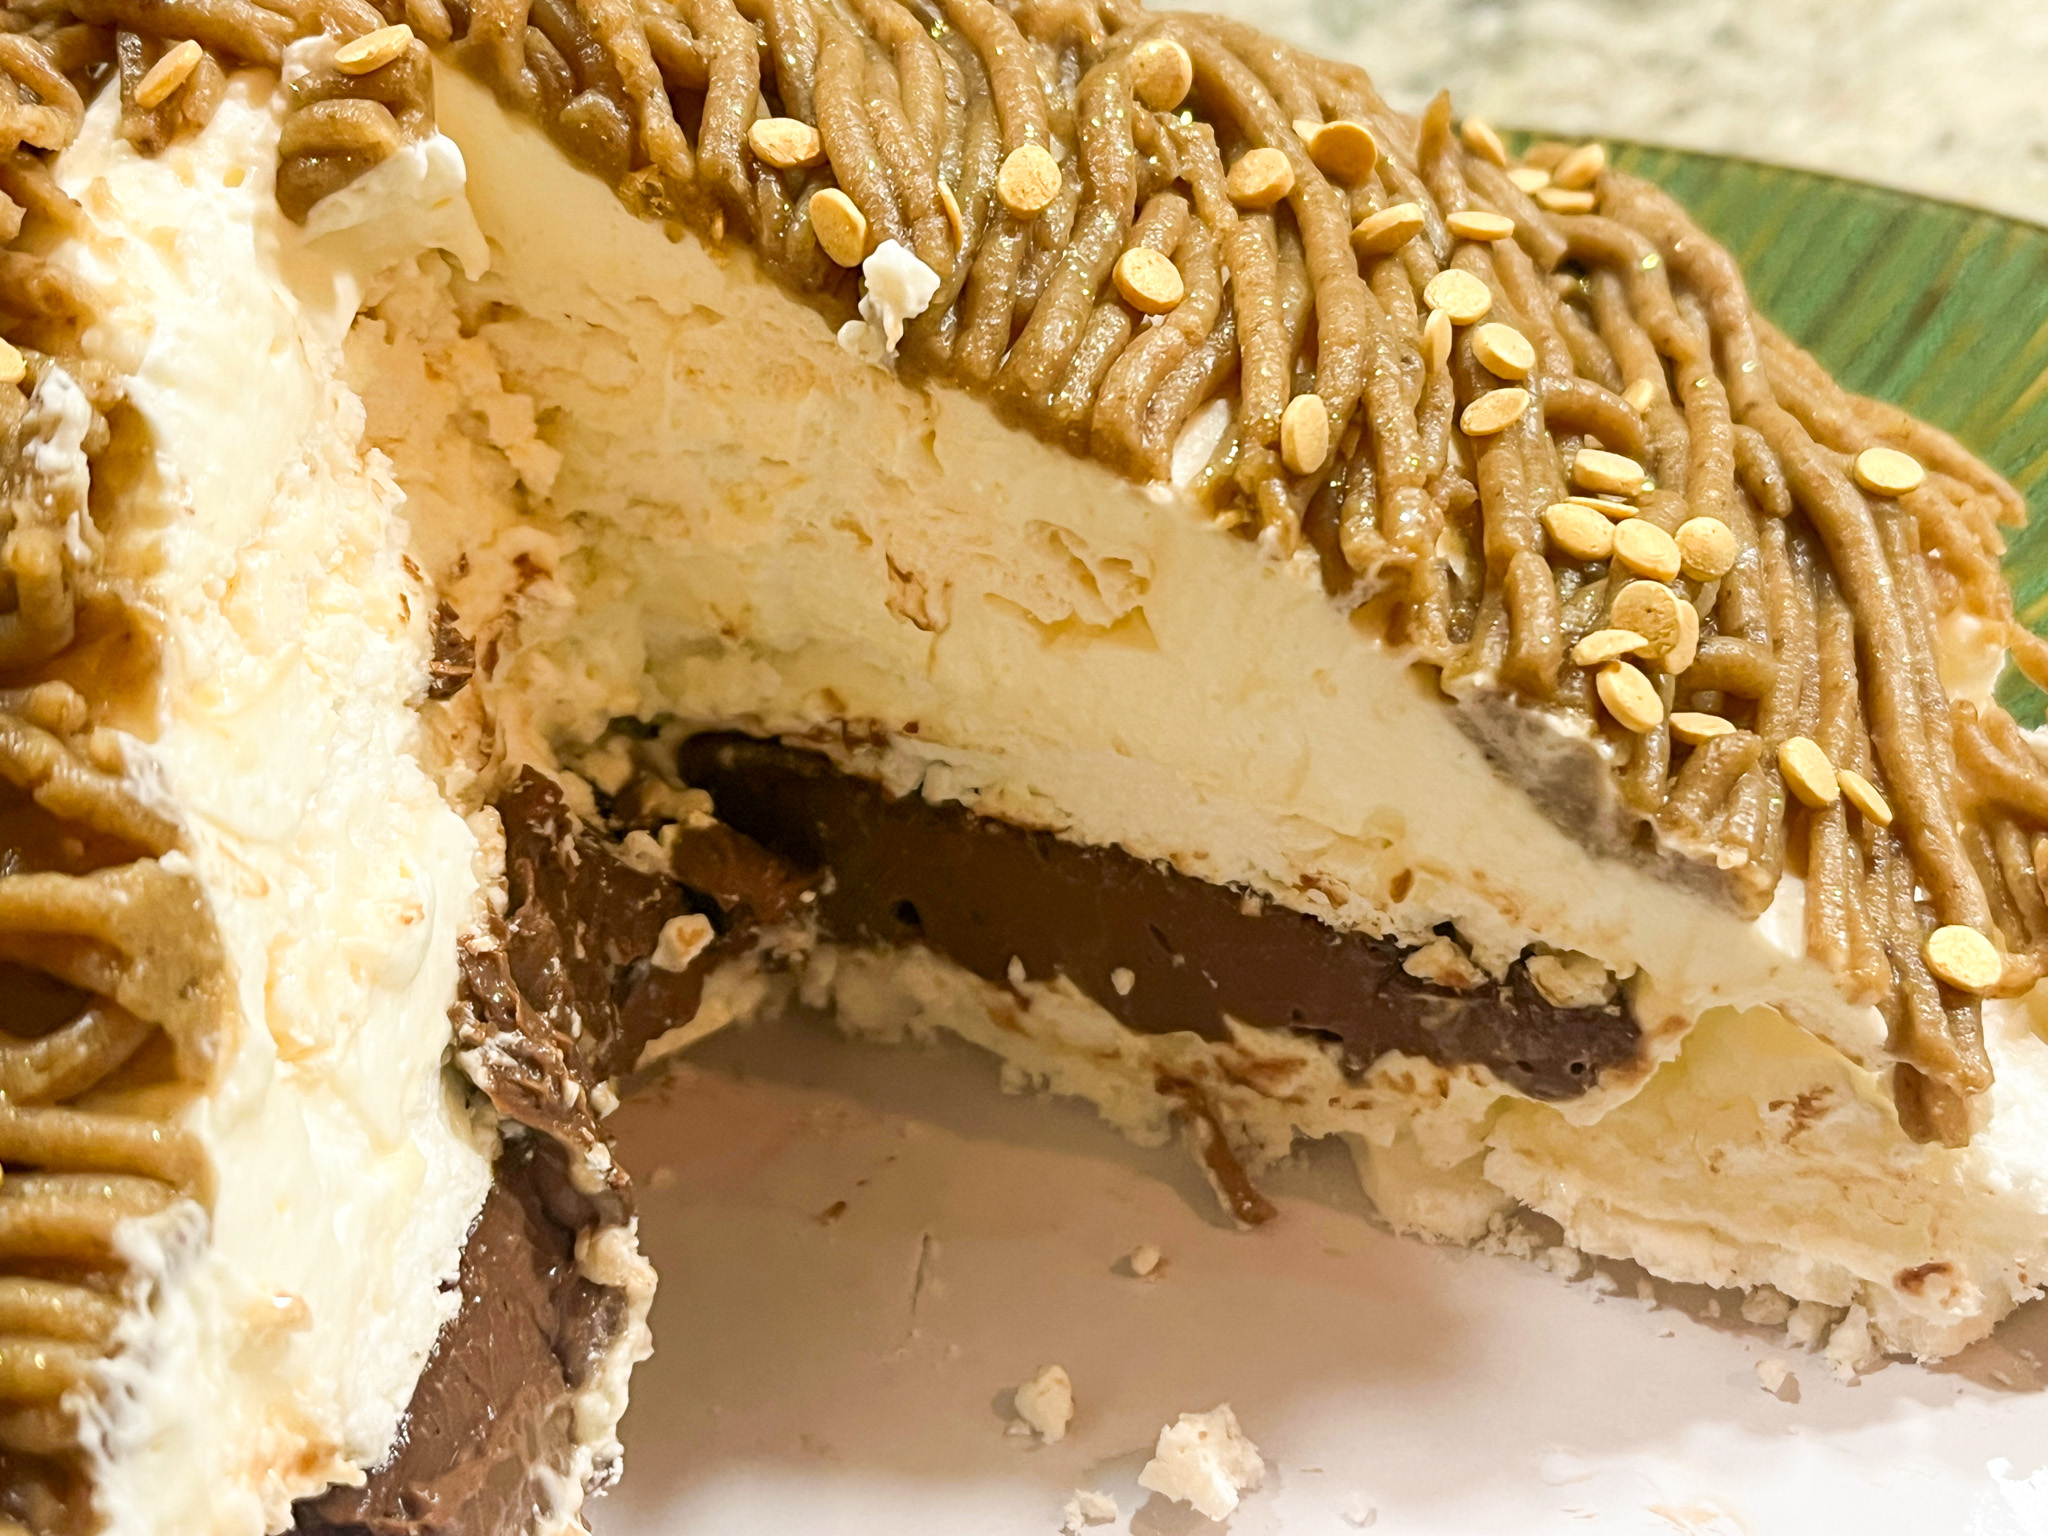
The photo above makes the dessert look huge, in fact it is 7 inches in diameter at the bottom, largest dimension. We had it on Christmas and also next day and loved each bite. Truly spectacular, the layers of meringue turn into one entity with the whipped cream, the chestnut cream is absolutely perfect and matches well with the chocolate coffee cremeaux at the bottom. Super rich, I won’t lie. But for a special occasion, you cannot ask for a better option.
I would love to re-visit this dessert turning it into a small, individual portion, make maybe 4 for a dinner party. That would be perfect. Speaking of perfection….
Final thoughts: Make the meringue discs the day before. Make the chocolate cremeux the day before. Then on the day of serving this beauty, just whip the cream and make the chestnut topping. I tried to use the special grass piping tip to make the ribbons, but it worked much better with a simple round open tip, about 2mm wide. Having my little turntable was a huge help. You can see it in action in this post from my past.
Today it is all a celebration of chocolate, so appropriate for the season, don’t you think? Let’s start with another winner of a recipe by Helen Fletcher.
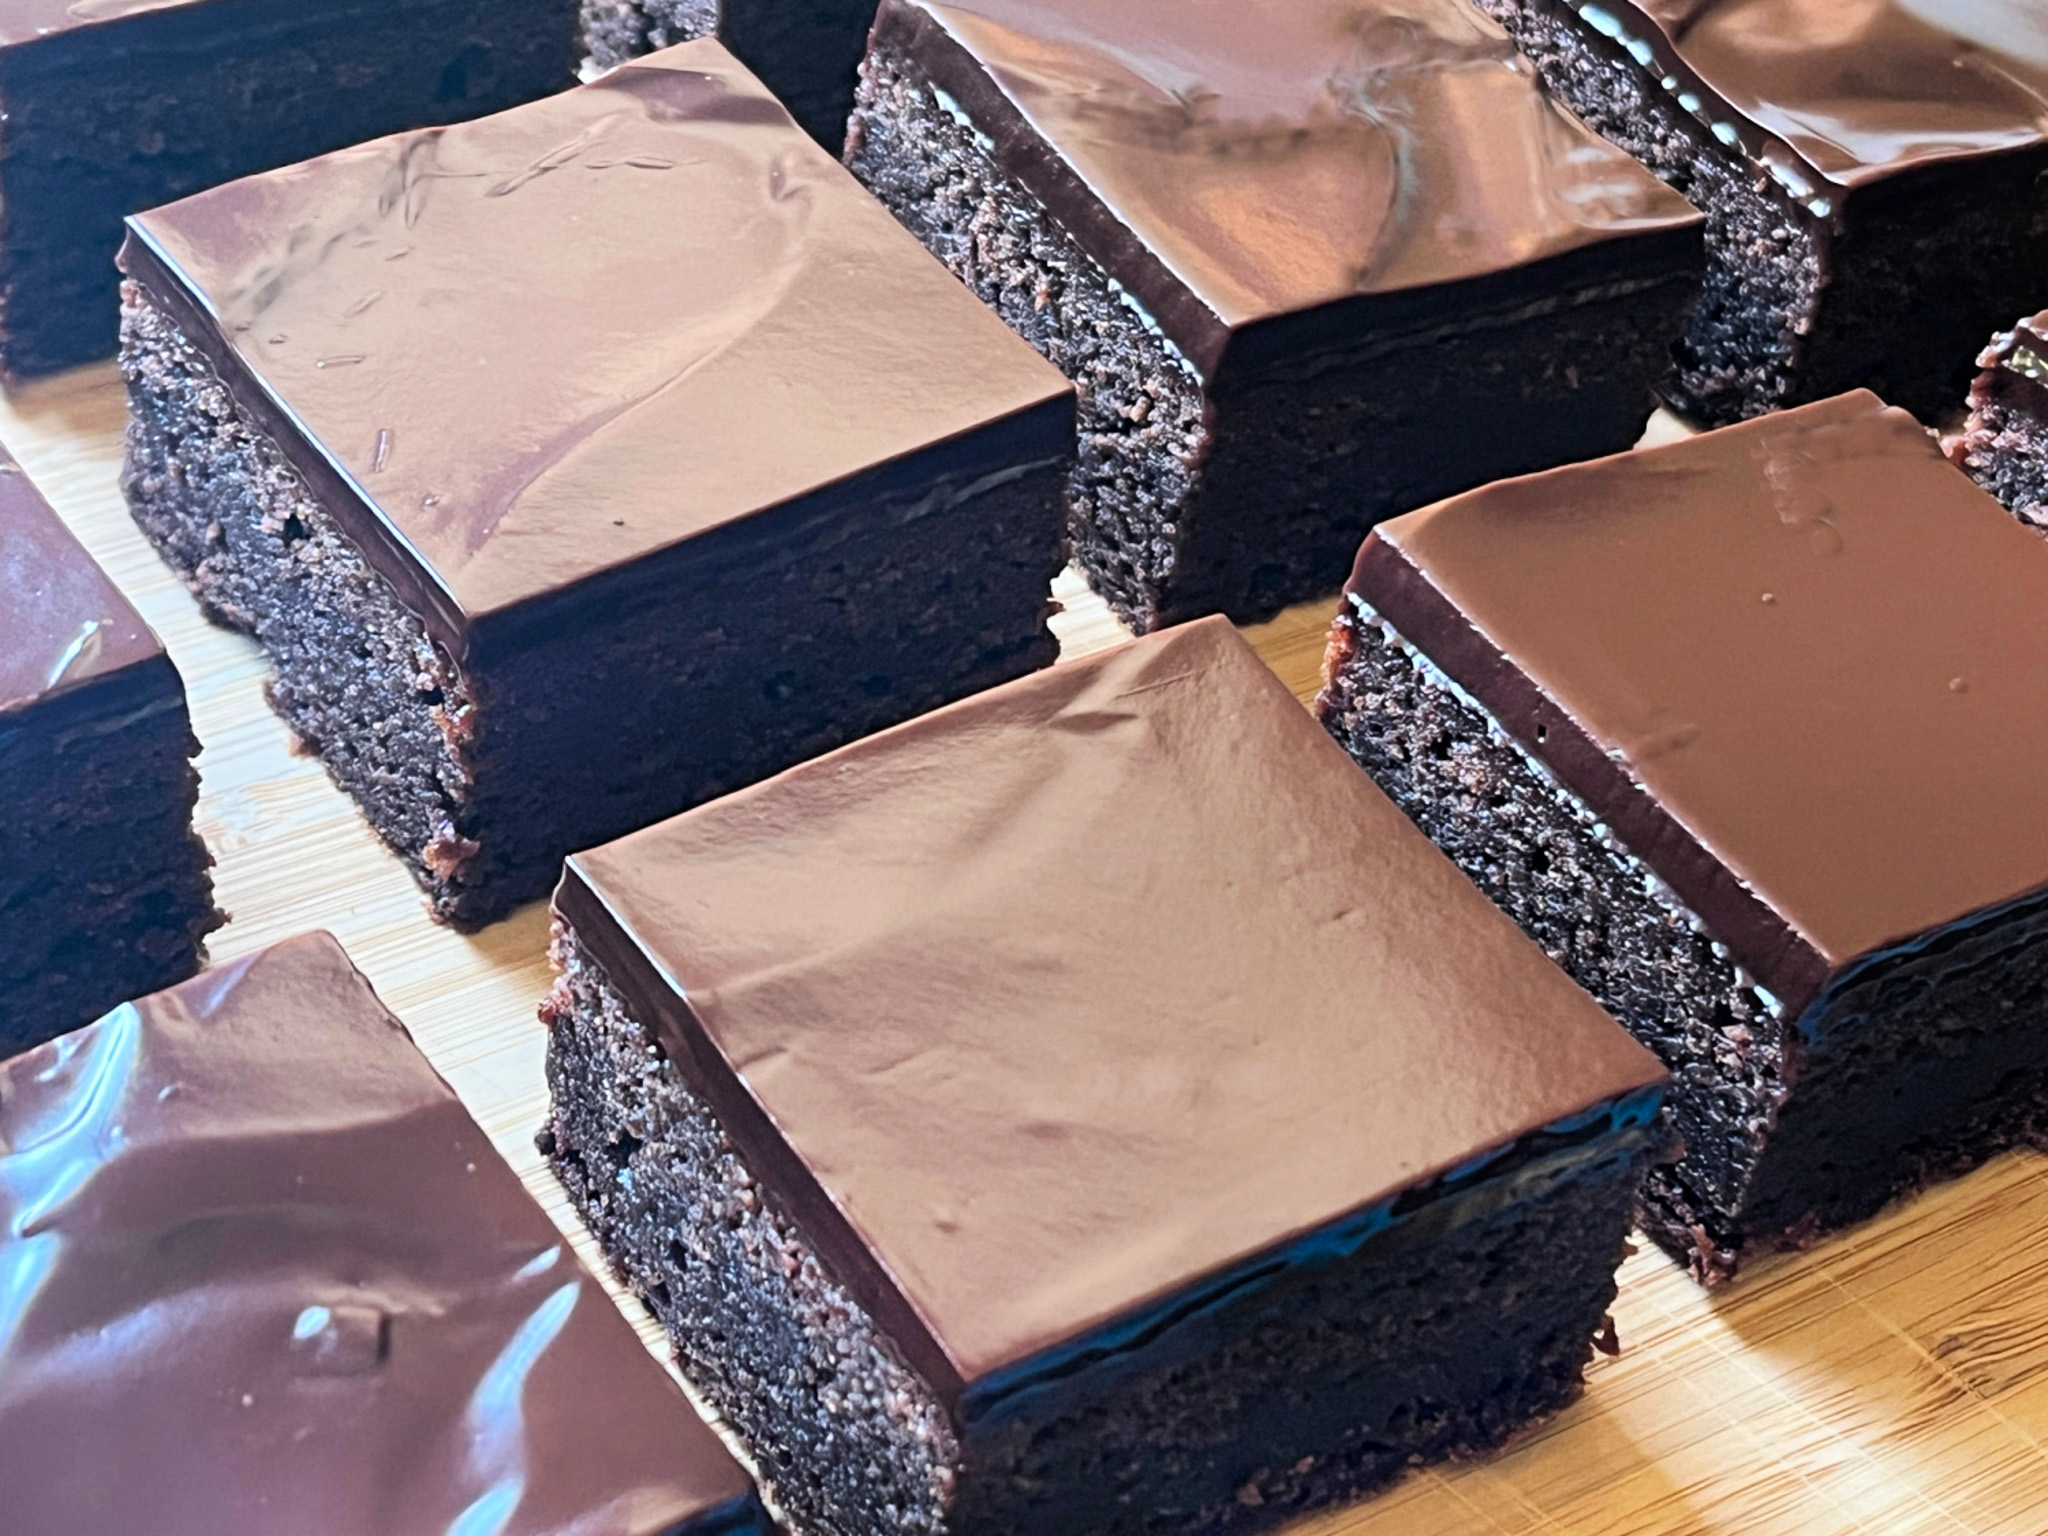
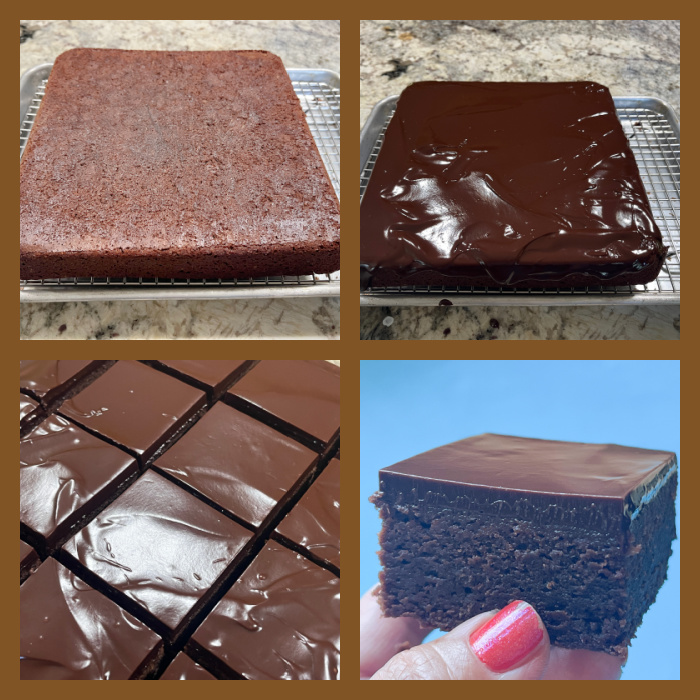
MEXICAN BROWNIES
To get the recipe, pay a visit to her site, where you can get step by step pictures to guide you through the process. One of the tips she gives is pouring the smooth icing on the brownie after flipping it so that the bottom side is up. That ensures a super flat surface for glazing. It is all in the details, my friends!
.
Moving on, a Celebration Cake I made for the chef who is behind the homeless meals, a person I admire so much! Works tirelessly to offer free meals 7 days/week.
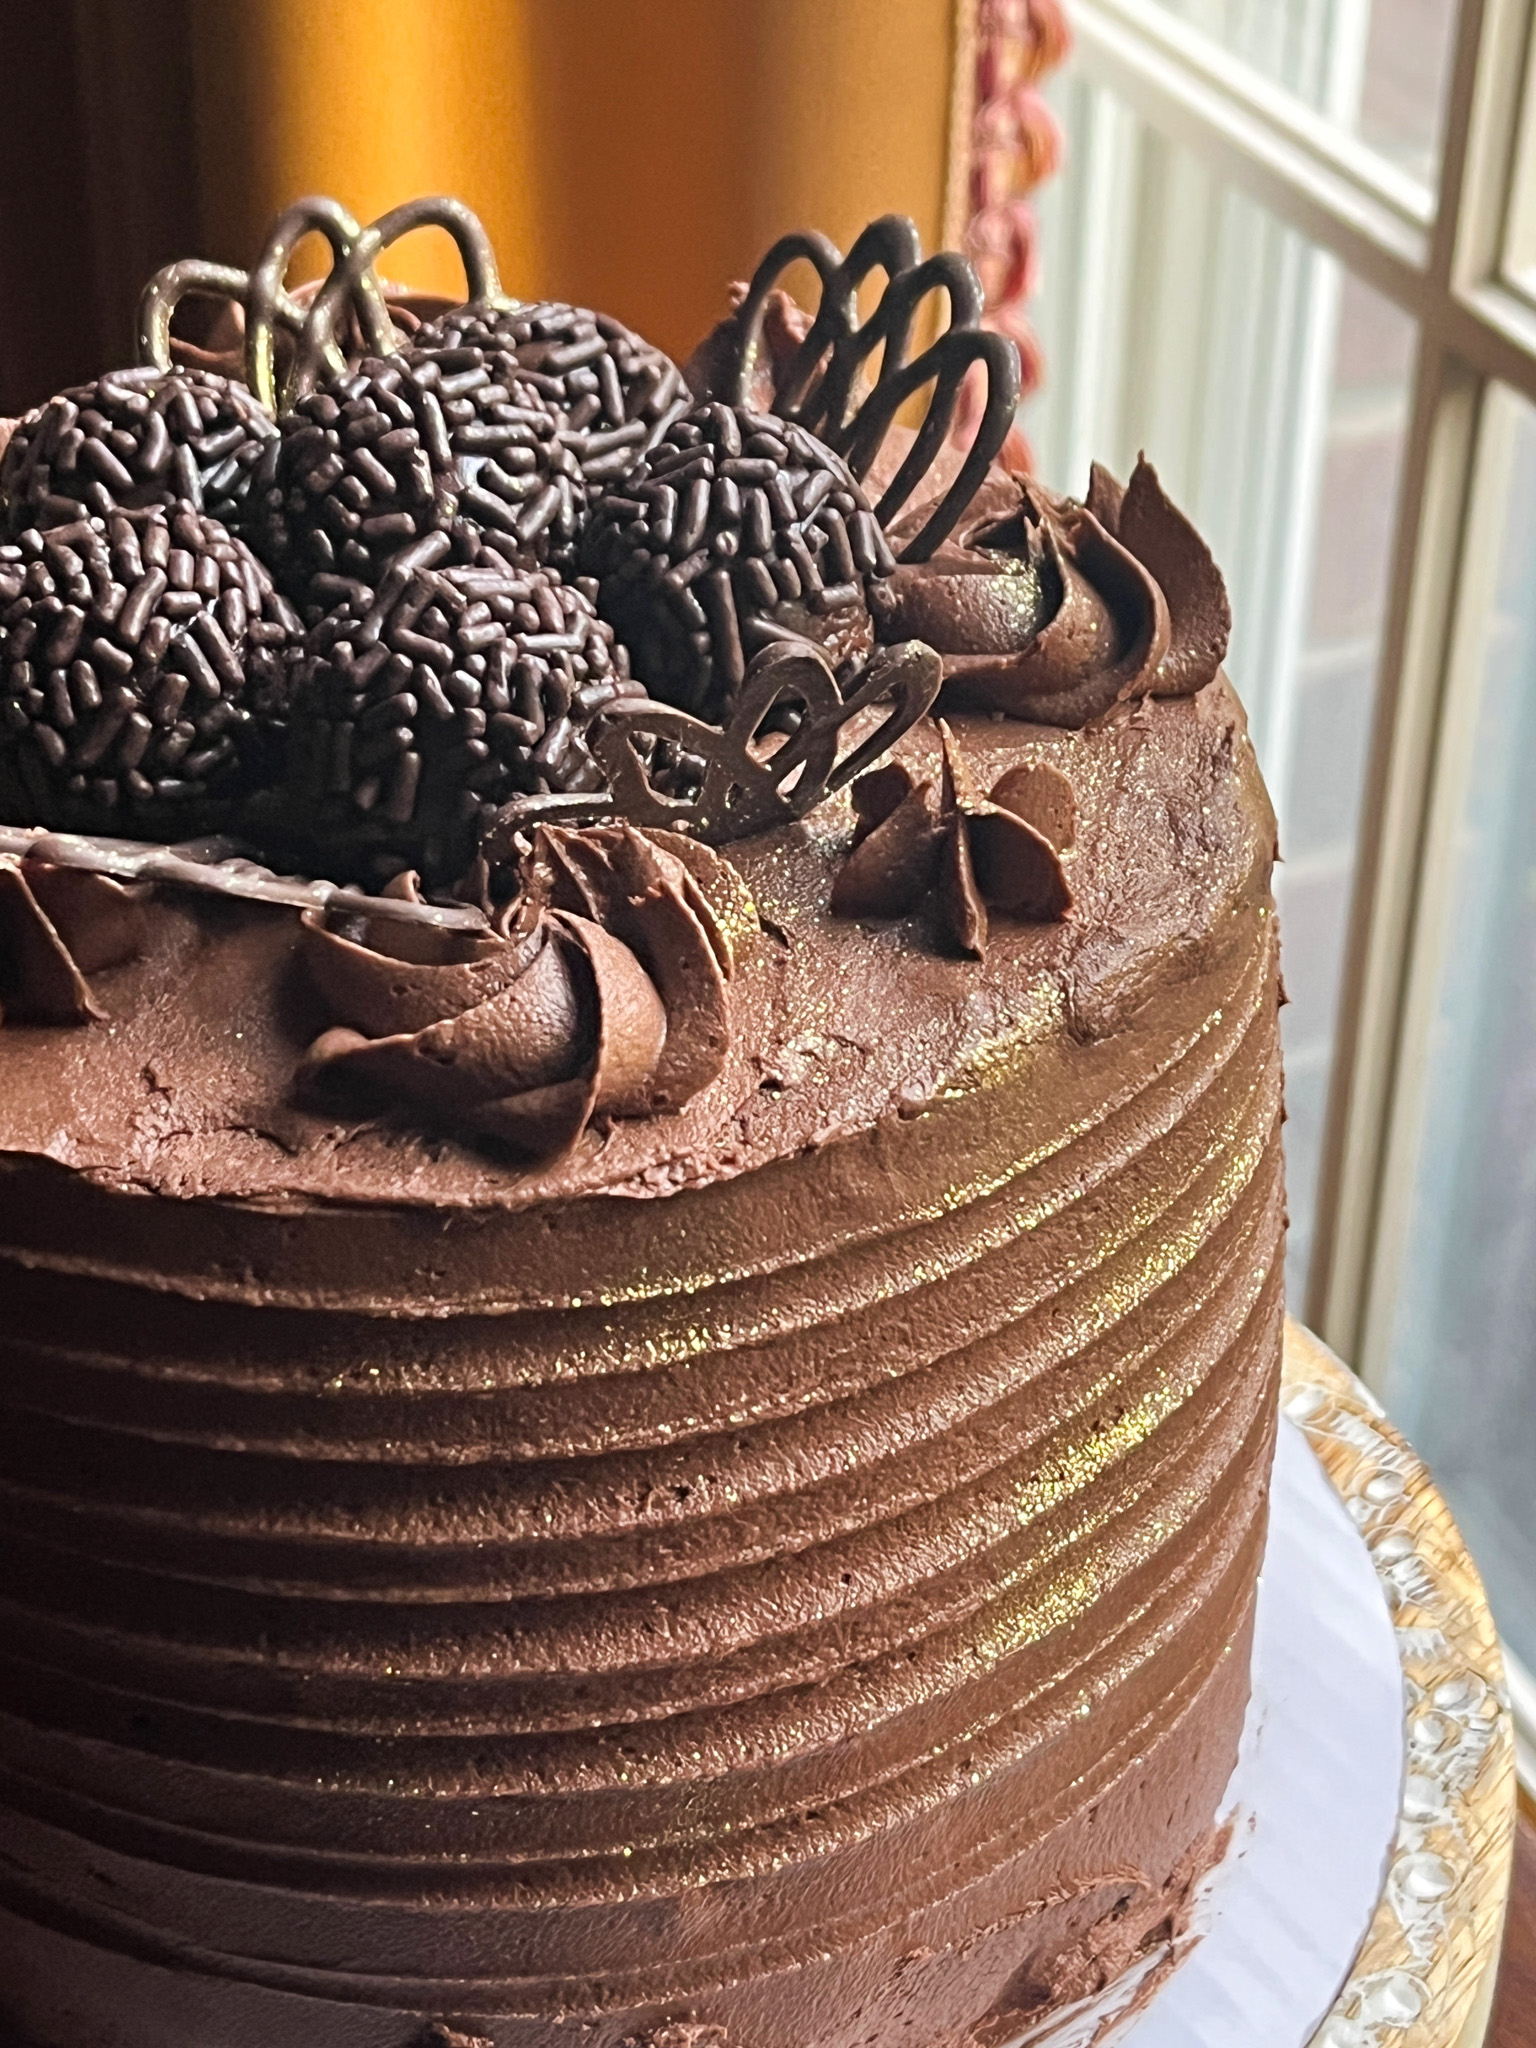
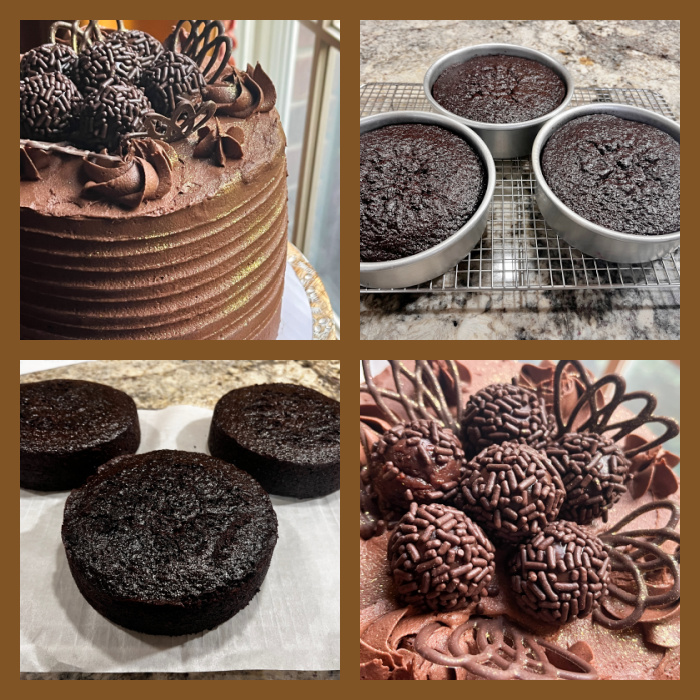
CHOCOLATE CELEBRATION CAKE WITH RASPBERRY FILLING (inspired by many sources)
for the cake: 1 + 3/4 cups (210g) all-purpose flour 1 + 1/2 cups (300g) sugar 3/4 cup (70g) cocoa powder 2 teaspoons baking soda 1 teaspoon baking powder 1 teaspoon kosher salt 1 cup buttermilk, shaken 1/2 cup vegetable oil 2 large eggs, at room temperature 1 teaspoon pure vanilla extract 1 cup freshly brewed hot coffee
for the buttercream: 1 cup (226g) unsalted butter, softened to room temperature 3 + 1/2 cups ( 420g) confectioners’ sugar 1/2 cup ( 45g) unsweetened cocoa powder 2 to 3 Tablespoons heavy cream pinch of salt 1 teaspoon vanilla extract
for the filling: Raspberry jam (store-bought or homemade)
for optional decoration: Brazilian brigadeiros (click here for recipe)
Heat the oven to 350 degrees F. Butter three 7-inch round cake pans. Line with parchment paper, then butter and flour the pans, or use baking spray.
Sift the flour, sugar, cocoa, baking soda, baking powder, and salt into the bowl of an electric mixer fitted with a paddle attachment and mix on low speed until combined. In another bowl, combine the buttermilk, oil, eggs, and vanilla. With the mixer on low speed, slowly add the wet ingredients to the dry. With mixer still on low, add the coffee and stir just to combine.
Pour the batter into the prepared pans and bake for 35 to 40 minutes, until a cake tester comes out clean. Cool in the pans for 20 minutes, then turn them out onto a cooling rack and cool completely before filling and frosting.
Make the frosting: On a stand mixer fitted with a paddle attachment, beat the butter on medium speed until creamy, about 4 minutes. Add confectioners’ sugar, cocoa powder, heavy cream, salt, and vanilla extract. Beat on low speed for 30 seconds, then increase to high speed and beat for 1 full minute. Adjust consistency with more powdered sugar or with heavy cream. Place in a piping bag fitted with appropriate icing tips for the decorations you desire.
Place the first cake on a circular cardboard, add a circle of buttercream as a dam around the perimeter, fill the center with jam. Place second cake on top, repeat the process. Place the last cake on top, cover with a thin crumb cake layer of buttercream and refrigerate for 30 minutes. Finish the buttercream icing, add brigadeiros if so desired, or any other decorations.
Comments: I donated this cake whole, so we have not tried it, but I have used this recipe before and it is really a delicious, very moist, intensely chocolate-y cake. The raspberry jam goes very well with it, although it is also outstanding with some salted caramel as the filling.
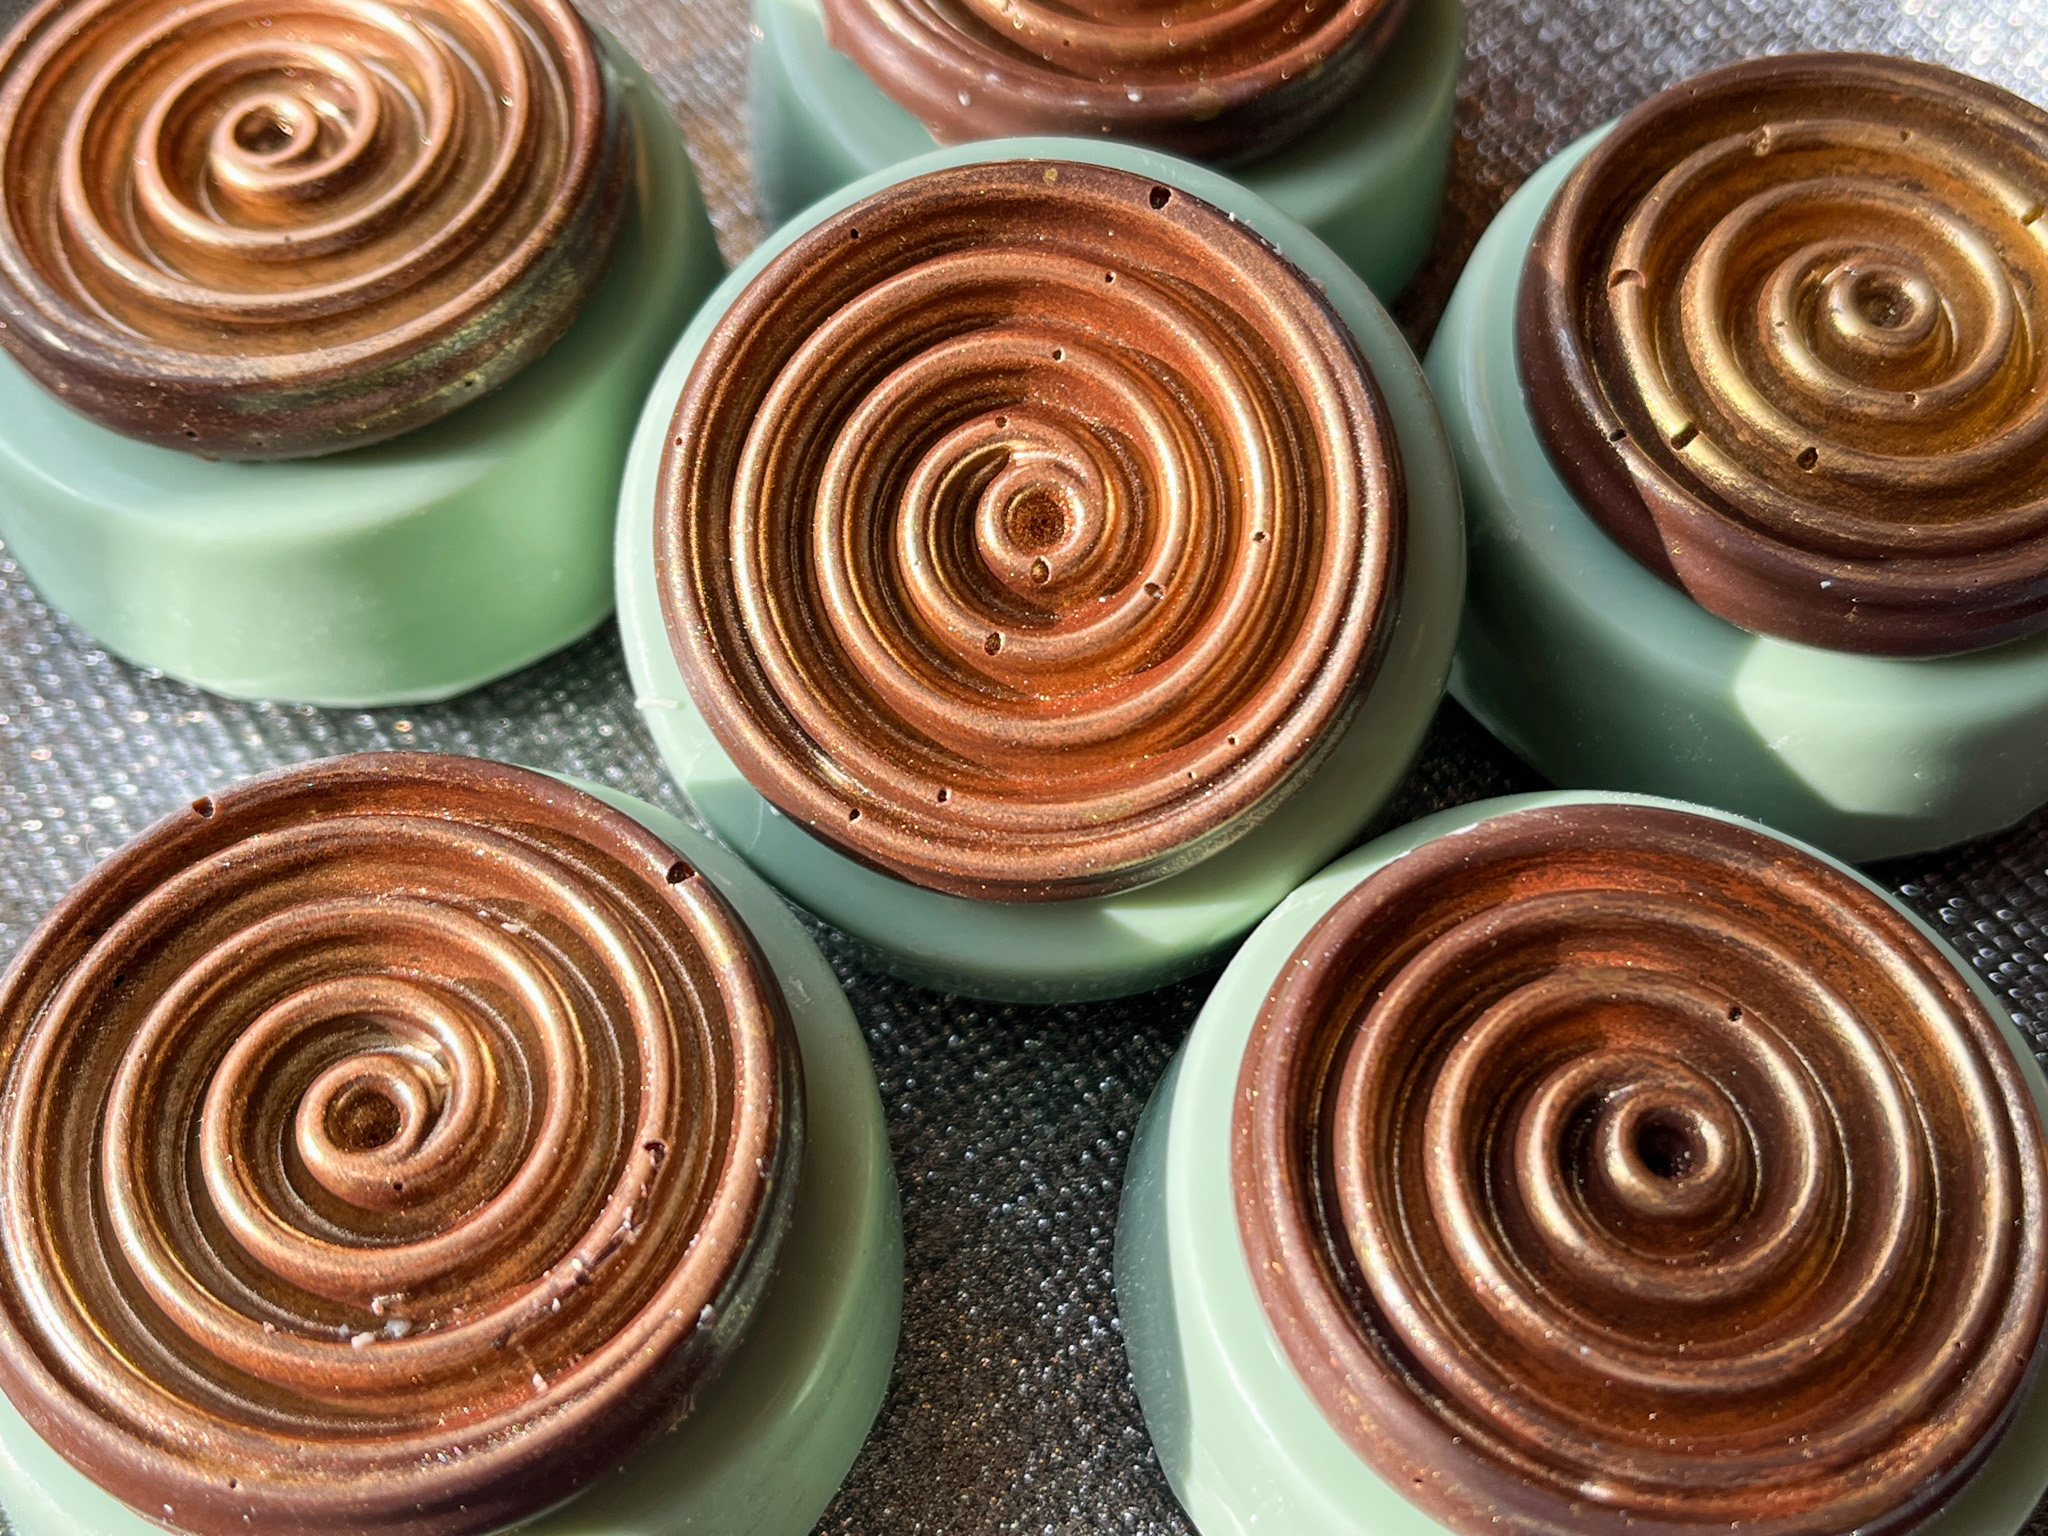
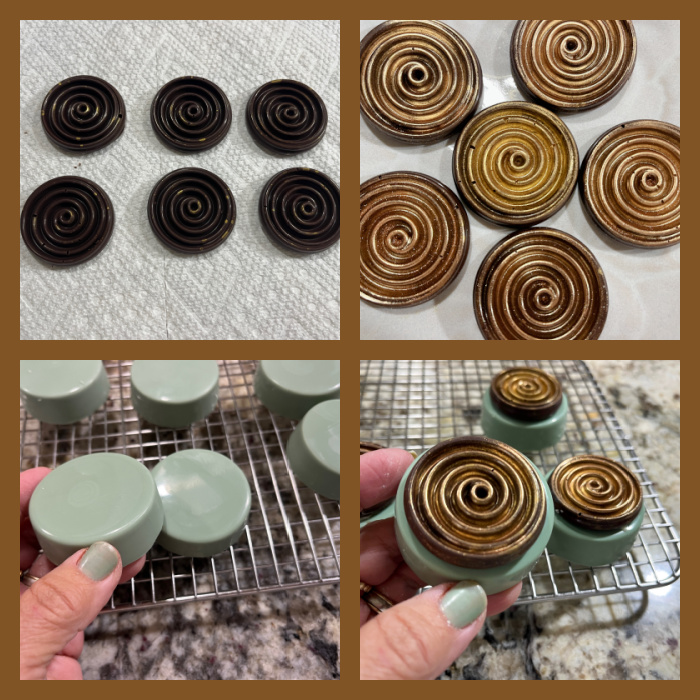
CHOCOLATE COVERED OREOS, DA VINCI STYLE
These turned out so cool, I was super happy with them. My sister Norma pointed out they reminded her of Leonardo da Vinci’s inventions, so that’s the reason for the name. I used a silicone mold I’ve had for many years to make the decorations with dark compound chocolate, later brushed with luster powder copper. I used a very light green to tint the chocolate for the molds.
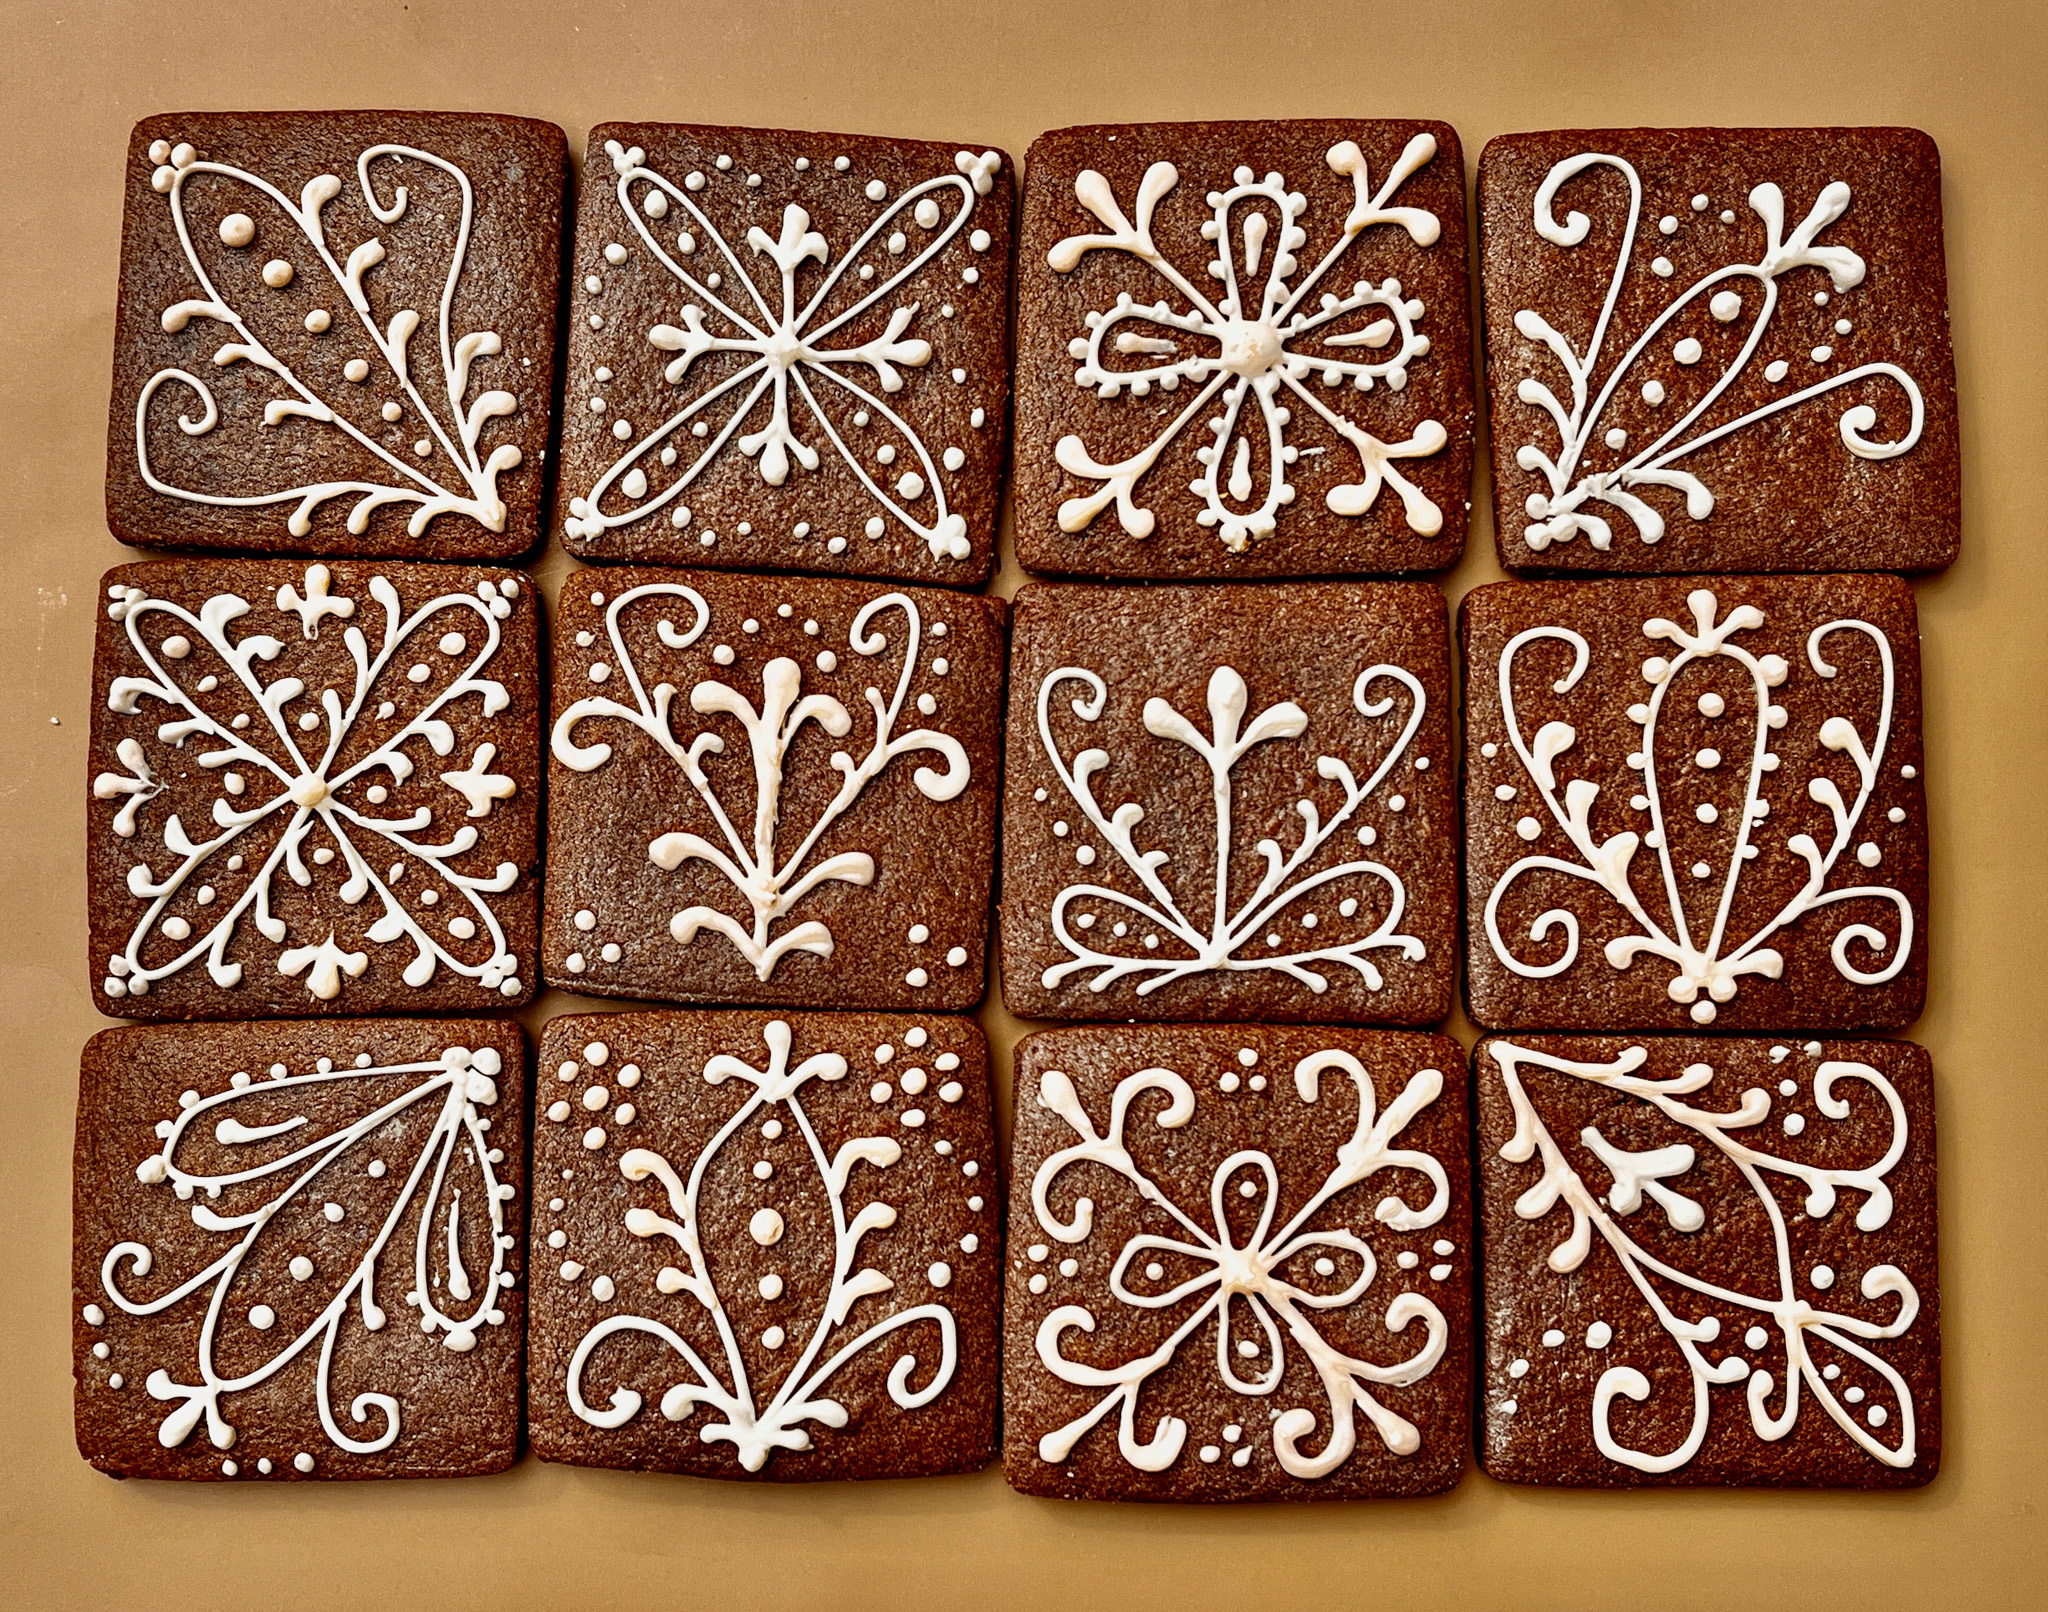
Finally, I close this post with a series of chocolate cookies decorated according to a tutorial from Tunde Dugantsi. Simple white Royal icing, good practice for fine line piping. It would also work well on gingerbread cookies, keep that in mind. I used my default chocolate cookie recipe for those (find it here).
I am totally in love with this cookbook! I have a soft spot for baking that is not overly sweet, which might sound strange, as I bake so many sugar cookies, macarons, and cupcakes. But a recipe that calls for adding miso to a cookie gets me dreaming. Salted caramel? Same thing. This is actually my second cookbook from Kat Lieu, and I think both would be a great Christmas gift for bakers (wink, wink).
Without further ado, here is a wonderfully delicious recipe for Masala Macaroons…
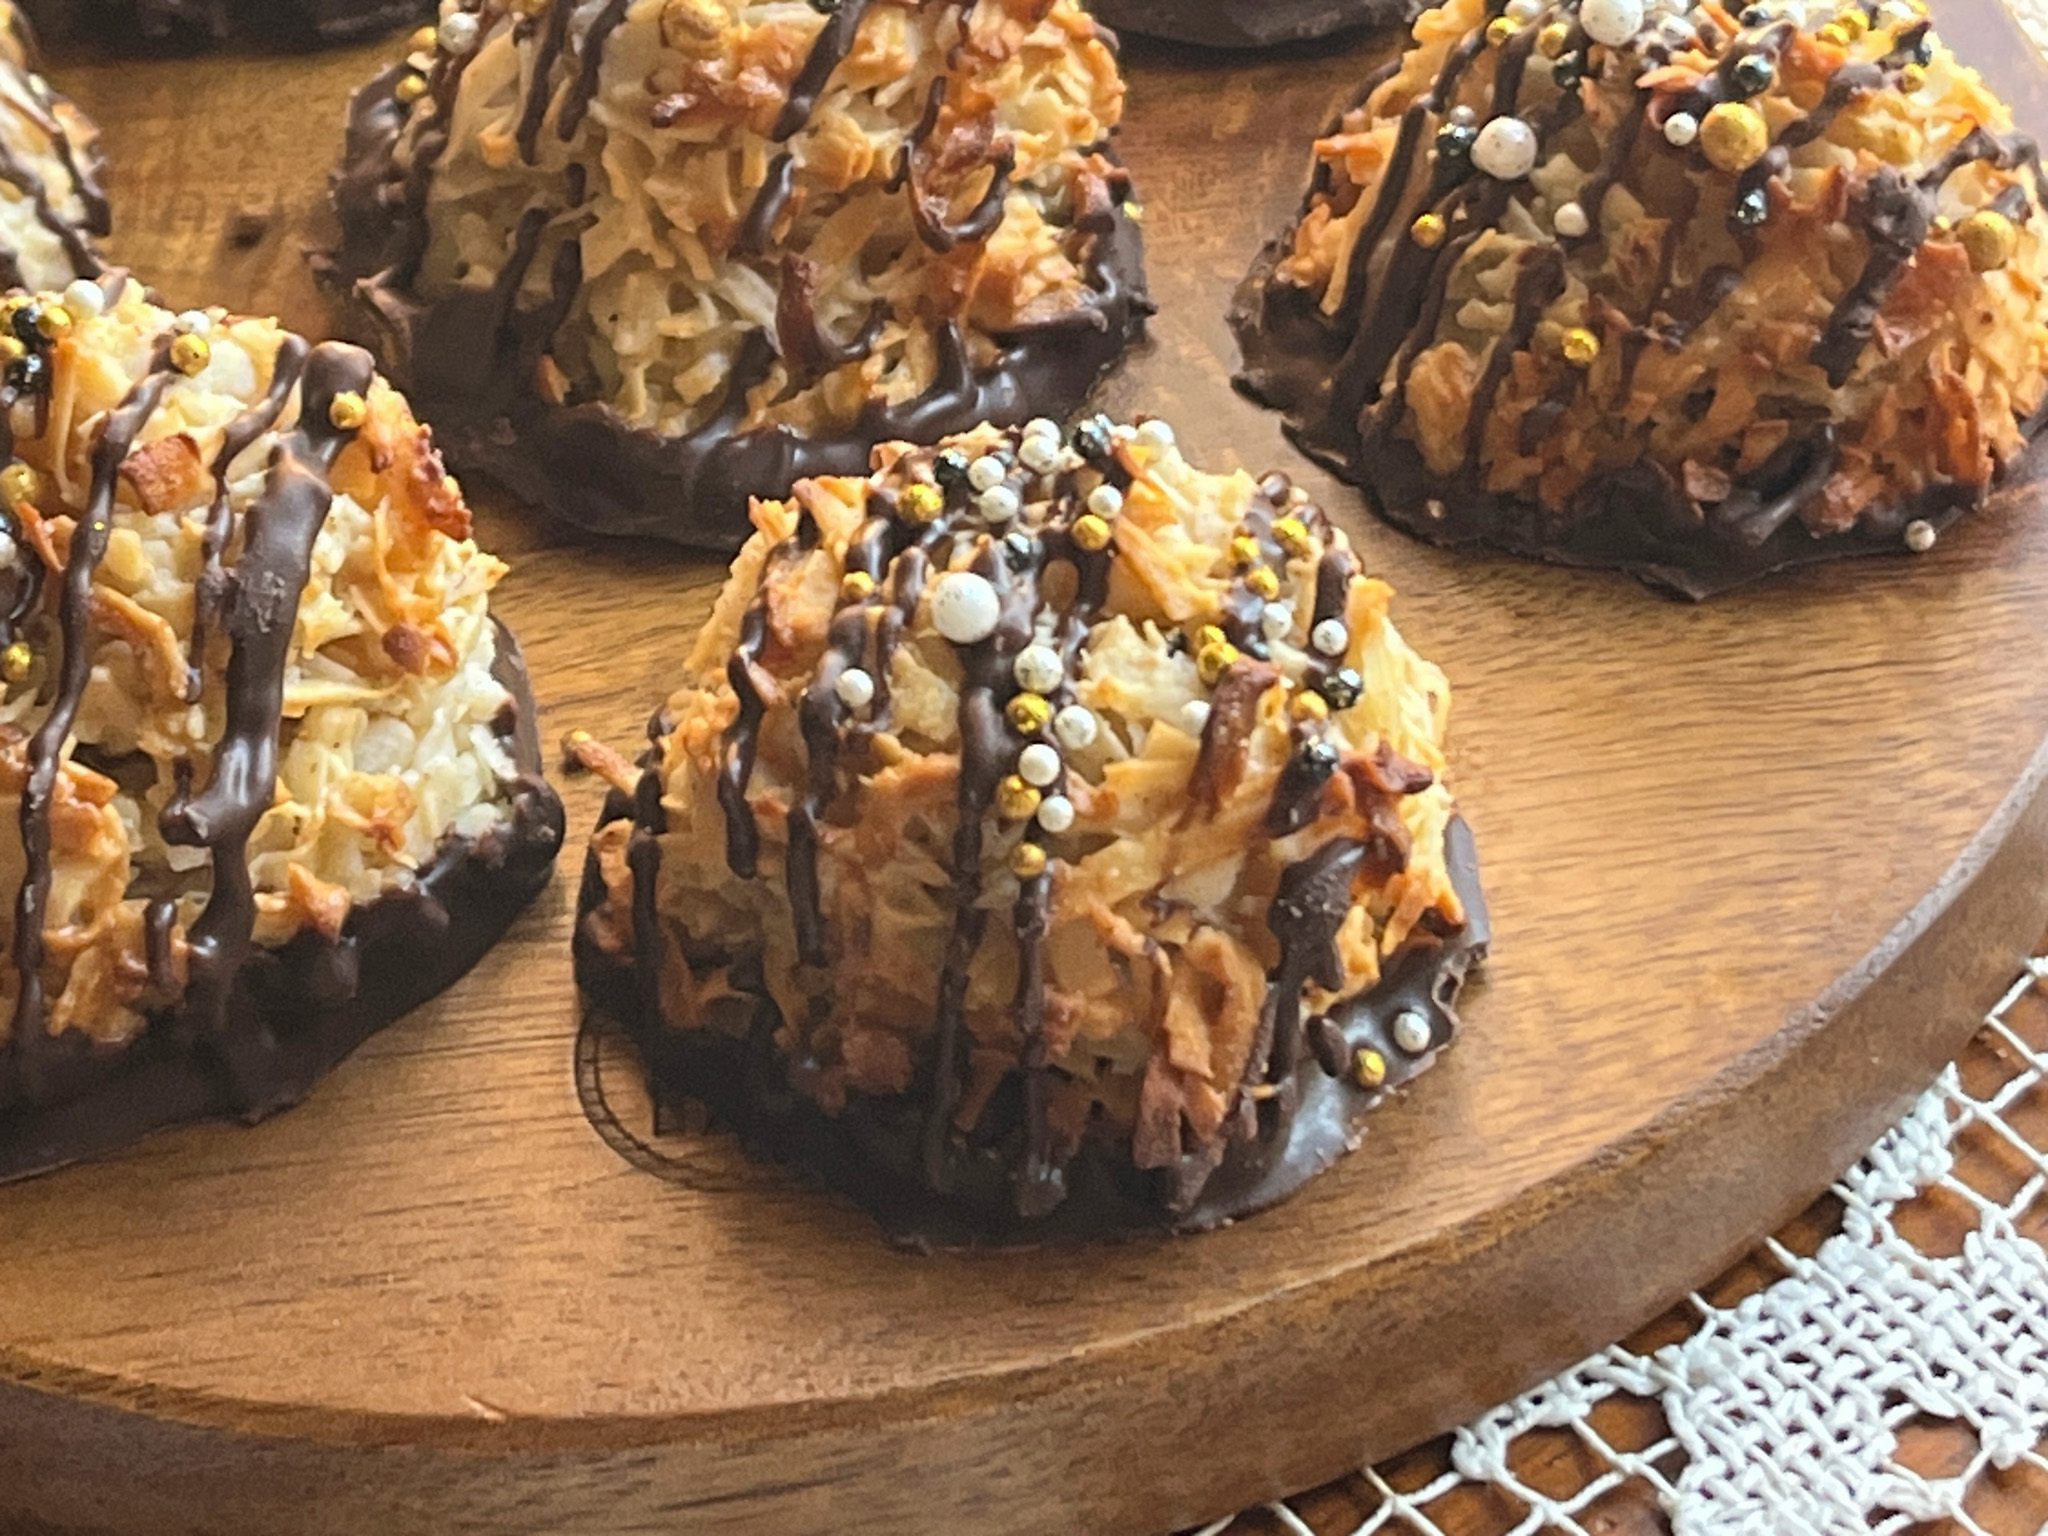
MASALA MACAROONS (published with permission from 108 Asian Cookies)
One 14-ounce (396 g) can sweetened condensed milk 1 ripe small banana, mashed 1 teaspoon red miso One 14-ounce (396 g) bag unsweetened shredded coconut 2 teaspoons garam masala ½ teaspoon ground cardamom ½ teaspoon ground ginger About ⅓ cup (60 g) semisweet chocolate chips, plus more as needed 1 teaspoon neutral oil Sea salt flakes, for garnish Sprinkles, for garnish (optional)
Heat the oven to 350°F. Line two baking sheets with parchment paper. In a large mixing bowl, mix the condensed milk, mashed banana, and miso until combined. Add the shredded coconut, garam masala, cardamom, and ginger and mix until well combined and the dough can hold itself together.
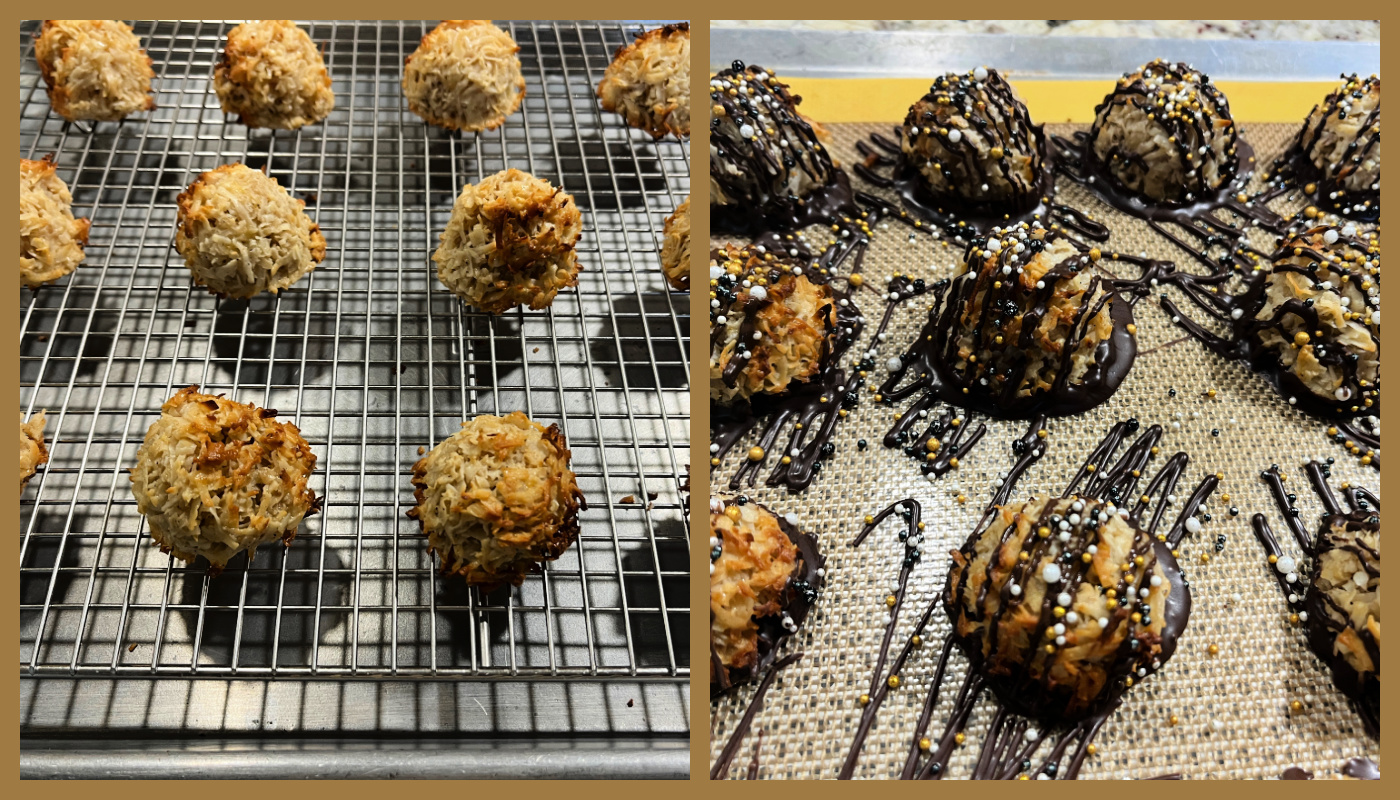
Scoop heaping tablespoons of batter for each macaroon and place on the prepared baking sheet. Keep their rounded mound shapes and give each about 1 inch of space. Bake all the macaroons until the edges are crispy and golden brown and the tops are lightly toasted, 16 to 18 minutes.
Let the macaroons set on the baking sheets for 5 minutes before transferring to a wire rack to cool completely. While the macaroons are cooling, combine the chocolate chips and oil in a medium heatproof bowl and microwave in 30-second bursts, stirring after each interval, until the chocolate is melted and smooth. Dip the bottoms of the cooled macaroons into the melted chocolate. Place them back on the parchment-lined baking sheets to set. Drizzle additional melted chocolate on top of each macaroon. Before the chocolate sets completely, sprinkle a few flakes of sea salt and sprinkles on top of each macaroon.
Comments: These were superb, I confess to stealing one from the donation box and being happy that I did… If you don’t like coconut, of course these are not for you, but if you love them, be ready for a treat! Easy to make, rich and luscious, one will satisfy your sweet tooth, but the spices and miso tone it down substantially. Truly special… You need them in your life.
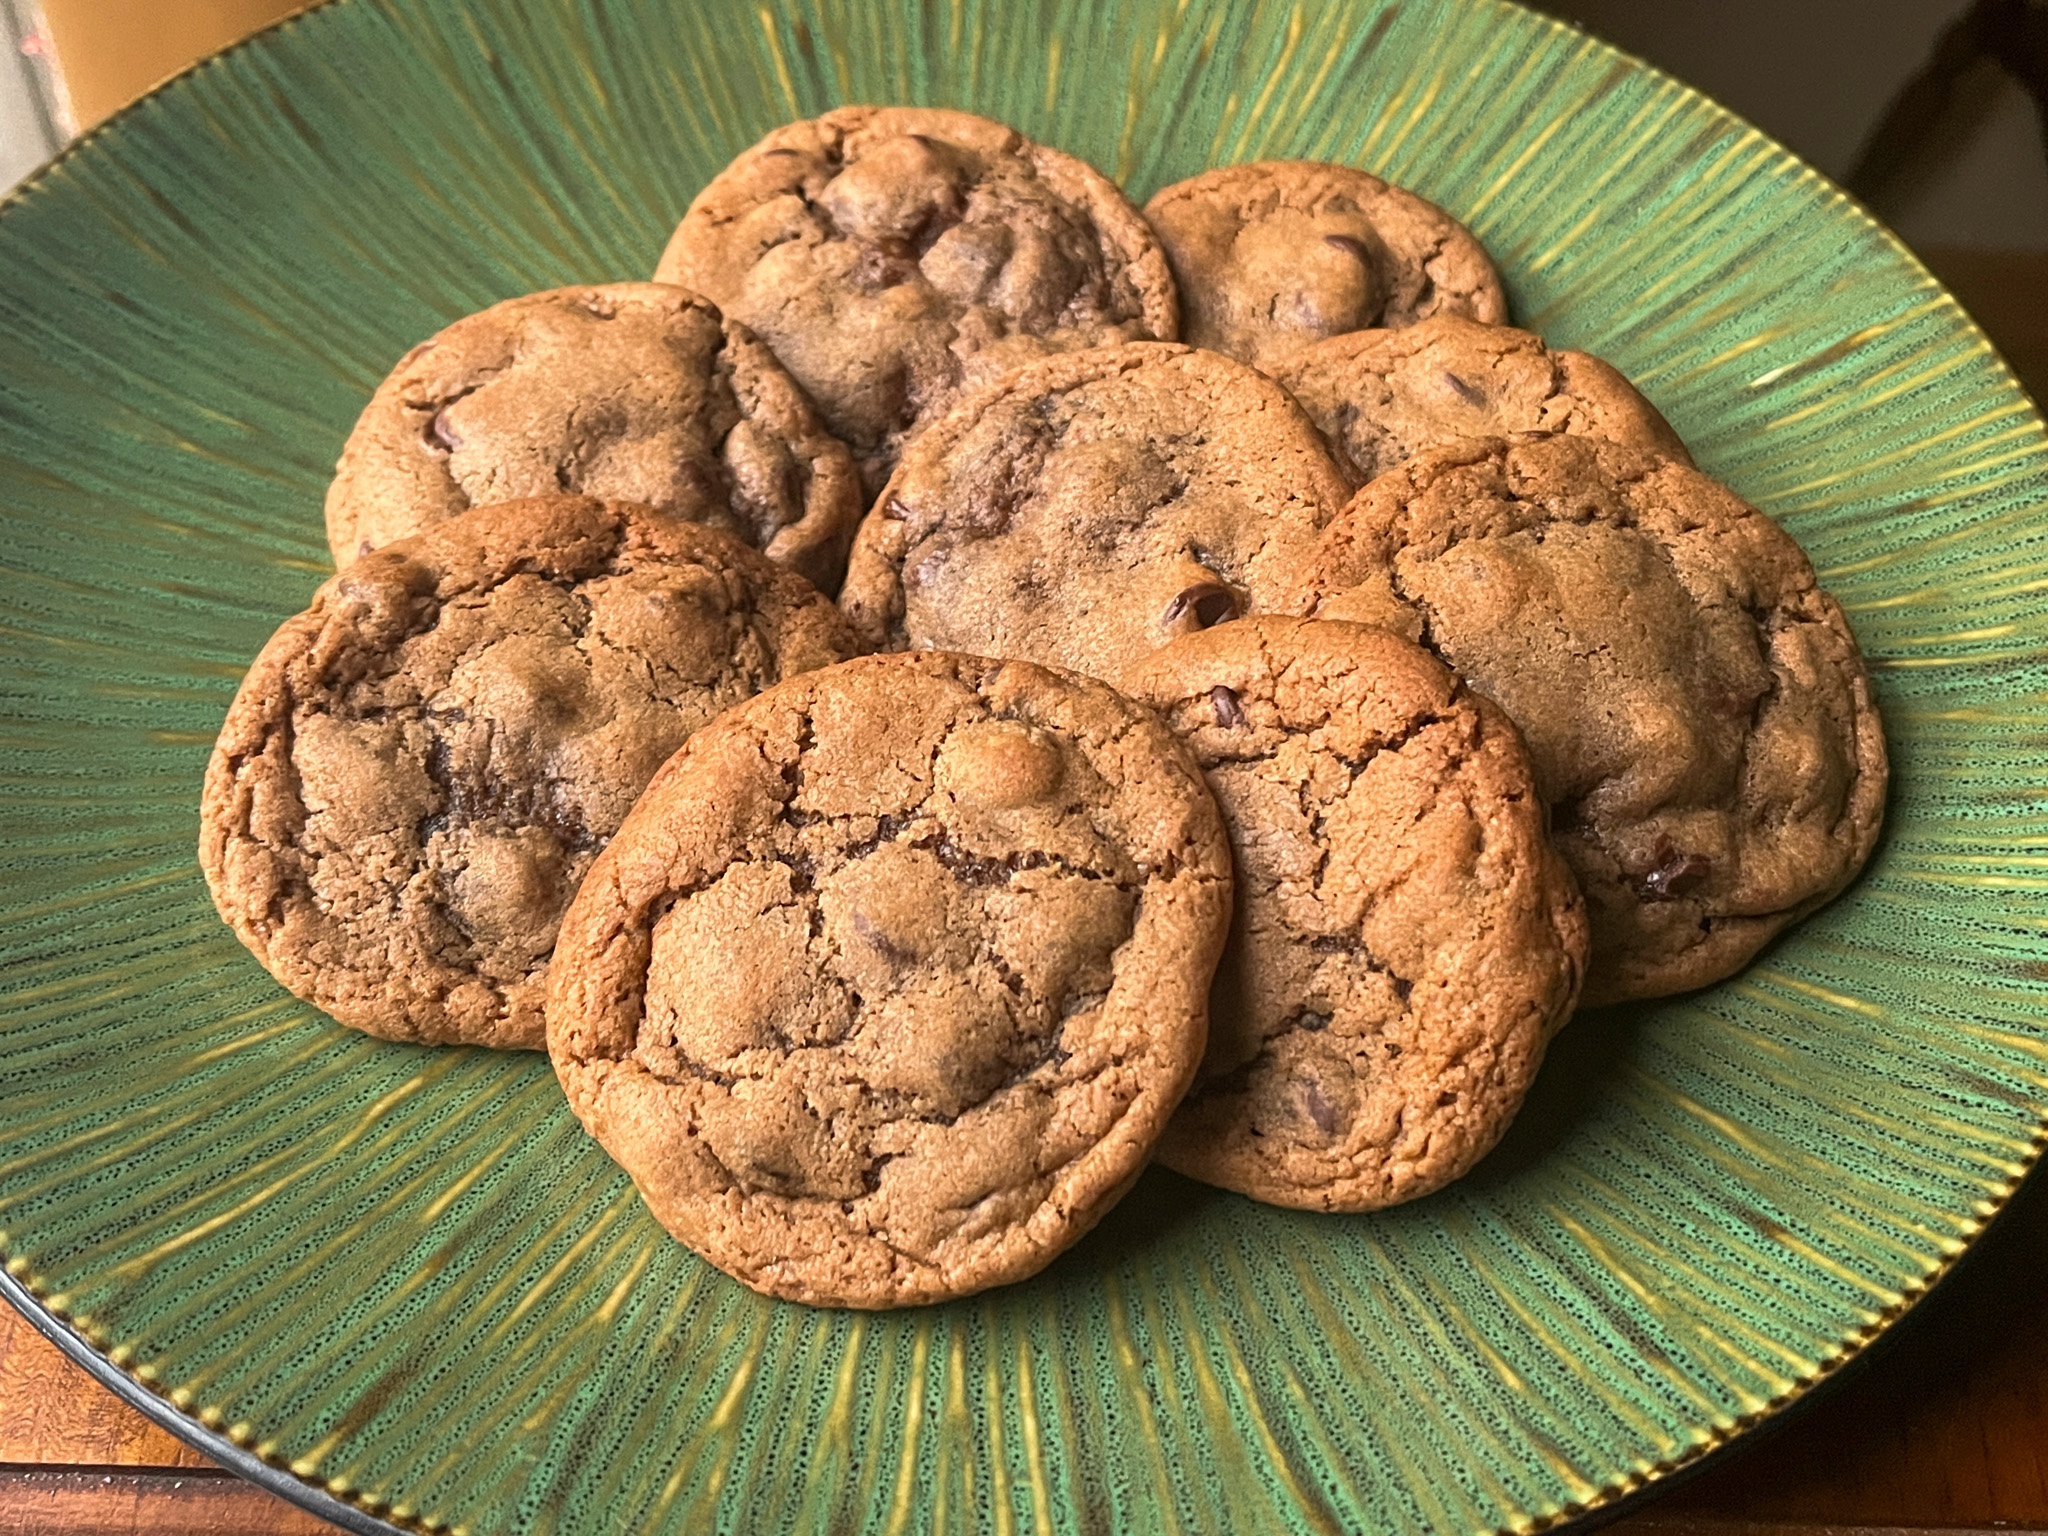
As a teaser, these are chocolate chip cookies described by Kat as Best Chocolate Chip Cookies Ever. They take Ovaltine, molasses and miso. To die for, honestly. You need these cookies and this cookbook in your life.
Big thank you to Kat for allowing me to share this recipe today!
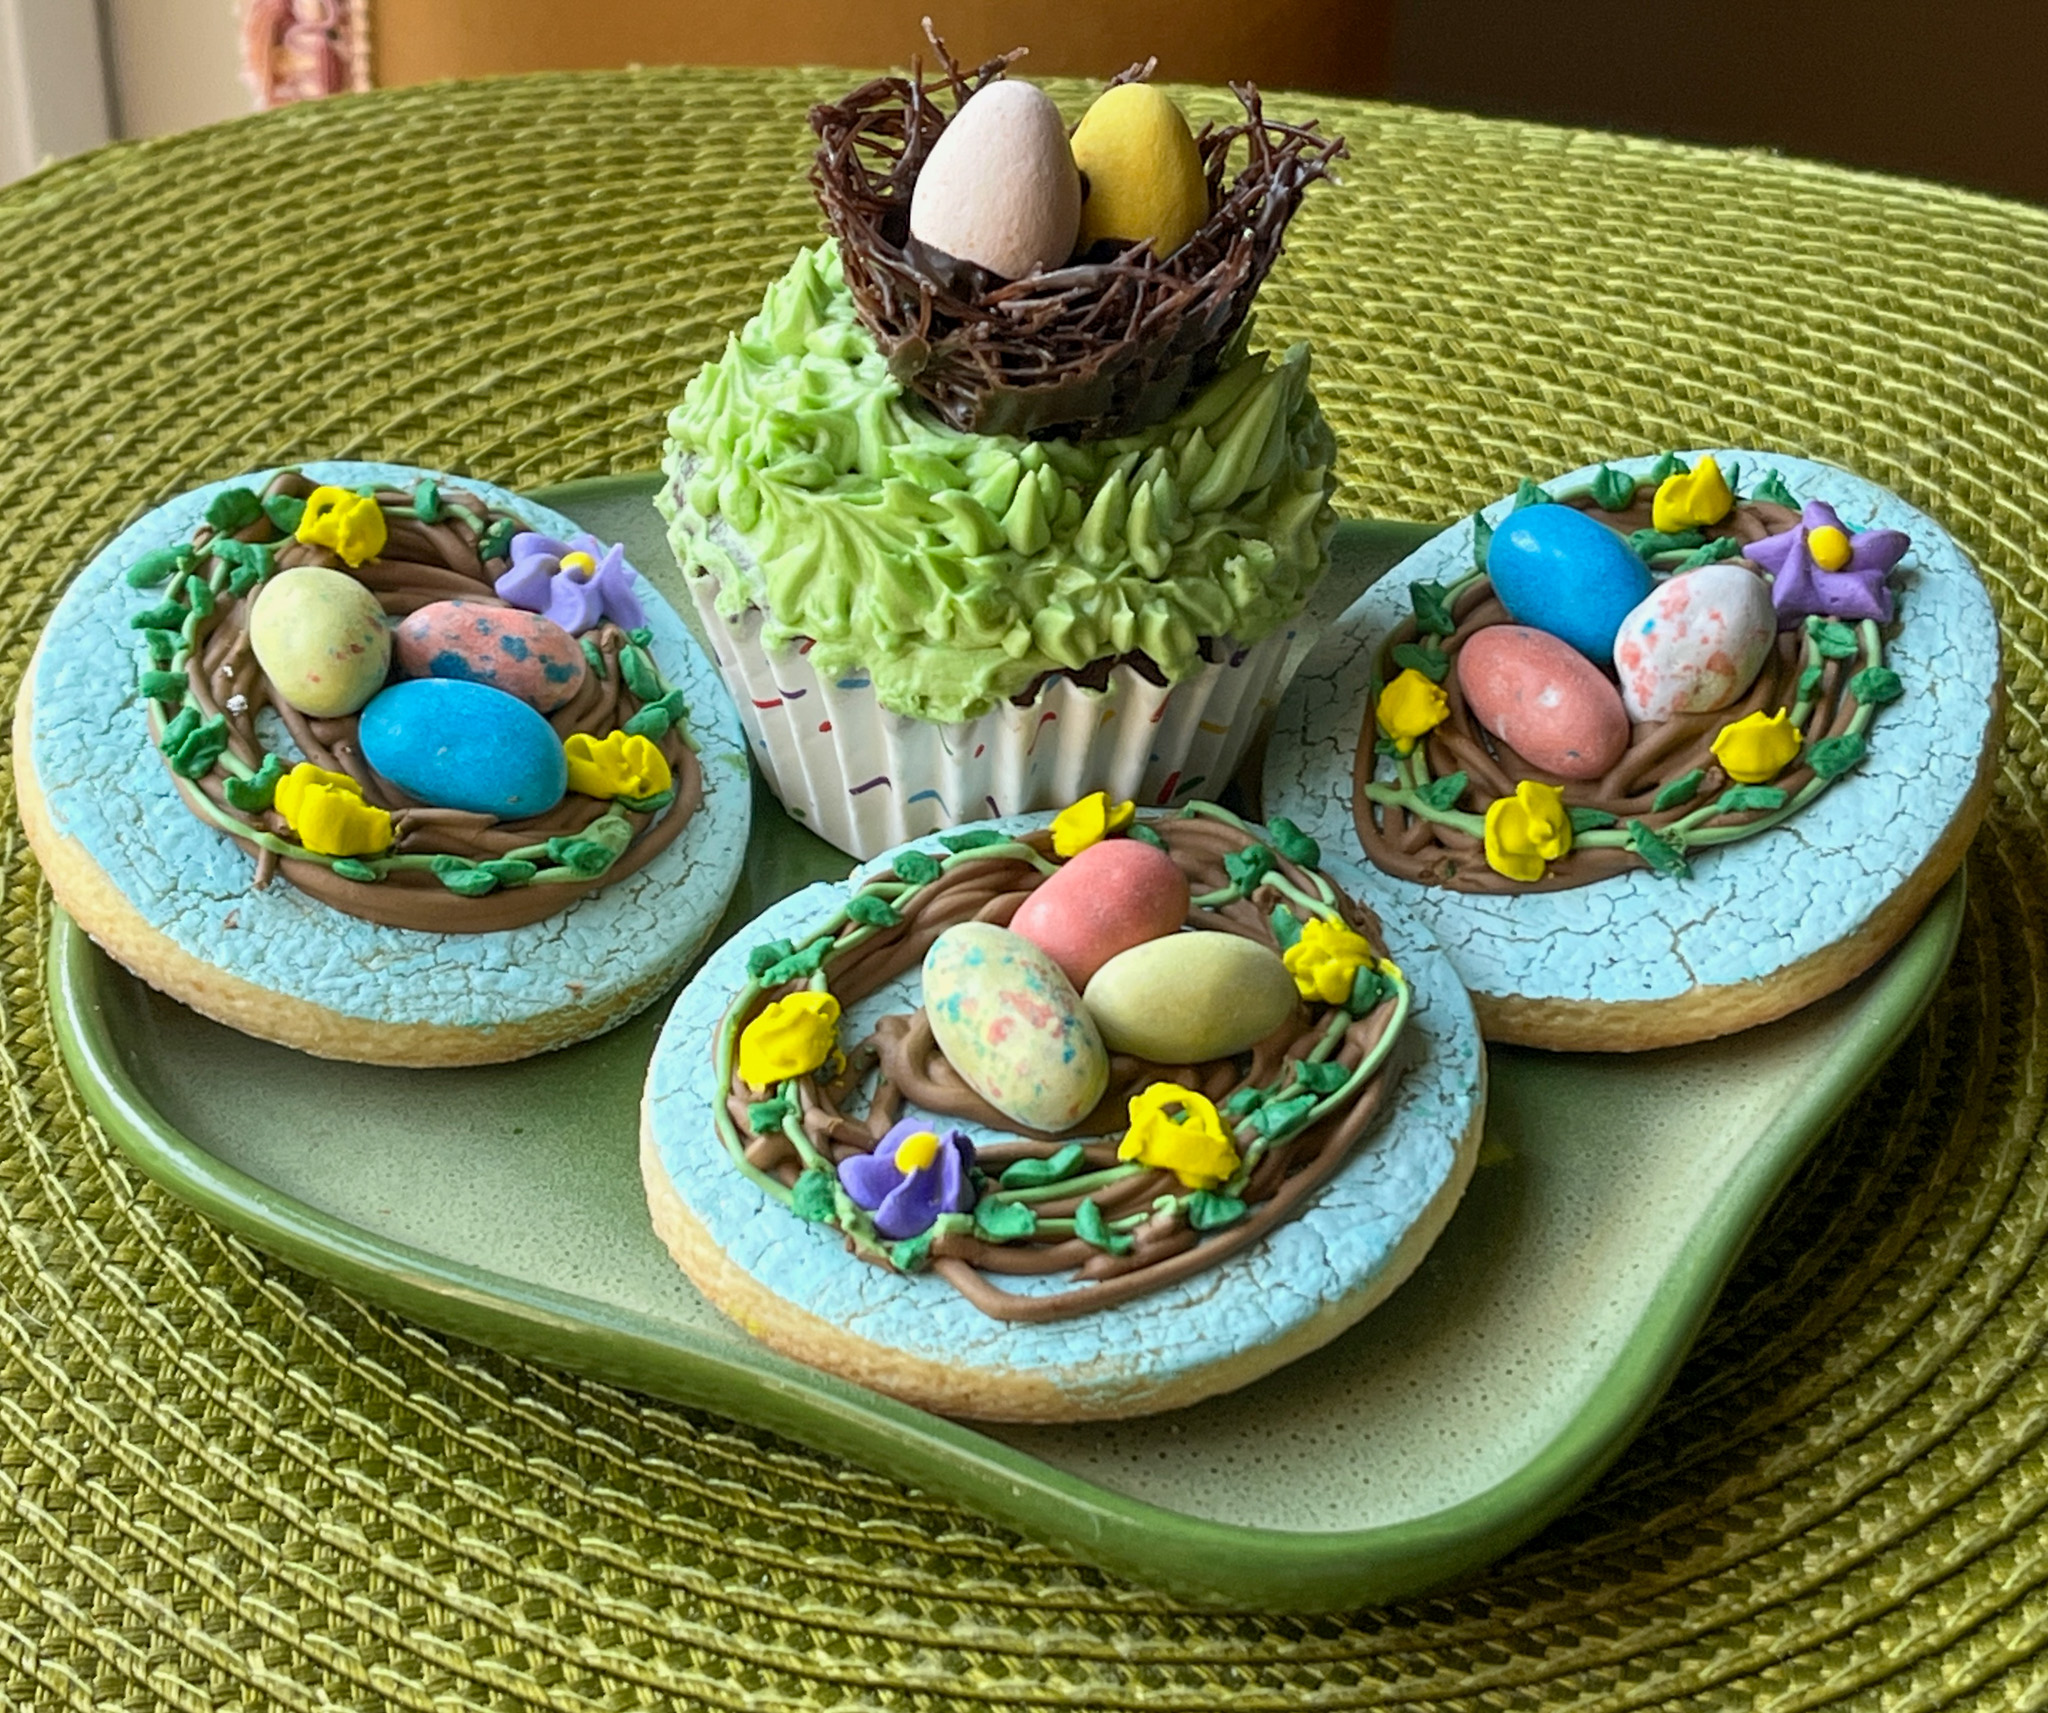
A small collection of bakes to celebrate the occasion… Cupcakes, cookies, bonbons… Let’s start with cupcakes, shall we?
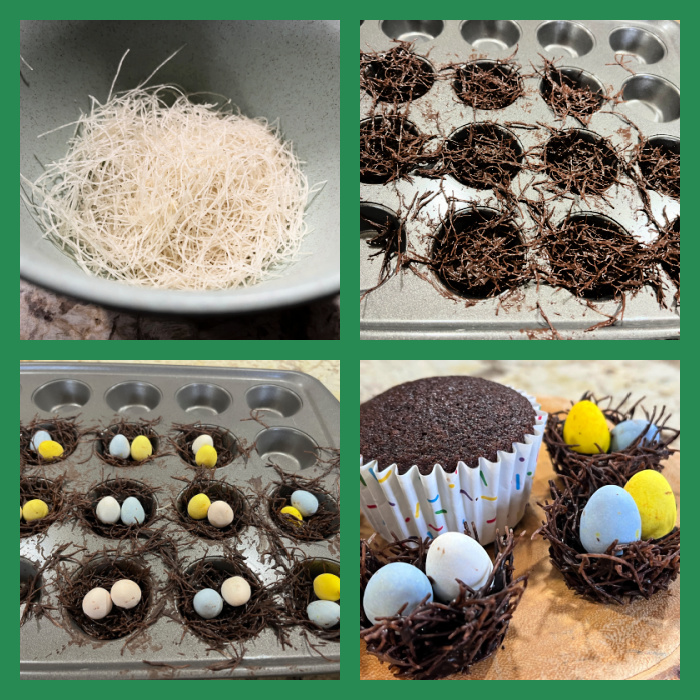
For the cupcakes, I went with chocolate, and used this recipe which is simple and wonderful. Frosting was a simple American buttercream, but the gilding of the lily was the little nest made with rice noodles broken up in little pieces, coated with melted chocolate and assembled in mini-muffin tins. I have tried other methods to make the nests and this was by far my favorite.
This is really a very very messy process, and there was some colorful language going around The Bewitching Kitchen, I won’t lie to you. But aren’t those nest super cute? Totally worth the trouble. Get the noodles and cut them with scissors in small little pieces. It will make a Royal mess in your kitchen and you will find pieces of noodles in unexpected places. Melt chocolate, coat them well (gloves are mandatory), and while everything is still pliable and warm, stick little portions inside mini muffin tins. Add the eggs and let it all set.
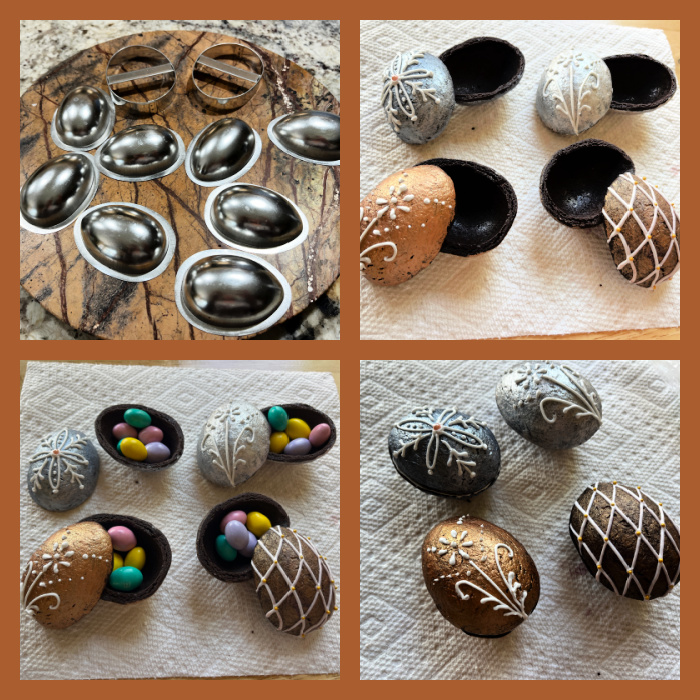
TRI-DIMENSIONAL EASTER EGGS
These are not made of chocolate, the shells are my favorite chocolate cookie (click here for recipe, I omitted the chipotle powder for this version) baked into these cute little molds. Once they are baked, I brushed them with luster powder mixed with vodka, decorated with Royal icing and filled with mini peanut butter eggs.
.
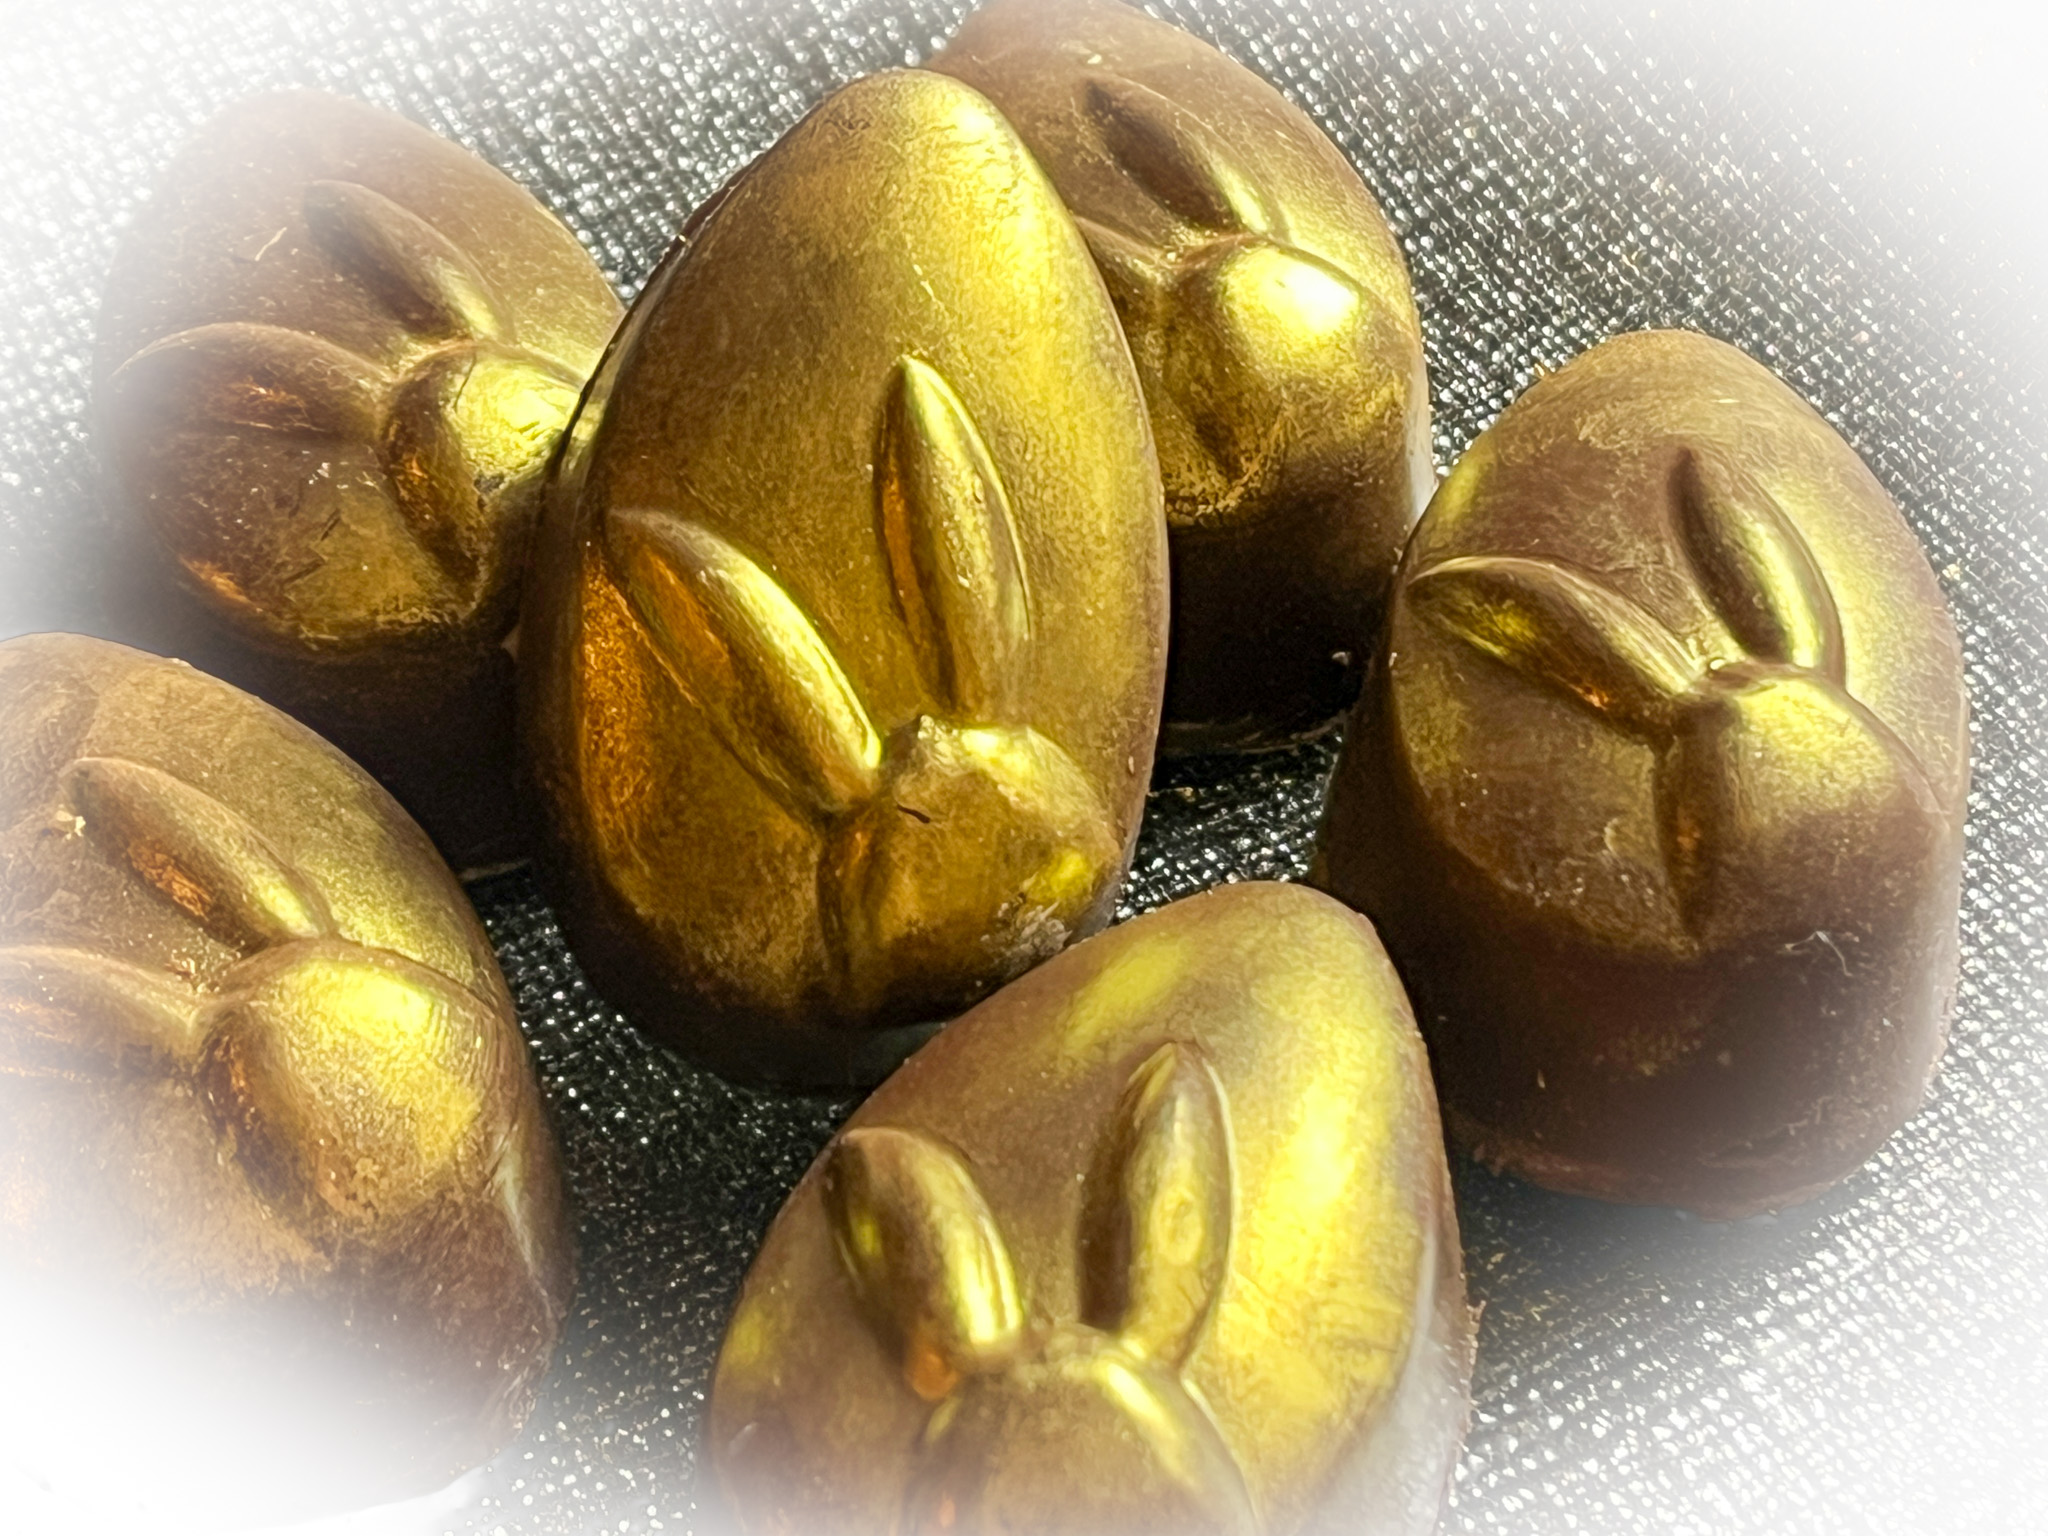
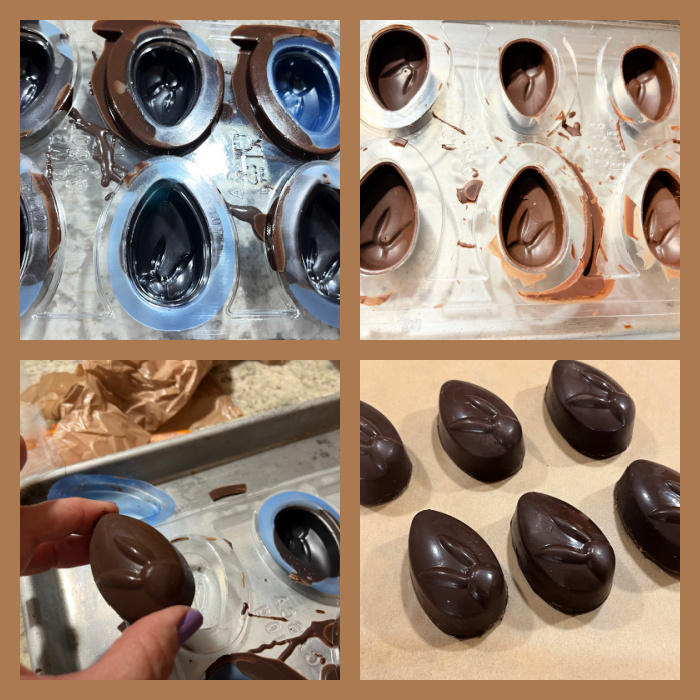
BUNNY BONBONS
A little labor of love, you’ll need a special mold for these babies, found at one of my favorite stores, Evil Cake Genius. It is a three component mold, so you make the top, let it set, fill with whatever you want (I used lemon brigadeiro), then close the bottom with more chocolate. A very detailed video is available here.
.
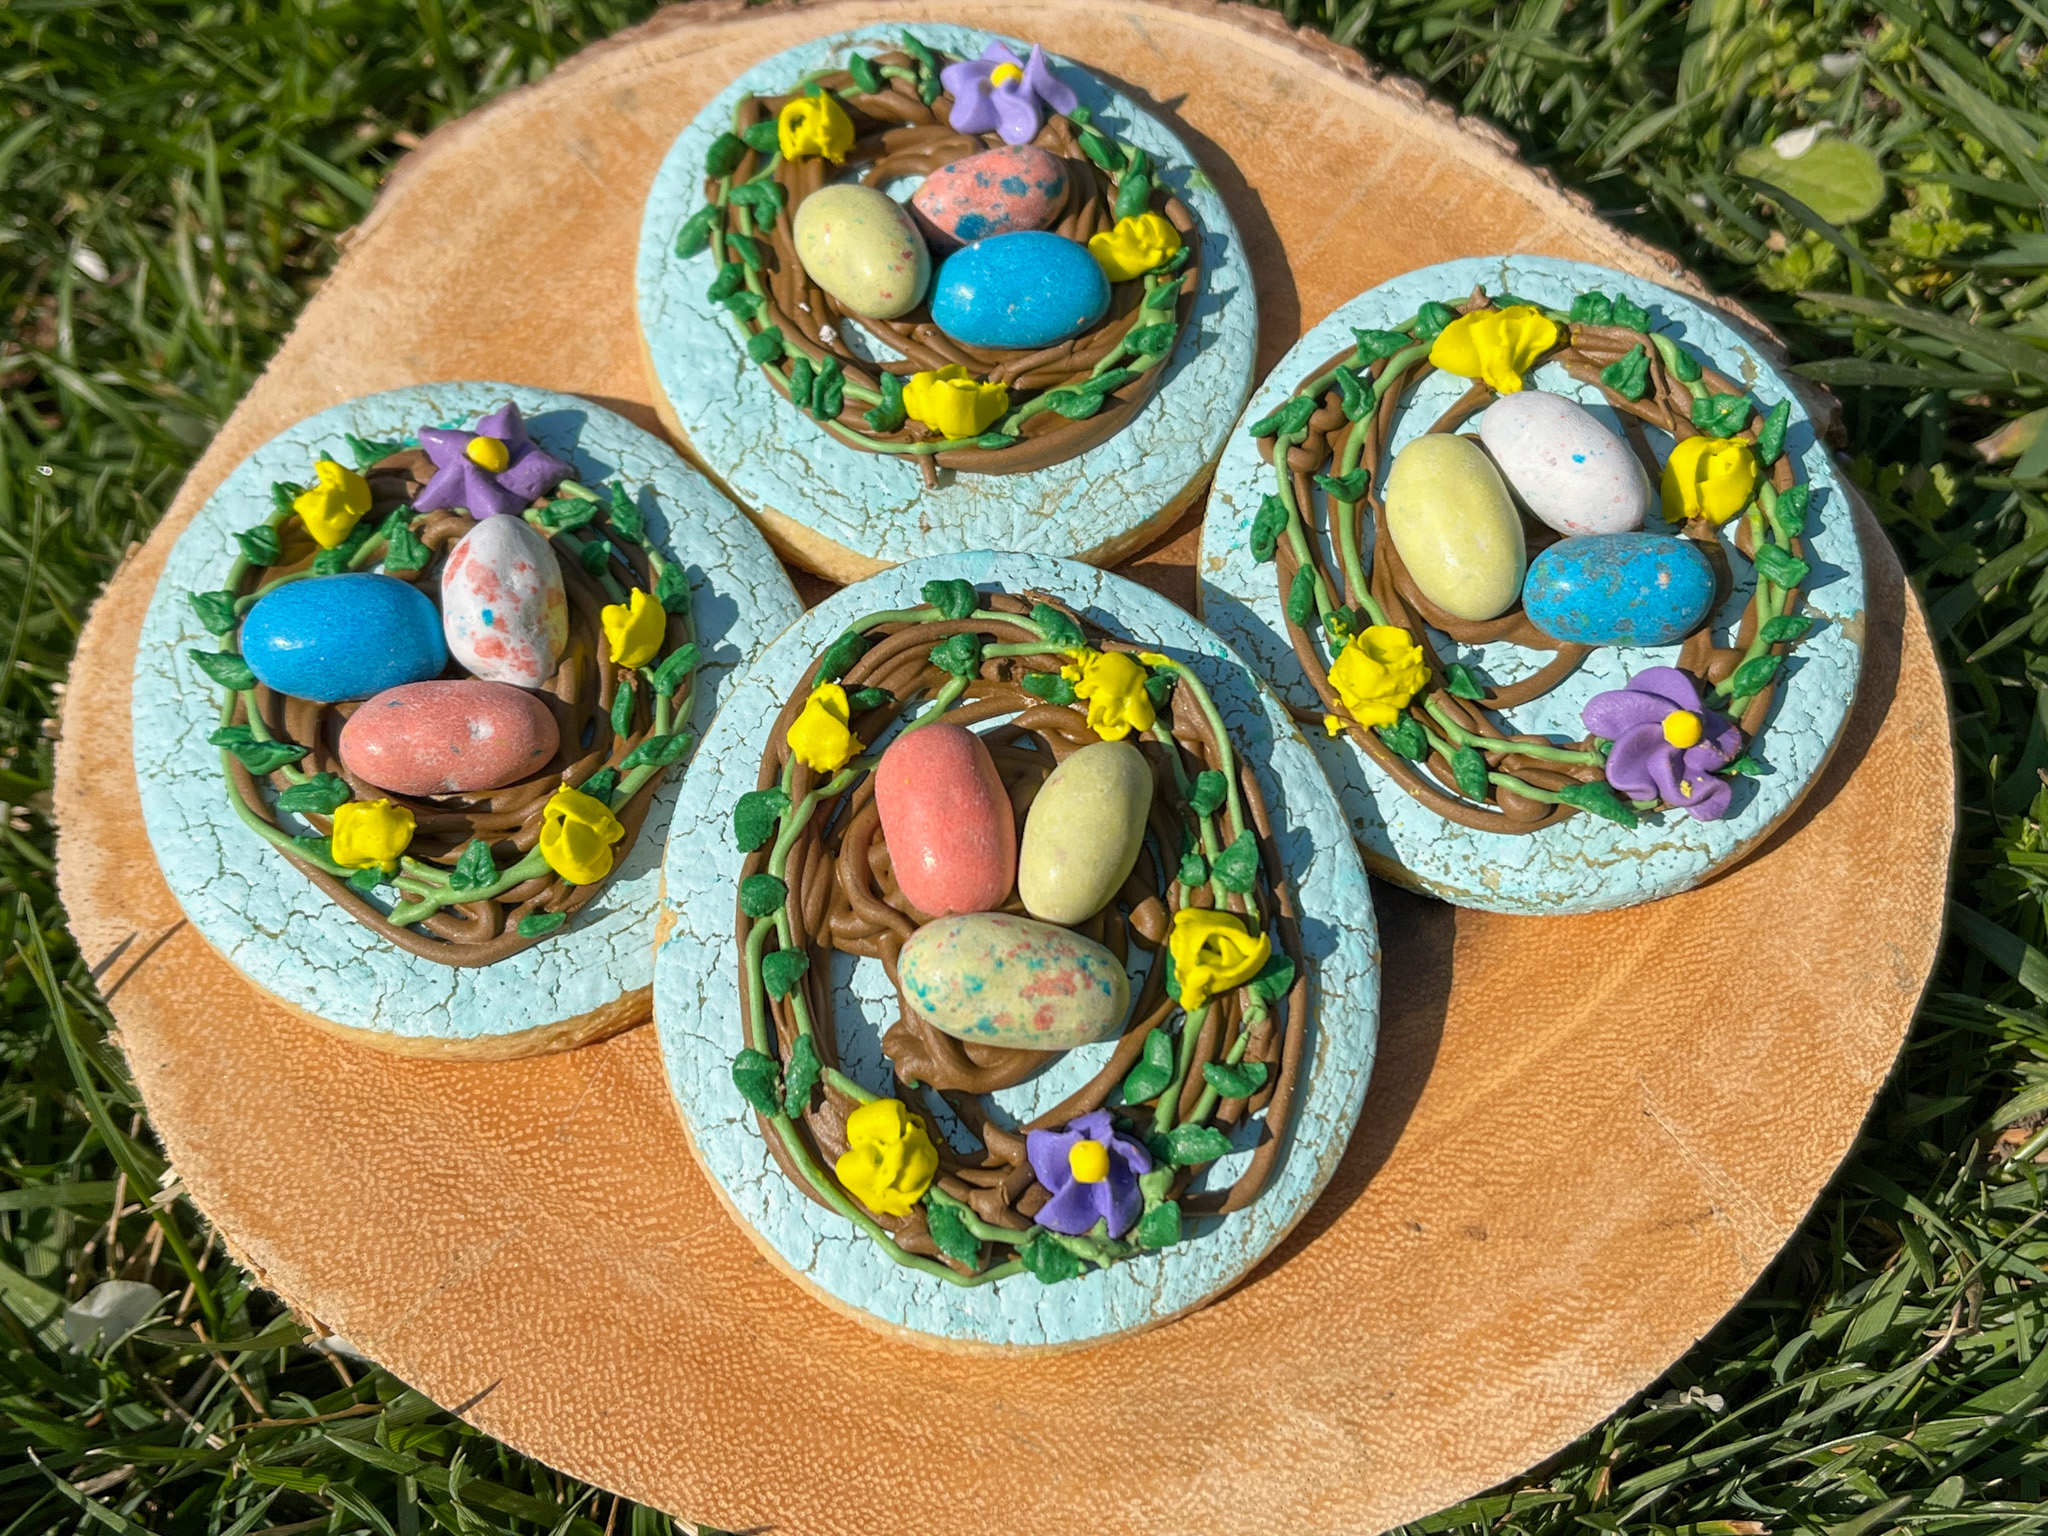
EGG NESTS CHOCOLATE COOKIES
Very little icing on these cookies, I brushed them with Americolor White + a touch of turquoise before baking. Then just added a few details with piping consistency icing, and placed mini eggs on top. They went together nicely with the cupcakes!
.
THE GOLFING RABBIT
Same cookie, made with the help of AI-generated image, and a mini-projector… Love these goofy fellows!
If you celebrate the date, I wish you a Happy Easter! Hope you have a wonderful day…