HELEN FLETCHER’S PINEAPPLE KOLACHE

I am going to say something quite daring, so here it goes: this might very well be the best thing I’ve baked in a whole year! If you follow my blog, you probably know I am quite fond of Helen’s recipes, because not only they always work, but her explanations are crystal clear, and make you comfortable to try something even if it seems complex or out of your skill level. I had never made kolache, but following the method described in this post, I had no issues. They turned out fantastic! Check her post for all sorts of variations for the filling, or go with the one I chose: pineapple. Tart, bright, fresh, perfect contrast with the slightly sweet bread dough. A winner. I promise you.

PINEAPPLE KOLACHE
(from Helen Fletcher’s Pastries Like a Pro)

for the pineapple filling:
1 cup well drained crushed pineapple
⅓ cup sugar
1 teaspoon potato starch or cornstarch
1 teaspoon lemon juice
1 tablespoon melted butter

Whisk together the sugar and potato starch or cornstarch. Combine all ingredients in a small pan and bring to a boil over medium heat. Boil for 1 minute. Cool completely. Refrigerate until needed.

for the dough:
½ cup butter (1 stick, 114 grams)
½ cup sugar (100 grams)
1 teaspoon salt
1 cup sour cream (225 grams)
2 teaspoons instant yeast
½ cup lukewarm water
2 eggs
4 cups all purpose flour (560 grams)

Cut the butter into pieces and place in a small saucepan along with the sugar and salt. Heat until the butter is melted. Remove from the heat and let it sit until it is lukewarm. Add the sour cream. Whisk it into the butter mixture. Add eggs and yeast, whisk them in. Lastly, add the water. Transfer to the bowl of a mixer. Add the flour and, beat until it comes together.  Knead in the machine for 3 minutes, turning after about 1 ½ minutes as the dough will adhere to the top of the dough hook and not get beaten.  The dough will be very soft and more of a batter.

Place it in a greased bowl or container, cover with plastic wrap and allow it to rise until doubled, about 2 ½ hours. After it has risen, punch it down, re-cover it and refrigerate overnight so the butter can firm up. 

for shaping and baking:
Refrigerated dough
1 egg, well beaten
pineapple filling

Line three baking sheets with parchment.  Set aside. Punch the dough down if risen and divide the dough in half (585 grams each).  Shape each piece into a rectangle.  Wrap each piece in plastic wrap and refrigerate for 10 to 15 minutes. Remove one piece of dough from the refrigerator and roll it out so it is ½ inch thick.  The dough will be very firm. With a 3″ cookie cutter (or whatever size you want) cut out rounds and place them on the parchment about 1 inch apart.  Repeat with the second piece of dough.  Reroll and cut additional rounds. Cover them with tea towels and allow to rise until almost doubled.

Preheat the oven to 375°F. With your fingers, make a deep well in the rounds about ½ inches in from the edge of the dough but do not go through the dough.  Start by making a hole in the center. Expand the well by pressing the dough down. Brush the top edges of the Kolache with the beaten egg. Fill the wells with 1 to 1 ½ tablespoons of filling.  Bake on a double pan for about 20 minutes for the 3″ size until the top of the dough is well browned.  Reduce the time for smaller pastries.

Makes about 20 – 3″ rolls with re-rolling the dough.

ENJOY!

to print the recipe, click here

Comments: I highly recommend you visit Helen’s site to get her step-by-step photos and instructions, especially if you’ve never made enriched bread dough. The dough is very nice to work with, a bit sticky, but I urged the temptation to add more flour and all ended well in the end. I was intrigued by the pineapple filling because I rarely use pineapple in baking, but it was much better than I expected. I made the filling the day before, right after mixing the dough and placing it in the fridge for overnight proofing. Next day the whole thing was a breeze, just rolled the dough, cut circles, filled and baked. I donated them all, but sampled one for “quality control”. It was hard to stop, but I exercised herculean self-control.

Helen, cannot thank you enough for so many great recipes I’ve made from your site!

ONE YEAR AGO: Blood Orange and Cranberry Mini-Cakes

TWO YEARS AGO: Simnel Cupcakes

THREE YEARS AGO: Oat and Sesame Seed Sourdough

FOUR YEARS AGO: Moroccan Turkey Pie with Olive Oil Crust

FIVE YEARS AGO: Another Twisted Sister of the Shepherd’s Pie 

SIX YEARS AGO: Cashew Chicken, My Way

SEVEN YEARS AGO: Two Deliciously Simple Salads

EIGHT YEARS AGO: In My Kitchen, April 2016

NINE YEARS AGO: Spring has Sprung with Suzanne Goin

TEN YEARS AGO: Chai Brownies

ELEVEN YEARS AGO: Pomegranate-Molasses Glazed Carrots

TWELVE YEARS AGO: Braised Brisket with Bourbon-Peach Glaze

THIRTEEN YEARS AGO: The Real Vodka Sauce

FOURTEEN YEARS AGO: Spring Rolls on a Spring Day

SHOKUPAN MARBLED BLACK SESAME BREAD

Not too long ago I got notification of a new blog post by my friend Karen. You can check her post here. She mentioned the yudane method, a kind of tahgzhong on steroids. I am familiar with tangzhong and love it, but yudane was new to me. I could not wait to give it a try. I ended up following this recipe that was linked at the end of Karen’s post.

In the tangzhong method, part of the flour is gently cooked until a paste forms. To make yudane, you boil water and mix with the flour, then place in the fridge for 4 to 24 hours. That gets incorporated into the bread dough. Fascinating, Mr. Spock, fascinating…

I loved making this bread. For the full recipe, please visit Bread Experience (click here). My modifications were just a few: I did not have white whole-wheat, and did not have kamut in the pantry, so I used the full amount of regular whole-wheat, King Arthur’s brand. For the liquid component I used oat milk. Finally, I used store-bought black tahini, just eye-balled about 2 tablespoons and got a nice dark color. The dough is a pleasure to work with, and the marbling worked perfectly!

The crumb is soft, tender, and the bread is absolutely delicious with a hint of sesame taste. I highly, highly recommend you give yudane a try. This is what it looks like…

Just don’t forget it in the fridge, make sure to grab it when you are ready to make the dough! (Yes, I almost forgot about it).

And look at that crumb!

I hope you give yudane a try, the bread stays soft and moist for at least a couple of days. After that I sliced and froze for later.

THANK YOU, KAREN AND CATH FOR THE BREAD INSPIRATION!


ONE YEAR AGO: Chicken with Pasilla-Pecan Sauce

TWO YEARS AGO: A Versatile Silicone Pan

THREE YEARS AGO: Buffalo Chickpeas

FOUR YEARS AGO: Bi-Color Croissant and Pain au Chocolat

FIVE YEARS AGO: Lemon-Blueberry Entremet Cake

SIX YEARS AGO: Walk Strong3: Jessica Smith’s latest workout program

SEVEN YEARS AGO: Pork Medallions with Black Berry Compote

EIGHT YEARS AGO: Indian-Spiced Chicken with Chickpeas and Spinach

NINE YEARS AGO: Curry Cardamon Cookies

TEN YEARS AGO: In My Kitchen, March 2014

ELEVEN YEARS AGOBoeuf Bourguignon for a Snowy Evening

TWELVE YEARS AGO: Chickpea Salad

THIRTEEN YEARS AGO: Soft Spot for Chevre

FOURTEEN YEARS AGO: Roasted Onion and Asiago Cheese Miche

UBE SOURDOUGH, TWO WAYS


Back in December last year I had a lot of fun playing with ube, the Filipino ingredient that was new to me. Today I share two ways to make sourdough bread incorporating ube. The basic recipe is the same, but in the first version I substituted some of the flour with ube powder. The second version incorporates 1/4 tsp ube extract in the dough. The one with the ube powder got a super light purple tone and the texture and structure of the bread was slightly different from a regular sourdough. If you are looking for color impact, definitely go with ube extract. A little goes a long way, and the taste is very mild.
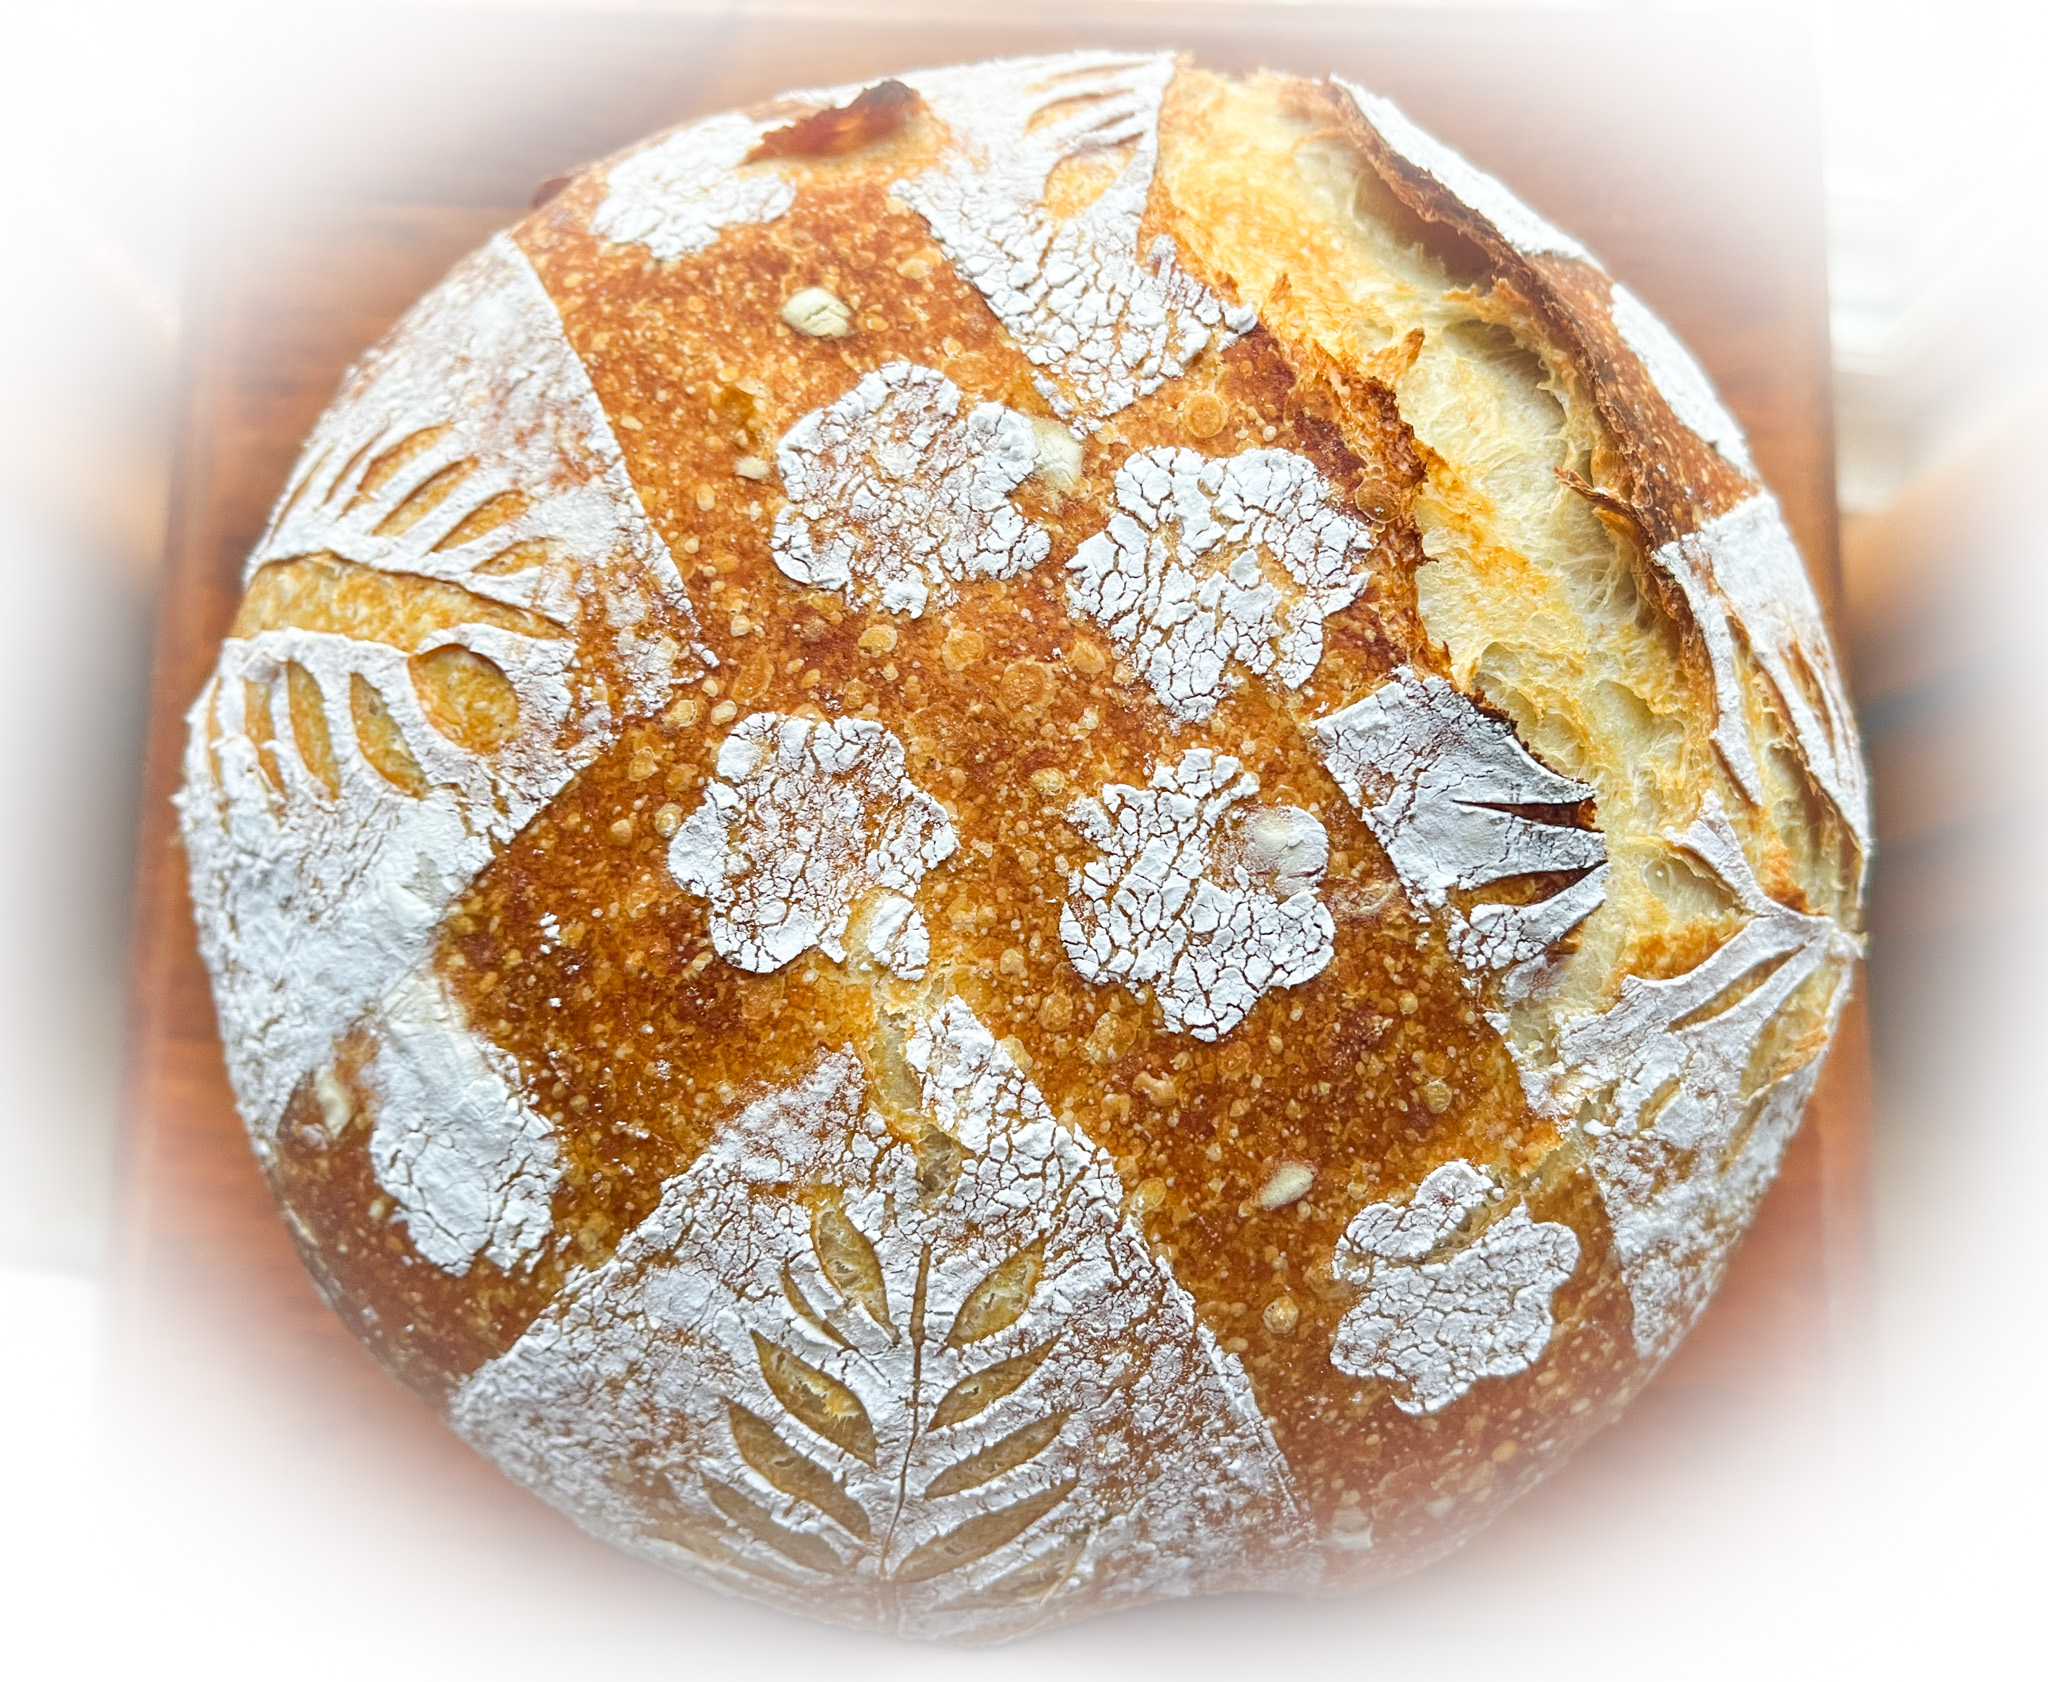
UBE SOURDOUGH, TWO WAYS
(from the Bewitching Kitchen)

480g white bread flour
20g ube powder
10g salt
350g water
75-90g sourdough starter at 100% hydration

Make the levain mixture about 6 hours before you plan to mix the dough. It should be very bubbly and active.

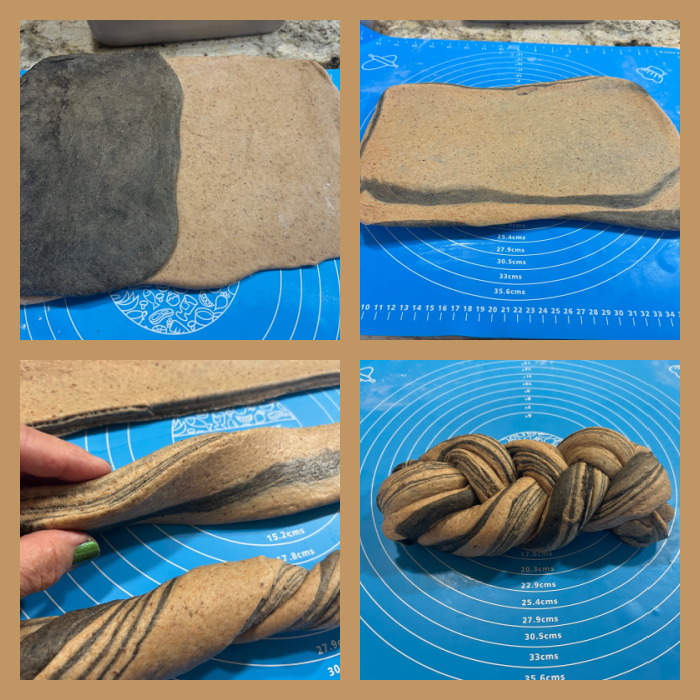
When you are ready to make the final dough, place the water in the bowl of a KitchenAid type mixer and dissolve the starter in it, mixing with a spatula briefly, then add the flour, ,ube powder and salt. Turn the mixer on with the hook attachment and knead the dough for 4 minutes at low-speed all the time. You will notice the dough will gain quite a bit of structure even with just 4 minutes in the mixer. Remove from the machine, and transfer to a container lightly coated with oil, cover lightly with plastic wrap and allow it to ferment for 4 hours, folding every 45 minutes or so. Because the dough is already a bit developed from the initial time in the mixer, you should get very good structure after 3 and a half hours, or even sooner than that.

After four hours bulk fermentation, shape the dough as a ball, and place, seam side up, in a lightly floured banetton. Leave at room temperature one hour, and then place in the fridge overnight, from 8 to 12 hours.

Next morning, heat the oven to 450F.

Place a parchment paper on top of the dough, a flat baking sheet, and invert the dough, flipping it out of the banneton. Flour the surface of the dough, add the stencil and air-brush if so desired. Score with a razor blade.

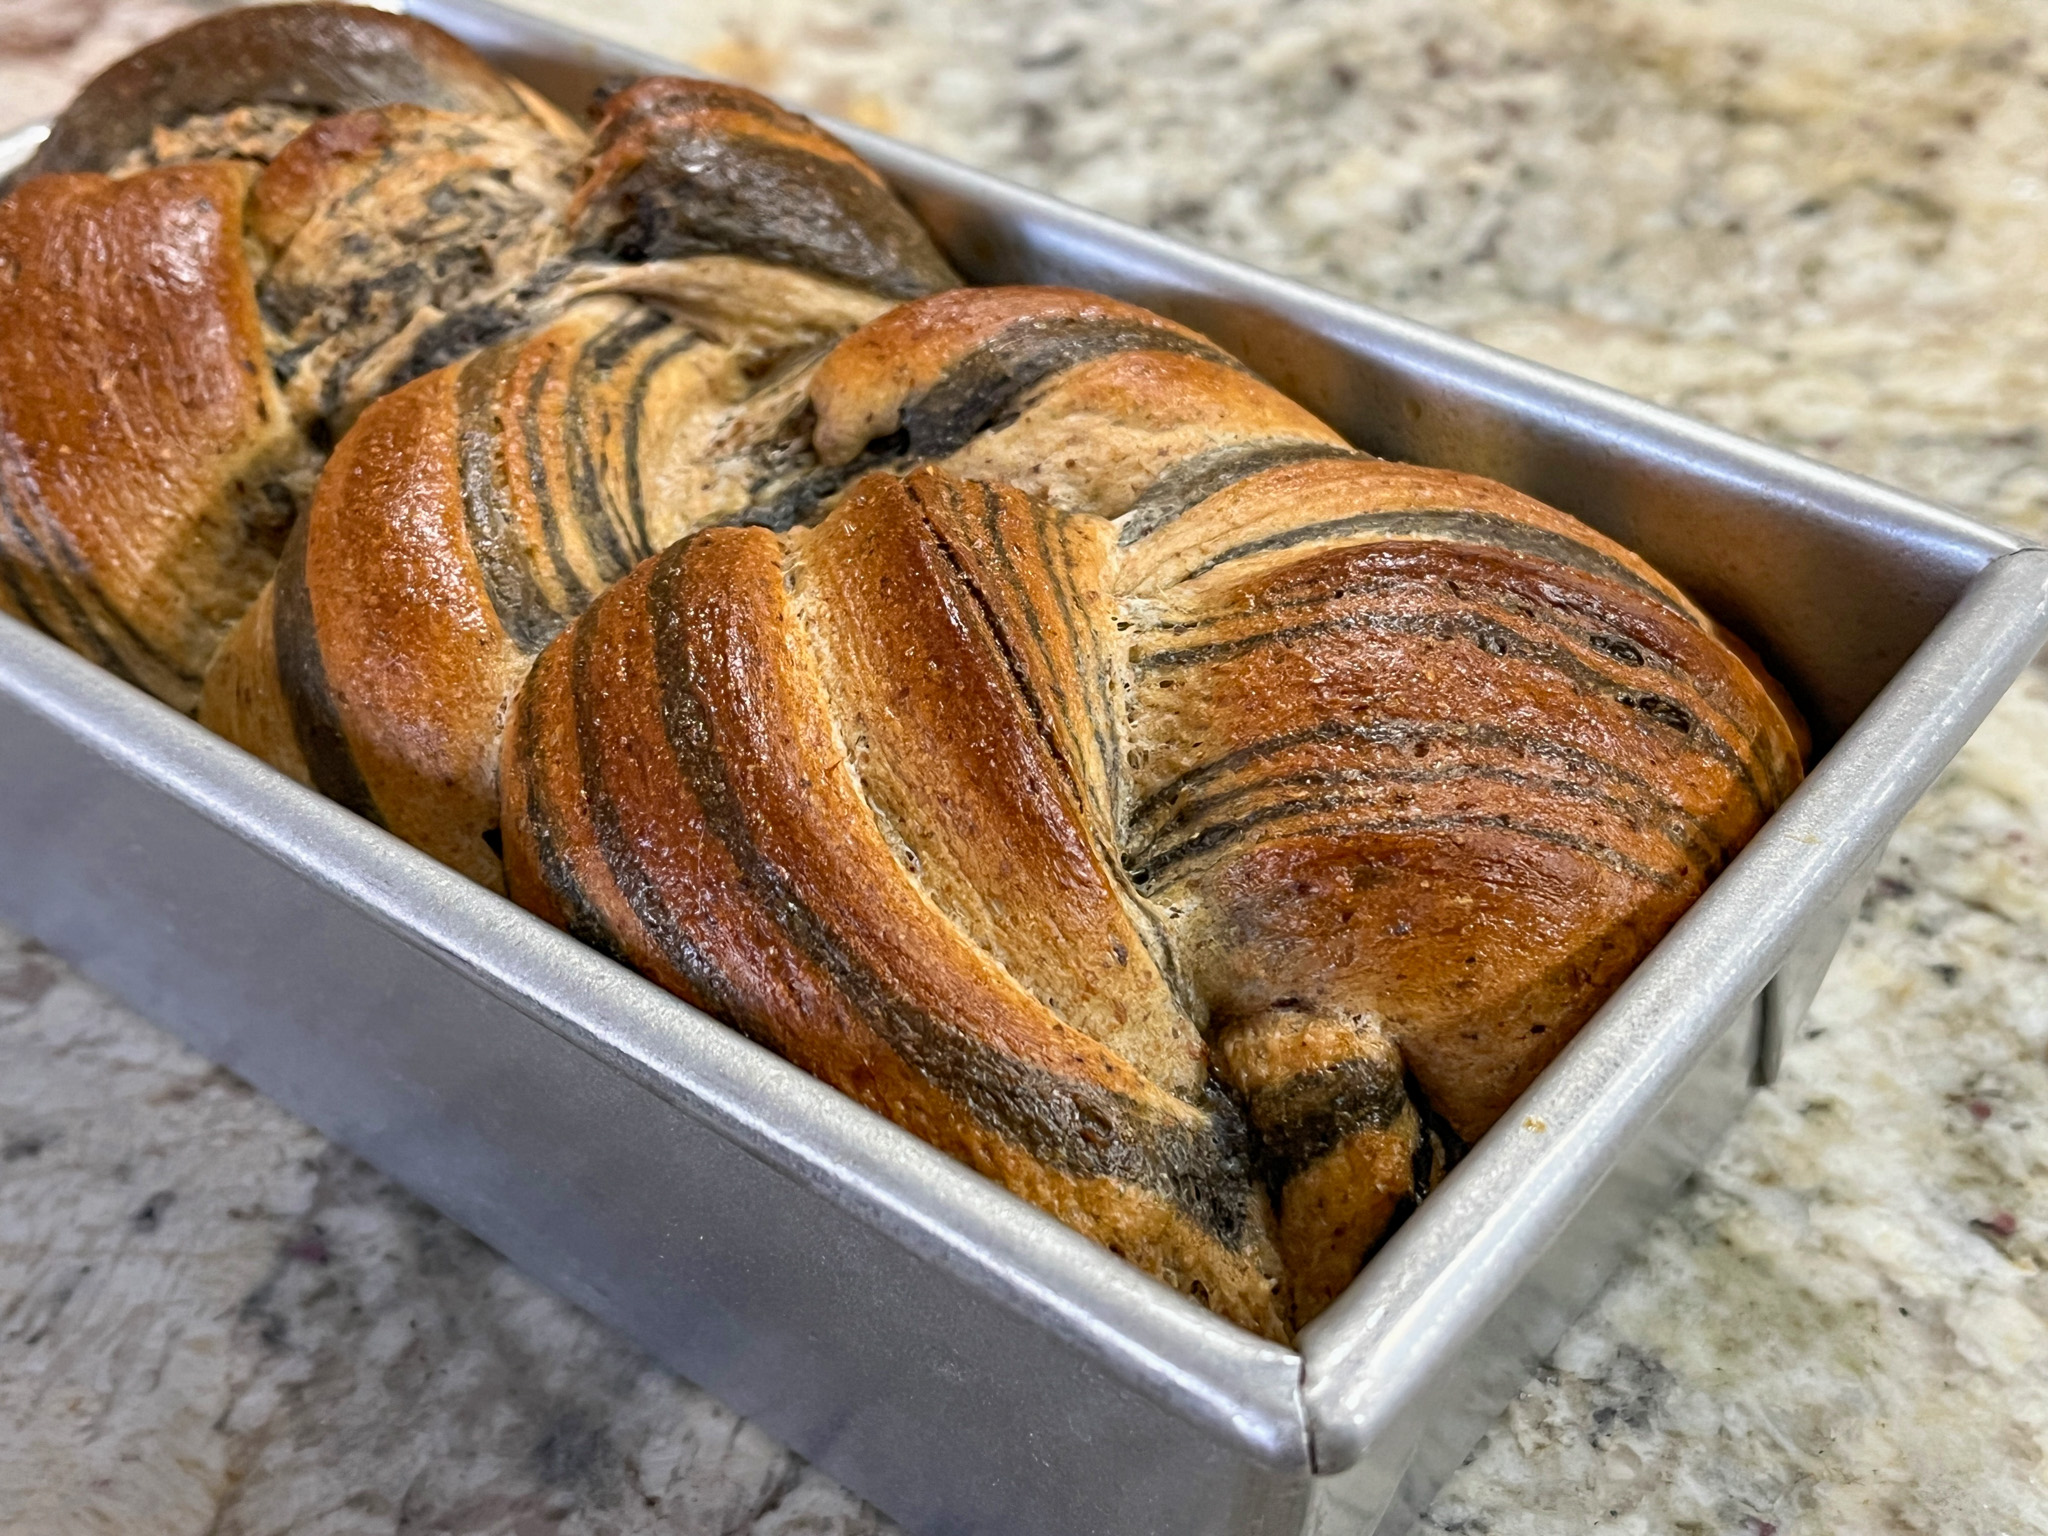
Bake at 450F for 45 minutes, preferably covered for the first 30 minutes to retain steam. Cool completely over a rack before slicing.

FOR VERSION #2
Use 500g bread flour and add 1/4 tsp ube extract to the dough, following the same method to prepare and bake the bread.

ENJOY!

to print the recipe, click here

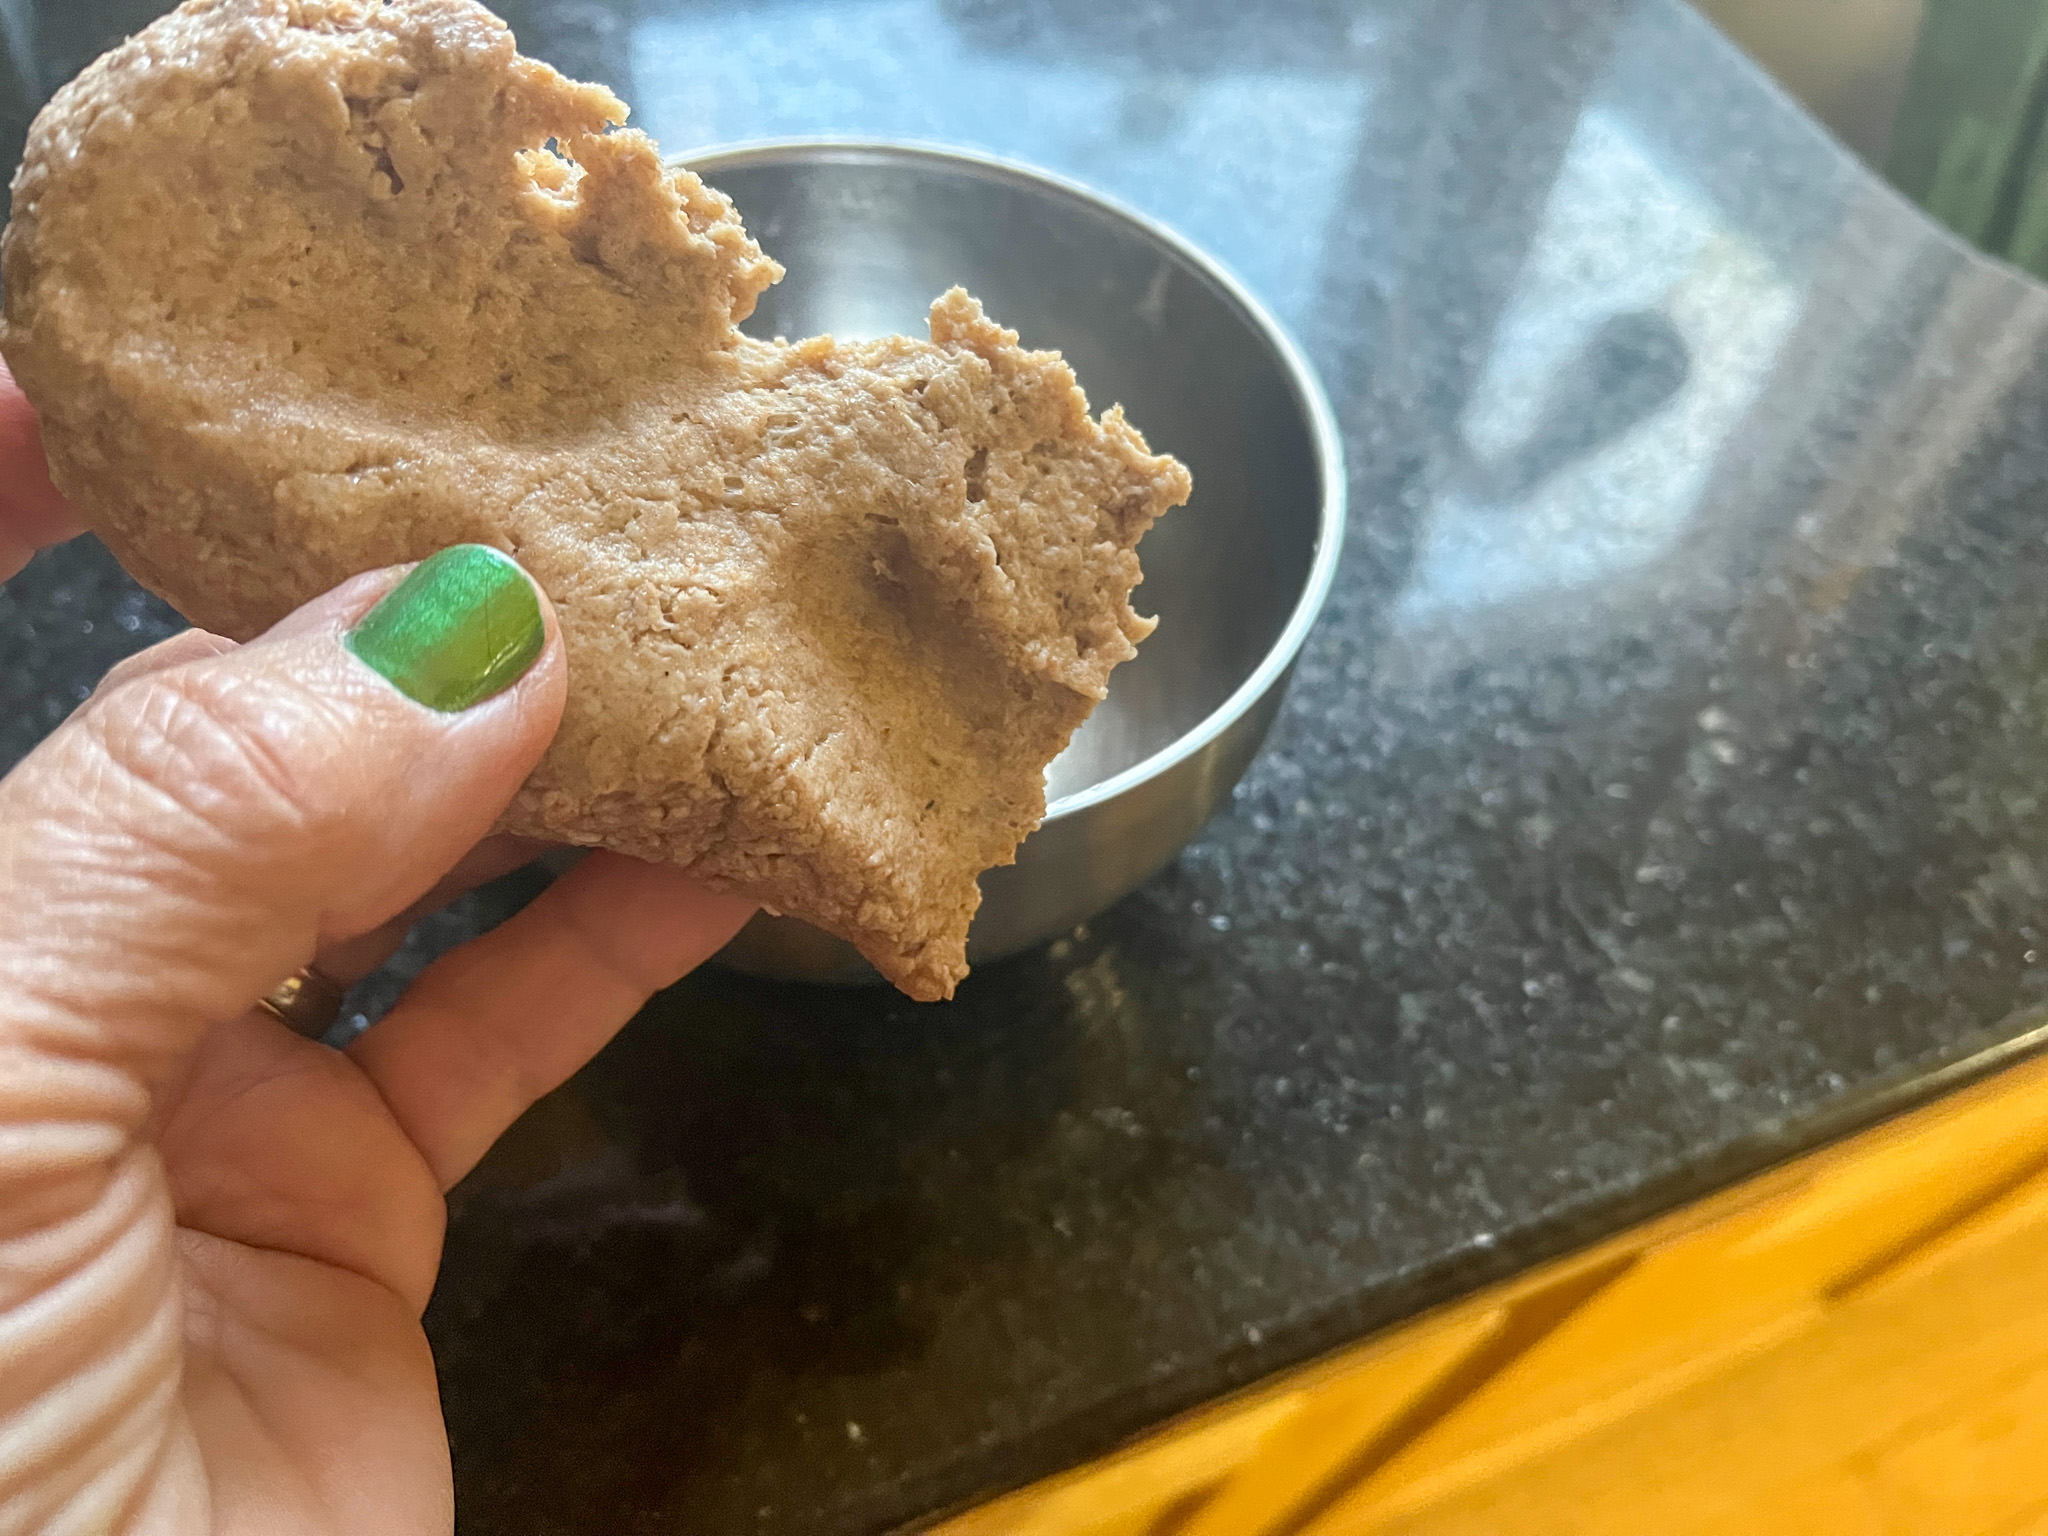
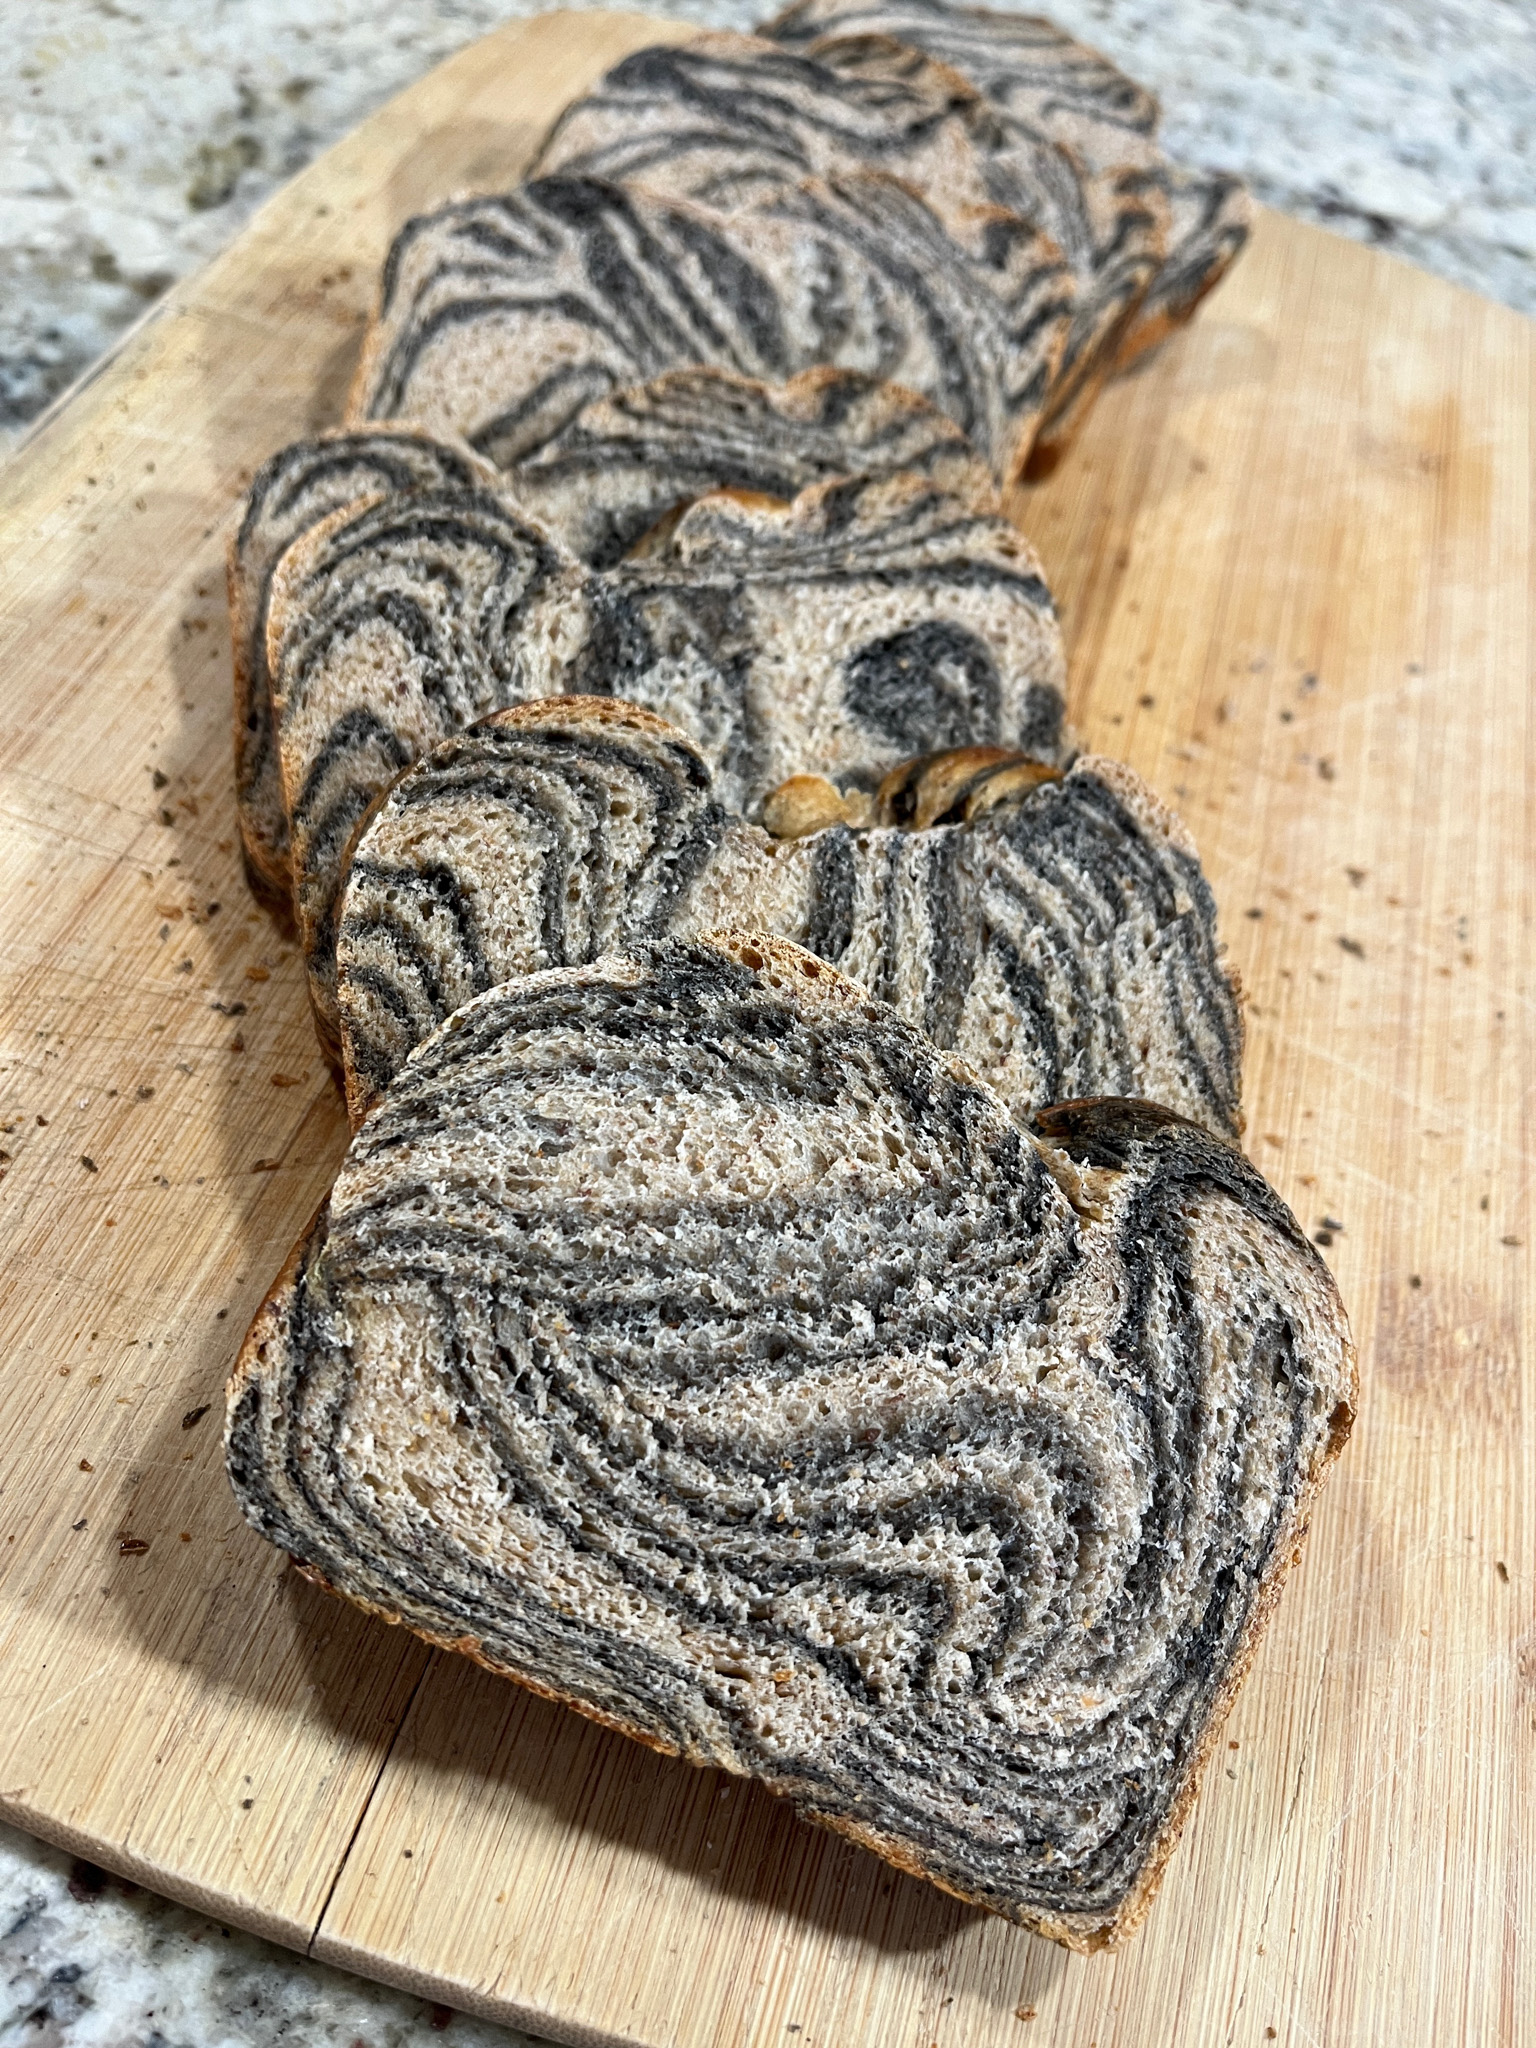
Comments: You will notice that the crumb is tighter than usual for a sourdough, and also the color purple is super subtle, quite light.  Version #2, with ube extract got a lot more color.
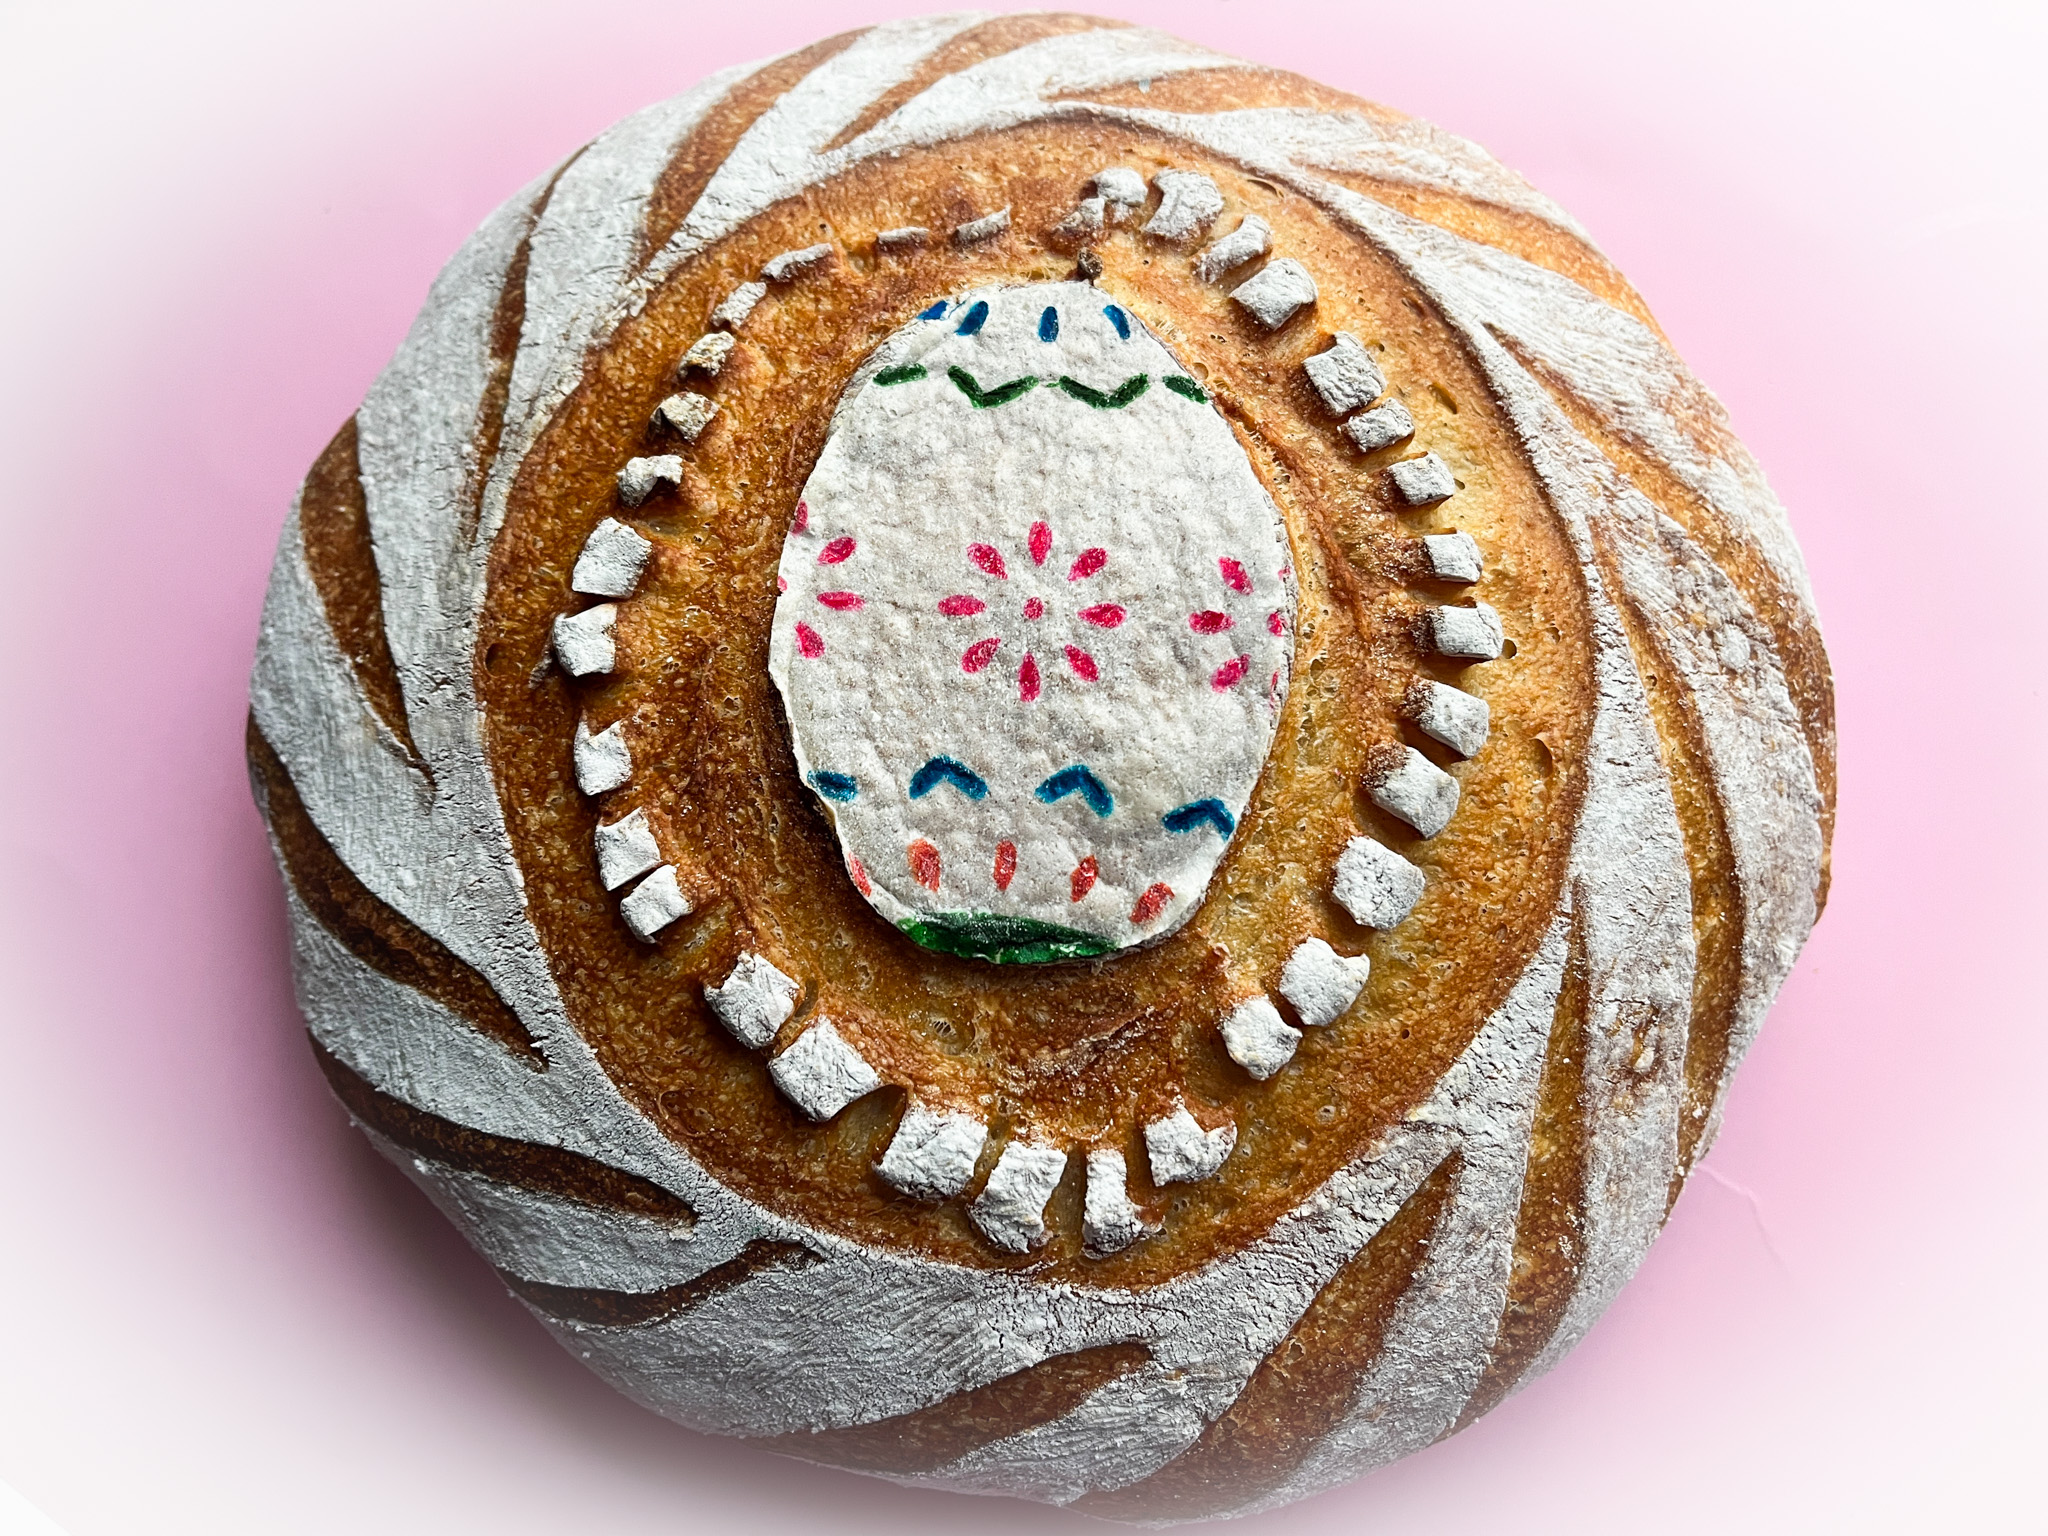

I used a different method to decorate it, with oats to form little flowers and black sesame seeds in the center. Just wet the surface of the dough a little bit and that acts like a glue.

It was a bit time-consuming to do, so I ended up forming just 4 little flowers. Maybe next time I can go for full-coverage…

The crumb was open and super purple!

So, if you like to play with this ingredient, I would recommend the extract, because I felt the dough was quite affected in its structure when some of the flour (therefore gluten) was removed and replaced with the powder. Also, the color that the extract provides is quite spectacular and stayed unchanged with baking. Flavor is very subtle.

ONE YEAR AGO: Brown Butter Dulce de Leche Cookie Cups

TWO YEARS AGO: Chicken Poblano Tortilla Soup

THREE YEARS AGO: Kung Pao Chicken

FOUR YEARS AGO: Galette de Rois

FIVE YEARS AGO: Sous-Vide Overnight Oatmeal

SIX YEARS AGO: A Valentine’s Day Opera

SEVEN YEARS AGO: Incredibly Simple Times Four

EIGHT YEARS AGO: Walnut-Cranberry Sourdough Bread

NINE YEARS AGO: Ottolenghi in Brazil?

TEN YEARS AGO: Roasted Winter Vegetables with Miso-Lime Dressing

ELEVEN YEARS AGO: 2012 Fitness Report: P90X2

TWELVE YEARS AGO: Caramelized Bananas

THIRTEEN YEARS AGO: Roasted Lemon Vinaigrette

FOURTEEN YEARS AGO: Whole Wheat Bread

BAKING WITH THE HEART

WELCOME TO MY 1700th POST!

Valentine’s Day is almost here! Some don’t care for it, some enjoy each minute. Whatever team you are on, here are some bakes that you can try this week, or anytime love is on your horizon… Without further ado, one recipe and eight ideas for you. Read on…

.
BLUEBERRY CURD SWISS ROLL CAKE
(filling adapted from Caroline’s blog)

for the decoration:
50g butter, softened
50g powdered sugar
50g egg whites
50g all-purpose flour
black and red gel colors

for the cake:
130g cake flour
1 teaspoon baking powder
5 large eggs, at room temperature
200 g granulated sugar
Zest of 1 lemon
1/2 teaspoon lemon extract
1/2 teaspoon vanilla extract
¼ teaspoon kosher salt
2 tablespoons butter, melted and cooled

for the filling:
https://www.easyonlinebakinglessons.com/blueberry-orange-curd/
I did not use plums, and used a little gelatin to thicken it further (see comments).

Make the piping decoration by beating the butter with powdered sugar in a small bowl until fully combined. I used a hand-held electric mixer. Add the egg whites and beat for a couple of minutes. Add the flour and mix by hand with a spoon, divide in one small portion to dye black, one larger portion to dye red.

Make a diamond pattern with a Sharpie pen on parchment paper, and add heart shapes. Flip the paper so that the writing is at the bottom, and pipe the outline black. Freeze for 10 minutes. Quickly fill the hearts with red paste. Freeze again while you make the cake.

Heat oven to 350°F. Sift the flour and baking powder into a small bowl. Reserve. Place the eggs and sugar in the bowl of a standing mixer fitted with the paddle attachment. Beat until the mixture form ribbons, about 12 minutes. Add the lemon zest, lemon extract and vanilla. Beat until combined. Sift the flour mixture over the beaten eggs, fold gently. When the flour is mostly incorporated, add a little bit of the mixture to the melted butter, whisk well. Pour that into the cake batter, whisk gently to disperse. Pour over the frozen parchment paper placed in a half baking sheet, and smooth the surface.

Bake the cake until it begins to pull away from the sides, 12 to 17 minutes.

Transfer the pan to a cooling rack, cover the cake with a towel and let it cool for 10 minutes. Remove the towel, sift a little powdered sugar over the surface and flip it over parchment paper. Gently peel off the paper with the design, flip the cake again over a clean towel. Starting with a short side of the cake, roll the cake gently, using the towel to support the cake as you go. Let the cake cool all rolled up in the towel, seam side down.

Carefully unroll the completely cool cake, spread the blueberry curd filling, then roll it again. Wrap the cake in plastic and refrigerate for at least 3 hours, overnight is best. When ready to serve, slice a small piece of each of the ends, so that it looks more polished.

ENJOY!

to print the recipe, click here

Comments: I haven’t made a patterned roll cake in a while, so I really enjoyed this little adventure. I messed up while making the curd (sorry, Caro!), did not cook it enough, so after 10 hours in the fridge it was still too loose. Lesson learned. I made a gelatin mass with 1 tsp gelatin + 5 tsp water, warmed it to dissolve in the microwave. I heated up the curd to about 60 C and added the melted gelatin. Mixed well and allowed it to cool slowly, then placed in the fridge overnight. It was perfect to use next morning. Huge thank you to my friend Gary for the advice to deal with the curd. I added a very small amount of pink gel dye to the cake batter, but that is optional. I did not include in the recipe, as the cake will look perfectly ok without it.

The cake was moist and tender, the blueberry curd absolutely delicious!
The combination of orange and blueberry is a real winner, thank you Caro!

And now, time to share a few ideas, you can use any recipe you like, or some that are already in my blog

.

CHOCOLATE-COVERED OREOS

I used white Wilton candy melts to cover Lemon-flavored golden Oreos, and once that was set I made the heart decoration with Royal icing. First piped the black outline, let that set a bit and flooded the center with pink.

.

COMIC-STYLE HEART COOKIES

Comic-style, so popular these days! I followed a recent tutorial from Amber (join her club here) to make these babies. Some steps shown below.

.

POLKA-DOT HEART COOKIES

Super simple design, just flood, air-brush with a stencil and add some Royal icing transfers. A little bead border is of course more than welcome…

.

ZENTANGLE HEARTS, TWO WAYS

For a modern look, just flood with any color of your choice, and then use a food safe pen to draw the design…

For a modern but romantic look, just play with flowers…

.

BICOLOR HEART COOKIES

For those who do not care for icing, these will be a huge hit. Just mix two recipes, chocolate and plain, cut shapes and mix-and-match the centers. Bake and you are done!

.

MINI-BONBONS WITH MARSHMALLOW FILLING

I used candy melts to coat tiny silicone molds with heart shapes (available here). Placed a mini-marshmallow in the center and covered the molds with melted chocolate. Once that set, I un-molded the bonbons and drizzled white chocolate for the decoration, adding a little sprinkle heart on some of them.

.

POLKA-DOT HEART SOURDOUGH

For the recipe, check my blog post with a click here.

I hope you’ve found some inspiration in this post for your future bakes, and please enjoy the weekend ahead, particularly if you are a football fan!

ONE YEAR AGO: Roasted Cauliflower with Chickpeas and Quinoa

TWO YEARS AGO: A Savory Phyllo Pie

THREE YEARS AGO: Nut-Free Lady Grey Macarons

FOUR YEARS AGO: Mini-Heart Cakes for your Valentine

FIVE YEARS AGO: Blue Moon Milk

SIX YEARS AGO: Slow-Cooked Chicken Meatballs

SEVEN YEARS AGO: Zesty Flourless Chocolate Cake

EIGHT YEARS AGO: Maple Pumpkin Pecan Snacking Cake

NINE YEARS AGOSilky Gingered Zucchini Soup

TEN YEARS AGO: Sweet Fifteen!

ELEVEN YEARS AGO: Sesame and Flaxseed Sourdough

TWELVE YEARS AGO: Green Beans with Miso and Almonds

THIRTEEN YEARS AGO: Saturday Morning Scones

FOURTEEN YEARS AGO: White Bread

MEXICAN BOLILLOS

Super excited to share these! Hubby loves them and always gets a bag at the grocery store, so I was tempted to bake them from scratch. My first attempt got over-baked and the crust was not as soft as the commercially available, but my second batch was pretty close to perfect, even if I say so myself… This is a very easy bread, made with instant yeast. From start to finish, about 3 hours.

MEXICAN BOLILLOS
(adapted from this post)

1 ½ cups warm water, plus more for steam baking
2 ¼ teaspoons active dry yeast (1 package)
1 tablespoon granulated sugar
500g all-purpose flour (about 4 cups)
2 teaspoons salt
2 tablespoons avocado oil (or another neutral oil)
vegetable oil spray (I used olive oil)

Prepare the yeast. Mix the water and sugar with the instant yeast. Let it stand for 5 minutes until it gets foamy. Prepare the dough. In the bowl of a stand mixer whisk together the all-purpose flour and salt.

Attach the dough hook to the mixer. Drizzle the oil over the yeast-water mixture, whisk a bit and with the machine running in low-speed, add the whole mixture to the bowl. Knead on the same low-speed for 7 minutes.  The dough will be slightly sticky. If it seems too sticky, knead in 1 tablespoon of additional flour at a time until smooth and elastic. If it’s too dry, add a little water and keep kneading for another minute.

Place the dough in a slightly oiled bowl and cover with plastic wrap. Proof at room temperature for about 90 minutes, when it should double in size. Line a large baking sheet with parchment paper. Divide the dough in 6 equal pieces (I used a scale, they were about 148 g each), shape each as a little oblong bread, trying to mimic the shape of the bolillo as you form it.

Spray the surface lightly with olive oil. Cover with plastic loosely and let it rise for 45 minutes at room temperature. Meanwhile, heat the oven to 420F and 15 minutes before you bake the rolls, place a 9 x 13 pan in the bottom rack and add 10 cups of hot water inside. That will generate steam for the baking.

Slit the dough in the center, spray the rolls with a little water and bake for about 30 minutes. If they are darkening too much, reduce the temperature to 400F and cover the surface with foil. Bread is baked if internal temperature reaches 205F.

Let them cool for at least 20 minutes before serving.

ENJOY!

to print the recipe, click here

Comments: Such a fun little bread to make! Just make sure to not bake them too long, because the crust will get very dark and hard if you do. It is still great but not like the original. Here you see my first bake maybe you can tell the crust got a little too baked, but the crumb was still very nice, just a bit harder than the second batch.

I urge you to make these, they go well with so many fillings, and even just a smear of olive oil and balsamic if you like to keep it simple. I know I will keep making batches to have some in the freezer at all times, just like I do regularly with sourdough. It is just a different style of bread.

ONE YEAR AGO: Brazilian Style Banana Cake

TWO YEARS AGO: Tiger Shrimp in Chili Sauce

THREE YEARS AGO: Tangzhong Hamburger Buns

FOUR YEARS AGO: Potato Soup with Spicy Shrimp

FIVE YEARS AGO: Rose-Harissa Chicken Thighs

SIX YEARS AGO: Caramel-Chocolate Tartlets

SEVEN YEARS AGO: Chicken Korma-ish

EIGHT YEARS AGO: Sunday Gravy with Braciola

NINE YEARS AGO: In My Kitchen, February 2015

TEN YEARS AGO: Avocado and Orange Salad with Charred Jalapeno Dressing

ELEVEN YEARS AGO: Green Olive, Walnuts and Pomegranate Salad

TWELVE YEARS AGO: Romanian Flatbreads

THIRTEEN YEARS AGO: Ziti with Artichokes and Meyer Lemon Sauce

FOURTEEN YEARS AGO: Blasted Broccoli, Stove-top version