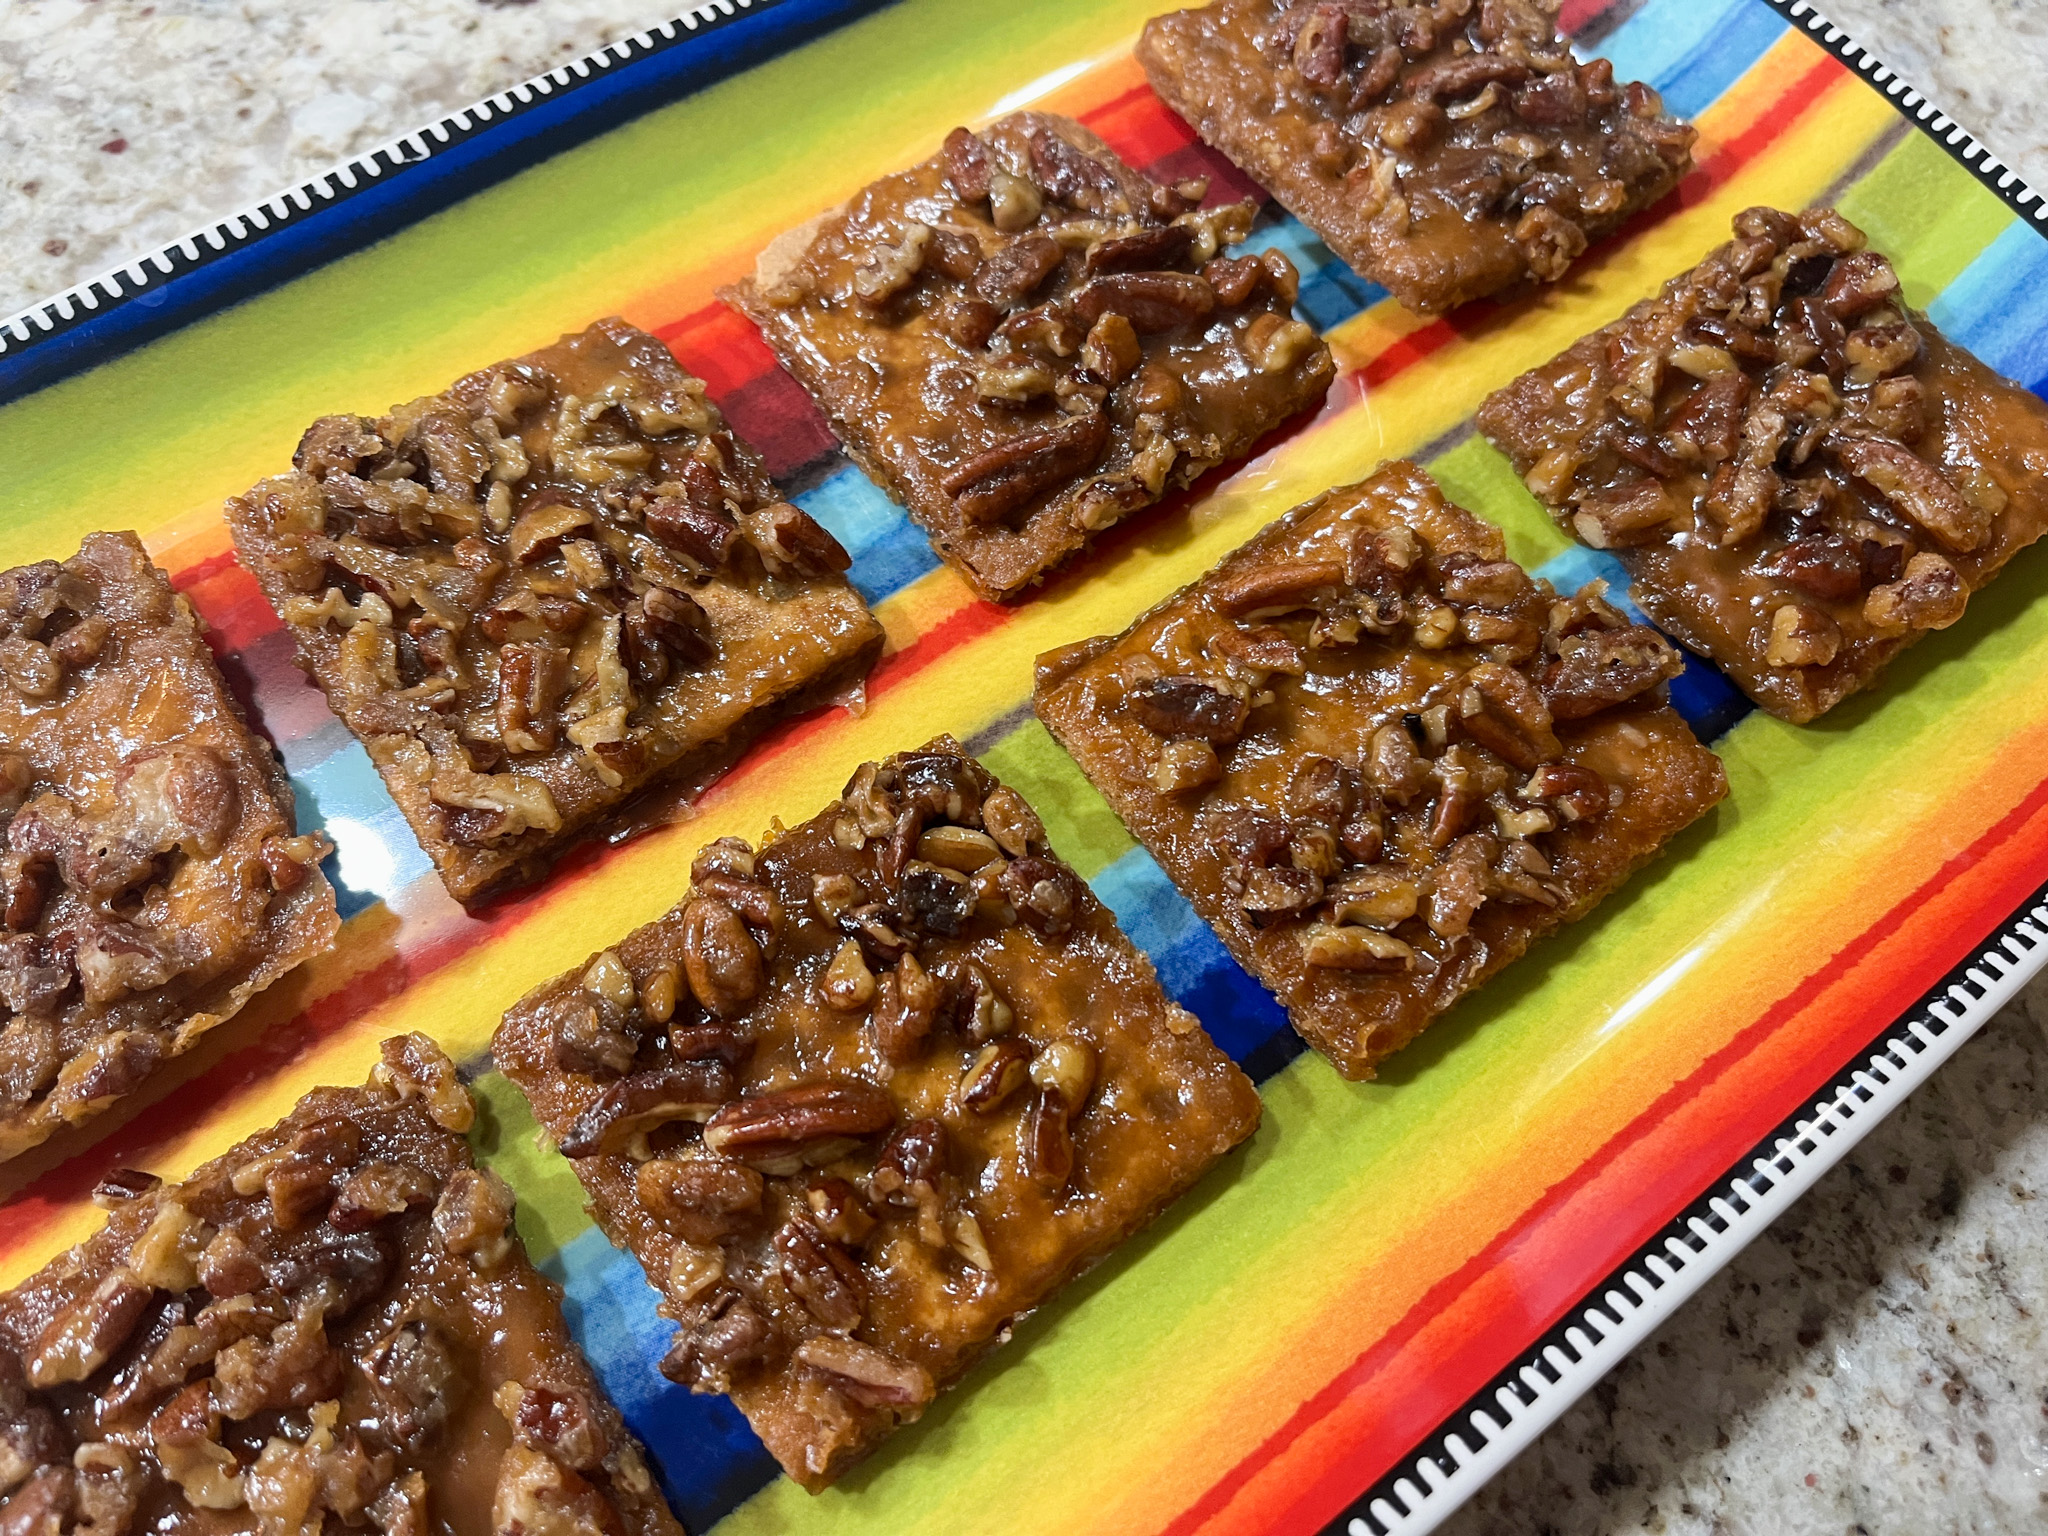
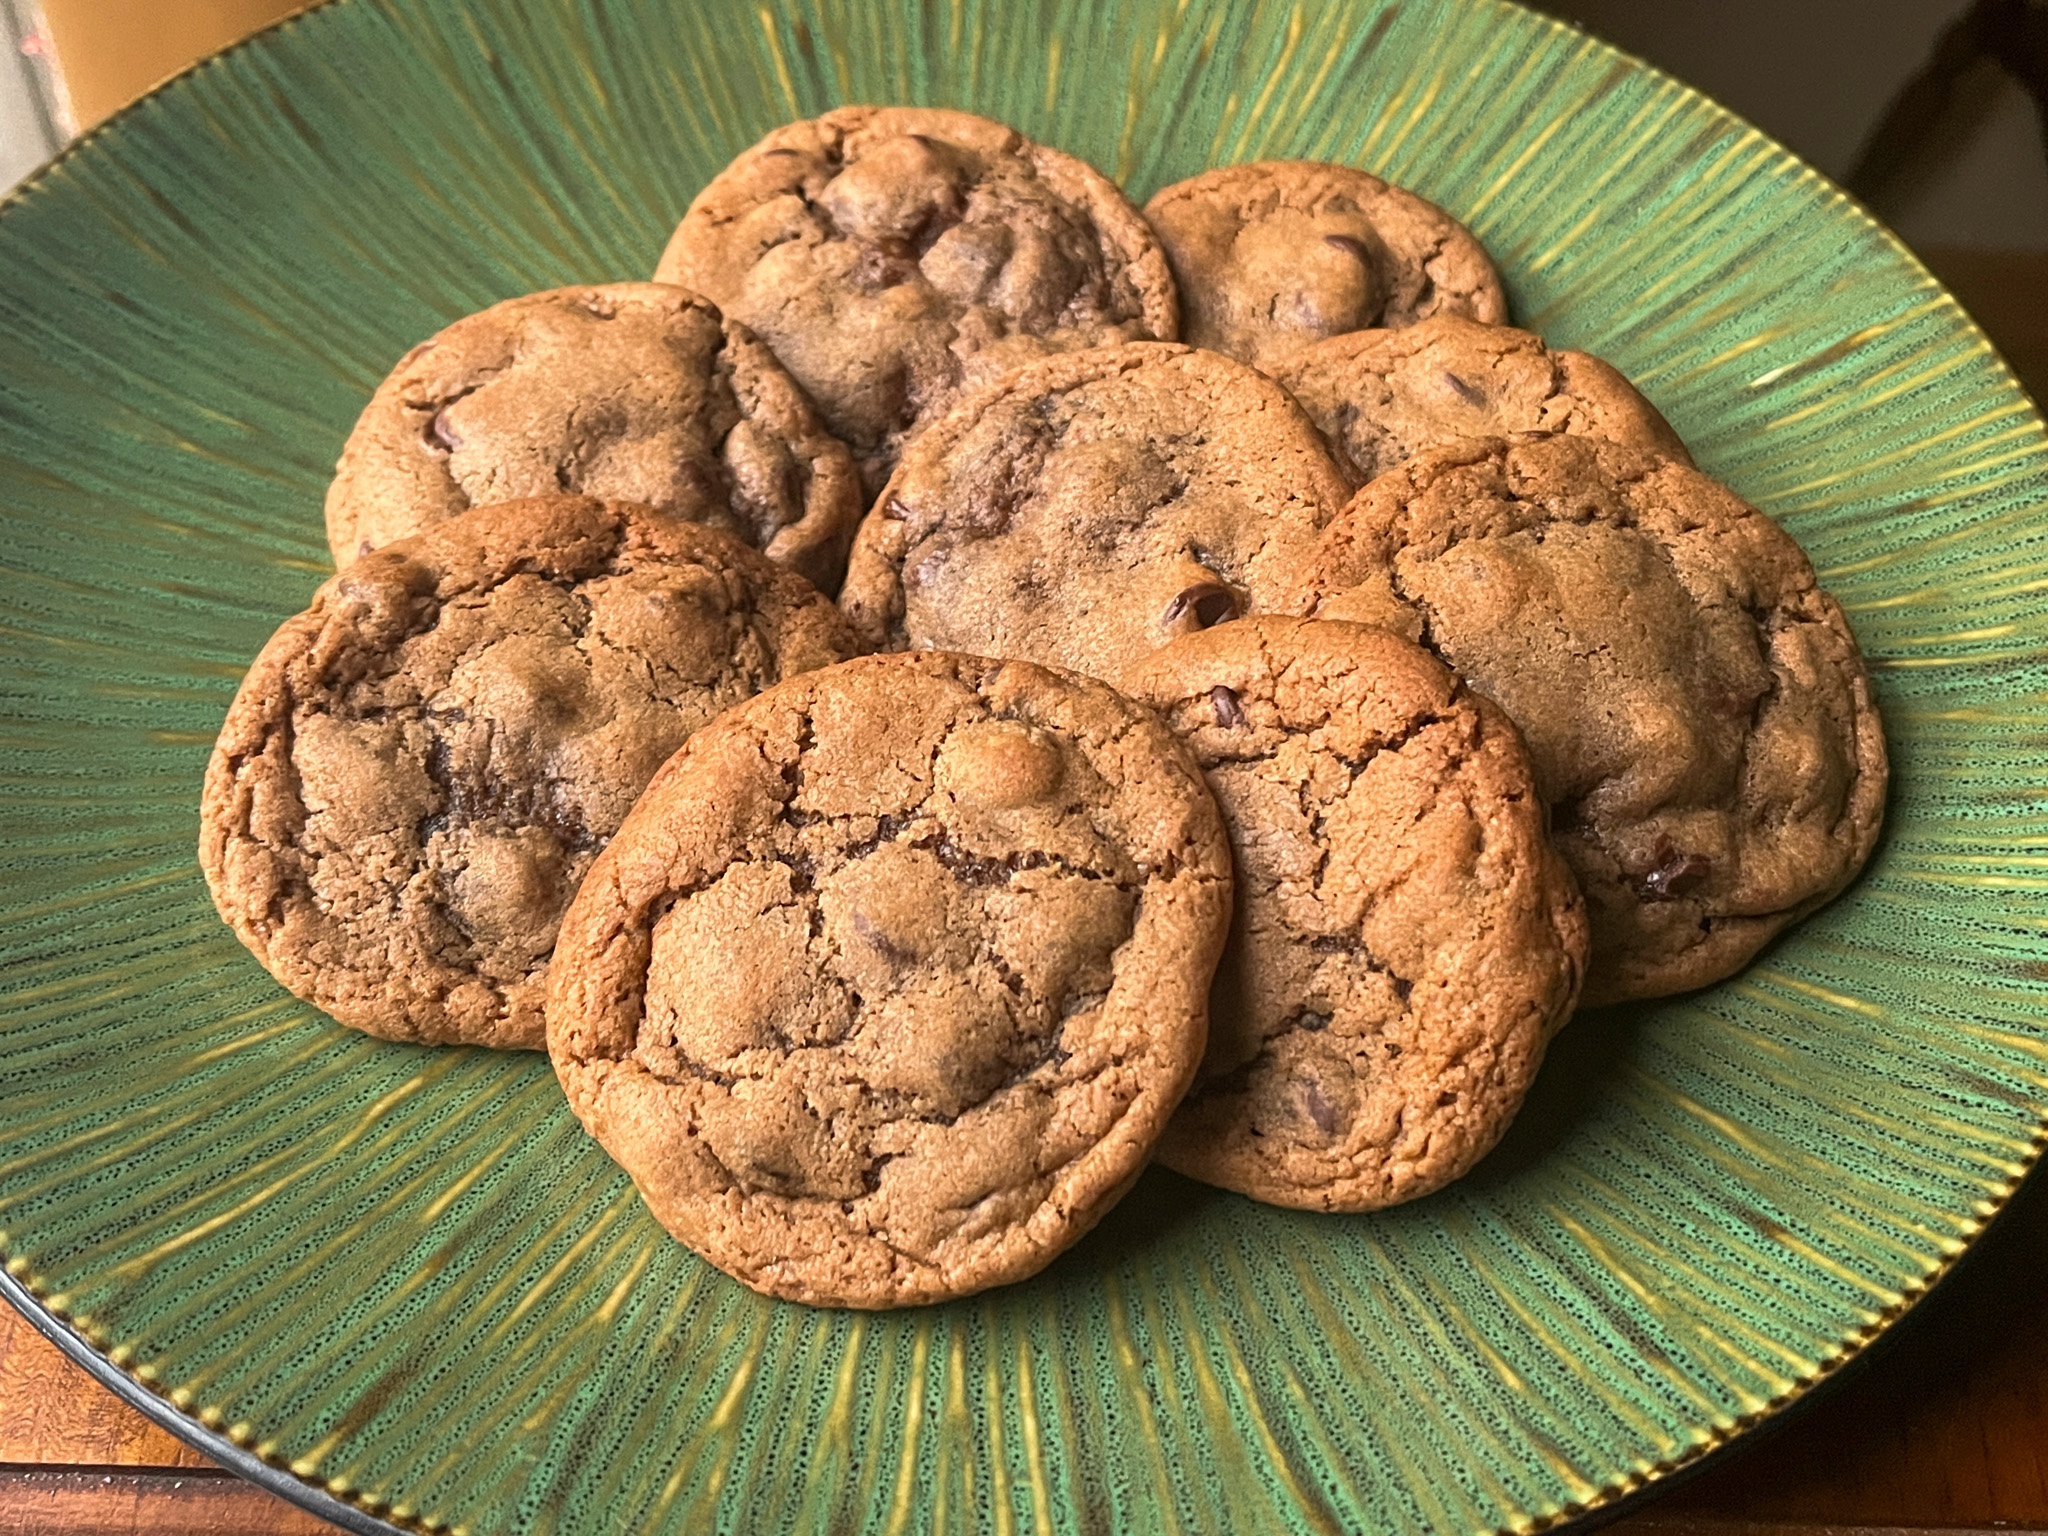
I don’t know how to put this more clearly to you: MAKE THESE COOKIES. Do not hesitate, do not postpone to next week, next month. My friend Dorothy from shockinglydelicious raved about them, and I am so glad I took action. They are incredibly easy to make and OMG-delicious! Addictive. Seriously so. The recipe is not yet in her blog, but I got it through her Facebook (check it out here if you are on FB).
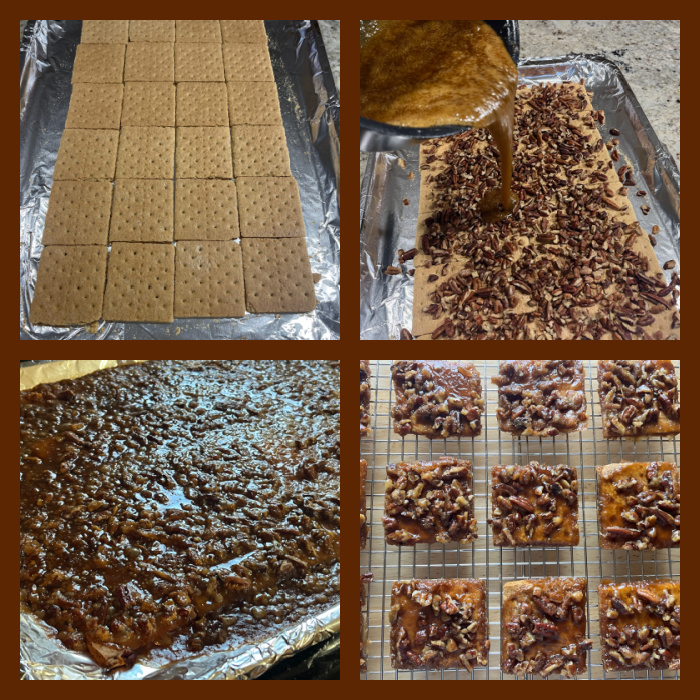
13 graham cracker rectangles 2 cups pecan halves and pieces 1 cup brown sugar 1 cup (2 sticks) unsalted butter 1/4 teaspoon salt 1 teaspoon vanilla extract
Heat oven to 350F. Line a rimmed baking sheet with parchment paper (or foil). Lay graham crackers to fit, breaking them if you need to. Fill the whole pan. Sprinkle all the pecans over top.
In a medium pot over medium heat, combine brown sugar, butter and salt. Bring to a boil and once boiling, let cook 2 minutes, stirring constantly. Remove from heat, stir in vanilla and quickly pour hot mixture over graham cracker and nuts in the pan, making sure all crackers are covered.
Bake 10 minutes; it will be bubbly. Remove from oven, allow to cool completely and break into pieces. This will be screaming hot, so don’t even try tasting it until it is entirely cool.
Comments: As you know, I donate 99% of the sweets I bake, or close to it… But every once in a while I get to taste one, particularly when it is a recipe I’ve never made before. So I did. The nickname “crack” seemed appropriate, not that I ever suffered from drug addiction. The image fit nicely. I had to exercise ALL my will power to put them away, so the poor homeless would have a chance. They are impossibly good. Trust me. As you are making them you will be sure there will be a disaster in the end. Things get furiously bubbly, it looks like chaos. But there will be a super bright and tasty light at the end of that tunnel!
I am totally in love with this cookbook! I have a soft spot for baking that is not overly sweet, which might sound strange, as I bake so many sugar cookies, macarons, and cupcakes. But a recipe that calls for adding miso to a cookie gets me dreaming. Salted caramel? Same thing. This is actually my second cookbook from Kat Lieu, and I think both would be a great Christmas gift for bakers (wink, wink).
Without further ado, here is a wonderfully delicious recipe for Masala Macaroons…
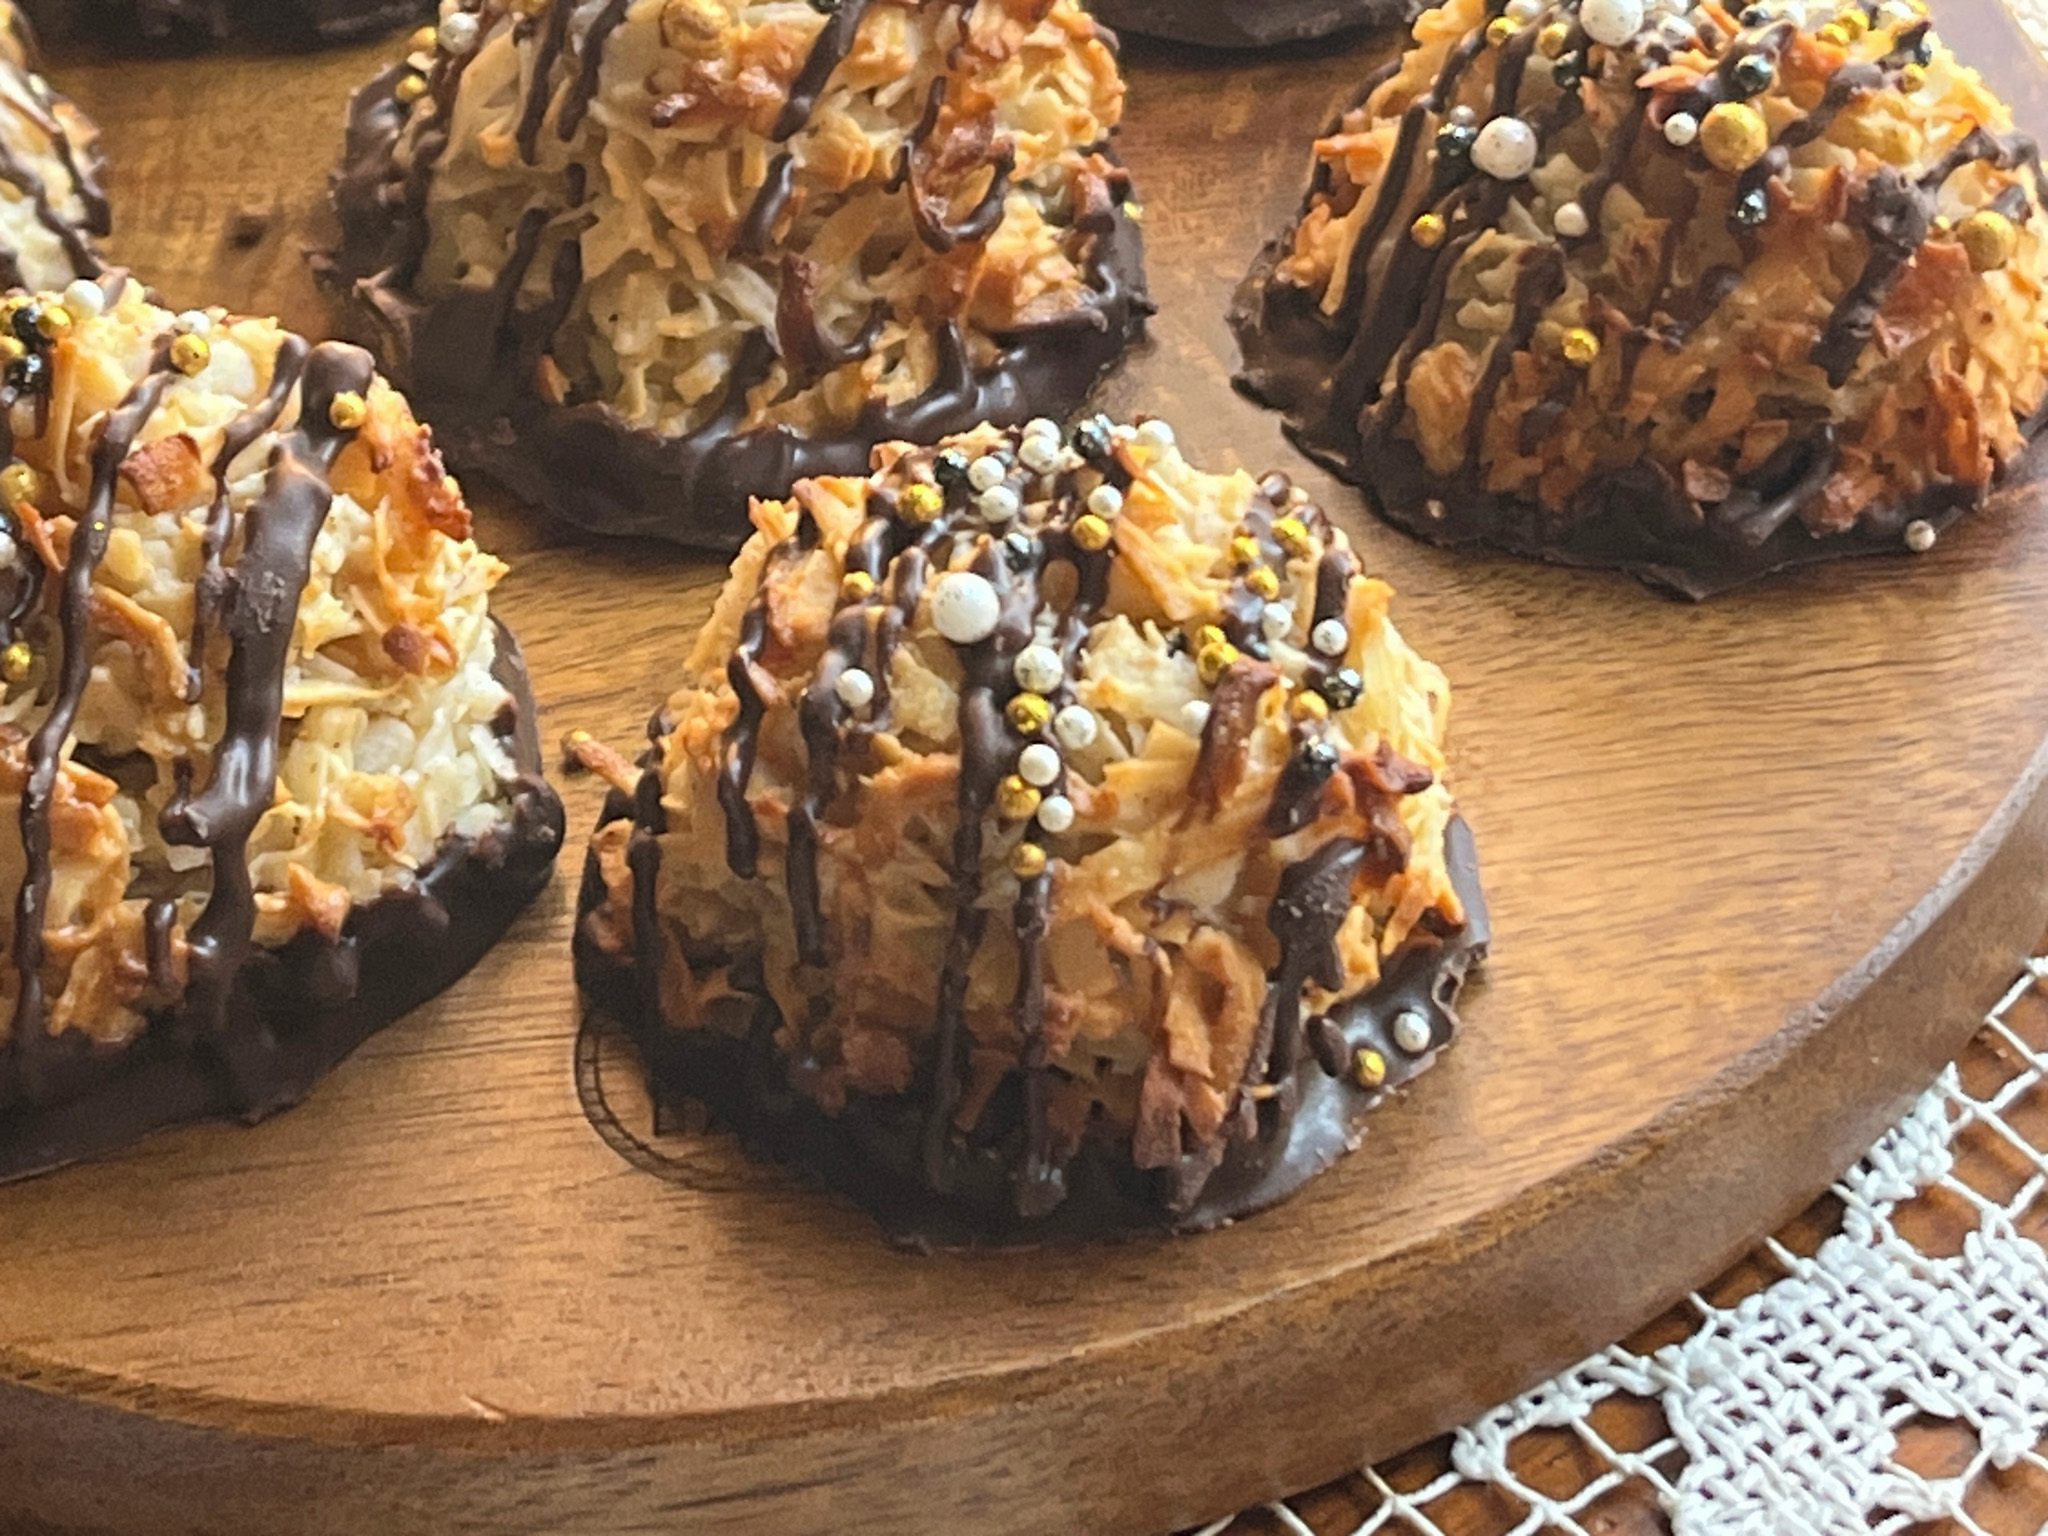
MASALA MACAROONS (published with permission from 108 Asian Cookies)
One 14-ounce (396 g) can sweetened condensed milk 1 ripe small banana, mashed 1 teaspoon red miso One 14-ounce (396 g) bag unsweetened shredded coconut 2 teaspoons garam masala ½ teaspoon ground cardamom ½ teaspoon ground ginger About ⅓ cup (60 g) semisweet chocolate chips, plus more as needed 1 teaspoon neutral oil Sea salt flakes, for garnish Sprinkles, for garnish (optional)
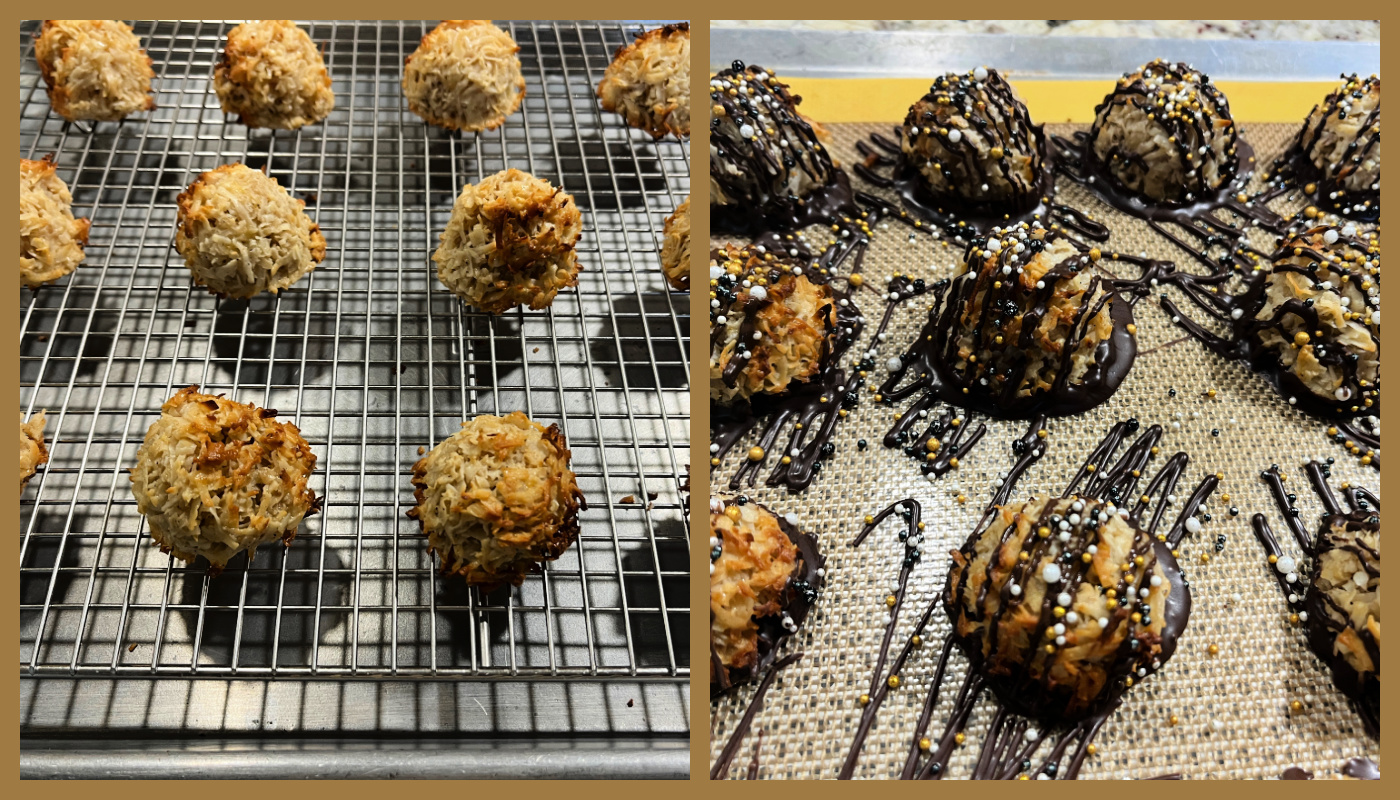
Heat the oven to 350°F. Line two baking sheets with parchment paper. In a large mixing bowl, mix the condensed milk, mashed banana, and miso until combined. Add the shredded coconut, garam masala, cardamom, and ginger and mix until well combined and the dough can hold itself together.
Scoop heaping tablespoons of batter for each macaroon and place on the prepared baking sheet. Keep their rounded mound shapes and give each about 1 inch of space. Bake all the macaroons until the edges are crispy and golden brown and the tops are lightly toasted, 16 to 18 minutes.
Let the macaroons set on the baking sheets for 5 minutes before transferring to a wire rack to cool completely. While the macaroons are cooling, combine the chocolate chips and oil in a medium heatproof bowl and microwave in 30-second bursts, stirring after each interval, until the chocolate is melted and smooth. Dip the bottoms of the cooled macaroons into the melted chocolate. Place them back on the parchment-lined baking sheets to set. Drizzle additional melted chocolate on top of each macaroon. Before the chocolate sets completely, sprinkle a few flakes of sea salt and sprinkles on top of each macaroon.
Comments: These were superb, I confess to stealing one from the donation box and being happy that I did… If you don’t like coconut, of course these are not for you, but if you love them, be ready for a treat! Easy to make, rich and luscious, one will satisfy your sweet tooth, but the spices and miso tone it down substantially. Truly special… You need them in your life.
As a teaser, these are chocolate chip cookies described by Kat as Best Chocolate Chip Cookies Ever. They take Ovaltine, molasses and miso. To die for, honestly. You need these cookies and this cookbook in your life.
Big thank you to Kat for allowing me to share this recipe today!
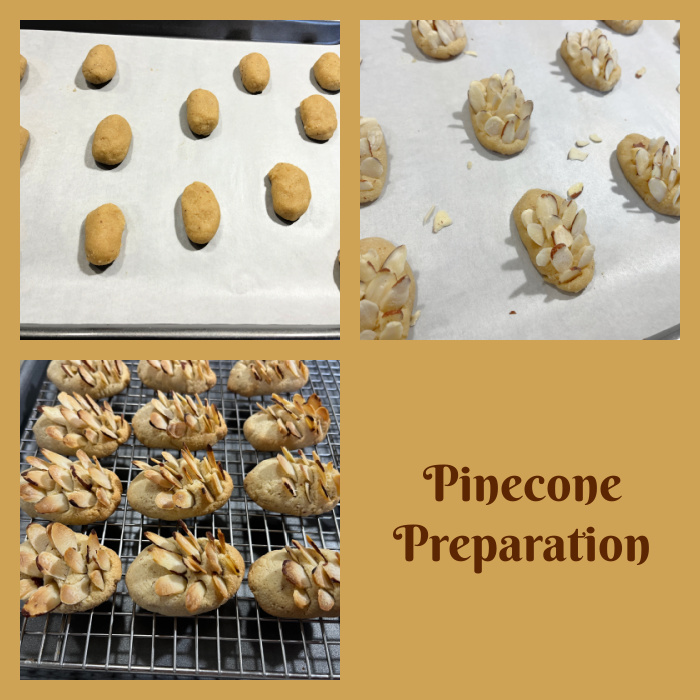
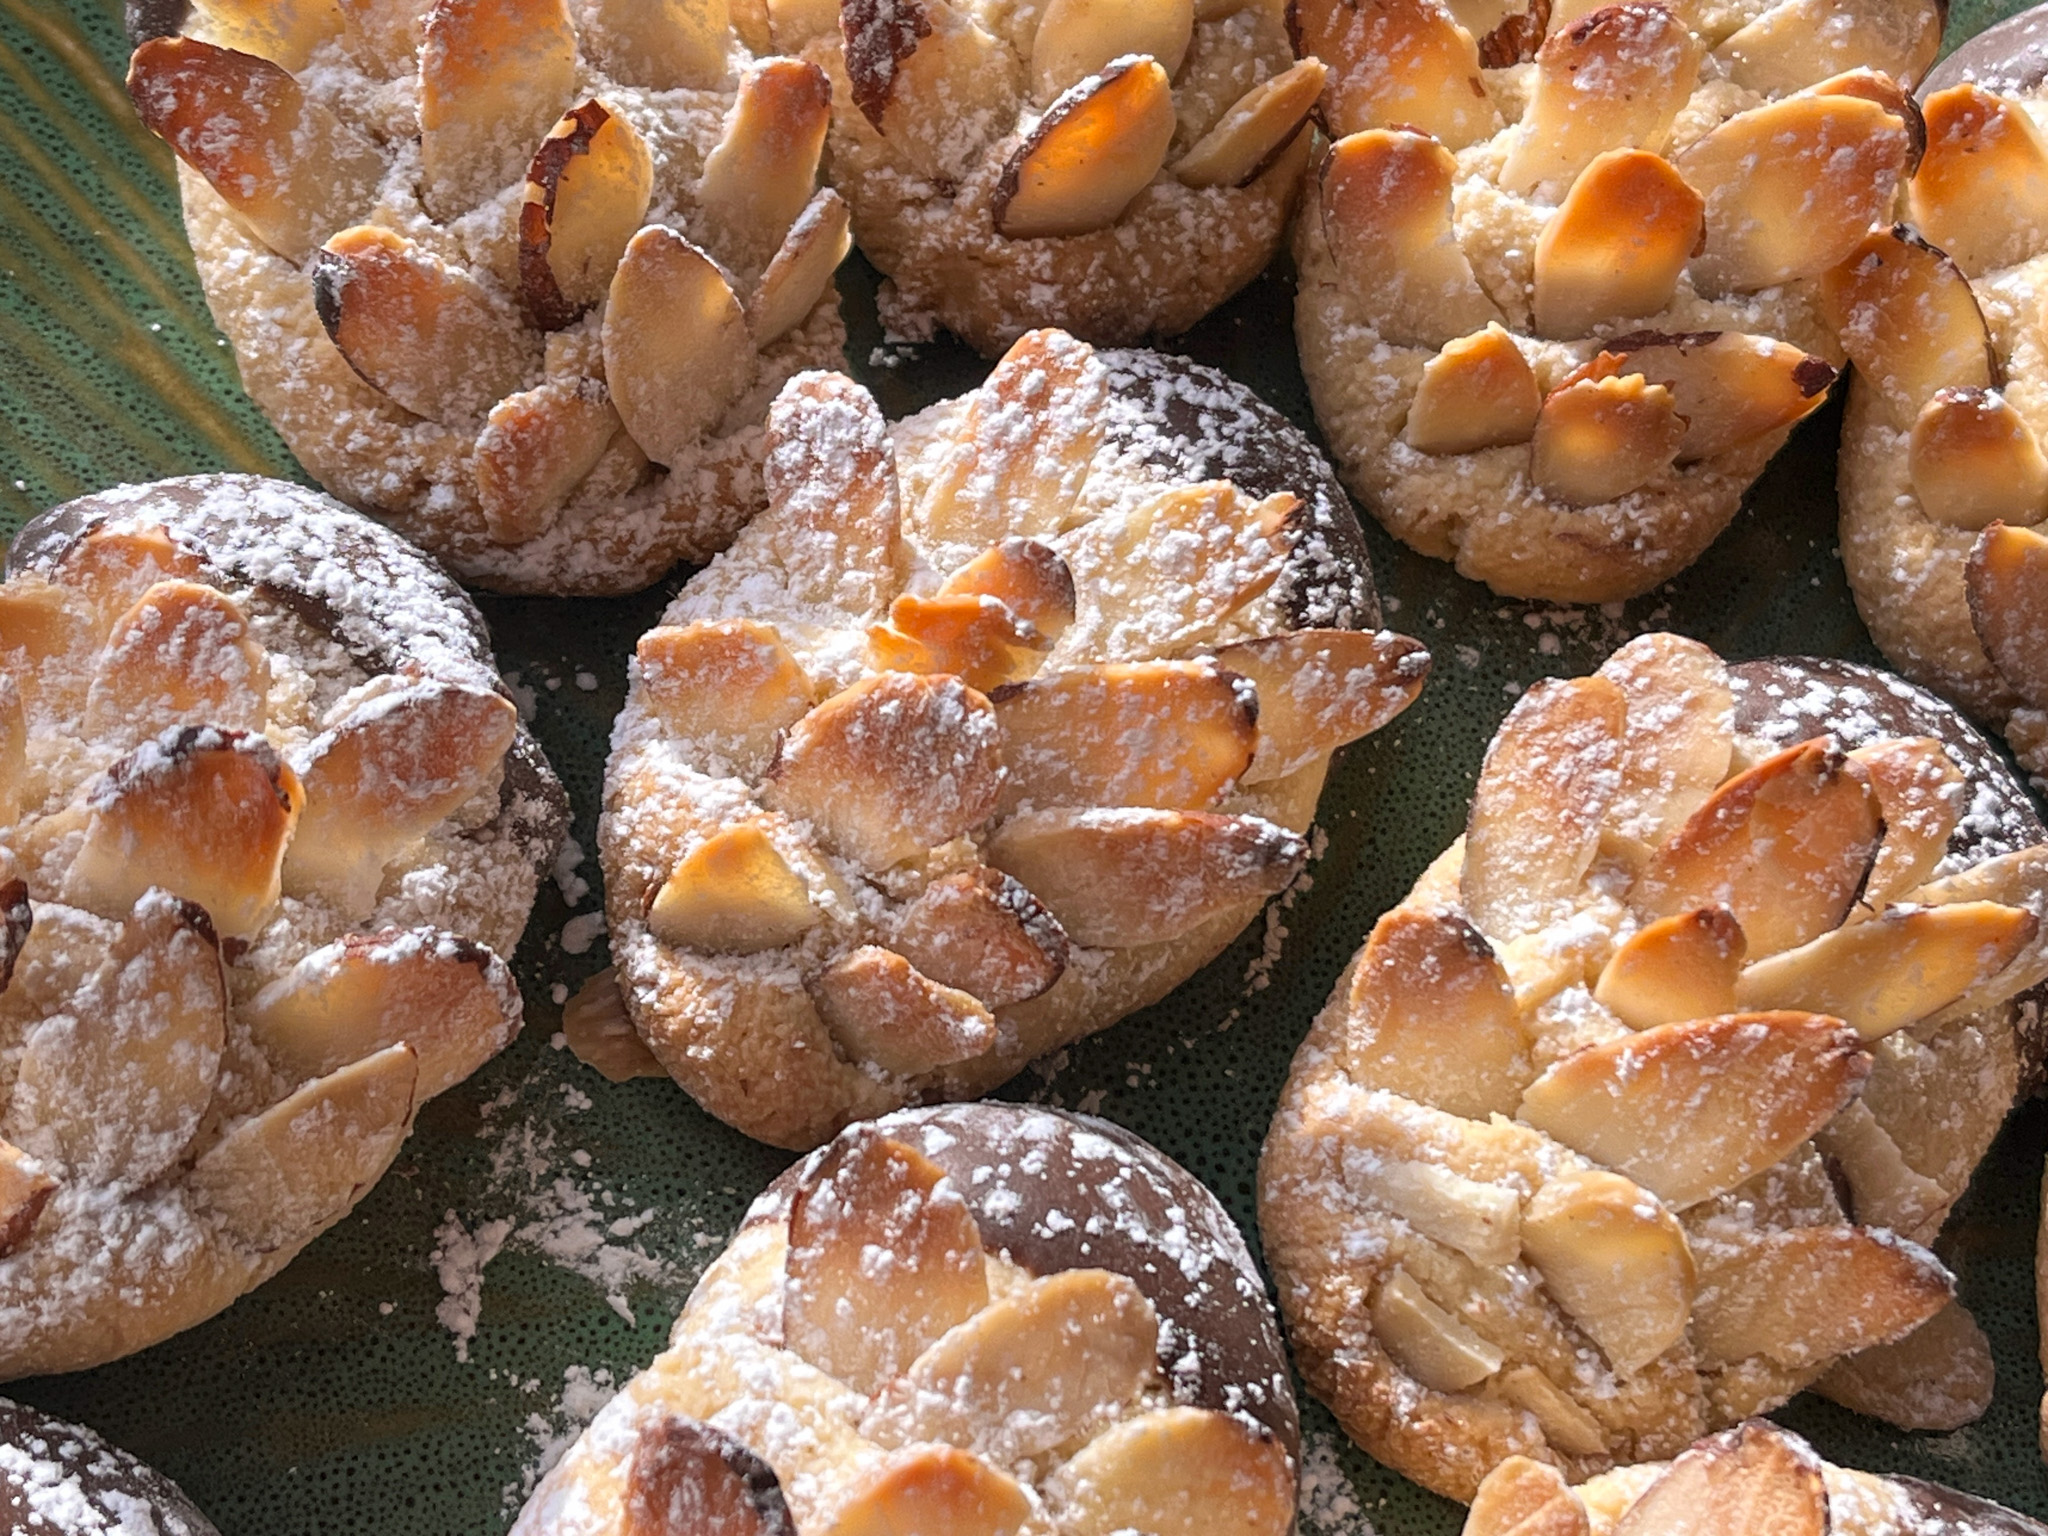
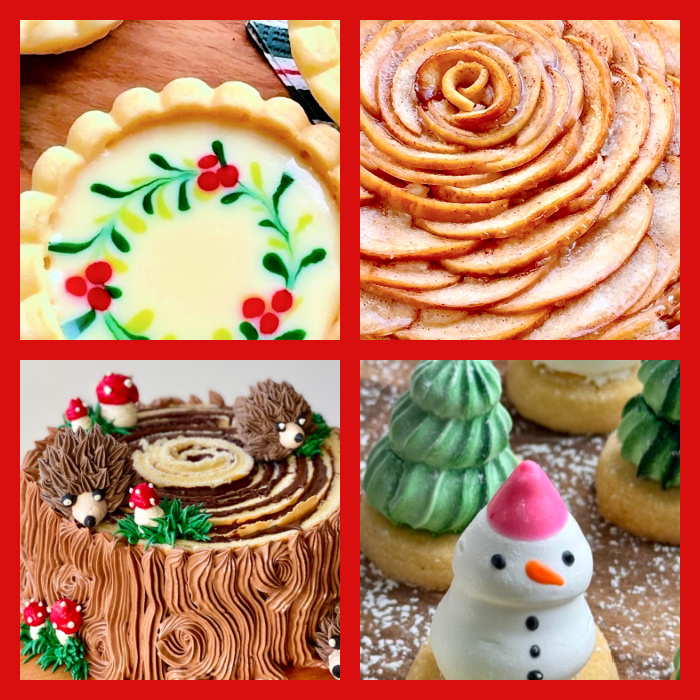
I follow wonderful bakers on Instagram, they are a great source of inspiration, from cookies to cakes, from tarts to bread baking, and patisserie in general. A few months ago I learned that Winnie Lee (IG ohcakeswinnie) was going to publish her first cookbook. I placed an order and anxiously waited. If you like to order Bake with Winnie for you or to gift to someone, click here. Her style of baking is whimsical, clever, creative. Reminds me of one of my favorite bakers from The Great British Bake-Off, Kim-Joy. Bake with Winnie is a book full of gorgeous bakes, colorful, playful, impossible to look at them and not smile. And dream. Today I share with you the second recipe I tried: Pinecone Almond Cookies Tartlets, absolutely adorable!
PINECONE ALMOND COOKIES (published with permission from Bake with Winnie)
Preheat your oven to 175°C and line a flat baking tray with baking paper.
In a large mixing bowl, combine the ground almonds and sifted icing sugar. Whisk the eggs, vanilla and almond extract in a separate bowl and add them to the dry ingredients. Mix with a whisk or spatula until you get a thick, slightly sticky paste. You can add a bit more ground almonds (25g / ¼cup) so it’s easier to work with.
Using a small ice cream scoop or your hands slightly damp, portion out the dough. Roll into long oval shapes and slightly flatten them. Arrange on the baking tray. Press sliced almonds into the top of each cookie in overlapping rows to mimic the look of pinecones, leaving about 1/3 of the cookie bare for dipping in chocolate later.
Bake for about 12–15 minutes or until lightly golden. Allow the cookies to cool completely on a wire rack.
Dust with icing sugar the almond section of the cookie. Melt the dark chocolate and dip the bare end of each cookie into the chocolate. Let the dipped cookies set on parchment paper before serving.
Comments: Just loved making this batch of cookies, which could easily also be flipped into hedgehogs, don’t you think? Add the chocolate to the other side, a couple of white drops of chocolate or Royal icing, or even sprinkles for the eyes, and there you go! New shape….. They have a nice texture and that delicious taste of almonds made more intense by the roasted pieces all over. The only time-consuming step is finding nicely shaped almond slices in the bag, they are often a bit too broken or damaged. But it is totally worth it.
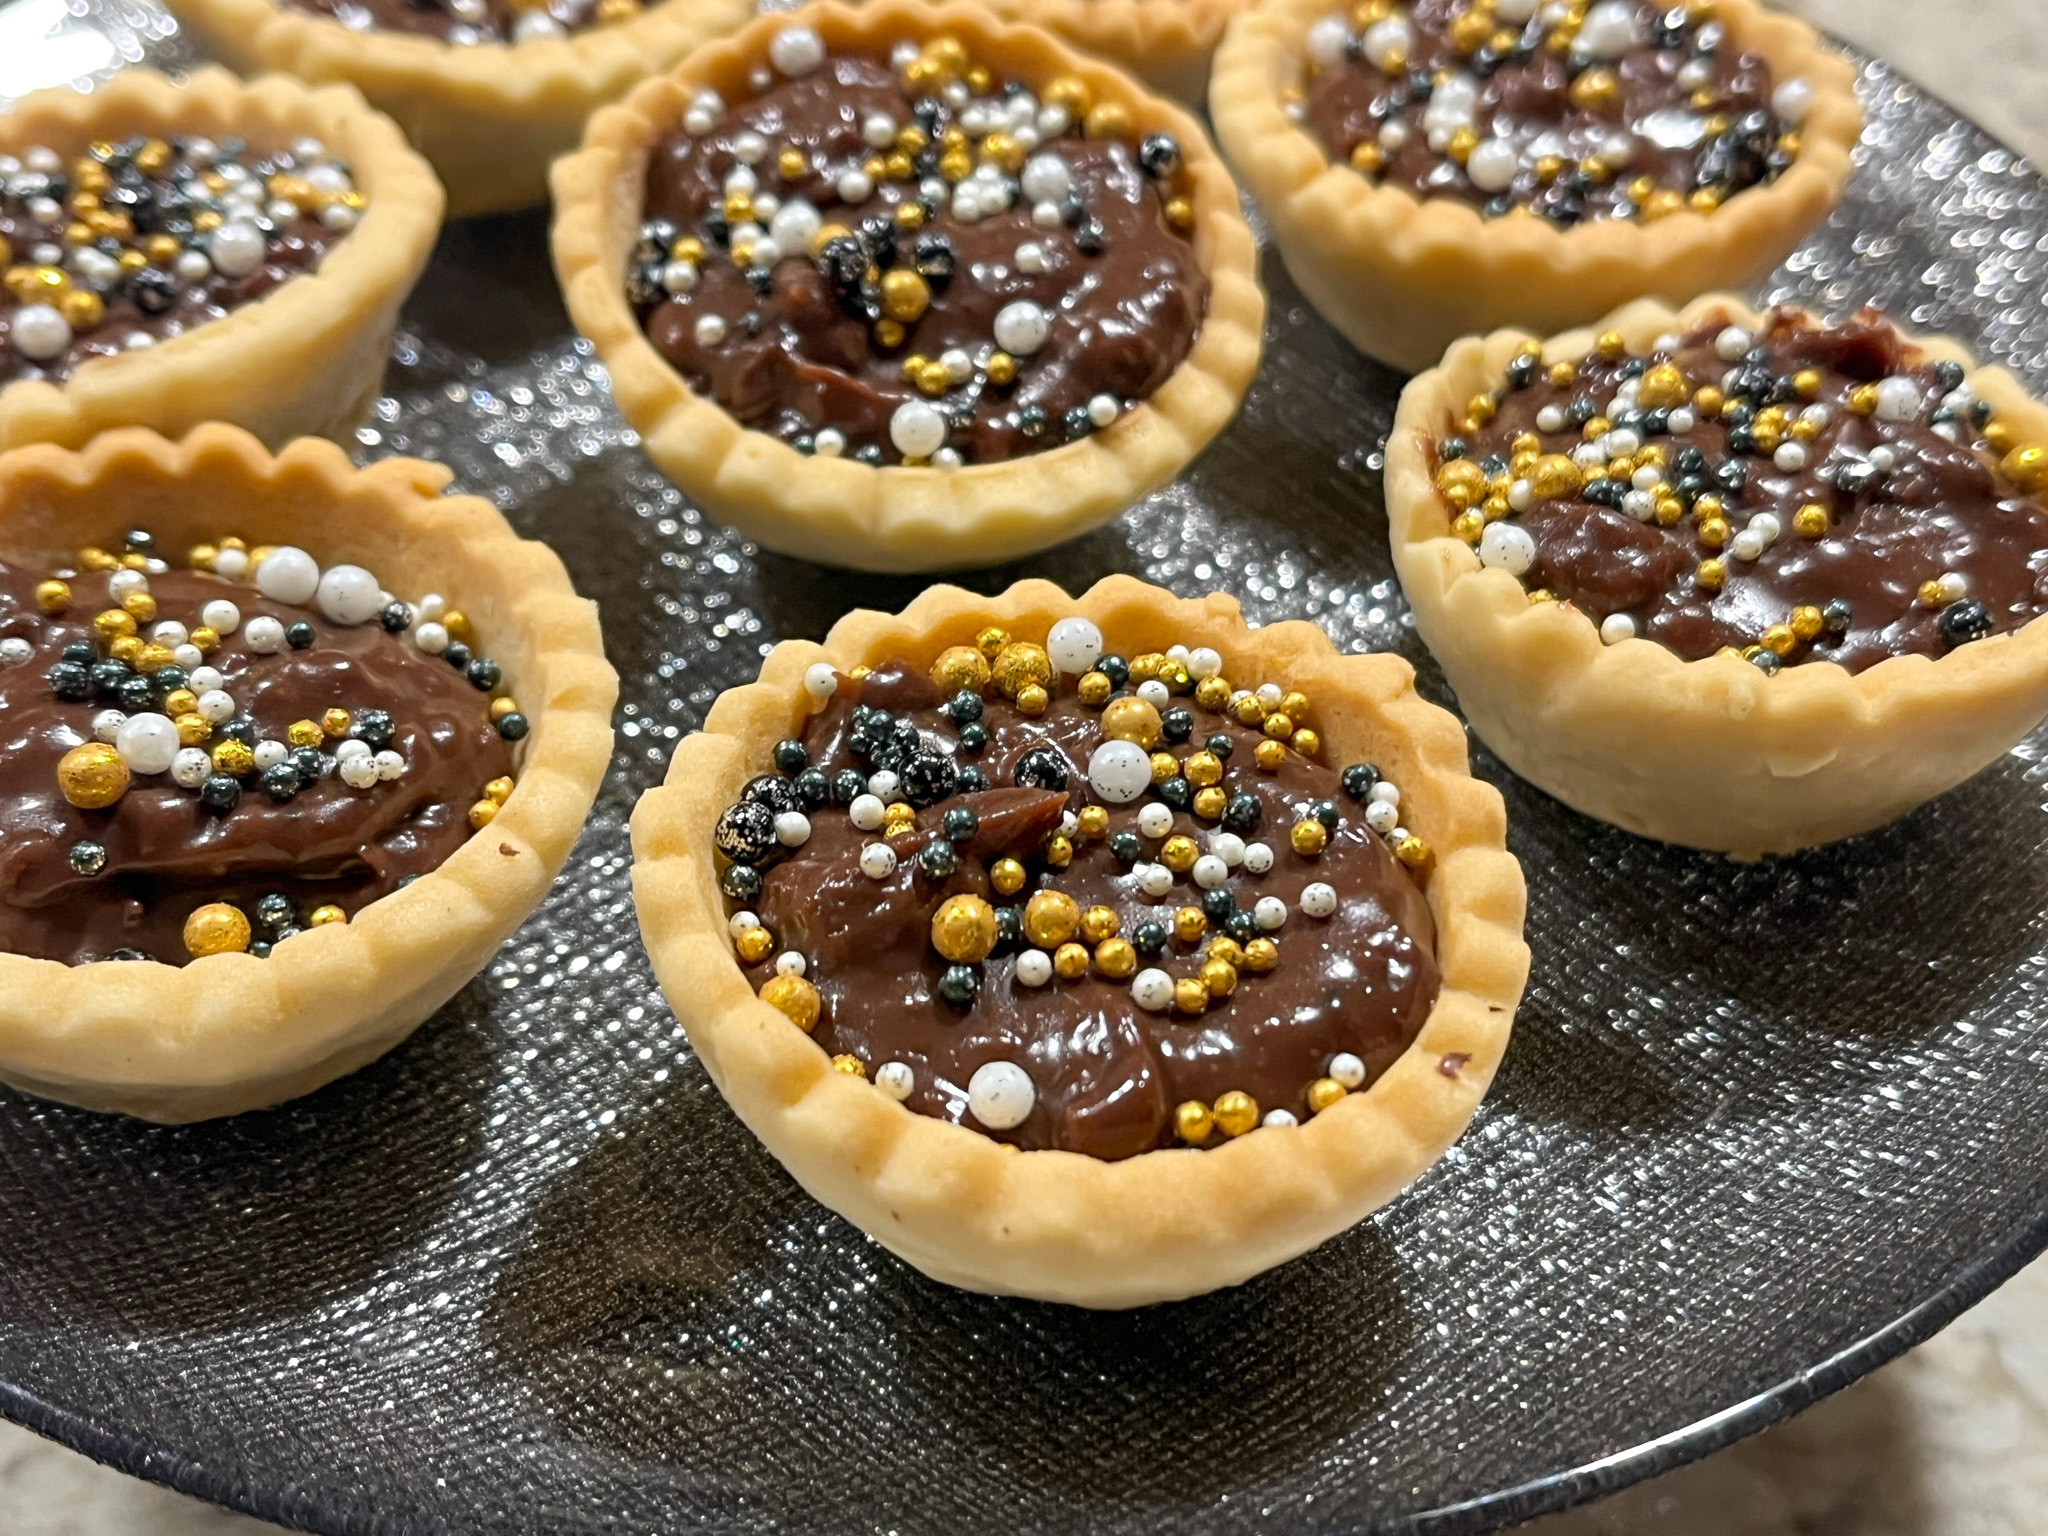
Moving on, a teaser recipe from the book, Chocolate Tartlets, in which she makes the dough in a pretty efficient way, shaping them in the bottom side of muffin tins.
.
That should give you an idea of Winnie’s style of baking. I am totally smitten by her cookbook. So let me take you through a little stroll through her publication… The book is divided in five sections.
PRETTY FOR SPRING. In this section she shares so many bakes with a floral and overall cute component. She opens the chapter with one incredibly beautiful crostata, perfect lattice and colorful flowers all around the edge, all made with pastry. Truly a masterpiece! Imagine Madeleines decorated with pressed flowers, a Roll cake perfect for Valentine’s with hearts imprinted all over. A complete dream of a chapter.
SUMMER LOVIN’.Again the chapter opens with a showstopper, her Happiness Cake Roll, at some point I simply must make it and take for my donations on Fridays. It is one of the happiest bakes I’ve seen, just gives you a smile. A patterned roll cake topped with all kinds of colorful concoctions made of meringue. Another favorite of mine is her Strawberry Cake, decorated with a white buttercream lattice. Must bake! Adorable Linzer-style cookies are part of this chapter too.
SWEET AND SPOOKY. If you are a Halloween-lover like myself, you will flip for this part of her book, but there is a lot more. It starts with cupcakes decorated as little foxes. It is in this chapter that you will find chocolate tartlets I used as a teaser recipe, although hers are different, the filling is ganache and they are all topped with a fresh raspberry. A Spider Web Cake Roll must be part of my Halloween next year. It is a promise! But my very very favorite? A Woodland Cake Roll which is rolled vertically. I’ve been fascinated with this type of cake for a long time.
MAGICAL CHRISTMAS. I almost made her opening recipe, Gingerbread Man Cake Roll. Yes, she is huge on cake rolls, a kind of bake I love and do not make often enough. That must change… Snowflake Pastries made with puff pastry are on my list also. They look absolutely amazing. Perhaps my favorite of this chapter: Holly Mini Tarts. Incredibly cute!
FROSTINGS AND FILLINGS. In this final chapter she shares some of the basic recipe used throughout the book, so it is very useful, plus you can use those for your own versions of cakes and bakes.
I thank Winnie for allowing me to publish a recipe from her cookbook, she is a very sweet person, quite helpful and interactive in her IG page (click here), so pay her a visit and order a copy of her book for yourself or someone you love…
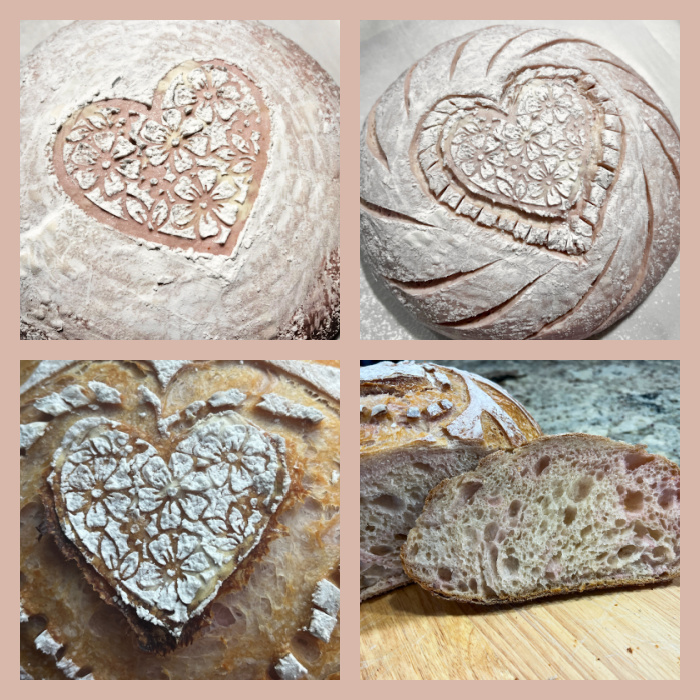
480g bread flour 20g spelt flour 16g dragon flower powder 10g salt 350g water 75g sourdough starter (70-100% hydration)
Make the levain mixture about 6 hours before you plan to mix the dough. It should be very bubbly and active.
When you are ready to make the final dough, place the water in the bowl of a KitchenAid type mixer and dissolve the starter in it, mixing with a spatula briefly, then add the two types of flour, the Dragon flower powder and the salt. Turn the mixer on with the hook attachment and knead the dough for 4 minutes at low-speed all the time. If the dough is too sticky, add a maximum of 1/4 cup flour, you want the dough to start clearing the sides of the bowl, but still be sticky at the bottom.
Remove from the machine. Get a small piece of dough and place in a little glass container to follow fermentation (optional, but highly recommended). Transfer the dough to a container lightly coated with oil, cover lightly with plastic wrap and allow it to ferment for 2 hours, folding every 30 minutes or so. After the fourth folding cycle, let the dough sit at room temperature until doubled in size, following the progress in the small amount of dough removed.
Shape the dough as a ball, and place, seam side up, in a lightly floured banetton. Place in the fridge overnight, from 8 to 12 hours or even longer, if you prefer.
Next morning, heat the oven to 450F. Invert the dough over parchment paper, carefully place the stencil on top, and dust with flour. Make sure to rub the flour well into the design, a small brush is helpful. Lift the stencil and place the dough in a Dutch oven.
Bake at 450F for 45 minutes, preferably covered for the first 30 minutes to retain steam. Cool completely over a rack before slicing.
Comments: This is actually my second loaf with the Dragon flower powder, the first one was beautifully pink inside, but this turned out marbled and light. Cannot quite figure it out, it was the same exact formula and method. Oh, well. Still absolutely delicious, no change in flavor, maybe the crumb has slightly more moisture, the bread is a bit more tender than a sourdough without the powder. .
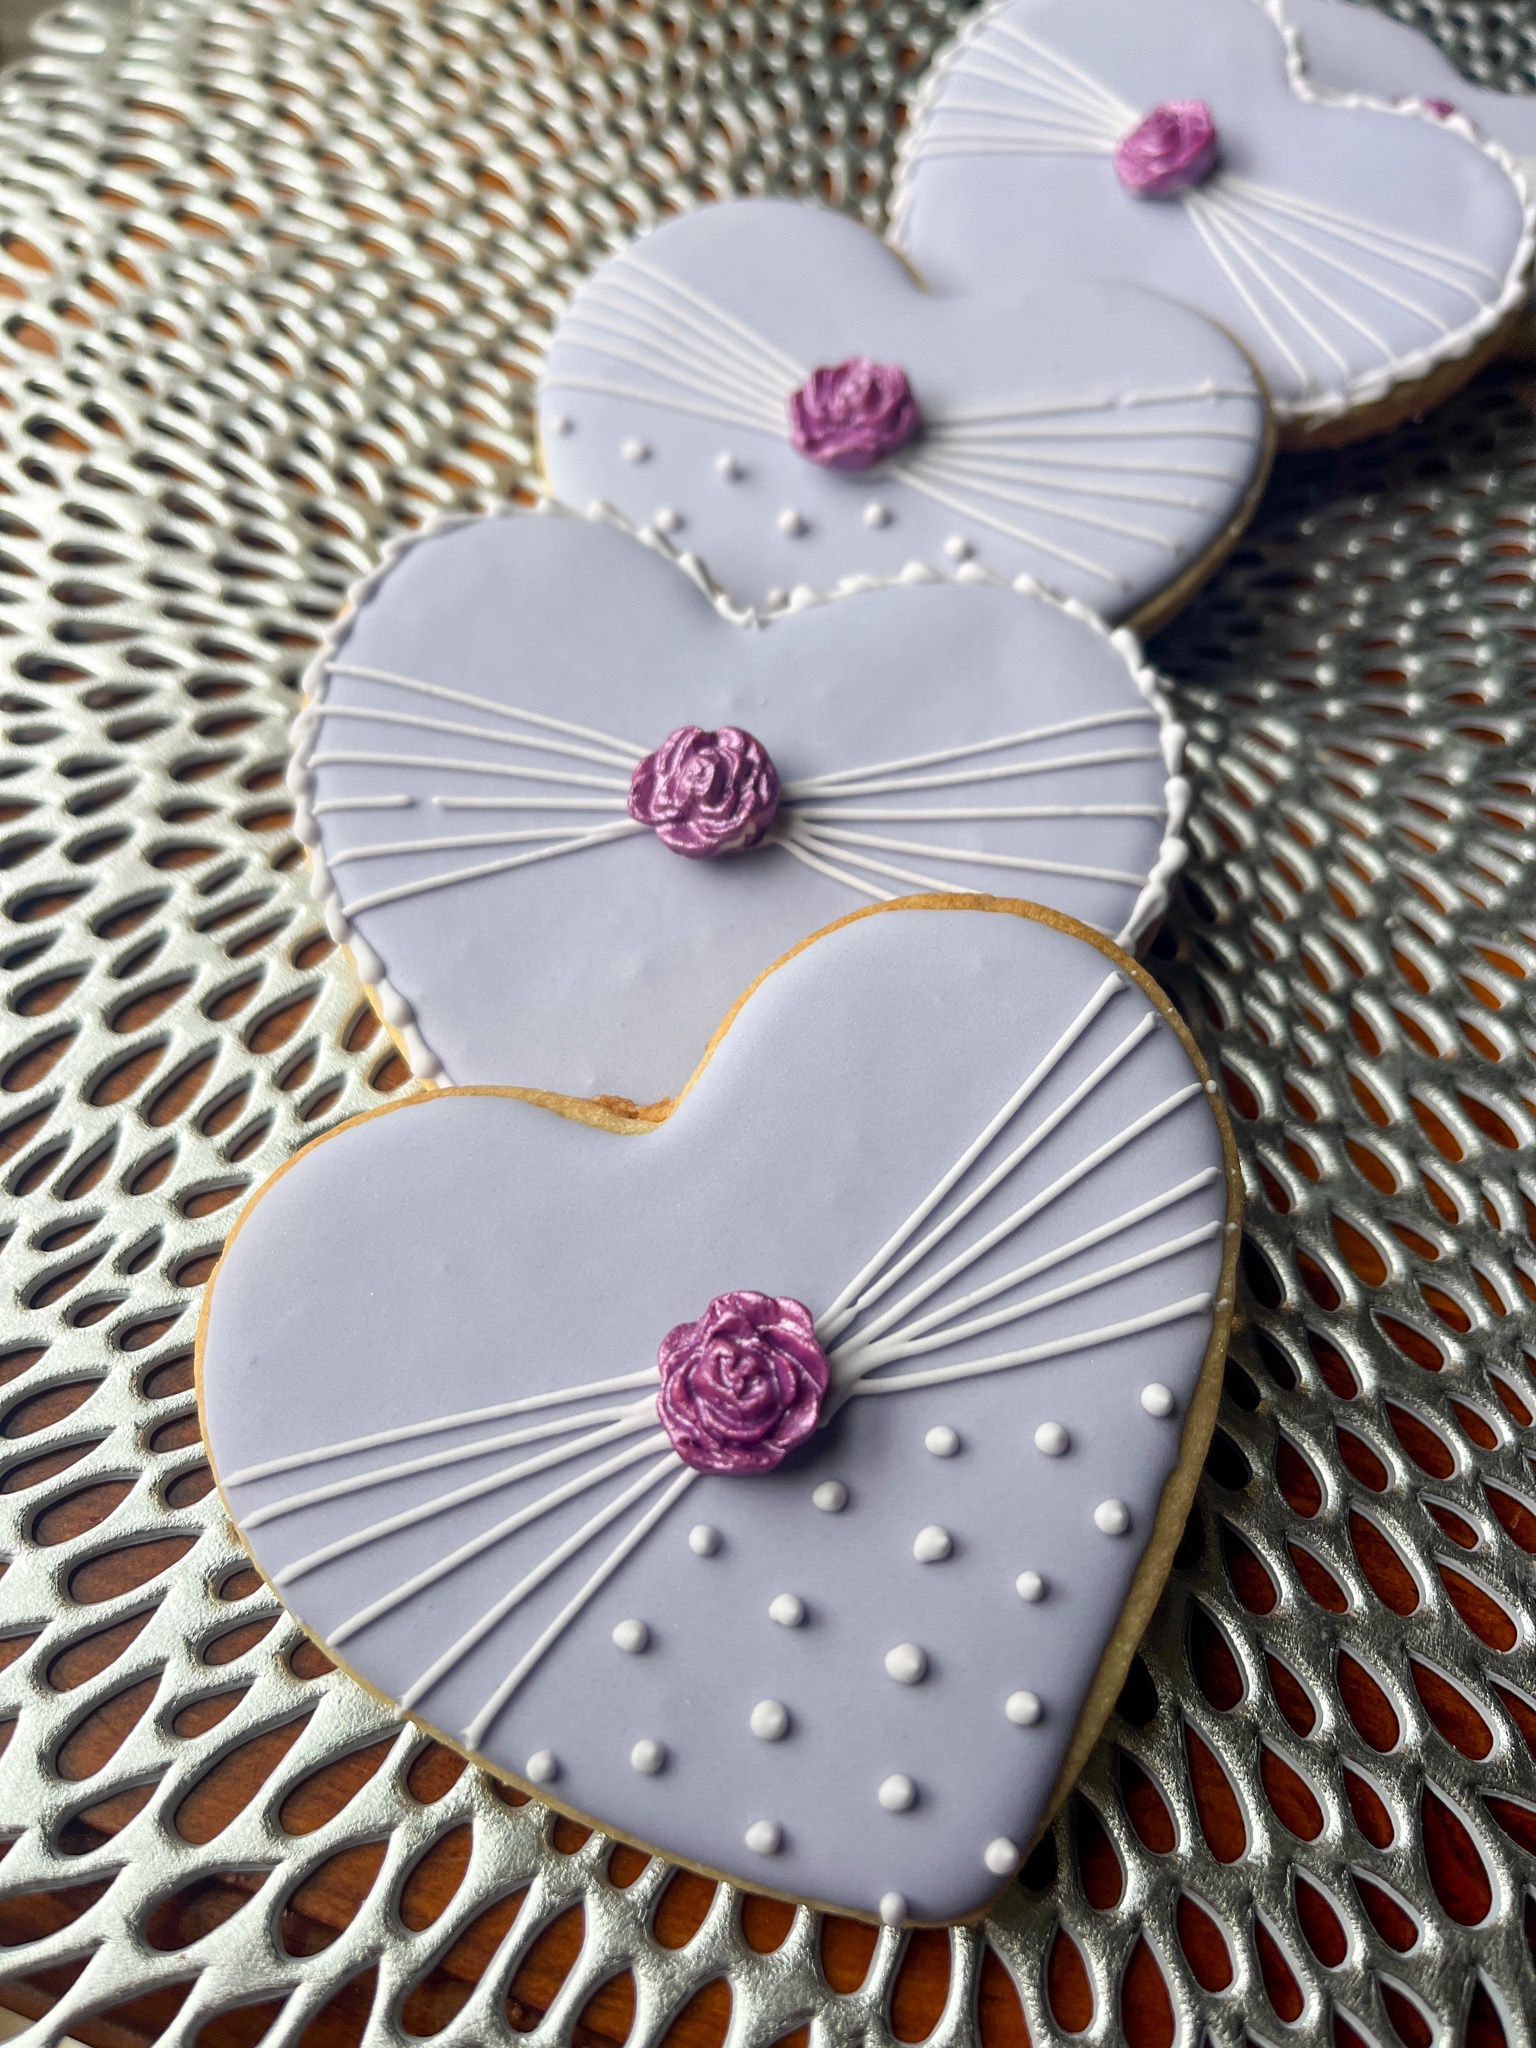
Moving on, I share a series of cookies that center on a message of love….
Royal icing lavender base; details in piping consistency white. Fondant rose detail.
.
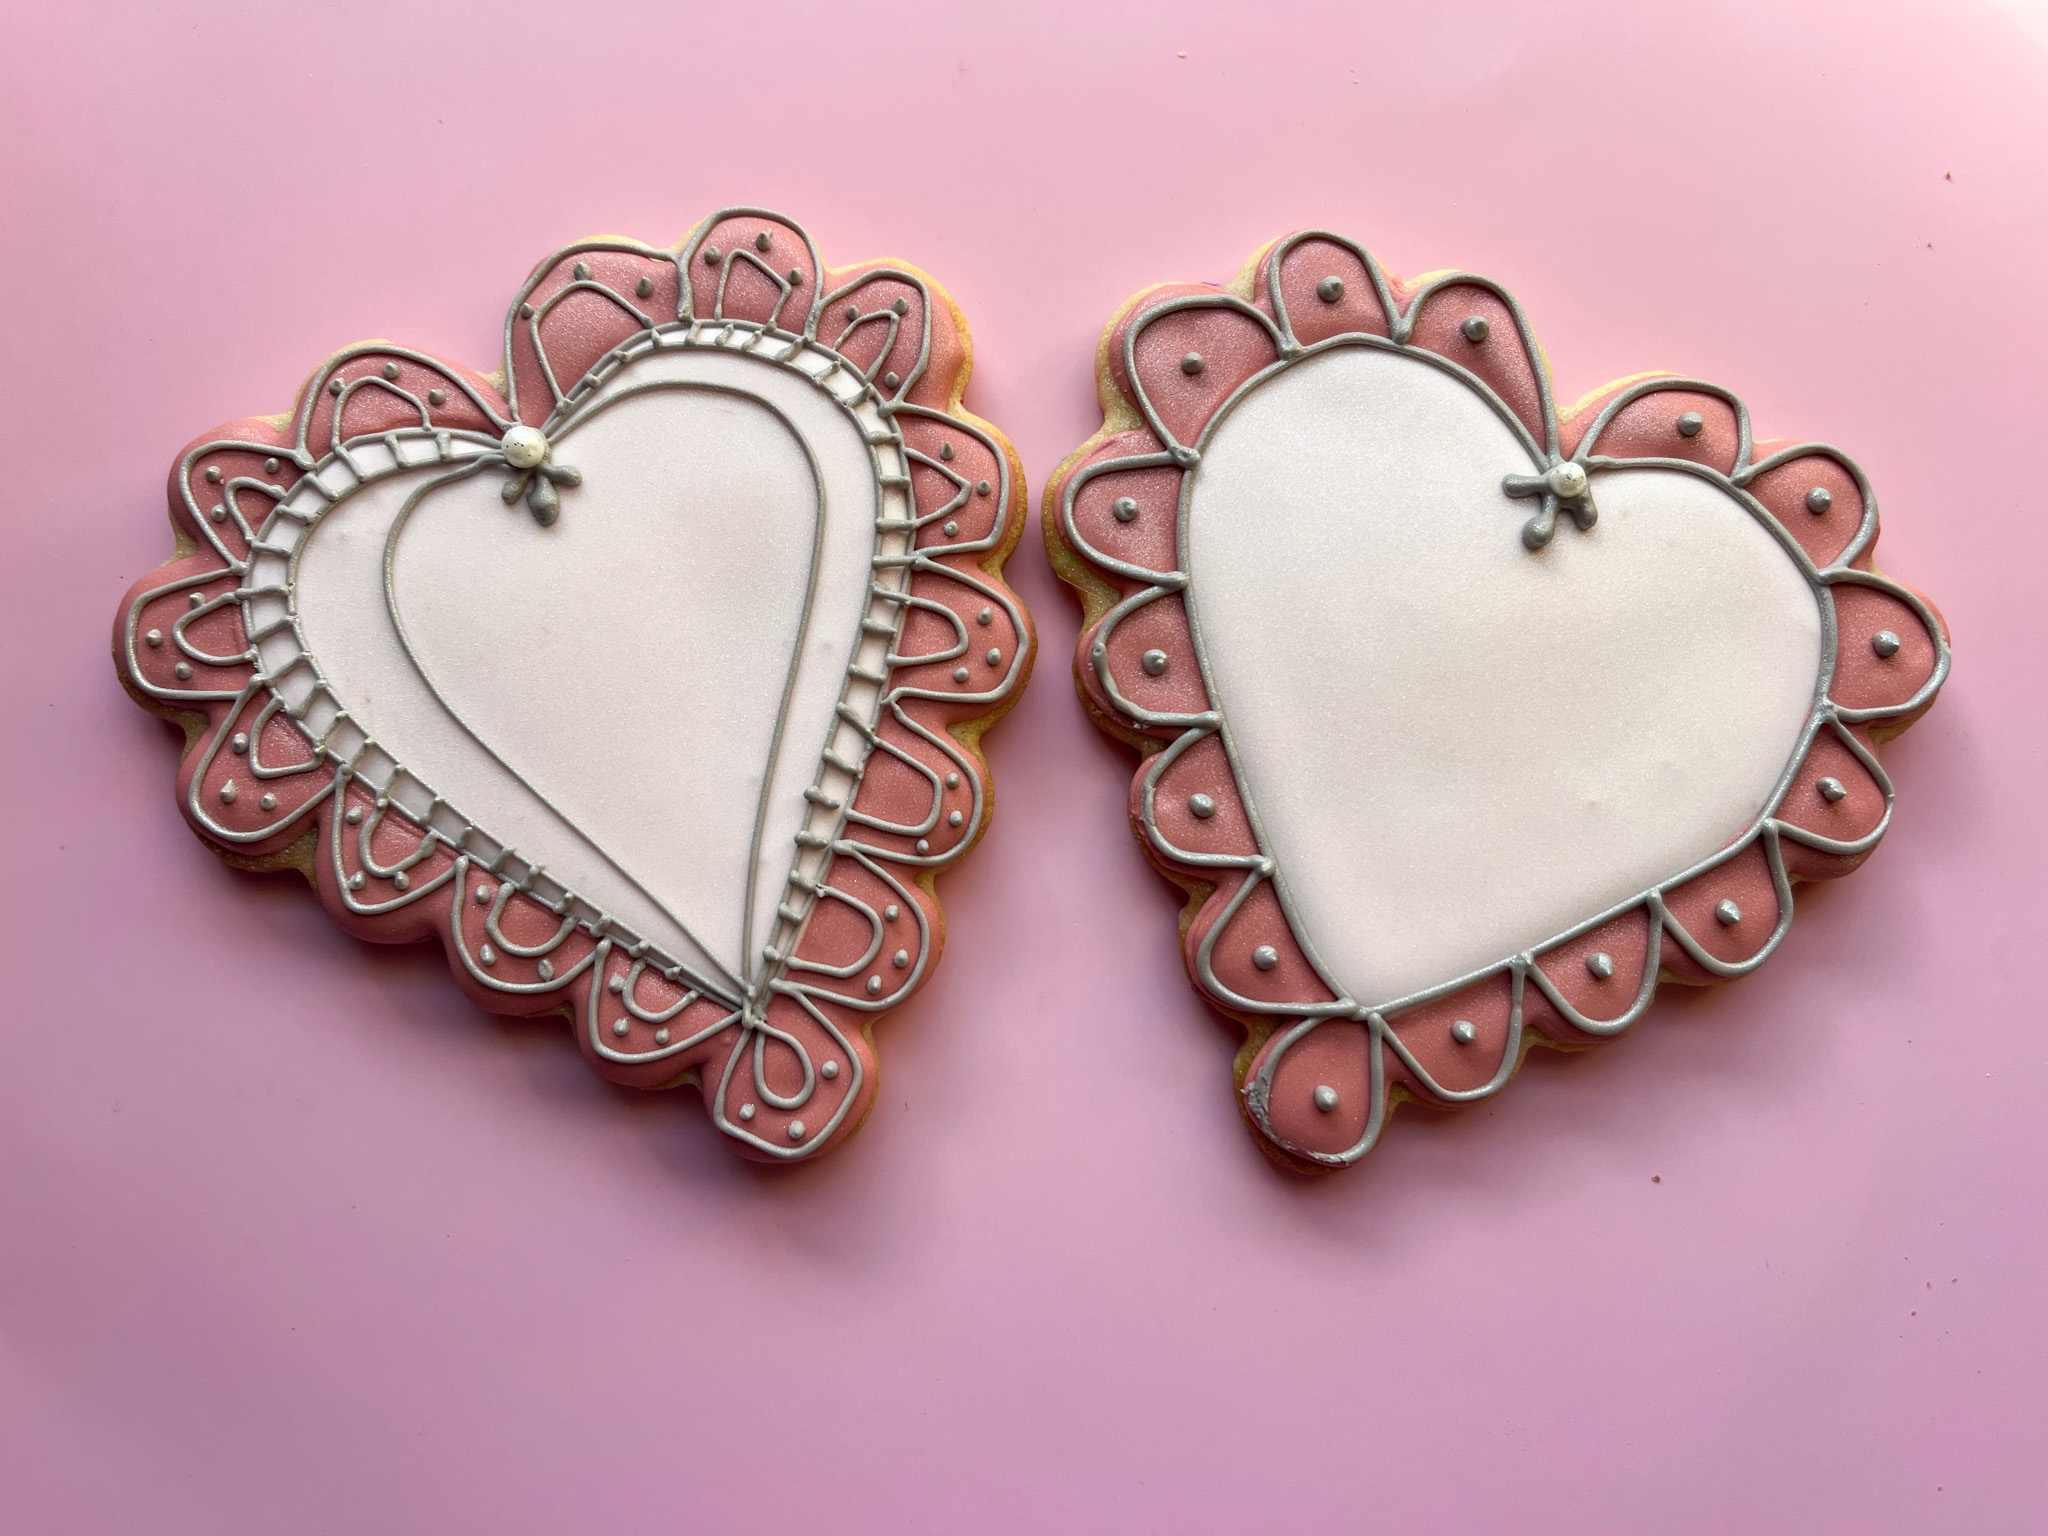
Scalloped edge heart cookie. Iced in two tones of Dusty Rose. Details in piping consistency gray.
.
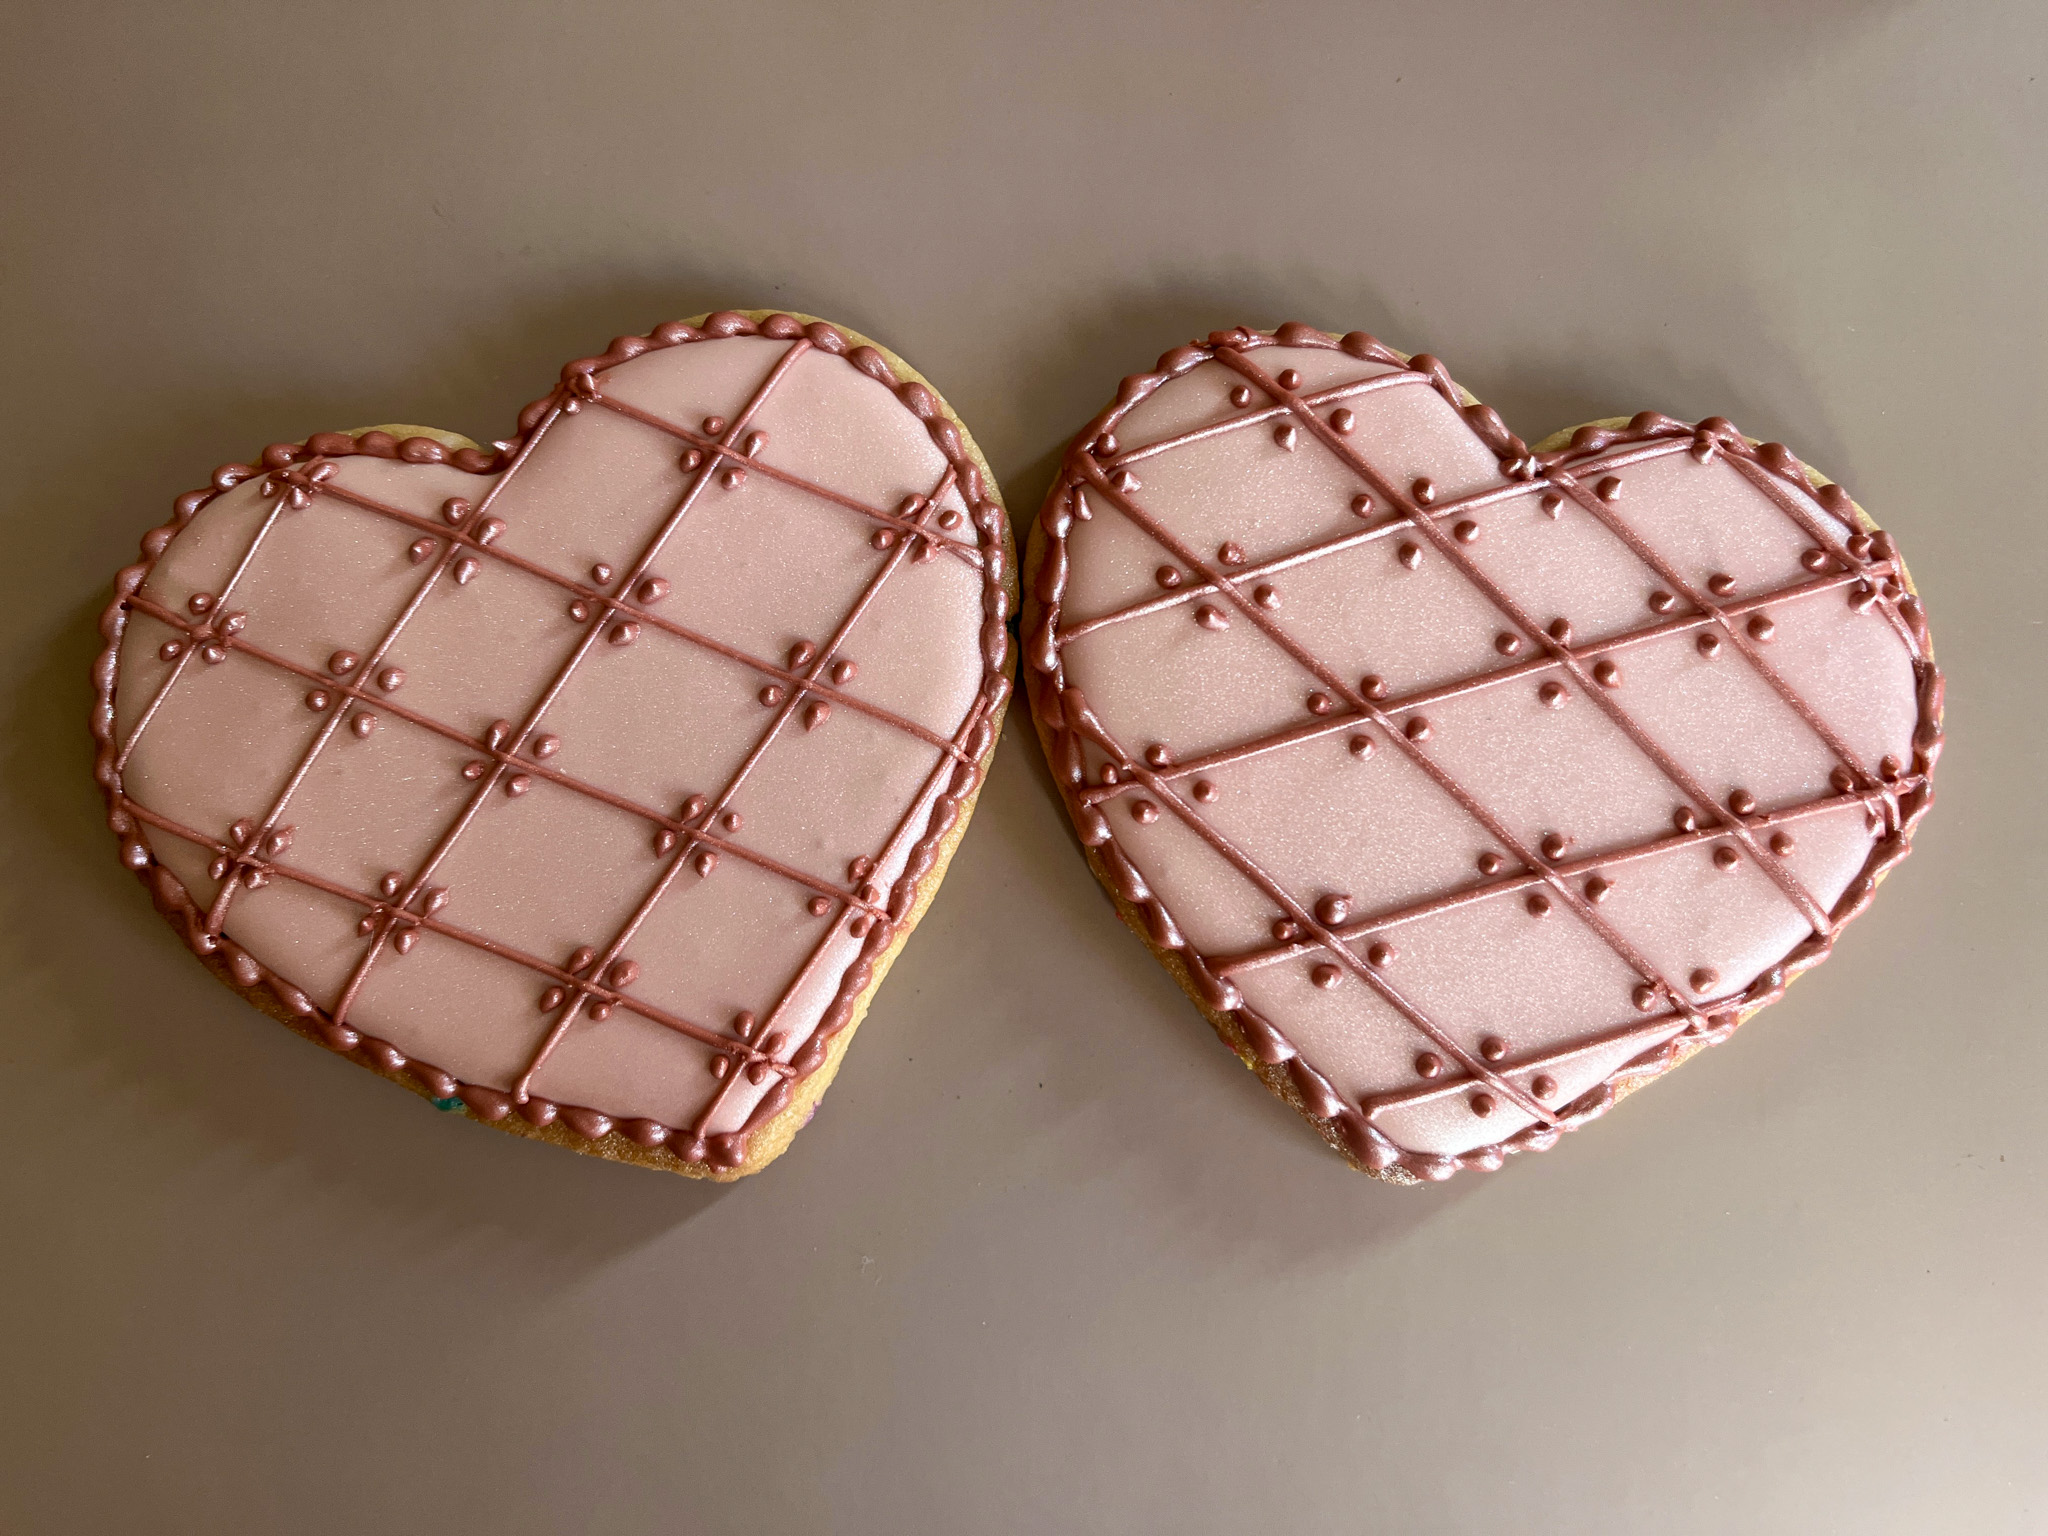
Dusty Rose for the base icing. Details in dark Dusty Rose, piping consistency, same for bead border.
.
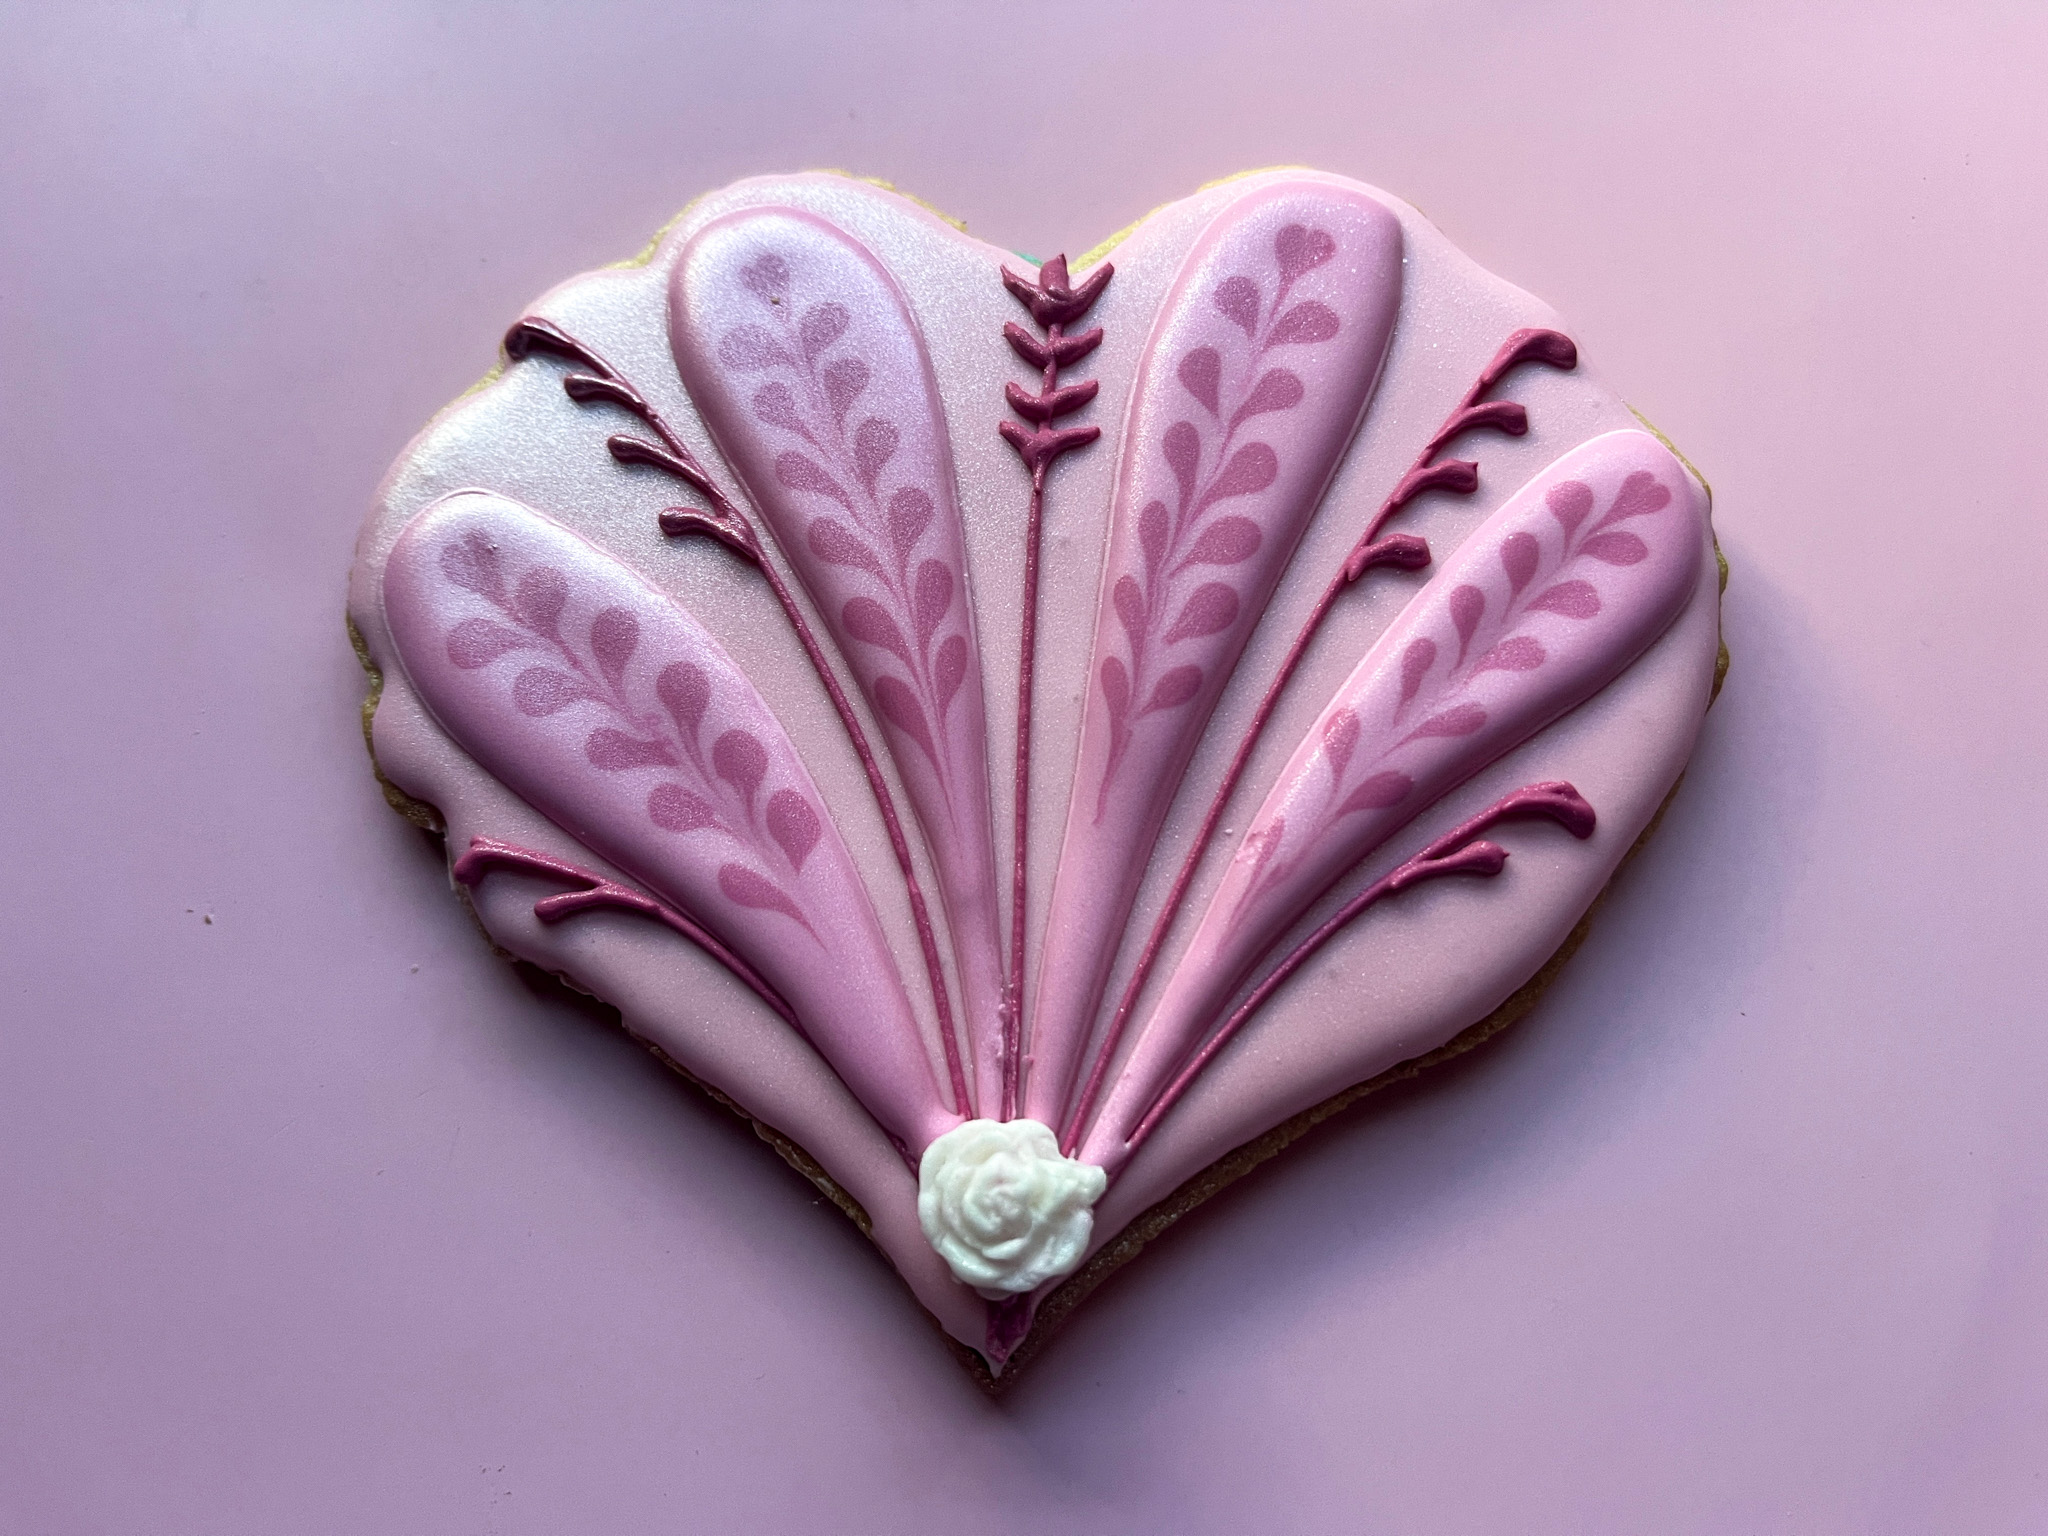
Inspired by a little reel I saw on Facebook. Shape cut by hand. Iced in two stages, wet on wet details, and piping consistency dark Dusty Rose. Fondant for the detail at the bottom.
.
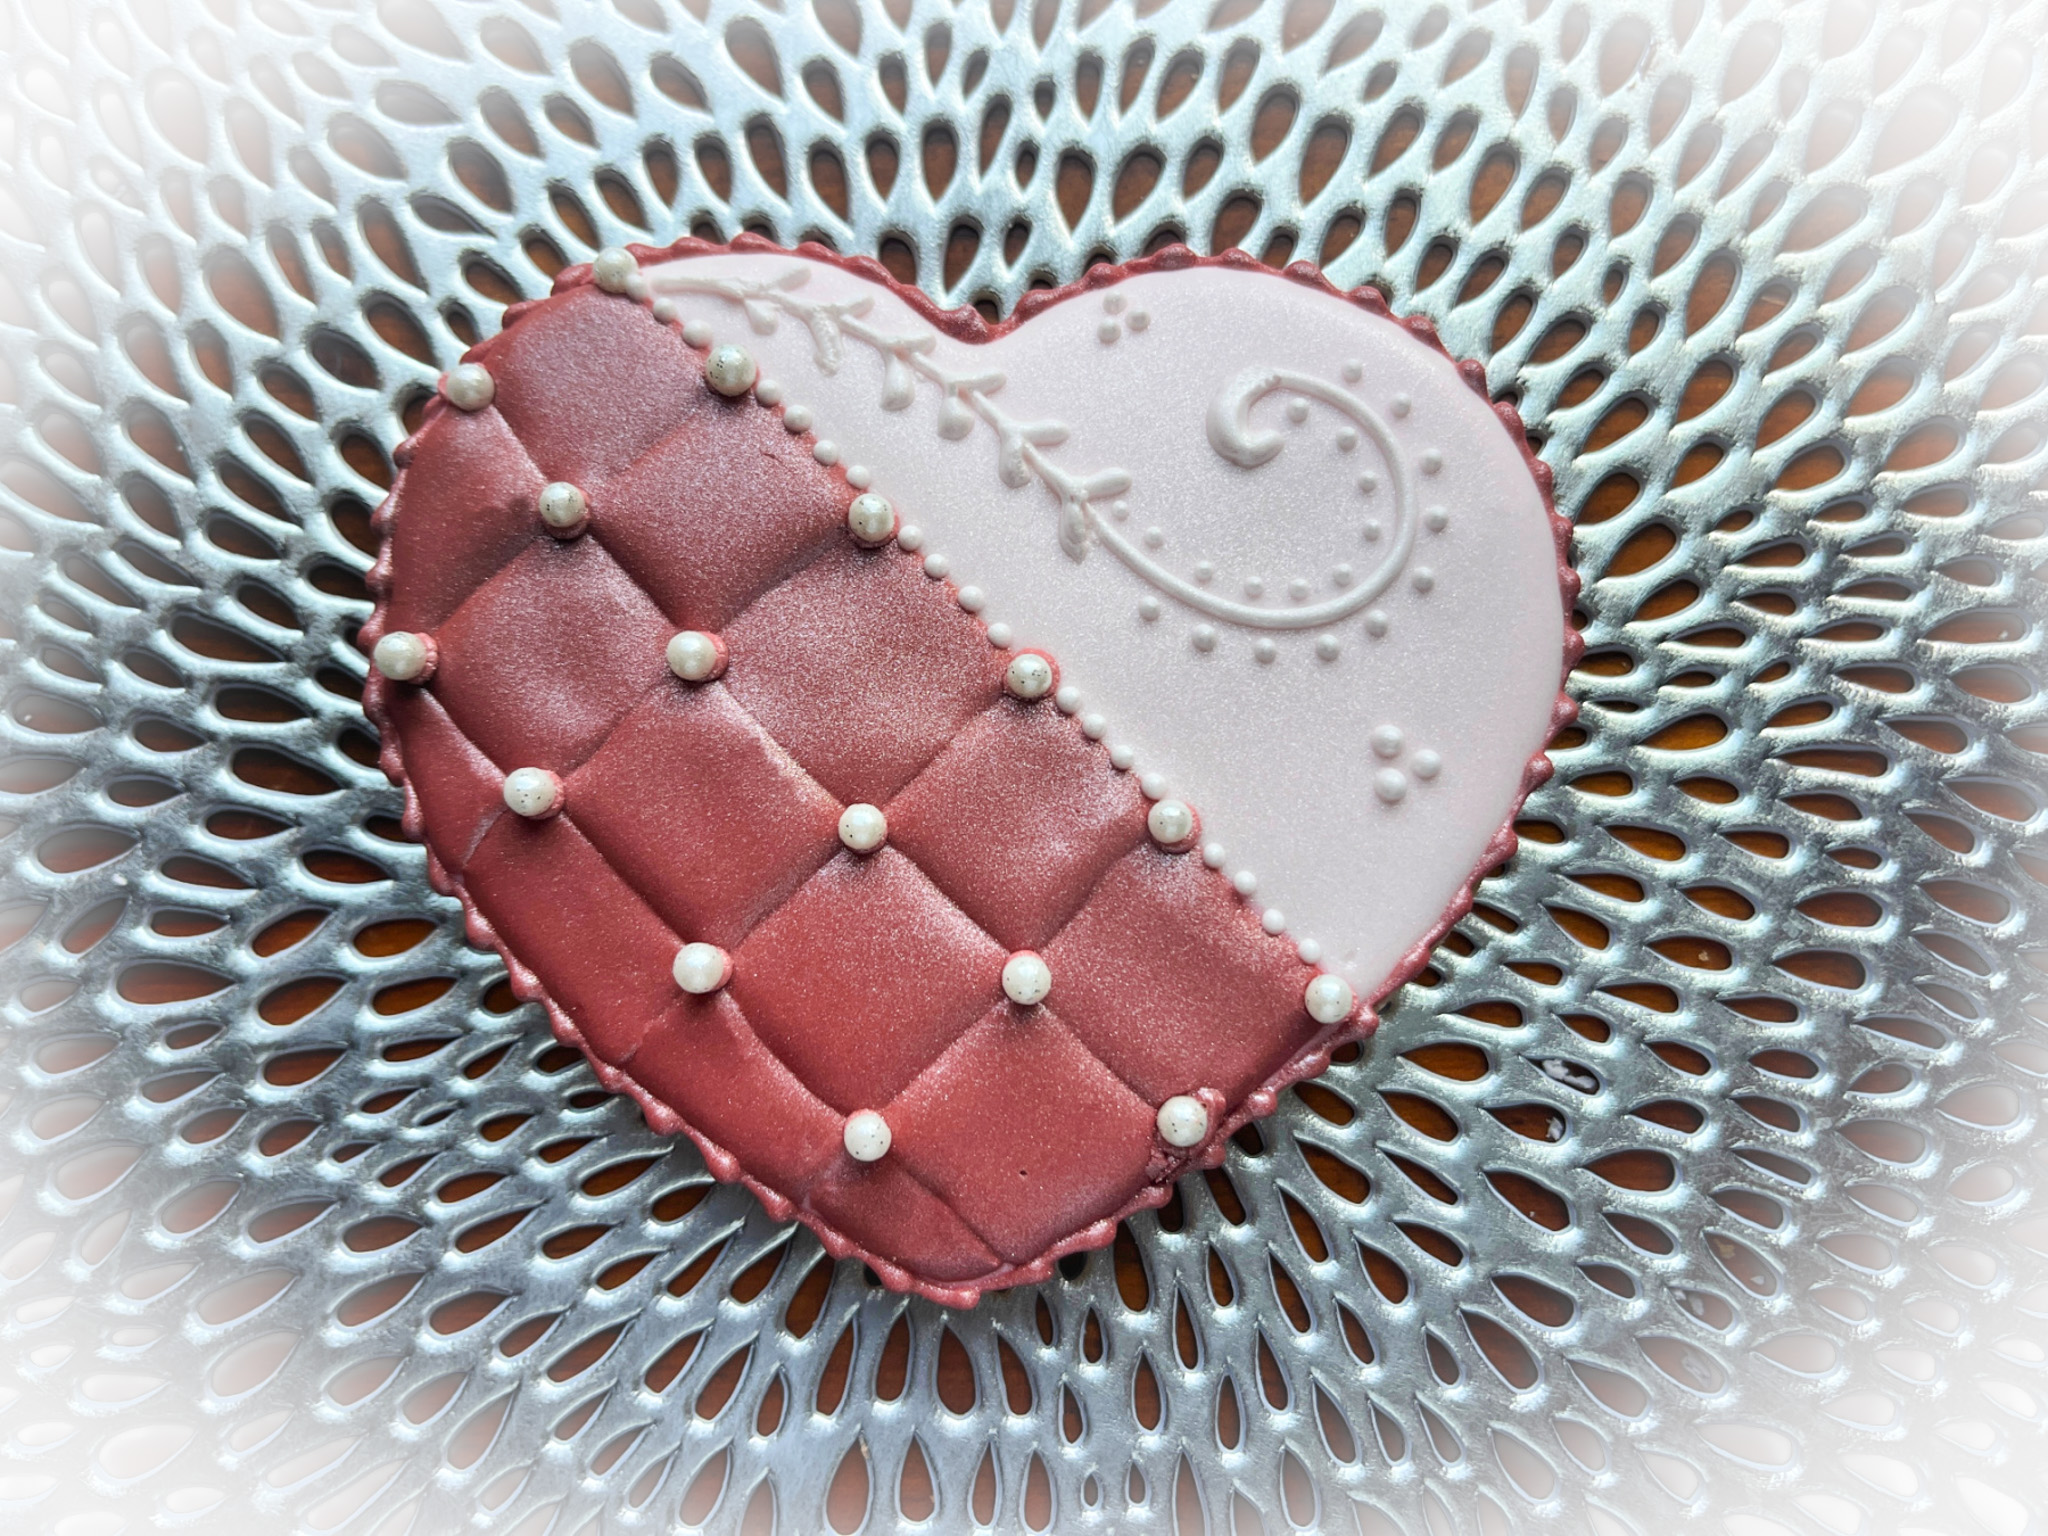
Two-toned heart. Once again using Dusty Rose as the main color. Details piped in white. White pearls for bling.
.
.
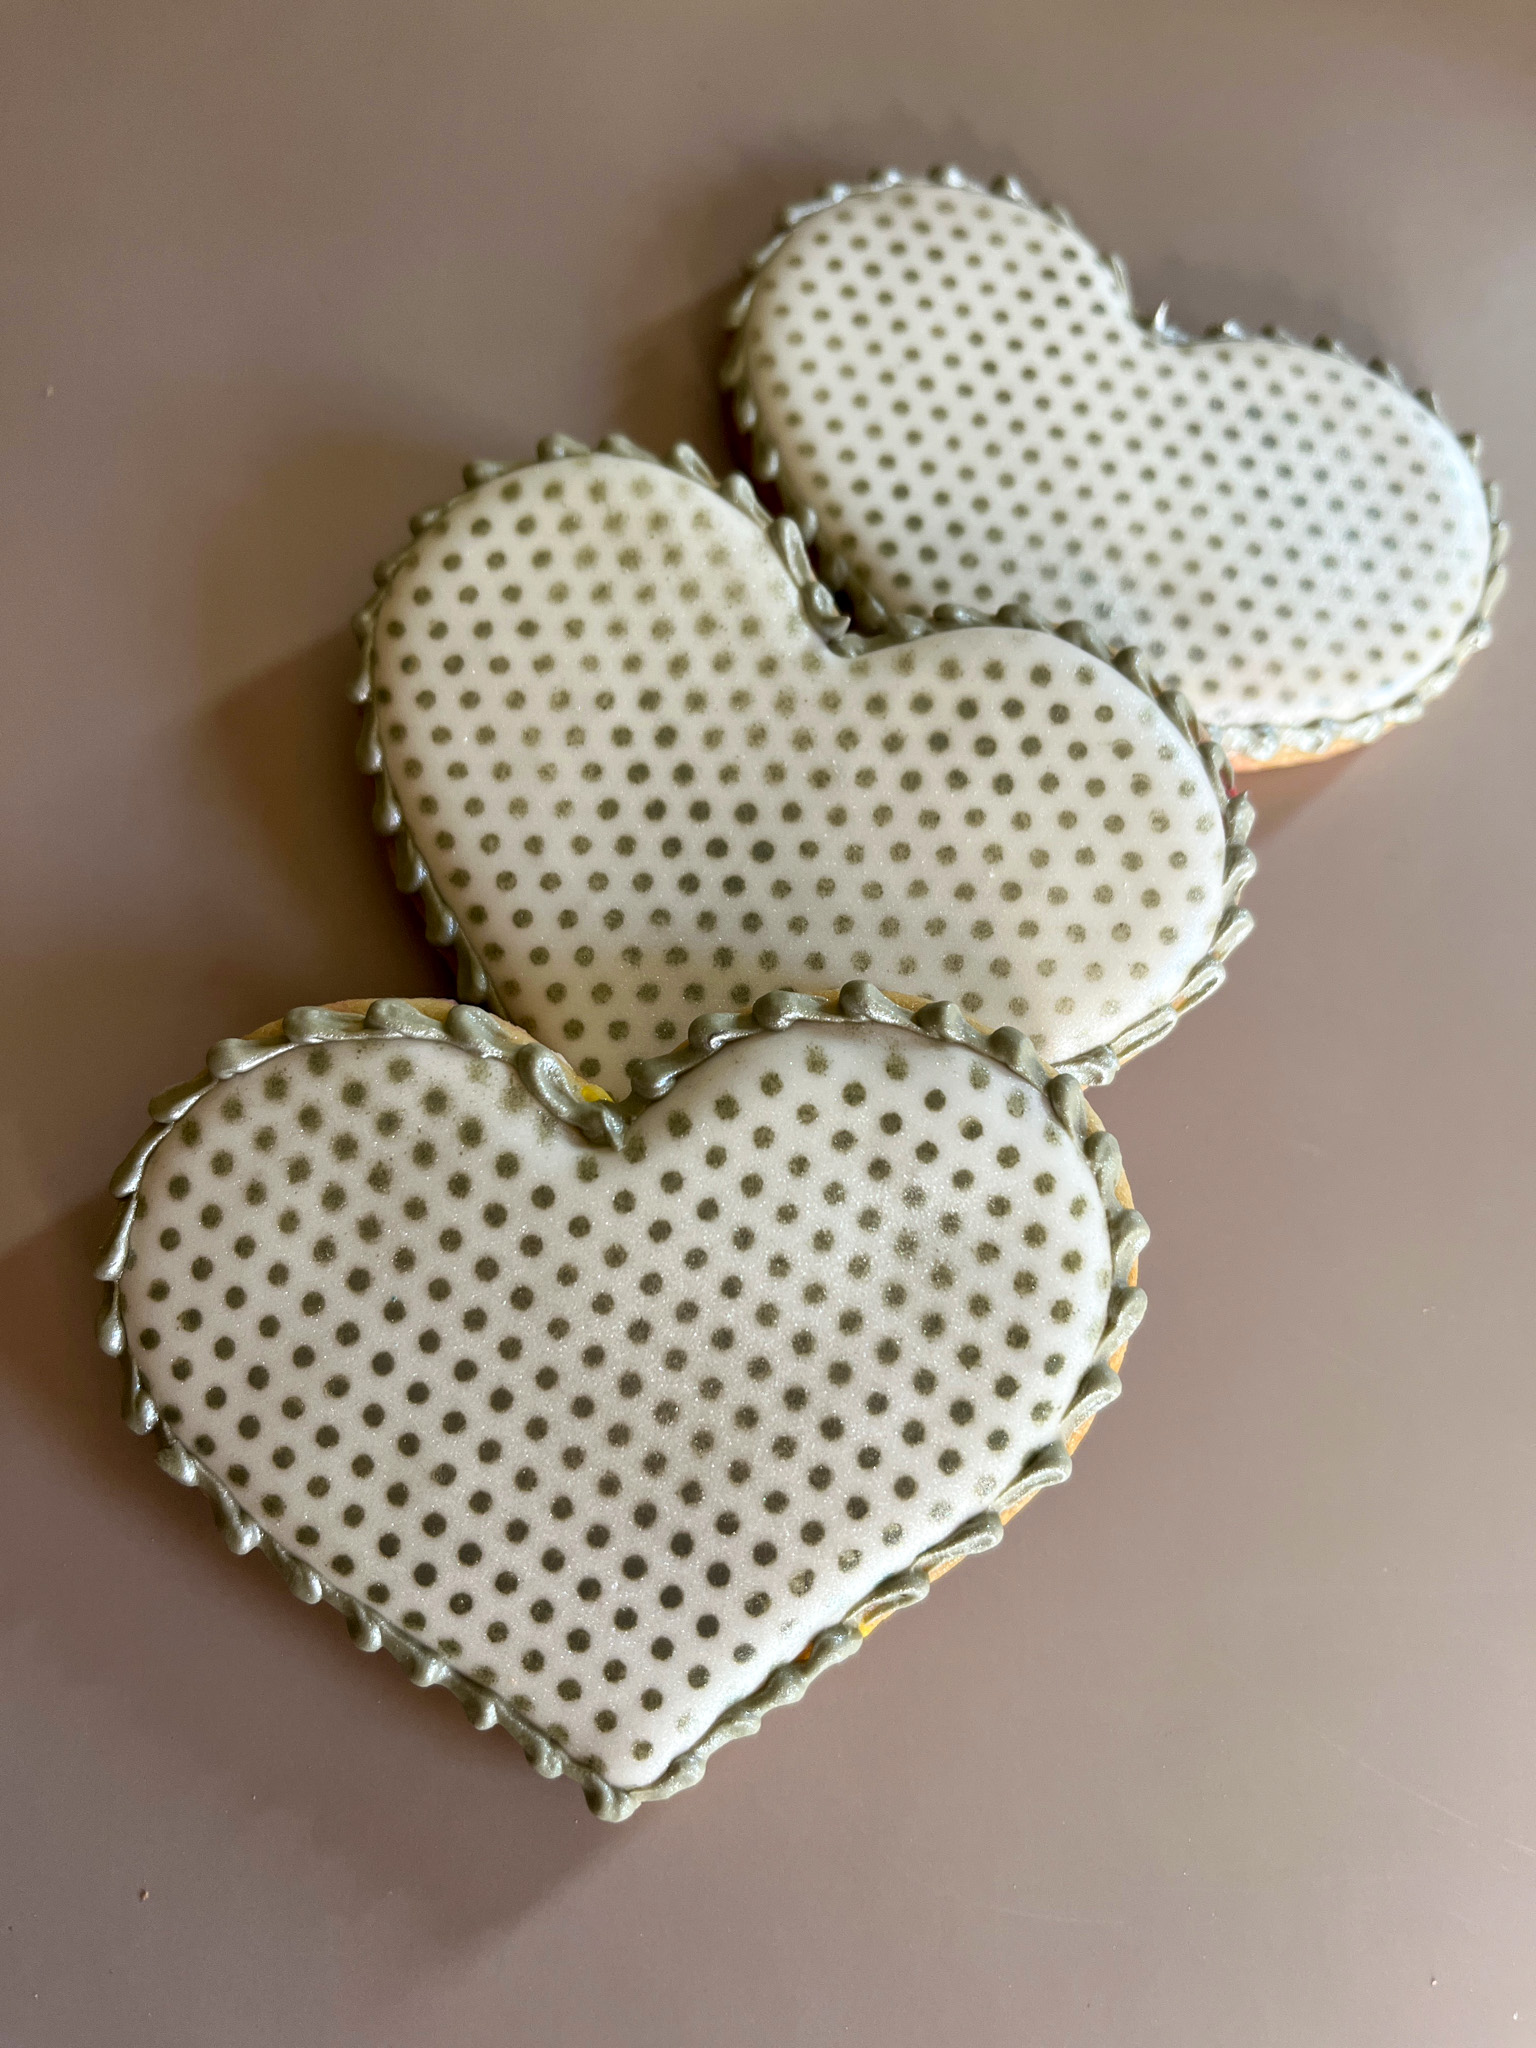
Stencil + Air-brushing over cookies iced with pure white.
.
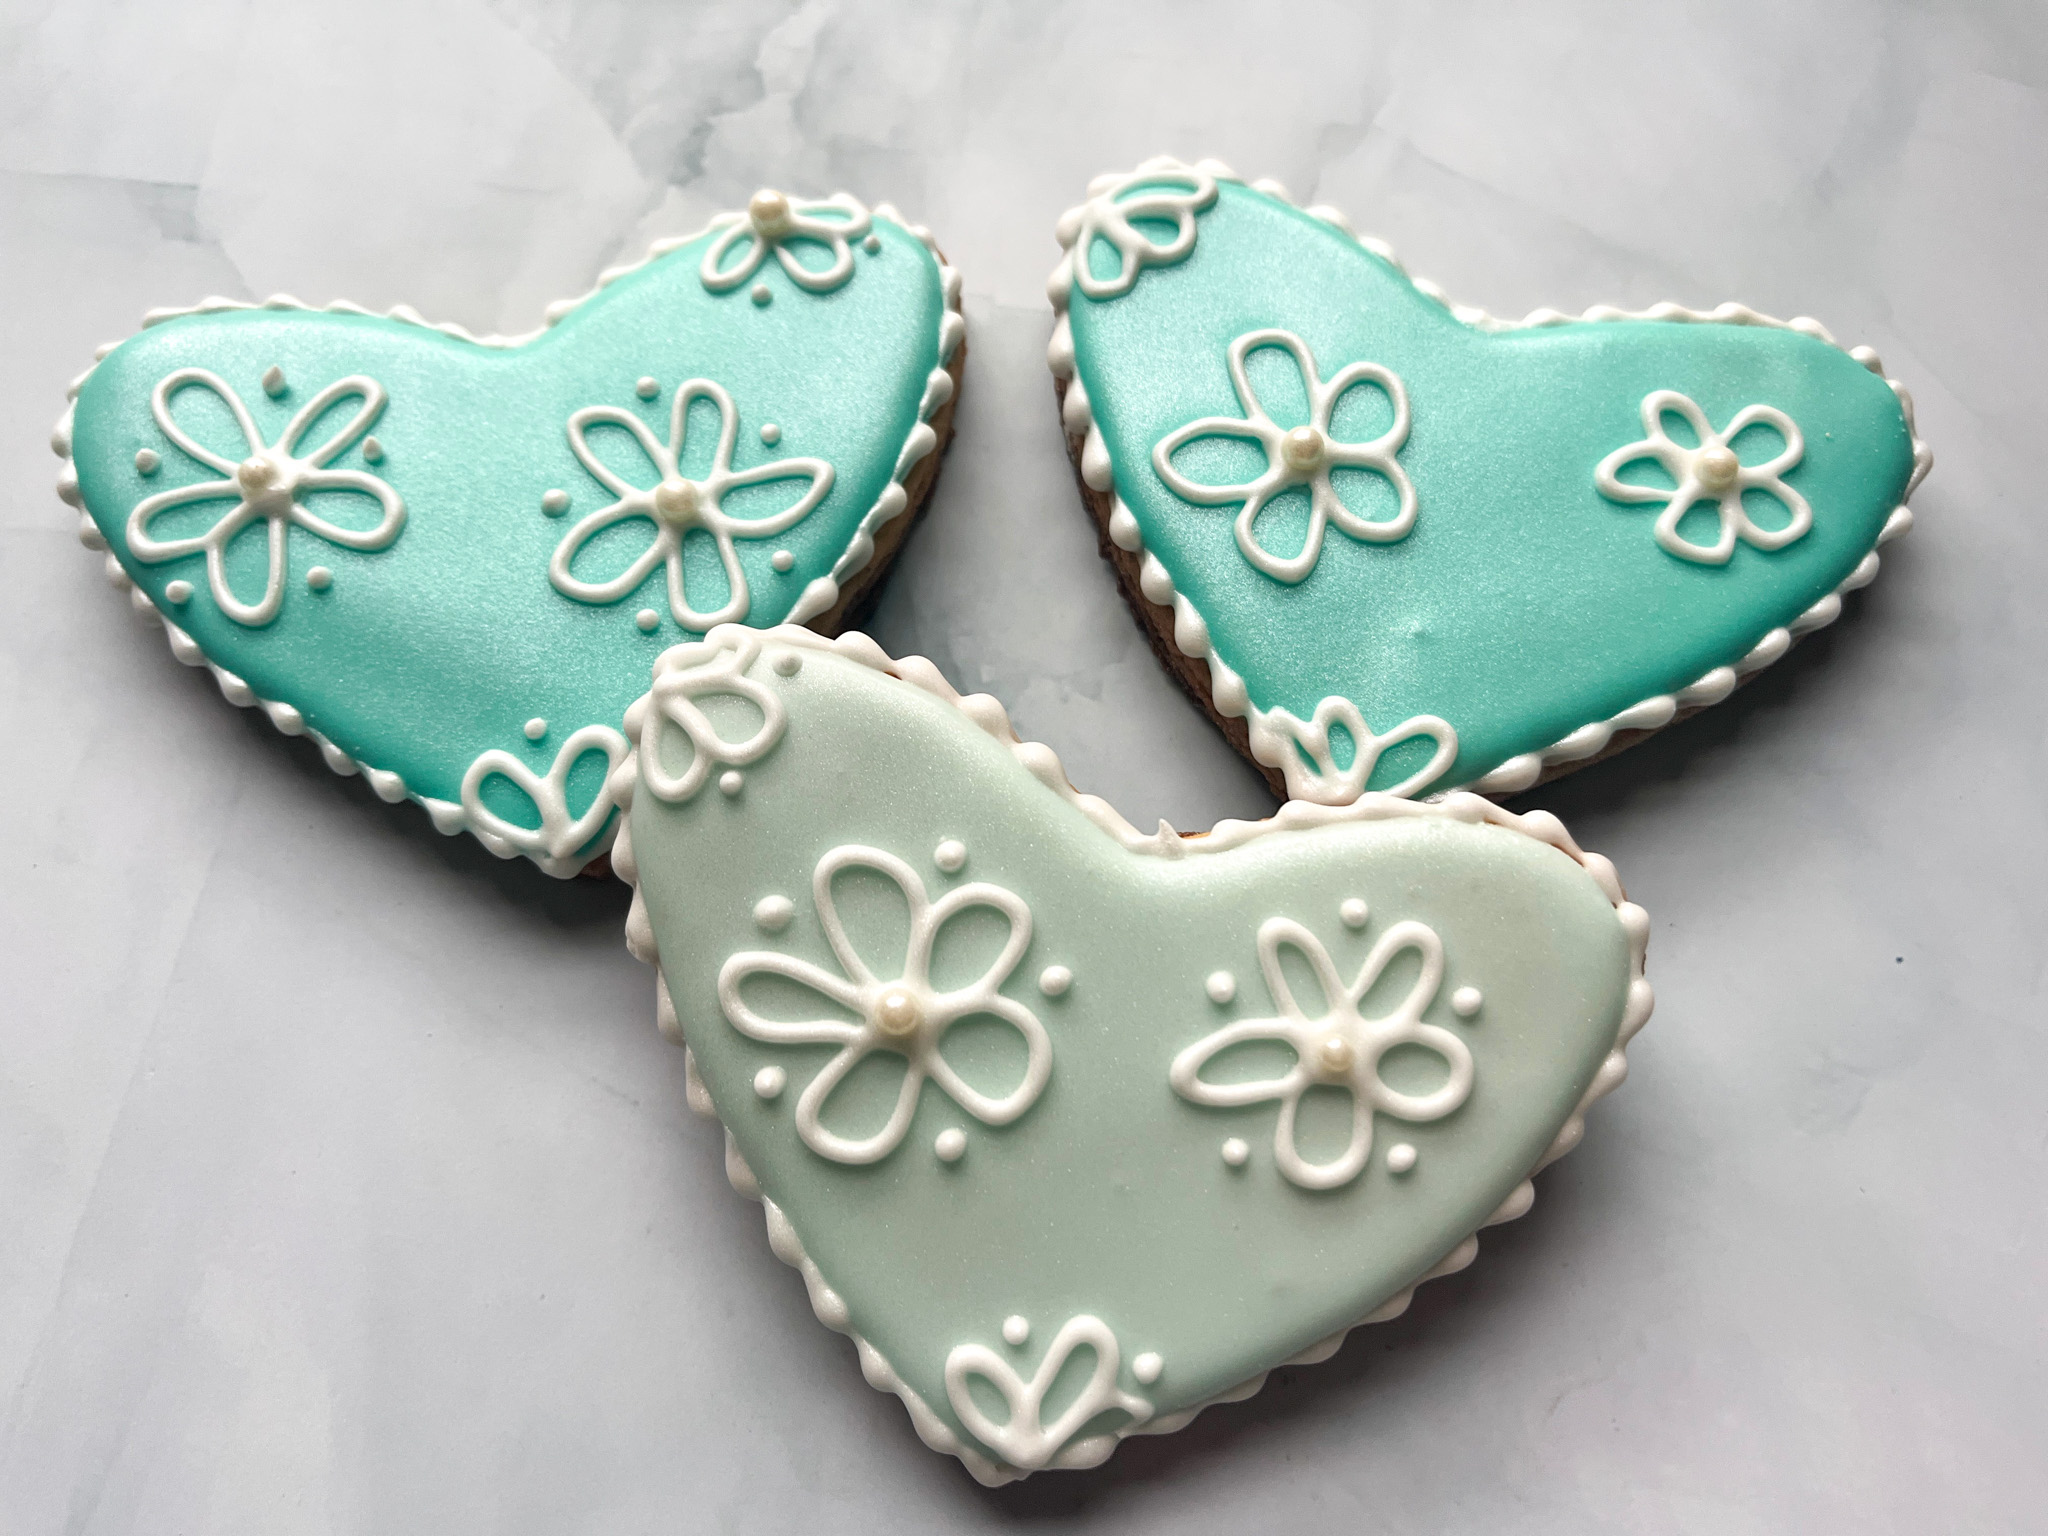
For a different take, a little pastel green. Details in piping consistency white.
I hope you enjoyed this little round-up of love in baking format. And don’t forget, always follow your heart!
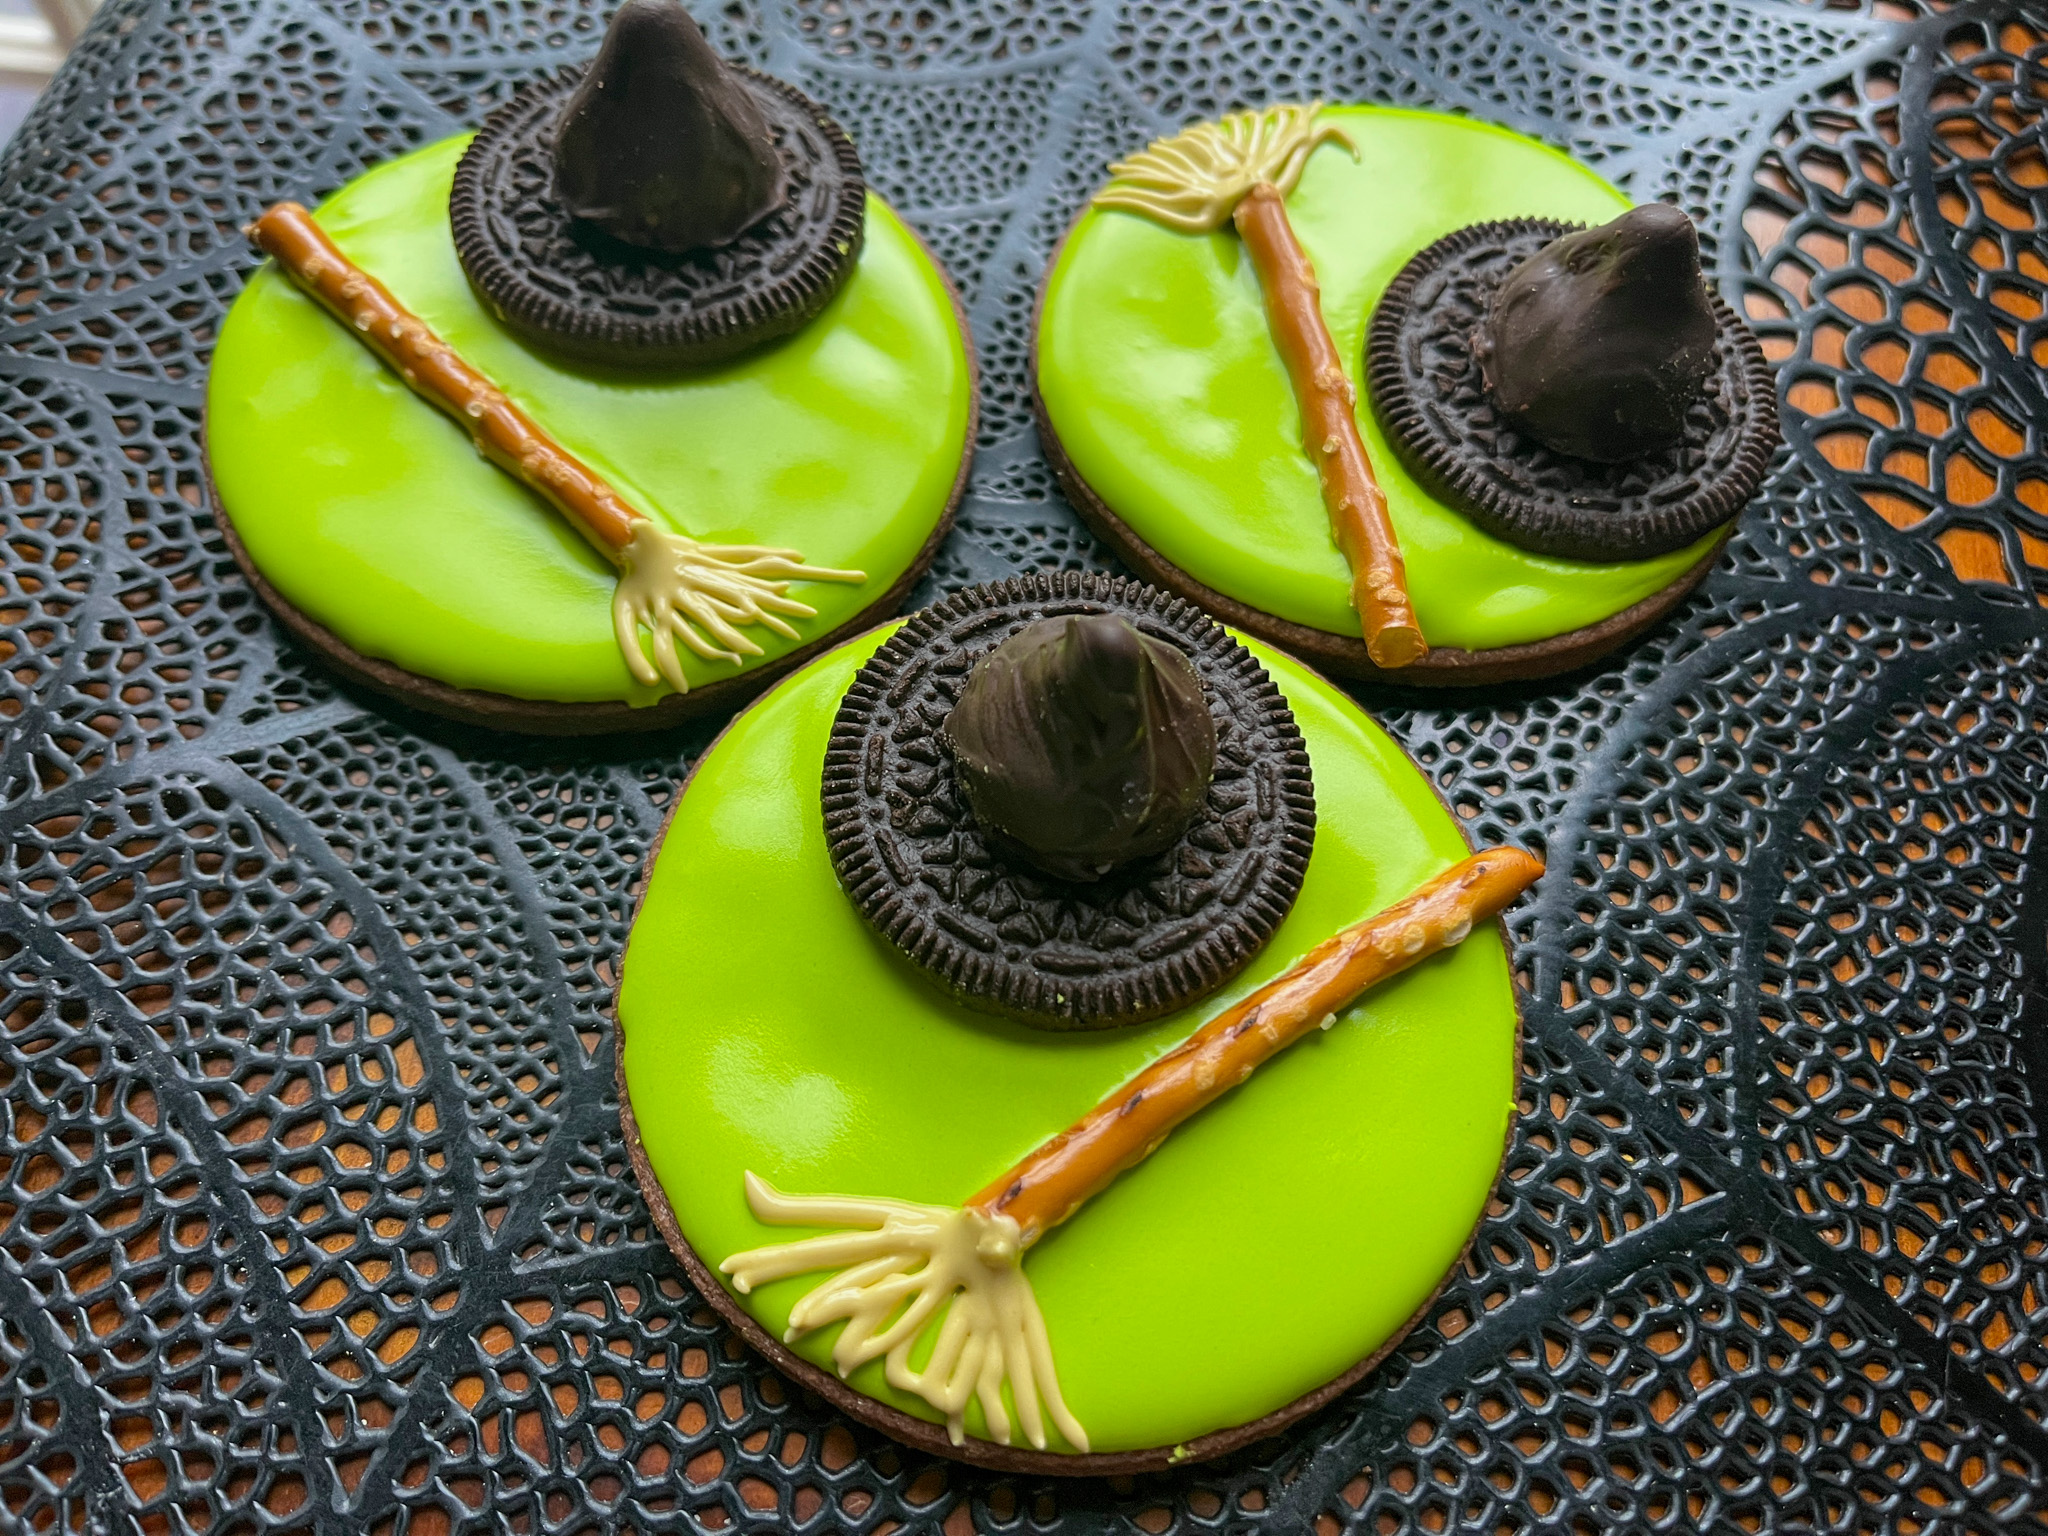
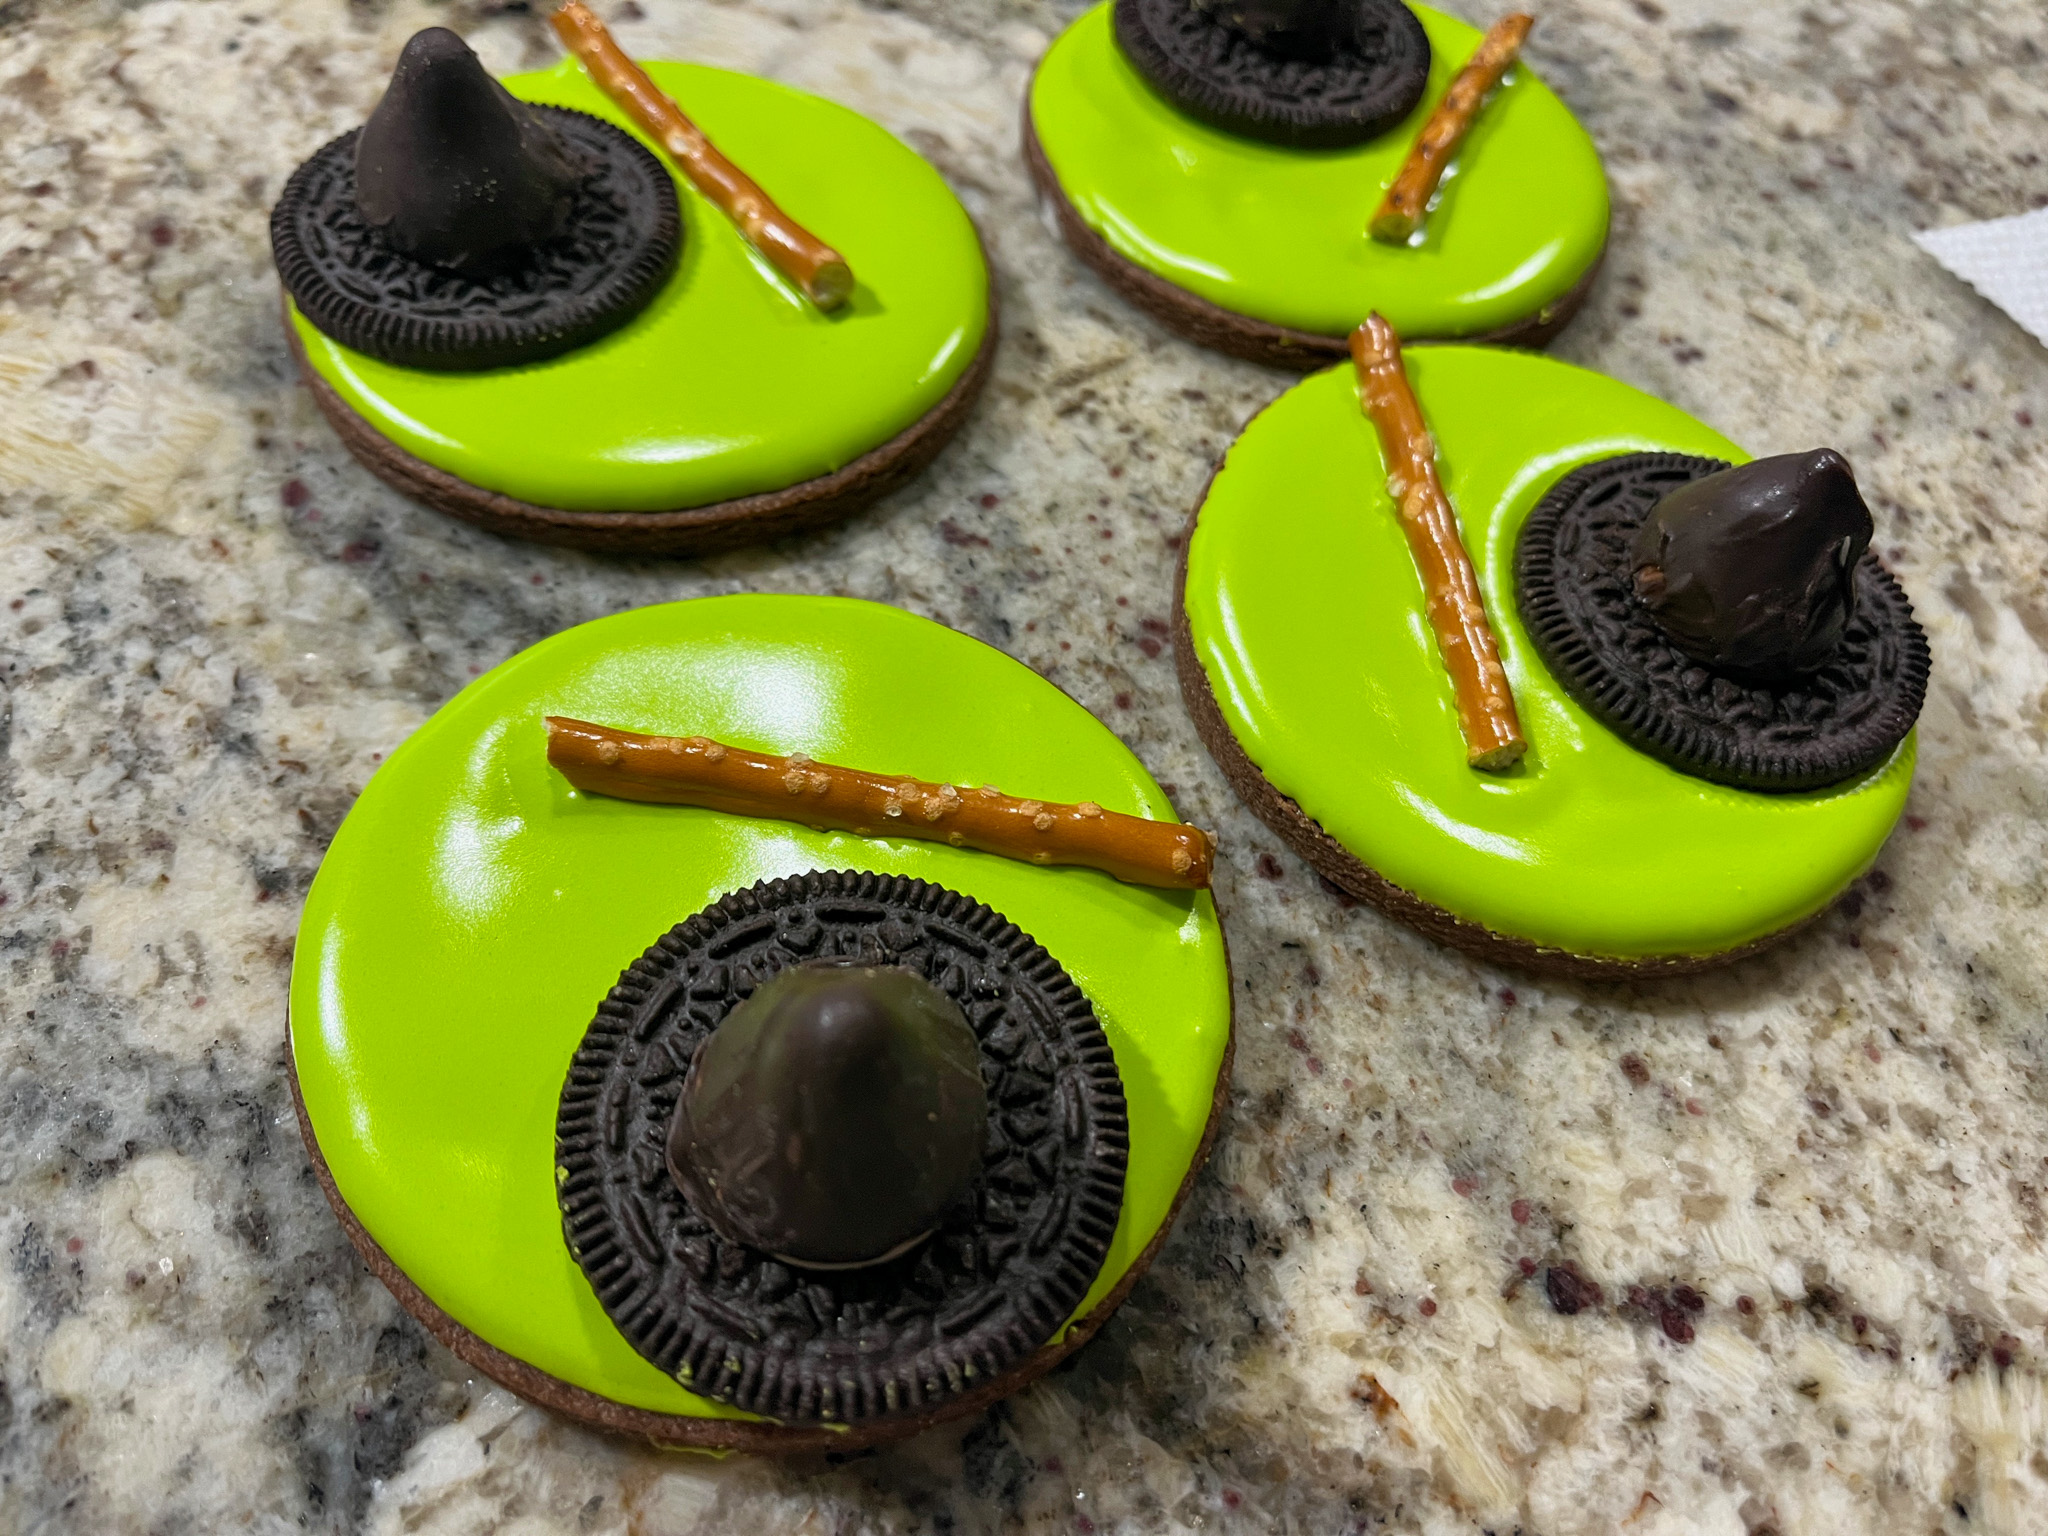
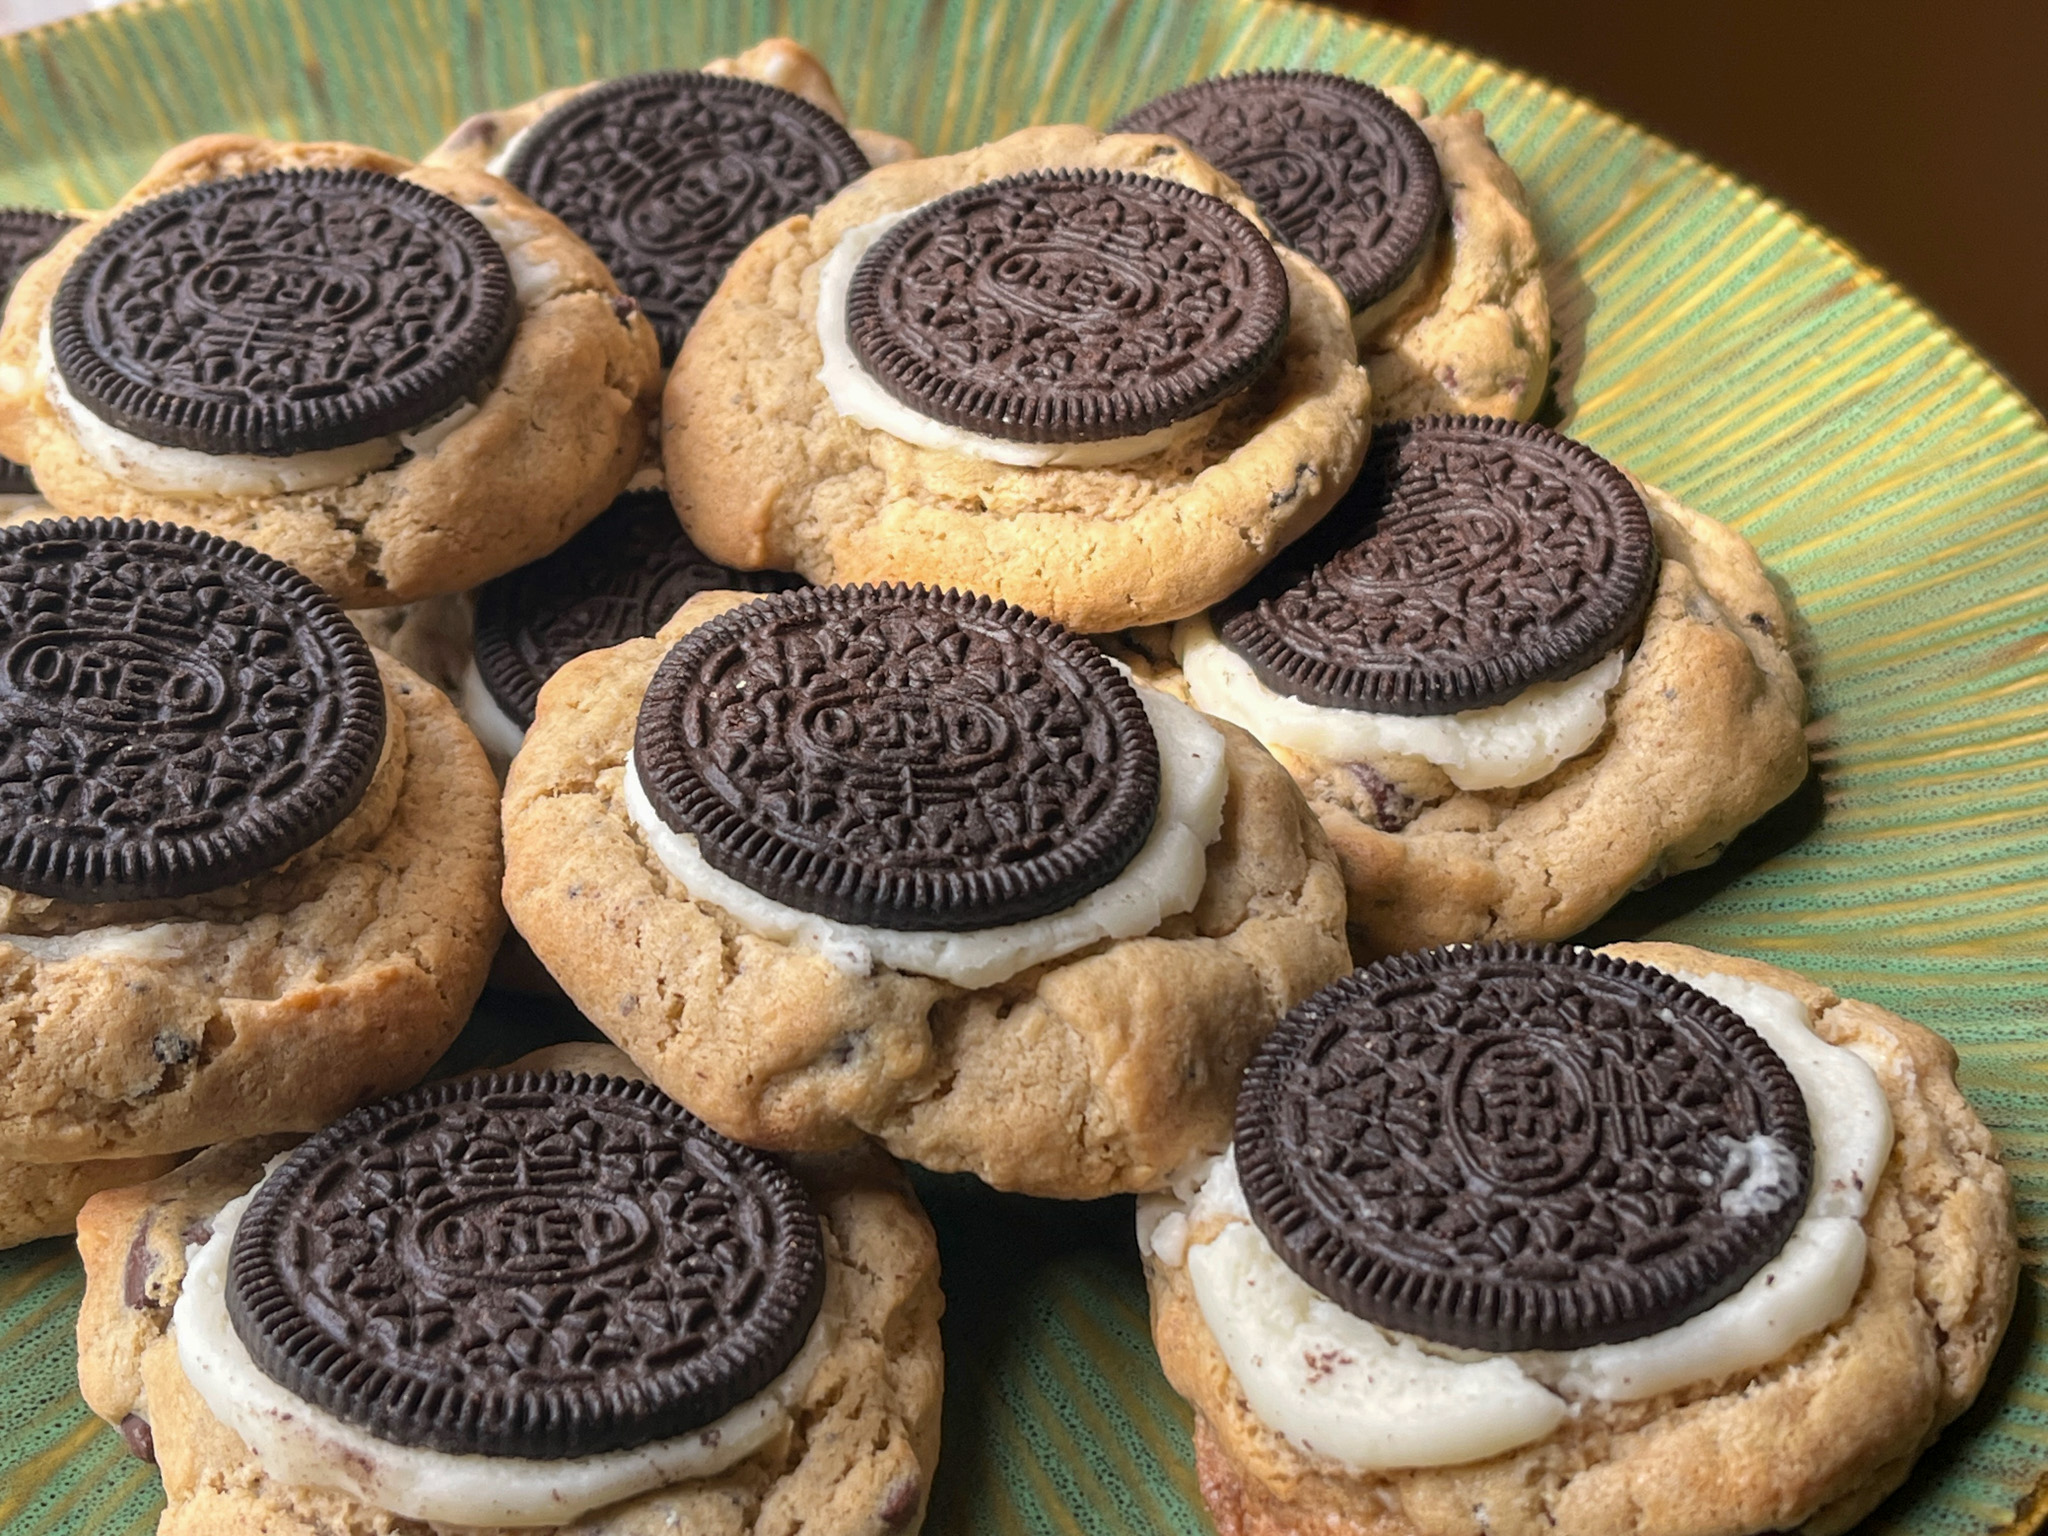
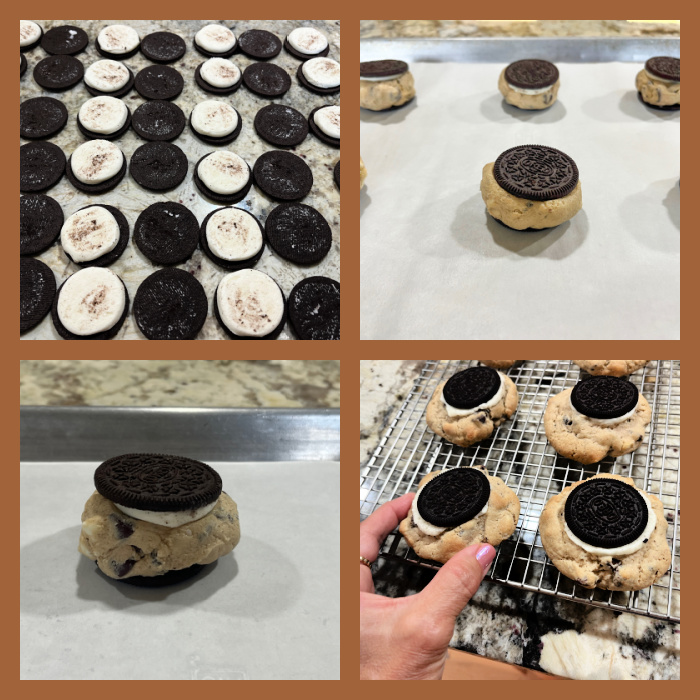
Four ways to use Oreos in your baking, starting with my favorite of this set…
The Melting Witch Chocolate Cookie
I cannot take credit for this cute idea, but I modified it slightly from what was published in this site.
For the cookie, I used my default recipe with a touch of chipotle pepper and cinnamon (click here). For the hat, I used Hershey’s kisses, but gave it an additional coat with Candy Melts dark chocolate, to make it match the color of the Oreo underneath. Then all you need to do is flood the cookie with Electric Green icing, immediately add the half Oreo cookie and the pretzel stick. Once that sets, pipe the broom detail, and glue the Hershey kiss on the Oreo. You are done!
.
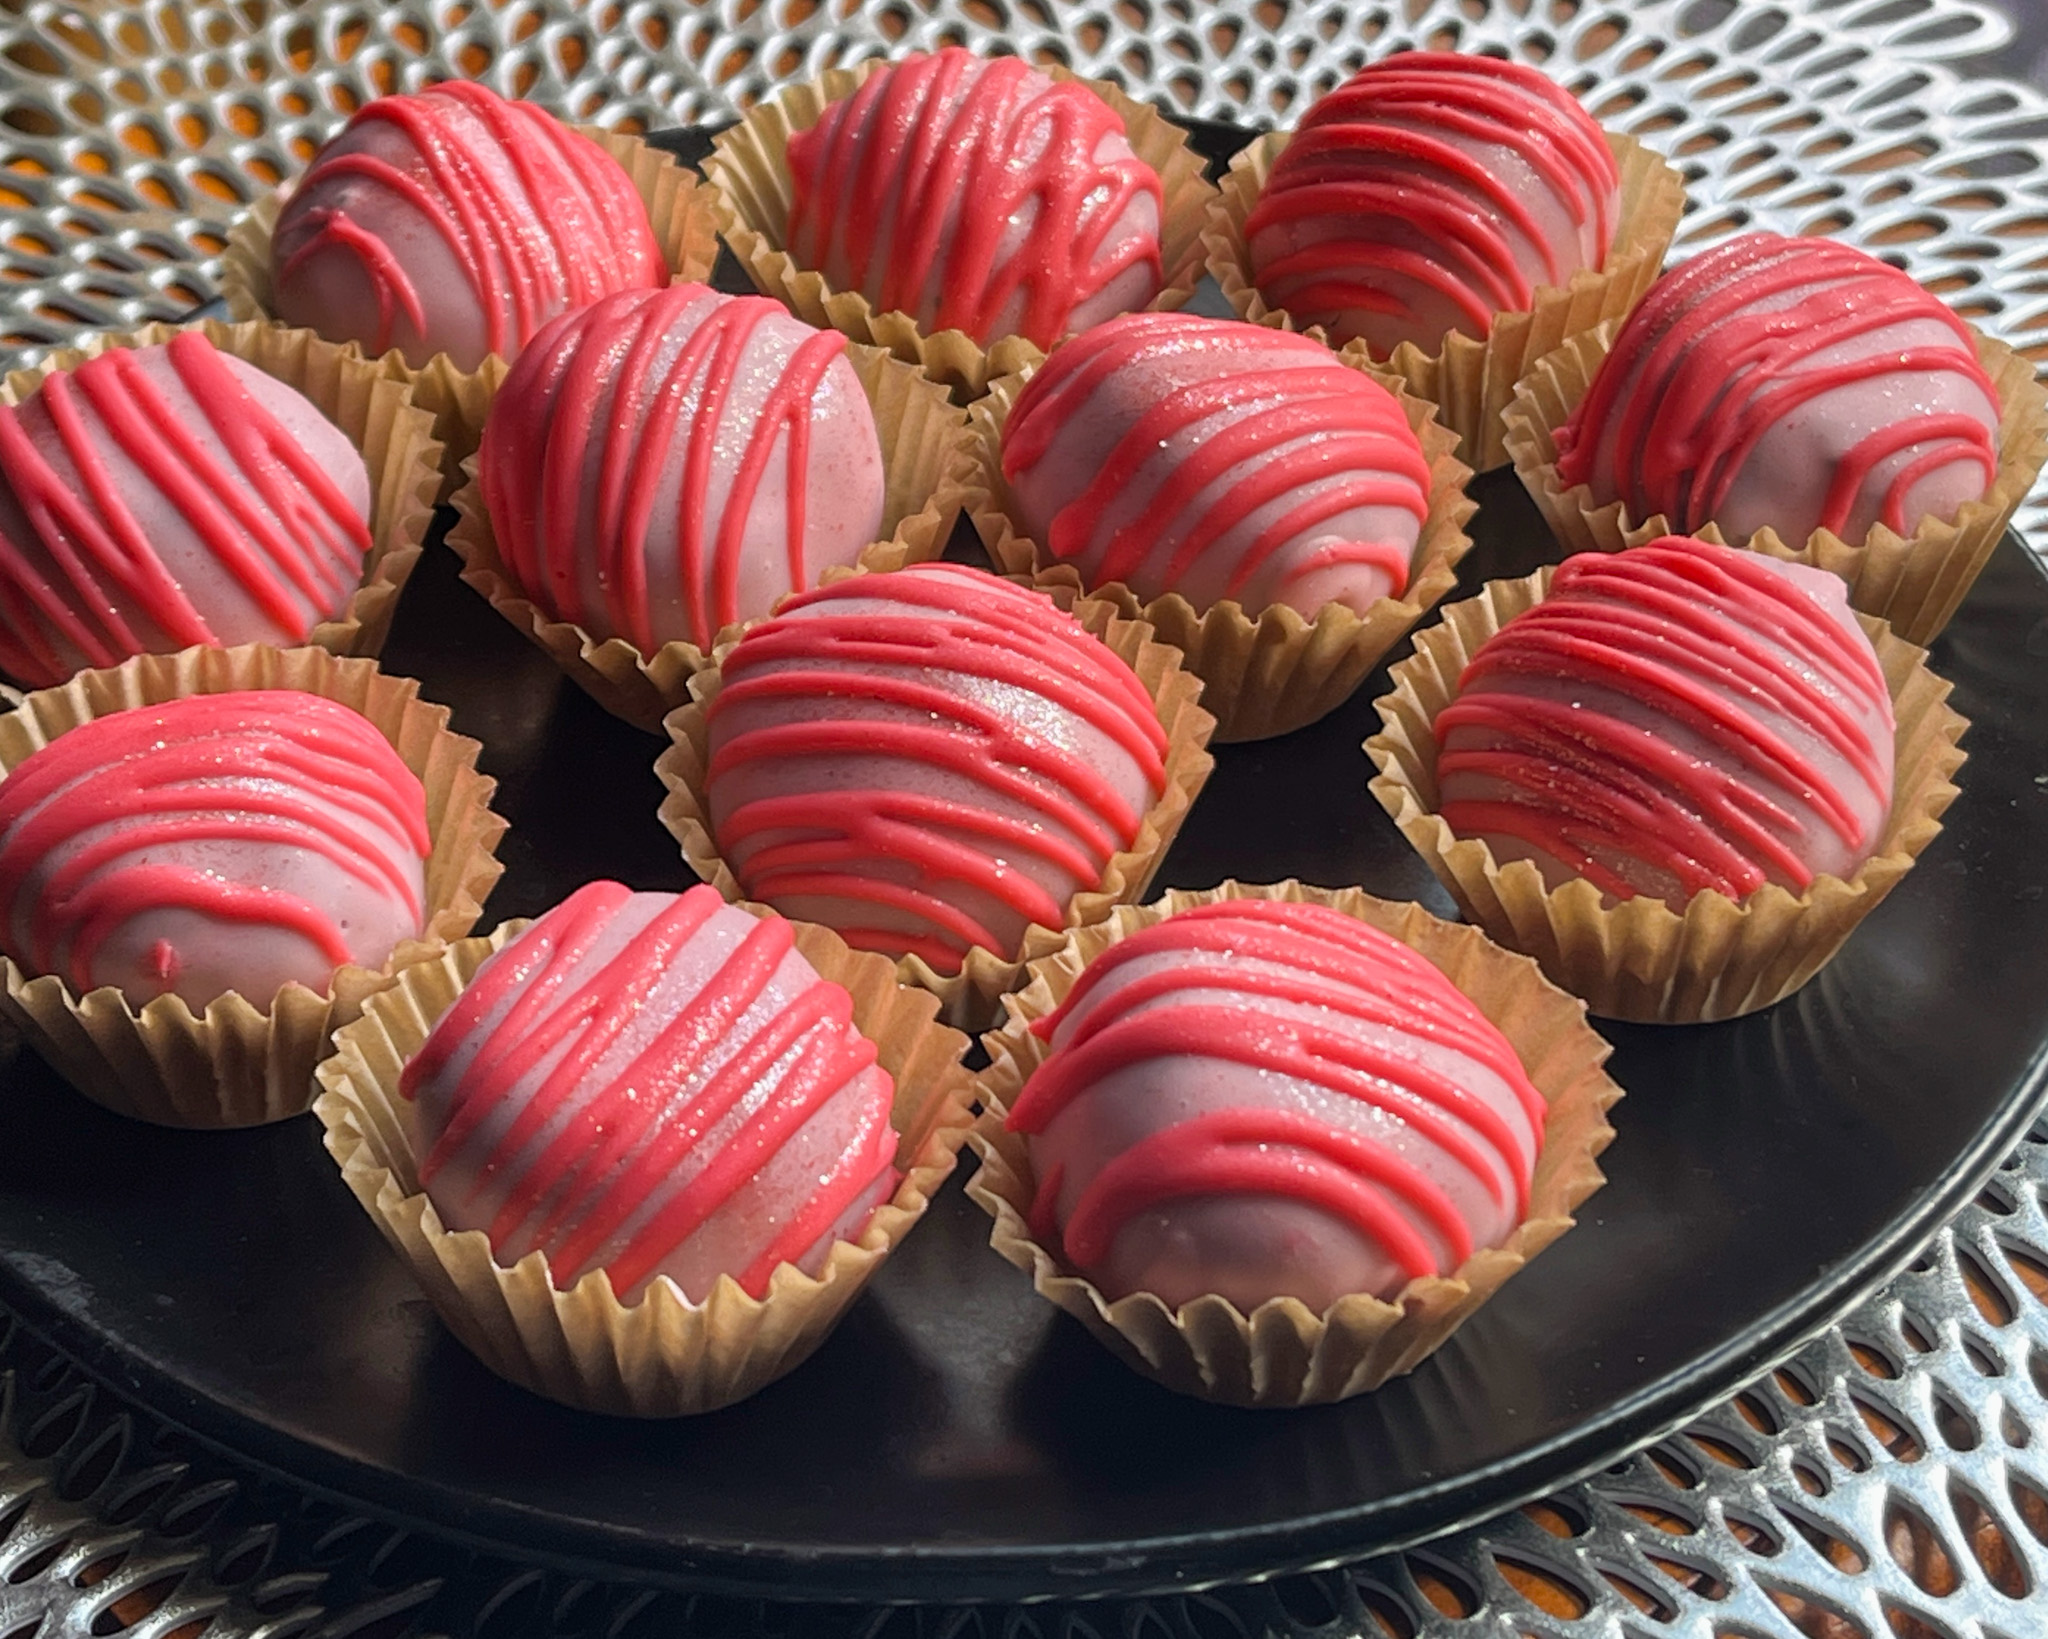
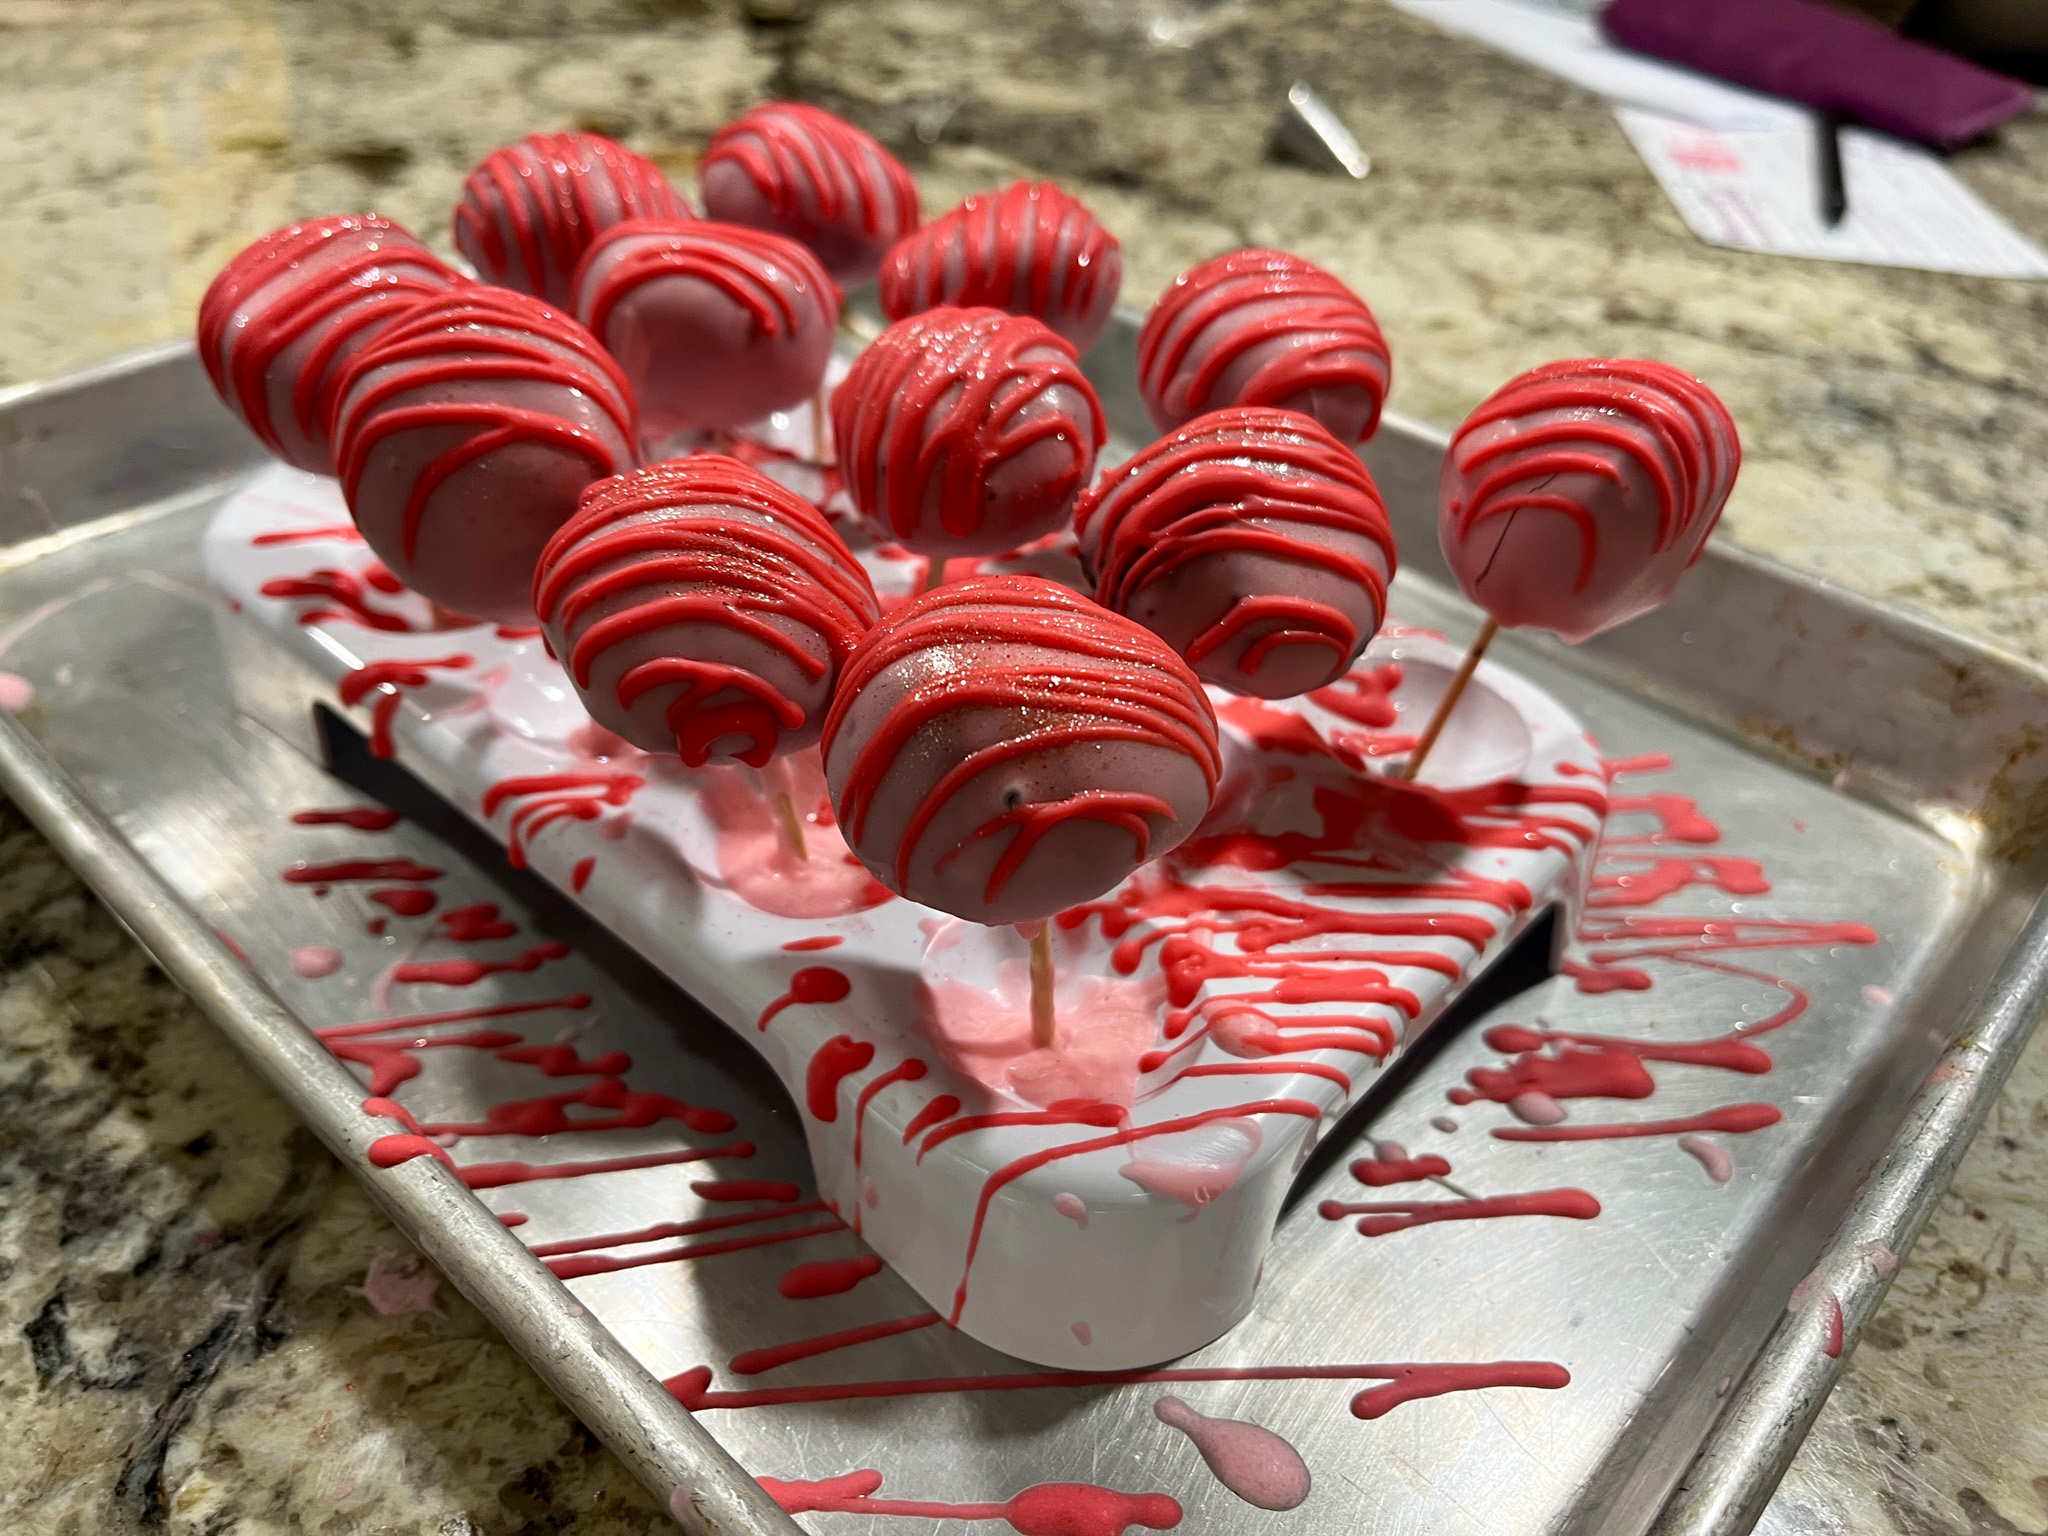
STRAWBERRY OREO LITTLE BALLS
OREO STRAWBERRY BALLS (from The Bewitching Kitchen)
24 Oreo cookies 90g strawberry cream cheese, at room temperature 200g white chocolate 30g grape seed oil fat-soluble dye, pink and red
Place the Oreos and cream cheese in the bowl of a food processor and process until it starts to form a dough.
Form little balls using about 20g of Oreo dough. Place them in the freezer for 1 hour.
Melt the chocolate gently in a microwave at 50% power, together with the oil. Whisk gently from time to time. Separate a small amount to dye red. Dye most of the batch pink.
Remove the Oreo balls from the freezer, and gently but quickly dip each one in the melted chocolate (ideally at about 100F), using a toothpick or medium-size wooden stick. Place upright to set. Drizzle the red chocolate all over for decoration. Remove the stick and place on paper cups to serve.
If desired, spray a little Diamond dust or pink luster powder over them.
These are nothing short of amazing… For the full recipe, please visit the site where I originally found them (click here). One cookie will feed a family of four, so to speak… But absolutely worth the calories!
.
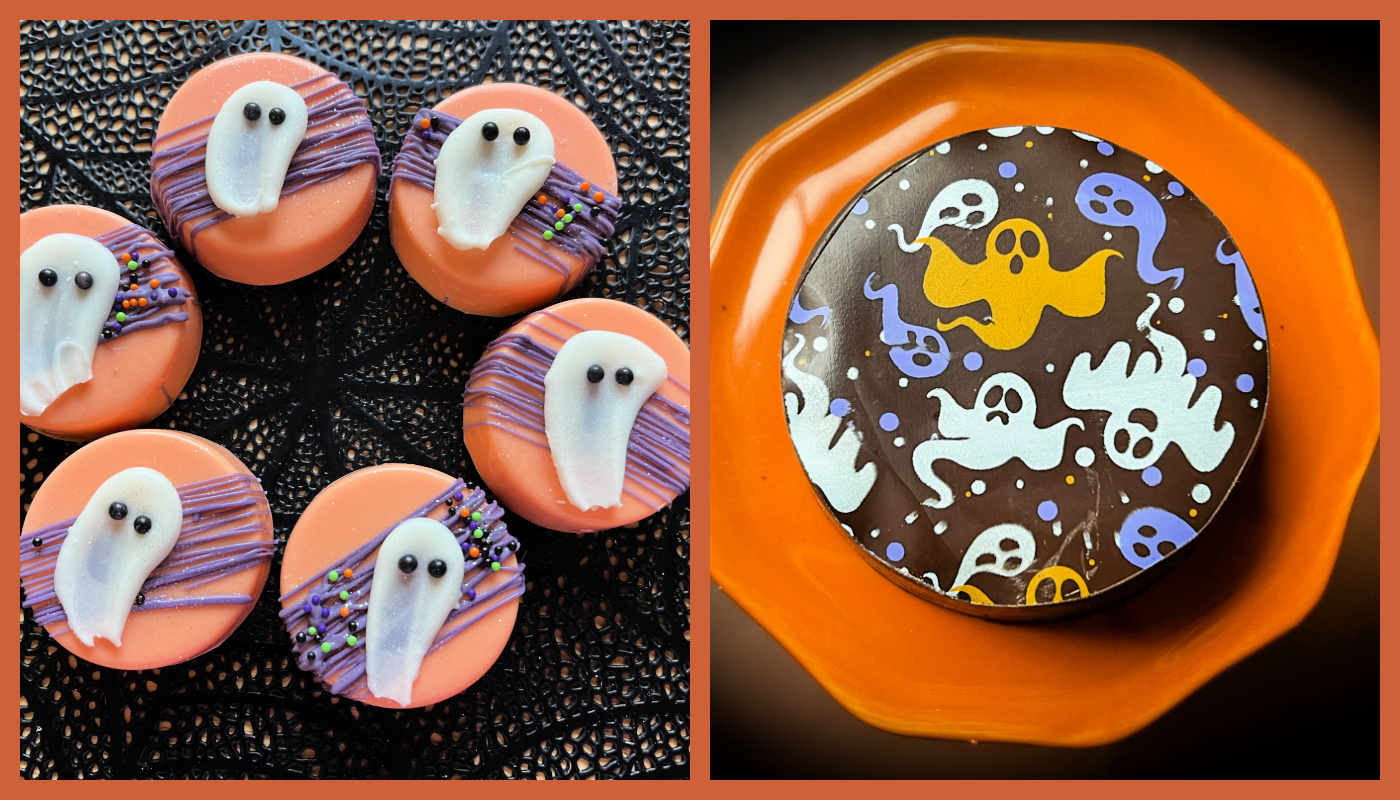
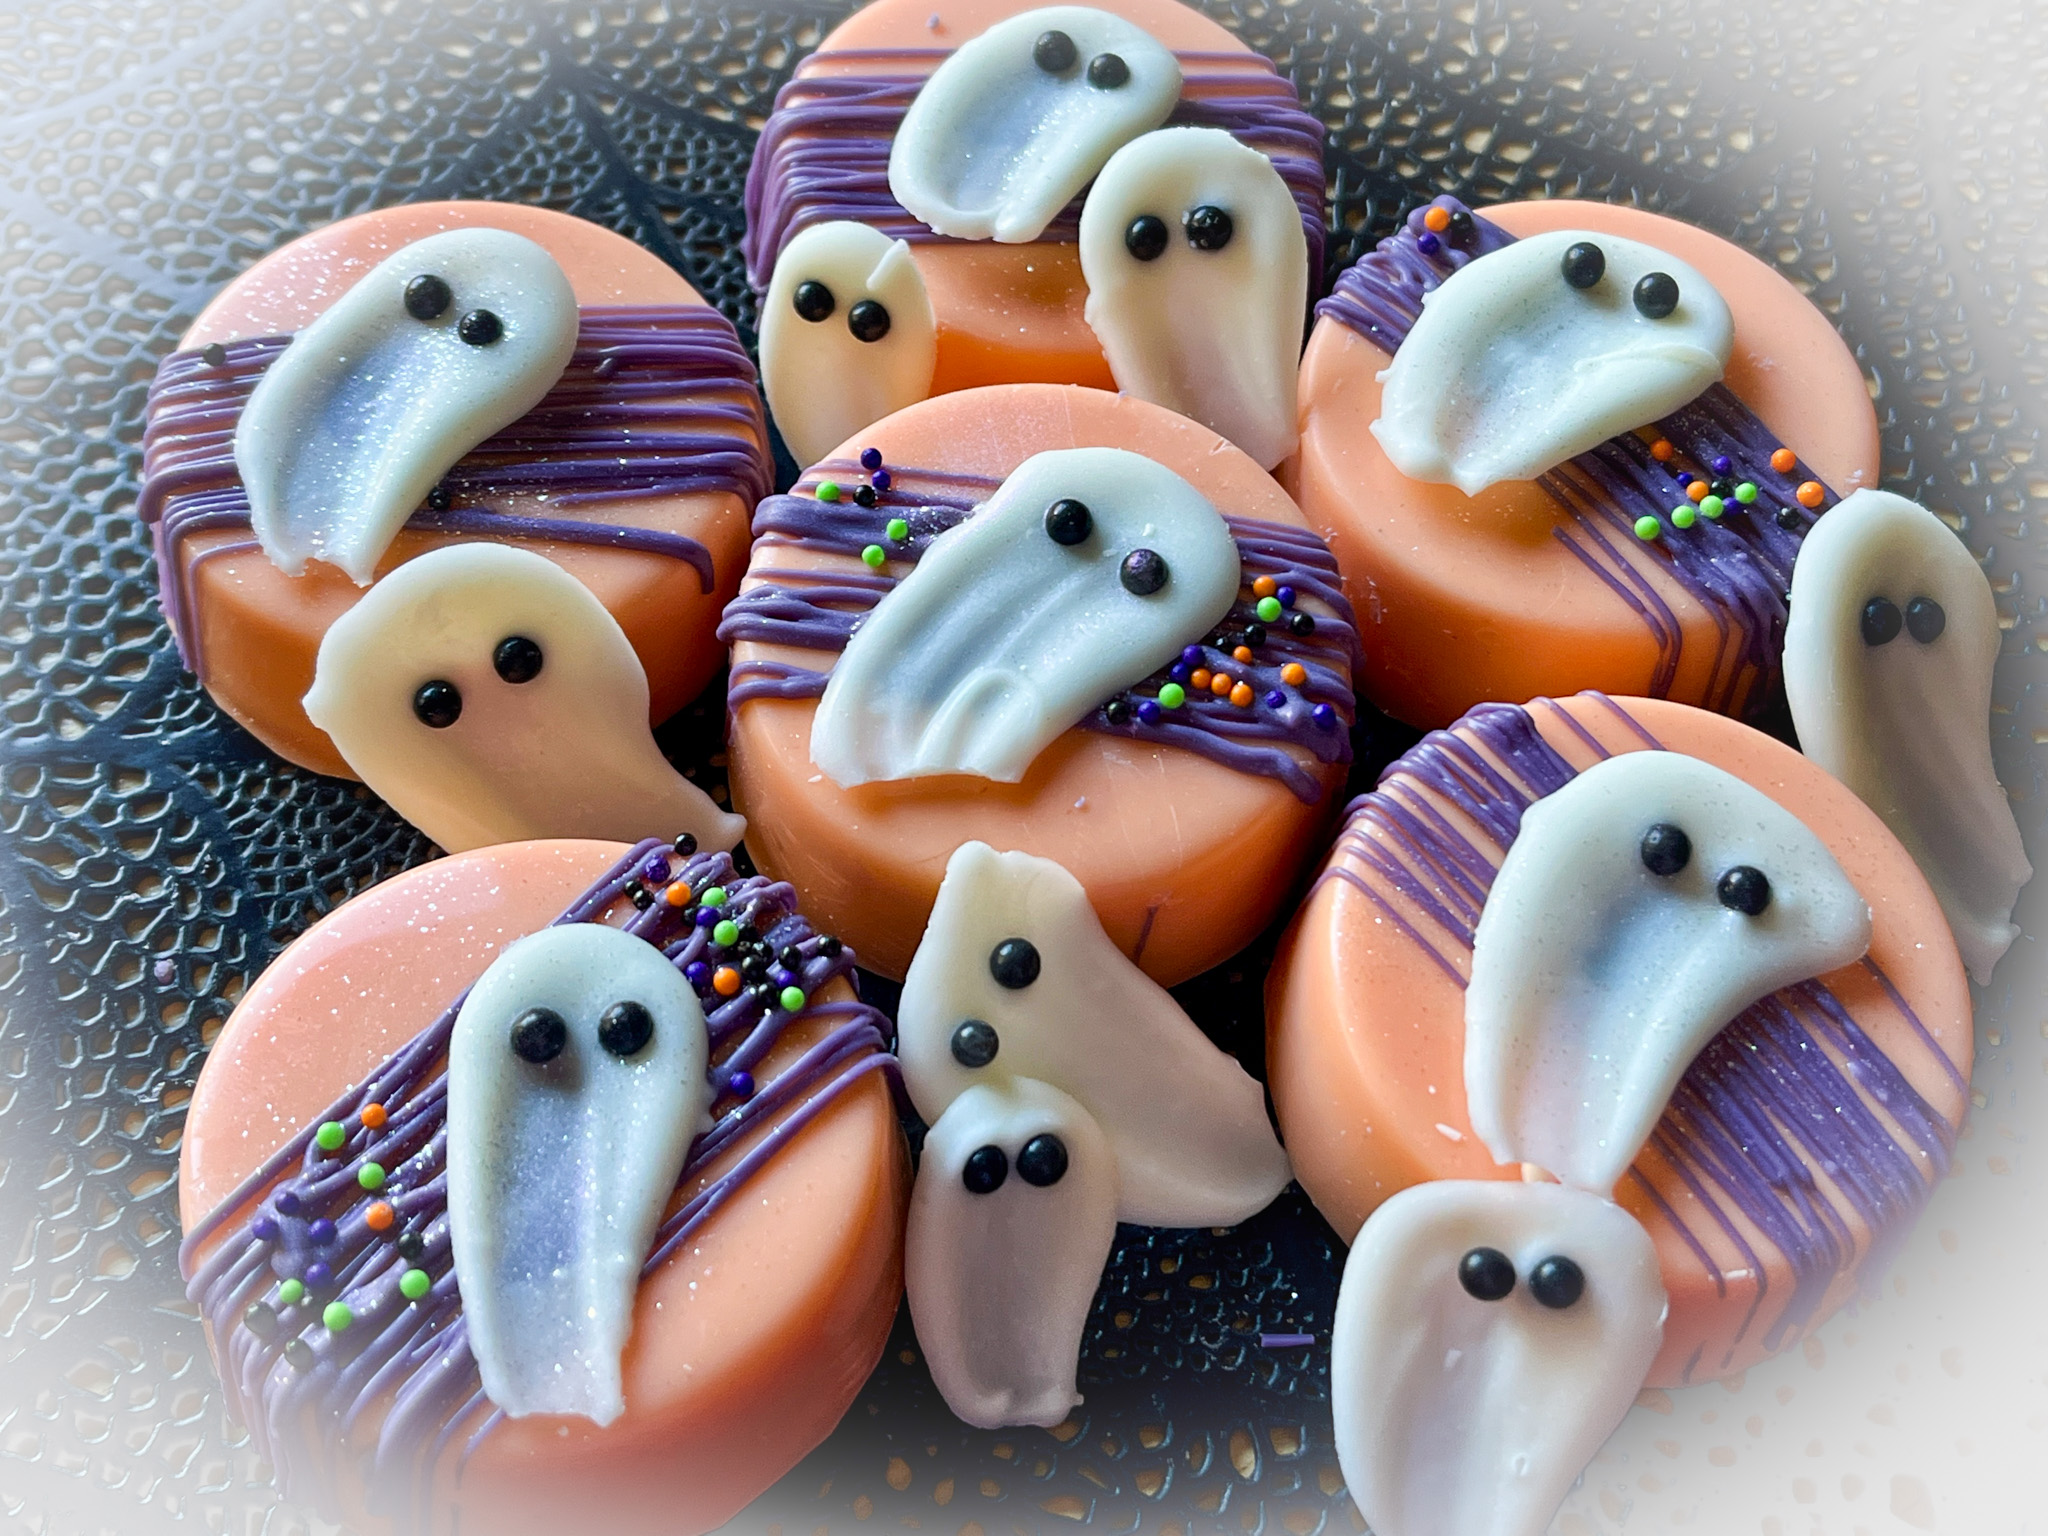
CHOCOLATE-COVERED OREOS
I do these often, as I like to include a small batch in my donation box of Friday. Two ways to decorate them for the Halloween season. On the left, ghosts made with candy melts, just a drop on parchment paper, then pull the shape with a gloved finger. Add eyes. Done! On the right, chocolate transfer sheets. Sweet and simple!
I hope I convinced you to go out and buy a big package of Oreos, so you can have some fun in your own kitchen…