I cannot take credit for the design, it is from a cookbook I highly recommend: Cupcakes for Any Occasion, by Rachel Lindsay (click here to order it). She used lemon cupcakes for her version, I opted for chocolate, going for a reverse creaming method that is so simple and easy to bake.

CAMPFIRE CHOCOLATE CUPCAKES
(inspired by Rachel Lindsay)
for 10 cupcakes:
100g all-purpose flour
25g unsweetened cocoa powder
140g white sugar
1/4 tsp salt
50g unsalted butter, room temperature, soft
1 large egg
120ml milk
1 tsp vanilla extract
1 + ½ tsp baking powder
for the buttercream:
226g butter, very soft
452g powdered sugar
1 tablespoon heavy cream (or more to adjust consistency)
1 tsp vanilla extract
pinch of salt
6 Oreo cookies, crushed fine
orange, red and yellow food gel coloring
Pretzel sticks (four per cupcake)
mini marshmallows (1 to 2 per cupcake)
Heat oven to 350F. Prepare a muffin type pan with cupcake liners.
Whisk the milk, egg and vanilla extract in a small bowl. Reserve.
Whisk the flour, baking powder, cocoa powder, salt, butter and sugar into the stand mixer
bowl with the paddle attachment. Mix on a medium speed until all the butter looks like small pieces of sand. Add half the milk mixture, mix to incorporate until smooth. Give it a final minute mixing in high-speed. Add the rest of the milk, and whisk until fully smooth.
Add to the lined pan, a little more than half full. These cupcakes rise a lot. Bake until a toothpick comes clean, about 16 minutes. Let cool completely before icing.
Make the buttercream. Whisk the butter in high speed for five minutes. Add half the powdered sugar, mix at medium-speed until fully smooth. Increase speed to high for 30 seconds. Add the other half of the sugar, pinch of salt, vanilla and heavy cream. Whisk in medium to high-speed until smooth. Adjust consistency if needed.
Keep half of the buttercream in the mixer. Add to it the Oreo crumbs. Transfer that to a piping bag fitted with a round tip. Divide the rest of the buttercream (around 110g portions) to smaller bowls. Dye each portion red, yellow and orange. Place them over plastic wrap as straight lines side by side. Make a sausage with that plastic wrap and insert into a piping bag fitted with a medium size leaf tip.
Decorate the cold cupcakes first with “stones”, using the Oreo buttercream. Add “flames”, stick Pretzels to make the decorations, using small marshmallows for additional touch.
ENJOY!
to print the recipe, click here

Comments: I love the way the addition of Oreo cookies make the buttercream perfect to mimic stones. That could come in handy for Halloween designs in the future. I made a little mistake and used Pretzel sticks to insert the marshmallows, but in the cookbook she advises using toothpicks, and they will work a lot better, so keep that in mind if you want to try these. I am so happy with the way they turned out!
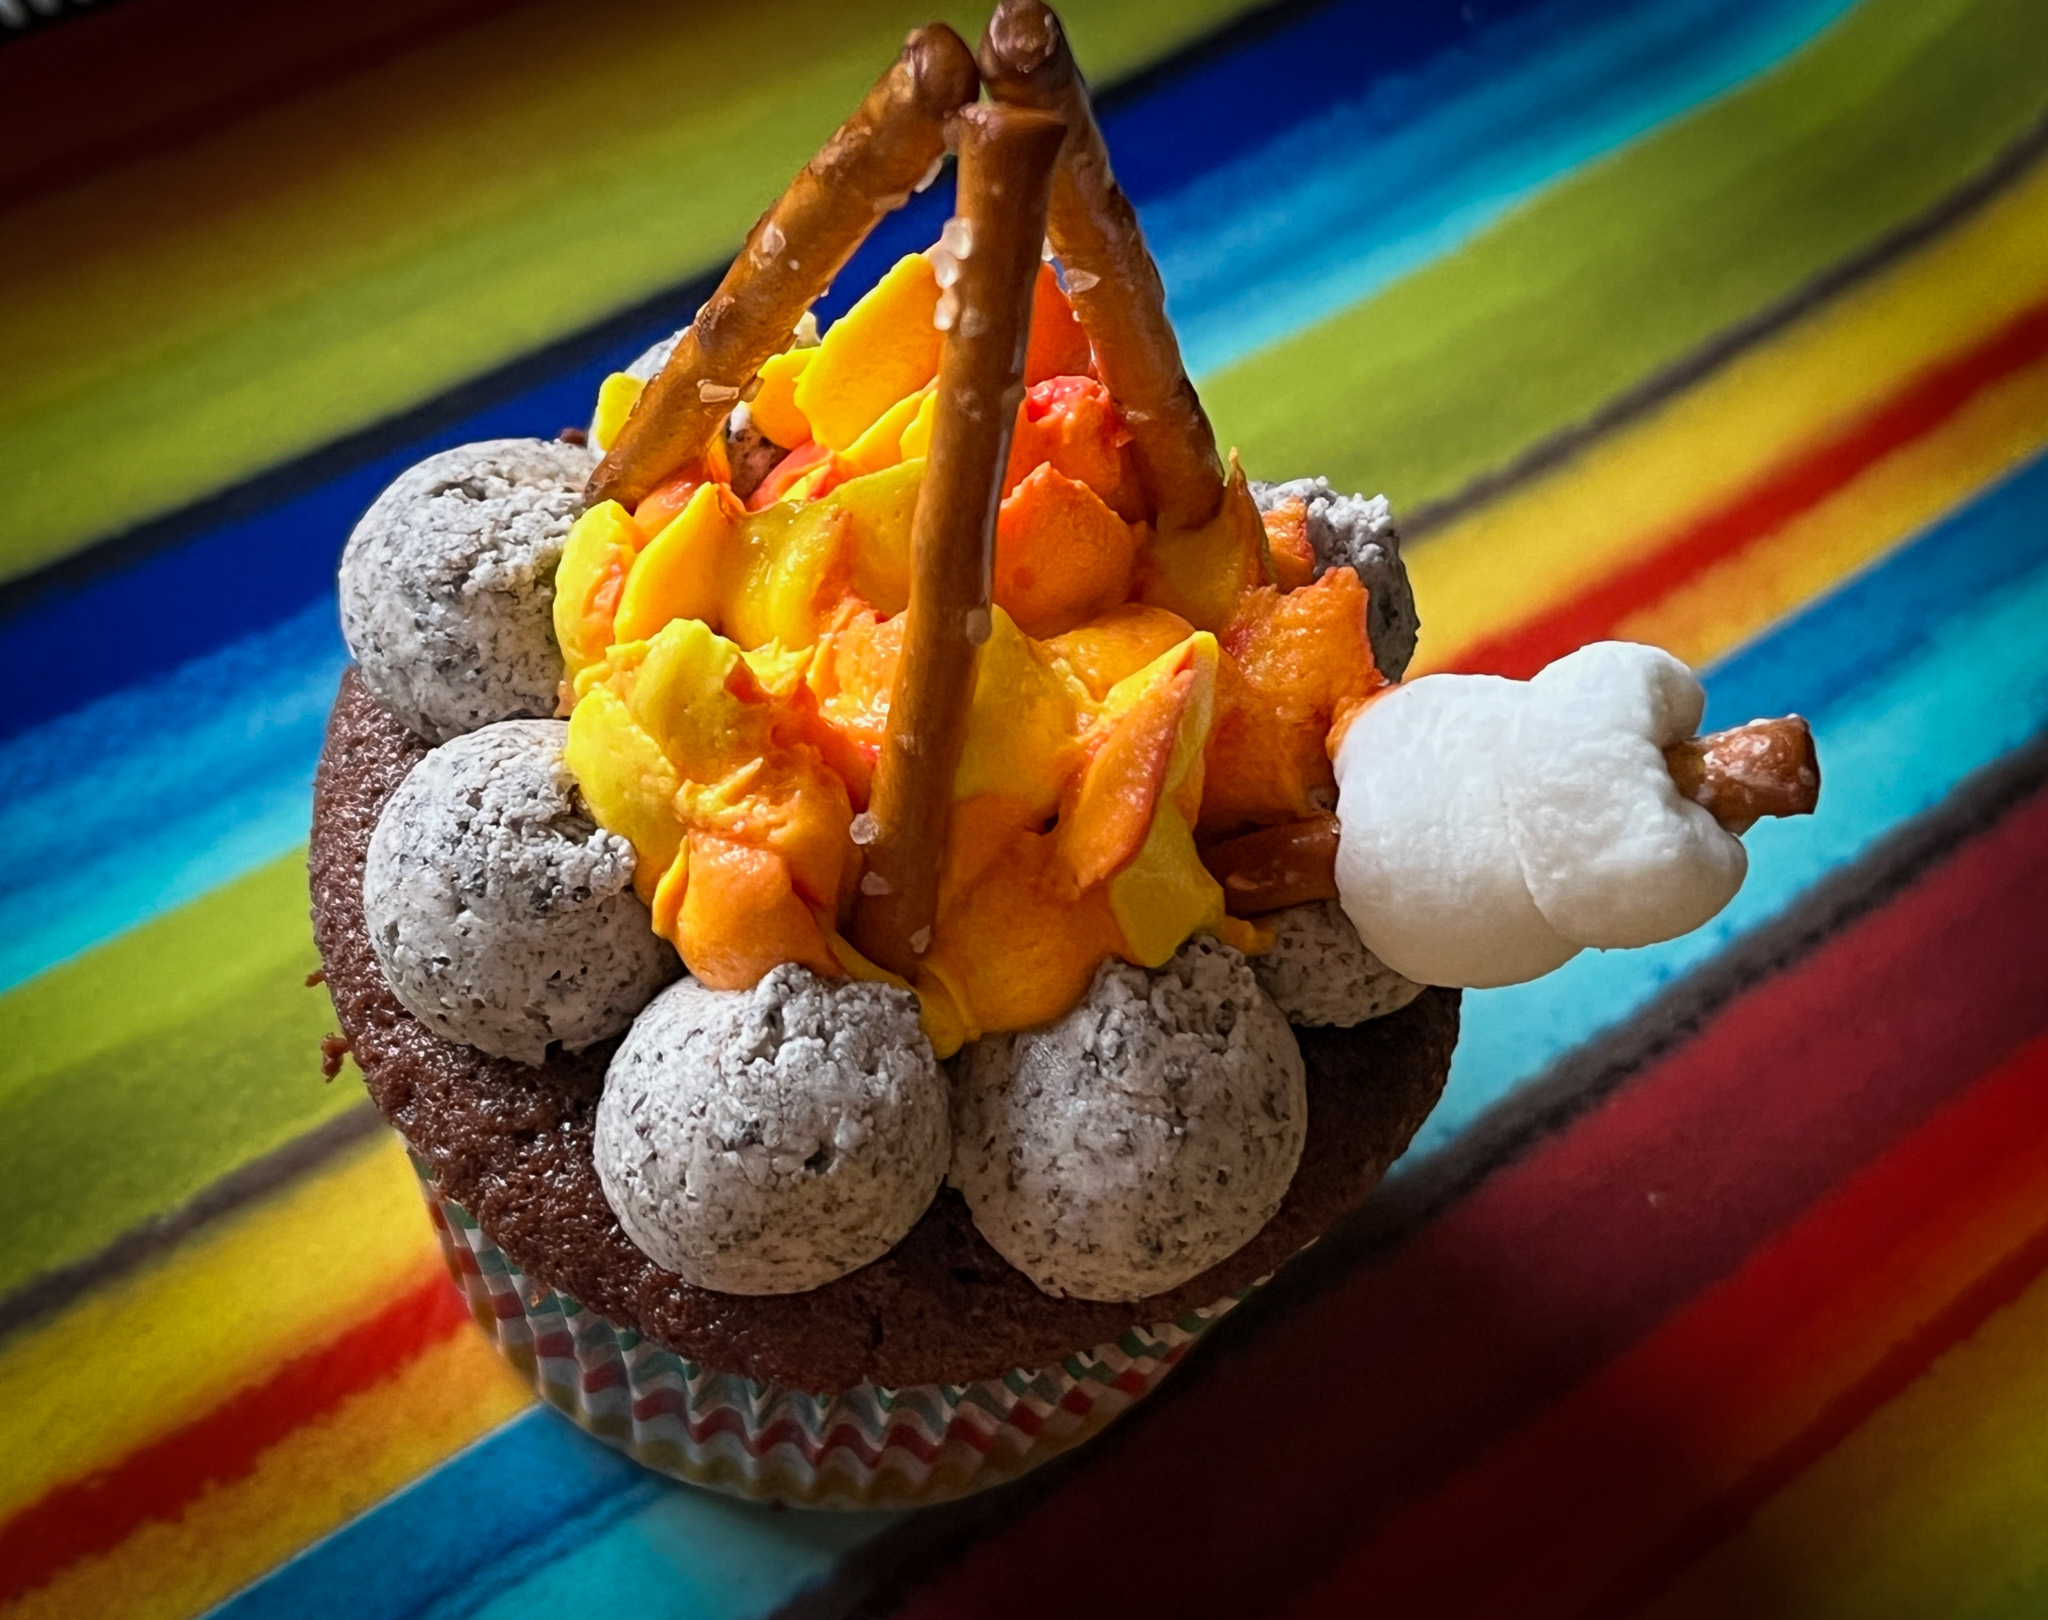
One extra bit of advice: when you pipe the “rocks”, smooth the surface with a brush to make them more round and smooth. I did not do that to some of them, and wish I had. Once the buttercream hardens you cannot quite smooth things out.

ONE YEAR AGO: La Couronne Lyonnaise, Two Ways
TWO YEARS AGO: Have a Heart
THREE YEARS AGO: Chocolate-Hazelnut Tartlets
FOUR YEARS AGO: Turkey Taco Salad
FIVE YEARS AGO: Cheese and Pesto Emmer Roll-ups and Elaine’s Cookbook Review
SIX YEARS AGO: Mango-Hazelnut Entremet Cake
SEVEN YEARS AGO: Lebanese Lentil Salad and a Cookbook Review
EIGHT YEARS AGO: Cottage Loaf
NINE YEARS AGO: Sourdough Loaf with Cranberries and Walnuts
TEN YEARS AGO: Sichuan Pork Stir-Fry in Garlic Sauce
ELEVEN YEARS AGO: Our Green Trip to Colorado
TWELVE YEARS AGO: Ditalini Pasta Salad
THIRTEEN YEARS AGO: Celebrate Wednesday with a Thai Seafood Curry
FOURTEEN YEARS AGO: Post-workout Breakfast
FIFTEEN YEARS AGO: Semolina Barbecue Buns
SIXTEEN YEARS AGO: Lavash Crackers