With this post I will upset a lot of people. First, by mixing a classic Middle Eastern recipe with a Mexican component. And second, by making it a much quicker version than the authentic. However, since I first made this version back in 2019, I never stopped. It is by far the most requested side dish by the resident food critic, and I adore it too. My only problem lies with that portion control thing. I tend to over-eat because it’s just too good. The basic method is the same, and to be honest I don’t even measure anything now, because it always works. This version rocked our little world.
POBLANO TAHDIG (from The Bewitching Kitchen)
1 cup rice 3 cups lightly salted water 1 Poblano pepper, roasted with a touch of olive oil until soft 1/3 cup full-fat yogurt 1/4 tsp salt 1/4 tsp chipotle pepper (or other pepper of your choice) drizzle of olive oil
Mix the yogurt with the poblano pepper, salt and chipotle pepper. Process with a mini-food processor until smooth. Reserve.
Cook the rice for 12 minutes in salted boiling water and immediately drain and rinse with cold water to stop cooking. Rice and yogurt mixture can sit separately for a couple of hours before continuing.
Mix the rice with the yogurt. Heat a 10-inch non-stick skillet and add olive oil, swirling around the whole surface. When the oil starts to get hot, add the rice-yogurt mixture and spread it all over the pan, smoothing the surface with a silicon spoon. Cover the rice with a paper towel moistened with water, then place a lid. Don’t worry if the lid is not totally tight.
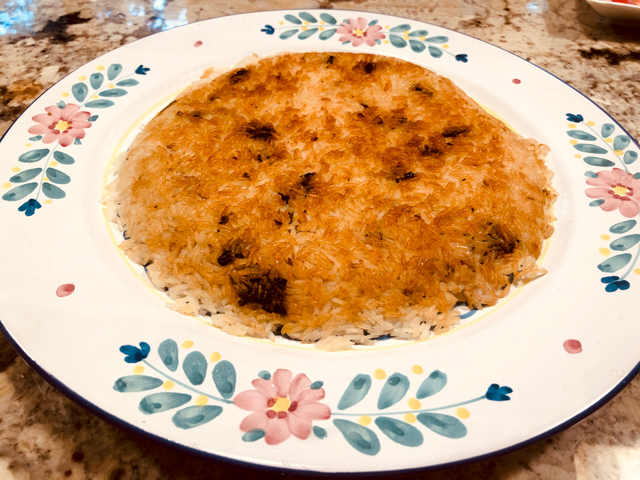
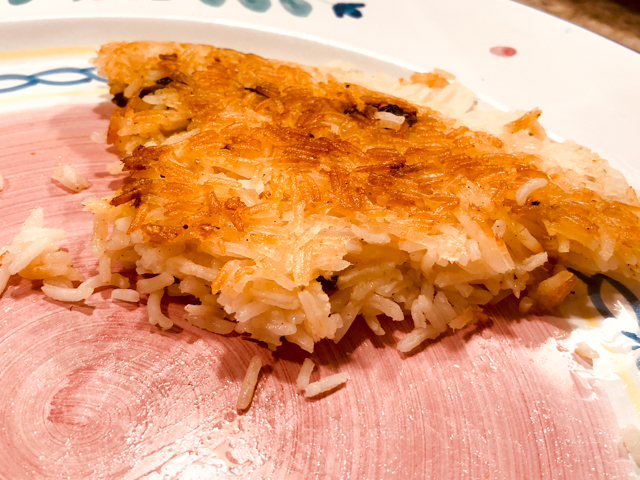
Place on a low-burner for exactly 30 minutes. At the end of 30 minutes check to see if the bottom is golden, if not, increase the heat lightly and remove the lid. Leave it for a minute or two, should be enough to make a nice crust at the bottom. Carefully place a platter on top and invert the rice on it. Cut in wedges to serve.
Comments: The above picture shows what was left once we finished our dinner. We could have inhaled it all, but I decided to consider my lunch next day. If you are a rice lover, please try this method. And now that we loved the poblano version so much, I have plenty of other variations to try. The only thing to keep in mind is under-cooking the rice in the beginning, and choosing a skillet that is right for the amount of rice you have. For 1 cup dry rice, the 10-inch skillet is perfect. Thirty minutes on low-heat. DONE.
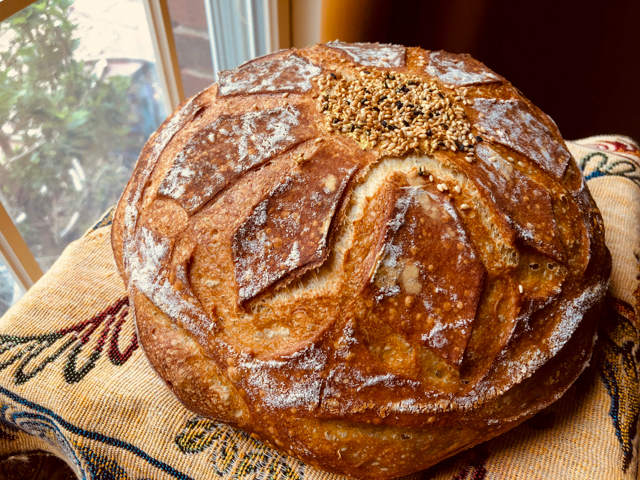
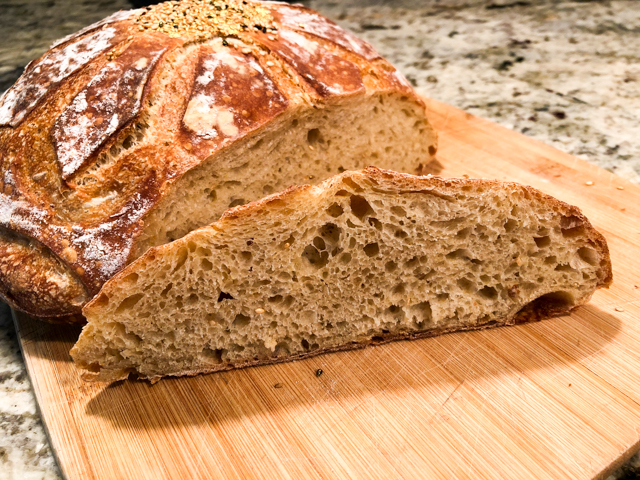
I am quite fond of adding Middle Eastern spices to sourdough bread, and this time I experimented with “baharat.” Interestingly, the word “baharat” means “spices” and a commercially available mixture might have different proportions of many kinds, depending on the origin. You can also make your own, using the formula suggested in this article. I went with a store-bought product, and chose this one. It has intense flavor, but it is not overly hot.
BAHARATFLOWER SOURDOUGH (from the Bewitching Kitchen)
385g white bread flour 16g whole-wheat flour 1/2 tsp baharat mixture 8g salt 280g water 65g sourdough starter at 100% hydration
optional for decoration: egg white + a little water (egg wash) sesame seeds (I used a mixture of white and black) luster powder + vodka
Make the levain mixture about 6 hours before you plan to mix the dough. It should be very bubbly and active.
When you are ready to make the final dough, place the water in the bowl of a KitchenAid type mixer and dissolve the starter in it, mixing with a spatula briefly, then add the two types of flour, the baharat and the salt. Turn the mixer on with the hook attachment and knead the dough for 4 minutes at low-speed all the time. If the dough is too sticky, add 1/4 cup flour, you want the dough to start clearing the sides of the bowl, but still be sticky at the bottom.
Remove from the machine, and transfer to a container lightly coated with oil, cover lightly with plastic wrap and allow it to ferment for 4 hours, folding every 45 minutes or so. After four hours bulk fermentation, shape the dough as a ball, and place, seam side up, in a lightly floured banetton. Leave at room temperature one hour, and then place in the fridge overnight, from 8 to 12 hours.
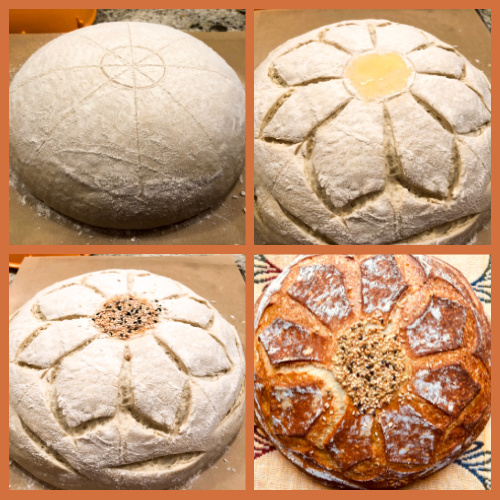
Next morning, heat the oven to 450F. Invert the dough over parchment paper, rub gently white flour on the surface. Score with a flower pattern and paint the details with a bright color using luster powder diluted with vodka. You need it to be a bit on the thick side, and don’t worry about precision, it will more or less mix with any flour bits around it. Do not worry. Paint the center of the flower pattern with egg wash and gently press sesame seeds on it.
Bake at 450F for 45 minutes, preferably covered for the first 30 minutes to retain steam. Cool completely over a rack before slicing.
Comments: If you ask me which type of spice is my favorite for sourdough, I would have to politely decline to answer. I love them all. I tend to use curry more often than others but probably because I have two or three types of curry in the pantry and like to put them to use. The amount included gives just a hint of flavor and the bread is still good to enjoy with anything you want. Even plain with a little olive oil or butter.
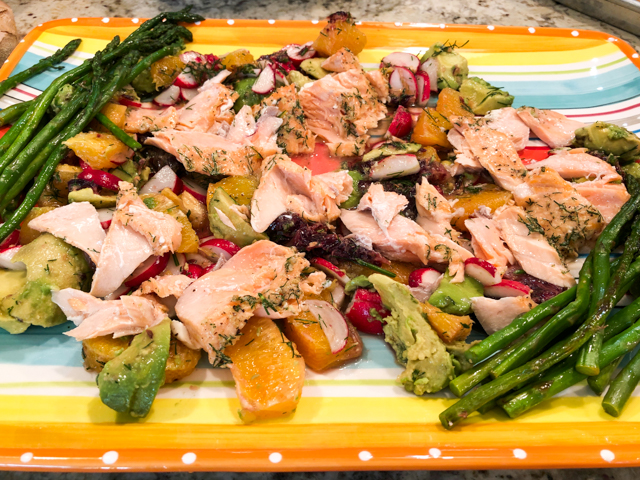
I get disappointed when pictures do not do justice to a recipe. You will have to trust me, this salmon was like an explosion of flavors and textures, even if it looks a bit “messy” on the plate. It is actually supposed to be just like that. The husband found the recipe in The New York Times, in an article highlighting favorites of their food editors. I can see why.
1 salmon fillet, skin-on Kosher salt and black pepper 6 tablespoons finely chopped dill 1 (1-inch) piece ginger, scrubbed and finely grated 2 tablespoons extra-virgin olive oil, plus more for serving 1 blood orange (or additional regular orange) 2 oranges 6 small radishes, cut into thin wedges 1 avocado Flaky sea salt, for finishing (optional)
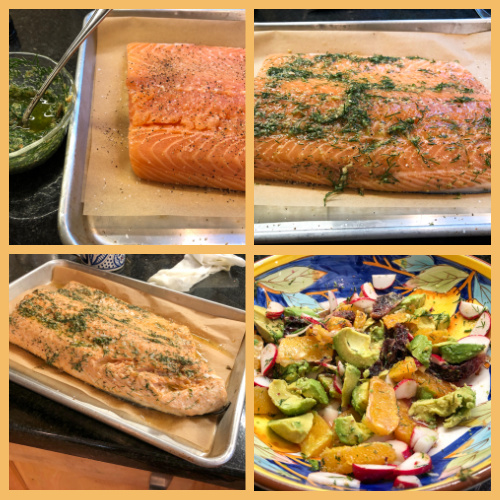
Heat oven to 325 degrees. Line a sheet pan with non-stick aluminum foil. Pat the salmon dry, then place on the tray skin-side down and season with salt and pepper.
In a medium bowl, stir together the dill, ginger and olive oil until combined. Season with salt and pepper. Spread half of the dill-ginger mixture over the top of the salmon. (Reserve the remaining dill-ginger mixture.) Bake until cooked through, 15 to 20 minutes.
As the salmon cooks, cut off the top and bottom of the two types of oranges and remove the segments. Squeeze the peels into the remaining dill-ginger mixture to get out any juice. Transfer the fruit and any juice on the cutting board to the bowl. Add the radishes, season generously with salt, and stir gently to combine.
Break the salmon into large pieces, and divide across plates with the citrus salad. Peel and pit the avocado, then quarter lengthwise and add to plates. Season with salt. Spoon the juices from the bowl over top, and season with black pepper, another drizzle of olive oil, and flaky sea salt, if using.
Comments: The husband is the seafood cook in our home, but every once in a while I venture into his domain. This was quite spectacular, even if I say so myself. We loved the contrast of the hot salmon with the cold citric salad. Perfect for a warm Summer evening. I highly, highly recommend it.
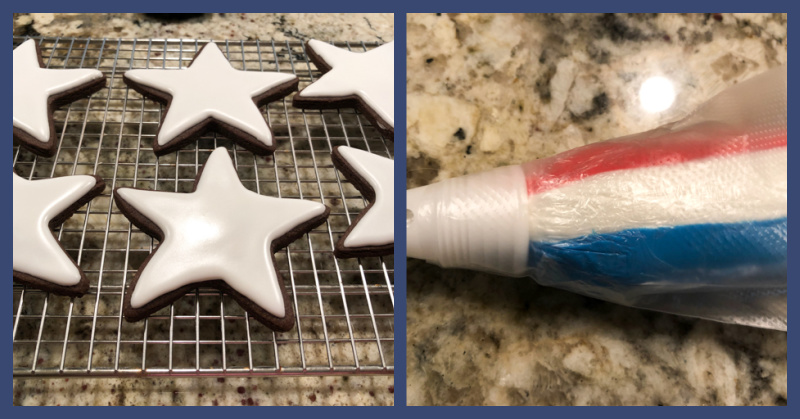
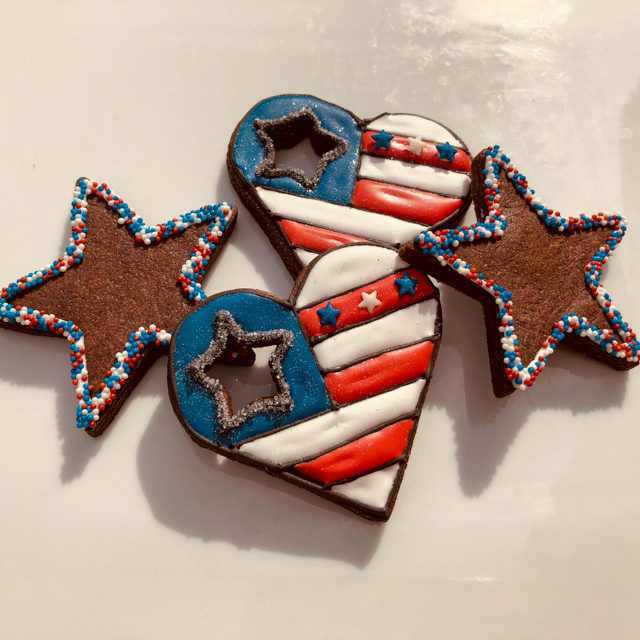
In this post I share chocolate cookies and brownie cupcakes, all dressed up for the occasion. Recipe for cookies can be found here, and brownie cupcakes with a click here.
Four types of decorations, depending on how much icing and how much work you’d like to put into the cookies. The simplest is the chocolate star with the sprinkle border. All you have to do is pipe a little line of icing all around and then dip the cookie gently in sprinkles. The hexagons were featured recently on my baby blog.
These stars were inspired by Haniela. They started with a flooded white cookie, and then some were air-brushed with a combination of stencils (stripes and stars), and some were outlined with a three-color icing using a flat icing tip.
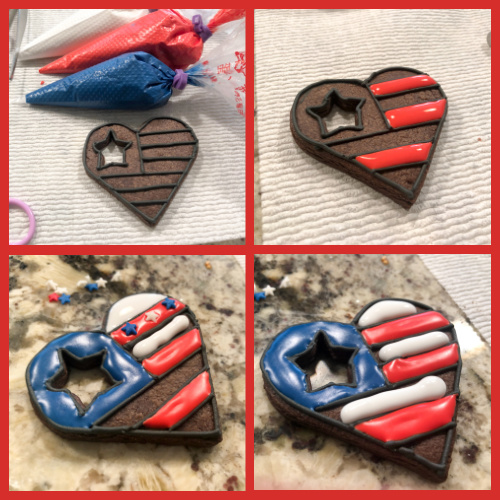
The 4th of July Hearts were inspired by something I saw on Instagram last year and saved for the future. And the future is now!
Cupcakes were made using 1/8 tsp of orange oil to flavor the cake batter. The icing was flavored with chai extract, as described in my post from a couple of months ago. Patriotic sprinkles complete the look…
I hope you are having a wonderful 4th, and please if you are into fireworks, think a little bit about all those pets getting terrified out there. If you can minimize your fun, or do it away from residential neighborhoods, please consider doing so.
In My Kitchen posts are hosted by Sherry, from Sherry’s Pickings. At the end of this article you will find a link to jump to her site and see what everybody else is sharing this month. I join four times each year, on the first day of January, April, July and October. If you are a food blogger, considering taking part of this fun event. It is chance to share those little things you bought or received as gifts and that make your life in the kitchen easier. Or that simply bring you joy…
In our kitchen…
We’ve been enjoying strawberries on a regular basis, just straight as fruit with yogurt, or in sorbets made by the resident Sorbet Maker Extraordinaire, aka The Husband.
In our kitchen…
This is my current favorite brand of espresso powder, strong, powerful, intense. Great in cookies, brownies, anything joining coffee with chocolate, that match made in heaven.
In our kitchen…
Pomegranate molasses. I’ve tried many brands and settled on this one. It has the viscosity I like, some are so thick you need supernatural powers to remove it from the bottle.
In our kitchen…
Let the baking gadgets roll!
A special set of brushes, including some super thin. They come in handy to paint details in cookies with gel dye or luster powder diluted in alcohol.
In our kitchen…
Dinosaur cookie cutters with an optional insert to make a design. These got a little dusting with cocoa powder right before baking, no icing, super simple. But I like the effect. Cannot take credit for the idea, it was shared by Marlyn in her IG page.
In our kitchen…
A set of food-safe pens, they have two sides, one very thin, one thicker. I love their colors and the way they handle. They were used to make the cookies below:
In our kitchen…
A wooden stamp and my first set of cookies made with it… Etsy is a great spot to find this type of stamps, and they work well with many kinds of cookie dough. Strawberry Glazed Brown Sugar Cookie recipe found here.
In our kitchen…
A heat gun and special shrink-wrap plastic bags. I am not happy with the heat gun, so I won’t include a link to it. It shuts down after sealing just 4 or 5 bags, which is annoying. I need to get a better one. But I am totally in love with this method to pack cookies, they stay perfect for days, and look quite nice in their little shinny nest.
In our kitchen…
A new springerle type mold. I have not used it yet, but I am not done with my obsessive bee-phase. I cannot wait to try it. Stay tuned!
In our kitchen…
A few new silicone molds, all from etsy.com. They can be used for fondant or modeling chocolate, and some are easier to handle than others. Here is my first set of cookies with two of them.
In our kitchen…
A new tea cup… how could I resist it? Dots and bling! Here it is with some of my favorite tea of all times, Rose Mint from Bigelow….
Not exactly in our kitchen….
Our raised bed made by Phil, and the two guardians of the plants. Amazing the progress in 6 weeks! We’ve enjoyed the most delicious lettuce ever coming from our garden… All credit goes to the husband, I don’t get close to the plants so they have a chance to thrive.
Speaking of credit to the husband…
Last Summer he built this outside patio (featured exactly one year ago in IMK) and we now enjoy dining outside when the weather is just right for it. The dogs are not able to visit the upper part of our backyard, so when we are dining, they can be in the lower part, but usually will climb the steps, for a stare and whine game.
Playing favorites again, aren’t we? Why are the two lesser dogs showing up whereas you ignore me?
Not ignoring you, and to prove it, let’s start the canine grievances with the Resident Mutt. Oscar has been through some trying times lately. For starters, he was offered strawberries, a capital offense in his book.
To add insult to injury, he had to face that dreadful Summer Shave…
But the real killer was a trip to the vet for a small intervention that was not pleasant and put our trooper in bad shape for a few days. We are happy to inform that he is fully recovered now. However, his humans got a bit of a lecture from the vet because apparently His Highness is overweight. He’s been on a diet and we can see positive effects already.
His older brother is getting the same treatment, also with clear improvement…
Hi! My name is Buck and I disapprove of this message.
I say NO to diet! YES to bread!
And if I cannot have bread, I will find stuff around and complement my diet on my own…
And now, let’s check on our Black-Dotted Capeless Hero, aka Bogey Quit That…
I am waiting for my Human to play with me…
But he seems to be gone, and I am here waiting… and waiting…
I guess I’ll have to settle for his shoes for now… (This picture makes me melt. There, I confessed it)
Because they are such good boys (cough, cough), I decided to cookie them…
Buck was pleased, as he believes he is the most elegant cookie model!
I would have to dispute the statement. The photo below was taken exactly 20 minutes after his bath, explaining part of the abundant gray hair on my head.
BogeyQT also sees things differently. He realizes he is the only one who gets not just one cookie, but two. And a tea cup to boot!
So what does Oscar think about that?
Cookies? Who cares about cookies or tea cups? The fool still pees like a girl!
Fool? Who, me? You are obviously jealous of my black-spotted nature…
I float way above it all, and march to the beat of my own drum…
That’s all for now, friends! We are tired of being in the spotlight, and wish you all a nice Summer!
My little forever-puppy-Bucky-Boy turns 14 today! He is dreaming of yet another year of bliss around the Bewitching Kitchen, and I just want his dream to come true…
SEE YOU IN OCTOBER!
To see what is happening in other food bloggers’ kitchens, click here.