Cauliflower is a unique wild card in the kitchen. When you want to low-carb anything, it is the first option that comes to mind. Well, here we have an exception, this is no low-carb, low-calorie recipe. This is cauliflower for the brave. When we finished our meal, the husband said “this may very well be the best cauliflower I’ve ever had.” I would like to bow and get a crown or at least a nice tiara, but all credit must go to Joanne. She raved about it, and when she raves, I cook.

CHIPOTLE-HONEY CAULIFLOWER WITH MANGO SALSA
(slightly modified from Joanne Eats Well with Others)
for the chipotle honey sauce:
1 can chipotle chiles in adobo (about 7 oz)
1 cup barbecue sauce (homemade or store-bought)
1/4 cup packed brown sugar
1/8 cup bourbon
juice of 1 lime
for the cauliflower:
1 large head of cauliflower
1 cup flour
3 tbsp cornstarch
1 cup milk
1/4 tsp kosher salt
1/4 tsp black pepper
1/2 tsp garlic powder
2 cups panko breadcrumbs
for the mango salsa:
3 ripe mangoes, diced
1 large avocado, diced
¼ cup cilantro, minced
1 jalapeno, seeded and minced
juice of 1 lime
salt, to taste
Combine the chipotles, barbecue sauce, brown sugar, bourbon, and lime juice in the bowl of a food processor. Process until completely smooth.
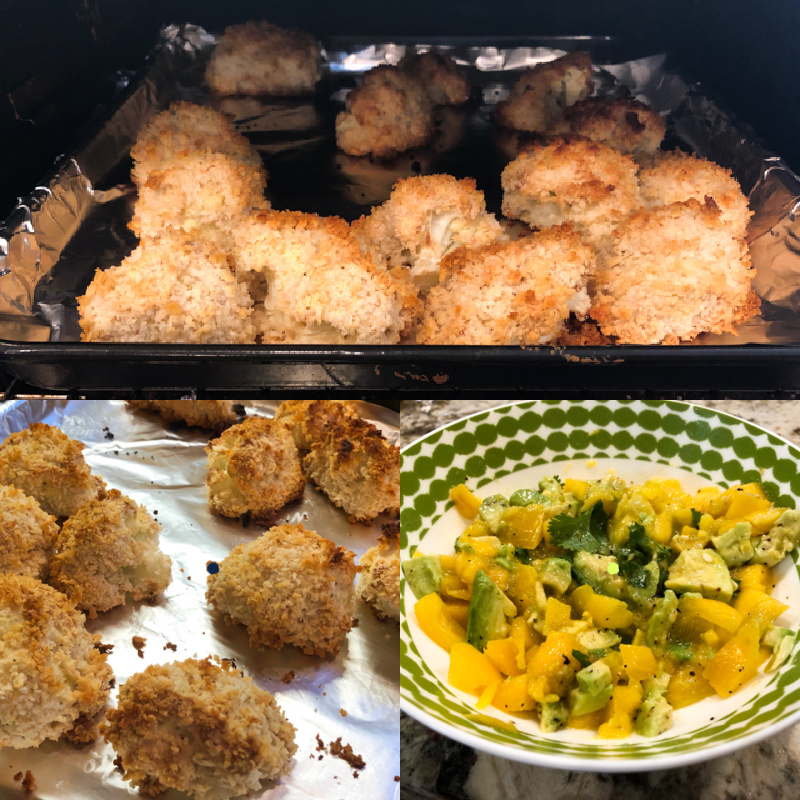
Heat oven to 450F. Line a baking sheet with parchment paper and set aside. Break the cauliflower into larger florets. In a medium bowl, whisk together the flour, cornstarch, milk, salt, black pepper, and garlic powder until thick and completely smooth. Pour the panko into a separate bowl.
Toss the cauliflower florets into the wet batter in batches, making sure they are completely coated. Next, transfer them to the panko bowl and coat them completely in the panko. Place on the prepared baking sheet in a single layer.
Place in the oven and bake for 25-30 minutes. Remove from the oven and brush with the chipotle honey bbq sauce. Place back in the oven for another 5 minutes to allow the sauce to set and soak into the florets.
Make the salsa. Combine the mangoes, avocado, cilantro, and jalapeno in a medium bowl. Season with lime juice and salt, to taste.
Serve the cauliflower over rice with the salsa on top.
ENJOY!
to print the recipe, click here
Comments: Moderation is key, but tricky. Something about the crispy texture of the panko coating joined with the spicy sweetness of the barbecue sauce turns this into dangerous stuff. The mango salsa does a perfect job cooling things down, which in turn makes that moderation advice even harder to listen to. You’ve been warned. This was majorly amazing. Sorry for the superlatives. It is all Joanne’s fault.
ONE YEAR AGO: Kansas Sunflower Seed and Black Walnut Macarons
TWO YEARS AGO: Curry Turmeric Sourdough
THREE YEARS AGO: Black Olive Tapenade and Deviled Eggs
FOUR YEARS AGO: Blueberry Crumble Coffee Cake
FIVE YEARS AGO: Fresh Strawberry Yogurt Bundt Cake
SIX YEAR AGO: Quinoa Salad with Red Grapes and Avocado
SEVEN YEARS AGO: Strawberry Coffee Cake
EIGHT YEARS AGO: Lemon-Poppy Seed Muffins
NINE YEARS AGO: Mascarpone Brownies
TEN YEARS AGO: Salmon Tacos
ELEVEN YEARS AGO: Cinnamon Turban Bread
TWELVE YEARS AGO: Summertime Gratin