This is a little change on my default recipe for hamburger buns using the tangzhong method. I make a batch of these babies regularly, but recently I’ve changed a small detail that improved things quite a bit. If allowed to proof freely and bake as you normally would, the buns tend to balloon quite a bit. Visually they are quite nice, but it gets pretty awkward to make a burger out of them. So, if you want to have buns that are a little more flat but have the same overall taste and texture, and absolutely perfect to enjoy with your beef, turkey or veggie burger, check the details after the picture.
When you shape them and place to proof, add a parchment paper on top and a light baking sheet. Let them proof like that for the full final 1 hour, depending on the yeast you used, it might be ok to bake after 45 minutes.
Place them in the oven WITH the parchment paper and the baking sheet on top for 5 minutes.
Remove the baking sheet and parchment paper, quickly brush with egg white, add seeds if desired, and bake for the remaining time.
I’ve seen a similar method in which the person baked with the baking sheet on top for the whole time, but that has two majordisadvantages: it compresses the bread a little too much, making it too dense. And the overall look is dull, since you cannot brush with egg wash. It also ends a bit too flat. I’ve tweaked that three times before hitting this final method, and highly recommend you give it a try.
This goes to the OMG FILES. Everything worked great together, and the husband went crazy for it too. He kept saying this is restaurant-quality meal. Top-notch restaurant. I must say that for something so simple to put together, it is amazing how tasty it was. The parsley oil stole the show. Think pesto, but lighter. You can use regular pasta, but there’s something about the texture of a rice noodle that worked even better with the shrimp.
GRILLED SHRIMP WITH PARSLEY OIL OVER BLACK RICE NOODLES (from the Bewitching Kitchen)
for the shrimp: 1 cup tightly packed fresh flat-leaf parsley 3 tablespoons freshly squeezed lemon juice 1/3 cup extra-virgin olive oil salt and pepper 2 pounds Jumbo shrimp, peeled and deveined 1/2 to 1 tsp Tajin Mexican seasoning 2 tablespoons grapeseed oil
Make the parsley oil: coarsely chop the parsley and place in a food processor. Add the lime juice, olive oil, season with salt and pepper. Process to a paste. Reserve.
Make the shrimp: whisk the grapeseed oil with Tajin seasoning. Add the shrimp and toss to coat well. Season lightly with salt. Grill the shrimp until cooked through, around 3 minutes per side, depending on how hot is your grill.
Serve the shrimp with the parsley sauce spooned all over it.
for the noodles: (adapted from Joanne’s blog) 12 oz cherry tomatoes 3 Tablespoons olive oil 1/2 tsp cumin seeds 1 tsp brown sugar zest of 1/2 lemon salt and pepper to taste black rice noodles (I used this brand)
Heat the oven to 425F. In a large bowl, mix the tomatoes with the olive oil, cumin, sugar, lemon zest, salt, and a grind of black pepper. Toss to combine, then transfer to a baking dish. Place in the oven and roast for 30 minutes, or until it starts to get brown at spots.
Cook black rice noodles according to the instructions in the package. Toss with the roasted tomatoes, making sure to incorporate all the juices that accumulate in the baking dish. Serve alongside the shrimp.
Comments: I am not too fond of grilling shrimp. If using a skewer, it is best to use two so that they don’t move around, but assembling that leaves me exhausted just thinking about it. So this time I went with a grilling basket, which is something usually maneuvered by the husband. He always does sea bass or red snapper using that gadget. I am quite impressed. Both by the husband and the gadget.
I sprayed the grid with a little olive oil, added the marinated shrimp, closed it, and placed on the grill. The shrimp cooked like a dream, perfectly juicy. Flipping them over midway into the grilling time was a breeze. Grab the basket by the handle, flip, and you are done. Granted, washing the basket is a bit of a hassle, but overall a small price to pay.
I hope you try this meal, either the whole thing or at least the shrimp component with that amazing parsley oil. We are still talking about it…
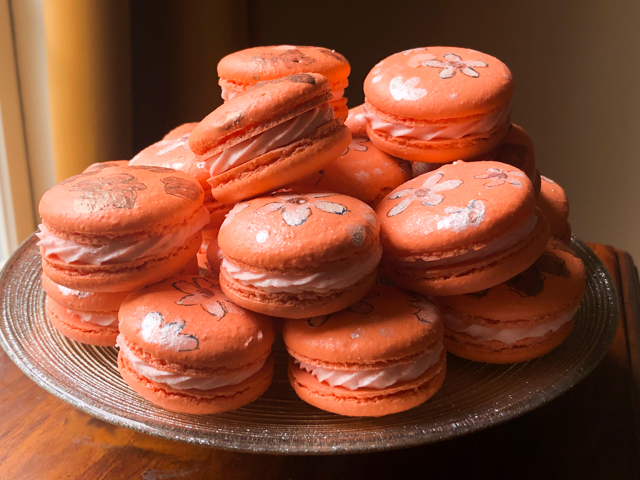
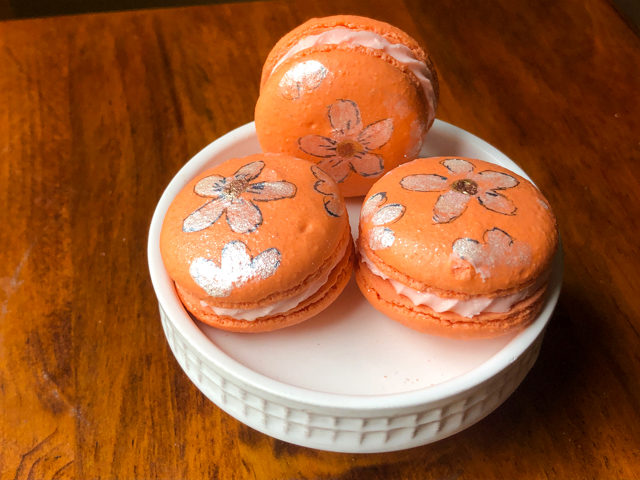
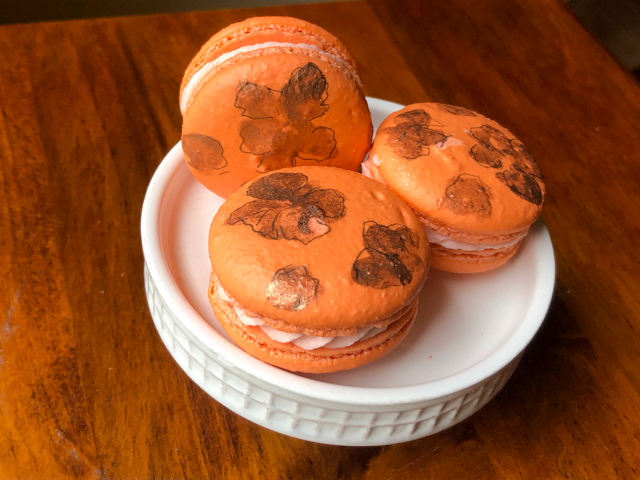
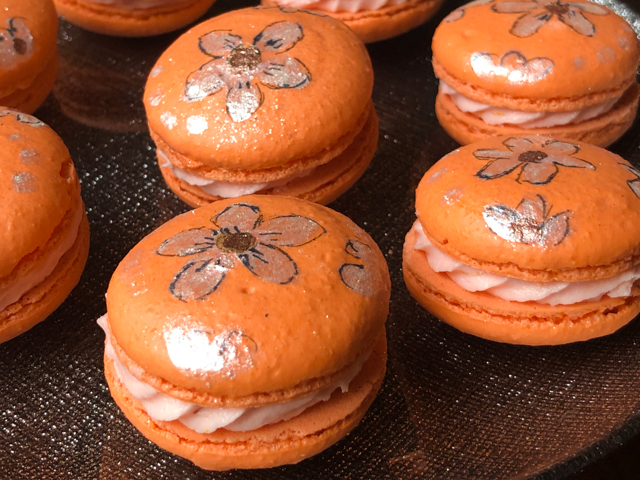
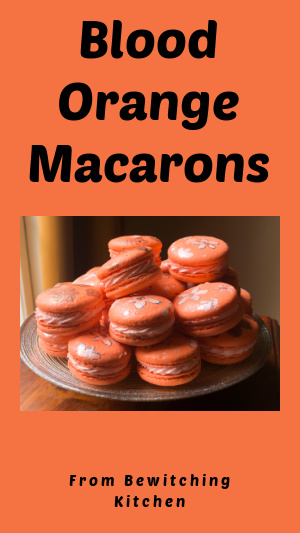
For the first post of a new year in my blogging life, I will once again feature macarons, as they are so special to me. Our grocery store had gorgeous blood oranges a couple of weeks ago, and the moment I saw them I knew resistance was futile.
BLOOD ORANGE MACARONS (from the Bewitching Kitchen)
For the shells: 200g powdered sugar 115 g almond flour 115 g egg whites at room temperature (approx. 4 eggs) 1/8 tsp of cream of tartar (optional) 100 g granulated sugar ¼ tsp vanilla paste or extract Tulip Red and Orange gel color luster powder, pearl and brown (optional) Everclear (optional)
For filling: 60 g unsalted butter softened 160 g powdered sugar zest of 1/2 blood orange 2 tsp blood orange juice 1/8 tsp blood orange oil pinch of salt heavy cream if needed to adjust consistency
Line 3 heavy baking sheets with parchment/baking paper or Silpat mats. Layer the powdered sugar and ground almonds/almond meal in a food processor. Pulse until the mixture looks like fine meal, about 12 pulses. Pass through a sieve and transfer to a small bowl or to a sheet of parchment paper. Set aside.
Place the egg whites and cream of tartar in the bowl of a stand mixer fitted with the whisk attachment. Make sure that the bowl and the whisk are impeccably clean. Starting on medium speed, whip the whites with the cream of tartar until they look like light foam. Add all the sugar at once and keep whisking until the meringue is soft and shiny. Add vanilla and food colors.
Whip the egg whites until the mixture begins to dull and the lines of the whisk are visible on the surface of the meringue. Check the peak. It should be firm. Transfer the whites to a medium bowl.
Fold in the ground almond/almond meal mixture in two increments. Paint the mixture halfway up the side of the bowl, using the flat side of a spatula. Scrape the mixture down to the center of the bowl. Repeat two or three times, then check to see if the mixture slides slowly down the side of the bowl. Put the mixture in a piping bag fitted with your choice of piping tip (round, ¼ or ½ inch in diameter or 6 – 12 mm). Pipe shells, I like to count numbers in my head and use the same count for each shell so they end up similar in size. If making snowmen, make a template with two circles joined together to form head and body, and pipe each section.
Slam each sheet hard four to six times on the counter/worktop. Let the unbaked macarons dry until they look dull but not overly dry. Drying time depends on humidity. In a dry climate, the macarons can dry in 15 to 20 minutes; in a humid climate, it can take 35 to 40 minutes.
While the macarons are drying, heat the oven to 300 F. Bake one sheet at a time on the middle rack. Check in 11 minutes. If the tops slide or move (independently of the ‘feet’ when you gently twist the top), then bake for 2 to 3 more minutes. Check one or two. If they move when gently touched, put them back in the oven for 1 to 2 more minutes until they don’t move when touched. Let the macaroons cool for 10 minutes before removing from the pan. The macarons should release without sticking. Mix the luster dust with everclear and paint flowers in a loose design. Later add an outline with fine tip black pen.
For the filling, use a hand-held electric mixer and whisk the butter until creamy. Add the other ingredients except the heavy cream, and whisk until creamy and smooth. If needed, add a bit of heavy cream to loosen the mixture.
Assemble the macarons: find two macarons similar in size and add a good amount of filling to the bottom of one of them. Place the other on top and squeeze gently to take the filling all the way to the edge. Store in the fridge for 24 hours for perfect texture.
Comments: I did two different designs for the decoration, painting some flowers with pearl or brown luster powder. Very loose, no need for precision. The outline with the black pen brings the design together. The pictures don’t show very well, I am afraid, but I really like the dark flowers better, even if they have nothing to do with orange blossoms…
Extracts, emultions, and oils can have a bit of an artificial taste, but this product from LorAnn is very nice. A small amount added to the buttercream intensified the blood orange component without any aftertaste. It works great in ganache also.
I finally figured out a way to get the nice ridges in the filling. I was always using the wrong tip, 1M, because it is my favorite for so many piping jobs. However, I know realize that the best tip to use in macaron fillings to get the effect I like, is a French star type. Pick a size compatible with your shells.
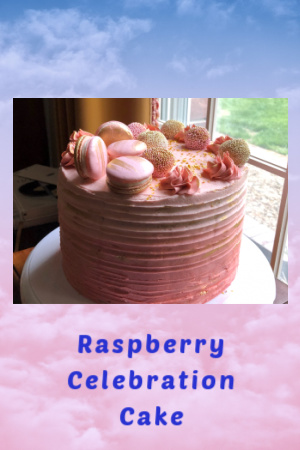
Twelve years. Hard to believe. It’s been such a journey, I sometimes don’t recognize myself in earlier posts. Like those written when I was a certified cake-o-phobe and decorated cookies were not to be found in my virtual spot. Twelve years later, I turned into a passionate baker, so much so that I started a second site just devoted to cookies. How did that happen? I have no idea, but I am having a blast with it. First things first. What is a Birthday party without cake? To celebrate this special day, I made a cake that joins my Brazilian roots (brigadeiros) with the cookies that launched me into a more serious baking path: macarons. Raspberry is the flavor. Pink and gold the colors. Happy 12th, my dear Bewitching Kitchen!
CELEBRATION PINK AND GOLDEN RASPBERRY CAKE (from the Bewitching Kitchen, cake slightly modified from My Cake School)
for one batch of cake: (I made two batches to have 4 cake layers, used 3 in the cake) 350g) sugar 285g cake flour 1 teaspoon salt 15g baking powder 5 egg whites 2 teaspoons vanilla 1 cup (242g) buttermilk 1/3 cup (72g) vegetable oil 140g unsalted butter, slightly softened.
Heat the oven to 325 degrees. Grease and flour two 8 x 2 inch round cake pans. Reserve.
In the bowl of your mixer add the dry ingredients, sugar, flour, salt and baking powder. Whisk to combine. Reserve. In a separate bowl, add the egg whites, buttermilk, vanilla and oil. Stir with a fork to combine.
With the mixer on low speed, add the slices of butter a few pieces at a time to the dry ingredients. Increase the mixer to medium speed and beat until the dry ingredients look crumbly and moistened by the butter. With the mixer on low speed, add half of the egg mixture, increase to medium speed and mix for 1 1/2 minutes, the batter will become thick and fluffy. Scrape the sides and bottom of the bowl. Add the remaining egg mixture in 2 pourings beating for 20 seconds after each addition. Divide the batter between the two pans.
Bake at 325 degrees for 35 to 40 minutes or until a toothpick inserted into the center comes out clean or with just a few crumbs attached. Let the cakes cool in the pans 10 minutes, then turn out.
for the raspberry filling: 2 cups ( 320g) raspberries 4 tbsp (60ml) water 1 cup ( 200g) sugar 25g cornstarch
Add the raspberries and water to a food processor and puree until smooth. If you’d like, you can strain the puree to remove the seeds, but in this case start from a bigger amount so you end up with 320g.
Combine the sugar and cornstarch in a medium saucepan. Stir in the raspberry puree. Cook over medium heat, stirring consistently until mixture thickens and comes to a boil, about 8-10 minutes. Allow to boil for 1 minute, then remove from heat. Refrigerate and allow to cool completely.
for the frosting: 1 cup (2 sticks) unsalted butter, at room temperature 1 cup vegetable shortening 2 teaspoons pure vanilla extract 3 to 4 tablespoons milk ¼ teaspoon salt 2 pounds (approximately 8 cups) powdered sugar food gel dye, Americolor Dusty Rose
In a large bowl, using an electric mixer on medium speed (if you have a stand mixer, use the paddle attachment), beat together the butter, shortening, and extracts until smooth and creamy.
Add 2 tablespoons of the milk or water, the salt, and half the powdered sugar and mix just until combined. Scrape down the sides of the bowl. On low speed, gradually add in the remaining sugar. Add more milk or water as needed to achieve the desired consistency.
Divide the frosting in three bowls, and add increasing amounts of gel dye to get the ombre effect.
for decoration: Raspberry Brigadeiros (recipe here) Lemon Macarons (recipe here, but omit the blueberry jam) Egyptian Gold luster powder Everclear or vodka
Cake layers can be made a week in advance and frozen. Thaw still wrapped in plastic at room temperature. Assemble the cake by placing one layer on a rotating cake stand over a cardboard round base. A little buttercream on the cardboard helps it stay stable as you work on it.
Make a little dam with buttercream frosting (use the lighter color), then add the raspberry filling. Place the second layer on top, repeat the process and top with the third. Frost the cake first with a crumb coat, refrigerate for 30 minutes, then frost with the darkest tone at the bottom. If desired, add texture with a cake comb or spatula. Use the darker color to make rosettes on top, add the brigadeiros and macarons.
Finish the look with a few strokes of gold color on the edges of the buttercream roses and ridges on the sides of the cake. If you have golden sprinkles, put them to use…
Comments: I should thank Tanya, my tent-baking friend, for the help and advice she gave me to make this cake. It turns out that I had not baked a cake in about 10 months and was feeling pretty rusty. But I am thrilled with the way it turned out, because I had this image in my mind, and the cake came pretty close to my goal. I loved making the ombre effect with the three tones of pink. Come to think of it, Dusty Rose from Americolor is a total must-have. Pink is tricky. Just a little more than you think you need will take you into bubblegum territory. Not what I wanted for my cake. Dusty Rose gives a nice pastel tone.
For the macarons, I painted one shell in solid gold, and added a brush of gold on the other side. I think the lemon of the macaron filling was a good match for the raspberry cake. As to the frosting, I went with a type of buttercream that stands well at room temperature for several hours. It is important to use a good quality shortening, and butter. I went with Spectrum and Kerrygold.
If you’ve been following me for a while or if you are new here, thank you for your support, and thanks for leaving comments and feedback on recipes you try. I step into the 13th year of this journey with the same enthusiasm I had on the second year. Or third. Or 10th. I’ve never set goals for my blog, it is a reflex of what goes on in my life as far as cooking and baking is concerned. I just try to keep it varied and interesting, and hope that it inspires others to cook and bake.
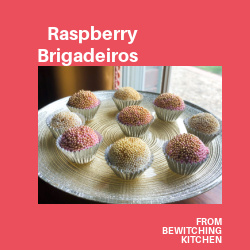
A departure on the Brazilian classic, I love the way these turned out. The raspberry cuts through the sweetness and gives them a little sharp bite I find quite pleasant. If brigadeiros are new to you, I urge you to make a batch. You can start from the traditional version, or go straight for this dressed up variation.
RASPBERRY BRIGADEIROS (from the Bewitching Kitchen)
1 can (14 oz) condensed milk 1 tablespoon butter 100g white chocolate, cut in pieces dash of salt 1/4 cup raspberry jam, seedless 1 tsp Amorettti raspberry flavor (optional) nonpareils, white and pink gold air-brush color (optional)
Grease a small baking dish with butter and set aside.
In a medium non-stick pan, combine the butter, sweetened condensed milk, and salt over medium-low heat, stirring constantly with a wooden spoon. Once the brigadeiro mix is warm, add the chocolate pieces, the jam and continue stirring.
The mixture thickens after about 8-10 minutes, and once you can run your spoon through the middle of it without it running back together for 2-3 seconds, it is done. When it starts to thicken, add the raspberry flavor, if using.
Pour the mixture into the greased plate, and let it chill until you can handle it with your bare hands. Form little balls and roll on nonpareils to coat. If desired, add a little gold color with an air-brush. Place them in small candy cups.
Comments: Brigadeiros are very sweet by nature (reducing condensed milk leaves you no way out of it), but even those who are against overly sweet goodies will enjoy this version. The raspberry does its magic.
I went with two colors, pink and white, and added a touch of gold because these brigadeiros had to be dressed for a special party. Have you heard that a certain food blog will turn 12 years old very soon? I say no more for the time being…