A little labor of love, these cookies are adorable and will brighten up any special occasion. You’ll need a special silicone mold, but other than that, it is all pretty straightforward.
GEOMETRIC HEART BUTTER COOKIES (from The Bewitching Kitchen, adapted from several sources)
240g unsalted butter, at room temperature 140g powdered sugar 2 egg yolks 2 tsp vanilla extract 260g flour 20g cornstarch 1/2 tsp salt
Candy melts or compound chocolate of your choice, white and pink sprinkles for decoration Diamond dust pump
Mix the flour with cornstarch and salt in a medium bowl. Reserve. Add the butter to the bowl of a KitchenAid type mixer, and using the paddle attachment, mix it for a couple of minutes until soft and creamy. Add the powdered sugar, mix on low, then increase the speed to medium and mix for a couple more minutes. Add the egg yolks and vanilla. Mix until all is incorporated, then add the reserved flour mixture.
Mix until all flour is incorporated and there are no dried bits anywhere. Fill the cavities of the mold with the cookie dough, 3/4 to the top, making sure to allow a little space for expansion. Ideally, you want the cookie to bake flush with the top of the mold.
Bake at 325F until the cookies are set in the center, that might take about 20 minutes. Let the cookies cool completely over a rack. If you want to be extra safe, place the cool mold in the freezer for 5 to 10 minutes before un-molding.
Remove the cookies, wash the molds and use them to melt compound chocolate and do the final coating and decoration.
Comments: To bake the cookies, you will need a silicone pan such as this one. The cookies will take longer to bake in the mold than they would shaped and baked on a baking sheet. Also, you need to let them cool completely before attempting to un-mold. Wash the pan, dry it well, and use it to pour a base of melted compound chocolate (I used white and pink, marbled together). Place the cookies gently back over the melted chocolate and freeze the whole tray for 15 minutes. Additional melted chocolate and sprinkles make the cookies even more festive, but of course, that step is optional.
.
These cookies would be perfect for an engagement party, a wedding anniversary, a teenage girl Birthday, or simply to offer to someone you really love!
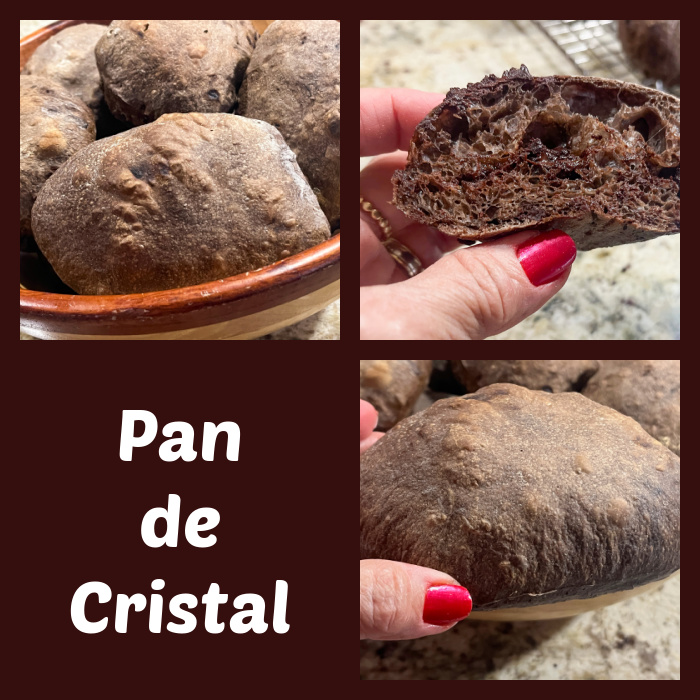
Decadent. First adjective that came to my mind after the first bite. It is not a sourdough, relies on commercial yeast, but I would not consider it a bread fit for beginner bakers. The high hydration level makes it very tricky to handle. However, if you don’t mind a little challenge, go for it. Absolutely wonderful!
500g bread flour 520g) water lukewarm 2 teaspoons (10g) table salt 3/4 teaspoon instant yeast 20g Dutch-processed cocoa powder olive oil to coat the bowl 130g chopped chocolate
In a medium bowl, mix the dough ingredients until thoroughly combined and homogenous. The dough starts off very slack and wet. Oil a two-quart rectangular baking dish (10” x 7”) with 1 tablespoon of olive oil. Pour the dough into the dish. If you have a bread proofing box, set it to 72F and place the dish inside it. Cover the pan and allow the dough to rest for 20 minutes.
Perform a first set of bowl folds: use your wet hands to grab a section of dough from one side, lift it up, then press it down into the middle. Repeat this about 12 times going all around the perimeter of the dough. Cover the dish and allow the dough to rest for 20 minutes.
To do a coil fold: with wet hands, reach under the dough and stretch the middle upward until the dough releases from the dish. Roll it forward off your hands, allowing it to fold over (or “coil”) on itself. Rotate the dish 90°(a quarter turn) and repeat. Continue performing this folding action until the dough feels like it won’t stretch and elongate easily, usually four to five times. Cover the dish and allow the dough to rest for 20 minutes.
Repeat the coil fold. Cover the dish and allow the dough to rest for 20 minutes.
Repeat the coil fold one last time. Cover the dish and allow the dough to rest for 20 minutes.
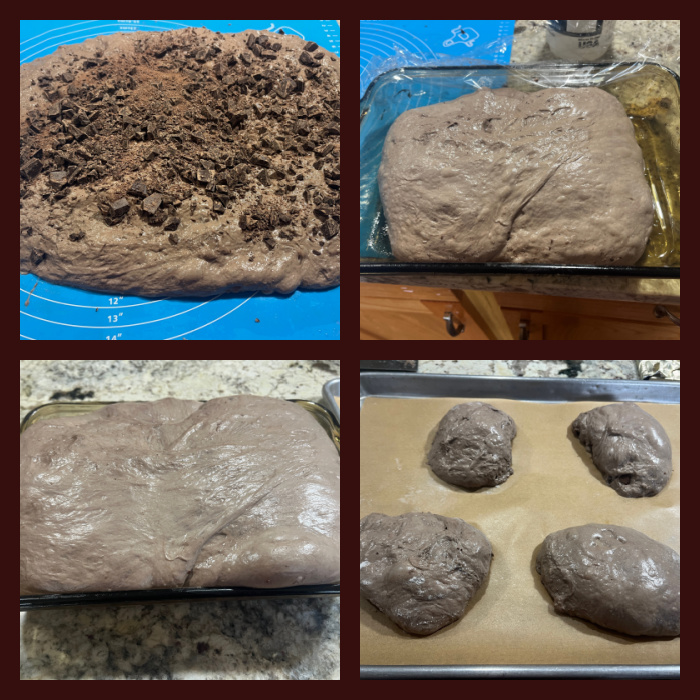
As gently as possible, turn the dough out onto a work surface spritzed with water. Gently coax the dough into a rectangle about 14” x 10” with the long side facing you. Sprinkle the dough evenly with the chocolate. Fold one of the short sides into the center, then fold the opposite third over the first, like you were folding a business letter.
Fold the dough a second time by bringing the top third of the dough down towards the center, then bringing the bottom third up to cover the top portion (another letter fold). Return the dough to the oiled dish to rise for about 80 minutes, until puffy.
Gently turn the dough out onto a heavily floured surface. Sprinkle a generous amount of flour on top of the dough and roll the cut sides of the dough on the floured surface so no sticky spots are exposed. Tuck any visible pieces of chocolate into the dough to prevent them from burning.
Working as gently as possible, use a bench knife or other sharp knife to divide it into eight pieces. Place four pieces on a sheet of parchment, leaving space between them. Repeat with the remaining four pieces of dough, placing them on another sheet of parchment. Let the rolls rest at room temperature for 2 hours, uncovered.
Heat the oven to 475F with a baking stone (or steel sheet) inside. Carefully slide the four rolls (still resting on the parchment) into the oven onto the stone or steel. Allow the other rolls to continue to rest.
Bake the rolls for 20 to 25 minutes. Remove from the oven to a rack to cool. Bake the remaining 4 rolls. Allow the rolls to cool completely.
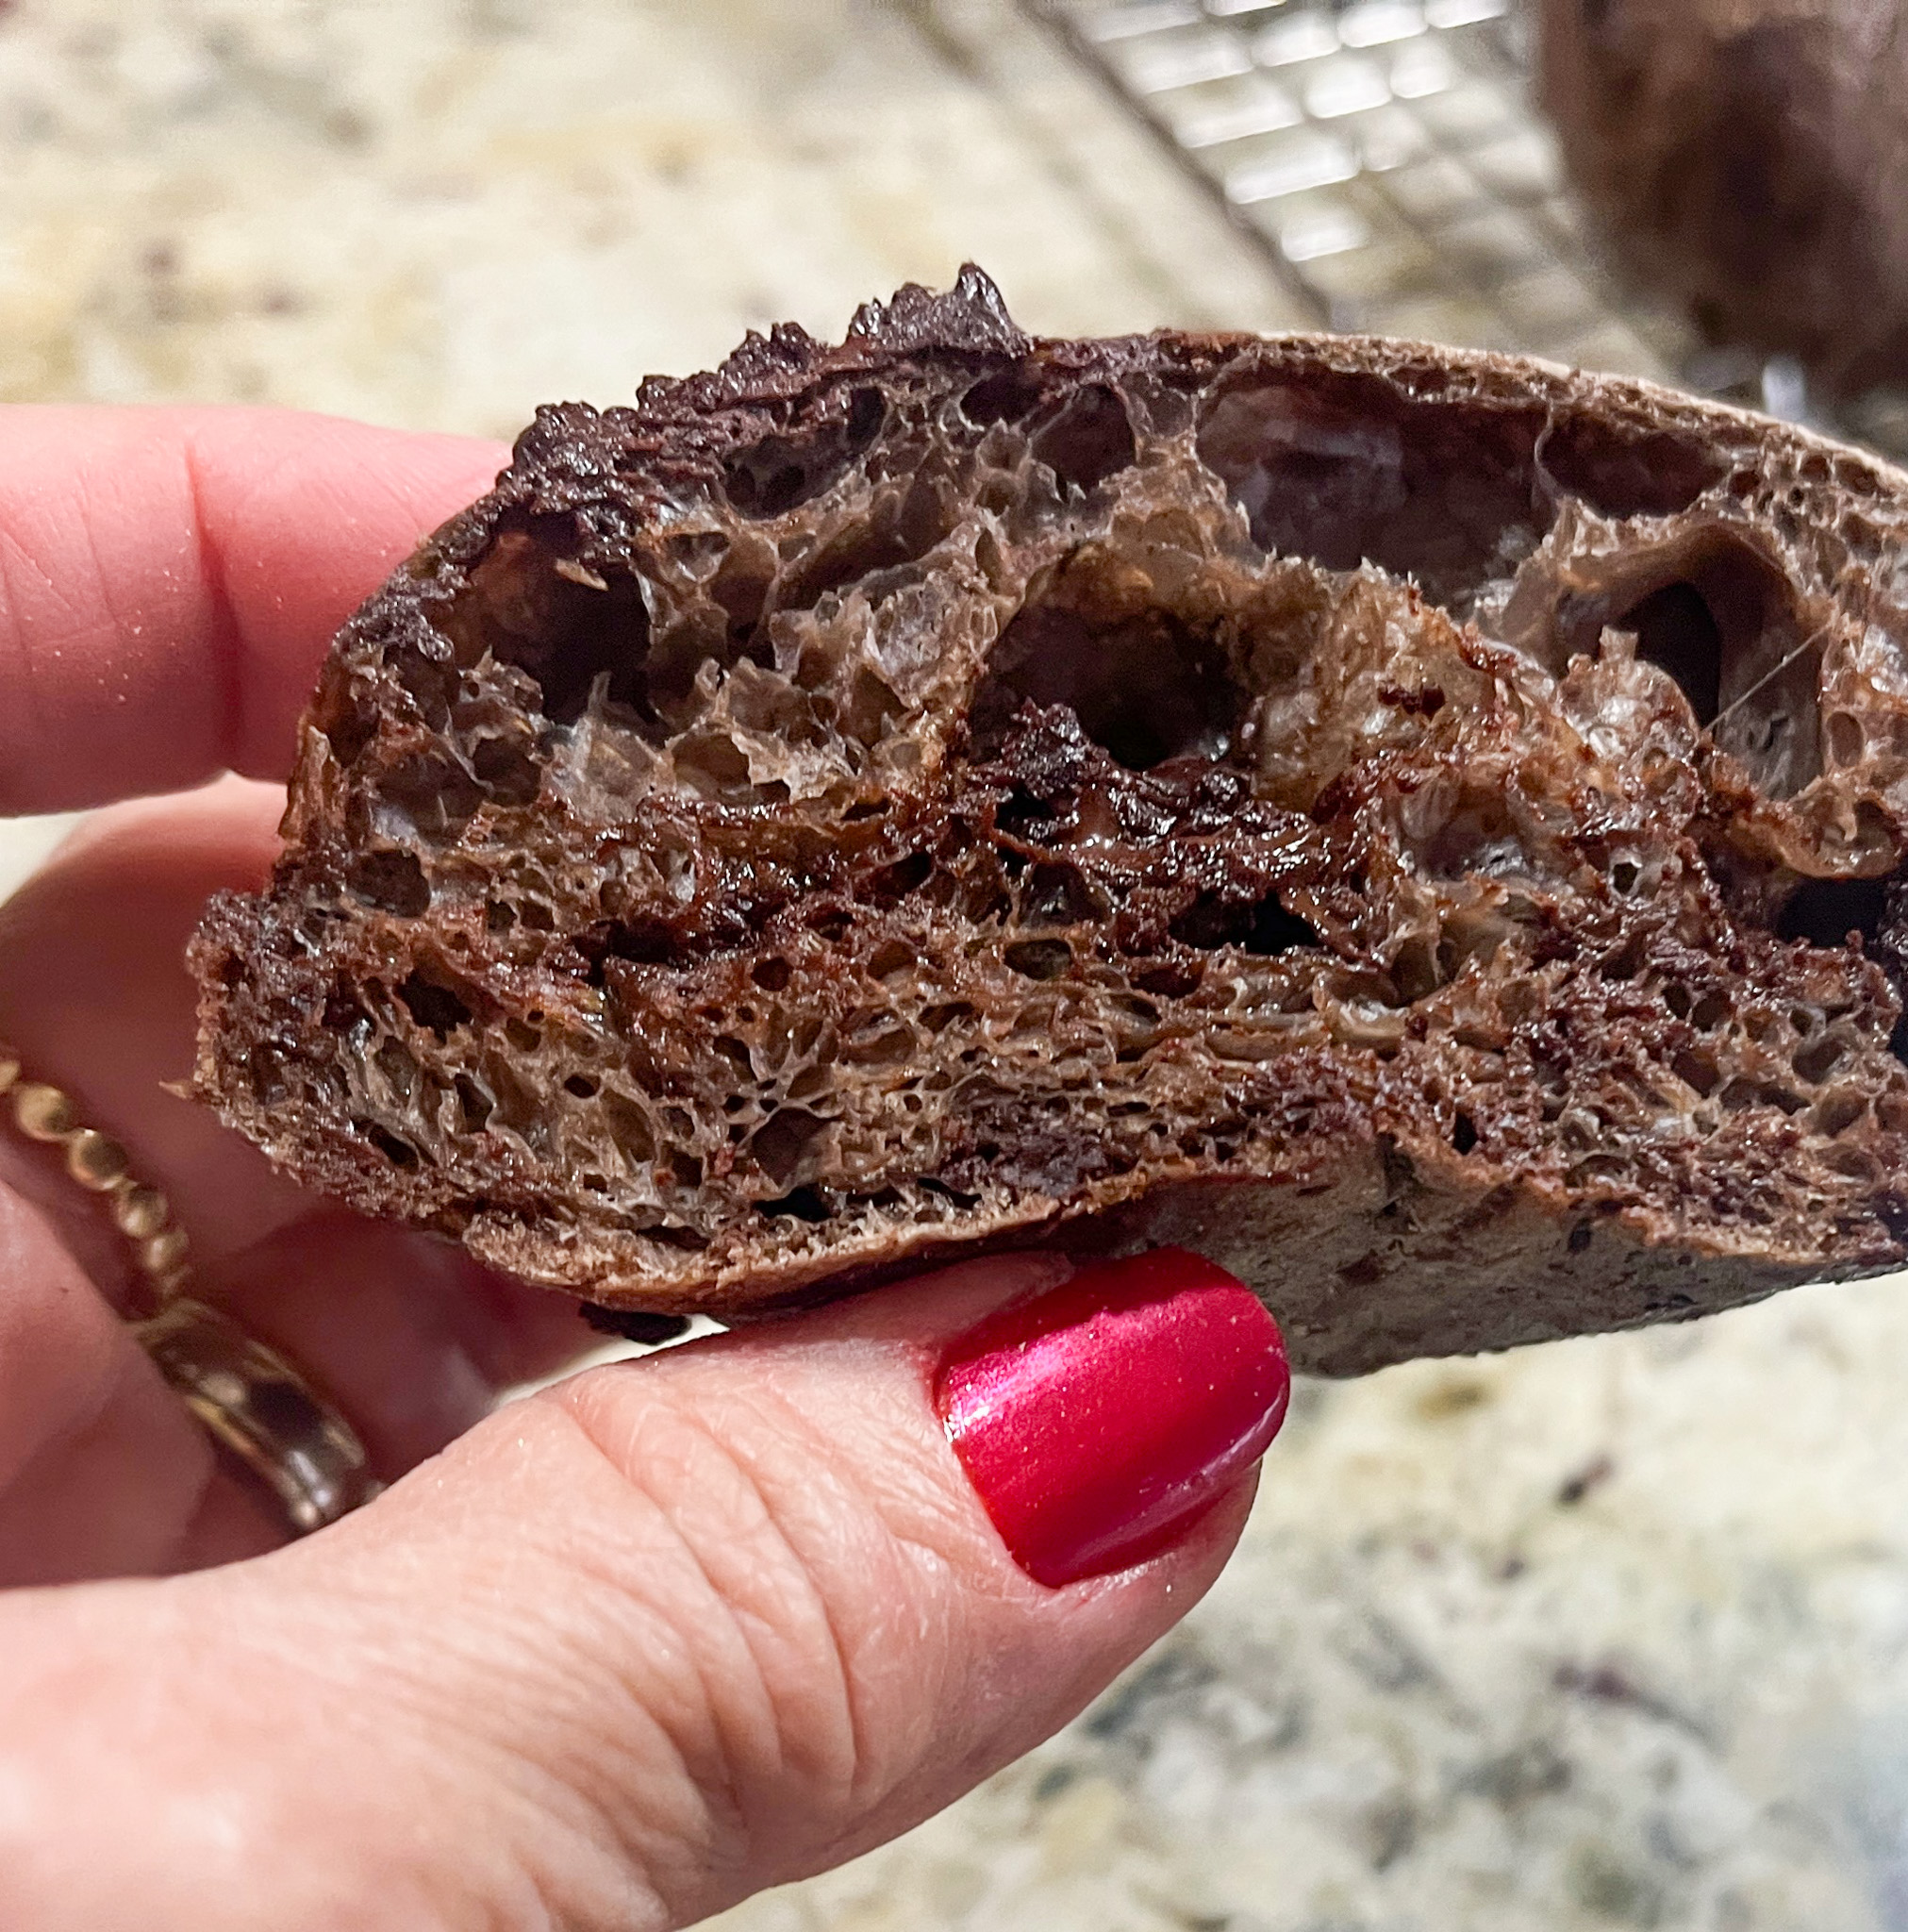
Comments: I have made the original Pan de Cristal last year (check it out here). As soon as I saw the recipe at King Arthur’s site, I knew I had to try it. This bread is not sweet, the chocolate brings almost a smokey quality to the bread, but when you happen to bite into a morsel of chocolate that did not quite fully melt into the crumb, you know it is the key ingredient. Do not expect to be able to shape the rolls, divide them and let them be. The bread is great without anything but a little butter, flaky salt, a little Brie cheese, or if you are into jam, apparently cherry jam would be awesome with it. Like most breads, it freezes superbly well, so make it and enjoy it for days and weeks to come!
If you’ve been following my blog over the years, you probably know a few things about my husband, Phil. He cooks dinner every other day. He is an avid (and pretty darn good) golfer. He is a biochemist and a Professor at Kansas State University. But maybe there a few things you don’t know. And I am here to share them with you, as we approach the day we’ll both retire from academia and research. Things I admire and cherish about the man who started as a co-worker and became my very best perfect match.
ON MENTORING STUDENTS
Maybe one of the things I admire the most. Quite often, in academia, faculty members subscribe to the idea that a graduate (or undergraduate) student should be solely responsible for their progress. In other words, they have high expectations and sets of rules to accept a student into their research group. Phil has a completely different approach. To join our group, all that he expected was enthusiasm for our research subject and the commitment to work hard. Anything else would be irrelevant. I’ve been around scientists from many parts of the world, and I can tell you, this is not usual. But it is absolutely wonderful, and super gratifying.
x
A PASSION FOR THE SUBJECT
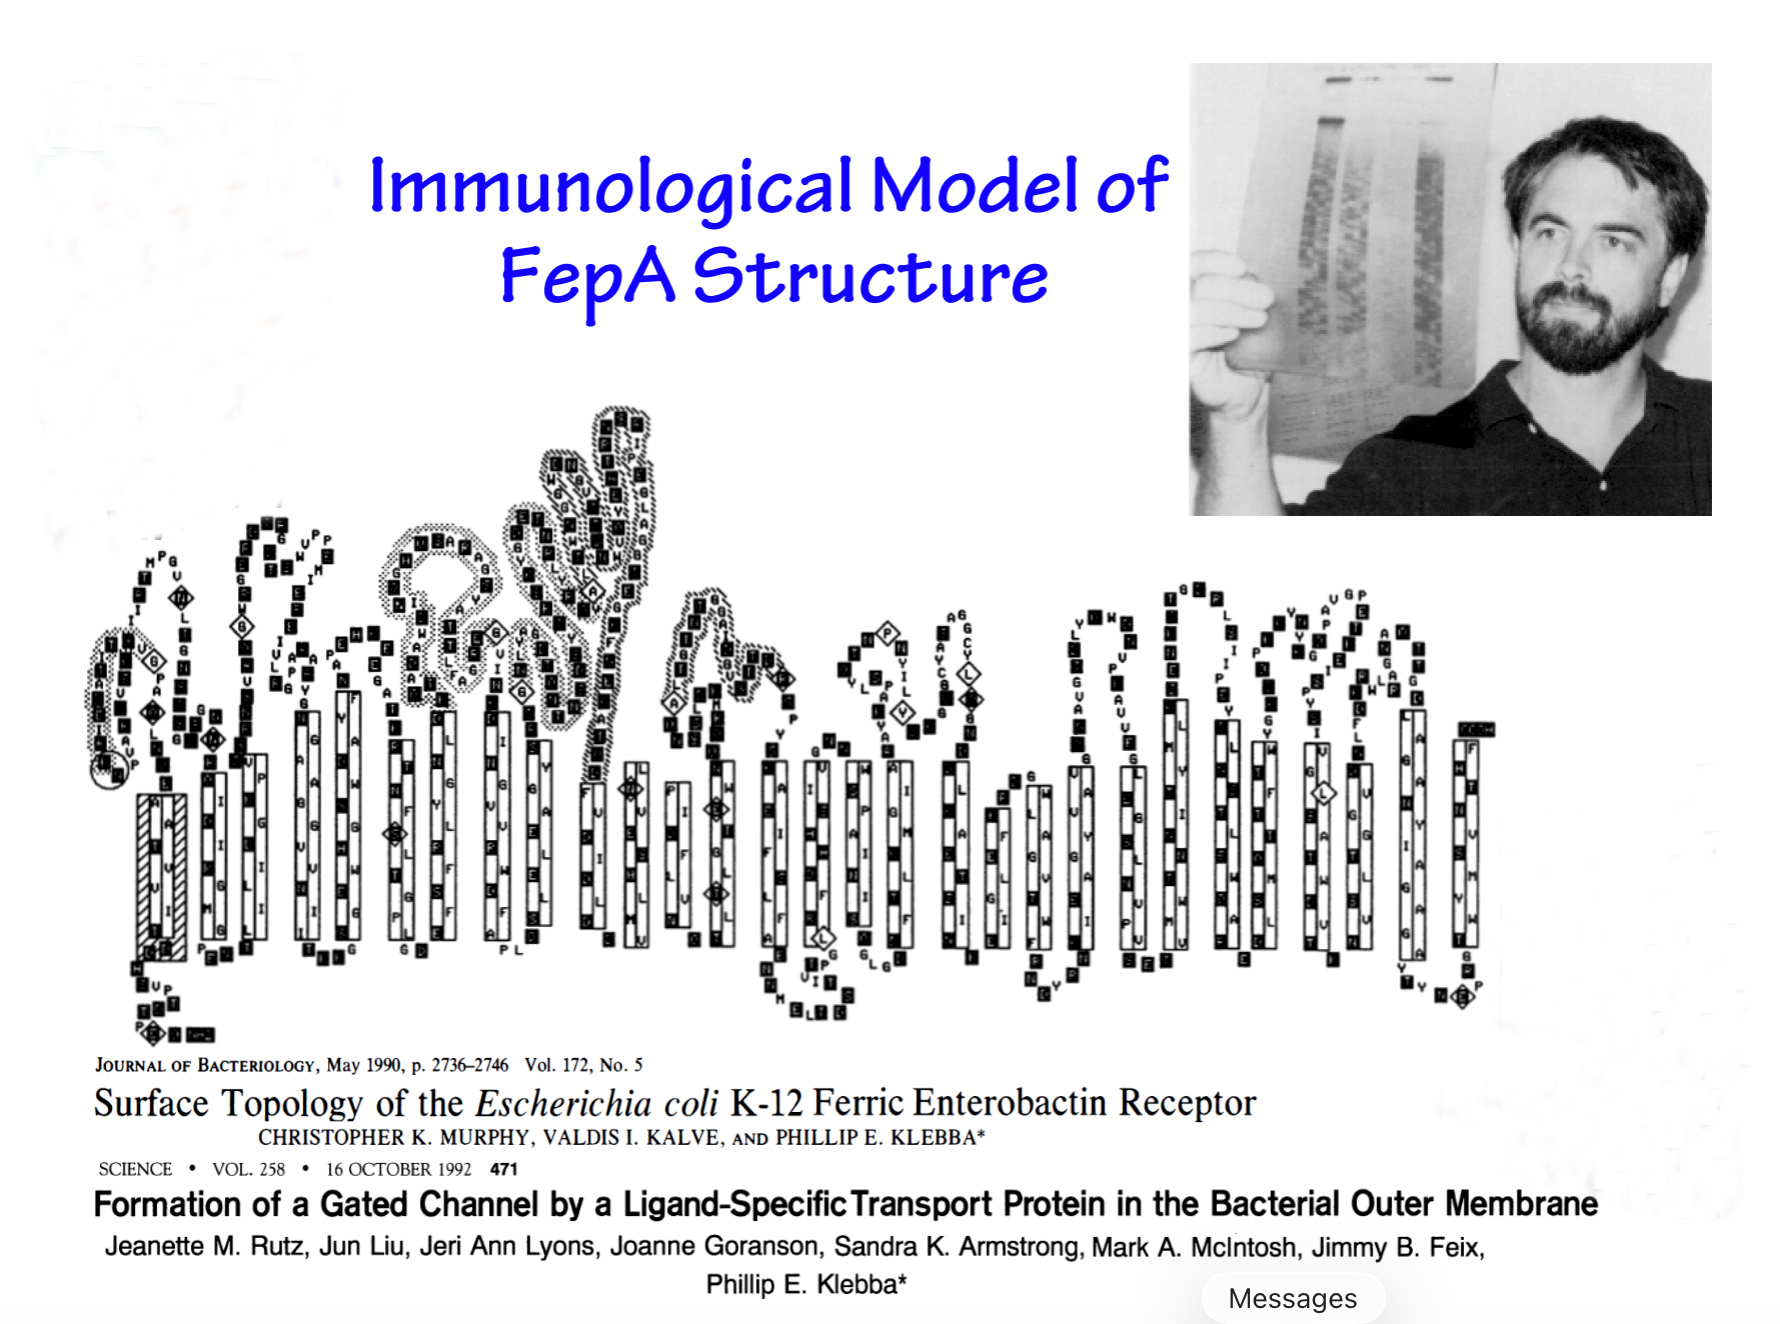
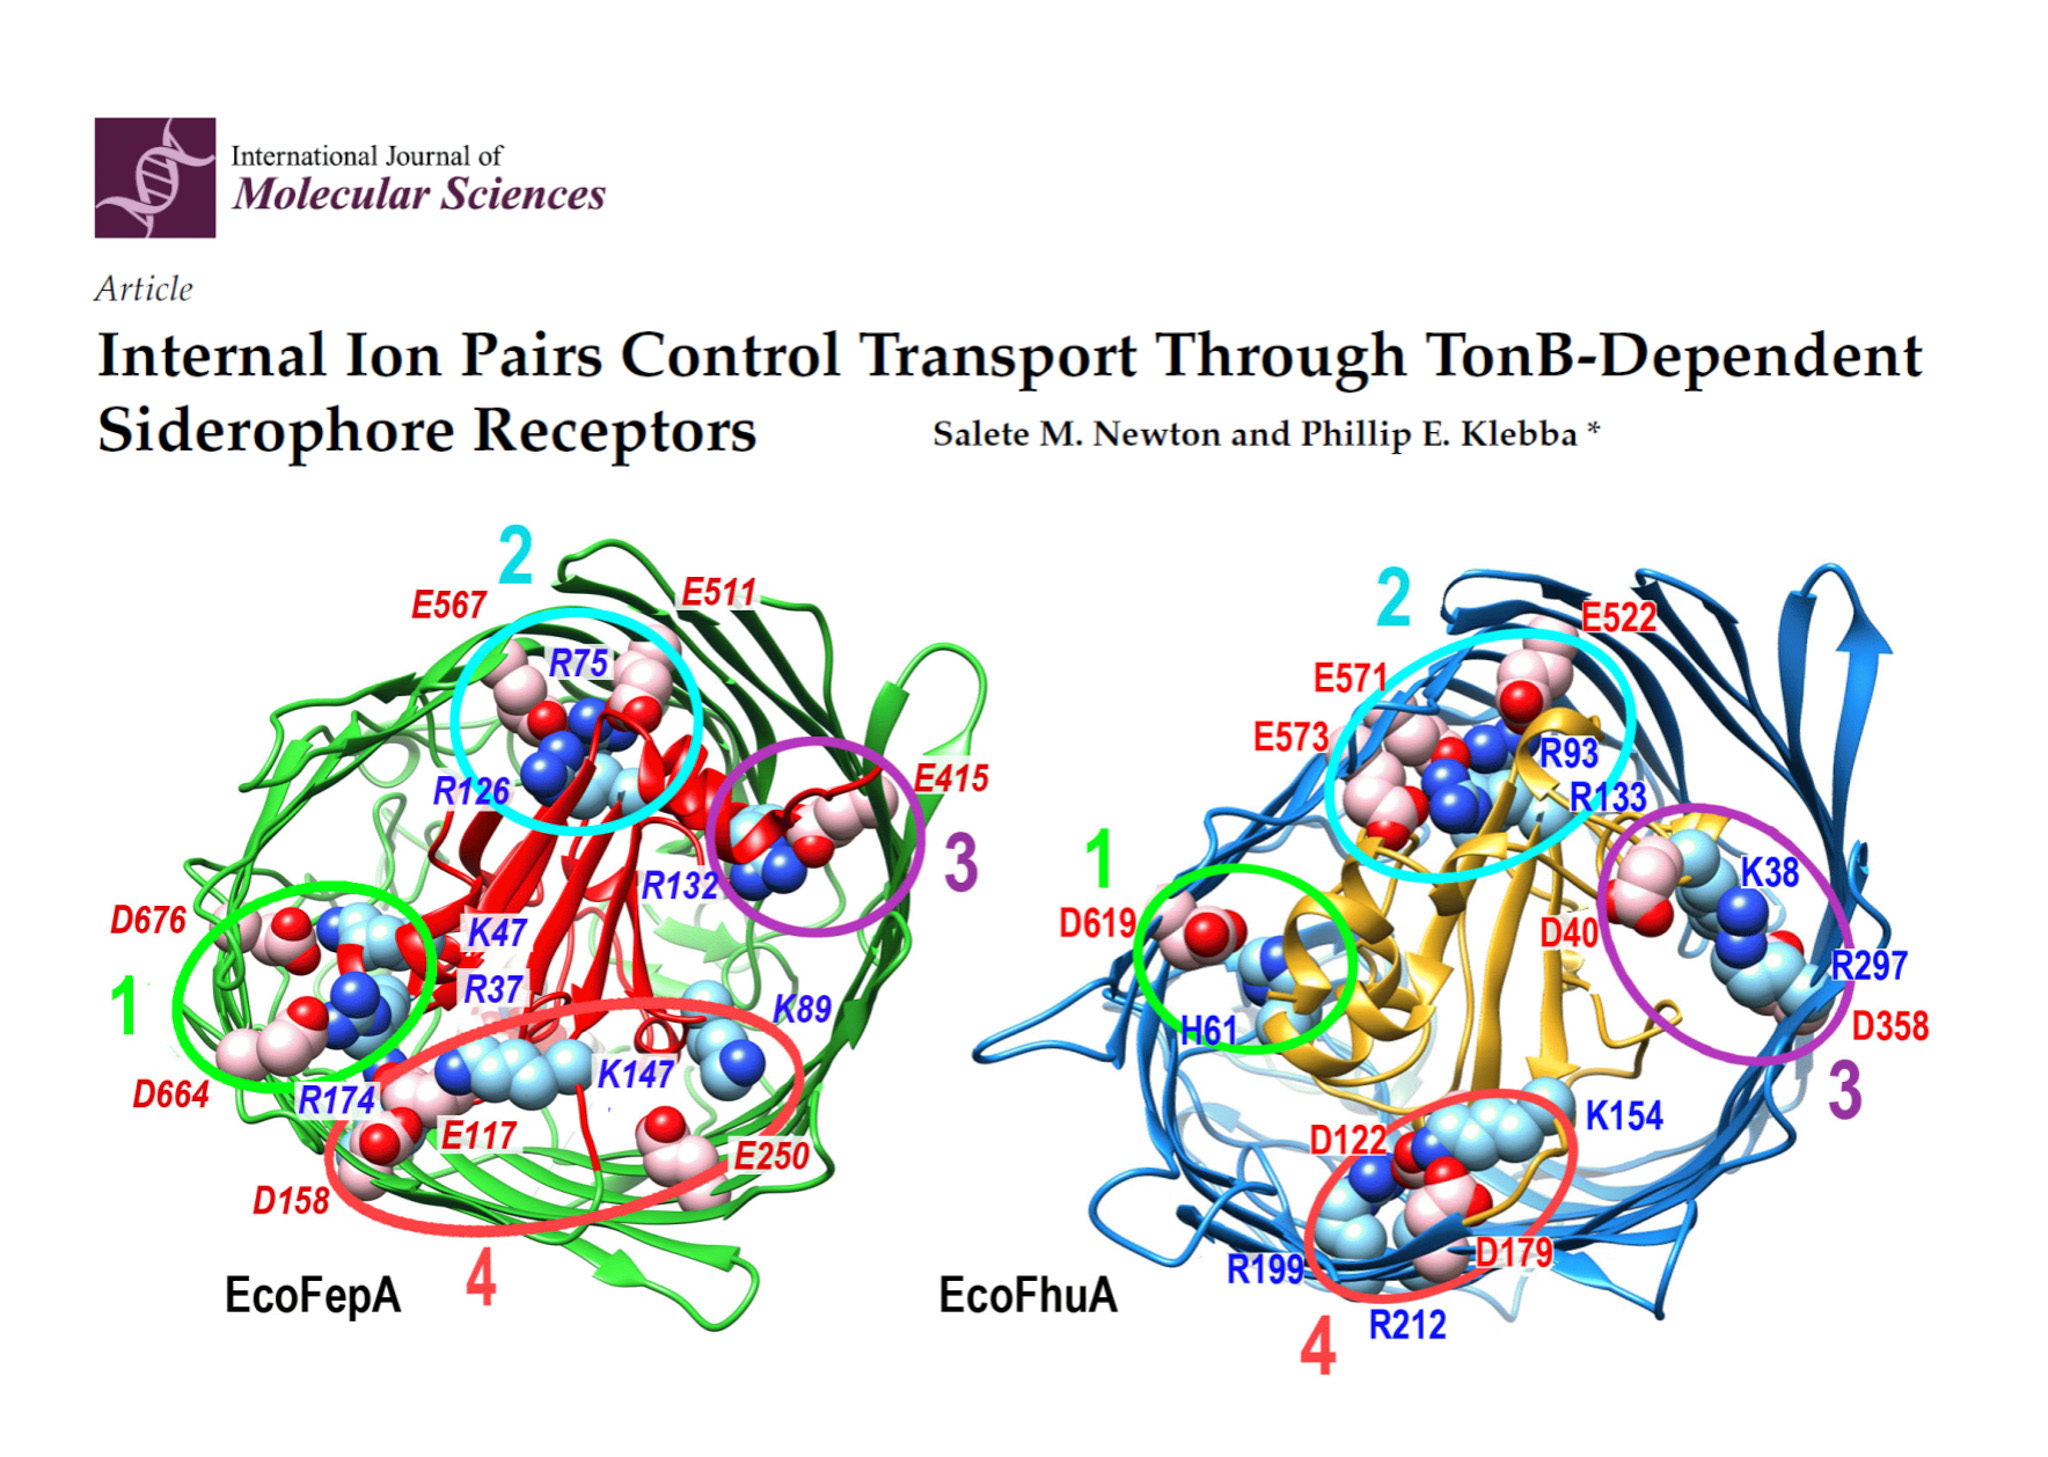
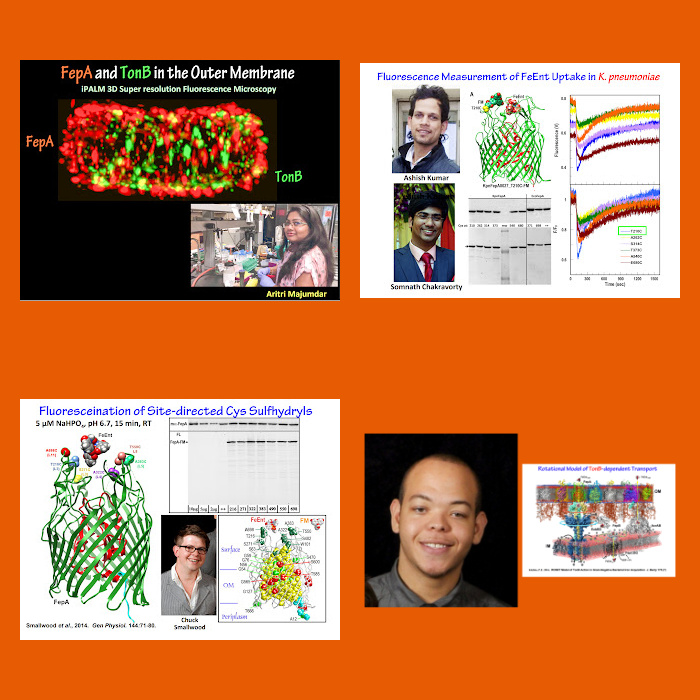
Phil has devoted his whole scientific career to a single subject: understand how bacteria capture iron from the environment. In the microbiological world, Escherichia coli is by far the most studied bacteria, and his decades of research revolved around a fascinating protein (FepA) that resides in the membrane of E.coli and scavenges iron with tremendous efficiency. I’ve been working in research since I was 20 years old. Phil started when he was 24. I’ve changed subjects several times, from genetic instability in Proteus mirabilis (my PhD thesis in Brazil), to bacterial flagellin, biotechnology of vaccines, and a decade after that I joined Phil’s research on iron uptake. Phil has been fascinated and absolutely committed to iron for all these years. I tell you a little story from our days working at Oklahoma University, in Norman.
.
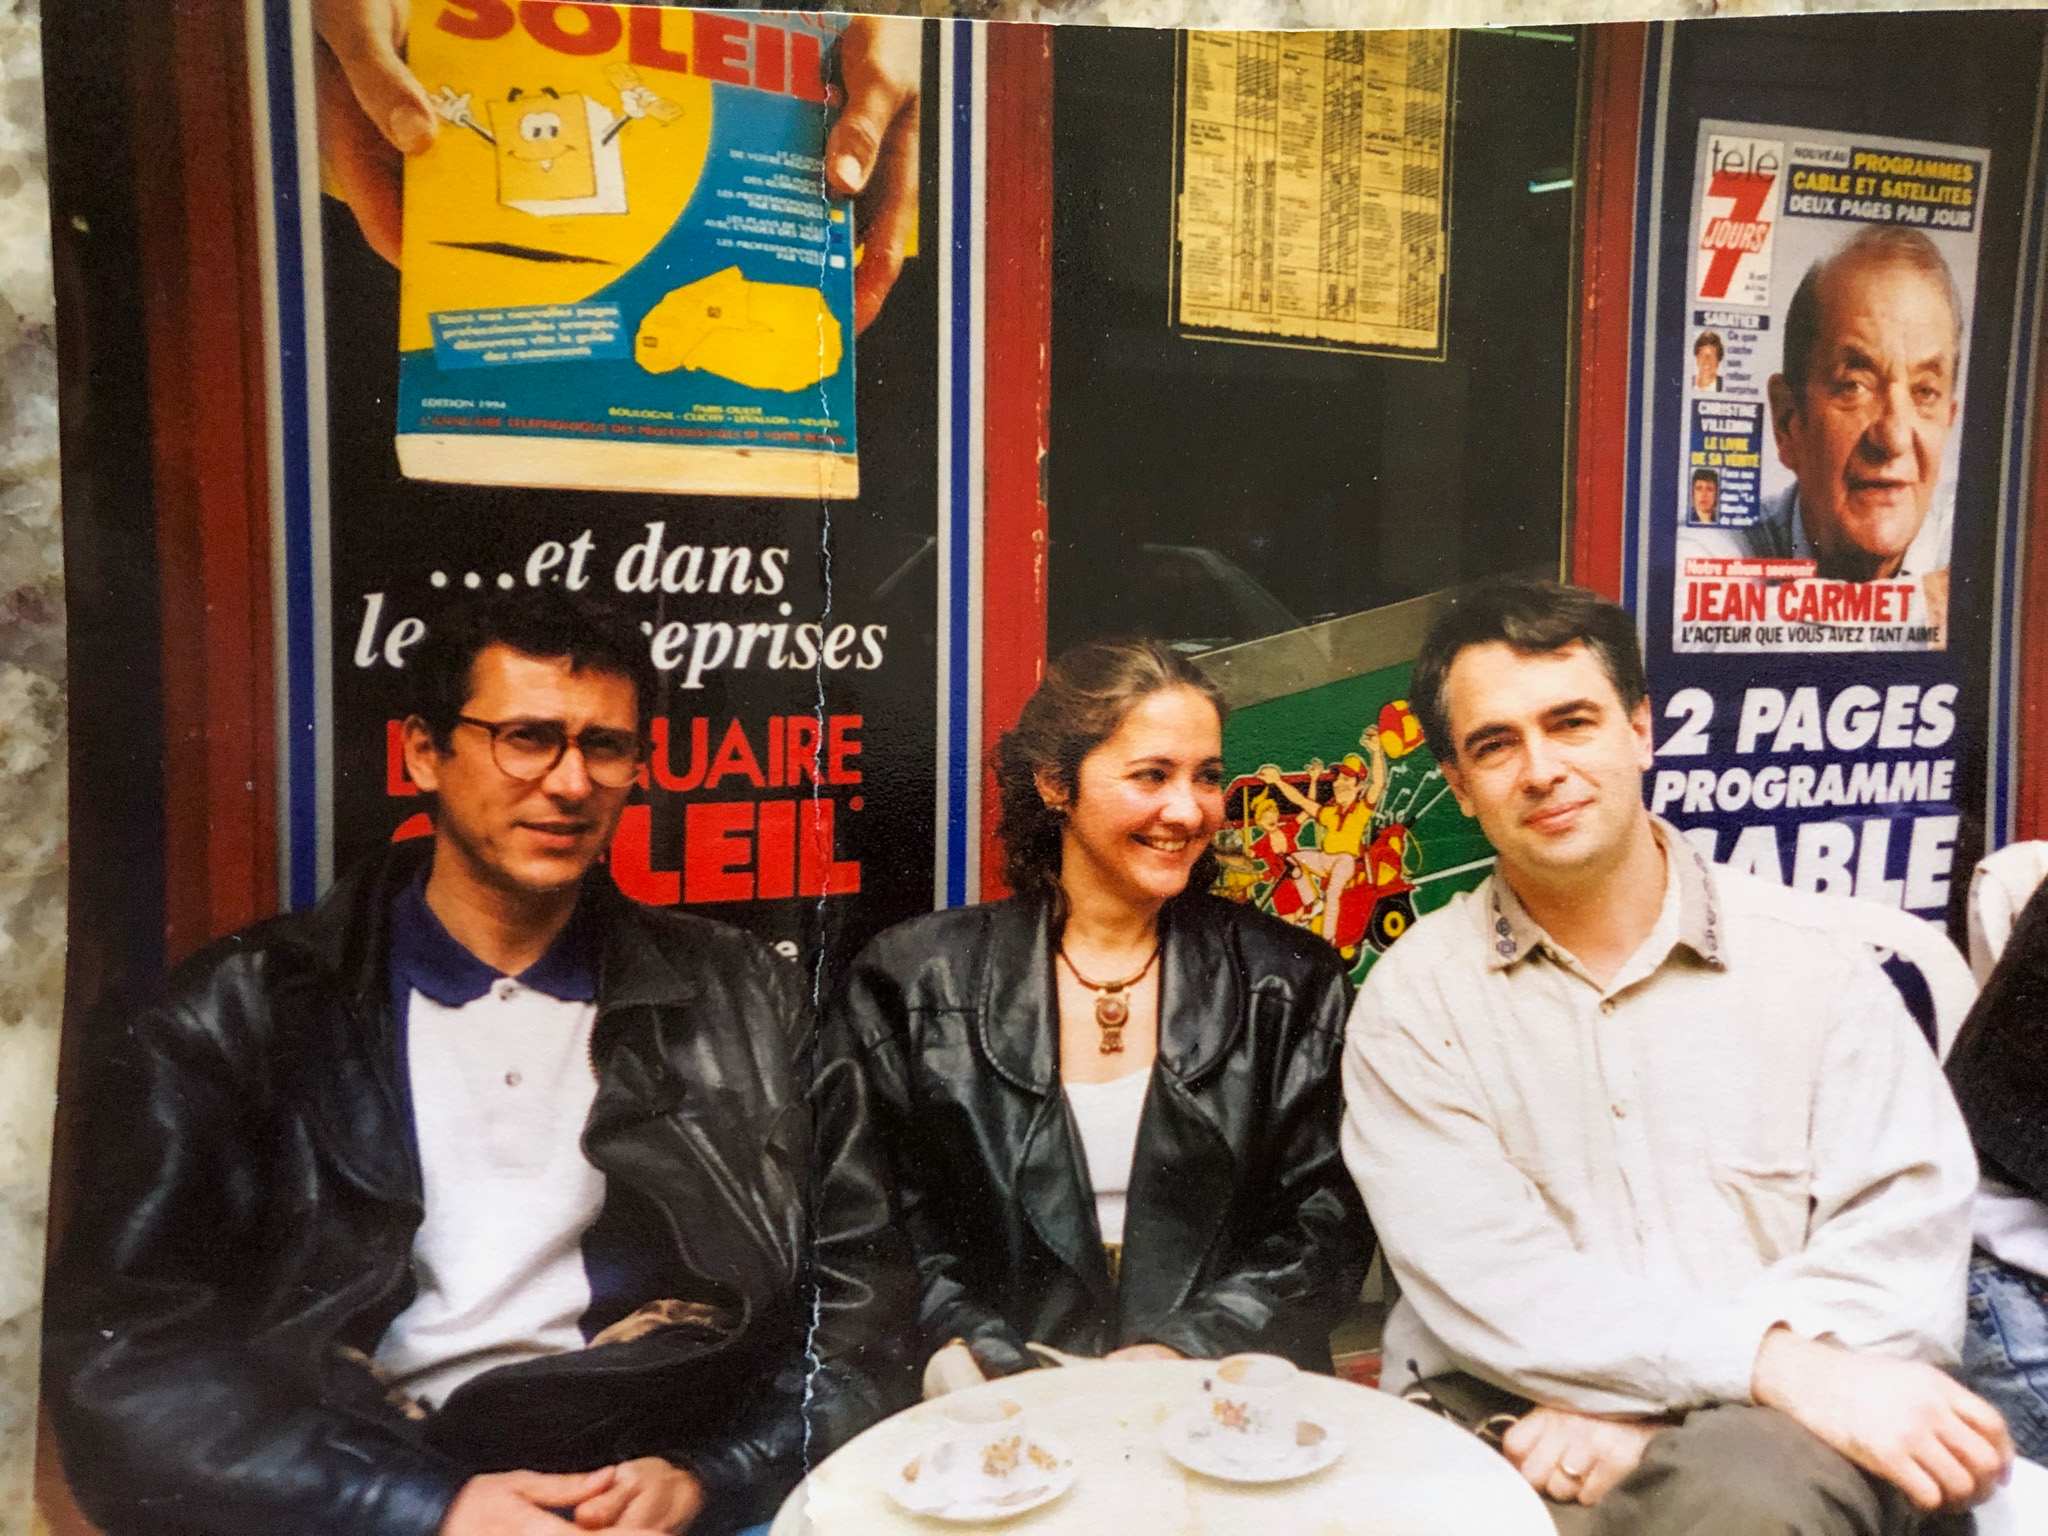
This was our research group at the time…
We had undergraduates, graduate students and a wonderful pos-doc (Marvin Payne, first author of this article). Some students stayed with us for several years, completed their thesis, some left for one reason or another. One of the students who left came back to visit us maybe 4 or 5 years down the line. He had left science to get what he called “a real job”. During his visit, he asked me “sooo, you guys STILL work on FepA and all that iron stuff?” There was as a clear derogatory tone, it was a snide remark by definition, as if only fools would “still” be doing the same old stuff. I just smiled, and said that yes, we were still working on it and still pretty excited about it all. Today, probably 20 years have passed and I can say that what that former student considered a flaw, I find the definition of awesome… To devote your career to figuring out a mechanism because you are so intrigued and so fascinated by it? It is what makes waking up every day and go to work absolutely worth it. Quite likely because of his passion and commitment for the subject, Phil has developed this amazing ability to visualize the bacterial receptor and devise the right experiments to answer the most relevant questions. He expanded our research into new areas, joining biophysics, fluorescence spectroscopy, 3D imaging, in ways that sometimes made me a bit insecure and almost skeptical – should we really venture into this totally new experimental area? His answer was always: why not? it will be fun… And he has been right, every single time.
.
ON PUBLISH OR PERISH
This is a real big one. In academia, you are evaluated by how many papers you publish per year. Most scientists will try to spread their findings into several articles, to increase that number. Phil has refused to do it from the very beginning of his career. He had zero interest in numbers but instead went for publications that would tell the most complete story possible. Our late friend and collaborator Alain Charbit, from Institut Pasteur, used to joke that we did not publish papers, we published treatises… I confess that at times I tried to convince Phil to change his ways on this, but I am glad he never did.
And speaking of publications, what might end up as our last scientific paper was accepted for publication by the International Journal of Molecular Sciences. Just the two of us as authors, which in a way makes it even more special…
..
x
ON GIVING CREDIT
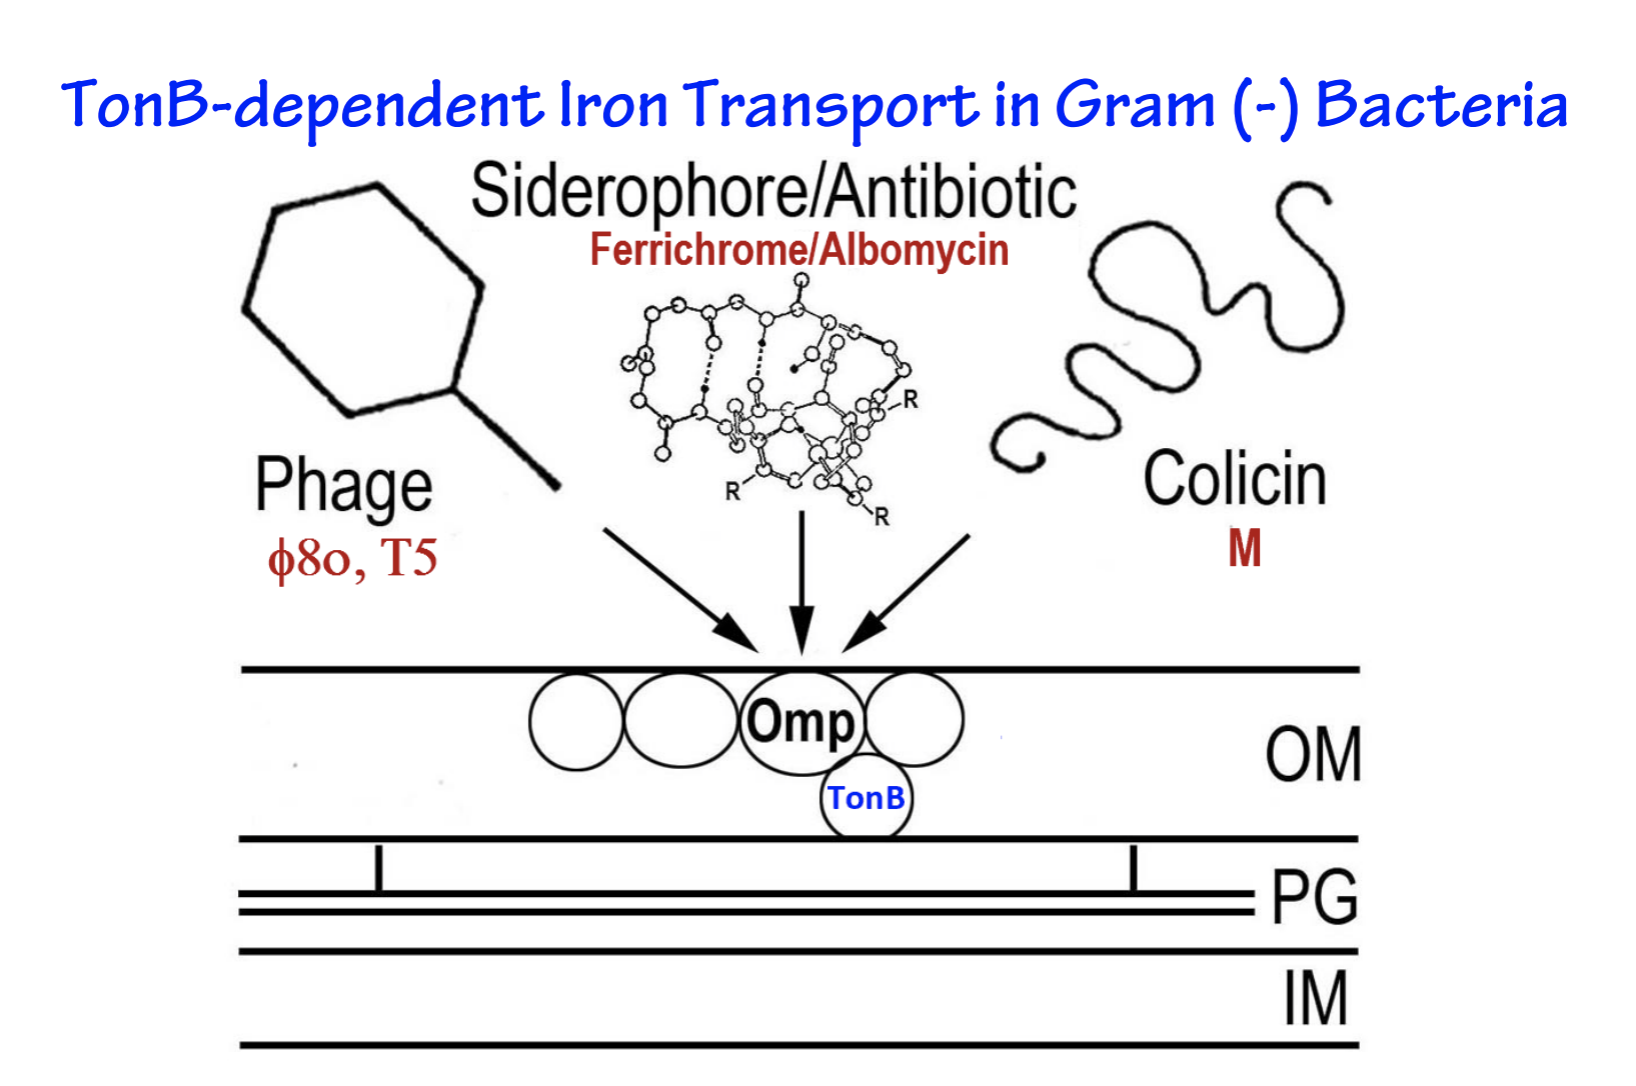
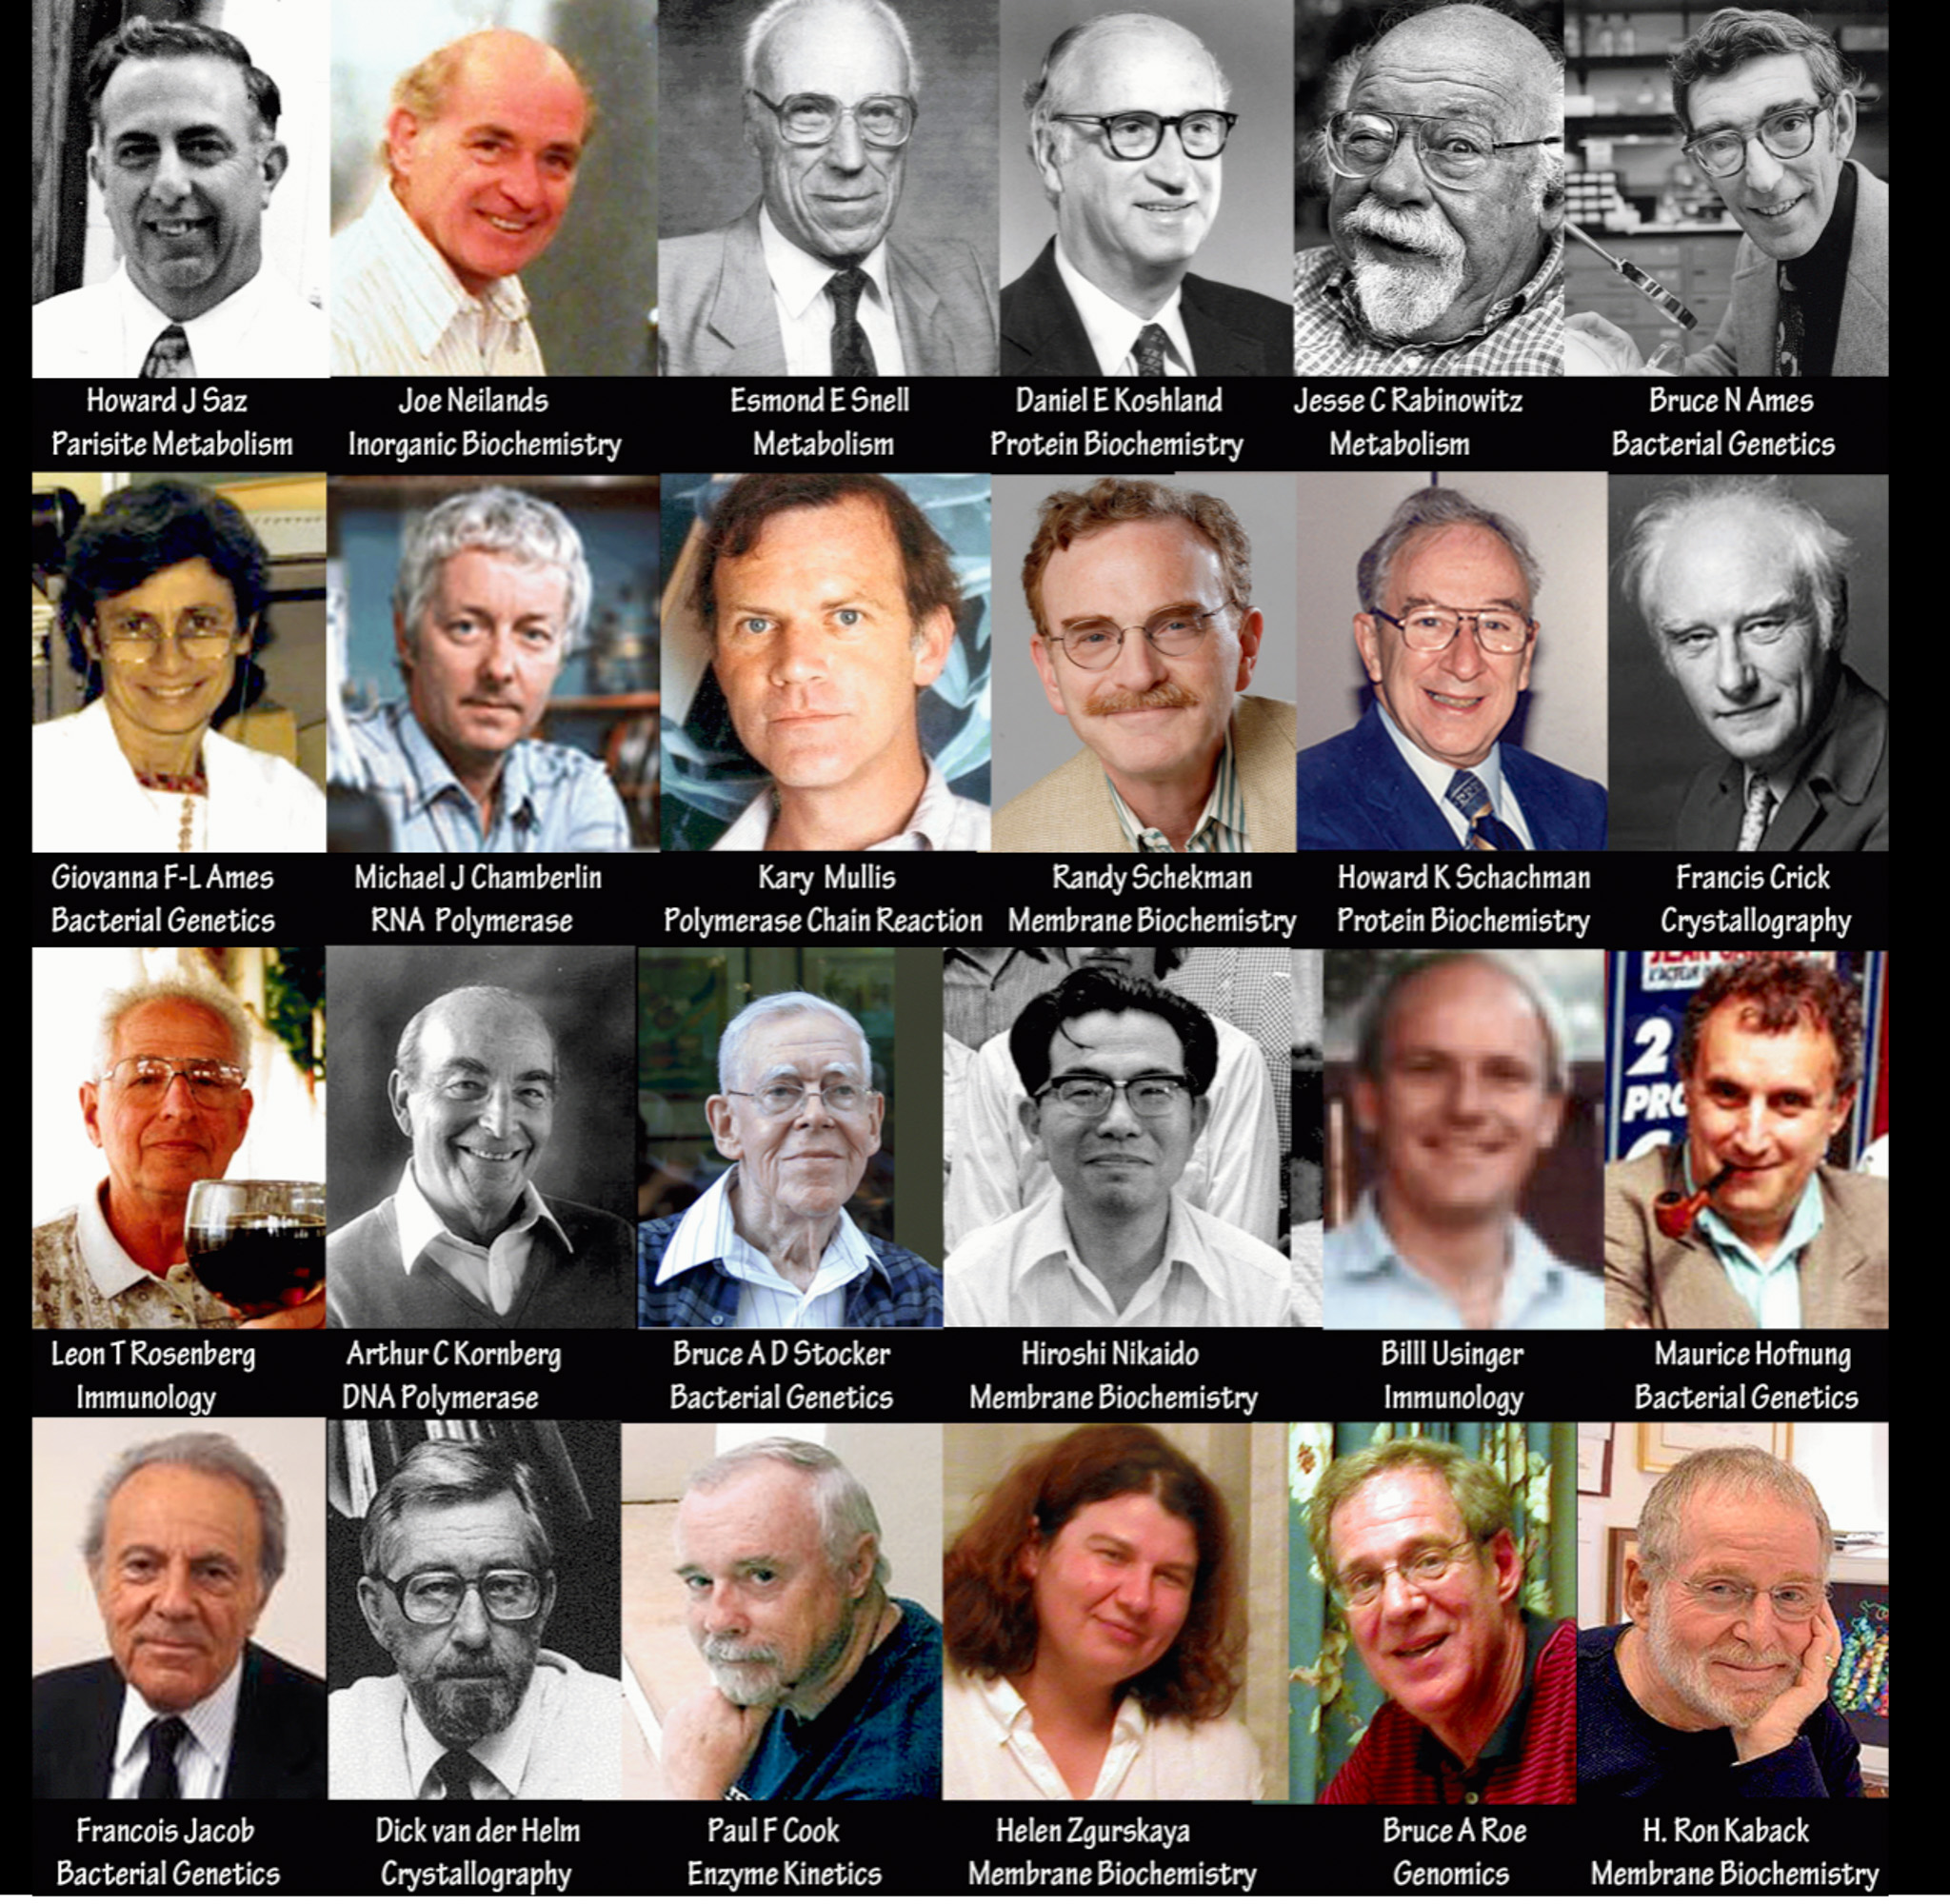
About a week ago, Phil gave his final seminar at Kansas State University, in which he covered all he did during the past 50 years (!!!!) working on iron uptake. To give you an idea of how much things changed, this was the way bacterial membrane was depicted in 1975, when he started working on his PhD in Berkeley with Dr. Joe Neilands (not only was he an amazing scientist, but a raging liberal, once stood side by side with Jane Fonda in Vietnam to protest the war).
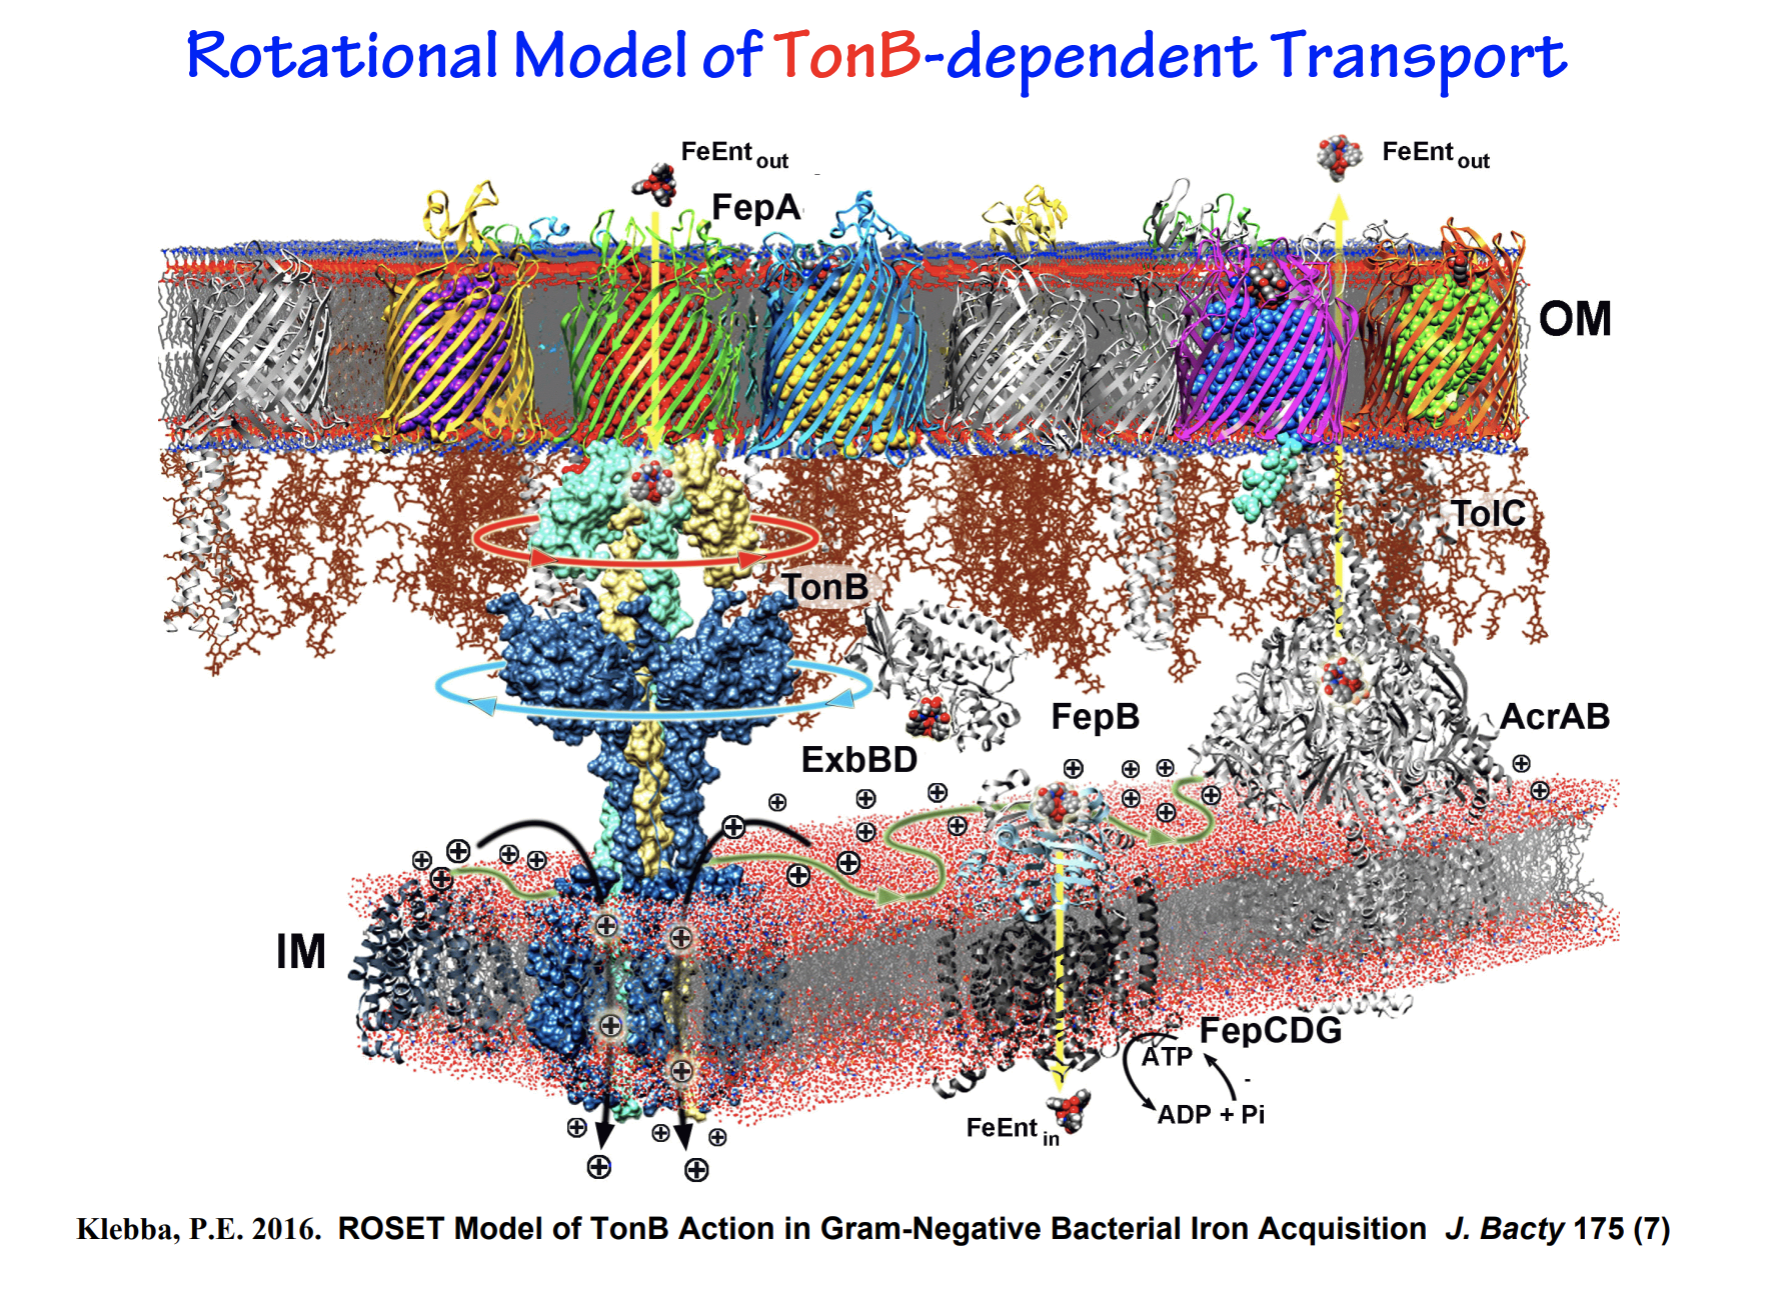
And this is how we visualize it now, with all the proteins that have been crystallized (in other words, their tri-dimensional structures defined and shown in detail). In the figure, OM stands for outer membrane, and IM is inner membrane. Bacteria such as E.coli have two membranes surrounding the cell. They are unicellular organisms.
We have never worked with crystallography, so no credit goes to our group for the structures shown above, but thanks to the availability of the structures, we could devise experiments to shed light on the mechanism of iron transport. In his talk, Phil gave credit to all the students and pos docs who did the work over the years. I share just a few here.
.x
He closed the seminar, not with the usual – thanking funding agencies for their financial support – but instead thanking those who helped him become the scientist he is today.
Screenshot
It was an amazing seminar. A real wonderful way to wrap things up. Our retirement is set for the last week of May, but we have a couple of experiments planned because… why not? It will be FUN! As we get ready for a new phase in our life, I have a ton of mixed emotions, but one thing is certain, I look forward to enjoying life with my Iron Man.
One more example of a recipe in which looks do not do it justice… This was so delicious, it goes into our regular rotation, although the weather for this type of meal is coming to an end. Comfort food without being overly heavy. Please give it a try, you won’t be disappointed.
1 tablespoons unsalted butter 2 tablespoons olive oil 1 shallot, finely chopped 2 sage sprigs Salt and black pepper 1 pound boneless, skinless chicken breasts 4 cups chicken broth 1 (15-ounce) can white beans, drained 1 bunch spinach leaves, coarsely chopped fresh lemon juice to taste, for serving
In a large pot or Dutch oven, melt the butter and olive oil medium. When foaming, add the shallot and sage, season with salt and pepper. Cook, stirring often, until softened and golden. Remove the sage sprigs.
Add the chicken, broth and white beans. Bring to a simmer over medium heat, then reduce heat to low, cover the pot and simmer until the chicken is cooked through, 15 to 20 minutes, depending on the thickness of the meat.
Transfer the chicken to a bowl and smash some of the beans on the side of the pot. Stir the greens into the soup. Increase heat to medium and simmer, uncovered, while you shred the chicken. Use two forks to shred the chicken. Stir the chicken back in the soup and season to taste with salt and pepper, squirt the lemon juice right before serving.
Comments: I love the way smashing the beans will give this stew a creamy, luscious texture, without any need to add heavy cream. I was pleasantly surprised by how much we enjoyed it, because it is such a simple preparation. You can use kale or other hearty greens instead of spinach, and add more beans, but I lightened it up a bit from the original. Leftovers are superb even after two days in the fridge. When I had the leftovers, I added a bit of harissa to my bowl, and that was a pretty nice touch, consider incorporating it into the recipe if you like some extra spice. Because, yes… some like it hot (wink, wink).
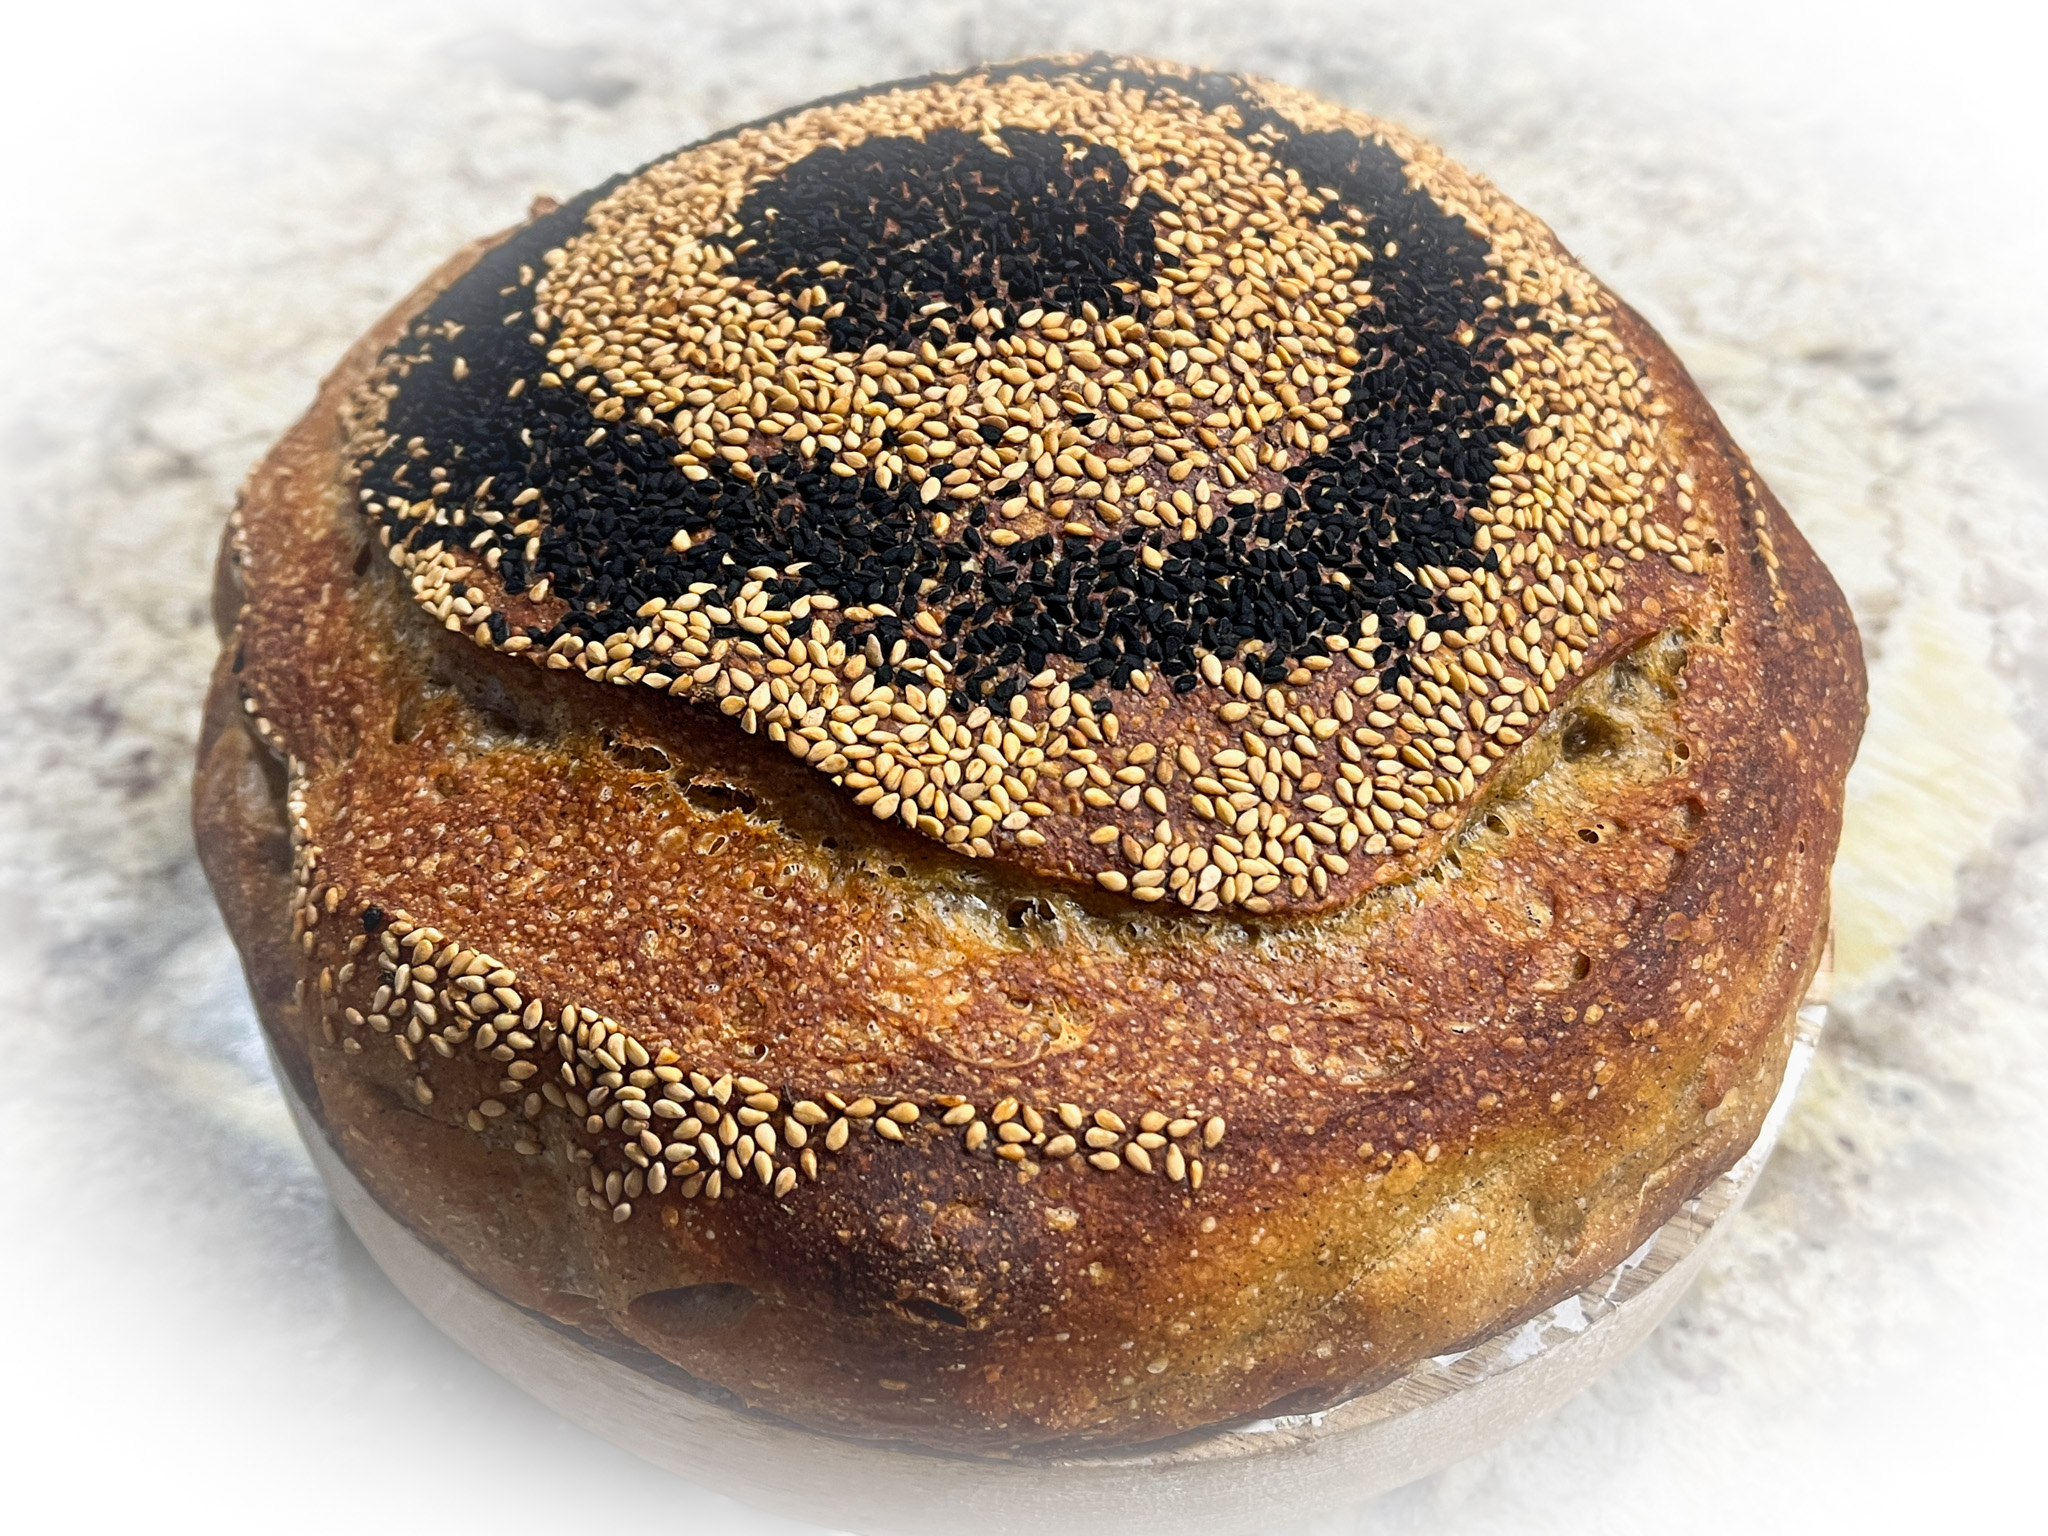
This wonderful bread was inspired by The Perfect Loaf, but I modified it quite a bit. Check his site for the original, which makes two loaves and includes a few extra instructions I omit.
SCALDED BUCKWHEAT FLOUR AND HONEY SOURDOUGH (adapted from The Fresh Loaf)
for the levain: 27 g whole wheat flour 27g water 27g sourdough starter
flour scald: 23g buckwheat flour 37g boiling water
autolyse step: 320g bread flour 95g whole wheat flour 270g water All of the flour scald
main dough: 45g water 9g salt all the level 40g honey
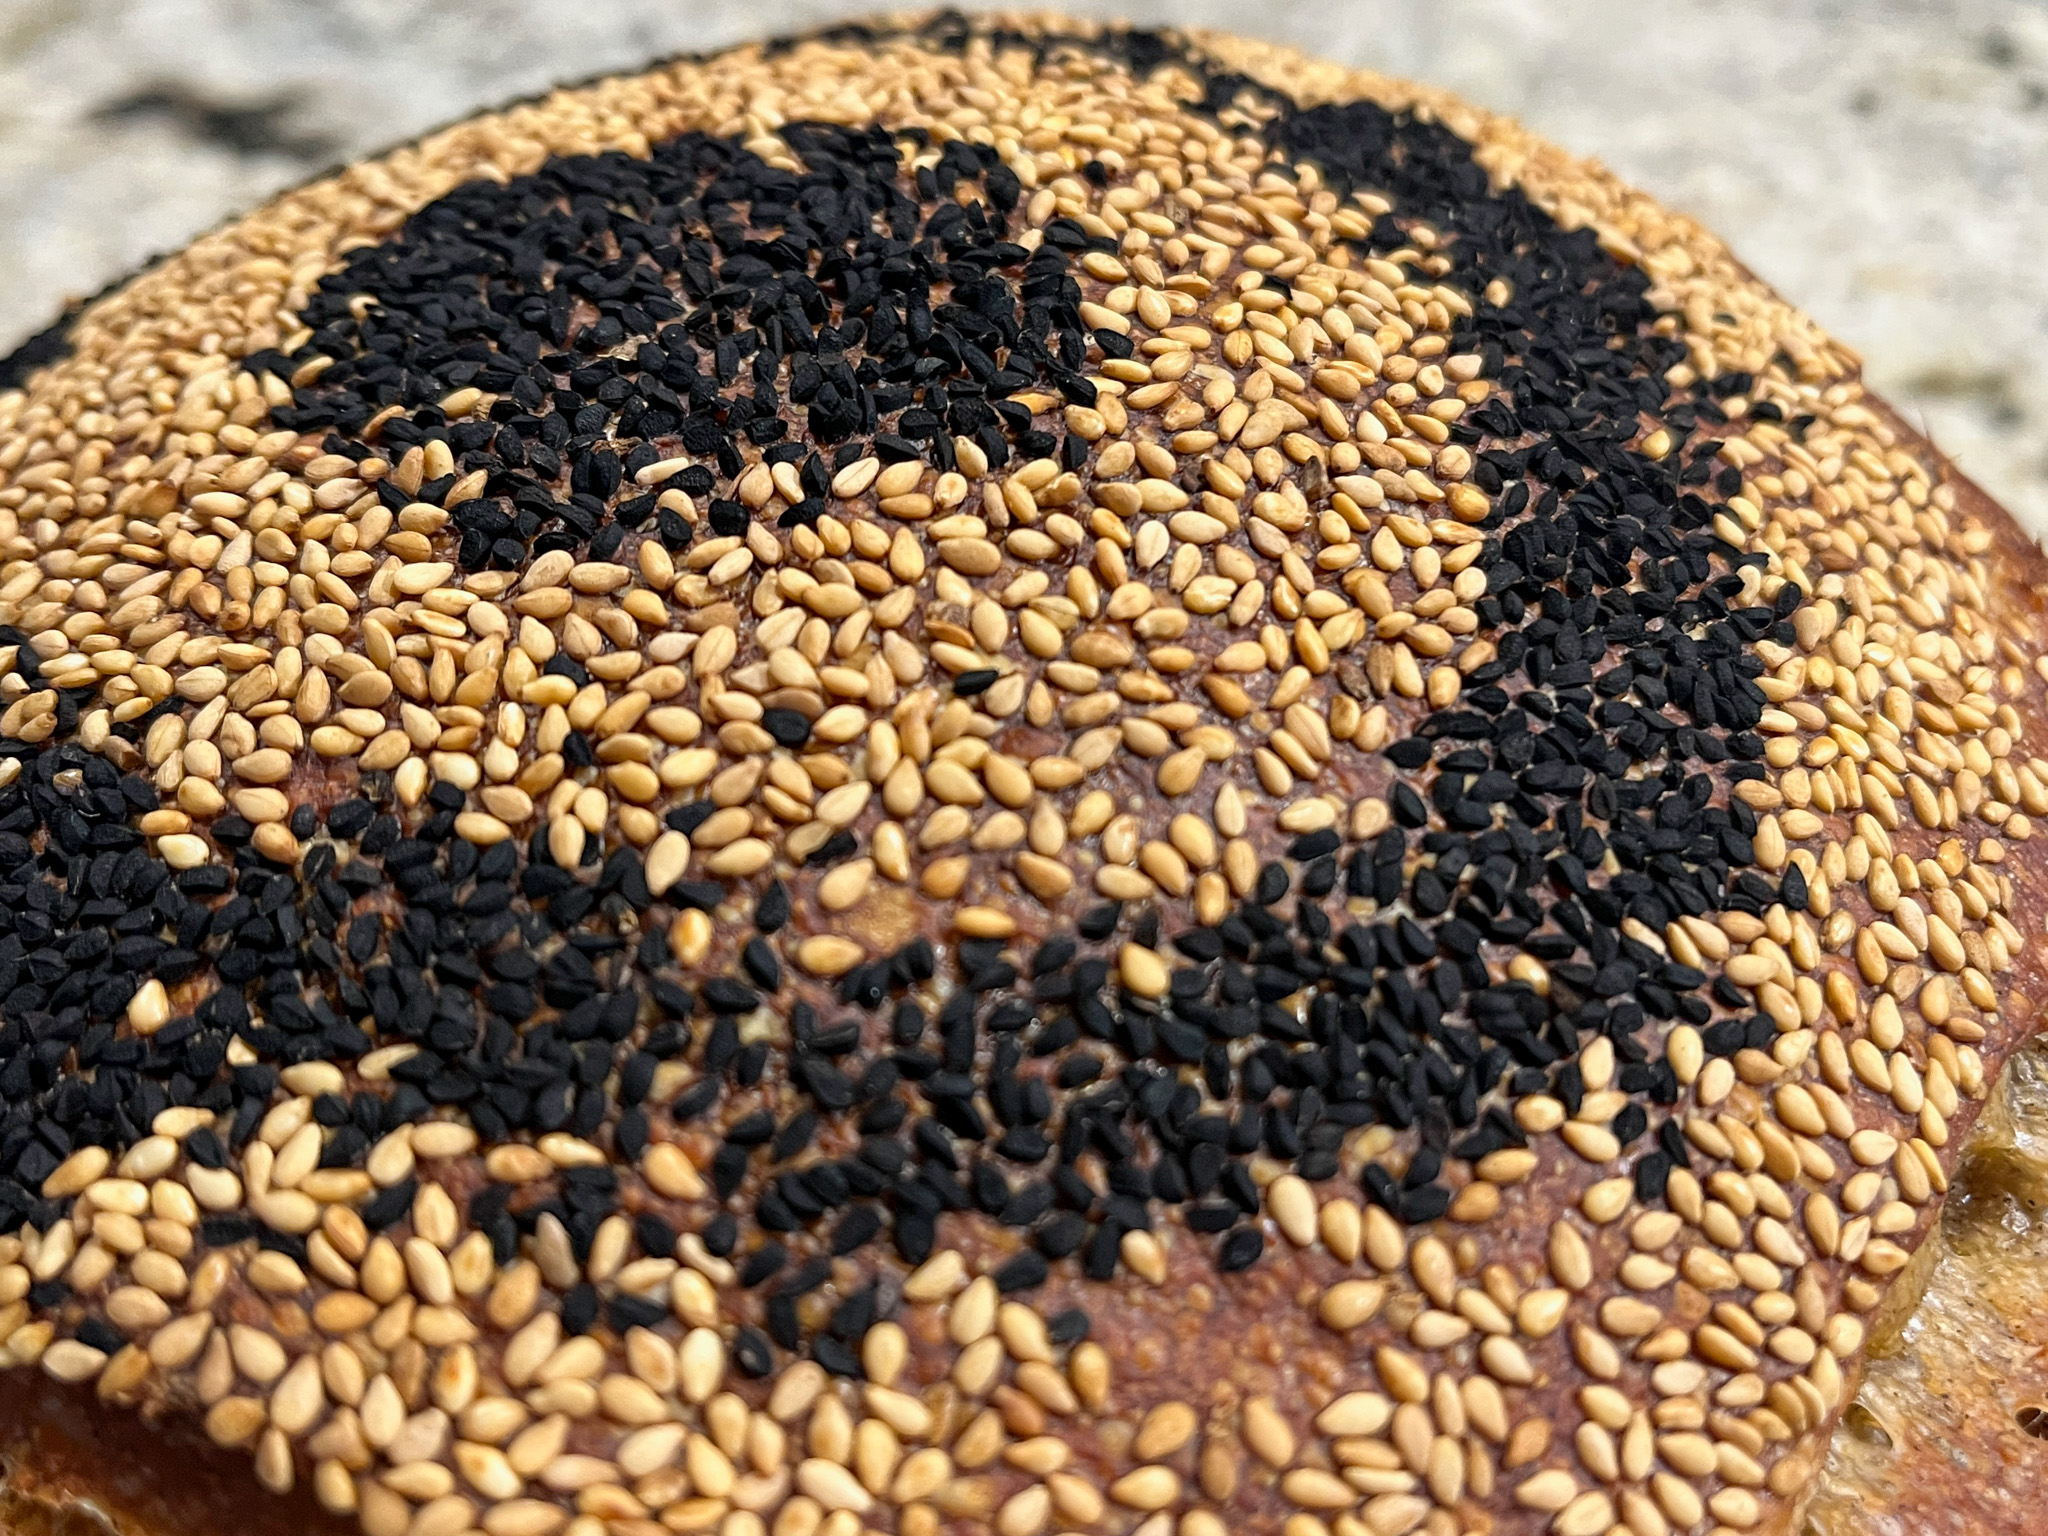
sesame seeds for decoration (optional)
Prepare the levain: mix and allow it to ferment for 3 hours. At the same time make the buckwheat scald by mixing the flour with boiling water. Mix well into a paste. Cover and reserve.
Do the autolyse step: Combine flours, water, and scalded buckwheat in the bowl of your KitchenAid mixer. Use your hands or the dough hook to mix the ingredients until the flour is all incorporated. Cover and let it at room temperature for 1 hour.
Add the levain, additional water (hold some back and see if the dough can take the full amount), salt, and honey. Turn the mixer with the dough hook and knead for 3 minutes in low-speed. Turn the mixer off, wait for 5 minutes and turn it on again at low-speed for 3 to 5 more minutes. Remove a small portion of the dough to monitor fermentation.
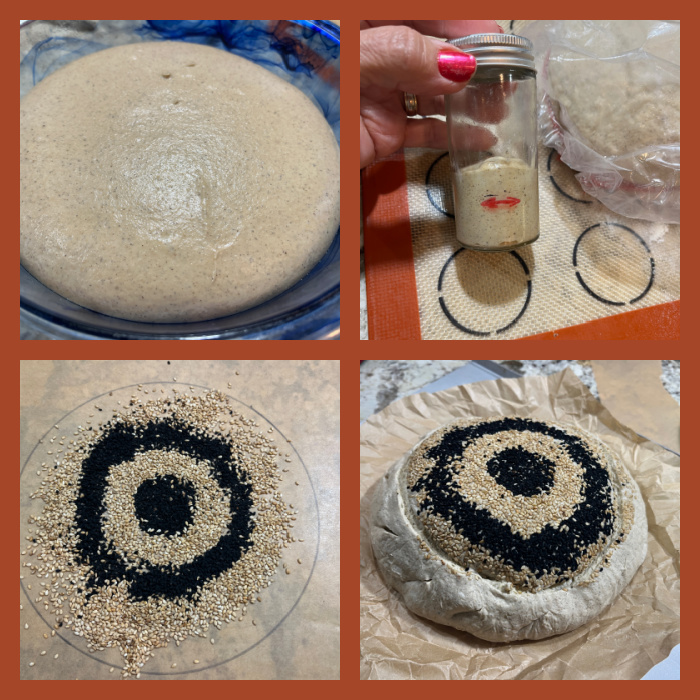
Ferment for 3 hours (I used my proofing box set at 78F), with folds at every 30 minutes. Allow the dough to sit undisturbed until it increases by 50% in volume. I left mine for a total of 6 hours.
Pre-shape the dough, allow it to rest for 15 minutes and shape as a ball. Place it in the fridge overnight.
Next morning, freeze the dough for 20 minutes to make it easier to handle. Spread black and white sesame seeds over parchment paper. Invert the dough on the seeds, roll to coat it well. Slash if so desired.
Bake in a Dutch oven at 450F for 30 minutes with the lid on, remove the lid and bake for another 15 minutes.
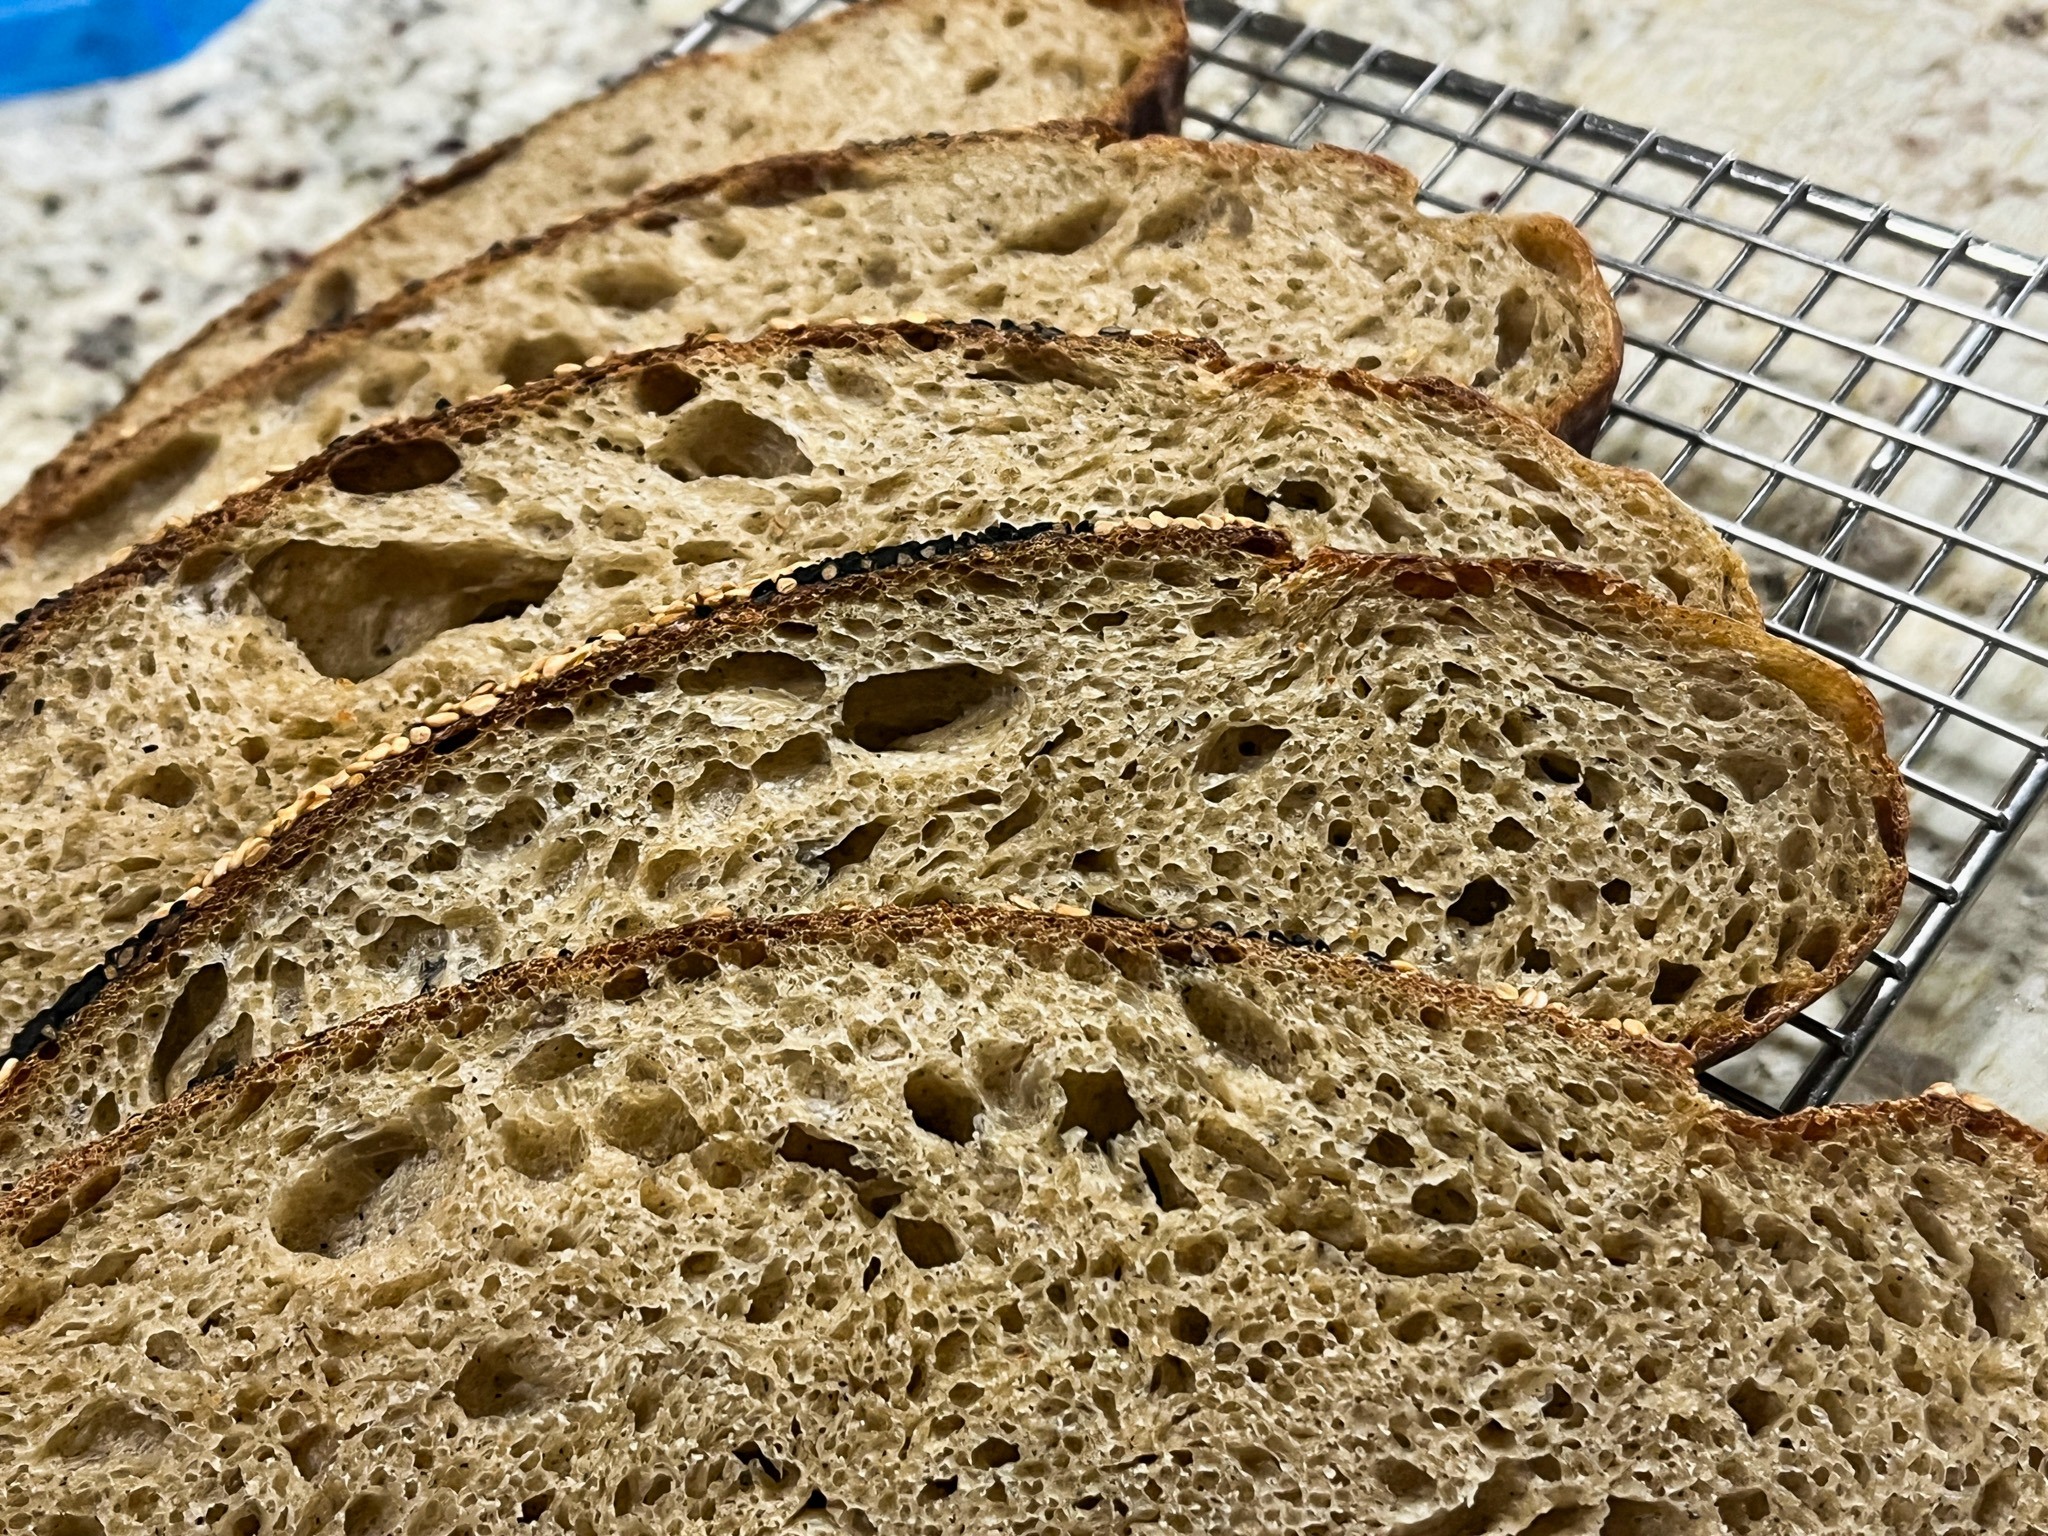
Allow it to cool completely before slicing the bread.
Comments: We loved this bread! It has a smoky quality, probably due to the scalded buckwheat flour, perfect for ham or smoked salmon. It is hearty, very flavorful, with a nice crumb and perfect crust. I highly recommend you try this recipe, or go for the original from The Perfect Loaf, that has a much higher proportion of whole-wheat, and uses malt syrup and aniseeds.