FLOWER SHAPED DINNER ROLLS

These adorable rolls popped on my Instagram feed, and I fell in love with them so hard that I mixed the dough right away. To be precise, 20 minutes after watching the reel (click here for it). I consider it a work in progress, for reasons I will discuss in the comments…

FLOWER-SHAPED DINNER ROLLS
(from Joyce Mrad)

325g flour
150mL slightly warm milk
1 egg
50g butter, softened
1 tsp instant yeast
30g sugar
1 tsp salt
purple carrot powder or any other natural food coloring, about 1 tsp

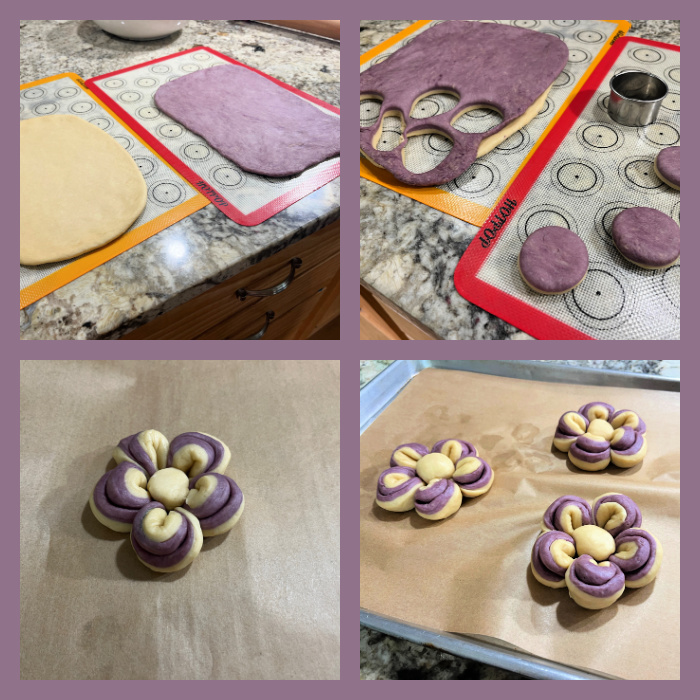
In a KitchenAid type bowl, add milk, sugar, yeast, egg, salt, and flour. Mix them together until they form a shaggy mass of dough. With the machine running (dough hook), add the butter in small pieces and knead until smooth. Split the dough in half. Color one half with your choice of natural dye.

Place both dough portions in a warm spot and let them rise for approximately 2hours, or until doubled in size. Once the dough has risen, punch it down. Roll and flatten both dough portions into squares, layering the purple dough over the white dough.

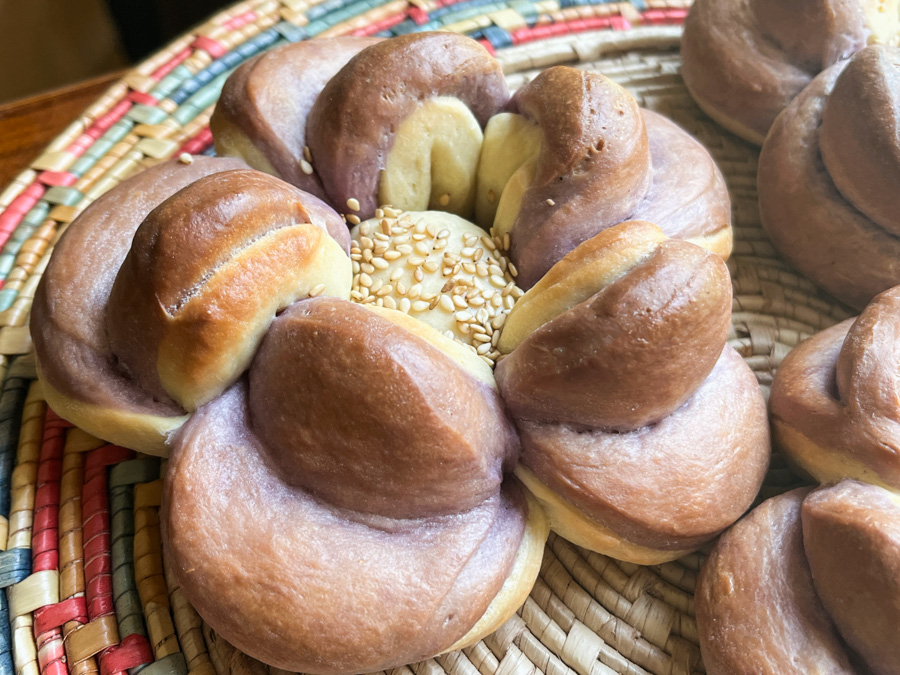
Use a cookie cutter to cut small circles from the layered dough. Take each circle and fold it three-quarters, then fold it in half again, pinching the ends to form petals. When you make five petals add a small ball of dough in the middle. Repeat the folding and shaping process until all the dough is used.

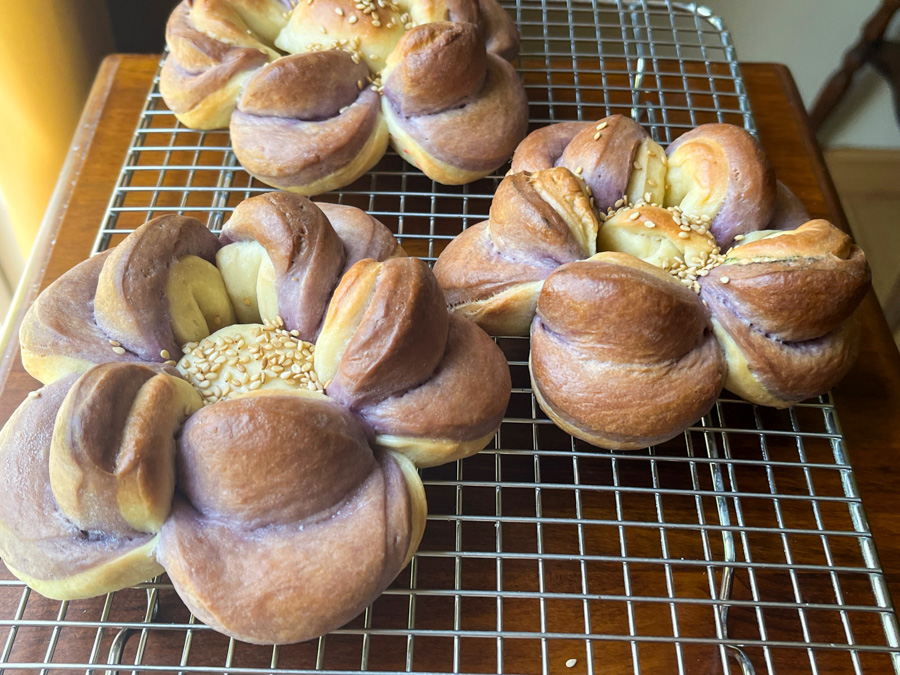
Cover the flower-shaped dinner rolls and let them rise again until doubled in size, about 1 hour. Brush the rolls with milk. Bake them in a 375F oven for 15-20 minutes, or until they turn golden brown. Once the rolls are baked, brush them with melted butter and sprinkle sesame seeds in the middle of each roll for decoration.

ENJOY!

to print the recipe, click here

Comments: I used ebony carrot powder which was very beautiful in the raw dough, but baked to a much less appealing color. I will use something different next time. Also, I believe the rolls will be better if made with a smaller cookie cutter, so that the petals are more delicate and the rolls smaller. The whole recipe gave me just three rose-shaped rolls, so smaller circles are going to work better for this.

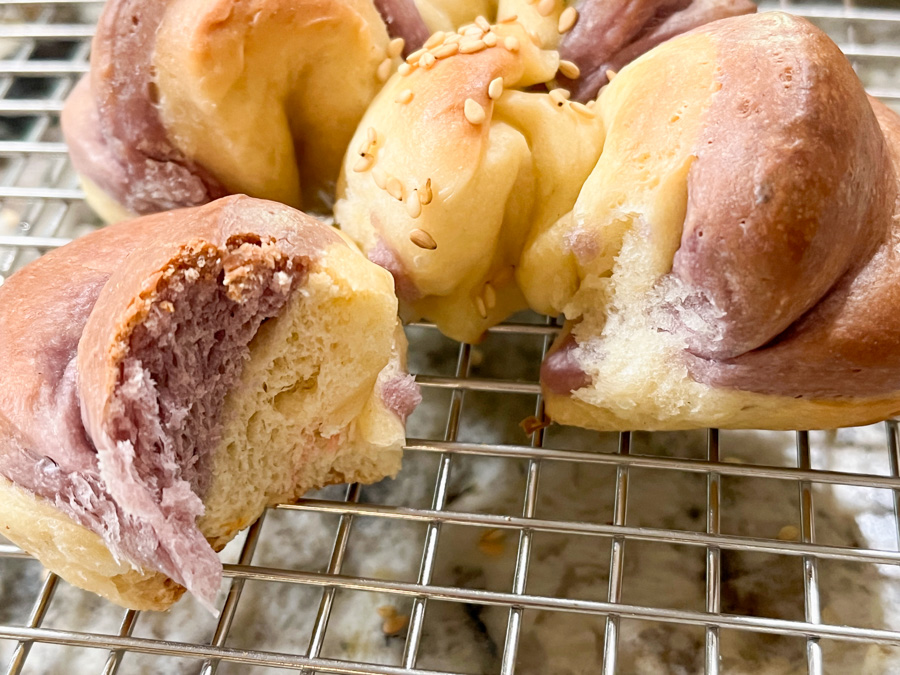
The rolls work almost like a pull-apart bread, pretty cool! Not at all complicated to make, and you can always use a single dough for the shaping effect, which will still be nice.

ONE YEAR AGO: Pride Macarons

TWO YEARS AGO: Blood Orange Macarons

THREE YEARS AGO: One-Two-Three Macarons

FOUR YEARS AGO: Marshmallow Macarons

FIVE YEARS AGO: Fujisan Bread

SIX YEARS AGO: Air-Fried Tomatoes with Hazelnut Pesto & Halloumi Cheese

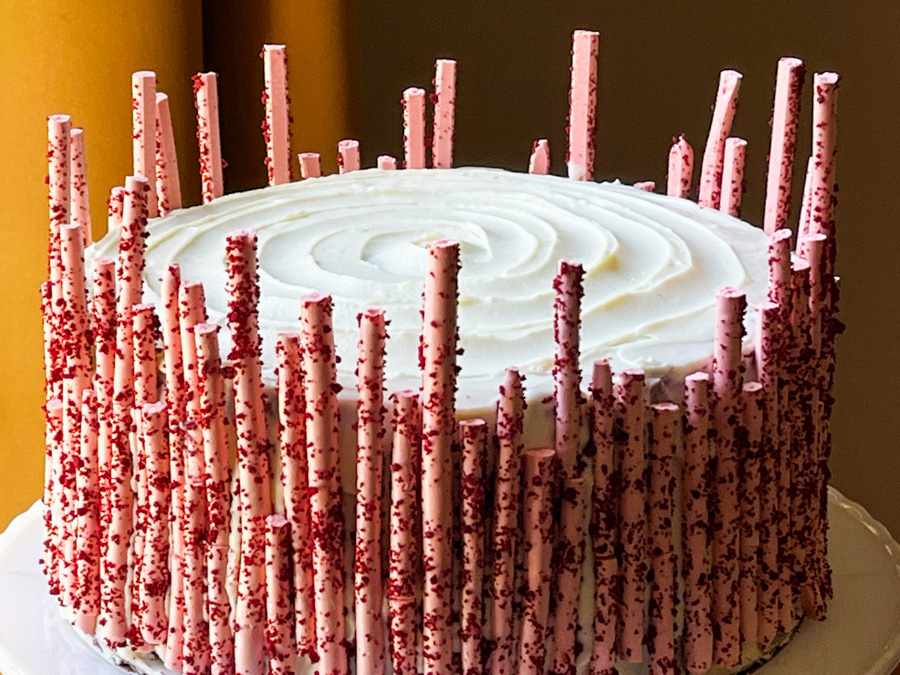
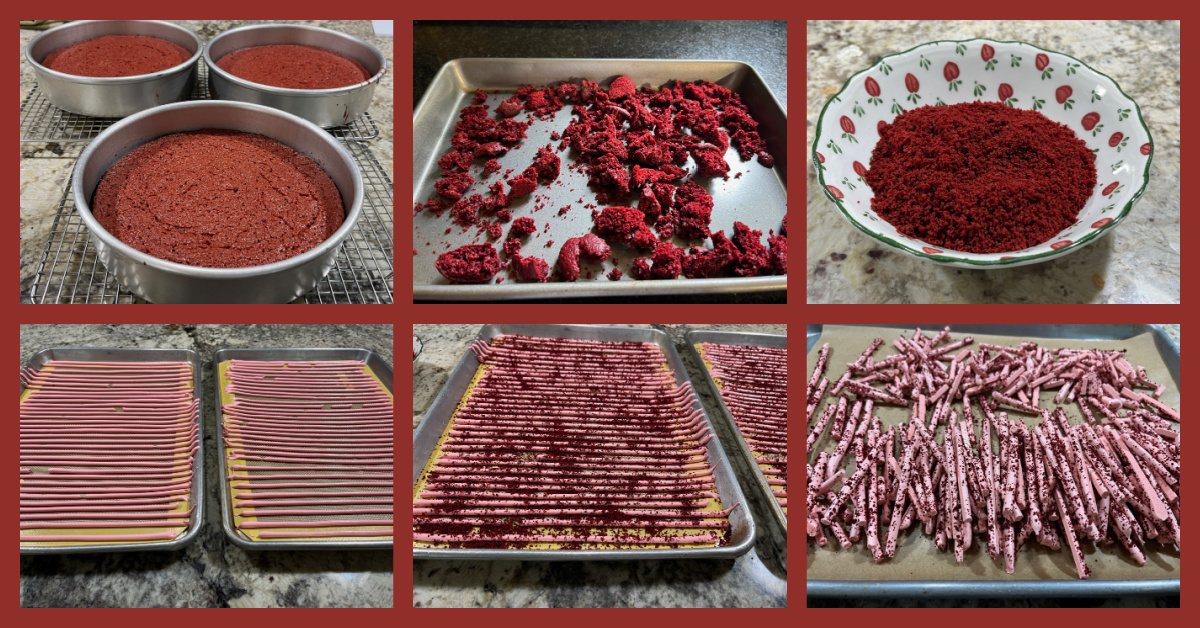
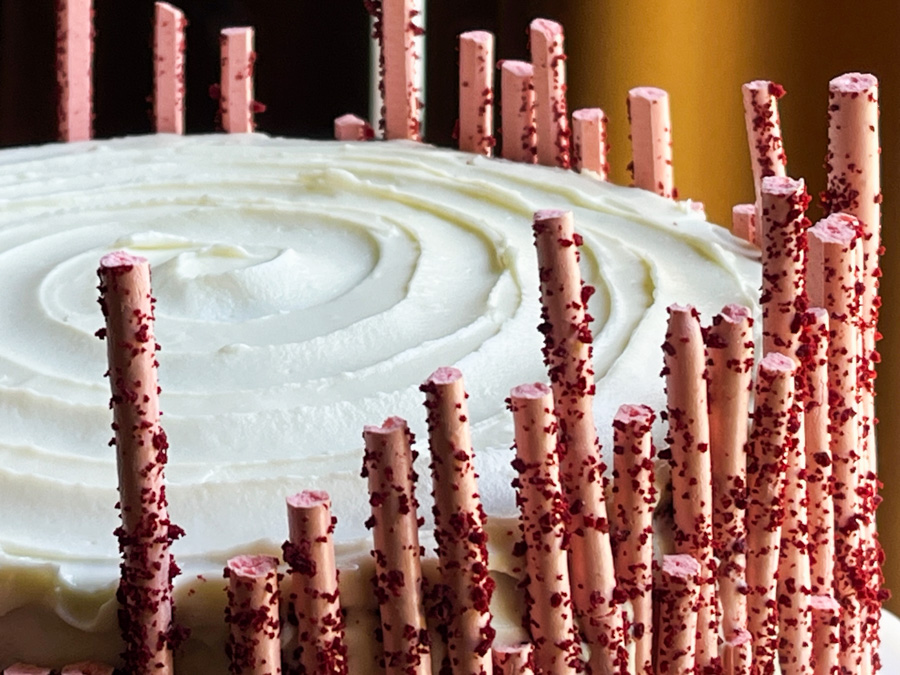
SEVEN YEARS AGO: Red Velvet Layered Cake

EIGHT YEARS AGO: Lemon-Lavender Bars

NINE YEARS AGO: Quinoa Fried Rice

TEN YEARS AGO: Carrot Flan with Greens and Lemon Vinaigrette

ELEVEN YEARS AGO: The Secret Recipe Club: Granola Bars

TWELVE YEARS AGO:  Awesome Broccolini

THIRTEEN YEARS AGO:  A Twist on Pesto

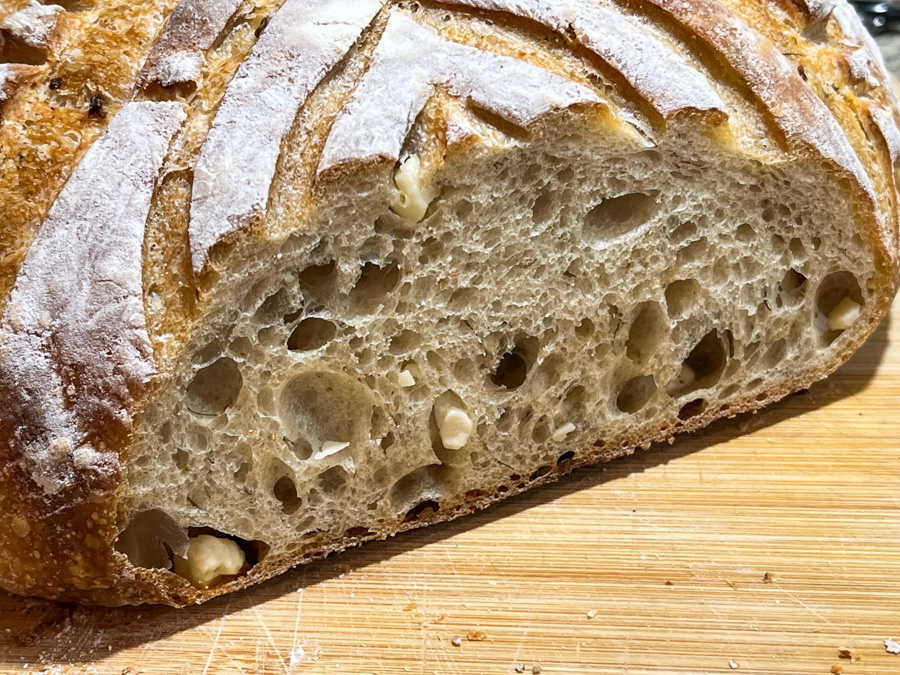
FOURTEEN YEARS AGO: Ciabatta: Judging a bread by its holes

THE BEWITCHING KITCHEN TURNS 14!

Fourteen years. One thousand, six hundred and thirty eight posts published. I confess this is the first anniversary that finds me with a little less gas in the tank. Am I going to stop? No, not yet. I still love sharing recipes and little bits about our life, the kitchen, the pups. So I am committed to one more year to make it to fifteen, and will re-evaluate at that point. To celebrate this day, I offer you a cake: Red Velvet with White Chocolate Cream Cheese Frosting. Made a little more special by decorating it with meringue sticks, not too complicated to make, and so striking to look at! Recipe from Kirsten Tibballs at Savour Cooking School.

RED VELVET CAKE WITH CREAM CHEESE FROSTING
(from Kirsten Tibballs)

Recipe is copyrighted and I did not get permission to publish it, so you need to be a member of Savour School to obtain it. Click here for details.

Comments: The cake is actually quite simple to put together. You can definitely use any red velvet cake recipe you are fond of, they are pretty similar with all the usual suspects. Make three cakes, 8 inch in diameter. When you trim the top of the cakes, use that part to make cake crumbs (I dried mine in a very low oven for 3 hours).

I loved making the meringue sticks, with a simple Swiss meringue method. A piping bag with a 4mm round tip is used to pipe lines that get coated with cake crumbs and baked for 2 and a half hours at low temperature, like required for meringues. Once the cake is iced, just glue the sticks of varying size all around.

.

Without further ado, let’s start the journey into my 15th year of food blogging!

ONE YEAR AGO: The Bewitching Kitchen turns 13!

TWO YEARS AGO: The Bewitching Kitchen Turns 12!

THREE YEARS AGO: The Bewitching Kitchen turns 11!

FOUR YEARS AGO: The Bewitching Kitchen Turns 10, and a Giveaway…

FIVE YEARS AGO: The Bewitching Kitchen turns 9!

SIX YEAR AGO: The Bewitching Kitchen turns eight!

SEVEN YEARS AGO: The Bewitching Kitchen Turns Seven!

EIGHT YEARS AGO: Bewitching Kitchen Turns Six!

NINE YEARS AGO: The Bewitching Kitchen turns Five!

TEN YEARS AGO: The Bewitching Kitchen turns Four!

ELEVEN YEARS AGO: The Bewitching Kitchen Turns Three! 

TWELVE YEARS AGO:  The Bewitching Kitchen turns Two!

THIRTEEN YEARS AGO:  Bewitching Birthday!

FOURTEEN YEARS AGO: Welcome to my blog!

SHRIMP WITH PICKLED JALAPEÑOS AND BROCCOLI

This super simple recipe is almost a full meal in itself, but of course rice is more than welcome on the same plate… Pickled jalapeños pack a ton of flavor and although slightly hot, they won’t overpower your senses. Great ingredient to keep in the fridge and add to stir-fries, omelettes, salads. In this recipe, you’ll use not only the peppers but also the pickling liquid.

SHRIMP WITH PICKLED JALAPEÑOS AND BROCCOLI
(from The Bewitching Kitchen)

1 pound large shrimp, peeled and de-veined
2 quarts water + 1/4 cup salt + 1/4 cup sugar, fully dissolved
2 tablespoons olive oil
1 tablespoon honey
2 tablespoons jarred pickled jalapeños, plus 2 tablespoons of the pickling liquid
salt and pepper to taste
1 small head broccoli, florets cut into bite-size pieces
½ cup crumbled feta
1/4 cup water
1/4 cup soy sauce
1 to 2 tsp cornstarch

Brine the shrimp by covering it with the salt-sugar water for 30 minutes. Drain, rinse briefly, set on paper towels to dry.

In a large bowl, mix together the olive oil, honey and 1 to 2 tablespoons of pickling liquid. Add this mixture to the brined, dried shrimp and let it sit for half an hour in the fridge.

Place the broccoli florets in a dish with a moistened paper towel on top, and microwave for 2 minutes. Remove the paper towel and let it sit at room temperature until you use it in the stir-fry.

Heat a large non-stick skillet, add the shrimp with the marinade. Cook stirring every so often until the shrimp is almost cooked through. Add the broccoli, the pickled jalapeños, season with salt and pepper, and sautee everything together until the broccoli is tender and the shrimp fully cooked. Mix the soy, water and cornstarch to make a slurry. Add to the pan and cook until it thickens. Sprinkle the feta cheese and serve immediately over rice.

ENJOY!

to print the recipe, click here

Comments: I was inspired by this recipe for chicken and changed things around to turn it into a seafood version. Without the added soy-cornstarch in the end, I thought it ended a bit too dry for our taste. We like to have some sauce to mingle with the rice. Play with the amount of pickled jalapeños and their pickling liquid to find the level that pleases you most. We like spicy food but not too much. A little lemon juice in the end is also a good move, keep that in mind.

SOMEONE TURNED ONE YEAR OLD YESTERDAY!

ONE YEAR AGO: Sticky Spicy Pork Over Golden Rice

TWO YEARS AGO: Mini-Pullman Sourdough Bread

THREE YEARS AGO: Gibassier

FOUR YEARS AGO: Sundried Tomato Twist Bread

FIVE YEARS AGO: And now for something completely different….

SIX YEARS AGO: Parsnip, Coconut, and Lemongrass Soup

SEVEN YEARS AGO: In My Kitchen, October 2016

EIGHT YEARS AGO: Paleo Moussaka

NINE YEARS AGO: In My Kitchen, October 2014

TEN YEARS AGO: In My Kitchen, October 2013

ELEVEN YEARS AGO: Crimson and Cream Turkey Chili

TWELVE YEARS AGO: Taking a break from the nano-kitchen

THIRTEEN YEARS AGO: Chocolate Chip Cookies

SESAME MISO YAKITORI

Totally in love with this recipe that was recently published on my friend Tara’s blog (Tara’s Multicultural Table). It will for sure be part of our regular rotation, as the husband already asked me “when will we have it again?”


SESAME MISO YAKITORI
(slightly modified from Tara’s Multicultural Table)

1/4 cup soy sauce
1/4 cup mirin
3 tablespoons red miso
2 tablespoons sake (I used Brazilian cachaça)
2 tablespoons toasted sesame seeds, ground
1 teaspoon granulated sugar
1 pound (450 grams) boneless chicken thighs

Soak the wooden skewers in water for 30 minutes prior to use.

In a small saucepan, whisk together the soy sauce, mirin, miso, sake (or cachaça), ground sesame seeds, and sugar. Place the saucepan over medium low heat and cook, whisking often, until thickened.
Remove from heat and pour 1/3rd of the mixture into a separate bowl and set aside with a clean pastry brush. This bowl of glaze and brush will be for the final coating over the cooked chicken skewers.


Cut the chicken into 1 inch pieces. Arrange the chicken on the skewers. Grill the skewers, brushing with the glaze from the saucepan. Cook until golden, then turn and brush again with the miso glaze. Continue to cook until the chicken is fully cooked. Brush the cooked chicken skewers with the clean brush and bowl of miso glaze.

ENJOY!

to print the recipe, click here

Comments: I normally do not have the patience to add meat to skewers. I know it sounds odd, as I can spend hours decorating a single cookie if needed, but such is life. However, this was so absolutely worth it, the texture is improved compared to grilling the boneless thighs as individual, large pieces. Plus, sesame miso sauce is divine. I used it on pork tenderloin and want to pair it with salmon in the near future. It is nutty, with just the right touch of sweetness. Please try this recipe and then thank Tara for it!

ONE YEAR AGO: Marinated Chickpeas with Slow-Roasted Red Peppers

TWO YEARS AGO: Mini-Pullman Sourdough Bread

THREE YEARS AGO: Gibassier

FOUR YEARS AGO: Sundried Tomato Twist Bread

FIVE YEAR AGO: And now for something completely different….

SIX YEARS AGO: Parsnip, Coconut, and Lemongrass Soup

SEVEN YEARS AGO: In My Kitchen, October 2016

EIGHT YEARS AGO: Paleo Moussaka

NINE YEARS AGO: In My Kitchen, October 2014

TEN YEARS AGO: In My Kitchen, October 2013

ELEVEN YEARS AGO: Crimson and Cream Turkey Chili

TWELVE YEARS AGO: Taking a break from the nano-kitchen

THIRTEEN YEARS AGO: Chocolate Chip Cookies

FRESH DILL AND FETA SOURDOUGH

A match made in heaven and materialized in the Bewitching Kitchen! We were lucky to get a huge bag of fresh dill from a departmental colleague and I had some feta cheese hanging in the fridge. One thing led to another and here we are!

FRESH DILL AND FETA SOURDOUGH
(from the Bewitching Kitchen)

475g white bread flour
25g whole-wheat flour
9g salt
350g water
65g sourdough starter at 100% hydration
2 tablespoons fresh dill, minced (or amount to taste)
50-100g feta cheese, crumbled

Make the levain mixture about 6 hours before you plan to mix the dough. It should be very bubbly and active.

When you are ready to make the final dough, place the water in the bowl of a KitchenAid type mixer and dissolve the starter in it, mixing with a spatula briefly, then add the two types of flour, and the salt. Turn the mixer on with the hook attachment and knead the dough for 3 minutes at low-speed all the time. Add the dill, knead for another minute to incorporate. If the dough is too sticky, add 1/4 cup flour, you want the dough to start clearing the sides of the bowl, but still be sticky at the bottom.

Remove from the machine, and transfer to a container lightly coated with oil, add the feta and gently mix it in. Don’t worry about incorporating it, it will all go into the dough as you fold it. Cover lightly with plastic wrap and allow it to ferment for 4 hours, folding every 45 minutes or so. After four hours bulk fermentation, shape the dough as a ball, and place, seam side up, in a lightly floured banetton. Leave at room temperature one hour, and then place in the fridge overnight, from 8 to 12 hours.

Next morning, heat the oven to 450F. Invert the dough over parchment paper, rub gently tapioca flour on the surface. Score with the pattern of your choice and bake at 450F for 45 minutes, preferably covered for the first 30 minutes to retain steam. Cool completely over a rack before slicing.

ENJOY!

to print the recipe, click here

Comments: For the scoring of the surface I used a combination of razor blade and scissors. The bread had impressive oven spring, but I liked the way the design ended up. As to the flavor, I noticed that the dill came through stronger on the second day of the loaf sitting at room temperature. Usually in the evening of day #2 we slice what is left and freeze for later, so that’s what we did.

Really nice to bite into a little piece of feta cheese…..


ONE YEAR AGO: Marinated Chickpeas with Slow-Roasted Red Peppers

TWO YEARS AGO: Passionfruit Millionaire’s Shortbread

THREE YEARS AGO: Chai-Mango Rosette Macarons

FOUR YEARS AGO: Common Table, Something New in My Life

FIVE YEARS AGO: The Daisy, a Bread with Brioche Alter-Ego

SIX YEARS AGO: Pork Tenderloin, Braciole Style

SEVEN YEARS AGO: Raspberry Buckle

EIGHT YEARS AGO: Seafood Gratin for a Special Dinner

NINE YEARS AGO: Cooking Sous-Vide: Sweet and Spicy Asian Pork Loin

TEN YEARS AGO:  Farewell to a Bewitching Kitchen

ELEVEN YEARS AGO: In My Kitchen. June 2012

TWELVE YEARS AGO: Goodbye L.A.

THIRTEEN YEARS AGO: 7-6-5 Pork Tenderloin