SHOKUPAN MARBLED BLACK SESAME BREAD

Not too long ago I got notification of a new blog post by my friend Karen. You can check her post here. She mentioned the yudane method, a kind of tahgzhong on steroids. I am familiar with tangzhong and love it, but yudane was new to me. I could not wait to give it a try. I ended up following this recipe that was linked at the end of Karen’s post.

In the tangzhong method, part of the flour is gently cooked until a paste forms. To make yudane, you boil water and mix with the flour, then place in the fridge for 4 to 24 hours. That gets incorporated into the bread dough. Fascinating, Mr. Spock, fascinating…

I loved making this bread. For the full recipe, please visit Bread Experience (click here). My modifications were just a few: I did not have white whole-wheat, and did not have kamut in the pantry, so I used the full amount of regular whole-wheat, King Arthur’s brand. For the liquid component I used oat milk. Finally, I used store-bought black tahini, just eye-balled about 2 tablespoons and got a nice dark color. The dough is a pleasure to work with, and the marbling worked perfectly!

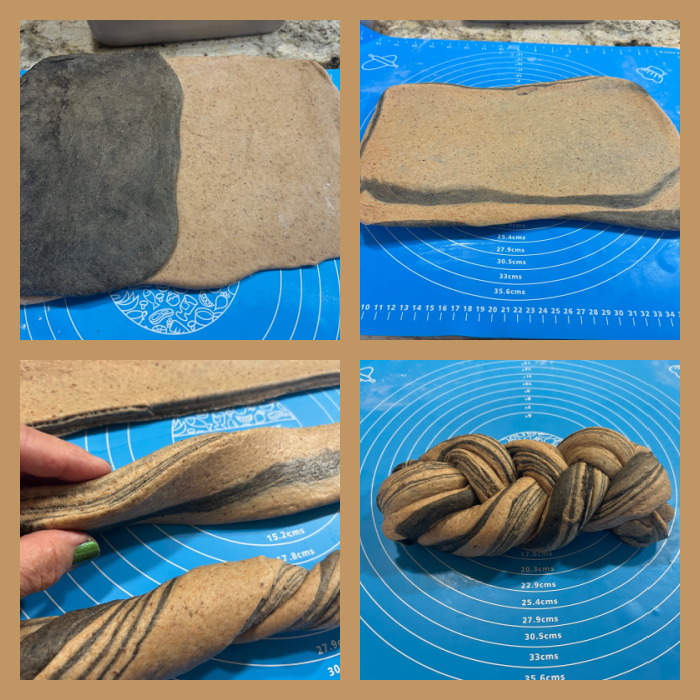
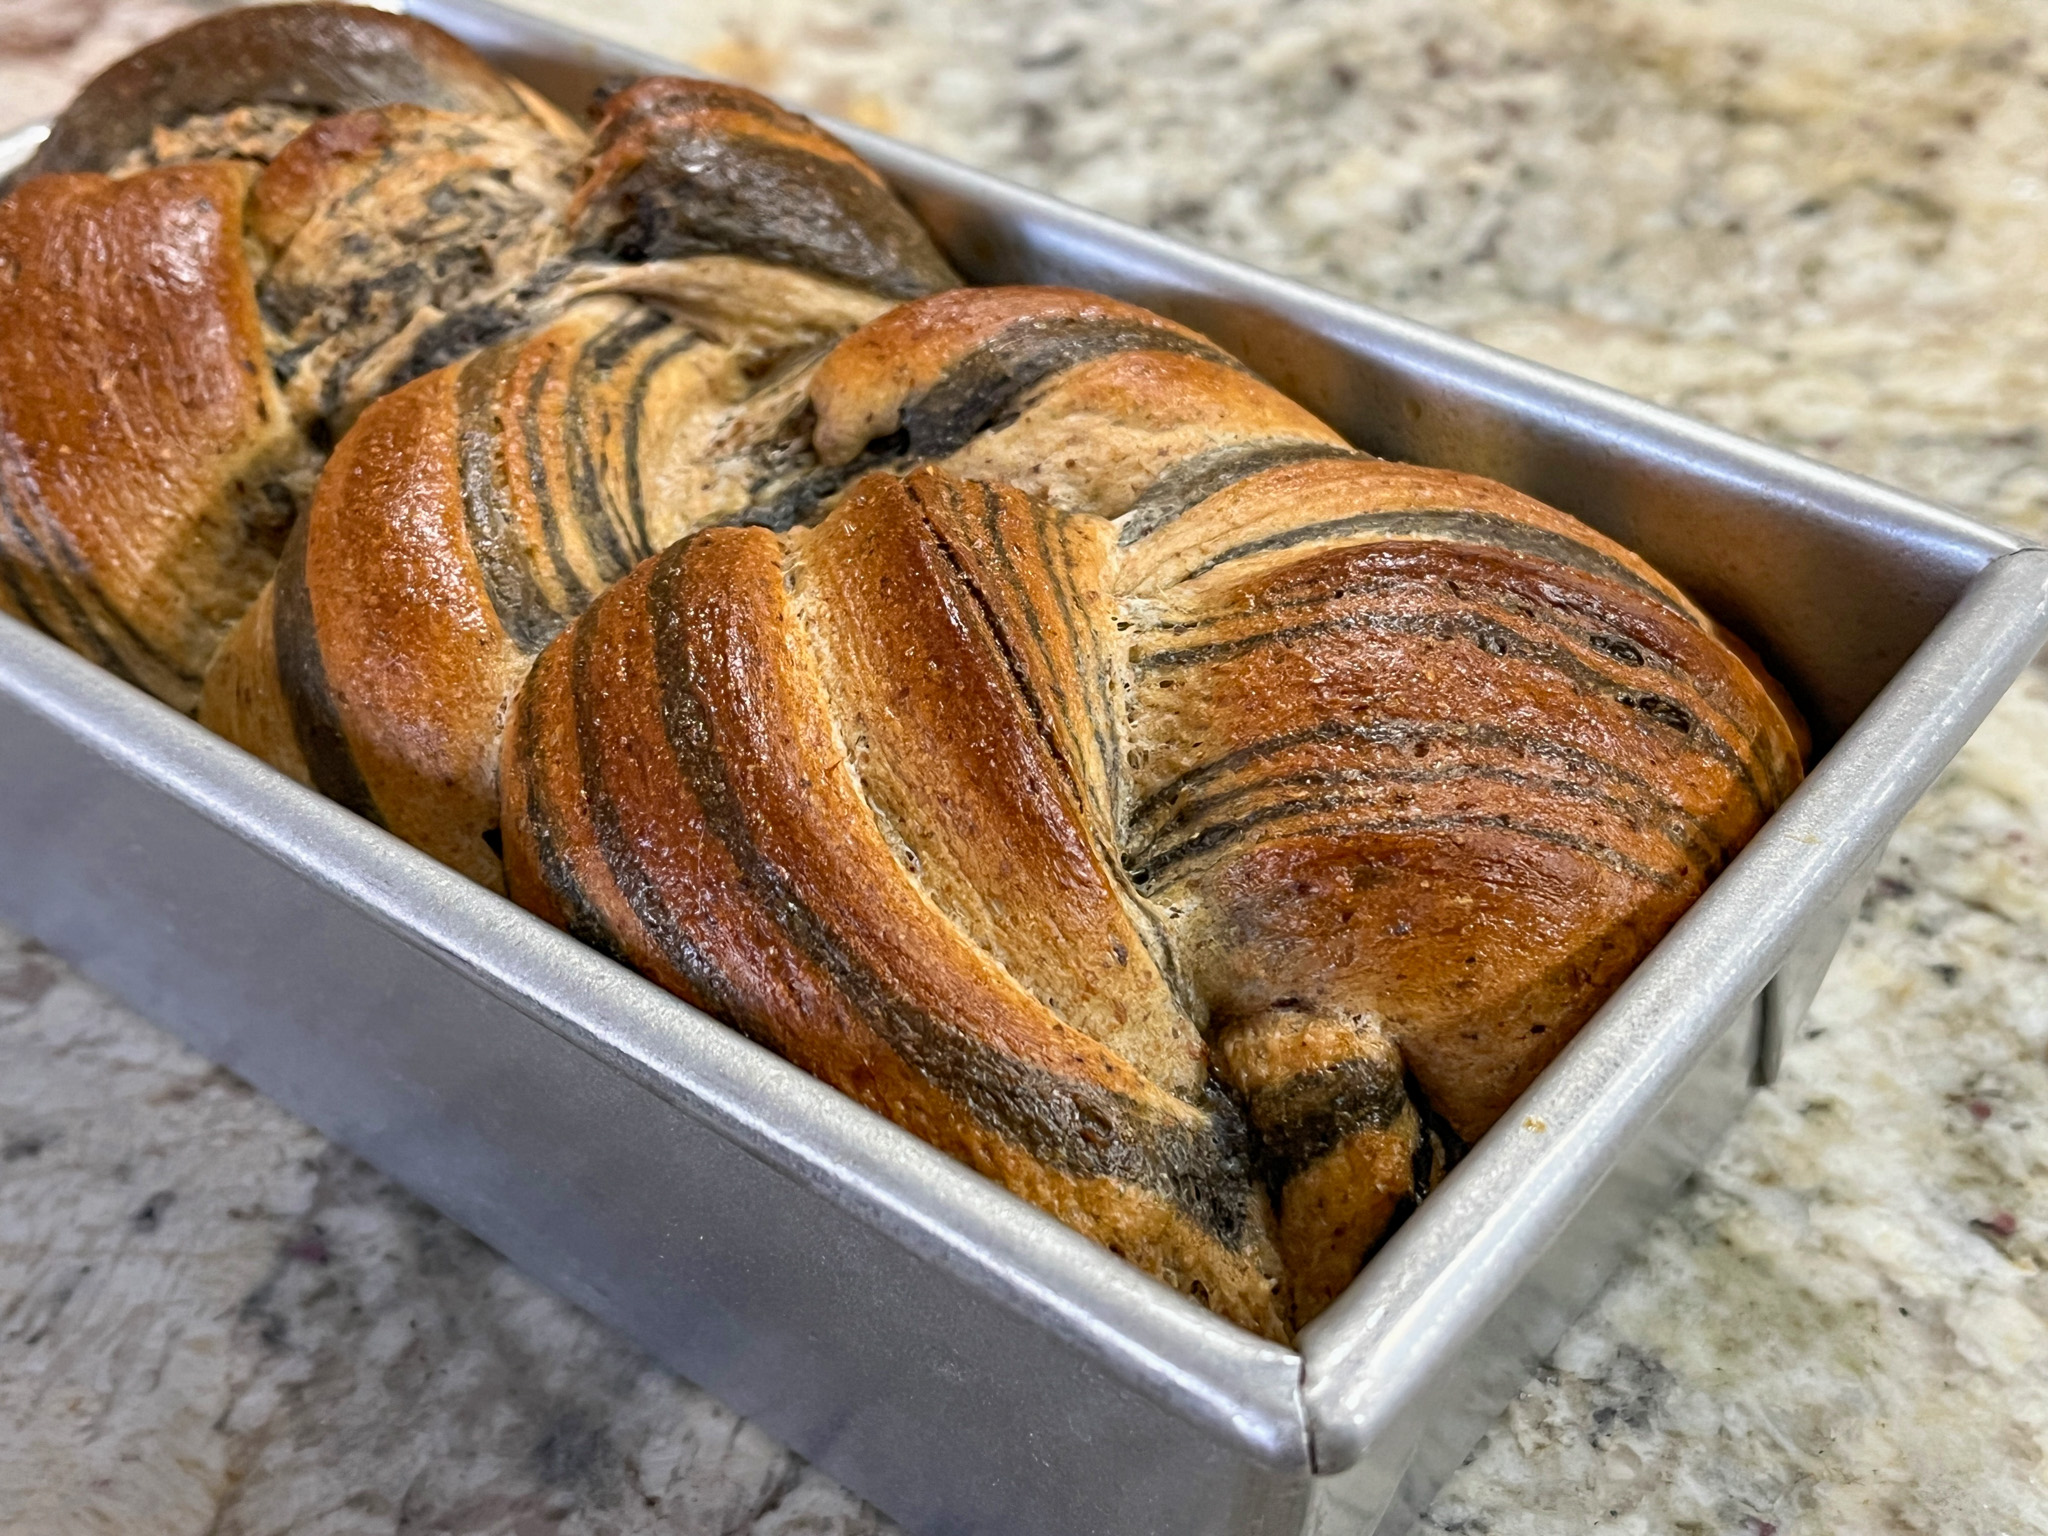
The crumb is soft, tender, and the bread is absolutely delicious with a hint of sesame taste. I highly, highly recommend you give yudane a try. This is what it looks like…

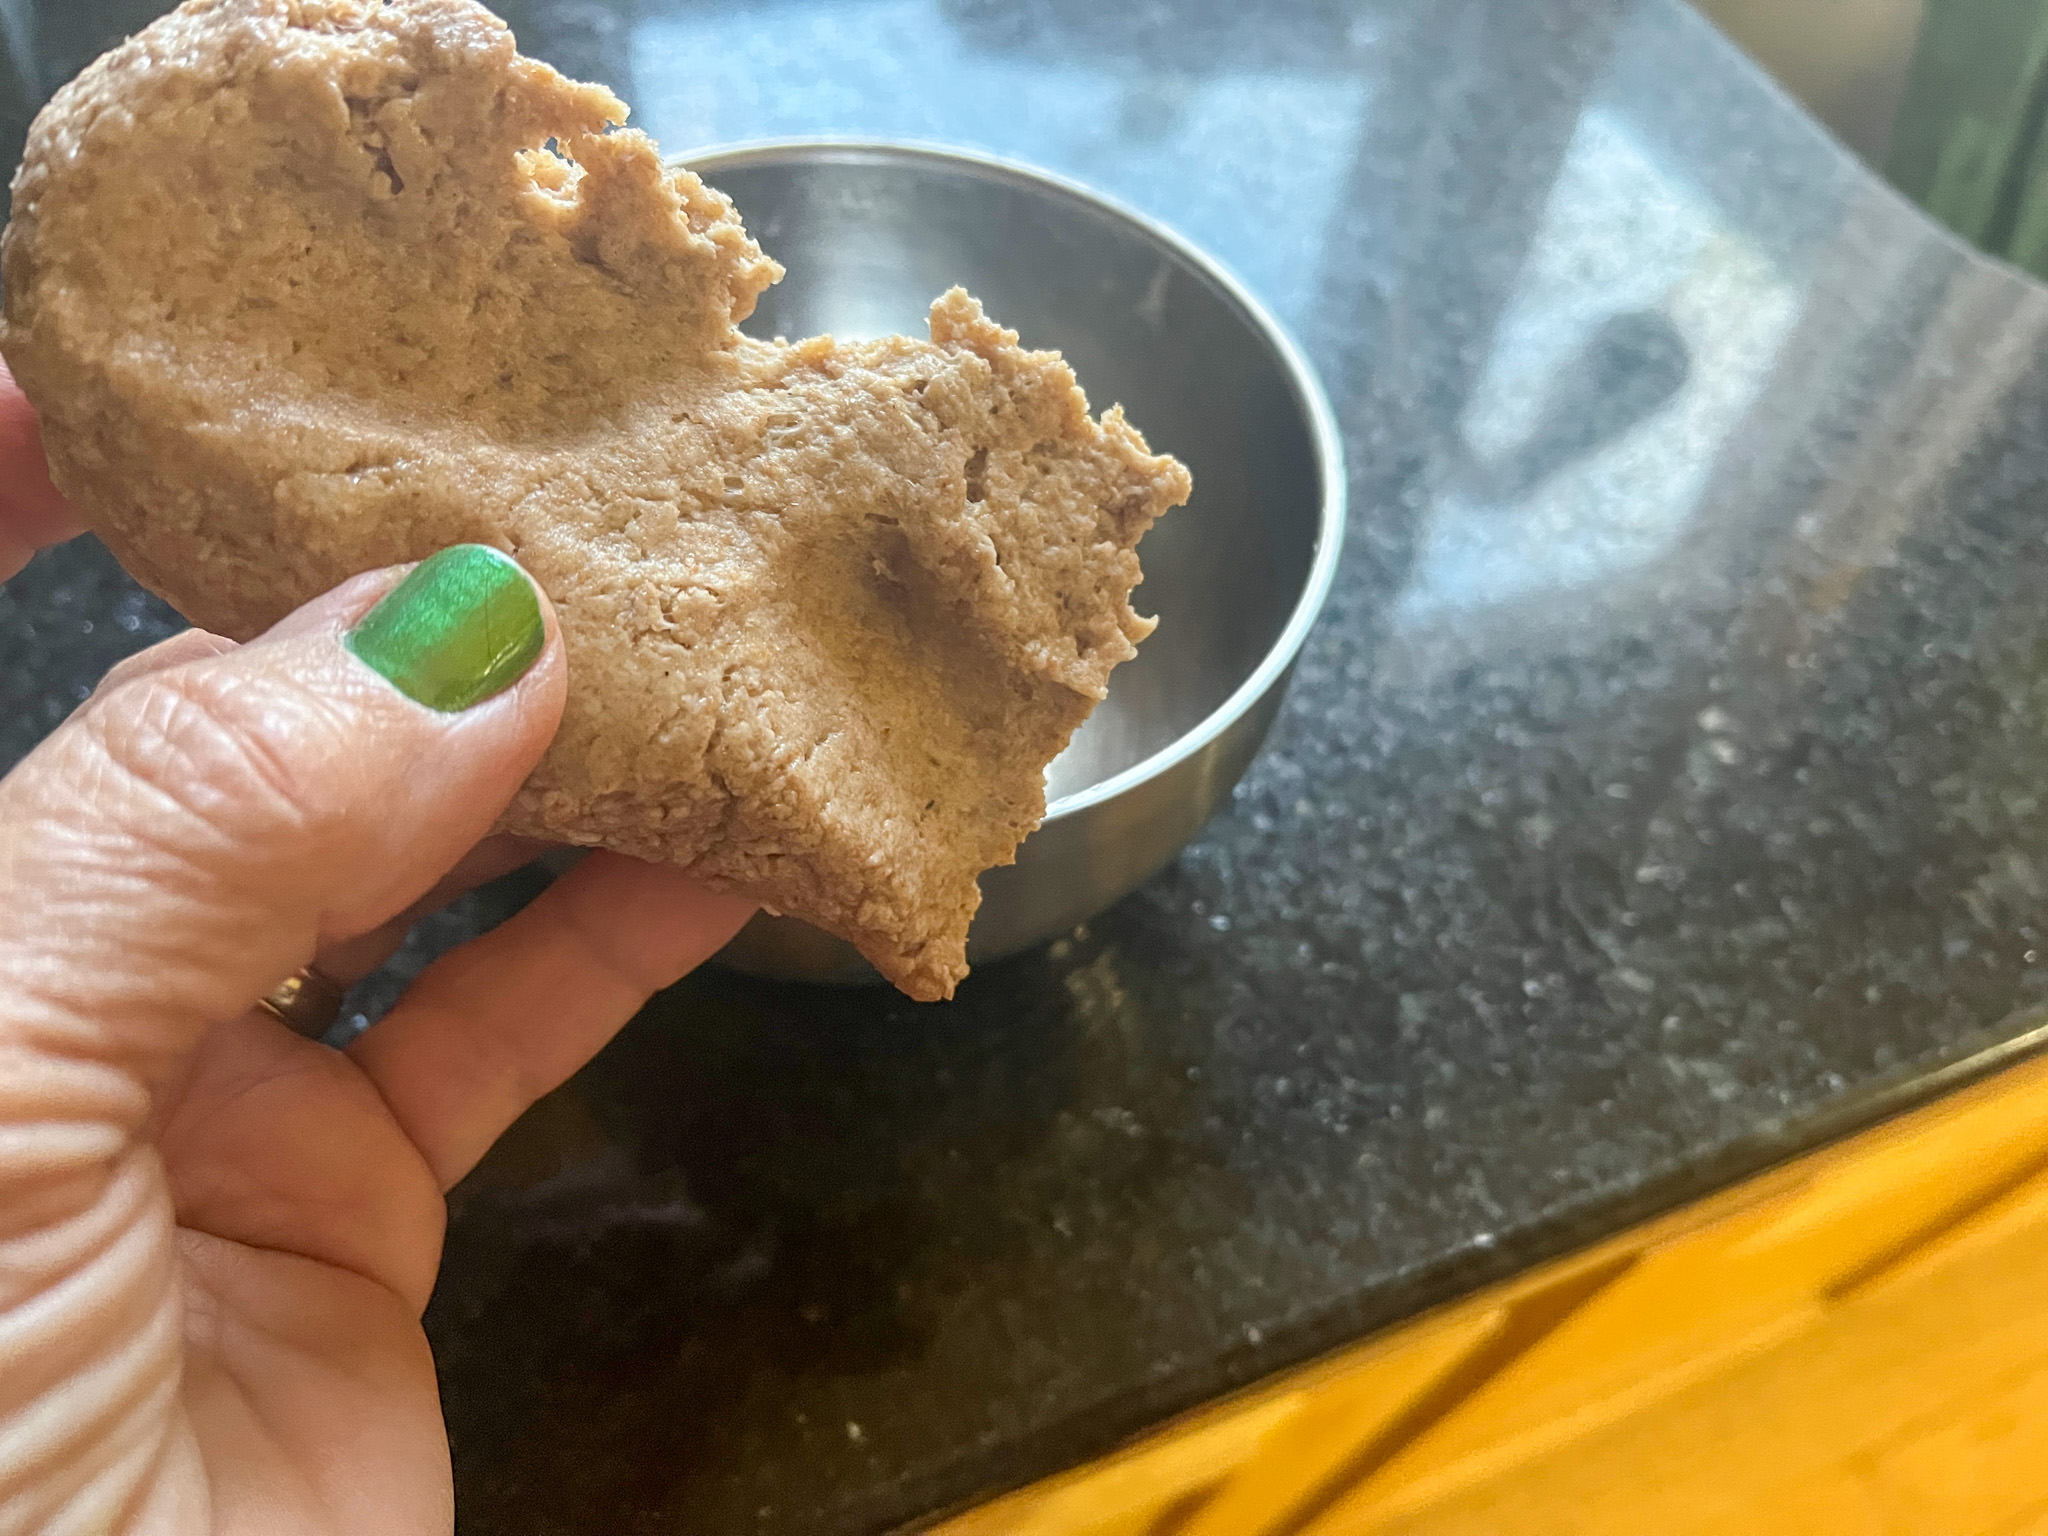
Just don’t forget it in the fridge, make sure to grab it when you are ready to make the dough! (Yes, I almost forgot about it).

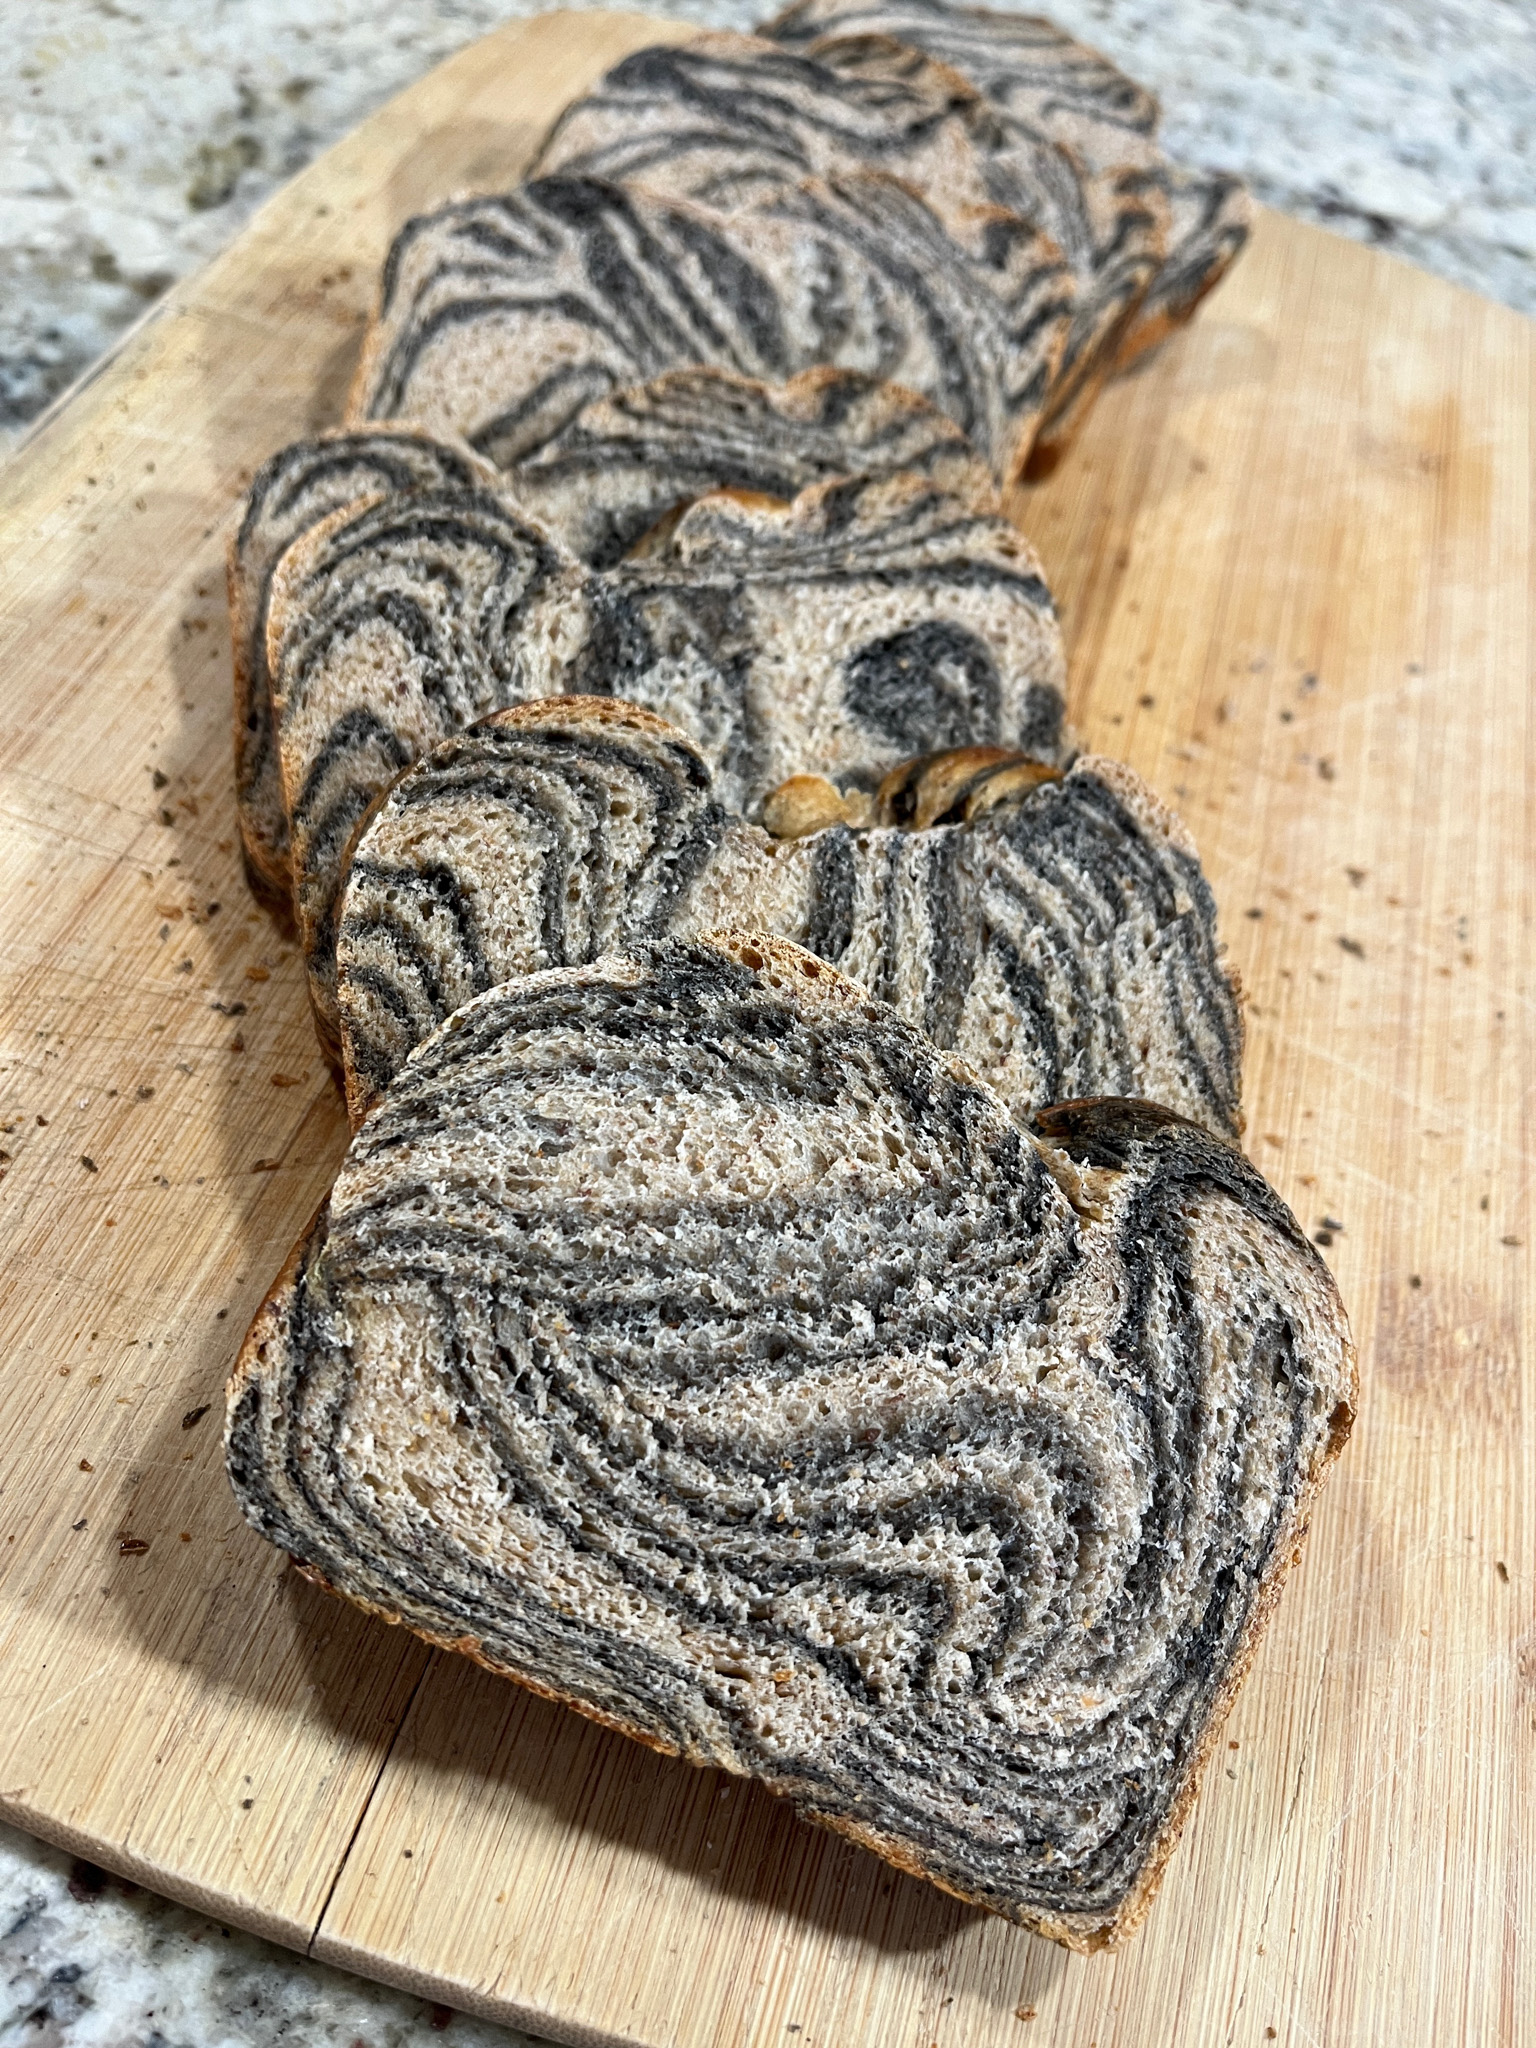
And look at that crumb!

I hope you give yudane a try, the bread stays soft and moist for at least a couple of days. After that I sliced and froze for later.

THANK YOU, KAREN AND CATH FOR THE BREAD INSPIRATION!


ONE YEAR AGO: Chicken with Pasilla-Pecan Sauce

TWO YEARS AGO: A Versatile Silicone Pan

THREE YEARS AGO: Buffalo Chickpeas

FOUR YEARS AGO: Bi-Color Croissant and Pain au Chocolat

FIVE YEARS AGO: Lemon-Blueberry Entremet Cake

SIX YEARS AGO: Walk Strong3: Jessica Smith’s latest workout program

SEVEN YEARS AGO: Pork Medallions with Black Berry Compote

EIGHT YEARS AGO: Indian-Spiced Chicken with Chickpeas and Spinach

NINE YEARS AGO: Curry Cardamon Cookies

TEN YEARS AGO: In My Kitchen, March 2014

ELEVEN YEARS AGOBoeuf Bourguignon for a Snowy Evening

TWELVE YEARS AGO: Chickpea Salad

THIRTEEN YEARS AGO: Soft Spot for Chevre

FOURTEEN YEARS AGO: Roasted Onion and Asiago Cheese Miche

FOR THE LOVE OF BROCCOLI

Three old recipes, and a new one for you today. We have broccoli at least once weekly, and these are the recipes in rotation because we never get tired of them. Contrary to many people, we are not too wild about simply roasting broccoli because for my taste it gets a little too harsh and bitter. I much rather enjoy it in different ways, although if you invite me over for dinner and serve me roasted broccoli, I will lick my plate clean, no worries. Let’s start with the new recipe, a super simple Broccoli Soup. No cream, no special ingredients, it is simple, light and delicious…

LIGHT BROCCOLI SOUP

LOW-FAT BROCCOLI SOUP
(slightly adapted from The Spruce Eats)

1 tablespoon olive oil
1 shallot, chopped
1 stalk celery, chopped
1 medium Yukon Gold potato, peeled and cubed
4 cups broccoli, chopped
2 cups vegetable broth
1 cup almond or oat milk

Heat oil on medium heat in a large stockpot. Sauté the shallot and celery for 3 to 4 minutes, until fragrant. Add the cubed potato, broccoli, broth, and milk. Bring to a boil. Reduce heat, cover, and simmer for 20 minutes, or until all the vegetables are tender.

Allow the soup to cool slightly. Transfer to a blender and blend until smooth in two batches. Return the blended soup to the pot and heat gently until ready to serve.

Top with croutons or sautéed almonds, whatever your heart desires.

ENJOY!

to print the recipe, click here


.

Comments: So far I’ve made this soup three times, and it’s been perfect each time. It has a very creamy texture, maybe it is that small amount of potato speaking. Truly magical. Try it, if you want a light but luscious soup for your dinner. Now moving on to the three oldies but goodies…

SMASHED BROCCOLI WITH CHEESE

This was originally posted last year (check the post here). It was already in the Incredibly Simple files, but I simplified it further by steaming the broccoli in the microwave, using a plastic cover recommended by my friend Marie Louise (click here to see it). I place the florets in a microwave-safe plate, with just enough water clinging to the surface from washing the florets. Place the over on top and steam for 1 minute. If already getting tender, I proceed with the smashing and roasting with cheese as described in the post. If still too tough, hear a few more seconds in the microwave.

.

PAN-STEAMED BROCCOLI, ANY WAY YOU LIKE


Basic method described in this post. I usually keep it super simple. In the final 3 minutes of cooking I whisk a little olive oil with lemon juice in a small bowl. Sprinkle some salt. When the broccoli comes out of the pan, into a serving bowl it goes, and my little dressing is poured on top while the broccoli florets are super hot still. How often can you have a flavorful side dish that is ready in…. 8 minutes total? You can season it in the end in countless ways – miso, as in my post, vinaigrettes, sesame oil, anything goes.

.

BROCCOLI PUREE A LA JACQUES PEPIN

Not the best picture I’ve ever taken, but this is truly delicious and I make it often. The original post is from 2014, so yes, I’ve been making it for 10 years (click here for full recipe). I now omit the brown butter and after cooking the broccoli florets until tender in salted water, I process them with full-fat yogurt, salt, pepper, and if needed a bit of the cooking water. I rarely need the water, usually I just adjust the consistency with yogurt. The spinach goes into the processor raw. I eye-ball everything, taste as I go. Once the consistency is right and the seasoning to my liking, it goes into a serving dish. If I want a little more richness, I sprinkle cheese on top and bake it until the cheese melts a bit.

ONE YEAR AGO: Spanakopita, Crackers and the Adventure of Phyllo Dough

TWO YEARS AGO: Chicken Noodle Soup

THREE YEARS AGO: Floral Chocolate Stick Cookies

FOUR YEARS AGO: Sally’s Spicy Mango and Coconut Macarons

FIVE YEARS AGO: Bouillabaise for a Chilly Evening

SIX YEARS AGO: Bergamot-Cherry Macarons

SEVEN YEARS AGO: Roasted Veggies with Queso Cotija Dressing

EIGHT YEARS AGO: Creamy Broccoli and Mushroom Casserole

NINE YEARS AGO: Maple Walnut Biscotti

TEN YEARS AGO: Barley Risotto with Peas

ELEVEN YEARS AGO: Oatmeal Fudge Bars

TWELVE YEARS AGO: Cauliflower Steaks

THIRTEEN YEARS AGO: Soft Spot for Chevre

FOURTEEN YEARS AGO: Quick sun-dried Tomato Crostini

ROASTED CHICKEN THIGHS WITH FRESH TURMERIC MARINADE

This was my first time using fresh turmeric root, but will definitely not be the last!

ROASTED CHICKEN THIGHS WITH FRESH TURMERIC MARINADE
(adapted from No Crumbs Left)

1 tablespoon paprika
1 tablespoon ground coriander
2 teaspoons smoked paprika
2 teaspoons Aleppo pepper
1 teaspoons ground sumac
2 tablespoons grated fresh ginger
2 tablespoons grated fresh turmeric
8 bone-in, skin-on chicken thighs
2 teaspoons kosher salt
1 cup full-fat unsweetened coconut milk
⅓ cup olive oil
juice of one large lemon

In a small bowl, stir together the hot paprika, coriander, smoked paprika, Aleppo pepper and sumac.

Arrange the chicken thighs in a shallow container and sprinkle with 1 teaspoon of the salt. In a medium bowl, stir together the coconut milk, olive oil, lime juice, ginger, turmeric, and the remaining teaspoon of salt. Stir in the dry spice blend. Set aside about ½ cup of the marinade and refrigerate, then pour the remaining marinade over the chicken. Cover the chicken and refrigerate for at least 3 hours or up to overnight.

Heat the oven to 350°F. Line a large baking sheet with non-stick aluminum foil. Remove the marinated chicken from the refrigerator and let it come to room temperature.

Put the chicken, with its marinade, on the prepared baking sheet and bake covered for 45 minutes, or until starting to turn golden. Remove the baking sheet from the oven. Without disturbing the chicken, carefully pour the juices from the pan into a small bowl. Baste the chicken by spooning the juices over, then return the chicken to the oven, increase the temperature to 400F and bake for 20 minutes more or until golden brown.

Pour the reserved marinade into a small saucepan and simmer over medium heat until it has reduced by half. Serve the chicken drizzled with the reduced sauce.

ENJOY!

to print the recipe, click here

Comments: The inspiration for this recipe came from one of my favorite cookbooks, No Crumbs Left, by Terri Turner. Fresh turmeric has such amazing color, but be careful, it will stain your hands and fabric pretty badly. The chicken was moist and super flavorful, the mixture of spices did not overwhelm it at all. I have to admit that I reduced them quite a bit from the original recipe because we tend to like moderation when adding spices to our food. Teri recommends juicing both the ginger and the turmeric, but I decided it was way too much trouble to go through that. And quite messy too. If you have her cookbook, consider giving her method a try. If you don’t have her cookbook, you need to get it, totally worth it. Available here.

ONE YEAR AGO: Sugarprism-Painted Linzer Cookies

TWO YEARS AGO: Kamut and Broccoli Salad

THREE YEARS AGO: Charcoal Peanut Sourdough

FOUR YEARS AGO: Chocolate Cake with Coconut Buttercream

FIVE YEARS AGO: Berry Rebellion Tarts 

SIX YEARS AGO: Bergamot-Cherry Macarons

SEVEN YEAR AGO: Roasted Veggies with Queso Cotija Dressing

EIGHT YEARS AGO: Creamy Broccoli and Mushroom Casserole

NINE YEARS AGO: Maple Walnut Biscotti

TEN YEARS AGO: Barley Risotto with Peas

ELEVEN YEARS AGO: Oatmeal Fudge Bars

TWELVE YEARS AGO: Cauliflower Steaks

THIRTEEN YEARS AGO: Soft Spot for Chevre

FOURTEEN YEARS AGO: Quick sun-dried Tomato Crostini

CHOCOLATE-COVERED OREOS

I make them weekly because they are very popular with the homeless dinner, and as you might imagine, I don’t like to repeat designs. I love variety. These can be decorated in countless ways, some easier than others. In fact, I have tried a few things that quickly went into the “Never Again Folder”… For previous collections, click here and here. Without further ado, here are some of the designs I made in the past couple of months, starting with perhaps my very favorite!

.
THE JAPANESE-MODERN

To make this design, all you need is some different colors of luster powder and a bit of vodka. Make a suspension and add small blotches on the surface of the mold. Let it dry for a few minutes and pour the melted compound chocolate. They will look good just with the colors, or you gild the lily with a small disc of chocolate decorated with a transfer sheet, in this case I used a cherry blossom pattern.

.


The same exact method works with white chocolate… In this case I added some fondant sunflowers I had from last year’s cookie projects. I have quite a few ideas for color combinations in the near future, so stay tuned!

Luster powder can also be used to paint the surface of the chocolate after it sets, as I did for the set below… It does not go into the “Never Again Folder”, but it is a bit time-consuming.

Another great way to decorate is Royal icing… For the ones below I made straight lines in black and before they set I glued a little sprinkle heart in the crossed section. I love their minimalist look.

You can also pipe thicker lines of Royal icing coupled with a little sanding sugar… For added contrast, I dyed the white chocolate poured into the mold with fat-soluble sky blue dye. These were a good match for some macarons I made in that same week (see post here).

Even easier is just making a random drizzle with icing, fast and straightforward..

Sharing perhaps my second favorite of this set: Royal icing in circular piping plus a disc of chocolate decorated with transfer sheet, also saved from a project last year. The Royal icing was dyed with Americolor Gold. And once all was set, I sprayed some gold dust all over because.. why not?

Finally, the method that I don’t recommend and it truly drove me crazy: spread the Royal icing with a stencil. It was very very tricky to hold the stencil over the small surface, I had to scrape it all and start all over many times, as it would smear and end up quite messy. I managed to get three reasonably good ones, but as I said before…. never again!

.

.

.

ONE YEAR AGO: Zucchini-Chickpea Baked Bites

TWO YEARS AGO: Slow-Cooker Hoisin Pulled Pork

THREE YEARS AGO: I Will Cracker you Up

FOUR YEARS AGO: Pickling Ribbons

FIVE  YEARS AGO: Green Beans and Carrots with Spicy Almonds

SIX YEARS AGO: Quiche 101

SEVEN YEARS AGO: Persian Butternut Squash Soup

EIGHT YEARS AGO: Walnut Cranberry Sourdough Bread

NINE YEARS AGO: Ottolenghi in Brazil?

TEN YEARS AGO: Roasted Winter Vegetables with Miso-Lime Dressing

ELEVEN YEARS AGO: 2012 Fitness Report: P90X2

TWELVE YEARS AGO: Caramelized Bananas

THIRTEEN YEARS AGO: Roasted Lemon Vinaigrette

FOURTEEN YEARS AGO: Whole Wheat Bread

UBE SOURDOUGH, TWO WAYS


Back in December last year I had a lot of fun playing with ube, the Filipino ingredient that was new to me. Today I share two ways to make sourdough bread incorporating ube. The basic recipe is the same, but in the first version I substituted some of the flour with ube powder. The second version incorporates 1/4 tsp ube extract in the dough. The one with the ube powder got a super light purple tone and the texture and structure of the bread was slightly different from a regular sourdough. If you are looking for color impact, definitely go with ube extract. A little goes a long way, and the taste is very mild.

UBE SOURDOUGH, TWO WAYS
(from the Bewitching Kitchen)

480g white bread flour
20g ube powder
10g salt
350g water
75-90g sourdough starter at 100% hydration

Make the levain mixture about 6 hours before you plan to mix the dough. It should be very bubbly and active.

When you are ready to make the final dough, place the water in the bowl of a KitchenAid type mixer and dissolve the starter in it, mixing with a spatula briefly, then add the flour, ,ube powder and salt. Turn the mixer on with the hook attachment and knead the dough for 4 minutes at low-speed all the time. You will notice the dough will gain quite a bit of structure even with just 4 minutes in the mixer. Remove from the machine, and transfer to a container lightly coated with oil, cover lightly with plastic wrap and allow it to ferment for 4 hours, folding every 45 minutes or so. Because the dough is already a bit developed from the initial time in the mixer, you should get very good structure after 3 and a half hours, or even sooner than that.

After four hours bulk fermentation, shape the dough as a ball, and place, seam side up, in a lightly floured banetton. Leave at room temperature one hour, and then place in the fridge overnight, from 8 to 12 hours.

Next morning, heat the oven to 450F.

Place a parchment paper on top of the dough, a flat baking sheet, and invert the dough, flipping it out of the banneton. Flour the surface of the dough, add the stencil and air-brush if so desired. Score with a razor blade.

Bake at 450F for 45 minutes, preferably covered for the first 30 minutes to retain steam. Cool completely over a rack before slicing.

FOR VERSION #2
Use 500g bread flour and add 1/4 tsp ube extract to the dough, following the same method to prepare and bake the bread.

ENJOY!

to print the recipe, click here

Comments: You will notice that the crumb is tighter than usual for a sourdough, and also the color purple is super subtle, quite light.  Version #2, with ube extract got a lot more color.


I used a different method to decorate it, with oats to form little flowers and black sesame seeds in the center. Just wet the surface of the dough a little bit and that acts like a glue.

It was a bit time-consuming to do, so I ended up forming just 4 little flowers. Maybe next time I can go for full-coverage…

The crumb was open and super purple!

So, if you like to play with this ingredient, I would recommend the extract, because I felt the dough was quite affected in its structure when some of the flour (therefore gluten) was removed and replaced with the powder. Also, the color that the extract provides is quite spectacular and stayed unchanged with baking. Flavor is very subtle.

ONE YEAR AGO: Brown Butter Dulce de Leche Cookie Cups

TWO YEARS AGO: Chicken Poblano Tortilla Soup

THREE YEARS AGO: Kung Pao Chicken

FOUR YEARS AGO: Galette de Rois

FIVE YEARS AGO: Sous-Vide Overnight Oatmeal

SIX YEARS AGO: A Valentine’s Day Opera

SEVEN YEARS AGO: Incredibly Simple Times Four

EIGHT YEARS AGO: Walnut-Cranberry Sourdough Bread

NINE YEARS AGO: Ottolenghi in Brazil?

TEN YEARS AGO: Roasted Winter Vegetables with Miso-Lime Dressing

ELEVEN YEARS AGO: 2012 Fitness Report: P90X2

TWELVE YEARS AGO: Caramelized Bananas

THIRTEEN YEARS AGO: Roasted Lemon Vinaigrette

FOURTEEN YEARS AGO: Whole Wheat Bread