
I’ve been struggling with bread stencils lately. My designs end up not as sharp as I hoped them to be, lack of contrast after baking, all sorts of annoying little disappointments. I finally figured out what I was doing wrong, after watching videos from bread guru Morgi. I will share a couple of tips today, in case you’d like to use this method to decorate your bread.

CHARCOAL PEANUT SOURDOUGH
(from the Bewitching Kitchen)
470g bread flour
20g spelt flour
10g peanut flour
7g charcoal powder
10g salt
370g water
100g sourdough starter at 100% hydration
Make the levain mixture about 6 hours before you plan to mix the dough. It should be very bubbly and active.
When you are ready to make the final dough, place the water in the bowl of a KitchenAid type mixer and dissolve the starter in it, mixing with a spatula briefly, then add the three types of flour, charcoal and salt. Turn the mixer on with the hook attachment and knead the dough for 4 minutes at low-speed all the time. You will notice the dough will gain quite a bit of structure even with just 4 minutes in the mixer. If the dough seems too soft, add a bit more bread flour. Remove from the machine, and transfer to a container lightly coated with oil, cover lightly with plastic wrap and allow it to ferment for 4 hours, folding every 45 minutes or so. Because the dough is already a bit developed from the initial time in the mixer, you should get very good structure after 3 and a half hours, or even sooner than that.
After four hours bulk fermentation, shape the dough as a ball, and place, seam side up, in a lightly floured banetton. Leave at room temperature one hour, and then place in the fridge overnight, from 8 to 12 hours.
Next morning, heat the oven to 450F. Invert the dough over parchment paper, if the surface seems moist you can place the stencil right away on top of it. If it seems dry, spray lightly with water and position the stencil. Shower some white rice flour on the stencil and rub gently with the fingers of your right hand as you steady the stencil with your left hand (do the opposite if you are left-handed). The idea is to rub the flour on the surface through the openings of the stencil, so that you get a good pattern formed. Carefully lift the stencil and slash the bread around it, so that the bread will not open and compromise the image.
Bake at 450F for 45 minutes, preferably covered for the first 30 minutes to retain steam. Cool completely over a rack before slicing.
ENJOY!
to print the recipe, click here
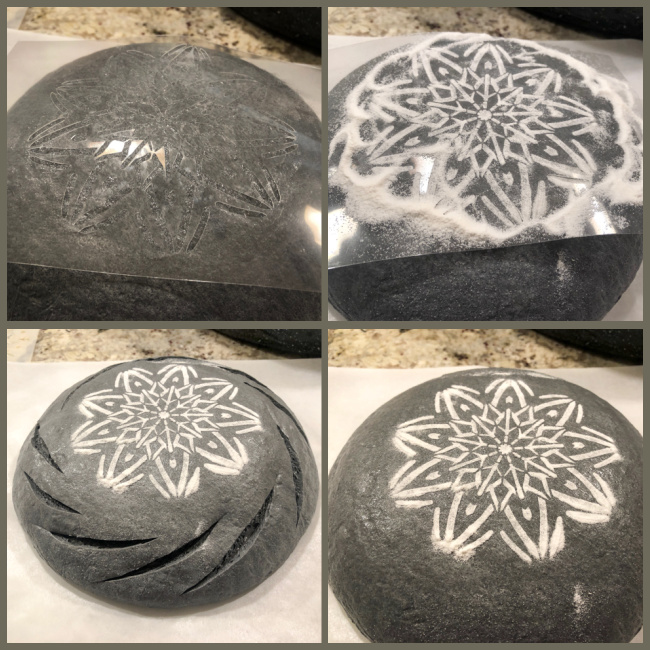
Comments: If you use a banneton for the final rise of your shaped loaf and it glues to it when you try to invert it to bake, you know that can be VERY frustrating. Sometimes it even distorts the beautiful shape achieved slowly overnight in the fridge. I normally add quite a bit of flour to the banneton before the dough goes in, but when I want to do the stencil decoration, I prefer not to have too much flour on the surface to start with. My tip is simple: place a plastic wrap (like Saran-wrap or other brands) inside the banneton and THEN add your bread – it does not prevent the ridges from making that cute impression on the surface (although it will be slightly less evident) and you will have NO issues inverting the dough to bake.

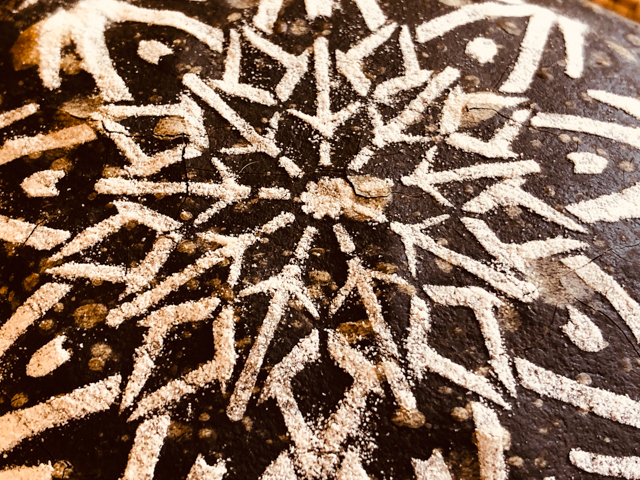
For the image to be sharp and evident, the trick is to have a little moisture on the dough, and rub the flour, gently but firmly. Hold the stencil in place with one hand, and rub the flour with the other. Lift the stencil as delicately as humanly possible. Finally, whatever design you choose, slash the bread in ways that coach the opening away from the design. You can cut four deep slashes in a square shape with the design in the center, or do what I did, a circular series of small, deep cuts all around.
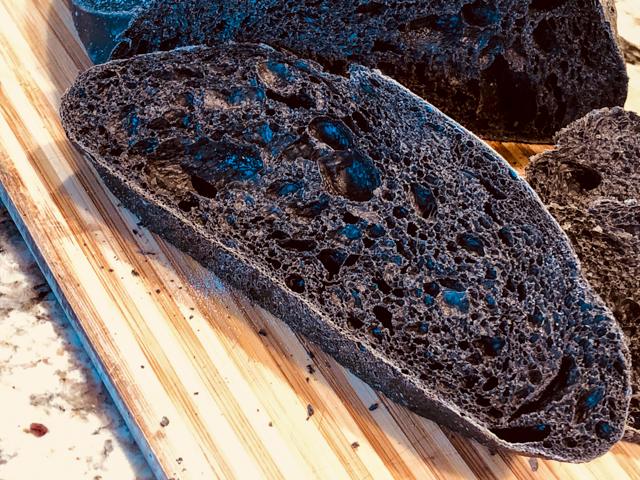
Peanut flour has no fat, but transfers the taste of peanuts quite well to the bread. It has a softer crumb than a straight sourdough with just bread and whole-wheat flours. And the charcoal contributes no taste. When we freeze slices after a couple of days, we like to cut one or two into croutons, because they look pretty amazing in that shocking black color.

ONE YEAR AGO: Chocolate Cake with Coconut Buttercream
TWO YEARS AGO: Berry Rebellion Tarts
THREE YEARS AGO: Bergamot-Cherry Macarons
FOUR YEAR AGO: Roasted Veggies with Queso Cotija Dressing
FIVE YEARS AGO: Creamy Broccoli and Mushroom Casserole
SIX YEARS AGO: Maple Walnut Biscotti
SEVEN YEARS AGO: Barley Risotto with Peas
EIGHT YEARS AGO: Oatmeal Fudge Bars
NINE YEARS AGO: Cauliflower Steaks
TEN YEARS AGO: Soft Spot for Chevre
ELEVEN YEARS AGO: Quick sun-dried Tomato Crostini

Thanks so much for sharing the stenciling tips! Your bread looks terrific.
I have not used peanut flour. I have used PB&Me but with sugar and salt for protein shakes in the past. I see there now is this product by PB&Me without added sugar and salt . Do you know if this powder is the same as peanut flour?
Cheers,
Anne
LikeLike
No that is not the same – I used peanut flour like this one https://www.amazon.com/Naturevibe-Botanicals-Peanut-Non-GMO-Protein/dp/B07Q2R48WR/ref=sr_1_1_sspa?dchild=1&keywords=peanut+flour&qid=1614266563&sr=8-1-spons&psc=1&spLa=ZW5jcnlwdGVkUXVhbGlmaWVyPUExMDVHUTRVMFVZMFdZJmVuY3J5cHRlZElkPUEwMTg4NTgwM1UzWVZDQ01WVEdYRCZlbmNyeXB0ZWRBZElkPUEwMjA1MjUxMjNCUzQ2NUQzU04zSCZ3aWRnZXROYW1lPXNwX2F0ZiZhY3Rpb249Y2xpY2tSZWRpcmVjdCZkb05vdExvZ0NsaWNrPXRydWU=
LikeLike
I also used a bit of peanut BUTTER in the bread and it works great too – it’s just different because it adds a lot of fat also, so you could experiment with what you have, using small amounts
LikeLiked by 1 person
Ok thanks! Good to know that PB&Me that is ground peanut powder is different than the peanut flour. I have never seen peanut flour so am looking forward to giving it a try.
I had thought about using peanut butter but only as a filling, spreading it on a rolled out rectangle of dough. Did not occur to me to try blending it in directly. I am more interested in getting a strong flavor of peanut butter than I am in minimizing fat content.
Your loaf is inspiring for both looks and flavor profile. Thanks for always keeping it fun and interesting. I learn so much from you.
Cheers,
Anne
LikeLiked by 1 person
These look lovely and too delicious to eat! Your blog is amazing and I hope u like mine too! See you around….
LikeLiked by 1 person
thank you!
LikeLiked by 1 person
Most welcome! You’d an check out my blog too! I started. A cooking and baking one a few months ago and we can cheer each other up!!
LikeLiked by 1 person
This turned out beautifully! I’m surprised that charcoal doesn’t add any flavour, interesting.
LikeLiked by 1 person
Beautiful! All you will need on the toast is a bit of jelly.
LikeLiked by 1 person