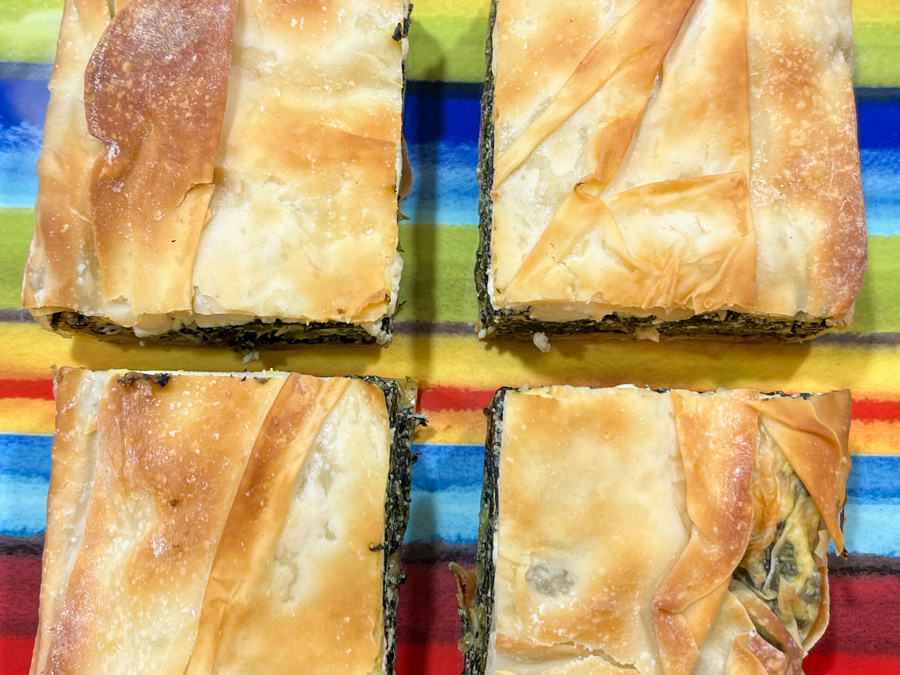
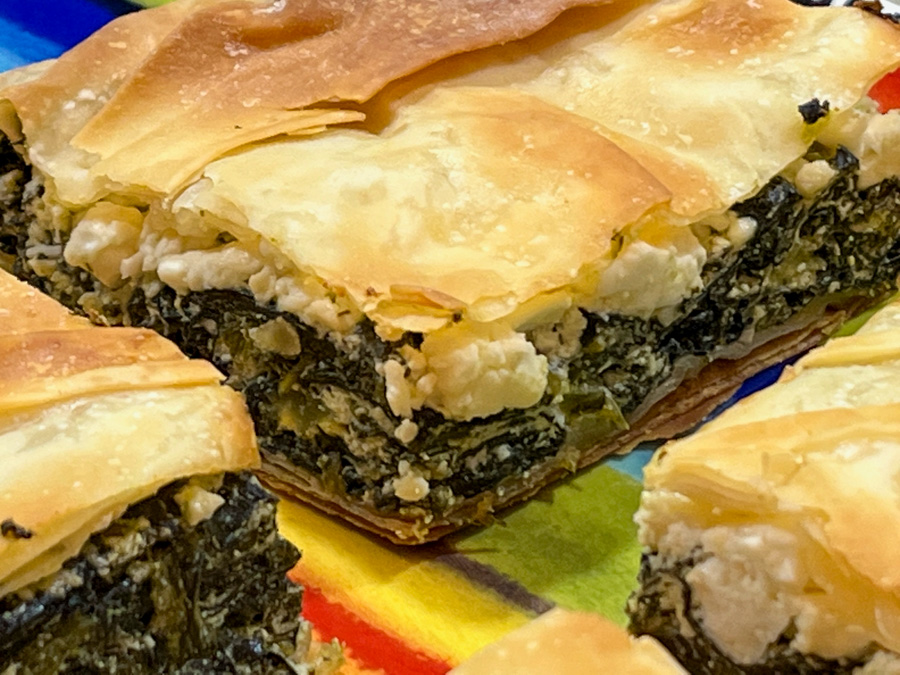
SPANAKOPITA, CRACKERS & THE ADVENTURE OF PHYLLO DOUGH

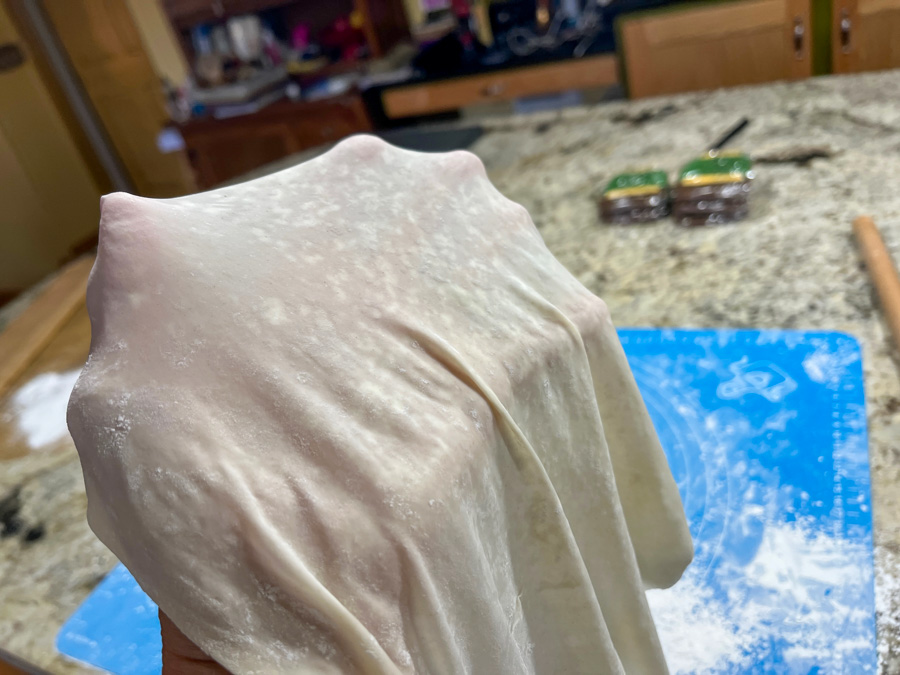
Have I totally lost my mind? No, not answering that. It turns out that I’ve always wanted to try making phyllo from scratch. When I was preparing for the Great American Baking Show, I had this annoying suspicion that it could be a technical challenge, but once you get accepted there is absolutely NO WAY to try to bake anything apart from the required, known bakes (signature and showstopper for every single episode). So I put it on the back burner ever since. But my friend Caro sent me the perfect rolling pin for the job, and it was the little nudge I needed. I tell you one thing, making phyllo is not for sissies. But I managed to have quite a bit of fun that weekend…

PHYLLO DOUGH
(following this video tutorial from Shereen Pavlides)

353 grams all purpose flour (3 cups)
1 teaspoon kosher salt
1 teaspoon baking powder
1 tablespoon olive oil
2 teaspoons white distilled vinegar
3/4 cup – 15 tablespoons warm water
corn starch – to roll out and dust the dough

Make the dough by adding all ingredients and HALF the amount of water to a KitchenAid type mixer fitted with the dough hook.

Knead for a few minutes, then start adding the other half volume of the water, tablespoon by tablespoon until the dough starts to clean the sides of the bowl. Once a smooth dough forms, remove it from the machine, knead it by hand for a couple of minutes, form a smooth ball and place in a large oiled bowl for one hour.

Divide the dough into 20 equal pieces (mine were 28g each). Place each little ball over a parchment covered baking sheet. Leave for one hour at room temperature.

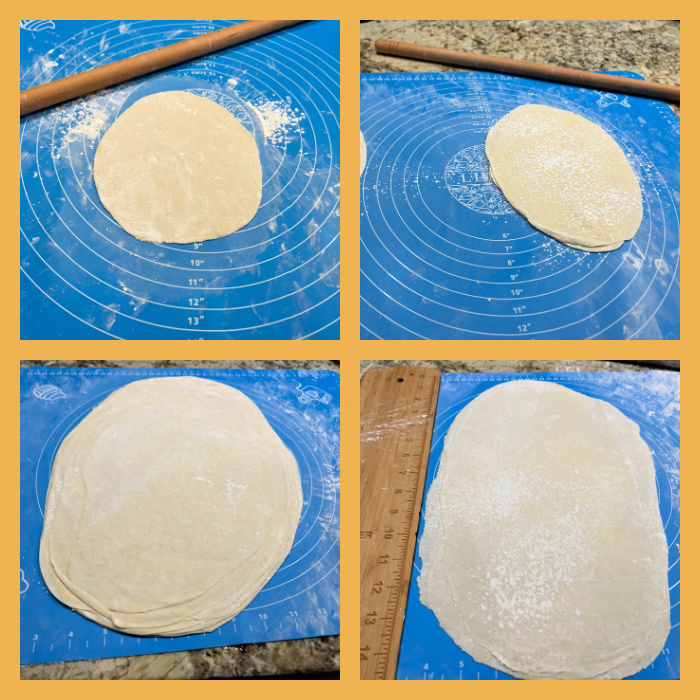
Start working the dough, first one little ball at a time, following her instructions on the video. My main change was to work with FOUR sheets at a time instead of TEN. I had too much trouble keeping them easier to separate, and decided ten was just too much for a first time. Four sheets at a time worked very nicely. That required 5 full cycles of rolling out to work on all 20 balls of dough. Another change I did was to separate each two sheets of phyllo fully rolled out with parchment paper, because I was afraid keeping them all together would result in severe sticking. I kept them in the fridge for a couple of hours before proceeding with the spanakopita and the crackers.


SPANAKOPITA
(adapted from several sources)

8 sheets of phyllo dough (if using commercial you probably get by with 6)
500 g spinach (preferably not baby spinach)
1 tablespoon olive oil
2 ribs of celery, finely diced
1 shallot, finely diced
salt and pepper to taste
nutmeg to taste
200 g full-fat ricotta cheese
100 g feta cheese, crumbled in large pieces
1 egg, beaten
olive oil spray

Boil water in a very large pan, add the spinach and press it down with a wooden spoon until the leaves wilt, 30 seconds or less. Drain into a large colander and place under running cold water to cool quickly. Drain well – squeeze out any excess water by pressing the spinach down with the wooden spoon, then squeezing with your hands. Using kitchen paper, pat the spinach dry into a compact shape, lay it on a board and roughly chop, then set aside.

Heat the olive oil in a large non-stick frying pan. Add the shallot, celery, and fry over a high-ish heat for 3-4 mins, stirring often, until softened and just starting to brown. Lower the heat, add the chopped spinach and stir for a few minutes to finish drying. Season with salt, pepper and nutmeg, and leave to cool.

Heat oven to 375F and put a baking sheet in to heat up. In a bowl, stir the ricotta into the beaten egg and season with pepper and a pinch of salt.

Lightly oil an 8 inch square baking pan. Lay one or two filo pastry sheets over the pan, spray with olive oil, and att two more, leaving a nice overhang on all sides. The pan should be completely covered, with a pastry overhang all round. Repeat the criss-cross layering with 2 more oiled filo sheets.

Stir the ricotta mixture into the spinach, then crumble in the feta. Lightly stir it in so you leave a few chunky pieces. Spoon this filling into the pan and level it. Bring the pastry sides up and over the filling, then brush a little oil over them. Add one or two more sheets sprayed with olive oil to top the spanakopita.

Bake for 30 to 35 mins until the pastry is crisp and golden. Leave to cool for 10-15 mins. Carefully remove from the pan, slice and serve.

ENJOY!

to print the recipes, click here

Comments: The most “traditional” way to roll out phyllo is going for a very large and thin sheet, patiently rolling and stretching the dough over a lightly floured cloth. I watched videos, read articles, and decided to go for a ‘beginner’s friendly” method, in which you divide the dough in small pieces and roll them thin, but to a smaller final size. The other change is that the sheets are stacked as you roll. The video advised to stack 10 sheets but I could not make it work. I went for 4 sheets at a time, and rolled them to 9 x 13 inches. Don’t expect to get phyllo as thin as the one you can buy at the store, particularly not on your first time. But I was pretty happy with the overall outcome. Very rewarding!

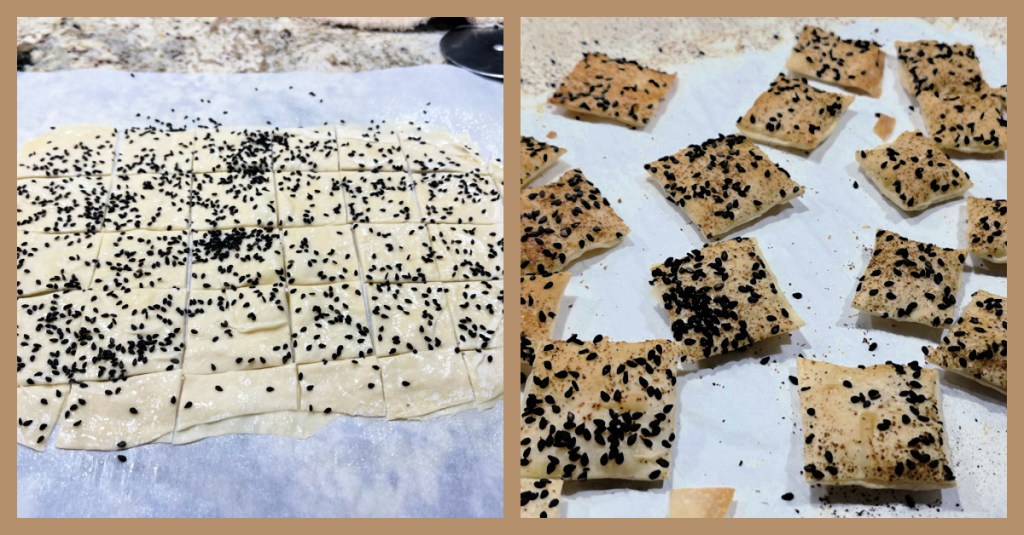
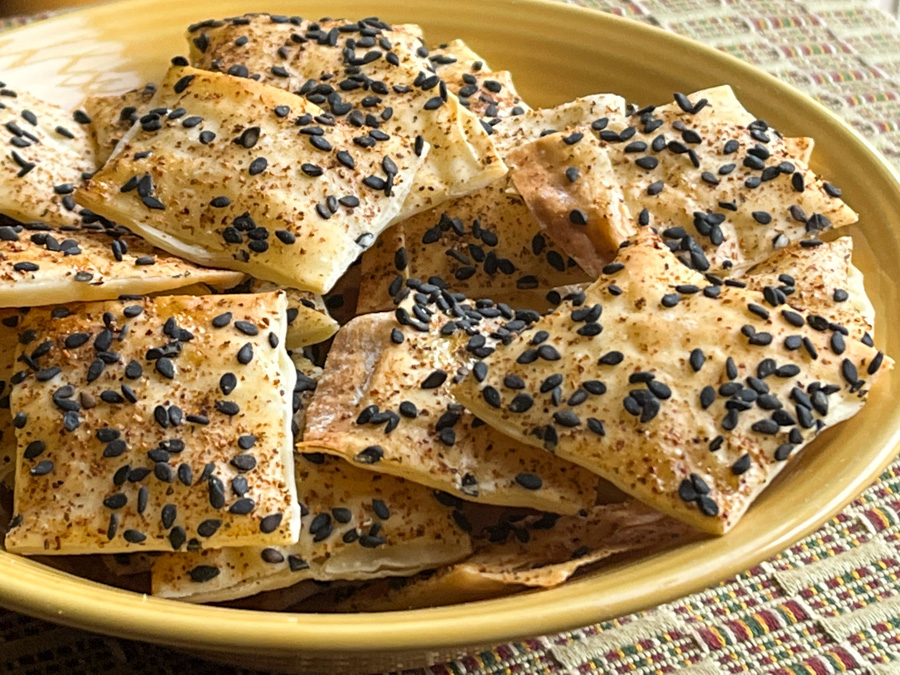
I also made crackers, using 4 of my precious sheets of home-made phyllo… Super simple. Stack the four sheets with a good spray of olive oil over each one. When you place the last sheet on top, brush some beaten egg white and add the toppings of your choice, so they will glue to the phyllo. I used black sesame seeds and Southwest spice from Penzey’s. Cut with a pizza roller and bake.

The crackers were absolutely delicious, and hubby thought I was a genius, crackers worth it of a Paul Hollywood handshake (allow me to dream, as I totally missed my chance, will you?)

I cannot lie to you, making phyllo from scratch is quite involved. I’ve found cornstarch in amazing places over the next couple of days. Things got wild, my friends… But how else can you have spanakopita made TOTALLY from scratch?

Caro, thanks so much for the thoughtful gift! I intend to make phyllo again, might even try the traditional approach and get a table cleared for the next adventure…

ONE YEAR AGO: Chicken Noodle Soup

TWO YEARS AGO: Floral Chocolate Stick Cookies

THREE YEARS AGO: Sally’s Spicy Mango and Coconut Macarons

FOUR YEARS AGO: Bouillabaise for a Chilly Evening

FIVE YEARS AGO: Bergamot-Cherry Macarons

SIX YEARS AGO: Roasted Veggies with Queso Cotija Dressing

SEVEN YEARS AGO: Creamy Broccoli and Mushroom Casserole

EIGHT YEARS AGO: Maple Walnut Biscotti

NINE YEARS AGO: Barley Risotto with Peas

TEN YEARS AGO: Oatmeal Fudge Bars

ELEVEN YEARS AGO: Cauliflower Steaks

TWELVE YEARS AGO: Soft Spot for Chevre

THIRTEEN YEARS AGO: Quick sun-dried Tomato Crostini

ZUCCHINI-CHICKPEA BAKED BITES

Yet another recipe that won’t win many votes in a beauty contest, but is so tasty and simple to prepare, I had to share with you. It happens to be vegan-friendly, because contrary to similar preparations, this one takes no eggs. All binding is given by processed chickpeas, straight from a can. It came from a Brazilian blog, but I modified it slightly to reduce the amount of carbs. Thank you to my niece Raquel for sending it to me, saying that the recipe “had my name written all over it.” I think she is right!


ZUCCHINI-CHICKPEA BAKED BITES
(inspired by this post)

200 g zucchini (1 large or 2 medium), grated on a large-hole grater
250 g canned chickpeas, well-rinsed and drained
basil leaves to taste
1/2 tsp salt + more to sprinkle on zucchini
1/2 tsp smoked paprika
1/8 cup almond flour
1/8 cup all-purpose flour
panko bread crumbs
olive oil spray

Heat oven to 420F.

Salt the grated zucchini lightly and allow it to sit on a colander for 10 minutes. Squeeze the zucchini dry preferably using a towel.
Add to a food processor together with the chickpeas, salt, paprika and basil. Process until fully smooth, stopping to clean the bowl with a spatula once. Add the two flours and process just to bind it all.

Form small patties, cover with panko bread crumbs on both sides. Place them separated over aluminum foil and spray the surface with olive oil. Bake for 10 minutes, turn them gently, spray more olive oil on the top. Bake for 10 to 15 minutes longer, until golden brown. Serve with you favorite sauce or plain.

ENJOY!

to print the recipe, click here

Comments: I was a bit skeptical that the little morsels would hold shape without the help of an egg, but although very fragile, I did not have problems. Just be gentle. If you want to fry them, you could still keep them vegan by using the liquid from the chickpea can to make a whipped “egg white substitute”, coat them with that and add bread crumbs. But I tend to avoid frying because I dislike dealing with the leftover oil. Air-frying could be also a good option but our fryer has a small basket and I would have to fry in batches, so I went with the baking option.

A bit of tomato sauce and grated Parmigiano is also a nice way to serve them, although obviously not vegan anymore. I will definitely make them again, and pair with a tahini sauce which I think will be another great serving idea.

ONE YEAR AGO: Slow-Cooker Hoisin Pulled Pork

TWO YEARS AGO: I Will Cracker you Up

THREE YEARS AGO: Pickling Ribbons

FOUR  YEARS AGO: Green Beans and Carrots with Spicy Almonds

FIVE YEARS AGO: Quiche 101

SIX YEARS AGO: Persian Butternut Squash Soup

SEVEN YEARS AGO: Walnut Cranberry Sourdough Bread

EIGHT YEARS AGO: Ottolenghi in Brazil?

NINE YEARS AGO: Roasted Winter Vegetables with Miso-Lime Dressing

TEN YEARS AGO: 2012 Fitness Report: P90X2

ELEVEN YEARS AGO: Caramelized Bananas

TWELVE YEARS AGO: Roasted Lemon Vinaigrette

THIRTEEN YEARS AGO: Whole Wheat Bread

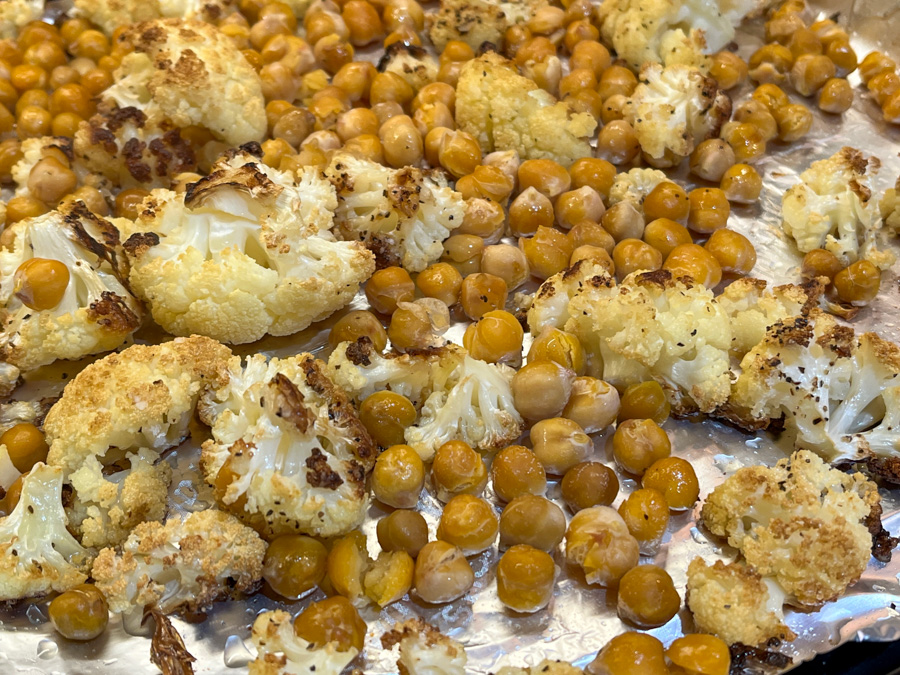
ROASTED CAULIFLOWER WITH CHICKPEAS AND QUINOA

This goes to the OMG FILES – if I had one, that is… Great recipe brought to my attention by my friend Eha. You can find the original jumping here. I modified it quite a bit, turning it from salad into warm side dish, as at the present time we endure temperatures that have the potential to make Brazilians weep.


ROASTED CAULIFLOWER WITH CHICKPEAS AND QUINOA
(slightly modified from Cook Republic)

for the roasted component:
1 medium-sized head of cauliflower, cut in florets
1 tsp smoked paprika
1 tsp ground cumin
2 – 3 tbsps olive oil
½ tsp salt
black pepper, freshly ground
1 can of chickpeas, drained and well-rinsed

for the dressing:
2 tbsps balsamic vinegar
1 tbsp mustard
1 tsp lemon zest
1 tbsp lemon juice
2 tbsps olive oil

to assemble the dish:
1 cup cooked quinoa, still warm
handful of raisins
handful of sliced almonds
fresh parsley, chopped, amount to taste

Heat oven to 400F. . Line a large, rimmed baking tray with non-stick aluminum foil or parchment paper.

Mix cauliflower florets, smoked paprika, ground cumin, olive oil, salt and pepper in a medium bowl. Spread cauliflower on the prepared tray and roast in the preheated oven for approximately 20 minutes until golden and tender. Add the drained chickpeas, a little more olive oil and roast everything together for 5 to 10 additional minutes. Remove from the oven and set aside to cool slightly.

Prepare the dressing by mixing balsamic vinegar, grain mustard, lemon juice and zest and olive oil in a small bowl. Mix well.
To assemble the salad, add warm quinoa quinoa to a large bowl. Add spring onion, raisins, toasted almond flakes and roasted cauliflower. Top with parsley and salad dressing. Mix well to ensure the dressing coats everything evenly. Serve with your main dish of choice.

ENJOY!

to print the recipe, click here

Comments: Amazing combination of flavors and textures, I do think it is much better warm than it would be cold, but as I always say, your kitchen, your rules. Make it as a salad if you prefer, or if perhaps you are living the height of the summer right now. The balsamic vinegar is quite prominent so I advise you to choose a brand you love. The original recipe called for grainy mustard, which I did not have, so I went with regular, smooth mustard. Everything worked great, from the raisins to the almonds, and leftovers were delicious two days later. This one is a keeper all the way, and we will be enjoying it regularly. Thank you, Eha!

ONE YEAR AGO: A Savory Phyllo Pie

TWO YEARS AGO: Nut-Free Lady Grey Macarons

THREE YEARS AGO: Mini-Heart Cakes for your Valentine

FOUR YEARS AGO: Blue Moon Milk

FIVE YEARS AGO: Slow-Cooked Chicken Meatballs

SIX YEARS AGO: Zesty Flourless Chocolate Cake

SEVEN YEARS AGO: Maple Pumpkin Pecan Snacking Cake

EIGHT YEARS AGOSilky Gingered Zucchini Soup

NINE YEARS AGO: Sweet Fifteen!

TEN YEARS AGO: Sesame and Flaxseed Sourdough

ELEVEN YEARS AGO: Green Beans with Miso and Almonds

TWELVE YEARS AGO: Saturday Morning Scones

THIRTEEN YEARS AGO: White Bread

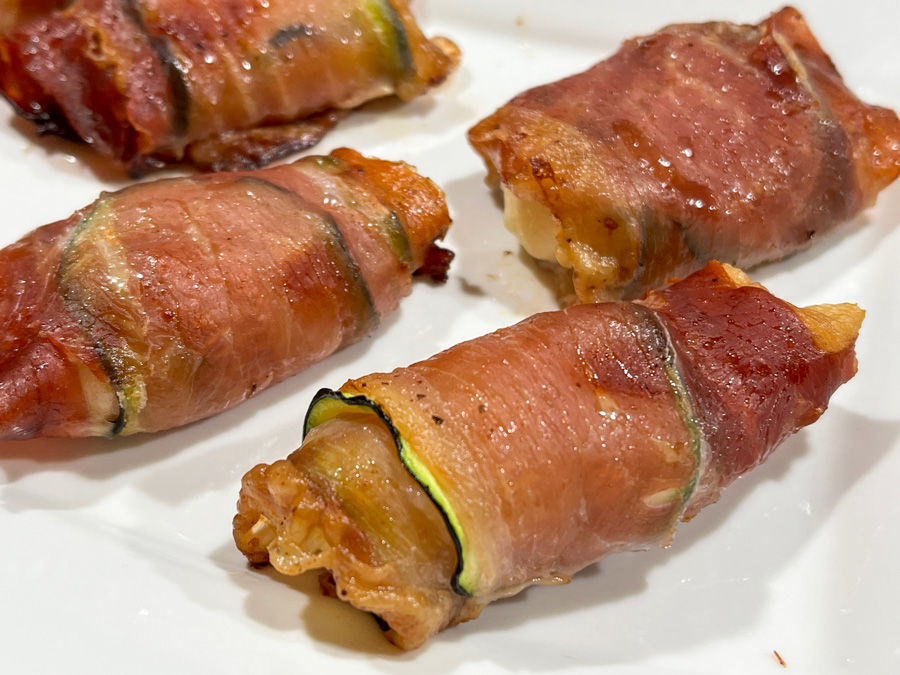
ZUCCHINI-PROSCIUTTO PARCELS

Two ways to make these delicious little morsels, perfect as a little appetizer or even as a side-dish, which is how we served them. You can use a creamy cheese, such as ricotta, perhaps mixing a bit of egg yolk for added structure, but I opted for halloumi cheese, that retains its texture quite well during baking. The first method requires a mandolin to slice the zucchini, as you need really thin slices so that they bend. You could slice it thicker and blanch them before forming the parcels, but I prefer to skip that additional step.


ZUCCHINI-PROSCIUTTO PARCELS
(from The Bewitching Kitchen)

1 or 2 large zucchini
prosciutto slices, one per appetizer
1/4 cup olive oil
juice of half a lemon
salt and pepper to taste
halloumi cheese cut in pieces, one per roll

Whisk the olive oil with lemon juice, season with salt and pepper. Reserve.

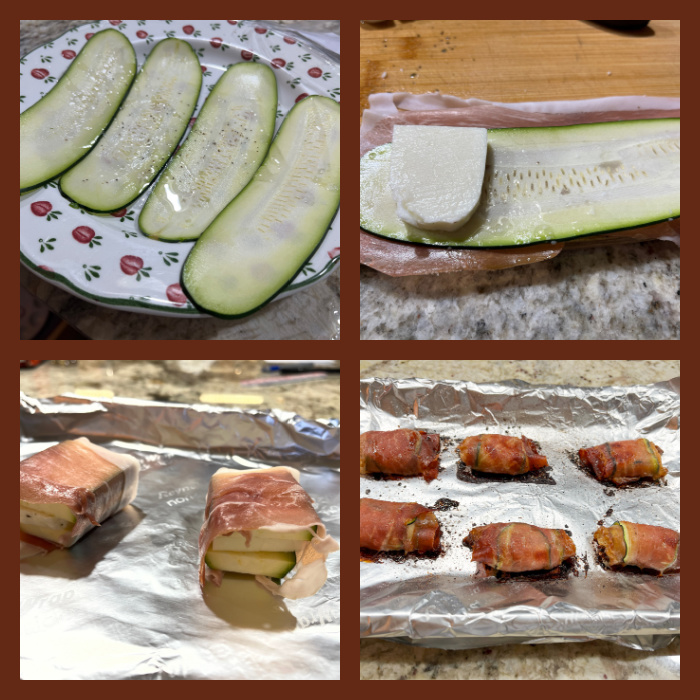
If using ribbons, cut the zucchini in very thin slices, as thin as your mandolin will go. If using zucchini pieces, cut them in squares of a size similar to the cheese. Brush the zucchini with the emulsified oil-lemon. Assemble each little package, either rolling or stacking.

Place over aluminum foil on a baking sheet and bake at 400F util the prosciutto is golden brown (about 25 minutes, depending on size). The zucchini will release a lot of juice during baking but it will dry out as it continues roasting. Do not panic, it will look a little hopeless before it looks great…

Serve while warm.

ENJOY!

to print the recipe, click here

Comments: I don’t know which version I prefer. The one with very thin zucchini slices looks a little more elegant but the zucchini pretty much disappears as far as taste and texture are concerned. The second way to do it makes the zucchini more prominent, but it does not look as good, so it’s really a matter of deciding which path you want to take. I do like the use of halloumi. If you go with a melting cheese, definitely do the zucchini ribbons to wrap the whole thing better.

ONE YEAR AGO: Double Peanut Sourdough Loaf

TWO YEARS AGO: Fennel-Rubbed Shrimp in Light Coconut Sauce

THREE YEARS AGO: Puff Bread Balls, Two Salads and a Cookbook Review

FOUR YEARS AGO: Pistachio-Caramel and Apple Mousse Cakes

FIVE YEARS AGO: La Couronne Bordelaise

SIX YEARS AGO: A Special Birthday Dinner

SEVEN YEARS AGO: Duck Confit for a Special Occasion

EIGHT YEARS AGO: Tuscan Grilled Chicken and Sausage Skewers

NINE YEARS AGO: Celebrate Wednesday with Pork Tenderloin & Apples

TEN YEARS AGO: Salmon Wellington

ELEVEN YEARS AGO: The Green Chip Alternative

TWELVE YEARS AGO: Weekend Pita Project

THIRTEEN YEARS AGO: Let it snow, let it snow, eggs in snow

ACCORDION POTATOES

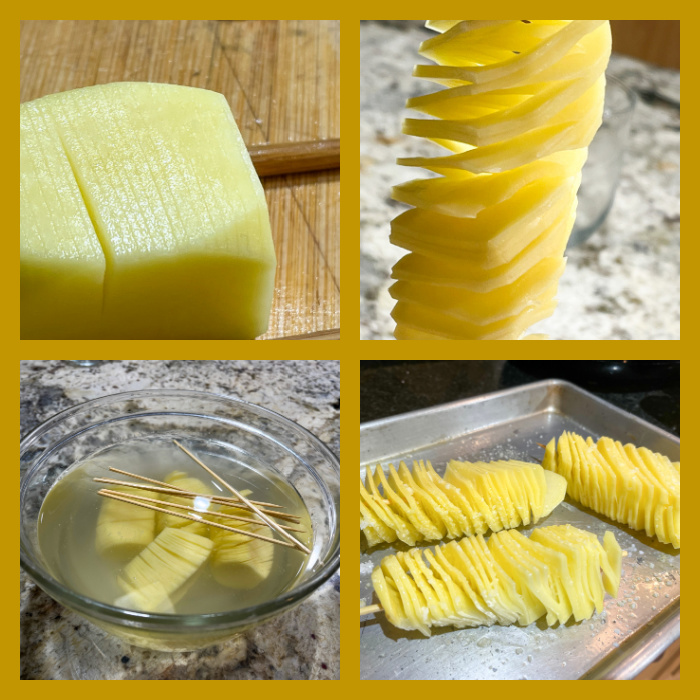
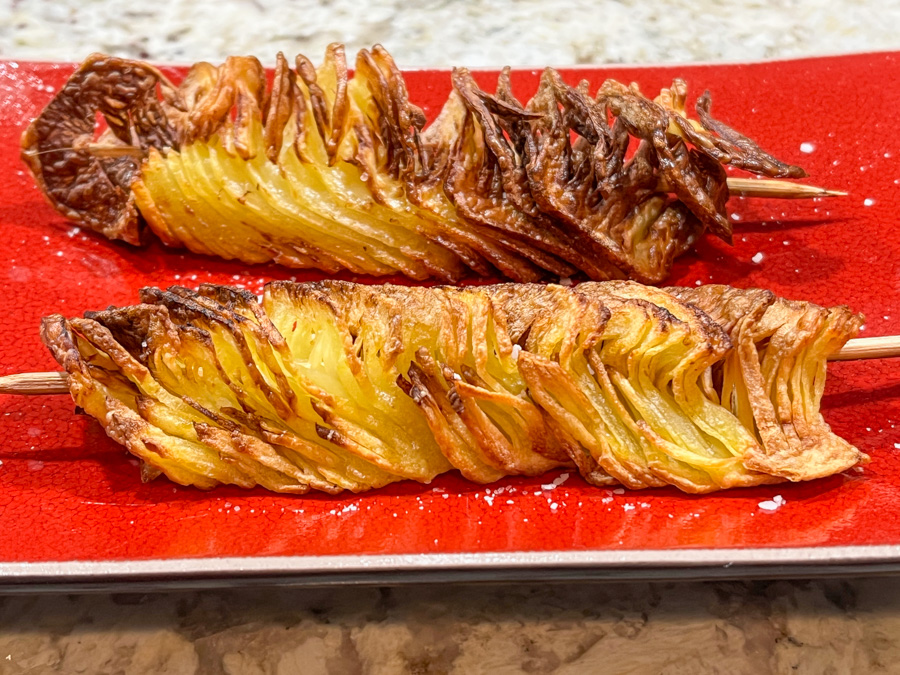
I am not a fan of tiktok, but apparently this method to cut the potatoes was a huge hit a while ago, everybody doing, sharing videos, raving about it. I was intrigued, decided to give it a try. Super cool technique, and if you don’t need to make too many of those, the air-fryer does a great job. I made three, which fit well in the basket of our fryer. Most people deep fry the potatoes, but I almost never choose that path. I suppose you could use a very hot oven too, but I haven’t try it, so feel free to experiment. If you want to see how to cut the potatoes, this video explains it in detail.

ACCORDION POTATOES
(from the Bewitching Kitchen)

3 large Russet potatoes
olive oil
salt and pepper

Peel the potatoes and trim them to form a nice rectangle shape. Place the trimmed potato over a cutting board, nudged between two chopsticks that will prevent your knife blade from cutting the potato all the way through. Make very thin slices – around 1mm thick. Turn the potato over, and make the same type of cut, but diagonally (check the video if you need clarification).

Thread a wooden skewer in the center of the cut potato and carefully open it like an accordion. Soak the potatoes and skewers in cold water for 30 minutes or so. Dry very well. Spray olive oil, season with salt and pepper and air-fry until golden brown, flipping the pieces every 5 minutes or so. Time will vary, depending on the power of your air-fryer and size of the potato.

You can deep fry if you prefer. Season with additional before serving.

ENJOY!

to print the recipe, click here

Comments: It is hard to understand how to cut the potato without watching a video, so I advise you to either watch the one I linked in the post, or search the many options available on youtube. The most important thing is to cut the slices thin, or you won’t have the accordion effect. I sometimes wish we had a larger air-fryer, and this was definitely one recipe that would benefit from it. But for the two of us, three accordion slabs are enough, so no need to invest in a bigger machine.

.

The best part is the crispy edge, but the center will be cooked nicely, very creamy. Even if you mess up and cut the slices a bit thick, it will work, but might take a little longer and not be so crispy. Experiment with it, we made it three times already. I intend to try with sweet potatoes soon…

ONE YEAR AGO: Braised Lamb Shanks in Clay Pot

TWO YEAR AGO: Cookies with a Smile

THREE YEARS AGO: Pearled Farro with Asparagus Coins

FOUR YEARS AGO: Pistachio Caramel and Apple Mousse Cake

FIVE YEARS AGO: Someone turns 70 today!

SIX YEARS AGO: Carioca Cake, the Final Chapter

SEVEN YEARS AGO: Duck Confit for a Special Occasion

EIGHT YEARS AGO: Ken Forkish’s Warm Spot Sourdough 

NINE YEARS AGO: Bran Muffins, Rainbows, and a wonderful surprise!

TEN YEARS AGO: Salmon Wellington

ELEVEN YEARS AGO: The Green Chip Alternative

TWELVE YEARS AGO: Weekend Pita Project

THIRTEEN YEARS AGO: Let it snow, let it snow, eggs in snow