SECRET RECIPE CLUB: GLUTEN-FREE & VEGAN RASPBERRY BARS

Last Monday of March, a month that makes me happy for several reasons. I was born in March, Phil and I got married 15 years ago in March, and the month also welcomes the beginning of Spring.  Can you fully grasp the unmeasurable joy associated with it? It means I survived another winter, and here I am, alive and kicking to share with you one more adventure as part of The Secret Recipe Club.   You know, that event that pairs two food bloggers in secret, and then the whole group posts about their chosen dish at exactly the same time. My assignment this month was the blog Without Adornment, hosted by Bean. She has a degree in Chemical Engineering, and her hobbies are cooking/baking, and photography, so of course her blog is a perfect venue to showcase her talent.  I was thrilled by this assignment, because Bean is a very accomplished baker who must make exclusively gluten-free recipes. Those of you who have gluten allergies know how tricky it can be to try and mimic the delicious cookies, breads, pies, and muffins that rely on gluten for perfect texture and taste. Browsing her blog really opened my horizons and the list of goodies I wanted to try was extensive.  To name a few, I was inclined to bake a batch of her White Chocolate Oatmeal Cookies with Cranberries,  then almost chose her Gluten-Free Pear Clafoutis, Another amazing option that I will bake soon: Dairy Free Creme Brulée (using coconut milk, how sweet is that?). As usual, savory stuff appeals a lot to me, so I also saved her Vegan Walnut Zucchini Crackers for final consideration. After a little bit of a mental struggle,  I went with her Raspberry Bars, in part because they use quinoa flakes and I had a box sitting in my pantry begging to come out and play.  I could not miss the opportunity…

RasberryBars

GLUTEN FREE VEGAN RASPBERRY SQUARES
(from Without Adornment)

1/2 cup almond flour
1/2 cup brown rice flour
1/4 cup tapioca starch
1/4 cup coconut flour
1 tsp. baking powder
1/4 tsp. salt
1 cup oats
1/2 cup quinoa flakes
3 tbsp. palm sugar
1/2 – 2/3 c. coconut oil
3 cup thawed raspberries, with as much of the liquid drained as you can.
3 – 4 tbsp. honey
1 tsp. cinnamon
1/2 tsp. nutmeg
1/2 tsp. cardamom
1/2 tsp. pure vanilla extract

Heat oven to 350F.

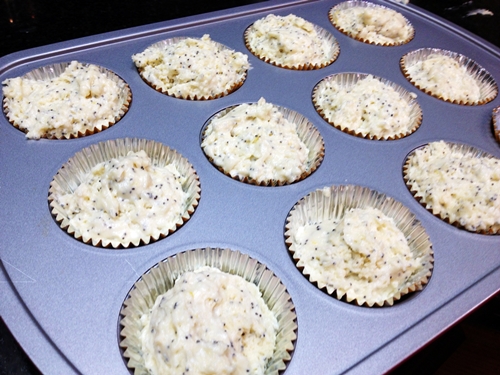
Whisk together flours, baking powder and salt. Add oats, quinoa flakes and palm sugar and mix until evenly distributed. Add in unmelted coconut oil. Using your fingers, work the coconut oil into the flour mixture until there are no lumps remaining and the mixture is crumbly.

In a separate bowl, stir together raspberries, honey and spices. Add more sweetener to reach desired sweetness. Press over half of the crumb mixture into a greased 8″ square pan. Scoop the raspberries onto the pressed bar mixture and distribute evenly. Sprinkle the remaining crumb mixture on top of the raspberries and pat lightly.

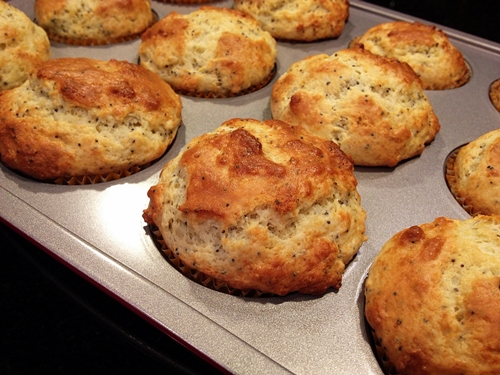
Bake for 30 – 40 minutes or until topping is light brown.

Cool completely before cutting into squares.

ENJOY!

to print the recipe, click here

composite1

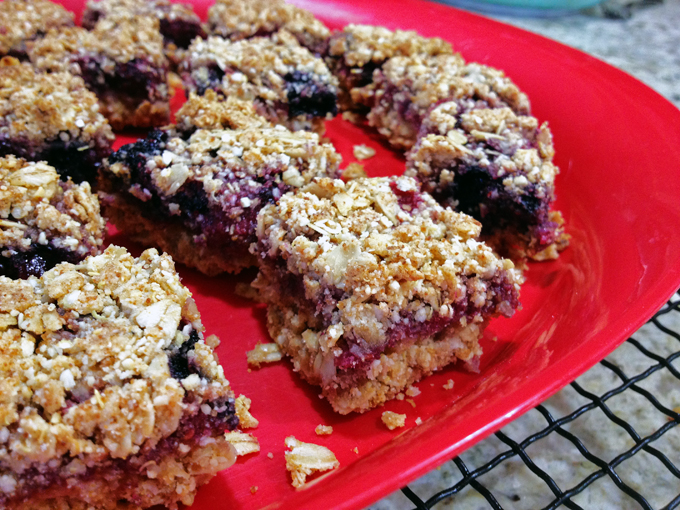
Comments:  I changed the recipe slightly by using a mixture of raspberries and blueberries, as the price tag on the raspberries was a little high. I don’t think it hurt anything, it just made the color of the filling darker than Bean’s concoction, and also a bit more chunky, as the blueberries retain their shape. The cute box of quinoa flakes was one of those classic impulse buys that I am often a victim of. But I knew the flakes would come in handy, and was glad to be able to use them in this recipe.

composite2

Gluten-free baking is really a huge challenge, because without gluten to provide that nice, elastic structure, baked goods tend to be dry, and much less pleasant to eat. However, using the right mixture of flours and grains, one can get close enough to the “real thing” and these bars are a perfect success story.  I took the squares to the department and did not mention they were gluten-free. Nobody seemed to notice, and they were inhaled in a little over one hour.  I call it a success story indeed.

Bean, I hope you had as much fun with your assignment as I had with mine!  And for those reading my blog, make sure to click on the blue amphibian smiling at you at the very end.  She (or he, who knows?) will take you to a new page showing all the tasty concoctions made by my virtual friends of The Secret Recipe Club.  Enjoy the collection!

ONE YEAR AGO: Lasserre, a French Classic

TWO YEARS AGO: Sourdough Bread with Walnuts and Dates

THREE YEARS AGO: Braised Brisket with Bourbon-Apricot Glaze

FOUR YEARS AGO: The Real Vodka Sauce

FIVE YEARS AGO: Pork Tenderloin and Blue Cheese

BISCOTTI FOR A BABY SHOWER!

Biscotti Baby ShowerToday I have a special post for you!  We are throwing a virtual baby shower for a great food blogger I got to know through the Secret Recipe Club, Tara,  from Tara’s Multicultural Table. We are all baking biscotti for this party. Why biscotti, you may ask? Well, it is her second baby, and these are twice baked cookies: a natural choice!  Wanna see what I came up with? Here they are:

MapleWalnutBiscotti

I was quite excited to participate, because – believe it or not – I’d never made biscotti from scratch. But first, let me share a story. My first time enjoying biscotti was in 1991, during a visit to Italy. The best possible place to get acquainted with this delicacy, if you ask me.  I had given a seminar in a big vaccine biotech company, and they took me out for a fantastic dinner later that evening. After dinner, where vino was flowing freely, someone insisted that we should all head to a bar so that I could try biscotti dunked in grappa. I knew nothing about either entity, but quickly realized that they complement each other perfectly. The biscotti are hard, but the grappa softens it. And the sweetness of the biscotti masks quite well – maybe too well –  the alcohol in the grappa. Of course, after dunking, you’re supposed to drink the leftover grappa with the little tiny bits of biscotti that found their way to the bottom of the glass. Great food, vino, grappa, all framed by the beauty of Tuscany! Good thing I had already given my talk at that point, and was in full “dolce far niente” mode. At any rate, it was a magical evening. I remember a complete sense of awe as I walked back to my hotel under the most amazing full moon shining over the streets of Siena.  One of those perfect moments that stay with you forever. Since biscotti are so dear to my heart, I spent quite a bit of time debating which kind to bake for Tara’s baby shower. Of course, keeping it all baby-friendly, I’ll ask you to skip that dunking in grappa.  Unless there’s a full moon outside, then all bets are off… 😉

tray

MAPLE WALNUT BISCOTTI
(from Susan Russo, for NPR)

Makes about 36 biscotti

for the biscotti:
2 cups unsalted walnuts
1 cup granulated sugar
1 cup light brown sugar
1/2 teaspoon ground cinnamon
2 teaspoons baking powder
2 1/2 cups all-purpose flour
2 large eggs, plus 1 egg, lightly beaten, for brushing tops of loaves
3 tablespoons maple extract

for the icing:
1/2 cup confectioners’ sugar
3 tablespoons maple syrup

Position racks in the upper and lower thirds of the oven and preheat to 350 degrees. Line 2 large baking sheets with parchment paper. Place walnuts in a single layer on a baking sheet and toast in the 350-degree oven for 10 minutes. Transfer to a cutting board and coarsely chop. Set aside.

In a large bowl, hand mix toasted walnuts, sugars, cinnamon, baking powder and flour. In a small bowl, whisk eggs. Add maple extract and whisk until well blended. Add to the flour mixture. Stir a few times. Work the batter together with lightly floured hands. Keep squeezing the batter with your hands, until a dough starts to form. Shape as a ball and divide it into 4 equal pieces.

On a lightly floured surface, place one piece of dough, and using your hands, roll into a log shape that is approximately 8 inches long, 2 inches wide, and 3/4 of an inch high. If it’s sticky, simply dust your palms with more flour. Repeat with remaining three pieces of dough. Brush loaves all over with 1 lightly beaten egg.

Bake for 40 minutes, rotating pans halfway through, or until the tops of the loaves are shiny and deep golden. Cool on a rack for about 20 minutes before slicing, using a large serrated knife. Cut 3/4-inch-thick slices, using a sawing motion to prevent crumbling. Each loaf should yield 9 to 11 cookies.

Place slices on their sides back on to the baking sheets; place in the still warm oven with the temperature off and the door closed for 30 to 60 minutes. The longer they stay in the oven, the harder they will become. Remove from oven and cool completely before storing in an airtight container.

To make the maple icing, mix the confectioners’ sugar and maple syrup in a small bowl and whisk briskly until the icing is smooth and opaque and clings to the back of a spoon. Dip a teaspoon into the icing and drizzle the spoon back-and-forth over the biscotti. Allow to dry completely before storing. Store biscotti in an airtight container, preferably a tin, which helps keep them crisp.

ENJOY!

to print the recipe, click here

composite1

Comments: I was a bit nervous about this baking adventure, because I know that biscotti can be tricky to make, and that very few things are worse than bad biscotti, right?  I fell in love with the flavors of this recipe because anything with maple makes me all warm inside, and walnuts only make it better.  I suppose most people go crazy for chocolate, but I usually opt for other flavors in sweets.  The recipe called for maple extract, because it has a more concentrated flavor, so I was “forced” to place an order for some. It smells amazing!

composite2
One of the tricky things about biscotti is slicing them after the first bake. You are supposed to wait for 20 minutes, and use a good quality serrated knife for the job. Worked great, I had no problems. By the way, I made half the recipe, and ended up with 18 biscotti, some quite small, cut from the edges. They are also called “sacrificial biscotti”. Honest. Not making that up.

I went for a double type of icing, the maple called for in the recipe, and then a drizzle of chocolate for cosmetic purposes.  But, after tasting them, I do think the chocolate drizzle did more than beautify them. The taste complements the maple and walnuts quite well.

dunking

Now that I am older, not necessarily wiser, I dunk my biscotti into a steaming hot cup of cappuccino… Great way to start any day!

Tara, I hope this virtual Baby Shower brought a big smile to your face, we certainly had a great time planning and making sure it was kept secret until today…

And here I share  the collection of biscotti from all virtual secreters who joined this party:

Biscotti Bites from Nicole at I am a Honey Bee

Blueberry Pecan Biscotti from Renee at Magnolia Days

Cinnamon Biscotti from Lauren at Sew You Think You Can Cook

Cranberry Pistachio biscotti from Stacy at Food Lust People Love

Dark Chocolate Orange Biscotti from Amy at Amy’s Cooking Adventures

Green Tea Biscotti Cookies from Rebekah at Making Miracles

Jam-Filled Mandelbrot from Kelly at Passion Kneaded

Maple Walnut Biscotti from Sally at Bewitching Kitchen

Nut-Free Anise Biscotti with Chocolate Chips from Susan at The Wimpy Vegetarian

Orange and Dark Chocolate Biscotti from Lynsey at Lynsey Lou’s

Orange, Date, and Almond Biscotti from Karen at Karen’s Kitchen Stories

Parmesan-Peppercorn Biscotti from Camilla at Culinary Adventures with Camilla

Spa Water from of Dorothy at Shockingly Delicious

Biscotti Baby Shower

ONE YEAR AGO: Barley Risotto with Peas

TWO YEARS AGO: Oatmeal Fudge Bars

THREE YEARS AGO: Cauliflower Steaks

FOUR YEARS AGO: Soft Spot for Chevre

FIVE YEARS AGO: Quick sun-dried Tomato Crostini

THE SECRET RECIPE CLUB: HERBED GOAT CHEESE SOUFFLES


Herbed Goat Cheese Souffle
Last Monday of February, a month that used to be my favorite. Summer in Brazil, carnival (not that I was that much into it, but still, a big break from work in the height of the summer was always well-received). That all changed 23 years ago, when I first moved to France and then, a couple of years later permanently to the US.  February is now a month I do my best to survive. I count the days for it to be over to get some hope of life percolating back into my veins. ANYWAY, I am sure you are not here to read me whine and pout. Instead, you are here for the reward of a revelation: which blog was my assignment for this month’s adventure with The Secret Recipe Club: it was the The Wimpy Vegetarian!  I literally screamed with joy when I got the email notification, because as a regular reader of Susan’s blog, I felt totally at home “stalking” it.  You should visit her “About” page, but let me just say that when she decided to become a vegetarian, or as she put it “to focus more on a plant-based diet“, her husband was not exactly thrilled. He went along with it for a while, but at some point started referring to “farro” as “horse food“. No bueno, folks. But Susan fought back using all the culinary skills accumulated from her classes at Tante Marie Cooking School, and turned veggie dishes (horse food included) into concoctions her husband could not resist. She succeeded big time, and her blog is there to show us how. There were so many dishes I bookmarked as tempting possibilities, but I narrowed them down to these:  Rustic Cauliflower and Tomato Gratin, Arepas Rellenas (I even have the special flour to make them, so I must get to this recipe at some point), Skillet Baked Corn Pudding, Farinata (another recipe I’m always dreaming about), Sweet Potato Biscuit Pillows (excuse me, I need to wipe drool off the side of my mouth), Broccoli-Cheddar Quinoa Casserole Tart. Susan is a fantastic cook and often enters – and wins – cooking contests, so pretty much anything on her site feels quite special.  Pay her a visit, and become a subscriber, even if you are not a strict vegetarian.

For my assignment, I went with very elegant Herbed Goat Cheese souffles. They turned out amazing!

baked

HERBED GOAT CHEESE SOUFFLE
(from The Wimpy Vegetarian)

1/2 teaspoon dried lavender
zest from 1/2 medium lemon
3 tablespoons finely grated Parmesan cheese
pinch of salt
freshly ground black pepper
3 ounces fresh soft goat cheese
1 ounce ricotta cheese
1 tablespoon fresh thyme leaves
1 tablespoon honey
3 eggs, separated
1/4 cup low-fat milk
2 teaspoons all-purpose flour (I used 4)
butter for the ramekins

Heat the oven to 375 degrees F. Prep the ramekins by smearing them with butter and sprinkling grated Parmesan cheese on the bottoms and around the sides. Set aside.

Rub the dried lavender between your fingers to reduce as much as half of the buds to a powder. Combine this with the lemon zest, 1 tablespoon of Parmesan, salt and pepper in a small bowl. Set aside.

In a medium bowl, combine the goat cheese, ricotta, 2 tablespoons of Parmesan cheese, thyme, honey, egg yolks, milk and flour together. Stir well to completely combine. Add to the reserved lavender mixture.

In a small bowl, whip the egg whites just to a firm peak. Be careful not to get them too firm, or they’ll be difficult to fold into the cheese-yolk mixture. Fold the beaten egg whites into the cheese-yolk mixture in thirds using a large spatula. It’s fine to have lumps of egg whites in the mixture – it will not be smooth. Place the ramekins in a baking dish and fill the dish with hot water one-half the way up the sides of the ramekins. Carefully spoon the cheese-egg mixture into the ramekins, filling them 2/3 full.

Bake for 20 minutes, or until browned on top and springy – firm to the touch. Remove and allow to cool in the ramekins for 15 minutes. The souffles will collapse and start to pull away from the sides of the ramekins. Run a knife around their edges and turn the ramekin upside down. The souffle should slide right out.

ENJOY!

to print the recipe, click here

composite1

Comments: What I loved the most about the recipe was the inclusion of lavender. It gave the souffle a sort of unusual component, Phil could not guess what it was, but once I told him it was lavender he could detect it. You need to add just a small amount, it is quite potent, don’t go crazy with it.  I was also surprised by the method of preparing the base, as I always make a bechamel type sauce. For this recipe, you mix it all and do not pre-cook, it goes straight into the oven, in a water-bath environment. Because I was afraid the mixture was a bit too liquid, I added double the amount of flour.  Not sure it was necessary, but they ended up with a very nice texture, and un-molded easily.

served2

This is the type of recipe that would be perfect for entertaining, or for that special dinner for two, candlelight and all… a first date, a first year anniversary, you catch my drift.  Any meal will be special when these are part of the menu!

Susan, it was a great pleasure to indulge a little more deeply into your blog, I hope you also had a blast with your assignment this month…

For my readers, the usual reminder to poke the blue frog at the end of my post. She will take you to plenty of great recipes made by my fellow virtual friends at The Secret Recipe Club.

ONE YEAR AGO: Barley Risotto with Peas

TWO YEARS AGO: Jammin’ Blueberry Sour Milk Pancakes

THREE YEARS AGO: Scallops with Black Pasta in Orange Cream Sauce

FOUR YEARS AGO: Stir-fried Chicken with Creamed Corn

FIVE YEARS AGO: Potato, Cheddar, and Chive Torpedo (one of the best breads I ever made!)


SECRET RECIPE CLUB: MOZZARELLA-STUFFED TURKEY BURGER

October is coming to an end. The last couple of years have been so busy for us! Months go flying by, each one bringing new challenges, but the last Monday of each month is always special: it is reveal day for The Secret Recipe Club, the best group event in the cooking blogosphere.  Food bloggers are paired in secret, stalk each others’ site in search of a recipe, cook it and blog about it at the exact same time.   The group is very popular now, there is a huge waiting list for new members, so if you are interested, send your name in.  Just keep in mind you need to be blogging for a while so that you have enough recipes in your database, and also a recipe index in your site.

This month I got a GREAT site to cook from: Cooking Whims.  Megan is funny, witty, her cooking style similar to ours.  I love this little bit she wrote about herself:

  “I love goat cheese, all things pumpkin, chocolate, and dancing to Sinatra while I experiment in my kitchen”.

Awesome!  Now, back to my assignment. The fact that we were away for 10 days on a trip to California and that our kitchen was still undergoing hellnovation made this month’s participation a bit of a stretch, but by now I am used to cooking stresses of many kinds.  Several recipes called my name during the stalking period.  For instance, her Oatmeal Ricotta Buttermilk Pancakes…  or Fish Tacos with Spicy Tomato-Cucumber Salsa… but I also flirted with her Beet Hummus,  and the Hungarian Paprika Chicken.  So, what did I choose in the end?   A turkey burger.  I could not resist that one, made ultra special by home-made marinara sauce and a stuffing of mozzarella.

sauced

MOZZARELLA-STUFFED TURKEY BURGER
(slightly modified from Cooking Whims)

for the marinara sauce
2 tsp olive oil
1 small shallot, chopped
1 garlic clove, minced
2 cups plum tomatoes, chopped
6  sun-dried tomatoes, chopped
1/2 tsp salt & pepper

for the burgers
1.5 lb ground turkey (50:50 dark and white meat)
1/4 cup chopped scallions
2 tsp Worcestershire sauce
grated zest of 1 lemon
1/2 tsp dried oregano
1/2 tsp pepper
1/4 tsp salt
3 Tbsp fresh parsley, minced
1/2 cup mozzarella cheese
2 tbsp minced fresh basil
4 thin slices of mozzarella cheese (optional)

For the marinara sauce: Heat the oil in a medium saucepan on medium heat. Add the shallots and garlic. Cover and cook, stirring occasionally until translucent, 5-7 minutes. Stir in the tomatoes, sun-dried tomatoes, salt and pepper. Bring to a simmer and cook until the tomatoes have broken down. Pulse a few times in a food processor. Set aside on very low heat to keep warm.

For the turkey burgers: Place the turkey, scallions, Worcestershire sauce, lemon zest, oregano, parsley, pepper and salt in a large bowl. Mix with your hands, then shape into 8 thin patties.

Combine 1/2 cup mozzarella cheese and basil. Divide evenly on the center of 4 patties. You may not need all the cheese. Cover each patty with the remaining patties and crimp closed.

Grill the burgers turning once, for a total of 8 to 10 minutes on a medium-high grill. When the burgers are almost cooked through, top with a slice of cheese and allow the cheese to melt before serving with a helping of marinara sauce on top.

We enjoyed our burgers “naked”, but for a real burger experience, have some toasted buns ready…  and

ENJOY!

to print the recipe, click here

ingredients

Comments:  Megan’s description of this recipe started with “This burger belongs on a show called burger wars.”.  Then, she says that another version from her blog would fight for the number one spot, the “Hummus Turkey Burger with Cucumber  & Feta Cheese“. Of course I intend to make that one soon.  Stay tuned.

We loved these burgers!  She is absolutely right, the lemon zest is a key component of the recipe, but everything comes together in perfect harmony, including the simple but tasty marinara, that calls for sun-dried and regular tomatoes.

I slightly modified the recipe by mixing dark and light ground turkey, and using about 50% more meat than she did to end up with 4 stuffed patties. Since we were going to enjoy them without buns, I wanted each to be slightly bigger. I also included fresh Italian parsley because I had some in the fridge and it seemed like a good herb to incorporate in the mix.   Once you have the mixture ready, portion 8 equal amounts over parchment paper, flatten them, add the cheese to half of them, cover with the other portion.

composite

Pinching the sides seems hard to do, but don’t worry, it will work.  I cooked my burgers on the grill, as it would have been impossible to cook them in our improvised kitchen.

composite2.

Now, as if I did not have enough grievance in my life, when I was getting ready to take the first photo, I could not find the lemon.  Keep in mind that the fridge was still in the garage, to get to it we needed to jump over a few pieces of wood and squeeze through some furniture.  So, I am going crazy searching for my lemon.  The thoughtful man I married suggested that “maybe you think you got it from the fridge but you didn’t“.  His remark caused me to go into a blazing hot monologue that traumatized for life two of our three dogs.  Chief was spared thanks to being deaf.   A second lemon quickly showed up at the scene, and we put the citric incident to rest.  Later that evening,  Phil calls me in the TV room:  cozy inside a dog bed between the sofa and the wall, a lemon was peacefully resting.

buck2

Never a dull moment, folks.  Never a dull moment…

Megan, I loved getting your blog this month, and hope you had fun with your own assignment too!

For those who want to see what Group D cooked up for the final Monday of October, click on the blue frog at the end of the post. She loves a little click!  😉

ONE YEAR AGO:  Cashew Chicken Lettuce Wraps

TWO YEARS AGO: Clay-pot Pork Roast

THREE YEARS AGO: Panmarino

FOUR YEARS AGO: A Classic Roast Chicken

SECRET RECIPE CLUB: LEMON POPPY-SEED MUFFINS

At the risk of repeating myself over and over and over, I must say the last Monday of each month makes me feel as happy as a kid in a toy store… Why? It is the day in which bloggers of my group at The Secret Recipe Club reveal which blog they were assigned to cook from, and post their recipes. This month, I could not be more pleased with my assignment. I got April’s blog, Angels Homestead. April is a very active participant of the club. You see, we have a Facebook group to discuss issues, make sure everyone is aware of what needs to be done (participation forms to be filled, upcoming Reveal Days), and April is always there with her very unique and personal touch. I was thrilled to cook from her blog! It took me just a few minutes to settle on a recipe, because right when I got the assignment I was wondering about something to bake and take to our department. Lemon poppy-seed muffins seemed perfect. And perfect they were! 😉

muffin1.
If you want to make a batch of muffins to cheer your co-workers early in the morning, here’s the way to do it:  before going to bed, measure the dry ingredients, place the flour in a large bowl, the baking powder and baking soda on small bowls next to it.  Get the two eggs ready to go, same for poppy seeds, sugar, and lemon.   Place paper liners in your muffin pan.  Measure the butter, the yogurt (or sour cream), and place both in the fridge. Marvel at your uncanny sense of organization, and go to sleep. Have pleasant dreams.

ingredients
Next morning, turn the oven on.  Grab the yogurt from the fridge, zest and juice the lemon,  add the poppy seeds and mix them al together.

poppy
Beat the sugar with the butter and the eggs, add the poppy seeds mixture, incorporate all very well.  Add the dry ingredients and mix gently.  Add scoops of the batter to the muffin pan, trying to add the same amount to each paper liner.  If you are like me, at this stage of the day the caffeine has not kicked in yet, so your consistency won’t be stellar.  Oh, well…  Do your best.

unbaked
Now, all you have to do is bake those babies, and get ready to brighten up the morning of your colleagues.  If you can make that a Monday morning, even better…   😉

baked

for a printable version of the recipe, click here

For some serious fun with the productions of my fellow Secret Recipe members, click on the blue frog that is smiling at you at the bottom of the post. She is a bit cross-eyed, but still pretty adorable.

April, I hope you know how much I enjoyed getting assigned to your blog this month!  A real special treat…  😉

ONE YEAR AGO: Secret Recipe Club: Mascarpone Brownies

TWO YEARS AGO: Salmon Tacos

THREE YEARS AGO: Cinnamon Turban Bread

FOUR YEARS AGO: Summertime Gratin