UZBEK FLATBREAD

It is amazing how one can be a foodie (for lack of a better term) and still find “new” food items to dream about. Like the traditional bread from Uzbekistan, a fascinating country north of Afghanistan. A couple of months ago I stumbled on this blog post and could not stop thinking about the beauty of those flat breads. The dough can be very simple, although I found countless recipe variations for them. From type of flour to amount of yeast, duration of fermentation, type of fat added, it’s hard to find a common denominator. But the basic characteristic is the stamping of beautiful images on the dough right before baking. I found a beautiful bread stamp for sale at Etsy, and a few weeks later it joined our kitchen. I could not wait to try it!

LEPYOSHKA – UZBEK FLATBREAD
(adapted from this video)

1 + 1/2 cups water, at room temperature
1 cup yogurt, full-fat
1 tablespoon instant yeast
1 teaspoon sugar
2 cups whole-wheat flour (I needed to add quite a bit more)
1 tsp salt
2 tablespoons olive oil

Mix all ingredients in the order listed in a bowl. Knead by hand for 10 minutes, or if using a KitchenAid type mixer, knead at medium speed for 6 minutes. If the dough seems too slack, add more flour at this point. It should feel sticky, but hold together nicely.

Transfer dough to a clean bowl lightly brushed with oil. Cover and allow it to ferment at room temperature for 2 hours.

Divide the dough in 4 portions, shape each as a small ball. Cover and leave at room temperature for 5 minutes.

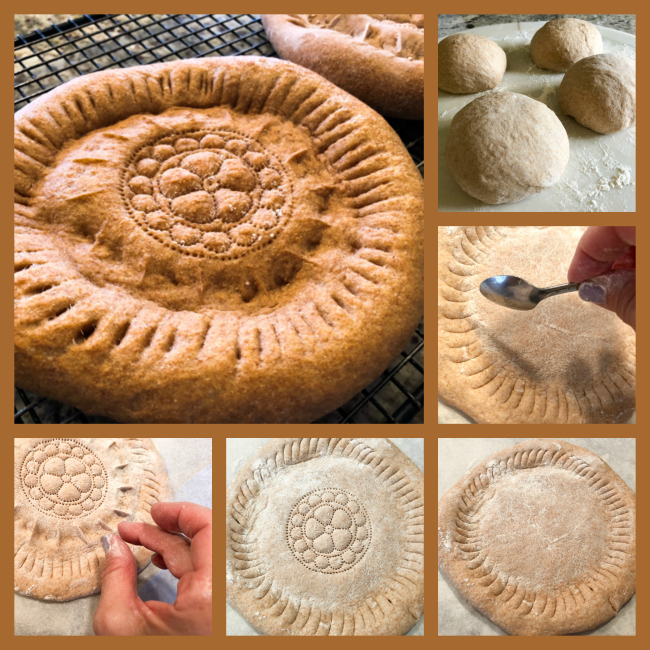
Flatten each ball into a round. Press the center, forming a thicker layer of dough all around the perimeter. Use a spoon and a bread stamp to decorate the surface.

Bake in a 375 F oven inside a Dutch oven for about 20 minutes. Remove the cover after 10 minutes. If you have a large enough Dutch oven, you can bake two at a time. If baking one at a time, leave the balls covered and make the decorations right before baking.

ENJOY!

to print the recipe, click here

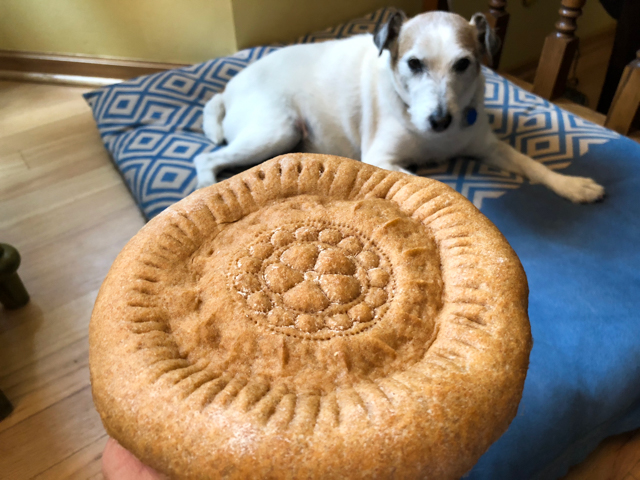
Comments: The recipe I am sharing is in fact my second attempt at making Uzbek flat breads. For my first adventure, I had not found a detailed recipe, it was more a vague set of instructions, so I made my own formula and used the fermentation time suggested. It contained quite a bit of yeast, and the proof fermentation was short, only 40 minutes.  The result was a bread that rose so much during baking that the pattern of the stamp was lost.  Below you see before and after pictures.

I was a bit disappointed, even though the bread tasted pretty good. I wanted my pattern to show. I asked for help in a bread Facebook page, and got great advice. Including the link to that youtube video with the recipe I used.  Worked like a charm! For my next time I intend to use 75% white bread flour and 25% whole wheat or spelt. I think it would make a nice texture, and probably need a little less flour during kneading.

As to the decoration, you can do pretty much whatever you feel like it. I opted for the technique in the video. It uses a spoon all around the edge, then the stamp goes in the center. Next, you pinch the dough with two fingers around the stamp. But you can do several rounds of stamps in the center instead, leave the dough plain all around. I imagine that each family has their own way to decorate their bread.

My design was approved by all members of our family… 

The bread was delicious with hummus, with goat cheese, and black olive tapenade. Sliced like a pita, it was fantastic to deliver fresh tomatoes juicy with a drizzle of olive oil and oregano.  Since learning about Uzbek flat bread, also called Lepyoshka, I’ve been fascinated by that country. You can find some nice pictures of Uzbekistan in this link.   

ONE YEAR AGO: First Monday Favorite – Black Sesame Macarons

TWO YEARS AGO: Chocolate Orange Mini-Cakes

THREE YEARS AGO: In My Kitchen, May 2015

FOUR YEARS AGO: P90X3, a Review of Tony Horton’s Latest Fitness Program 

FIVE YEARS AGO: Pasta and Mussels in Saffron Broth

SIX YEARS AGO: Triple Chocolate Brownies

SEVEN YEARS AGO: Shanghai Soup Dumplings

EIGHT YEARS AGO: Bite-sized Chocolate Pleasure

SaveSave

SaveSave

SaveSave

SaveSave

SaveSave

SaveSave

SaveSave

SaveSave

SaveSave

SaveSave

SaveSave

SaveSave

SaveSave

GILDING THE SOURDOUGH LOAF

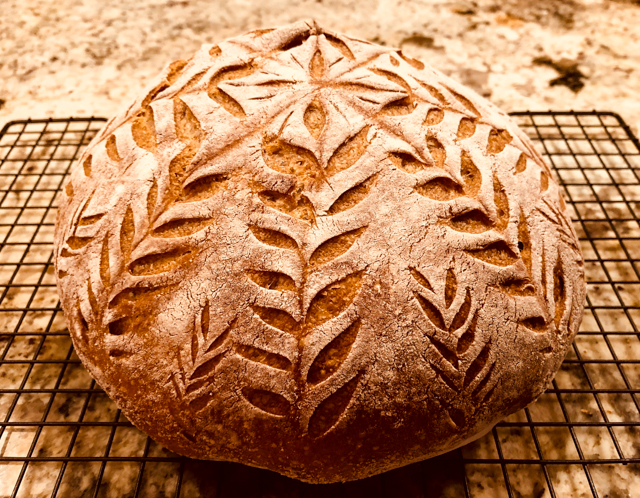
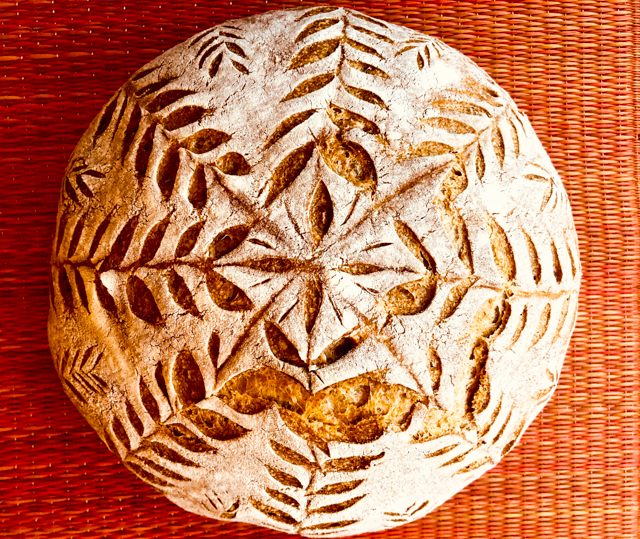
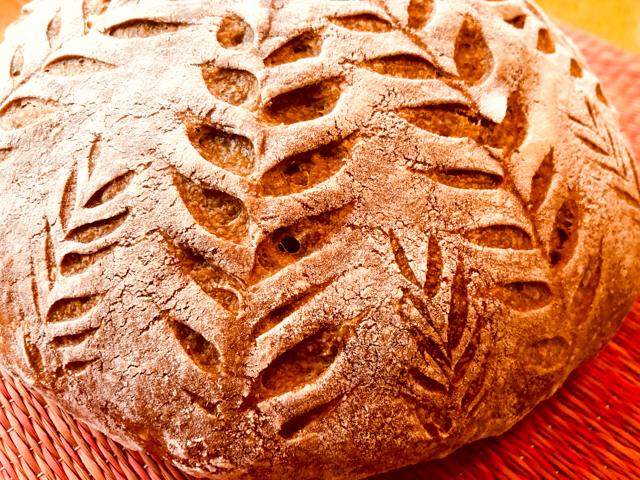
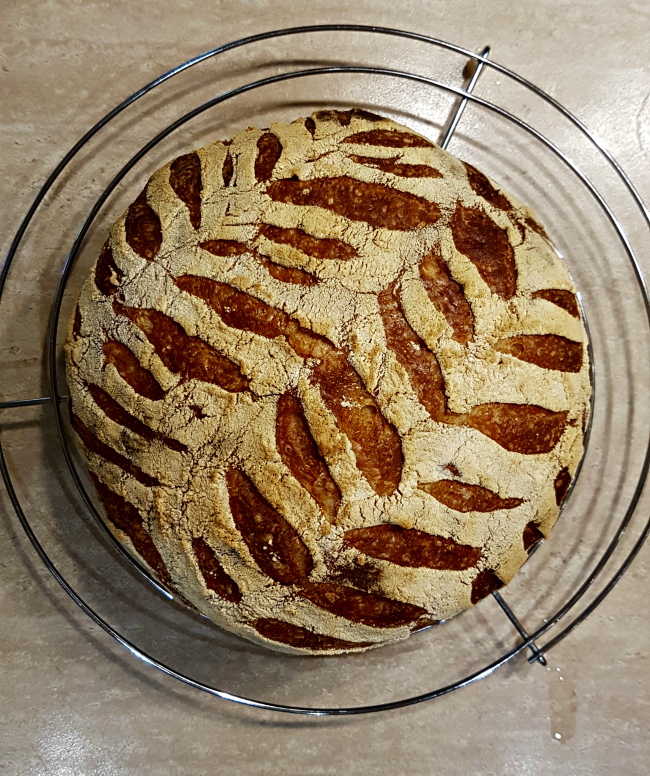
Two sourdough posts in a row! But this one brings back the subject to its most classic use: a rustic bread made less rustic with a razor blade and a ton of fun. Here is my baby, all dressed up for party!

CLASSIC SOURDOUGH BREAD
(adapted from Anna Gabur)

for the levain:
120g water
40g starter
40g whole-wheat flour
80g all-purpose white flour

for the final dough:
Half of the levain above (about 140g)
375g water
50g spelt flour
150g whole-wheat flour
300g bread flour
10g salt dissolved in 15g water

Make the levain mixture about 6 hours before you plan to mix the dough. It should be very bubbly and active.

When you are ready to make the final dough, dissolve half the prepared levain in water (375g), then add all flours. Save the remaining levain in the fridge for later.  Mix well with your hands until a shaggy dough forms.  Leave it at room temperature for 30 minutes.

Add the salt dissolved in the remaining water, and incorporate by folding repeatedly the dough over itself. Now let the dough ferment for a total of 4 hours, folding a few times every 40 minutes. You don’t have to be precise, but allow the full four hours fermentation to take place.

Shape as a round ball and place inside a banetton covered with a cloth and lightly floured. Keep it in the fridge overnight, from 8 to 12 hours.

Next morning, heat the oven to 450F.

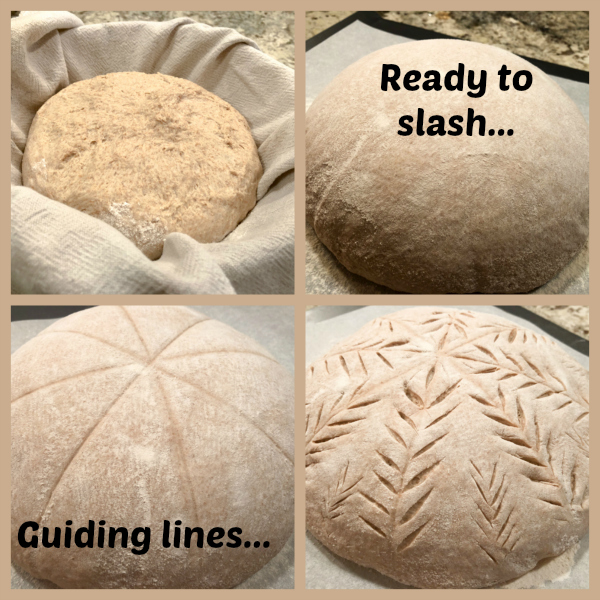
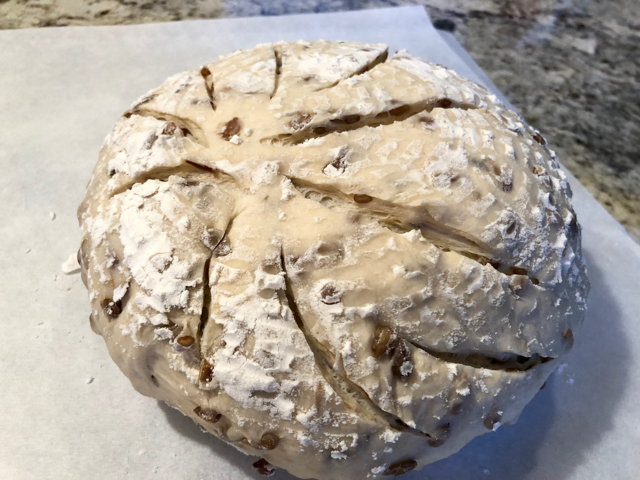
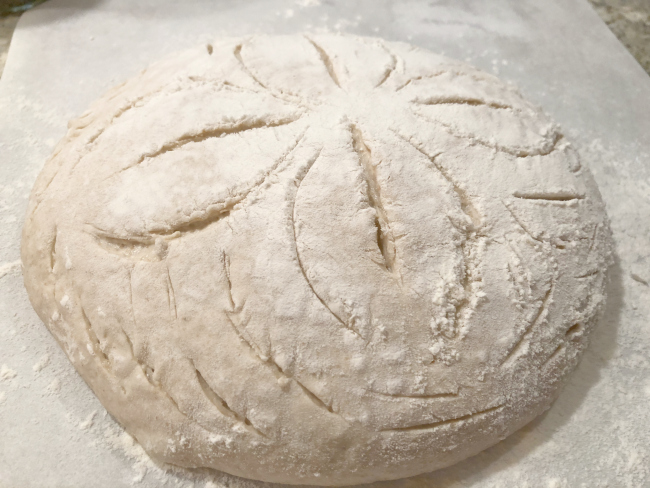
Invert the dough on a piece of parchment paper and lightly, very lightly coat it with flour, then rub all over the surface with the palm of your hand. Score the guiding lines according to the desired pattern, use a razor blade to slash the dough with firm, short slashes.

Bake at 450F for 45 minutes, preferably covered for the first 30 minutes to retain steam.  Cool completely over a rack before slicing.

ENJOY!

to print the recipe, click here

Comments: I love a rustic sourdough that is left untouched, opens up in the oven according to its own desire, or one that gets a very basic crisscrossed slash at the top to get things started. But I must admit it’s nice to work a little magic on the crust. However, my previous attempts failed to match my expectations. In other words, I had issues to transfer to the razor blade the image I had in my mind for the baked loaf.

A couple of weeks ago I found an online course taught by a gorgeous woman named Anna Gabur on artistic bread slicing. I asked myself, do I really need this? Not sure what happened, but before I could give an honest answer to that question, my paypal account was activated and the online class was playing on my screen. Very odd. Must be a computer virus or something. At any rate, I am very glad this odd phenomenon happened, because I loved the class, learned a lot and was very pleased with the results of my very first attempt. I followed her design very closely, but maybe at some point I’ll feel confident to come up with my own creations (fingers crossed).

Between you and me, I can hardly believe this bread came out of our own oven… I was in total awe when I opened the lid and saw the oven spring, the pattern, the crust starting to get golden. A real baker’s thrill…

I highly recommend that you get Anna’s course if you are passionate about bread baking. You don’t need to make a sourdough, any bread formula will work, as long as it’s not very high in hydration. You need some structure to be able to slash it, so high-hydration formulas won’t work as well. Also, it helps a lot if the bread gets its final fermentation in the fridge, so that its surface is tight and easier to slash. My loaf went straight from fridge to pre-heated oven, it took me less than 10 minutes to finish the slashing, and I bet most people can do it much faster.  You’ll need a regular razor blade that you will hold between two fingers, not using a lame holder. And, according to Anna, one blade should last you for about 5 loaves. It needs to be truly sharp. She makes it seem so easy, it is a pleasure to watch her in real-time making a very elaborate design on the loaf. You can also marvel at all her photos on Instagram.

The bread had excellent taste and crust, the crumb was not super open, but that was expected from a bread with a lower hydration level.

Anna has quite a few articles about bread baking written on her blog, like this one that goes over basics of artistic slashing, and this one that shares her favorite bread formula. If you’d like to sign up for her online tutorial, follow this link.    She lives in Moldova, and often has to adapt her bread baking for the types of flour she can find. I often get a bit upset with “trendy” bread cookbooks that insist you must obtain the flour that was milled 4 days ago under a full moon, otherwise don’t bother making the recipe.   All you truly need is flour, water, a bit of yeast, a touch of salt, and the right amount of passion… Anna’s masterpieces prove this point!


ONE YEAR AGO: Lolita Joins the Bewitching Kitchen

TWO YEARS AGO: Cashew Cream Sauce

THREE YEARS AGO: Blood Orange Margaritas

FOUR YEARS AGO: Smoked Salmon Appetizer

FIVE YEARS AGO: Clementine Cake

SIX YEARS AGO: Springtime Spinach Risotto

SEVEN YEARS AGO: The end of green bean cruelty

EIGHT YEARS AGO: Torta di Limone e Mandorle

SaveSave

SaveSave

SaveSave

SaveSave

SaveSave

SaveSave

SaveSave

SaveSave

SaveSave

SaveSave

SaveSave

SaveSave

SaveSave

SaveSaveSaveSave

SaveSave

SaveSave

SaveSave

SaveSave

SaveSave

SaveSave

SaveSave

SaveSave

SaveSave

SaveSave

SaveSave

SaveSave

SOURDOUGH CHOCOLATE TWIST BREAD

Every once in a while, it’s nice to expand the horizons of the sourdough starter. I have yet to try sourdough croissants, a much more involved process, but when I saw a blog post joining bubbly starter with chocolate in a twisted shaping, I could not wait to try it.  It does take a little practice to get the braiding correctly, but I think this attempt turned out a little better than the one of years ago. Practice, practice, practice.

SOURDOUGH CHOCOLATE TWIST BREAD
(slightly modified from My Daily Sourdough Bread)

Starter
100 g water
100 g bread flour
1 tablespoon sourdough starter

Dough
all of the above starter
180 g warm milk (water can be used instead, for a less rich dough)
370 g bread flour
1 egg yolk
2 tablespoons of melted butter
1 tablespoon of sugar
6 g salt

Filling
100 g soft butter
60 g brown sugar
50 g grated chocolate (70% cocoa)

In the evening, first prepare your sourdough starter. Mix 100 g of white wheat flour, 100 g of water, and 1 tablespoon or your base starter. Leave it to ferment until risen, puffed, active and bubbly, so you will be able to mix it into the dough next morning.

In the morning, mix the dough. First, dissolve all of your starter in 180 g of milk (or water, if desired). Add egg yolk and melted butter. Next, add all of the flour (370 g), salt and sugar. Mix well, and knead the dough for 10 minutes until smooth. Shape it into ball and place it into a bowl. Cover with a plastic wrap and leave to ferment until doubled in volume, about 3 hours.

Prepare the filling mixing softened butter, sugar, and grated chocolate. Line a Dutch oven or another appropriate baking container with a piece of parchment paper.

Roll the dough into a 12×18 inch rectangle. Drop the filling across the rolled dough and spread it thinly, leaving about 1 inch clean border on all sides.  Roll the dough from the longest side, then tuck the ends underneath. Cut the rolled dough in half length-wise. Flip the cut halves outwards.

Start braiding two strands one over another. Tuck the ends together to form a circle. Place the twisted bread into Dutch oven and let it rise until doubled, about 1.5 hours.

Heat the oven to 375°F. When the dough is ready, put the Dutch oven into oven and bake it for 35 to 40 minutes. Cool on a rack before slicing. If desired, cover the bread with a sprinkling of powdered sugar.

ENJOY!

to print the recipe, click here

Comments: This was a fun weekend project, for sure. My only issue was that during baking, a lot of butter sipped out of the bread, forming a puddle on the bottom of the baking dish. I was not sure how to deal with it, so I ended up using one of those stainless steel bulb basters (like this one) to remove the butter a couple of times during baking. The bread tasted amazing, no major harm done on the bottom crust, all seemed fine. It was not overly greasy either.

We enjoyed some of it still a bit warm from baking. A deep silence ensued. You know how that goes sometimes.  Leftover wedges were wrapped in plastic and frozen. A few minutes in a low oven restored the bread to top-notch level, so rest assured, you won’t need to consume it all in one sitting. There’s a limit of how much aerobics a person can do…

This bread is a nice alternative for a pain au chocolat craving. Much easier to make and equally delicious.

ONE YEAR AGO: Dan Lepard Times Three

TWO YEARS AGO: Turkey Portobello Burger

THREE YEARS AGO: Raspberry Ricotta Cake

FOUR YEARS AGO: In My Kitchen, April 2014

FIVE YEARS AGO: Whole-Wheat Pasta with Lemony Tomatoes and Spinach

SIX YEARS AGO: Blood Orange Duck: A work in progress

SEVEN YEARS AGO: Grilled Mahi-mahi with citrus marinade

EIGHT YEARS AGO: Memories of Pastéis

SaveSave

SaveSave

SaveSave

SaveSave

SaveSave

SaveSave

SaveSave

SaveSave

SaveSave

SaveSave

SaveSave

SaveSave

SaveSave

SaveSave

SaveSave

SUNFLOWER SEED KAMUT SOURDOUGH

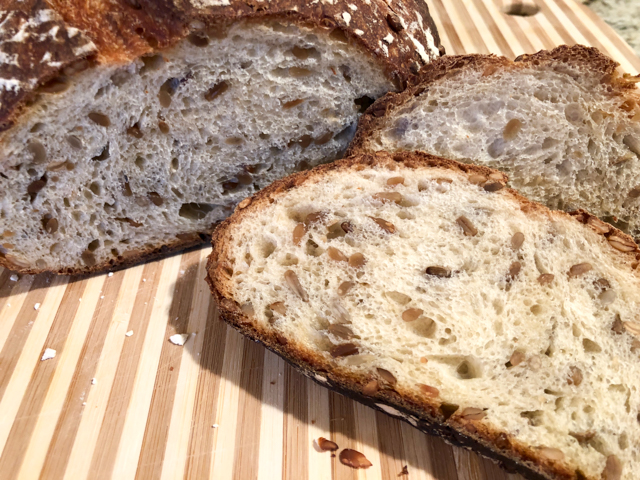
Inspired by classic recipes around, this bread is for those who love a little texture with their soft crumb, and a very mild sourdough taste. The kamut flour makes the crumb slightly more “creamy” than a sourdough made exclusively with white flour. You can substitute it with spelt, whole wheat, or semolina flour, all will work well in the formula.

SUNFLOWER SEED KAMUT SOURDOUGH
(from the Bewitching Kitchen)

100 g sourdough starter at 100% hydration
110 g water, at room temperature
200 g bread flour
50 g kamut flour (or another flour of your choice)
100 g sunflower seeds, toasted
3/4 tsp sea salt
2 tablespoons honey
1/2 teaspoon instant yeast

Combine the flours with the toasted sunflower seeds and the salt in a large bowl. In another bowl, mix the water with the sourdough starter, dissolving it gently. Add the honey and the yeast, mix to combine.

Add the liquid ingredients to the bowl with the flour mixture, and incorporate it all using your hands. It will be pretty shaggy, once it’s more or less incorporated, allow it to rest for 10 minutes.

Knead briefly on a surface coated with oil (avoid adding more flour), allow it to rest for 10 minutes.

Knead briefly again, and let the dough rest for 30 minutes.

Knead briefly one last time and let the dough rest for 1 hour.

Shape it as a ball, place in a banetton with the seam side up to rise for 2 hours.

Invert it on a piece of parchment paper, slash the surface and bake in a 450 F oven for 40 minutes, with initial steam.

Allow it to cool completely before slicing.

ENJOY!

to print the recipe, click here 

Comments: This recipe makes a reasonably small loaf, perfect for the two of us to enjoy and then freeze a few more slices for delayed bread pleasure. The toasted sunflower seeds have almost a popcorn flavor, do not skip the toasting part because it is a game changer in this type of bread.

A perfect match for this sourdough is a slice of Roquefort cheese. Something about the sunflower seeds meeting the salty and sharp nature of the blue cheese makes it all pretty hard to resist.

ONE YEAR AGO: Sweet Potato “Hummus”

TWO YEARS AGO: Cauliflower Crust Pizza

THREE YEARS AGO: Silky Rutabaga Puree

FOUR YEARS AGO: Bon Bon Chicken: Light and Spectacular

FIVE YEARS AGO: Red Wine Sourdough Bread with Cranberries

SIX YEARS AGO: Award-Winning Sourdough Baguettes

SEVEN YEARS AGO: Country Rye (Tartine)

EIGHT YEARS AGO: Penne a la Vechia Bettola


SaveSave

SaveSave

SaveSave

SaveSave

SaveSave

SaveSave

SaveSave

SaveSave

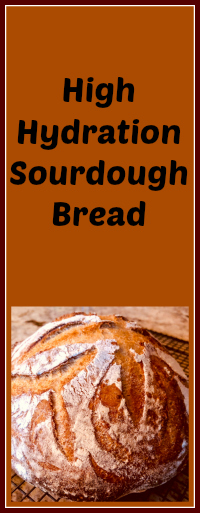
EMILIE RAFFA’S HIGH HYDRATION SOURDOUGH

As you might imagine, I should stop buying cookbooks because I’d need to live to be 173 years old to go through the ones I already own. However, I am thrilled that I got the latest one from Emilie, pre-ordered the moment I saw it available: Artisan Sourdough Made Simple.

I’ve been following Emilie’s blog for a long time, and even reviewed her first cookbook a while ago (click here for a flashback).  The salad I chose to feature in that post is one of those rare recipes that ended up in our regular rotation. You know how it goes in the kitchen of a food blogger. We are always trying new recipes, it’s a bit compulsive sometimes, but when a truly spectacular thing lands on our table, we go back to it. With this new book, Emilie does exactly what the title states: simplifies the making of artisan sourdough bread. She offers a very detailed explanation on how to make your first sourdough starter (that method that collects microorganisms from the environment), how to keep it healthy and use it to make all sorts of wonderful concoctions, going beyond bread baking.  Formulas are simple, the timing is flexible, as exemplified in the recipe I share with you today. I was so fond of it that I made it four times in 5 weeks! Yes, talk about re-visiting something spectacular. I am not the only one smitten with Emilie’s book. Celia, the one and only blogger who lives in beautiful Australia, composed a wonderful review of Artisan Sourdough Made Simple, and I urge you to stop by and take a look… It might just be the push you need to take the book home with you (at least virtually, as I did with my Kindle version…). So, without further ado, my first sourdough bread from Emilie’s book…
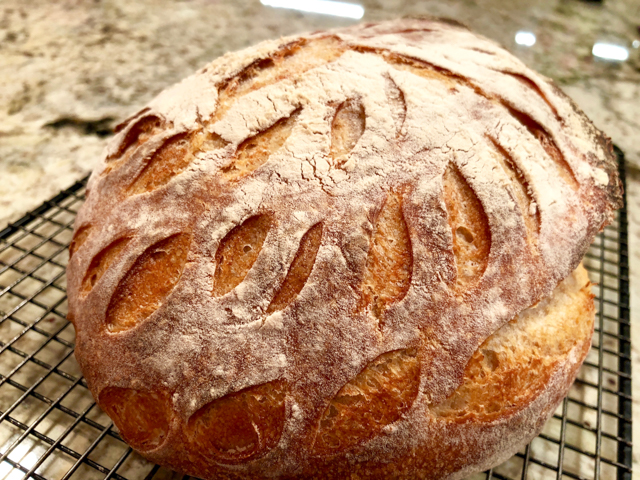
HIGH-HYDRATION SOURDOUGH
(printed with permission from Emilie Raffa)

Tips from Emilie: The first step toward bigger holes is to add more water, or to increase the dough’s hydration. The second step is to expand your sourdough technique: Gently dimple the dough after the bulk rise and then shape it twice. Both techniques will help to open up the crumb and can be applied toward other doughs to achieve the same effect.

Suggested baker’s schedule: Thursday and Friday: Feed your starter until bubbly and active. Saturday Evening: Make the dough and let rise overnight. Sunday Morning: Shape the dough, let rise again, score and bake.

Bread formula
50 g (¼ cup) bubbly, active starter (mine was at 100% hydration)
375 g (1 ½ cups plus 1 tbsp) warm water
500 g (4 cups plus 2 tbsp) bread flour
9 g (1 ½ tsp) fine sea salt

Making the dough
In the evening, whisk the starter and water together in a large bowl with a fork. Add the flour and salt. Mix to combine, then finish by hand to form a rough dough. Cover with a damp towel and let rest for 1 hour.  After the dough has rested, work it into a ball, about 15 to 20 seconds.

Bulk fermentation
Cover the bowl with a damp towel and let rise overnight at room temperature, about 8 to 10 hours at 70 ° F (21 ° C). The dough is ready when it has doubled in size, has a few bubbles on the surface, and jiggles when you move the bowl from side to side.

Shaping the dough
In the morning, coax the dough onto a floured surface. Dimple the dough all over with floured fingertips. Gently shape it into a round and let rest for 5 to 10 minutes. Meanwhile, line an 8-inch (20-cm) bowl or proofing basket with a towel and dust with flour. Using a bench scraper, scoop up the dough and flip it over so that the smooth side is facing down. Shape it again, and then flip it back over. Cup the dough and gently pull it toward you in a circular motion to tighten its shape. Place into your lined bowl, seam side up.

Final fermentation
Cover the dough and refrigerate for 1 hour to set its structure. Note: You can chill this dough for up to 6 hours or more. When ready to bake, let sit at room temperature while the oven heats up.

Baking the bread
Heat your oven to 500 ° F (260 ° C). Cut a piece of 
parchment to fit the size of your baking pot. Place the parchment over the dough and invert the bowl to release. Dust the surface with flour and rub with your hands to coat. Using the tip of a small knife or a razor blade, score the dough with the pattern of your choice. Use the parchment to transfer the dough into the baking pot.  Place the pot on the center rack, and reduce the heat to 450 ° F (230 ° C). Bake the dough for 20 minutes, covered. Remove the lid, and continue to bake for 30 minutes. Lift the loaf out of the pot, and bake directly on the oven rack for the last 10 minutes. Cool on a wire rack for 1 hour before slicing.

ENJOY!

to print the recipe, click here

Comments: One of the advantages of a simple bread recipe is that you can concentrate on aspects other than the making of the dough, or its shaping, since it’s all so straightforward. This recipe was my gateway to practice different slashing patterns. My conclusion was that bread has a mind of its own. Almost every single time the final product was not exactly what I had in mind. But, isn’t that what life is all about? The more we try to control things, the more frustrated we might get. Until… until we learn to dance to the music and enjoy the unexpected, the stuff that does not go exactly as planned. No, I am not that wise yet, but working on it.
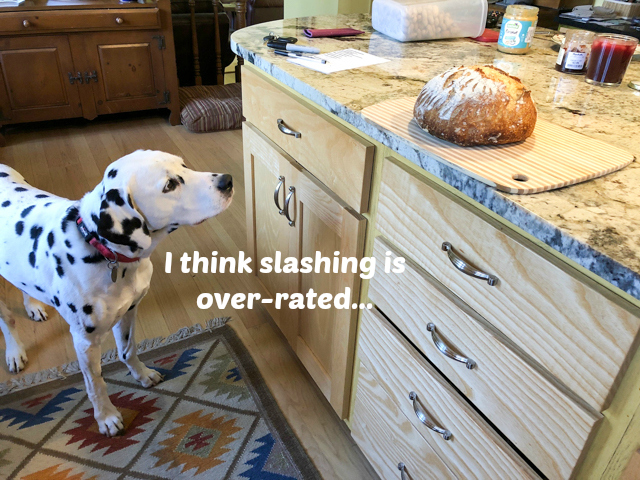
Indeed, for some members of our home, the way the bread looks is totally irrelevant…

Let me now show you my quartet of breads, all made with the same basic Emilie’s recipe, except that for the third loaf I increased the hydration even further (385 g water instead of 370g), and included one series of folds before the dough fermented at room temperature overnight.  I did that after the dough had rested for one hour, then waited 45 minutes more to shape it into a ball and leave it alone at room temperature until next day. The more you push the hydration up, the more you’ll need some type of folding or kneading to make sure you have some structure in it.  All things considered, I think Emilie’s formula as written is spot on,  considerably simplifying the process.

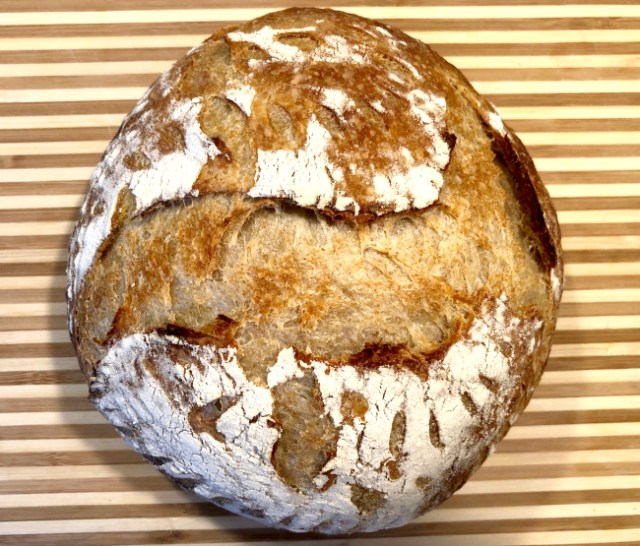
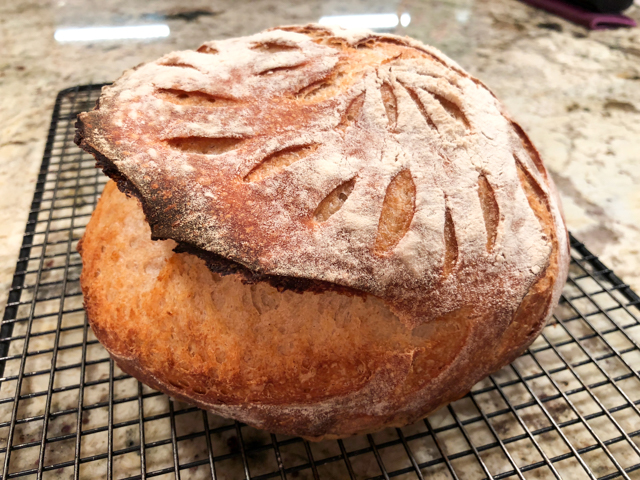
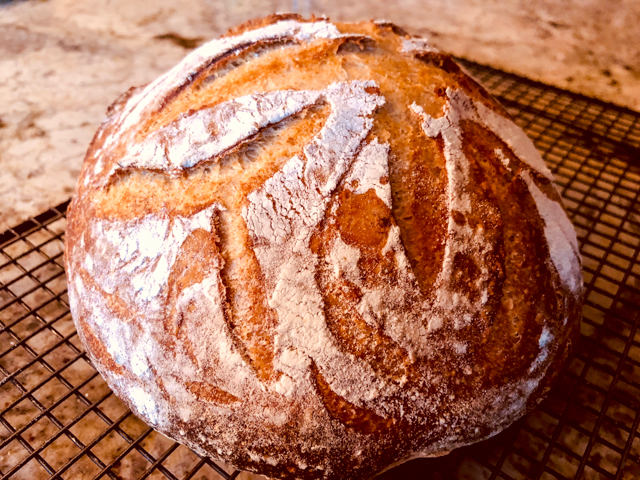
Slashing #1
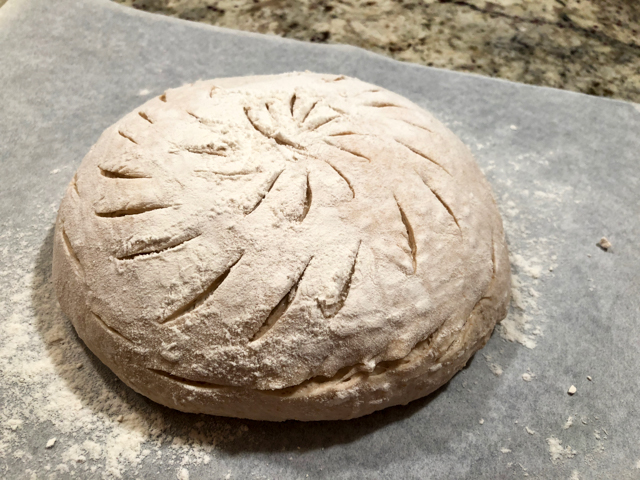
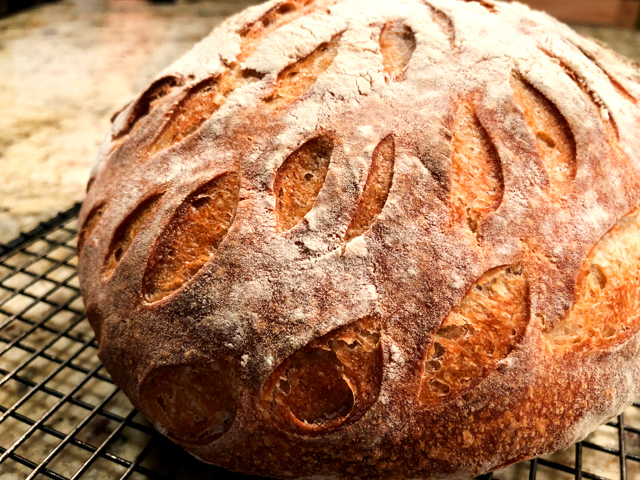
That is the exact slashing that produced my featured bread.  You probably did not see anything wrong with it, but that’s because I picked the best angle of the bread to take the picture. Full disclosure? Here we go:

The slash at the base of the circle was probably a bit too deep, and the thing lift off like a lid! Looked pretty funny, almost like a Trilobite fossil in search of food. And the crust got a tad too dark in that spot.  Lesson to learn: be more gentle with the slashes at the base of the dough.

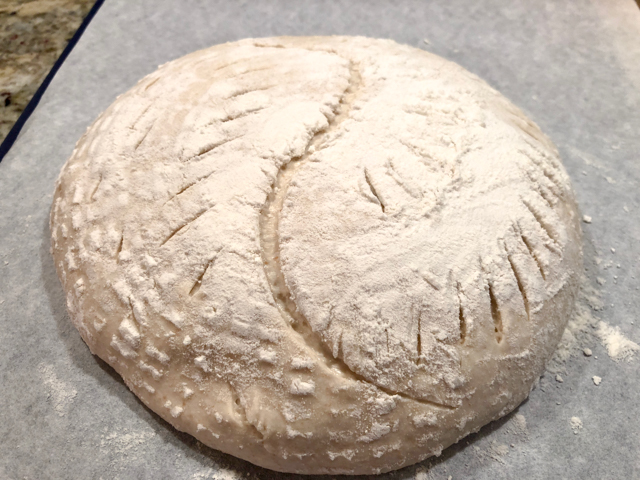
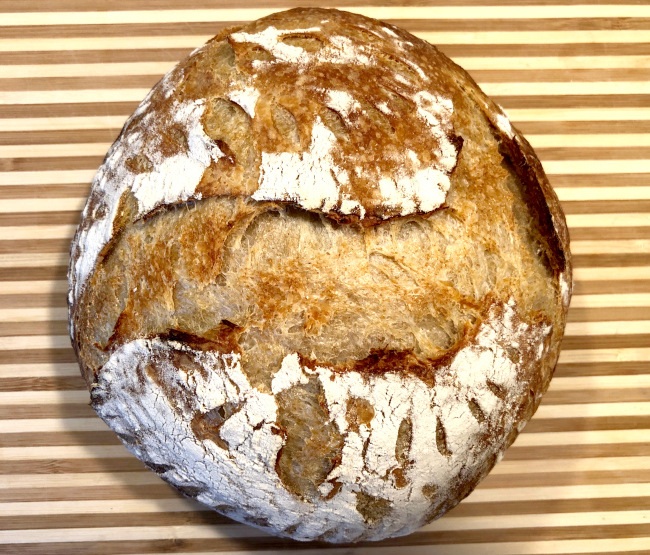
Slash #2

I was aiming for a yin-yang kind of thing.  Here’s the result after baking…
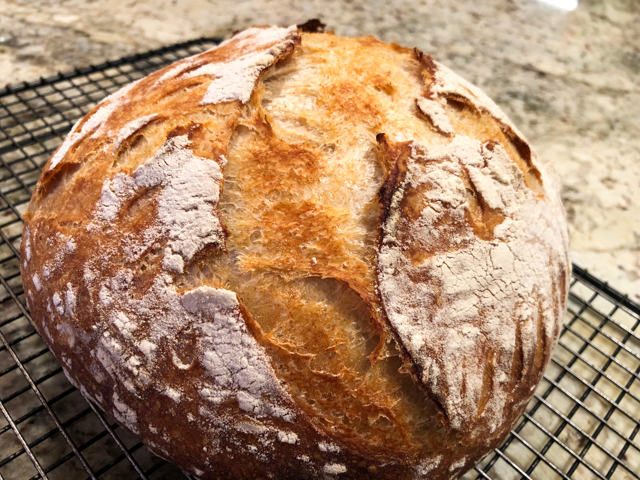
Nice, open ears, but definitely not what I expected. Not sure if I had to be more delicate with the depth of the central slashing… but I liked the way the bread looked.

Slash #3
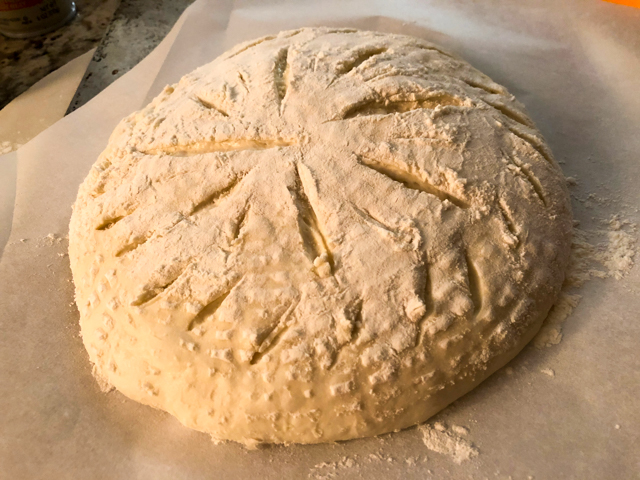
I went with a star-type pattern, and diagonal small slashes all around….  This time I had no particular expectations, just decided to accept whatever the Gods of the Yeasty Things rewarded me with…

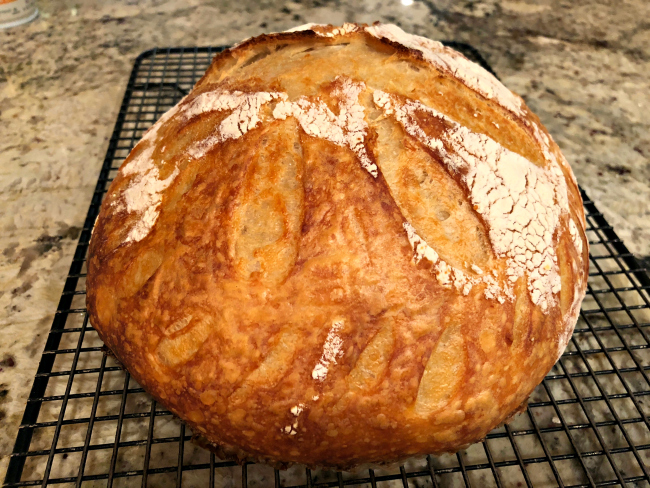
Slash #4
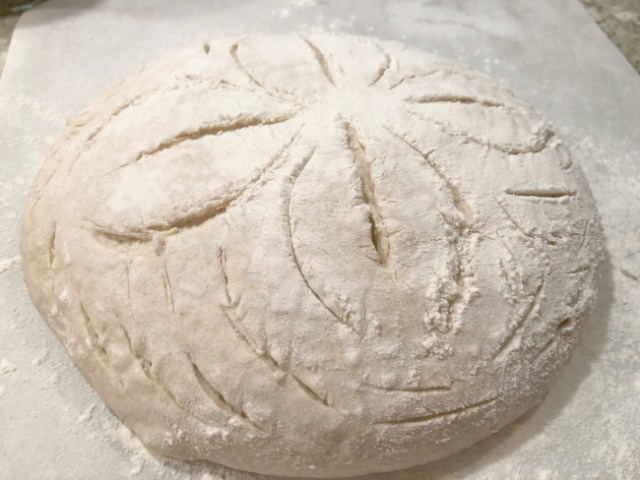
and the final, resulting loaf….

Probably my favorite… all plump and was singing out loud as it cooled…

All breads made with the high-hydration sourdough tend to have open crumb,
very creamy texture, with a hard crust.
The kind of bread we really love!
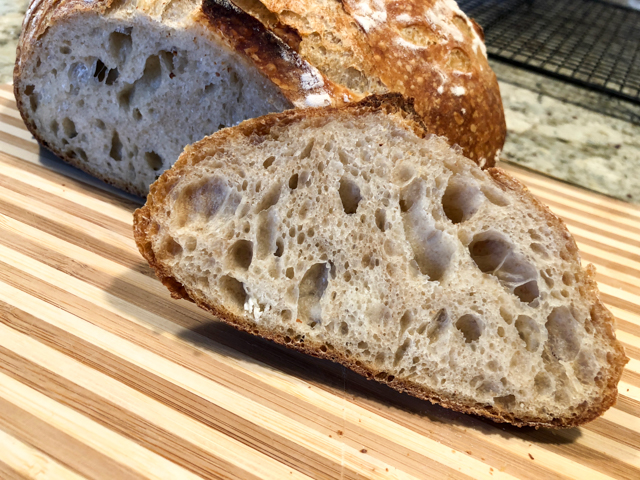
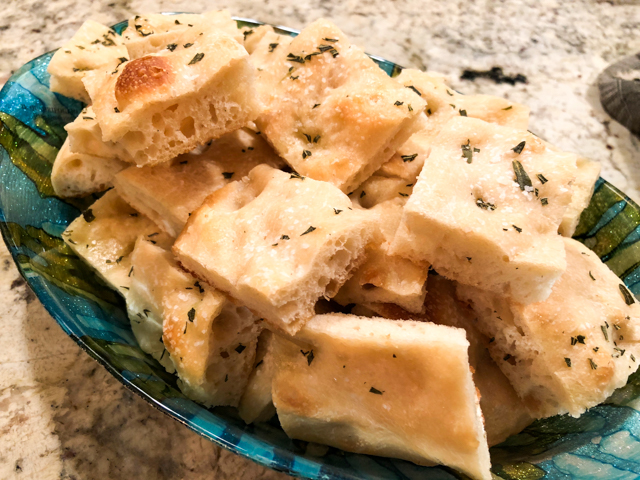
So there you have it, four loaves of bread made with a basic sourdough formula, according to Emilie’s Artisan Sourdough Made Simple.  The same formula produces amazing – let me state that again – produces AMAZING focaccia…

It is really a lovely book, Celia did a great job reviewing it, so let me just tempt you with a very simple list of breads included in one of her chapters. I want to bake every single one of them. Period.

Decadent Chocolate Chip (O.M.G)

Dill and White Cheddar

Olive, Thyme, and Parmesan

Seeded Pumpkin Cranberry (O.M.G. #2)

Cinnamon Raisin Swirl

Chocolate Peanut Butter Chip

Pickled Jalapeno, Cheddar and Chive (O.M.G. #3)

Roasted Garlic and Rosemary

Sticky Date, Walnut and Orange (I rest my case)
Emilie, thanks for giving me permission to share one recipe from your lovely book…  I am looking forward to baking more and more goodies from your tasty collection!

Note added after publication… I am thrilled to share with you a bread made by one of my followers, Sue (check her comment below). She used this recipe to make a real masterpiece in bread form! 

Great job, Sue!  Thanks for sharing your bread with me!
ONE YEAR AGO: Short-Ribs with Chickpeas and Chard & London Cookbook Review

TWO YEARS AGO: Asian-Style Short Ribs 

THREE YEARS AGO: Herbed Goat Cheese Souffles

FOUR YEARS AGO: Barley Risotto with Peas

FIVE YEARS AGO: Jammin’ Blueberry Sour Milk Pancakes

SIX YEARS AGO: Scallops with Black Pasta in Orange Cream Sauce

SEVEN YEARS AGO: Stir-fried Chicken with Creamed Corn

EIGHT YEARS AGO: Potato, Cheddar, and Chive Torpedo


SaveSave

SaveSave
SaveSave
SaveSave
SaveSave

SaveSave
SaveSave
SaveSave

SaveSave

SaveSave
SaveSave
SaveSave
SaveSave
SaveSave
SaveSave
SaveSaveSaveSave
SaveSave