Entremets seem to be the rage at the moment. Originally, entremets were small portions of sweet concoctions served in between savory items in a multi-course banquet type meal. We are talking royalty stuff, from the Middle Ages to the overindulgence that was happening in France before 1789 (wink, wink). Nowadays, the term is applied to cakes that involve multiple layers with different textures and flavors. Basically it is a layer cake with severe superiority complex. My version was closely based on a Craftsy class taught by Kathryn Gordon, Contemporary Layer Cakes. I don’t have permission to publish the recipe but will share an overview.

BLOOD ORANGE ENTREMET CAKE
Recipe Overview
(from Craftsy)
For the cake component, a Jaconde sponge is prepared using the following ingredients:
6 egg yolks beaten with 90g sugar
110g almond flour sifted with 60g cake flour
a touch of vanilla and salt
60g melted butter
meringue made with 6 egg whites and 90g sugar
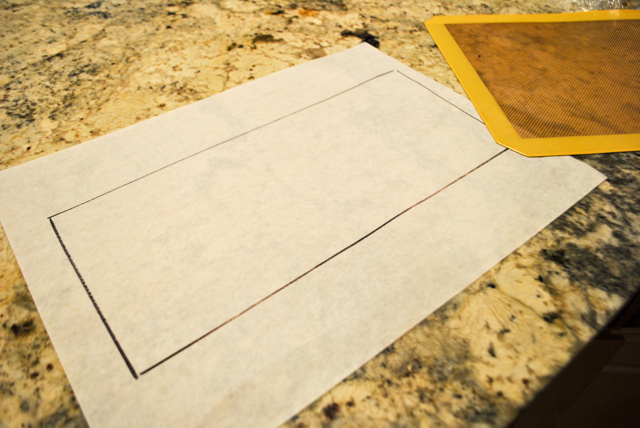
The cake batter will be enough to bake one round 8 inch cake and you will have leftover batter to spread as a thin rectangle for the sides (for lack of a better term) of the cake. The round cake will be halved crosswise so that you’ll have two layers for the entremet. To line the pan, make sure you will have 2 pieces that will cover its whole circumference. You can use the mathematical formula C = π x D or cut a piece of string that goes around the pan, and measure it. In any case, you will arrive at the need for two pieces of cake 13 inches long. The height depends on how tall your cake will be in the end. Make it around 6 inches so you have some flexibility. The top can be trimmed once assembled. I placed a Silpat on top of the paper and spread the cake batter on it, using the drawing underneath to guide me.
For the marble effect you have two options: paint some food color on the Silpat and pour the batter on top, or divide the batter in two portions, add orange food color to half, and pour the two batters together, spreading them gently so that the color is not fully distributed. I prefer the second method because it gives a much more subtle effect. But, if you are in a Pollock frame of mind, go wild with a brush.

In the center you see the full rectangle of very thin cake, that was split in half lengthwise and placed inside the ring. Those are technically called “sponge strips” and I thank Gary, patissier extraordinaire for enlightening me. Please keep in mind that the photos are not on the same scale. The cake is assembled inside an 8-inch ring. First the sides are set in place, with the swirl facing the outside. Then the bottom layer.
Filling components:
Blood Orange Cremeux: cream made with 8 egg yolks tempered and cooked with 360mL heavy cream previously infused with the zest of two blood oranges and 3/4 cup of blood orange juice. Once the mixture coats the back of a spoon, it is poured over 200g white chocolate and 6g sheet gelatin, softened in cold water.
Caramelized rice cereal: 1/4 cup sugar is heated in a heavy pan until amber. To that 1/2 cup popped rice cereal is added, quickly mixed and poured on a Silpat or parchment paper.
Caramelized blood orange segments: Make a syrup with 100g sugar and 4 tablespoons water. Heat until fully dissolved, then pour over the segments of one blood orange. Let the fruit sit in the syrup until cold, drain before using in the cake.
To the bottom cake layer, a little cremeux is added and spread. Then pieces of caramelized puffed rice. A bit more cremeux, caramelized orange segments, and more cremeux on top. The second piece of cake goes over it, pushing down to make sure it’s all well compacted.

The top of the cake is brushed with a bit of melted white chocolate and oil, to seal the layer. The whole thing is frozen for several hours, then the cake is covered with a very thin layer of white chocolate mirror glaze, made with sugar (50g dissolved in 2 T water), heavy cream (2 T), corn syrup (1 T) and white chocolate (150 g). Kathryn explains exactly how to do it in a way that the top will be very smooth.
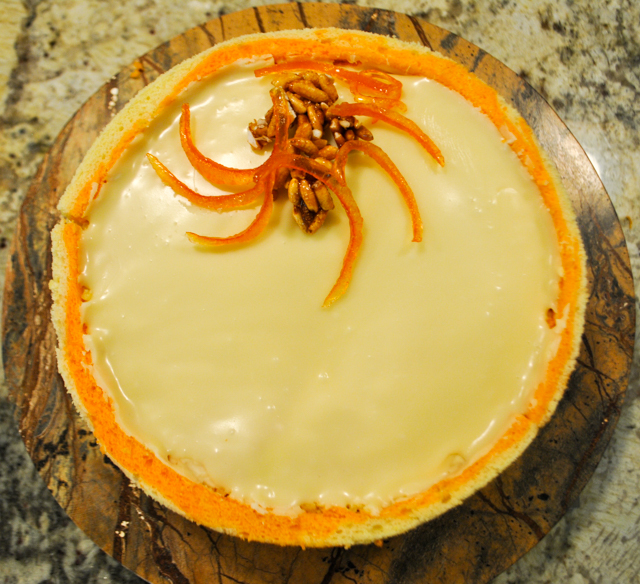
The cake is then removed from the ring, the top edge is trimmed, if so desired, and the top is decorated with bits of caramelized rice cereal and blood orange zest.
Comments: First of all, my apologies for not posting the full recipe, but without permission to do so, I cannot do it. You can find the basic method of preparing a Jaconde sponge, as well as all other components online. In fact, many different cake formulas and fillings will work to produce a similar entremet cake. All you need to keep in mind is a contrast of textures and flavors.
The blood orange cremeux turned out very refreshing, so even considering this is a rich, indulgent dessert, it had a light and bright quality to it. Rice puffed cereal is a good alternative to the famous Gavottes cookies that were part of my recent Gateau Royal. You can definitely caramelize it and use it to add crunch to any layer cake. Those things are sold in huge bags, and we don’t eat puffed rice as a cereal, so I see a few aventures with this caramelized version in my future.

This Craftsy class by Kathryn is really wonderful, because not only she explains every single step of the recipe in real-time, but she encourages you to plan and make your own version of this elaborate cake. Although it might seem a bit too involved, each component can be made in advance. I actually baked the cakes and made the cremeux on a Saturday, the other components Sunday morning, assembled the cake, froze it, and added the mirror glaze in the end of the day. Piece of cake! (Literally).
Just like macarons are my favorite cookies, I suspect entremets are quickly becoming my favorite type of cake. The possibilities of cake, fillings, textures, and icing are endless.

ONE YEAR AGO: Flourless Chocolate Pecan Cake
TWO YEARS AGO: A Tale of Two Macarons
THREE YEARS AGO: Chocolate Chip Shortbread Cookies
FOUR YEARS AGO: Chicken in Green Pipian Sauce, Sous-vide Style
FIVE YEARS AGO: Classic Shrimp Gobernador Tacos
SIX YEARS AGO: A Walk Towards the Sunset
SEVEN YEARS AGO: In My Kitchen
EIGHT YEARS AGO: Heavenly Home-made Fromage Blanc
NINE YEARS AGO: A Perfect Sunday Dinner