FRENCH STYLE BAGUETTES

I have never met any person living in France who worries about baking baguettes at home. Why would anyone do so, when they can walk a few steps from the front door and find the very best examples, fresh from the oven? But when you live in the US the situation is totally different. The stuff you see sold as “baguettes” could bring Paris back to 1789. Some, if held up, will fold. Wrap your mind around that. A baguette with such poor inner structure, with so much stuff added to the dough to prolong its sorry life, that it folds under its own weight. I have a few recipes for baguette in the blog already, but decided to bite the bullet and try America’s Test Kitchen version. I say bite the bullet because, as my friend Cindy always says, their recipes ensure that you will dirty every single pan, bowl, utensil you have. They don’t cut corners. They create them. In the case of their baguettes, the issue is not so much messing up stuff, but the timing and super detailed instructions. You can find the full recipe in their site, I will give just a very minimal overview, as I could not get permission to publish their method.

FRENCH BAGUETTES
(from America’s Test Kitchen)

¼ cup (1⅓ ounces) whole-wheat flour
3 cups (15 ounces) all-purpose flour
1 teaspoon instant yeast
1 teaspoon diastatic malt powder (optional)
1½ teaspoons salt
1½ cups (12 ounces) water

OVERVIEW OF THE METHOD

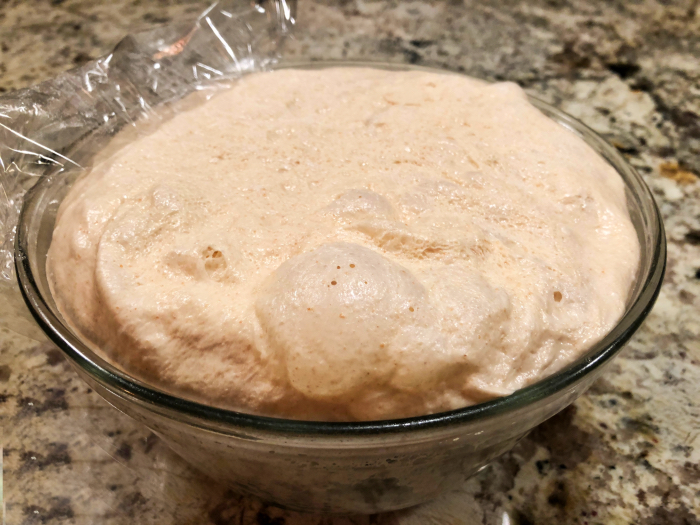
Make a dough with all ingredients by kneading with a mixer for about 7 minutes. Leave it at room temperature and knead by folding three times, letting the dough rest for 30 minutes in between folding cycles. Refrigerate overnight.

Remove dough from fridge, divide in half, work with half the dough at a time. Follow their precise measurements to obtain four portions of dough.


They will instruct you to pre-shape the dough, minimizing how much you handle it, and with a lot of waiting time in between each manipulation, including the final shaping and stretching to a size compatible with home ovens.

After a final rise of 45 to 60 minutes, the baguettes will be ready for a 500F oven, baked for 5 minutes covered with a disposable aluminum baking pan (excellent method to create steam), and uncovered for the final 15 minutes for proper browning.

for full recipe, visit this site

You will be able to bake two baguettes at a time. I did not bother retarding the two last baguettes in the fridge, as the baking takes a reasonably short time.  Overall, it is a good recipe, just pretty convoluted in terms of all the instructions given for handling the dough.

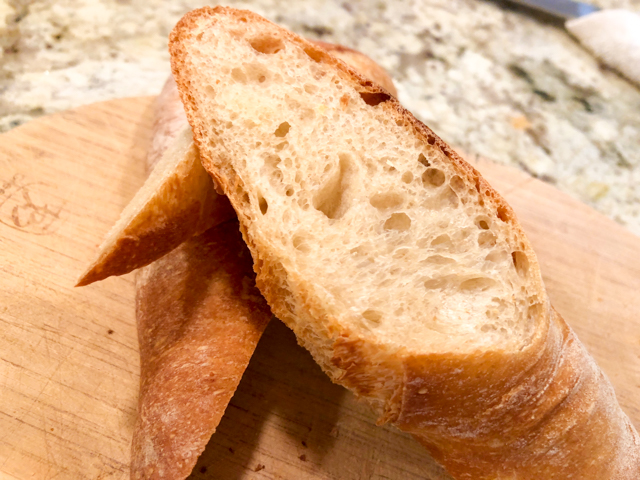
The inner crumb had the uneven holes that are the mark of a good baguette, but I expected a slightly more open structure. Taste was pretty spectacular, I think the proportion of whole wheat and all-purpose flour is perfect.  I will probably do a few changes in the way I shaped it, because I suppose a bit more surface tension could be better, two of the baguettes were not as round as I would like.

America’s Test Kitchen insists they should be consumed within 3 to 4 hours. I beg to differ, and find that they freeze quite well and a small visit in a toaster oven brings them back to life…

ONE YEAR AGO: Sad Times

TWO YEARS AGO: Slow-Cooker Carnitas Lettuce Wraps and Paleo Planet Review


SaveSave

SaveSave

SaveSave

SaveSave

SaveSave

SaveSave

SaveSave

SaveSave

SaveSave

SaveSave

SaveSave

SaveSave

AWARD-WINNING SOURDOUGH BAGUETTES

It was bound to happen.   Once I felt comfortable shaping baguettes, I went on the pursue of a recipe for a sourdough version. My number one source of inspiration for all things related to bread is Susan’s Wild Yeast, and this recipe charmed me right away.  Award-winning sourdough baguette version?  I am sold!   First thing I did was to drop an email to Samuel Fromartz, the writer-turned-baker behind the recipe,  asking for permission to publish his very detailed method.  To my delight, he replied within a few minutes, and we exchanged a few messages, in which I got great tips to improve steaming during baking  (I will test his method this weekend).   Sam Fromartz is currently working on a book about grains, bakers and bread for Viking/Penguin. So, if you are like me, and cannot have enough info on the subject, check his website for the development of his project.  I know I will…  😉

FROMARTZ BAGUETTE TRADITIONAL
(recipe published with permission from Samuel Fromartz)
(read original article at Chewswise blog)

Makes four baguettes

90 grams sourdough starter (at 100% hydration)
420 grams water
590 grams flour (I used King Arthur Organic All Purpose Flour)
10 grams whole wheat flour
13 grams sea salt
2 teaspoons instant dry yeast (I used  SAF Instant Yeast)
Olive oil to grease bowl
cornmeal to dust cutting board

FIRST DAY
Pour starter and yeast into bowl and add water, mixing until the starter breaks up a bit.  Add flours and salt and mix for a couple of minutes. The dough will be heavy and shaggy. Let it rest for 5 or 10 minutes, covered with plastic.

Rub the surface where you will knead the dough with a tiny amount of olive oil to prevent the dough from sticking (great tip originally from Dan Lepard).  Use a scraper to move dough onto the counter and begin to knead by stretching and folding dough, trying to use your finger tips.

After kneading for 5 minutes, scrape mass into a clean bowl or plastic bin. Cover and let rest for 20 minutes.

Oil the counter again if necessary and remove dough to counter. Stretch it until 1-inch thick then fold top and bottom in thirds like a letter. Do the same type of folding, coming from left to right. Put dough back in the bowl, cover, let it  rest for 20 minutes.

Remove from bin, fold again, and put back in a covered bowl for 20 minutes.

Remove from bin, fold again for the third and final time. Clean the bowl, oil lightly (with 2 tsp olive oil), and put dough back inside. Cover and place in refrigerator for 12 to 24 hours.

SECOND DAY
Place baking stone or quarry tiles in middle of oven. Place a thick rimmed cookie sheet or cast iron pan on oven floor or lower shelf. Heat oven to 470F (245 C).

Put a little olive oil in your palm and oil a 20-by-20 inch (50 x 50 cm) section of the counter. Remove dough from container. Cut dough in half. Put half back in container and into refrigerator. Cut dough into two rectangular pieces (about 250 grams each) and gently stretch into rectangles 5-by-7 inches (13-by-18 cm) with the long edge facing you.  Cover with light towel and let rest for 5 minutes.

While dough is resting, cut parchment paper large enough to fit your baking stone. Dust paper with flour. Dust  a couche (or kitchen towels) lightly with flour.

Shape dough into a log by folding top and bottom of rectangle toward middle and gently sealing the seam with thumb. Then fold top to meet the bottom and seal seam. You should have a log about 1.5 to 2 inches thick (4 to 5 cm). Gently roll and stretch into a 14-inch loaf (36 cm) or just under the size of your baking stone.

Place each loaf on parchment paper about six inches apart, seam side down. Place one rolled up towel underneath the paper between the loaves and one under each other edge, supporting their shape.  Cover with light kitchen towel and let rise for 45 minutes to 1 hour.

Put 2/3 cup water in measuring cup and bring to a boil in the microwave.

Carefully move the paper with the loaves onto a flour-dusted overturned cookie sheet or cutting board. Dust top of loaves very lightly with flour. Use a bench scraper to gently adjust the loaves and straighten them out.

Make four cuts on the top of the loaf with a razor blade, 1/4-inch deep, running lengthwise on the dough. A swift slash at a sharp 20-degree angle works best. Take cutting board and slide parchment paper with baguettes onto hot baking stone. Shut oven door. Open door, and carefully pour 2/3 cup water onto cookie sheet or cast iron pan. Be very careful if using boiling water. Shut door. Do not open the oven again while baking.

Check baguettes after 18 to 20 minutes. They should be dark brown and crusty. If pale, continue baking for 1 to 2 minutes. Let cool for 20 minutes on rack before eating. They are best eaten within 6 hours.

While baguettes are baking, form the remaining dough into loaves or leave for up to 24 hours and make fresh loaves the following day.

ENJOY!

to print the recipe, click here

for a streamlined version, click here

Comments:  To read the fascinating story behind perfecting  this recipe, check Sam’s write up about it here.

If you are a novice in baking bread, baguettes can be tricky, but you can find very detailed discussions about this particular recipe in his blog about it.  Don’t forget to read the comments, because they contain a lot of useful, additional information.  Sometimes little details we read  en passant  might mean the difference between failure and success.

I absolutely loved this recipe!   Handling a dough from the fridge is quite a bit easier than at room temperature (about 78 F), I had no problems shaping the loaves and going for their final stretch.   I will be playing with this recipe for a while,  using it to practice my slashing technique (just got a new blade, per my friend Gary’s recommendation), and baking with steam.  The baguettes had a complex “feel”,  with very delicate sourdough flavor, open crumb, and a hearty crust.  I know that when I overcome the steaming problem they will be even better… stay tuned, friends… stay tuned…

This slideshow requires JavaScript.

I am submitting this post to Susan’s Yeastspotting event….

ONE YEAR AGO: Meet our Lab (Lab = laboratory, not Labrador Dog… ;-))

TWO YEARS AGO: My New Favorite Tomato Sauce

Add to FacebookAdd to DiggAdd to Del.icio.usAdd to StumbleuponAdd to RedditAdd to BlinklistAdd to TwitterAdd to TechnoratiAdd to Yahoo BuzzAdd to Newsvine

VOILA’ LES BAGUETTES!

Second chapter on Cooking Projects 2012!

Five weekends. One hundred and twenty six ounces of flour. Blood. Sweat. A few tears. But, I am not afraid of shaping baguettes any longer. Is there room for improvement? No doubt, but the goal now shifts from shaping to baking: I must find a way to optimize the generation of steam.  Apart from that, I am pretty happy with my babies…
UN-KNEADED, SIX-FOLD FRENCH BREAD
(from Jeffrey Hamelman, Bread)

2 pounds + 4.5 oz  bread flour (8 + 1/4 cups)
1 pound + 10.6 oz water (3 + 3/8 cups)
3 + 1/2 tsp salt
1 + 1/4 tsp instant dry yeast

Place all the ingredients in a large bowl, and using your hands or a plastic scraper, bring them together forming a very shaggy mass.  The best way to do it is working the scraper down the sides of the bowl, and then rotating the bowl as you bring it up, and fold that part of the mixture on top. Do this movement about 20 times, which should mix everything together reasonably well at this stage.  Do not worry about how smooth the dough is, it will feel and look very “rough”.

Set a timer to go off every 30 minutes. You will fold the dough every thirty minutes, for a total of six times (at that point you will be 3 from the start).  At each cycle, fold the dough on itself using a scraper, for a total of 20 times,  either removing the dough to a surface, or folding it inside the bowl.  After the sixth folding cycle, leave the dough undisturbed for 30 minutes, then divide it in 12 ounce pieces (from the start,  you will be at the 3 hour and 30 minutes mark).  One full recipe makes 5 long baguettes.

Gently form each piece into a cylinder shape, and let it rest for 15 minutes (very important to relax the gluten, don’t skip this step).  Shape as a baguette, then roll the baguettes to stretch them to their final size (make sure they will fit over your baking stone or the surface you intend to bake them on).

Let the baguettes rise (preferably using a couche well coated with flour) for 1 to 1 and a half hours at room temperature (ideally at 76 F).  Score the baguettes and bake in a 460 F oven, with initial steam, for a total of 22 to 25 minutes. Cool completely before slicing.

ENJOY!

to print the recipe, click here


Comments:   I like to do the first four of the six kneading cycles using a different technique:  I coat the granite counter top with a very light amount of olive oil,  and slam the dough on it 15 to 20 times.  You can see the technique demonstrated in this video.  The last two cycles I omit the “slamming”,  and simply fold it, so that the airy structure is not disturbed.   Phil insists that I should let him make a video of my “slamming technique”, but so far I resisted the idea.  Maybe one day… 😉

As to the shaping, I will be forever grateful to Gary, my friend and baker extraordinaire, who went through the trouble of mailing me a DVD of Chef Jeffrey Gabriel CMC, from Schoolcraft College. Gary made the video during his class on French baguettes, and I watched it over and over… and over!   The main difference between Chef Gabriel’s technique and this one, is that he is not too concerned with where the seam of the baguette ends up.   On my initial attempts, I was so worried about keeping the seam up for the final rise, that I ended up manipulating the baguettes too much and messed up their final shape.   Gary’s method is much more user-friendly, and once you score the baguettes and bake them, the seam position seems to have no influence on the final look of the bread.

A few important pointers for success:

1.  Coat the surface where the baguettes will rise (after the final shaping) with flour.   They WILL stick if you forget this step, leading to intense grievance.

2. Allow the dough to rest for 15 minutes before shaping.  You need that or the gluten will keep fighting back like an elastic band.

3. The better you get at shaping the baguettes, the longer they will be.  If you want to bake them covered to create steam, this could be a problem.  Consider making shorter baguettes – not authentic, but easier to bake in a home oven.

4. Baguettes are scored  with an odd number of slashes. Usually 5 or 7.   Some advise you to wet the blade to do it, I prefer to use a dry blade, as I like the “spiky” look of the slashes.

5.  The baker’s blade is sharp.  Make sure you cover it with the protective plastic cap when you are done, or, if using a blade with no cap, put it away. Leaving it sitting on the counter top is a recipe for disaster.   (sigh)

After practicing several weekends in a row, I now settled on making half this recipe, and shaping either 3 long baguettes or 4 medium-sized.   The tricky part is baking them: I can bake two at a time, so the last one must go through a longer rise.  Sometimes it seems to be slightly over-proofed, and the resulting baguette is a bit flat.  However, the taste is spectacular, this recipe produces a very creamy crumb, with a flavor that transported us to the 7eme arrondissement in Paris.  Not a bad virtual trip to take!   😉

I am submitting this post to Susan’s Yeastspotting

ONE YEAR AGO: Cornmeal English Muffins

TWO YEARS AGO: Cornish Hens for a Sunday Dinner

Add to FacebookAdd to DiggAdd to Del.icio.usAdd to StumbleuponAdd to RedditAdd to BlinklistAdd to TwitterAdd to TechnoratiAdd to Yahoo BuzzAdd to Newsvine

36 HOUR SOURDOUGH BAGUETTES

Over the past two and a half years I became comfortable baking rustic breads  using wild yeast.  The baguette, however, gave me lesson after lesson in humility. Baguettes are deceptively simple to prepare, but if you seek a bread with Parisian quality, then each step of preparation must be flawless: bulk fermentation, shaping, final proofing, and baking.  I’ve tried many recipes, but they never quite matched the superb baguettes of the 7th Arrondisement, where we used to live.

That all changed during our recent trip home.  I was looking forward to baking a  sourdough bread in our own kitchen, and decided on sourdough baguettes.  I followed the detailed instructions of TxFarmer, one of the most accomplished bakers of The Fresh Loaf Forum, and voila‘,  the baguettes from my own oven were just the way I’d hoped for…


TxFARMER’s 36 HOUR SOURDOUGH BAGUETTES

(recipe found at The Fresh Loaf forum)

150 g very active sourdough starter (at 100% hydration)
425g all purpose flour
300g cold water
10g salt

Mix water and flour into a lumpy mass, cover and place in the fridge for 12 hours.

Remove from the fridge, add the starter and salt to the dough, and mix until distributed. The dough will be very sticky, but you should resist the temptation to add more flour. Allow it to rise at room temperature for 2 to 3 hours, kneading by the “stretch and fold method” every 30 minutes. The dough may rise about 30% of its total volume. Place the dough covered in the fridge for 24 hours.

Remove the dough from the fridge and let it warm up for 1 to 2 hours – you want it to rise but not get overly bubbly, because that will make shaping very tricky later. Divide the dough in four pieces, taking care not to deflate it too much. Place each piece over floured parchment paper, and let it relax for 40 minutes.

Shape each one as a baguette (for a nice tutorial, click here), proof for 30 to 50 minutes, and bake with initial steam at 460 F for 25 minutes.

Let it completely cool before slicing.

ENJOY!

to print the recipe, click here

Comments: When Txfarmer described this recipe as “everything I know in one bread,”  she meant it. She baked multiple batches to perfect it, and made it clear that you need a good “feel” for the dough to get good results. That’s why the initial stretch and fold cycle varies from 2 to 3 hours, depending on the ‘strength” (gluten development) of your dough. The final rise at room temperature will also change depending on the temperature of your kitchen, and how much “lift” the starter provided during the 24 hour fermentation in the fridge. If you are new to bread baking, particularly using wild yeast, all these variables are intimidating. But if you’ve baked your share of sourdough breads, then consider making a batch of these baguettes, which taste incredibly good! The crumb is open, the taste surprisingly mellow, with an almost “sweet” component, hard to imagine in a sourdough.

You may have noticed that my individual baguettes ended with different types of crusts. The difference lies in how I generated steam during baking. Two baguettes were baked with an inverted roasting pan (sightly wet) on top: they developed a nice, shiny crust, with a “caramel” color. The other two baguettes were baked in a perforated pan, with steam coming from water poured in a cast iron pan placed at the bottom of the oven. Their crust is less shiny, but they had more oven spring. My favorite method is the inverted roasting pan, but it has a major drawback: I can only bake one baguette at a time.

If you dream of perfecting baguettes at home, you MUST try TxFarmer’s recipe. Many bakers already did, and raved about it (check the discussion at The Fresh Loaf Forum by clicking here).

I am submitting this post to Susan’s Yeastspotting event…

This slideshow requires JavaScript.

ONE YEAR AGO: Potato and Leek Braise

Add to FacebookAdd to DiggAdd to Del.icio.usAdd to StumbleuponAdd to RedditAdd to BlinklistAdd to TwitterAdd to TechnoratiAdd to Yahoo BuzzAdd to Newsvine

receita em portugues na proxima pagina

BBA#26: POOLISH BAGUETTES

These days the the wonderful aroma of bread is wafting through the Bewitching Kitchen  …   For those who don’t know about “The BBA Challenge“, a few months ago Nicole, of  “Pinch My Salt“, decided to bake every  bread from Peter Reinhart’s   book  “The Bread Baker’s Apprentice“, and sent out a virtual invitation to anyone interested in joining her.    It involves forty-three breads in all,  made in the order that they appear in the book.  Over two hundred people accepted the challenge, including me.  It’s been a ton of fun so far, with ups and downs, successes and failures.

Here we are, at recipe number 26: Poolish Baguettes

twobaguettes1cut

Poolish is a soft mixture of flour, water and yeast that ferments overnight (or longer) and then gets incorporated into a bread dough.  In this recipe, the dough contains both white and whole wheat flour, but the whole wheat is first sifted to remove some of the bran.  It’s an interesting method, and here’s all the bran left behind after sifting a few ounces of flour:

sifted

Reinhart’s recipe calls for kneading the dough.  I prefer folding instead of kneading, so that’s what I did: 3 folding cycles during the initial 2 hours of fermentation.  After cutting the dough into three pieces, I shaped each one as a baguette.  After two more hours rising, the baguettes were slashed with sharp razor blade, and placed in the oven.

Notice how bubbly the dough was…

compositeEven though  my slashing skills still need improvement, this time my shaping wasn’t too bad.   There are many online videos showing how to shape a baguette;  maybe one day if I get really good at it… I’ll post my own  😉

In the meantime, you can watch a particularly instructive video here….

These baguettes were delicious!   I’d probably reduce the proportion of whole wheat in the dough, but this recipe is already a winner for me and my husband.

twobaguettes