It is hard to believe it’s been two years since Aritri left us. But it is even harder to believe and accept that someone so full of energy and joy had to face such cruel fate. She still had a lot to do, a lot to live, a lot to give and receive. The unfairness of it all. Hard to find words.
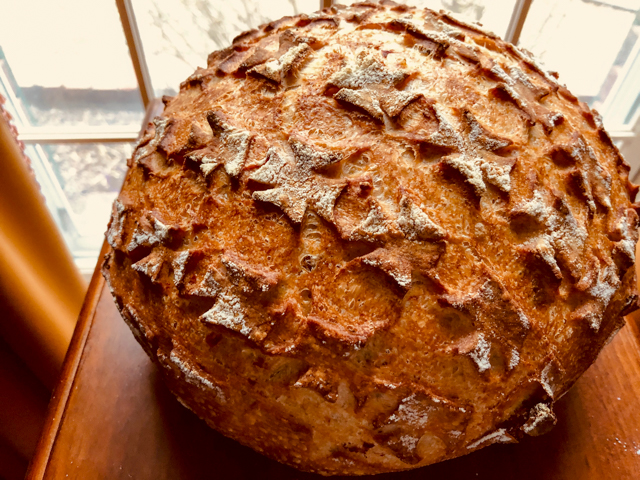
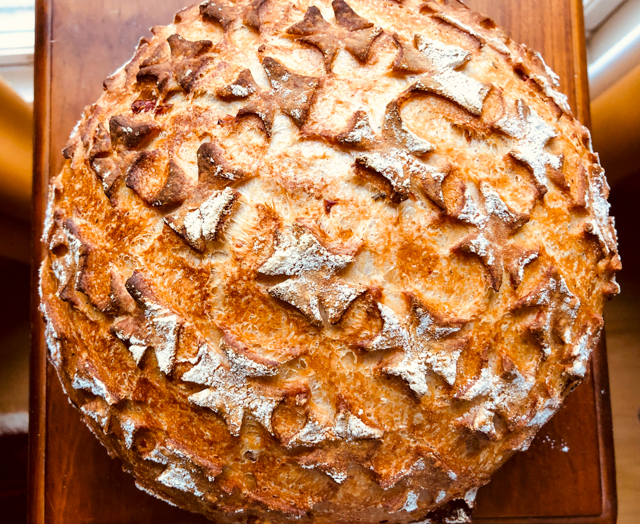
This is just another little departure on my basic formula for sourdough bread, also using my default method of KitchenAid first, folding next. I decided to try a totally different type of scoring, and must say I am pretty happy with the way it turned out.
SUNDRIED TOMATO SPELT SOURDOUGH (from the Bewitching Kitchen)
480g bread flour 20g spelt flour 50g sundried tomatoes, chopped in pieces 10g salt 370g water 80g sourdough starter at 100% hydration
Make the levain mixture about 6 hours before you plan to mix the dough. It should be very bubbly and active.
When you are ready to make the final dough, place the water in the bowl of a KitchenAid type mixer and dissolve the starter in it, mixing with a spatula briefly, then add the two types of flour, and the salt. Turn the mixer on with the hook attachment and knead the dough for 2 minutes at low-speed all the time. Add the sundried tomatoes and knead for 2 more minutes. If the dough is too sticky, add 1/4 cup flour, you want the dough to start clearing the sides of the bowl, but still be sticky at the bottom.
Remove from the machine, and transfer to a container lightly coated with oil, cover lightly with plastic wrap and allow it to ferment for 4 hours, folding every 45 minutes or so. After four hours bulk fermentation, shape the dough as a ball, and place, seam side up, in a lightly floured banetton. Leave at room temperature one hour, and then place in the fridge overnight, from 8 to 12 hours.
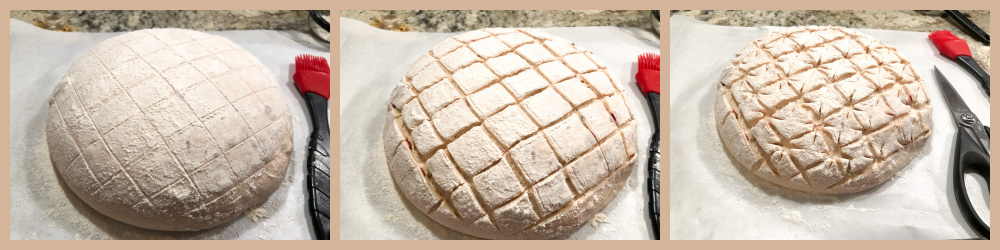
Next morning, heat the oven to 450F. Invert the dough over parchment paper, rub some flour all over the surface, and use a string to lightly score lines forming a grid on the surface. Next, use a brand new razor blade to score those lines, and scissors to form a star pattern at the corners (see picture below).
Bake at 450F for 45 minutes, preferably covered for the first 30 minutes to retain steam. Cool completely over a rack before slicing.
Comments: To score the bread you’ll need a string, so that you can very lightly mark the pattern. I don’t have enough confidence with a razor blade in my hand to go at it without these markings, but you might not need it. After scoring with the blade, make the details with the scissors. I now visualize a next bread in which the grid won’t be squared, but tilted in some way. Not sure exactly how I’m going to do it, but I will definitely play with it.
The sundried tomatoes I used were soft and moist, I got them from our grocery store in their salad bar, they were lightly marinated with herbs. I would avoid using super dry tomatoes, but if that’s the only kind you have, maybe softening a bit in warm water can be a good idea.
It is really a totally different look from what I’m used to. I like the way it allowed the bread to rise very uniformly, which is not always the case for some patterns. Contrary to cookies, which I have a venue to donate, I only bake bread for us, so it becomes a “once-a-month” kind of project. I have quite a few things to try, but they tend to materialize more slowly. Maybe I should start giving bread to neighbors? Departmental colleagues? Graduate students?
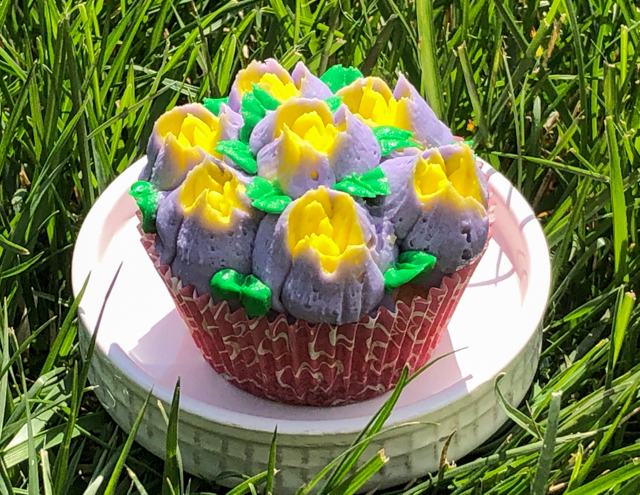
I’ve had a set of Russian icing tips for years. They were sitting in a drawer, minding their own business, not harming anyone. What possessed me to grab them to decorate some vanilla cupcakes? I have no idea. All I know is that I managed to produce ONE cupcake. Let’s call him Neo. Never again, my friends. Never again. A few more months of my life expectancy are gone.
NEO CUPCAKE WITH BUTTERCREAM FLOWERS (from the Bewitching Kitchen)
1 recipe for yellow cupcakes (for ATK recipe, click here)
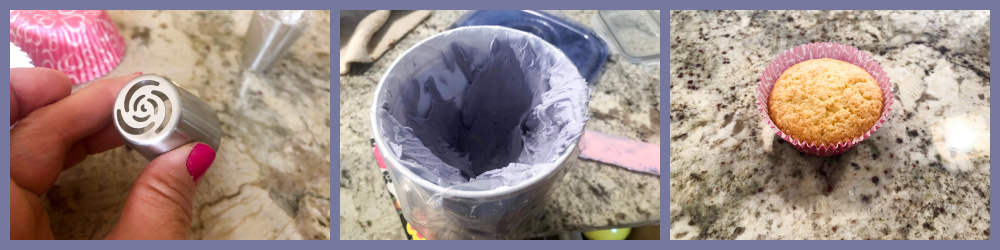
buttercream: 1 cup butter, slightly softened (I used Kerrygold) 1 pound icing sugar 1/8 tsp salt 1 + 1/2 tsp vanilla extract 1 to 2 tablespoons milk purple, yellow, and green food gel dye Russian piping tip 1M piping tip (optional)
Make the cupcakes according to the directions from America’s Test Kitchen recipe. It is a very simple and straightforward method that works great, I highly recommend it.
Make the buttercream: add the butter to the bowl of a KitchenAid type mix, fitted with the paddle attachment. Mix for a couple of minutes until the butter is creamy and lighter. Add the salt and vanilla, beat a little more. Turn the mixer off, add the powdered sugar and turn it on the lowest speed.
Once the risk of powdered sugar explosion is over, increase the speed, and beat for a couple of minutes, until very creamy, adding milk just to have the perfect piping consistency.
Separate a small amount (1/4 cup maximum) to dye green to pipe leaves. The rest of the buttercream divide in two, one large portion for purple, one smaller portion for yellow. Fit a large piping bag with the Russian tip of your choice, add the purple icing to the sides of the bag, leaving the center empty. Fill the center with yellow buttercream. Close the bag, pipe small amounts of buttercream on a piece of parchment paper until you are sure the yellow is showing through in the center. Pipe flowers on the surface of the cupcakes.
Add green buttercream to a small piping bag fitted with a leaf tip. Pipe leaves around the flowers.
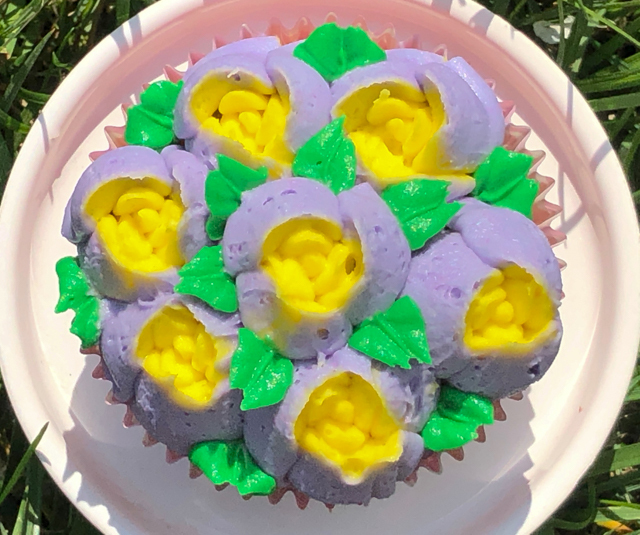
Comments: Don’t you think that icing tip looks like the most innocent gadget in the universe? If you watch youtube videos teaching the secrets of the Russian tips, they make it all seem like the most peaceful walk on the most beautiful tropical beach. They are not telling you the truth. Not the full truth. I advise you to go for a tip that does not need a clear separation between the two colors. I wanted the yellow to be at the center, and the purple around it, and yes, I managed to do that in this single cupcake.
But as you go along, the colors tend to mix, the buttercream also gets a bit less firm, and instead of keeping open like a flower, the outer edge collapses in, and you are left with an “almost flower” next to a blob of undefined shape, next to another blob of even worse shape, and pathetic color. Accordingly, my reaction went from “ooops” to “what the heck is this?” to words unfit to print.
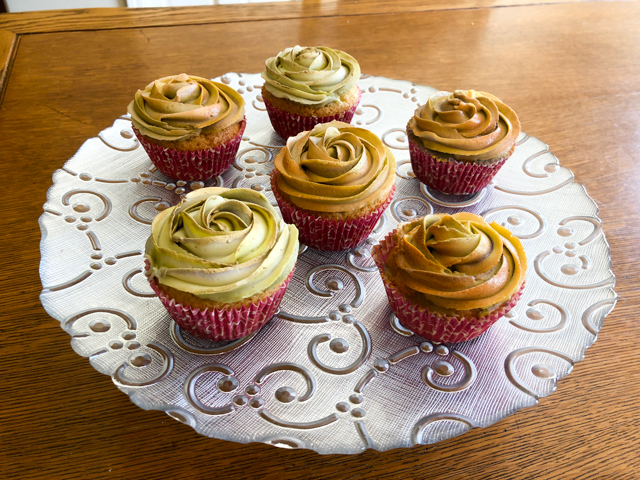
As I mentioned, I could only pull one cupcake decorated with “the Devil’s tip.” I had to scrape all the blobs, mix the icings together, spoon them in another bag fitted with my trustworthy 1M tip, and call it a day. It’s a good thing I don’t drink, because the tequila bottle winked at me. Twice.
As the road to get to the final icing was quite rocky, I was not too fond of the resulting color. If you mix yellow and purple, you’ll see what I mean (don’t do it). So I air-brushed some with a rose gold dye, and painted edges with gold luster. I am happy with the way they turned out, and for that my husband is elated.
Now, if you like to live dangerously and want to try “the Devil’s tips”, I advise you to pick one that you can use either with a single color or that would work well with a marbled design. You can then add two shades of the same color to the bag, so that mixing during piping won’t be a problem. Thinking back, I think it would be possible to add the yellow color to the center enclosed in a second bag, and spoon the purple around it. I might give it a try, but not in the near future. I need to recover from this adventure first… It’s not as if I am a young puppy with plenty of life expectancy to waste.
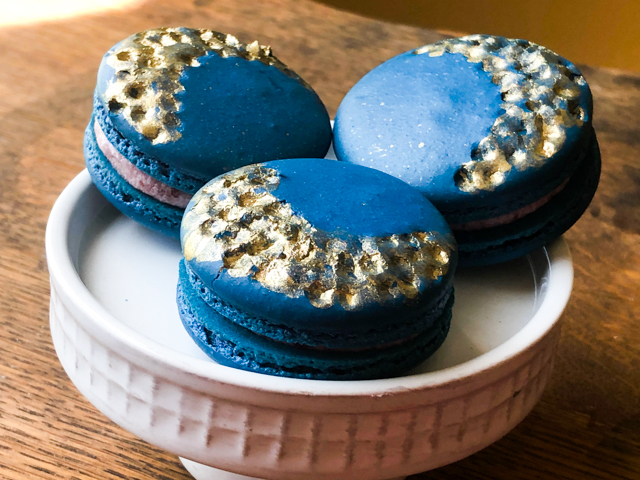
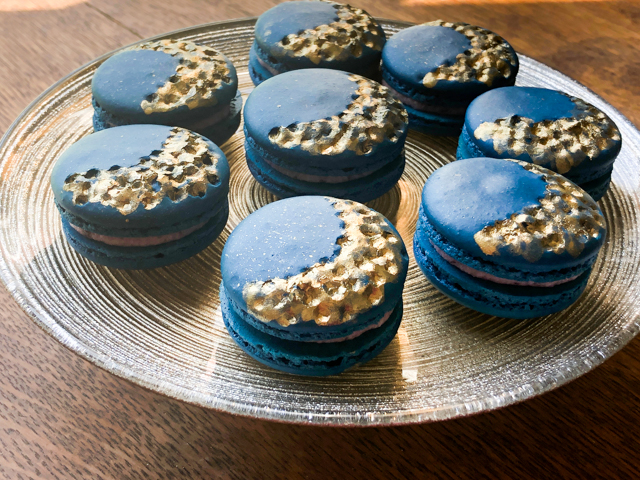
Today my original plan was to share a series of macarons with different styles of decoration. But, I am so over the moon with these, they elbowed every macaron in the waiting line and here they are. Alone in all their golden glory.
OVER THE MOON BLUEBERRY-LEMON MACARONS (from the Bewitching Kitchen)
For the shells: 200g powdered sugar 115 g almond flour 115 g egg whites at room temperature (approx. 4 eggs) 1/8 tsp of cream of tartar (optional) 100 g granulated sugar ¼ tsp vanilla paste or extract blue and black food gel color (I used Sugarflair and Americolor) Egyptian gold luster powder everclear
For filling: 60 g unsalted butter softened 160 g powdered sugar 1 tablespoon blueberry jam zest of 1 lemon 2 tsp lemon juice 1/8 tsp lemon oil pinch of salt heavy cream if needed to adjust consistency
Line 3 heavy baking sheets with parchment/baking paper or Silpat mats. Layer the powdered sugar and ground almonds/almond meal in a food processor. Pulse until the mixture looks like fine meal, about 12 pulses. Pass through a sieve and transfer to a small bowl or to a sheet of parchment paper. Set aside.
Place the egg whites and cream of tartar in the bowl of a stand mixer fitted with the whisk attachment. Make sure that the bowl and the whisk are impeccably clean. Starting on medium speed, whip the whites with the cream of tartar until they look like light foam. Add all the sugar at once and keep whisking until the meringue is soft and shiny. Add vanilla and food colors.
Whip the egg whites until the mixture begins to dull and the lines of the whisk are visible on the surface of the meringue. Check the peak. It should be firm. Transfer the whites to a medium bowl.
Fold in the ground almond/almond meal mixture in two increments. Paint the mixture halfway up the side of the bowl, using the flat side of a spatula. Scrape the mixture down to the center of the bowl. Repeat two or three times, then check to see if the mixture slides slowly down the side of the bowl. Put the mixture in a piping bag fitted with your choice of piping tip (round, ¼ or ½ inch in diameter or 6 – 12 mm). Pipe shells, I like to count numbers in my head and use the same count for each shell so they end up similar in size. If making snowmen, make a template with two circles joined together to form head and body, and pipe each section.
Slam each sheet hard four to six times on the counter/worktop. Let the unbaked macarons dry until they look dull but not overly dry. Drying time depends on humidity. In a dry climate, the macarons can dry in 15 to 20 minutes; in a humid climate, it can take 35 to 40 minutes. When they form a skin, use a very small fondant baller tool to draw a moon.
While the macarons are drying, heat the oven to 300 F. Bake one sheet at a time on the middle rack. Check in 11 minutes. If the tops slide or move (independently of the ‘feet’ when you gently twist the top), then bake for 2 to 3 more minutes. Check one or two. If they move when gently touched, put them back in the oven for 1 to 2 more minutes until they don’t move when touched. Let the macaroons cool for 10 minutes before removing from the pan. The macarons should release without sticking. Mix the golden luster dust with everclear and paint the dimpled region. Flick some of the suspension to get a few golden dots on the smooth part of the shells.
For the filling, use a hand-held electric mixer and whisk the butter until creamy. Add the other ingredients except the heavy cream, and whisk until creamy and smooth. If needed, add a bit of heavy cream to loosen the mixture.
Assemble the macarons: find two macarons similar in size and add a good amount of filling to the bottom of one of them. Place the other on top and squeeze gently to take the filling all the way to the edge. Store in the fridge for 24 hours for perfect texture.
Comments: I recently saw macarons on Instagram with this dimpled effect but absolutely no mention of the technique used. I realized it was similar to what I’ve done with sugar cookies before, so I played with it a bit. At first I thought that I should bake the shells and make the dimples while they were warm. Don’t even try it, it just cracks in a pathetic way. Could be a nice effect too, depending on how you manage to create cracks, but definitely not what I was hoping for. So what you do is allow the skin to form, and right before you bake the shells, very delicately press the surface with the smallest fondant baller tool you can find (mine is the smallest from this set). You can also use the handle of a small painting brush. Bake as you would normally do, then paint the dimpled region with gold luster powder. I used Egyptian gold which is the brightest kind.
Fling some extra gold with a brush over the surface, and that’s about it. The recipe was my default, but I changed one important step: instead of adding the granulated sugar in stages, I dumped the whole amount after the egg whites were starting to leave traces as the whisk moved through them, maybe 1 to 2 minutes after starting the Kitchen Aid. The meringue will take slightly longer to firm, but what that does is give a better chance for the sugar to fully dissolve. You would not do that if making an Angel Food Cake that requires a very light and airy meringue, but for macarons it works like a charm. You can read the rationale behind it in this article. Interestingly, this method is the one favored by JC Gregg, The Macaron King, former contestant of the Great American Baking Show, season 3. I really like how much simpler it is, and how it improves the shells. Particularly the base, there are no crystals making the surface rough, or the shell threatening to glue to the silpat. Smooth like a mirror, as you can see in my composite photo above. I am sold.
It still amazes me that you can totally mess up the surface of a macaron and have it bake as if nothing happened. The possibilities of decoration are mind-blowing, so if you are into baking macarons, consider trying this method. Way too cool for words, don’t you agree?
Some shells baked without the dimpled effect were decorated with a stencil. Silver stars to go along with the golden moon…
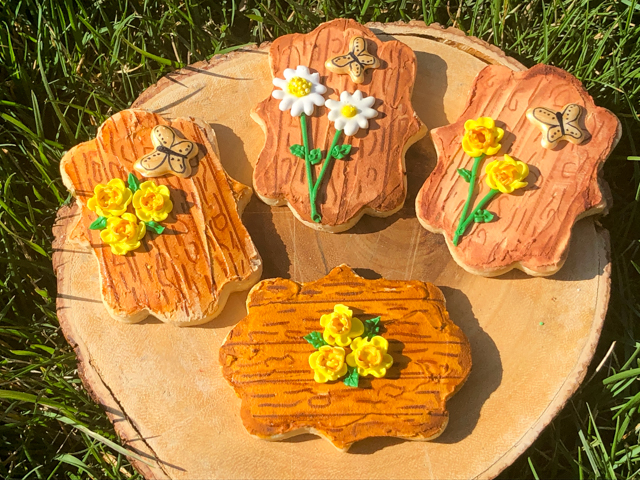
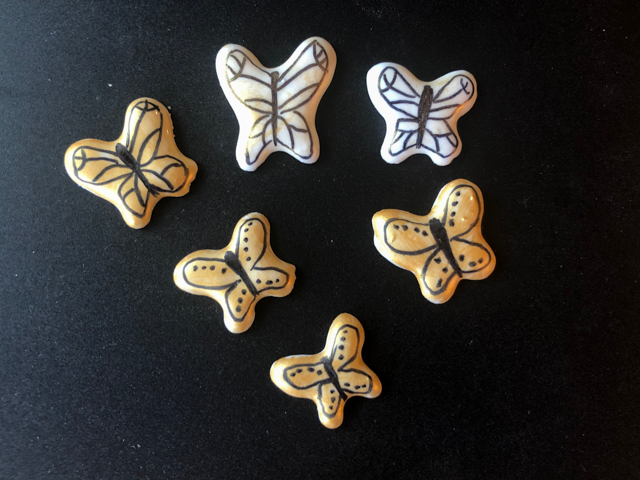
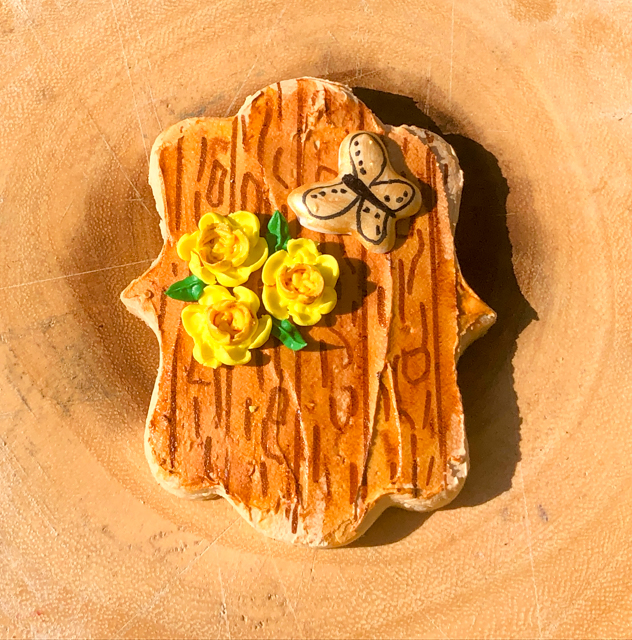
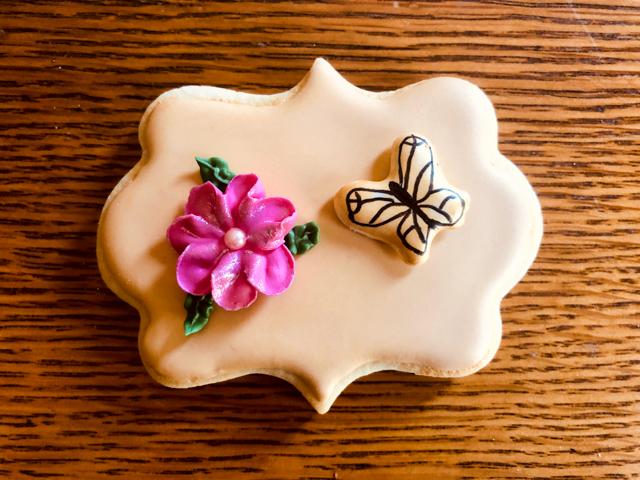
My cookie-baking adventures go on and on. So many different techniques to try, sometimes I am not sure which one to go for next. But the moment I saw my tent-baking friend Tanya sharing her method to make wood plank cookies, I dropped all other projects that were waiting, and jumped on it, like a Jack Russell on a snake. Or Oscar on an ankle (missed the story? click here). She shared a blog post and three tutorials to come up with a showstopper production, involving a bunny rabbit and gorgeous tulips. I confess that the skill to pipe the rabbit on the cookie is beyond my reach, so I opted to let the bunny go and bring butterflies, made as Royal icing transfers. A lot less stressful. I’m quite pleased with the way they turned out…
CHERRY-ALMOND SUGAR COOKIES (from The Bewitching Kitchen)
1 cup (227g) unsalted butter,cubed, cold 1 cup (200g) granulated sugar zest of half an orange 2 eggs 3 1/2 cups (420g) all-purpose flour 1/2 cup (60g) cornstarch 1/2 teaspoon kosher salt 1/4 tsp baking powder 1/2 teaspoon cherry extract (Olive Nation) 1/2 teaspoon almond extract (Olive Nation)
to decorate: your favorite recipe of Royal Icing (I use Tanya’s) royal icing transfers (butterflies and flowers) food-safe pen
Heat the oven to 350 F and line baking sheets with parchment. Sift the flour, cornstarch and salt, and set aside. Mix the sugar with the zest rubbing it well to release the oils. Cream the butter with the flavored sugar, just until smooth and combined.
Mix in the eggs and flavoring extracts until incorporated. Add the flour mixture on low-speed, in three portions. The mixture will seem very dry and sandy at first, but after a couple of minutes the mixer it will start to pull away from the sides of the bowl.
Remove the dough from the bowl, cut in two pieces and wrap one in plastic. Roll the second piece of dough out between 2 sheets of parchment paper, to a thickness of 1/4 inch. Cut into rounds, press a detail flower using another type of cutter, and freeze for 10 minutes. Bake for 10 to 15 minutes, depending on the size of the cookie. I like to have a slight golden tone at the edges.
Cool on a rack and decorate as desired. For the bee decoration you’ll need thick consistency Royal icing in cream color for the background, and leaf green for details. A brown food pen with reasonably fine tip, food gel dye in caramel or brown color, vodka, and royal icing transfers of the decorations you feel like adding to the plank.
Comments: To see Tanya’s gorgeous cookies visit her site with a click here. Those who have been following my blog for a while know that I’ve never been into cookie decorating, and Royal icing scared every cell of my body. My approach for a decade had been “thanks, but no thanks.” Being part of the Great American Baking Show forced me to deal with the issue. Although I never got as far as making decorated cookies in the tent, I admit that what I had planned for that particular episode was not that great. Once the show was over, I set as a goal for myself to improve, and ended up following the footsteps of Tanya in her online tutorials. She literally turned me into a cookie addict. Cookie making, that is. So, if you suffer from the same problem I used to, check her blog. Consider also supporting her through Patreon (or offering a subscription to someone you love).
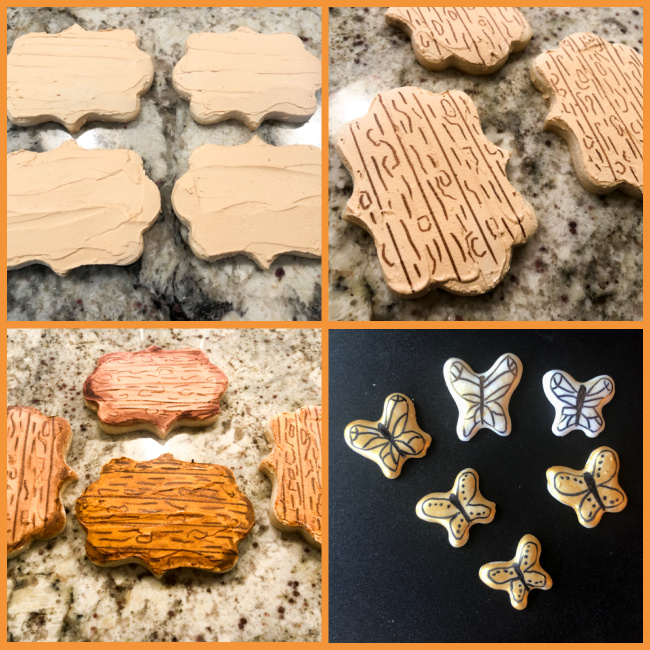
There are several ways to generate a wood appearance on cookies, but I like Tanya’s method because it minimizes the amount of icing you’ll need. She lays a background color with a spatula, gives it a little texture, draws the veins of the wood with a pen and goes over it all with diluted food dye. It is all very carefully detailed in her tutorial, step by step. For my decorations, I made small butterflies with Royal Icing. I drew templates by hand with a very loose butterfly format, and piped white icing. For transfers, you want icing that flows smoothly from the tip of your bag (I use tipless bags for that), or from the icing tip. But, it needs to be thick enough to hold it’s shape. I’d say about 20 seconds is what you want. For the base and the leaves and stems, you’ll need thicker than that. Once the butterflies dried completely (overnight is best), I painted them with luster gold and drew a pattern with a fine tip black food pen.
The daffodils were made according to a tutorial from Haniela which you can find here.
The plank is a very nice background to add to several shapes of cookies, and compatible with many different additions: birds, flowers, animals, butterflies, or even a simple monogram. And the plaque shape is also quite interesting to play with, even if you decide to go with a simple, solid color background.