Some people find sourdough bread to be a bit “harsh” as far as texture goes. I am not part of that team, but I can understand where they are coming from. This bread retains the basic sourness of the classic, but the texture is so mellow that it reminded me of soft sandwich breads I enjoyed as a kid. It is the soaked oats and seeds that perform the magic. Absolutely delicious, I hope you’ll give it a try.
OAT AND SESAME SEED SOURDOUGH (from The Bewitching Kitchen)
375g white bread flour (+ more to adjust consistency) 25g spelt flour 220g water 100g starter at 100% hydration 40g steel-cut oats 10g white sesame seeds 10g black sesame seeds (or 20g all one type) 10g salt
When you refresh your starter, maybe 6 hours before starting the bread, make the soaker: mix the oats and sesame seeds, and add enough water to just cover them. Cover the bowl with plastic wrap and leave at room temperature until it is time to mix the dough.
Add the soaked seeds ad all other components of the dough to the bowl of a Kitchen Aid mixer fitted with the dough hook. If there is too much water not absorbed by the seeds, leave it behind, but keep in mind that a lot of the moisture of the water in the formula should come from the soaker. Knead for about 4 minutes, paying attention to the texture of the dough. It should just start to clean the sides of the bowl. If necessary, add more flour at this point. I had to add about 1/4 cup flour to mine.
Remove the dough from the Kitchen Aid, transfer to any appropriate container lightly oiled and perform a series of stretch and folds every 45 minutes. Do it four to five times, which will take you up to 4 and half hours from initial bulk fermentation. Even if you fold it only 4 times, leave it fermenting until you reach 4 and a half hours.
Shape as a round ball and place in a floured banneton, seam side up. Leave 45 to 60 minutes at room temperature, then place in the fridge overnight.
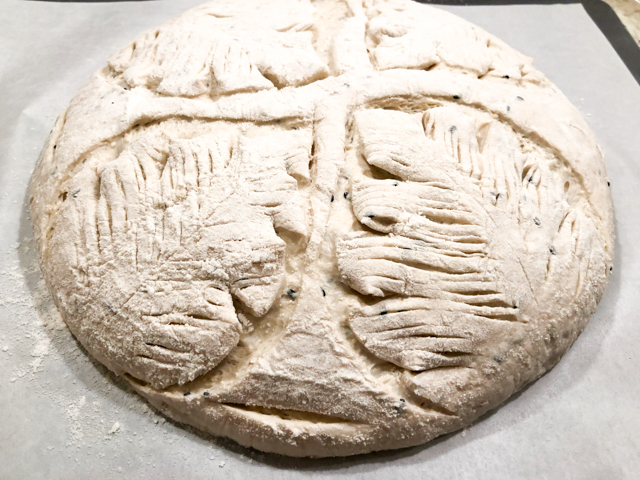
Remove the dough by inverting it on parchment paper, dust the surface with rice or white flour and slash any pattern you like. I used scissors coupled with a razor blade to get the leaf pattern.
Bake at 450F in a Dutch Oven, covered for 30 minutes, then remove the lid to brown the crust. Allow it to cool completely before slicing.
Comments: I have included sesame seeds in my sourdough breads many times in the past, but don’t remember their flavor being as evident as in this loaf. I suppose the soaking step helps with it, which surprises me. Roasting them I could understand but just the soaking? Interesting. The texture of this bread is also remarkable, so I must repeat myself and tell you to try it and serve even to those who are a little uncomfortable with a rustic sourdough loaf in all its full glory.
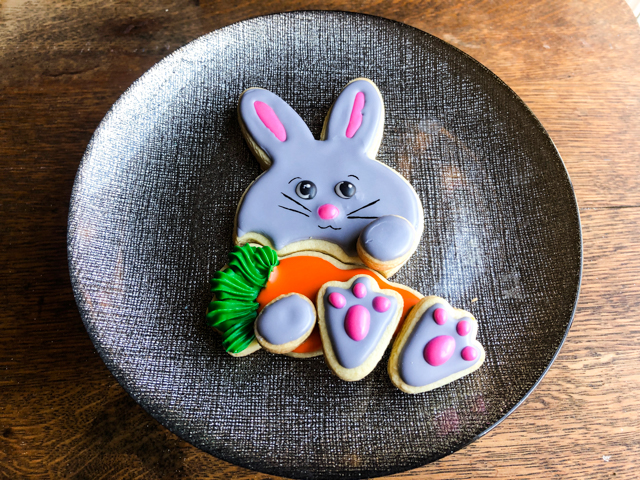
Do you know what a Franken-cookie is? No, it’s not just for Halloween, although of course you can make some perfectly tailored to that occasion. Franken cookies are made by joining different cutters in unexpected compositions. I share today my first attempt with Easter season in mind. Credit must go for the one and only Marlyn, cookier-extraordinaire from Canada (Montreal Confections). Her work is simply amazing. For a very detailed tutorial to make this little guy, click here. It starts at the 38 min mark. You will need rabbit cookie cutters + carrot shape cutter (mine was the one from this set).
FRANKEN BUNNY HONEY-LEMON COOKIE (design my Marlyn, cookie recipe from Bewitching Kitchen)
1 cup butter (226g), cut in pieces, cold 200g sugar zest of 1/2 lemon 2 eggs 1 tsp honey extract (Olive Nation) 1/2 tsp vanilla extract 420 g all-purpose flour 60 g cornstarch 1/2 tsp salt 1/4 tsp baking powder
Mix the flour, cornstarch, salt and baking powder and reserve.
Cream sugar, butter and lemon zest in the bowl of a Kitchen Aid for a couple of minutes until the sugar is incorporated well and does not feel gritty. Add the eggs, honey emulsion and vanilla extratc slowly and mix until incorporated, but don’t over-mix.
Add the flour mixture slowly, mixing in low-speed. If needed, add a little more flour, up to 1/4 cup. Once the dough comes together, stop, and form three discs. You should have three discs with about 330g each. Dough can be rolled out immediately or placed in the fridge to roll out later. It also freezes extremely well.
Cut in shapes, freeze the cut-outs for 10 minutes, then bake in a 350F oven for about 13 minutes. Ice and decorate as desired.
For my favorite Royal Icing recipe, visit Tanya’s blog with a click here.
Comments: This is my favorite cookie recipe for the time being. It is the same basic “neat edges” recipe I’ve been using for months, but the honey extract from Olive Nation truly takes this to a whole new level. I love it.
To decorate the Franken bunny, you’ll need Royal icing orange and grey in flooding consistency, pink in medium consistency (maybe around 20 -25 seconds if you like to measure it by how many seconds it takes to level off). Green in stiff consistency, as you will pipe the green part of the carrot with a star tip and you want it to hold the shape. Making the eyes as royal icing transfer was a bit tricky, but I managed to get 3 pairs that looked ok. You can always paint them with a food pen to make life easier. The transfer produces a more dramatic, realistic look.
For other fun examples of franken-cookies, take a look here, here, and here.
For this cookie, Marlyn suggests making all details as Royal Icing transfers, so make sure you plan ahead, as those need to dry overnight. Pipe more than you think you’ll need, because then you can choose the best ones, and also not go into panic mode if they break. You can always simplify and just flood the cookie then paint the details with a food pen.
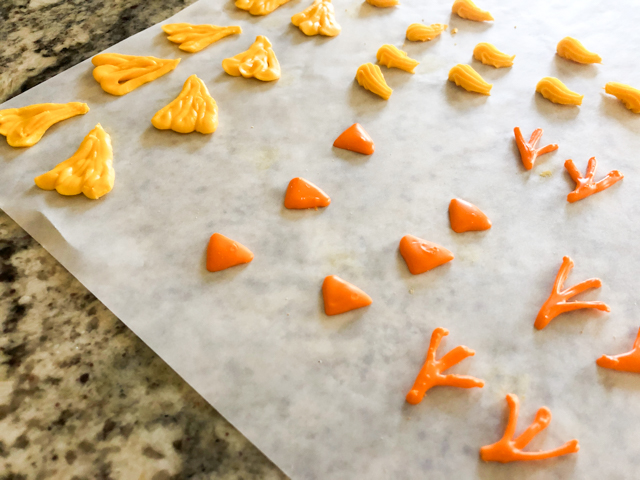
The wings are made with a petal icing tip, the decoration on top of the head with a small star tip, and the beak and feet with a tipless bag, or if you prefer, a number 1 Wilton tip. Next day, flood the egg-shaped cookie with royal icing, and carefully place the transfers on top. For the eyes I used PEM black pearls, because they never bleed into the surrounding icing.
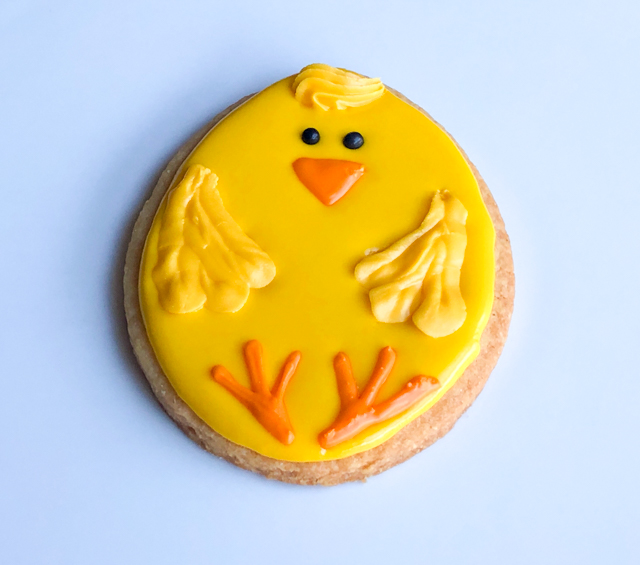
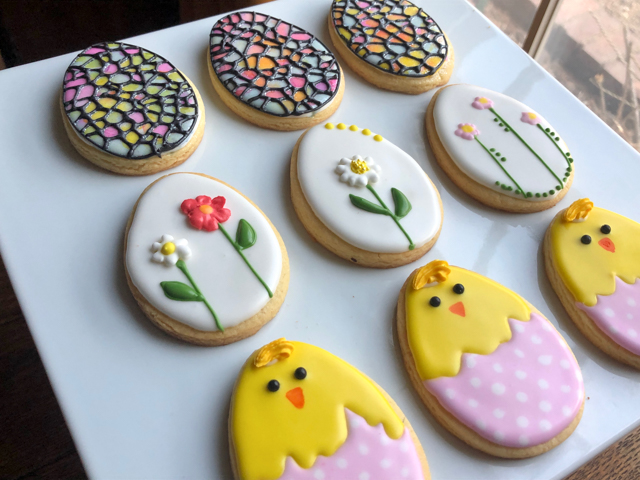
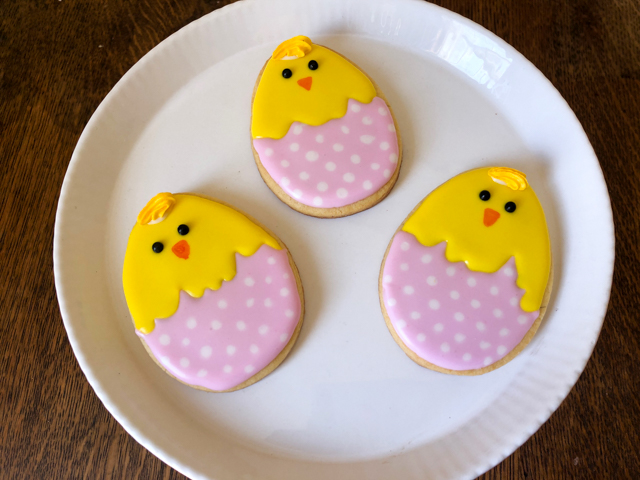
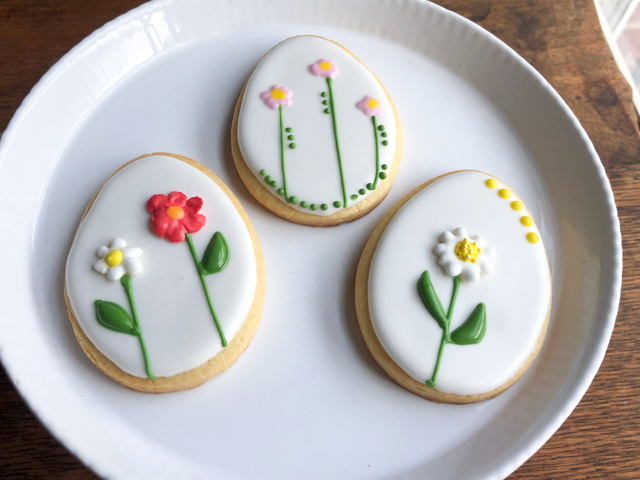
EGG-SHAPED TRILOGY
All cookies were made from the same recipe, Honey-Lemon Sugar Cookies. The simplest one to decorate is the bi-color chick, although I did use leftover decoration from the previous cookie for the top of the head. That can be omitted.
You will need pink, yellow and white Royal Icing, all in flooding consistency. Flood the pink, forming a random edge slightly above the middle of the cookie. Immediately add small white dots. Let it dry for 15 minutes, flood with yellow. Add the eyes if using black pearls, or allow to fully set before drawing the details with a food safe pen, orange and black.
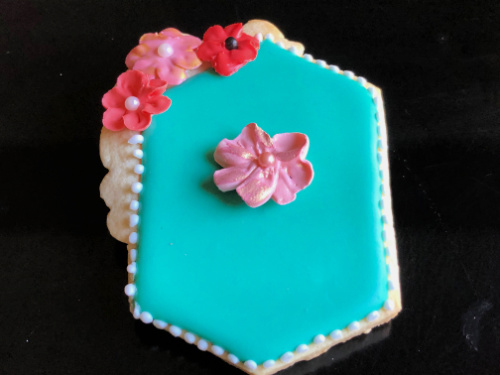
For these cookies, you will need white Royal icing to flood the surface, and if adding flowers as transfers, place them immediately on top. The upper, central cookie was decorated with simple royal icing using a tipless bag, after the flooding set.
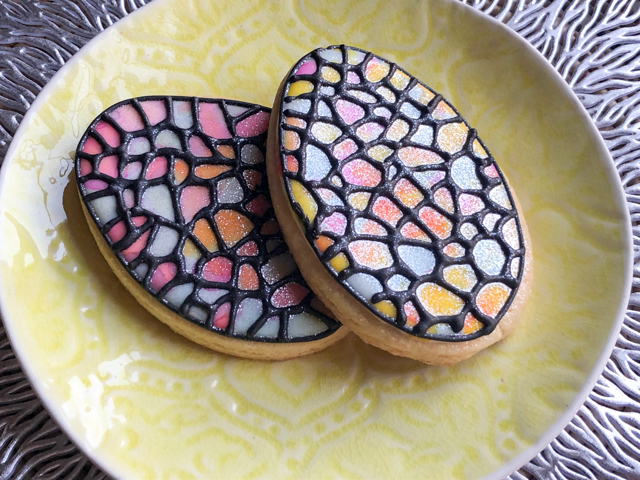
These were a lot of fun to make. I definitely need to improve on the dreadful fine lines, but how can you improve if you don’t try, right? The design is from another great cookier, Haniela, from sunny Spain. Her detailed tutorial for these eggs is found here.
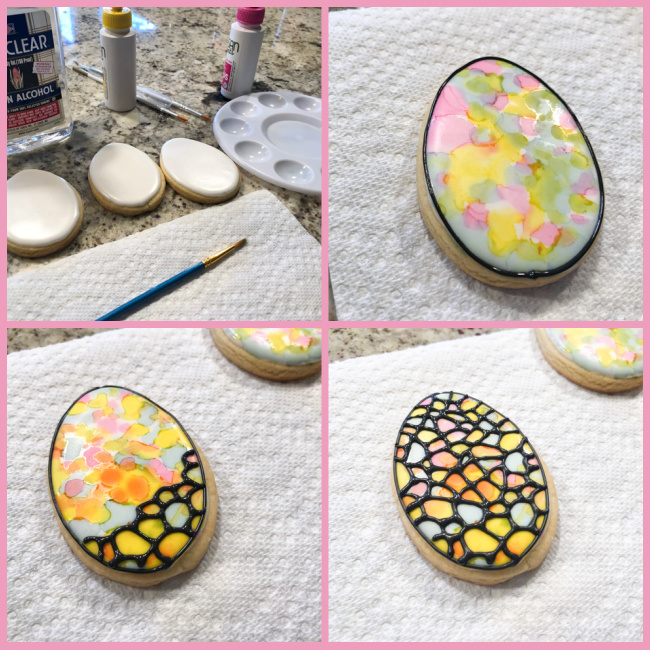
You start with a white-flooded cookie, do a tie-dye decoration with gel dye and vodka, in any shades of colors you like. Let that air-dry for a few minutes, and add the details with black Royal icing using as fine a tip as you are able to. Follow Haniela’s tutorial for the best results. I need more practice.
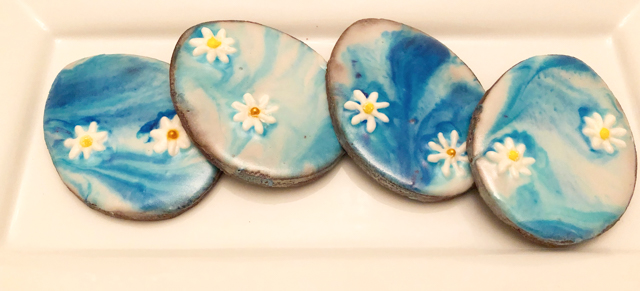
BLUE MARBLED EASTER EGGS
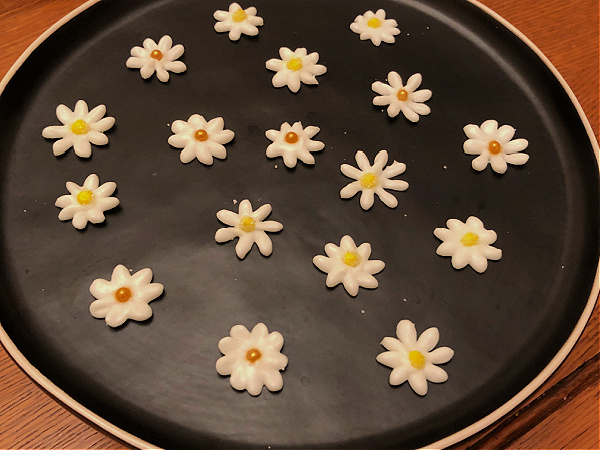
Another design by Haniela, using Royal icing in three different shades of blue, and then placing sugar daisies on the surface. Her tutorial explains it all very clearly. Once again, keep in mind that the daisies have to dry overnight before using as decoration.
BUNNY RABBIT STICK COOKIES
I could not share a series of Easter cookies without including cookie sticks, as I am quite smitten by this shape. They were inspired by CookieliciousNZ. I flooded them with light yellow Royal Icing allowed that to set, then piped the body of a bunny rabbit on top. Added a few more little details like the grass and tail. The flower cookie was made with Royal icing in detail consistency and a tipless bag.
I hope you liked this small collection of Easter-inspired sugar cookies. I have been practicing making Royal icing flowers, or simpler star-tip buds (like those used in the bunny’s tail). I simply save them in a little plastic box. It’s amazing how they can come in handy to add a little something something to cookies. Because you don’t need that much to make this type of decoration, whenever I have Royal icing leftover, I adjust the consistency to firm, and practice a few flowers. There are plenty of tutorials in youtube to help, Marlyn and Haniela have many available for free. Check their youtube channels here and here.
Do you follow Lisa is Cooking? She writes cookbook reviews and is the person I blame for quite a few of my acquisitions, which are usually Kindle versions, so I feel less guilty. Her latest post centered on a book called East: 120 Vegan and Vegetarian Recipes from Bangalore to Beijing, by Meera Sodha. I ordered it within minutes of reading the blog post. I modified one of the recipes quite a bit, and share my version with you today.
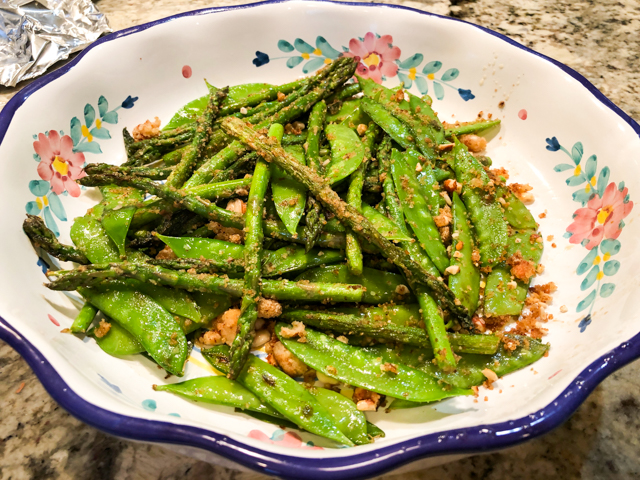
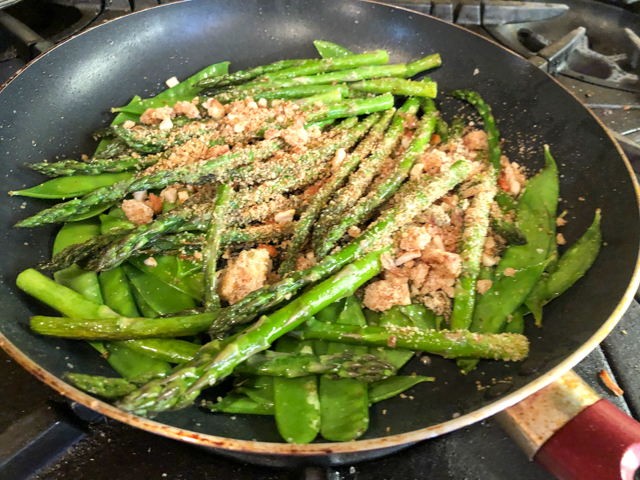
ASPARAGUS AND SNOW PEAS WITH WALNUT CRUMBS (adapted from Meera Sodha’s East)
1 bunch thin asparagus, tough ends trimmed Snow peas (about 1/4 pound) 1/4 cup grapeseed oil, divided 1/3 cup walnuts, coarsely ground 1/2 cup bread crumbs, preferably homemade (Panko works too) 1 Serrano pepper, very finely minced salt and pepper to taste zest and juice of 1 lemon (I used Meyer Lemon)
Start by making the crumb component. Heat 2 tablespoons of oil in a large non-stick skillet and add the walnuts and Serrano pepper, season lightly with salt and pepper. Stir-fry for a minute or two, add the bread crumbs, cook until fragrant and getting toasted. Immediately squirt the juice of 1/2 lemon, mix well and transfer to a bowl. Reserve.
Add one tablespoon of oil to the skillet, and cook the asparagus, making sure they form a single layer in the pan with not much overlapping. Season lightly with salt and pepper. Cook in high heat for a couple of minutes, cover the pan, reduce the heat and allow it to cook in its own steam for another minute or so. Transfer to a bowl, and add a little more oil to the skillet. Now add the snow peas and cook in high heat for a couple of minutes. Add the asparagus and the reserved crumbs to the skillet, warm everything together moving it often. Squirt the juice of the remaining half of the lemon, adjust seasoning, and serve.
Comments: If you need inspiration to prepare vegetables in creative, unusual ways, this book is a must-have. But Lisa reviewed it in the best possible way, so just jump to her blog for details. I made the original version of this recipe that used peanuts and quite a bit more of the crumb component, but to my taste it was a bit much. I toned it down and also liked it better using walnuts in place of peanuts. I think a drizzle of walnut oil to finish the dish could be excellent, and I am kicking myself because I did not try it, as I do have walnut oil in the fridge. Best laid plans.
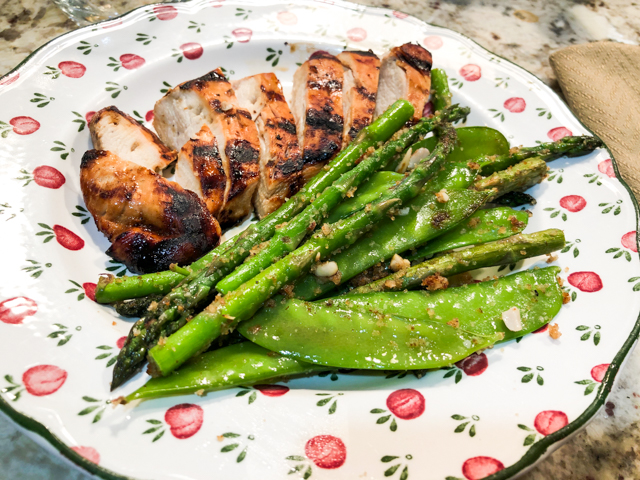
The book is full vegetarian and vegan, but I will use it mainly as a source for side-dishes. This delicious salad (she calls it a salad, although it is served warm), was enjoyed with juicy grilled chicken breasts, a recipe that quickly became a regular in our kitchen. It was a bonus recipe featured in this post from my recentpast.
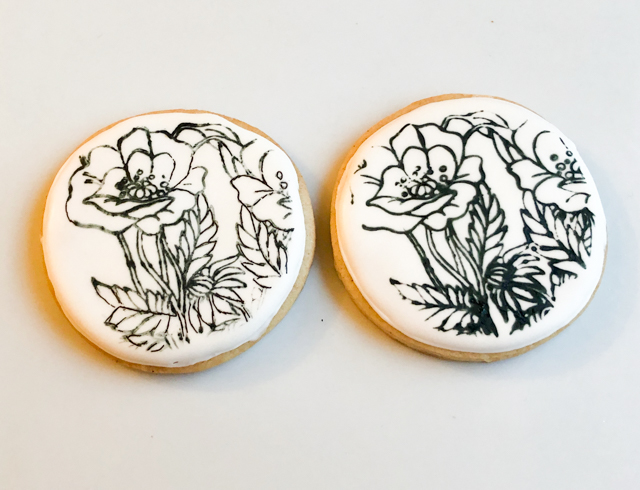
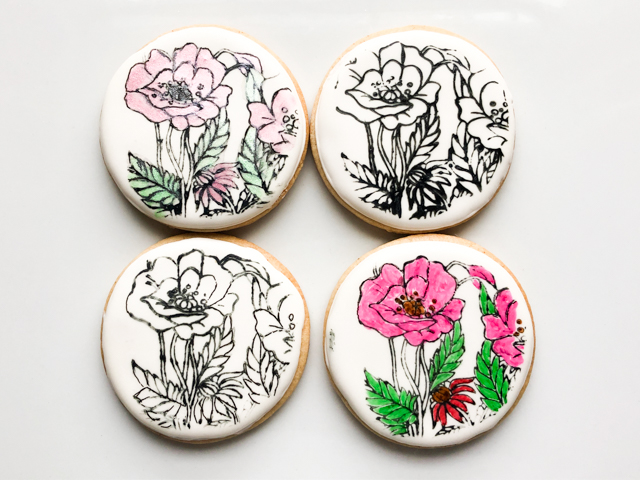
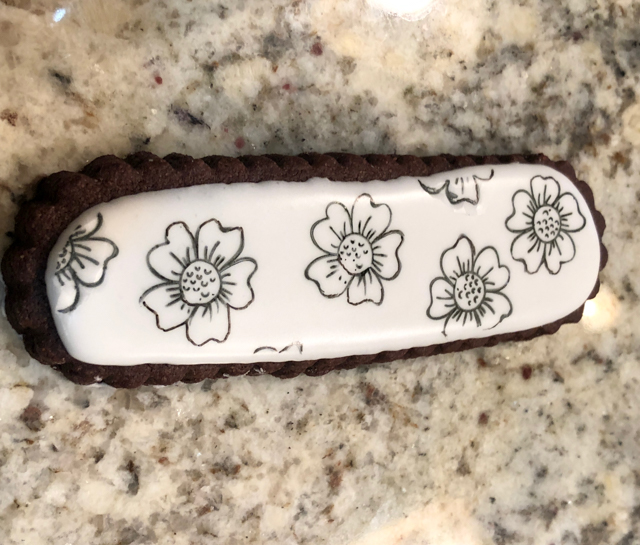
I try hard to avoid repeating myself, but sometimes I cannot help it: I am soooo excited about this! Rubber stamping is one cool method to decorate cookies for the artistically-challenged like myself. Truth is, if someone asks me to draw something or else face the guillotine I will simply tell them to make sure it is well-sharpened. Make it quick. Now, rubber stamping? Anyone can do it! All you need is to flood your cookies in any color you like, but I normally go for white. Let it sit overnight. Do not rush. I repeat: do not rush! The surface needs to be fully set and hard so that you can press the stamp on top and make sure the maneuver is not going to hurt the icing. If you go to a store such as Michael’s or Jo-Ann, visit the section on scrapbooking and pick your weapons. Some stamps work better than others, so it is a bit of a trial and error thing. But… so much fun!
For this set, I used a type of stamp that I had never heard of, but apparently is very popular with the crowd that does serious scrapbooking. They are made of plastic and come glued to a type of acetate sheet. You can find them on amazon or etsy, I have not seen them for sale in stores where I live. For the one I used in these cookies, click here. Usually one sheet comes with several different designs. I find it easier to cut the acetate and isolate the image I want to work with. Then, I spread with a brush a small amount of food gel dye on kitchen paper, either black or another dark color like gun metal from Americolor, a bit more subtle. Press the stamp on it, and practice on a sheet of paper to check that the whole extension of the design was properly covered with dye. It does take a bit of playing with it. If you look at the set of four cookies above, you’ll notice that the design transferred better in some than others. If the design does not transfer completely, you can fill the missing lines with a very fine food pen like Tweets Cookie Connection 03. The cookies look nice in black and white, but I also made a couple painted either with luster powder (top left) or food pens (bottom right). Food pen is a lot easier and faster but I think I prefer the subtle look of luster powder.
Regular rubber stamps also work very nicely and tend to have simpler designs that are more user-friendly.
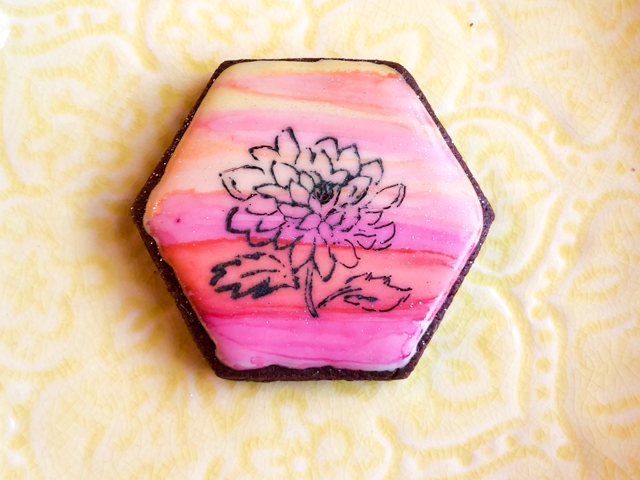
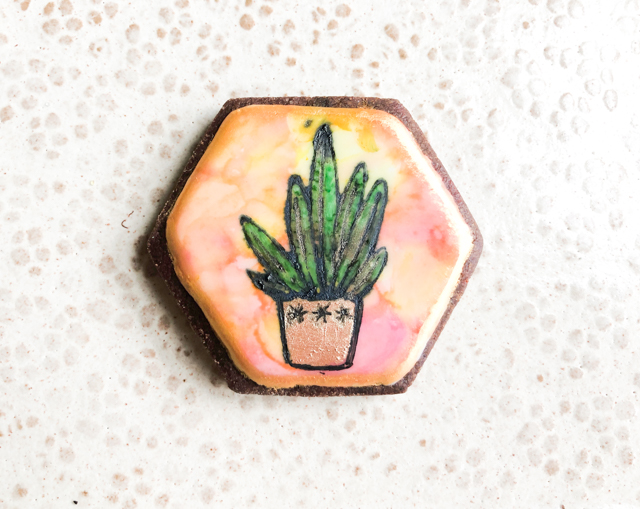
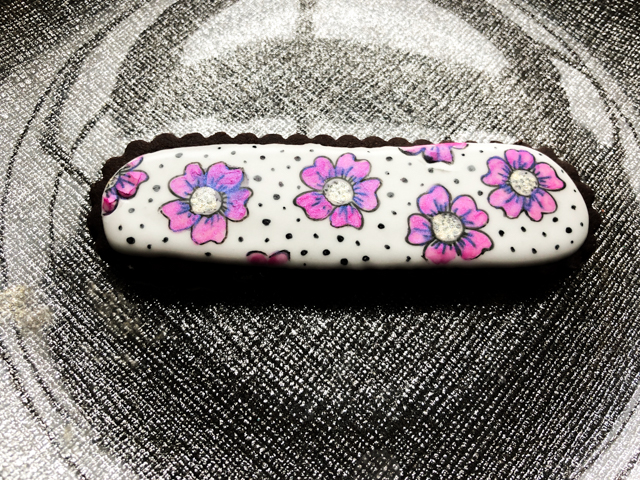
For this design I started with a flooded white icing and painted a background of striped in warm colors, using food gel dye and alcohol, just like described in a recent blog post.
The amount of dye to add to the paper is something you’ll need to adjust as you go. I don’t like the idea of buying a pad as used in scrapbooking because you need a lot of dye to soak it, and I am not sure how well it keeps for future uses, so I believe you waste too much dye.
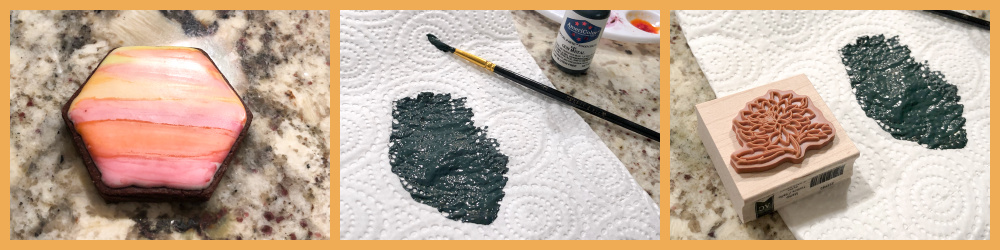
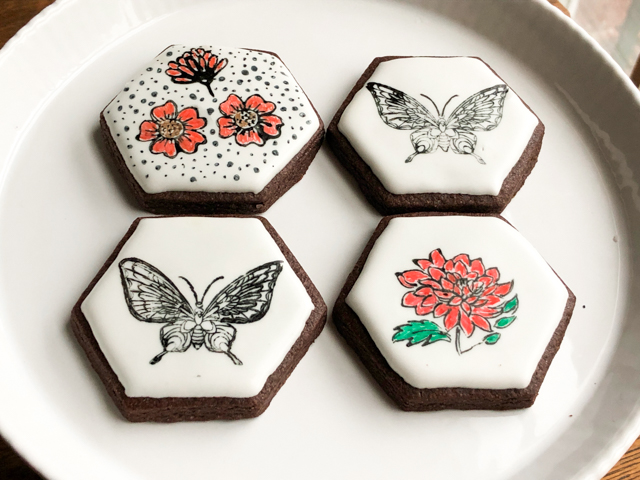
This is another stamp, also the traditional type, rubber with a wooden base. I colored the icing as before, but using a tie-dye instead of stripes. And in this design I went with colors: leaves painted with a food pen, and the little vase with gold luster powder. After painting, you might have to go back to the outline and touch it up with a fine tip black pen. Make sure the paint is fully dry, which happens quite quickly anyway.
Another way to deal with the stamp is using a food pen with a thicker point (I like this kind), paint the stamp, then quickly press it on the iced cookie. You need to work a bit faster because the amount of dye is going to be less than by soaking the paper, therefore it might dry quickly as you paint the stamp. The advantage of this method is reducing the probability of smearing, and saving quite a bit of dye. Below you see what it looks like.
Very sharp lines, no smearing at all. Again, you can leave it black and white or go wild with the design….
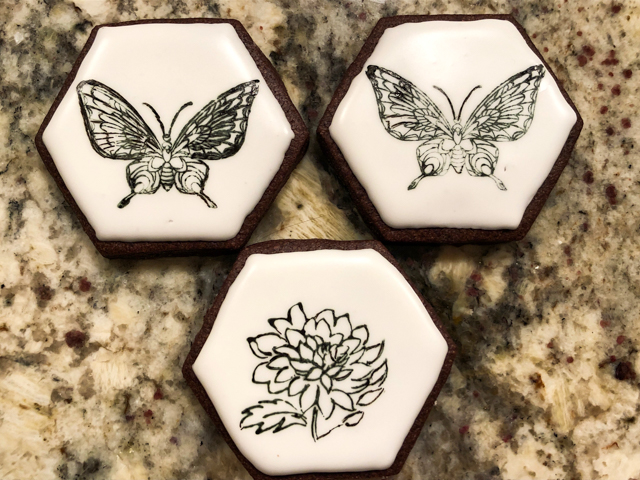
Some drawings like the butterfly are a bit too “busy” and not easy to transfer. I still think they are worth playing with, because the end result is quite striking. You need a very steady hand and be very assertive when laying the stamp on the cookie. Any hesitation and you’ll have a smudged design. If that happens, just eat the evidence when no one is looking.
In the set above, the butterfly was a plastic-acetate stamp, the other two were the traditional rubber kind. The top left, a composite using two very small stamps.
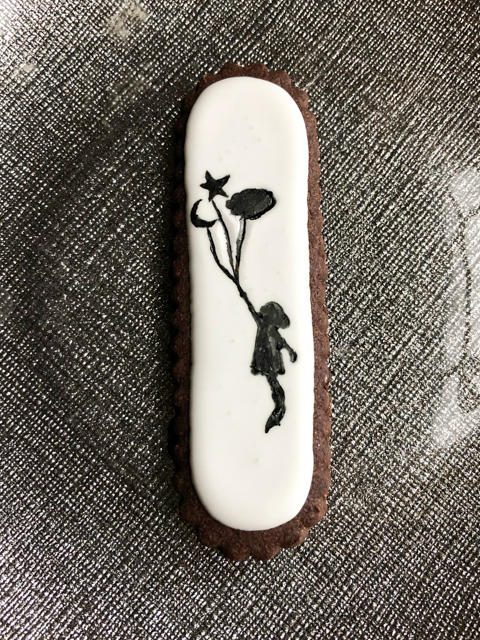
My most recent “experiment” with stamping was with a design that proved a bit tricky. It involved a silhouette type stamp, and it was almost impossible to get it uniform and without blurry edges. This was the best I could do. I think silhouettes might be better left for a projector.
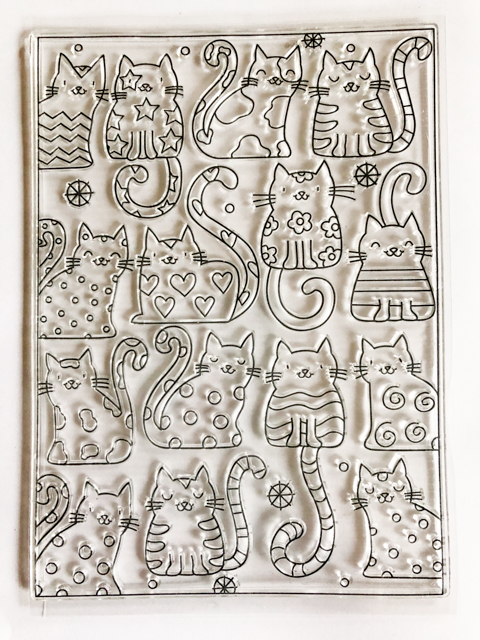
I close this post with something I got in the mail just as I finished writing this article.. Available here.
This is a plastic-acetate stamp sheet. It measures 4 1/2 x 6 in. Each kitten is a little different, so you can either stamp a series together or cut them individually and add to your cookie as a central image, which is what I intend to do. I suspect those images will work very well, as they are overall simple. My last attempt with a complicated image was a beautiful hummingbird (you can see it here), but I could not make it work on the surface of the cookie. Too bad, it is a stunning image. Maybe I’ll conquer it at some point.
I hope you’ll consider rubber stamping as a nice alternative for cookie decorating. It does take some experimenting and playing with it, but the possibilities are endless, and once you get the hang of it, you’ll be hooked.
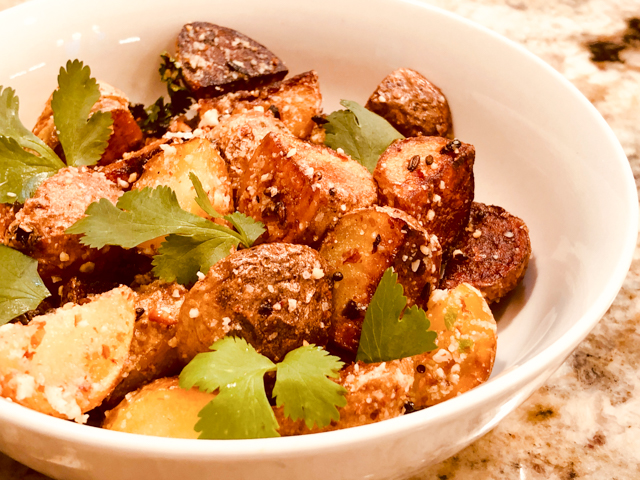
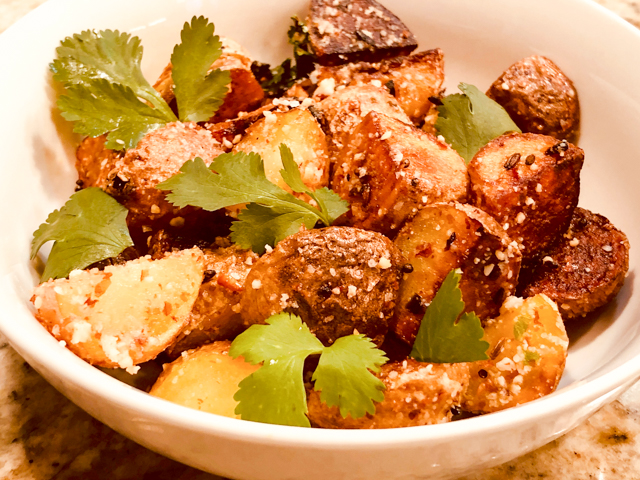
If that title did not call your attention, nothing will. Brazilians might suspect the dish involves potatoes, since the word for them in Portuguese is “batata.” And they would be right. This recipe, aka Ferrari Potatoes, is enjoyed by Hindus on days they must fast. I would not mind fasting with a nice bowl of these in front of me…
12 oz small new potatoes, yellow and red cut in quarters 1/3 cup peanuts unsalted, raw 1/2 tsp cumin seeds 1/2 tsp black pepper, freshly ground 3 tablespoons canola oil 1 small Jalapeno pepper, very finely minced 1 piece of ginger, peeled and grated (about 1/2 inch in size) 3/4 teaspoon salt fresh cilantro, chopped juice of half a lemon
Coarsely grind the peanuts using a mini-food processor and set aside.
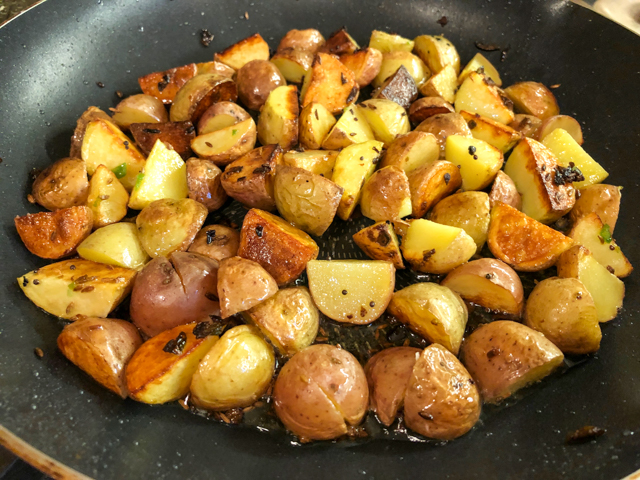
Heat the oil into a wide-bottomed frying pan on a medium heat. When it’s hot, add the cumin seeds and as soon as they start to pop and release a nice smell add the potatoes and ground black pepper. The idea is to cover the whole surface of the pan with the potatoes, so adjust the amount of potatoes accordingly.
Stir-fry the potatoes for around 12 minutes, until they start to brown. When they are getting tender, add the jalapenos, ginger, and salt. Continue to cook until the potatoes are golden brown. Transfer to a bowl, add the ground peanuts on top, the cilantro leaves, and finally sprinkle with the lemon juice, mixing it all gently.
Comments: I never thought of adding peanuts (particularly ground!) to a potato dish, but it turned out pretty awesome. This is a recipe full of flavor, perfect to go along a roast chicken, although that would compromise the fasting aspect even further. I will not hold it against you, in fact… that’s exactly how we enjoyed it, with a very juicy clay-pot roast chicken, which will be on the blog soon.
As I mentioned in the recipe, you’ll need to have the potatoes in a single layer so that they all brown nicely in the end. Depending on the size of your skillet, you can add a few more potatoes than I did. No need to adjust the other components, though. It is all going to have a very happy ending.
The peanuts end up looking like sesame seeds, and I bet those would work very well also, so in case you have peanut allergies, go for toasted sesame seeds when you serve it.